¶ Microsoft Dynamics v1 Configuration
Microsoft Dynamics doesn’t require any special configuration.
.
¶ CRM Integration Service

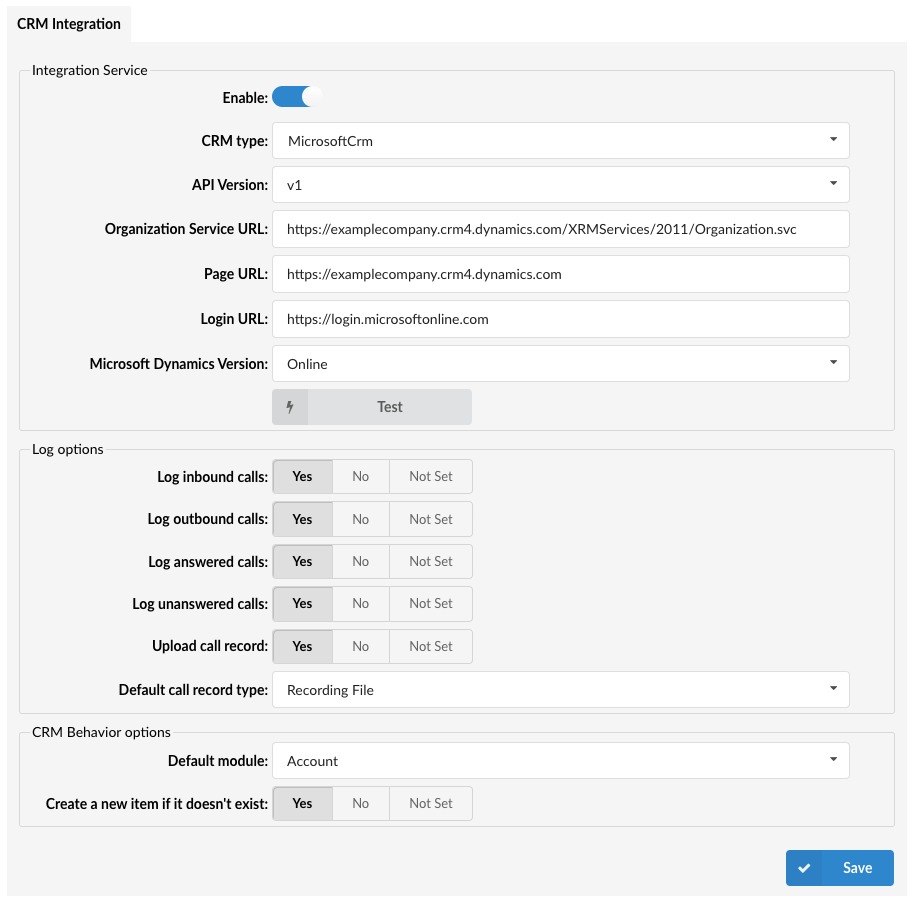
Configure the CRM Integration Service with the following options:
Pressing the toggle button will enable or disable the service.
(E.g. On/Off)
- CRM Type
Select one of the CRM services supported by PBXware.
(E.g. MicrosoftCRM)
- API Version
Select one of the API versions
(E.g. v1)
- Organization Service URL
Organization Service URL for the Organization
(E.g. https://examplecompany.api.crm4.dynamics.com/XRMServices/2011/Organization.svc)
NOTE: For more information, please refer to the screenshot.
- Page URL
URL of the user's Organization
(E.g. https://examplecompany.crm4.dynamics.com)
NOTE: For more information, please refer to the screenshot.
- Login URL
Microsoft's Login page
(E.g. https://login.microsoftonline.com)
NOTE: For more information, please refer to the screenshot.
- Microsoft Dynamics Version:
Select the Microsoft Dynamics Version
(E.g. Online/On-Premise)
Additionally, the 'Save to enable' button will appear which indicates that a user has to populate all fields on the page and 'Save' settings.
After populating all fields and saving the settings, the 'Test' button will appear.

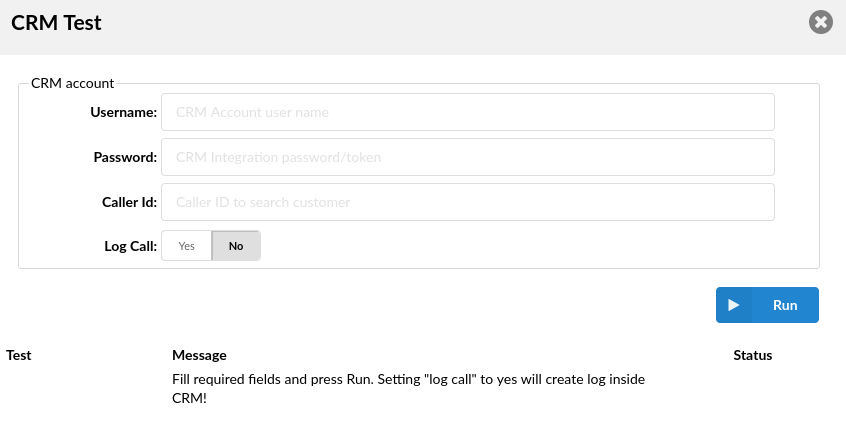
Upon clicking the button, users will be prompted to a different pop-up window where they can enter the CRM account information in order to test the configuration.
- Username:
Provide the CRM account's username.
- Password:
Provide the CRM account's password.
- Caller ID:
Caller ID to search for a customer (optional).
- Log Call:
Setting 'Log call' to 'Yes' will create a log inside CRM.
(E.g. Yes/No)
After providing all the necessary information, press 'Run' and the CRM Integration test will be started.
.
¶ Log Options
Users can enable the CRM default log options that each gloCOM instance is going to use. In addition, each gloCOM instance can set its own log options if needed.
The default log options are:
- Log inbound calls
(E.g. Yes/No/Not Set)
- Log outbound calls
(E.g. Yes/No/Not Set)
- Log answered calls
(E.g. Yes/No/Not Set)
- Log unanswered calls
(E.g. Yes/No/Not Set)
- Upload recordings
(E.g. Yes/No/Not Set)
Please refer to the example of how to Integrate MS Dynamics CRM with PBXware:
.
¶ Microsoft Dynamics v2 Configuration

Users need to create their application (their CRM) and register it with the Azure Active Directory.
For more information, please refer to the link: https://docs.microsoft.com/en-us/powerapps/developer/data-platform/walkthrough-register-app-azure-active-directory#create-an-application-registration
Additionally, in order for it to work successfully with tokens, users should also add this to their Manifest: https://docs.microsoft.com/en-us/azure/active-directory/develop/scenario-protected-web-api-app-registration#exposing-application-permissions-app-roles
NOTE: The ‘id’ can be any ID of a user's choosing, and the ‘description’ can be set as preferred.
Also, in your Microsoft Dynamics CRM (https://orgxxxxxxxx.crm4.dynamics.com), you need to have at least one Application user created.
For more information, please refer to the link: https://portal.dynamics365support.com/knowledgebase/article/KA-01262/en-us in the ‘Create new application user’ section.
.
¶ CRM Integration Service
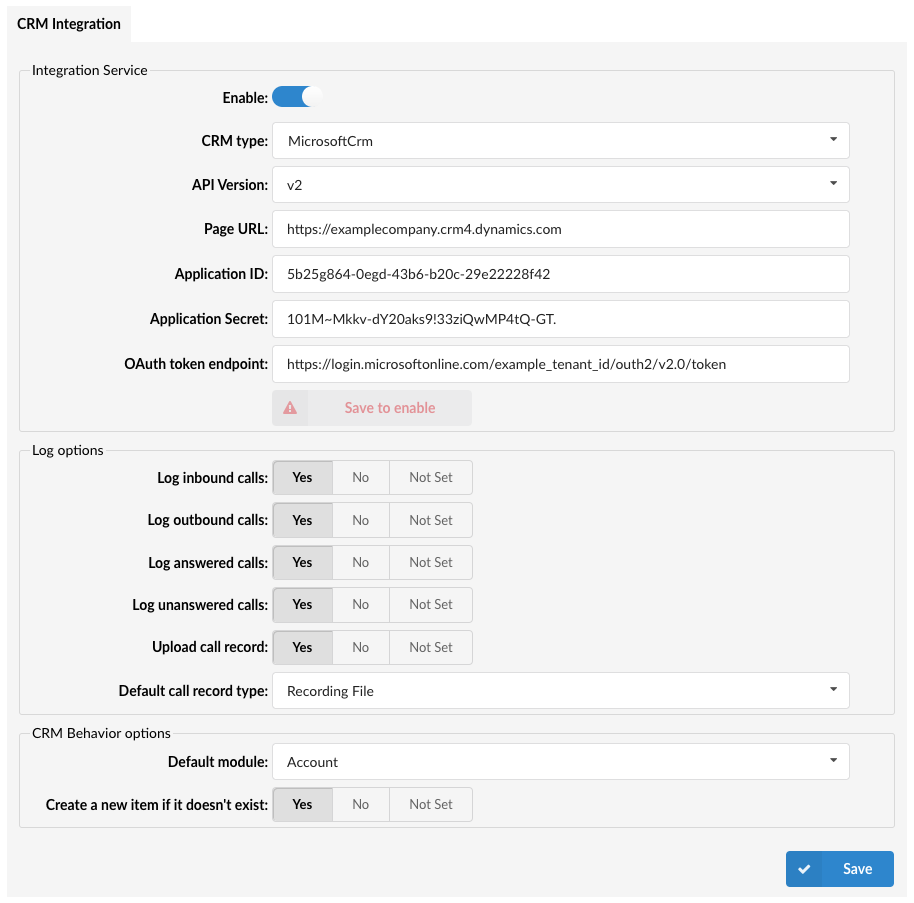
Configure the CRM Integration Service with the following options:
Pressing the toggle button will enable or disable the service.
(E.g. On/Off)
- CRM Type
Select one of the CRM services supported by PBXware.
(E.g. MicrosoftCRM)
- API Version
Select one of the API versions
(E.g. v2)
- Page URL
URL of the user's Organization
(E.g. https://examplecompany.crm4.dynamics.com)
NOTE: For more information, please refer to the screenshot.
- Application ID
Enter the Application ID set for Microsoft Dynamics CRM
(E.g. hmn563-fdm6h-dmg8776g-fnfdi79-223l)
NOTE: Application ID can be found in the 'Overview' page for your application in the Azure portal.
- Application Secret
Enter the Application Secret set for Microsoft Dynamics CRM
(E.g. hmn563-fdm6h-dmg8776g-fnfdi79-223l)
NOTE: Application Secret can be found on the 'Certificates & secrets' page for your application in the Azure portal. Users can either copy the existing client secret, or create a new one.
- OAuth token endpoint
Enter the endpoint for authorizing a token for a Tenant for Microsoft Dynamics CRM
(E.g. https://login.microsoftonline.com/{tenant_id}/oauth2/v2.0/token)
NOTE: First, on the Azure portal, users need to find their application in the 'App registrations' page. After that, in the 'Overview' page, click the 'Endpoints' tab where they should find a field by the name of 'OAuth 2.0 token endpoint (v2)'. Instead of 'organizations', please enter the Directory(tenant) ID which is found in the 'Overview page' of the application.
'Save to enable' button will appear which indicates that a user has to populate all fields on the page and 'Save' settings.
After populating all fields and saving the settings, the 'Test' button will appear.

Upon clicking the button, users will be prompted to a different pop-up window where they can enter the CRM account information in order to test the configuration.
- Username:
Provide the CRM account's username.
- Password:
Provide the CRM account's password.
- Caller ID:
Caller ID to search for a customer (optional).
- Log Call:
Setting 'Log call' to 'Yes' will create a log inside CRM.
(E.g. Yes/No)
After providing all the necessary information, press 'Run' and the CRM Integration test will be started.
.
¶ Log Options
Users can enable the CRM default log options that each gloCOM instance is going to use. In addition, each gloCOM instance can set its own log options if needed.
The default log options are:
- Log inbound calls
(E.g. Yes/No/Not Set)
- Log outbound calls
(E.g. Yes/No/Not Set)
- Log answered calls
(E.g. Yes/No/Not Set)
- Log unanswered calls
(E.g. Yes/No/Not Set)
¶ Upload Call Record

This option controls whether the call record is uploaded after each call:
- Yes: The call record will be uploaded to the CRM, as determined by the Default Call Record Type setting.
- No: The call record will not be uploaded.
- Not Set: No action is taken; the call record is not uploaded.
¶ Default Call Record Type

When Upload Call Record is set to "Yes," this setting defines how the record is accessed:
- Recording File: The call recording file is uploaded to the CRM and can be found in the call details section. Users can download or play the record directly.
- Link to Call Record: A link to the call record is provided. Users must click the link and log into their OSC (Online Self Care) to access the call record and call recording.
NOTE: Extension owners from the same tenant, even if they were not participants in the call, can click on the link and access the call record and call recording in their OSC. However, users from a different tenant will not be able to access the call record via the link.
These options allow users to manage how the call record is stored and accessed in their CRM.
¶ CRM Behavior options
Users can manage the automatic creation of new Accounts, Contacts, or Leads based on caller ID availability.
-
With 'Create a new item if it doesn't exist' enabled: If the caller ID is unknown, the system will open the creation page in the CRM according to the selection made in the 'Default module'. For example, if 'Leads' is selected, it will open a new Lead creation page.
-
With 'Create a new item if it doesn't exist' disabled: If caller ID is unknown, the CRM remains inactive. Conversely, if caller ID is recognized, the system will automatically navigate to the corresponding page for the identified Account, Contact, or Lead.
This setting ensures that users have control over the automatic creation of records in the system based on the availability of caller ID.
- Default module

Select one of the modules supported by CRM.
(E.g. Lead)
- Create a new item if it doesn't exist:

(E.g. Yes/No/Not Set)
.
¶ gloCOM Configuration
For the gloCOM setup, the username should be the e-mail address of the Microsoft CRM account. A password field can be left empty.
Please refer to the example of how to Integrate MS Dynamics CRM with gloCOM:


