¶ System
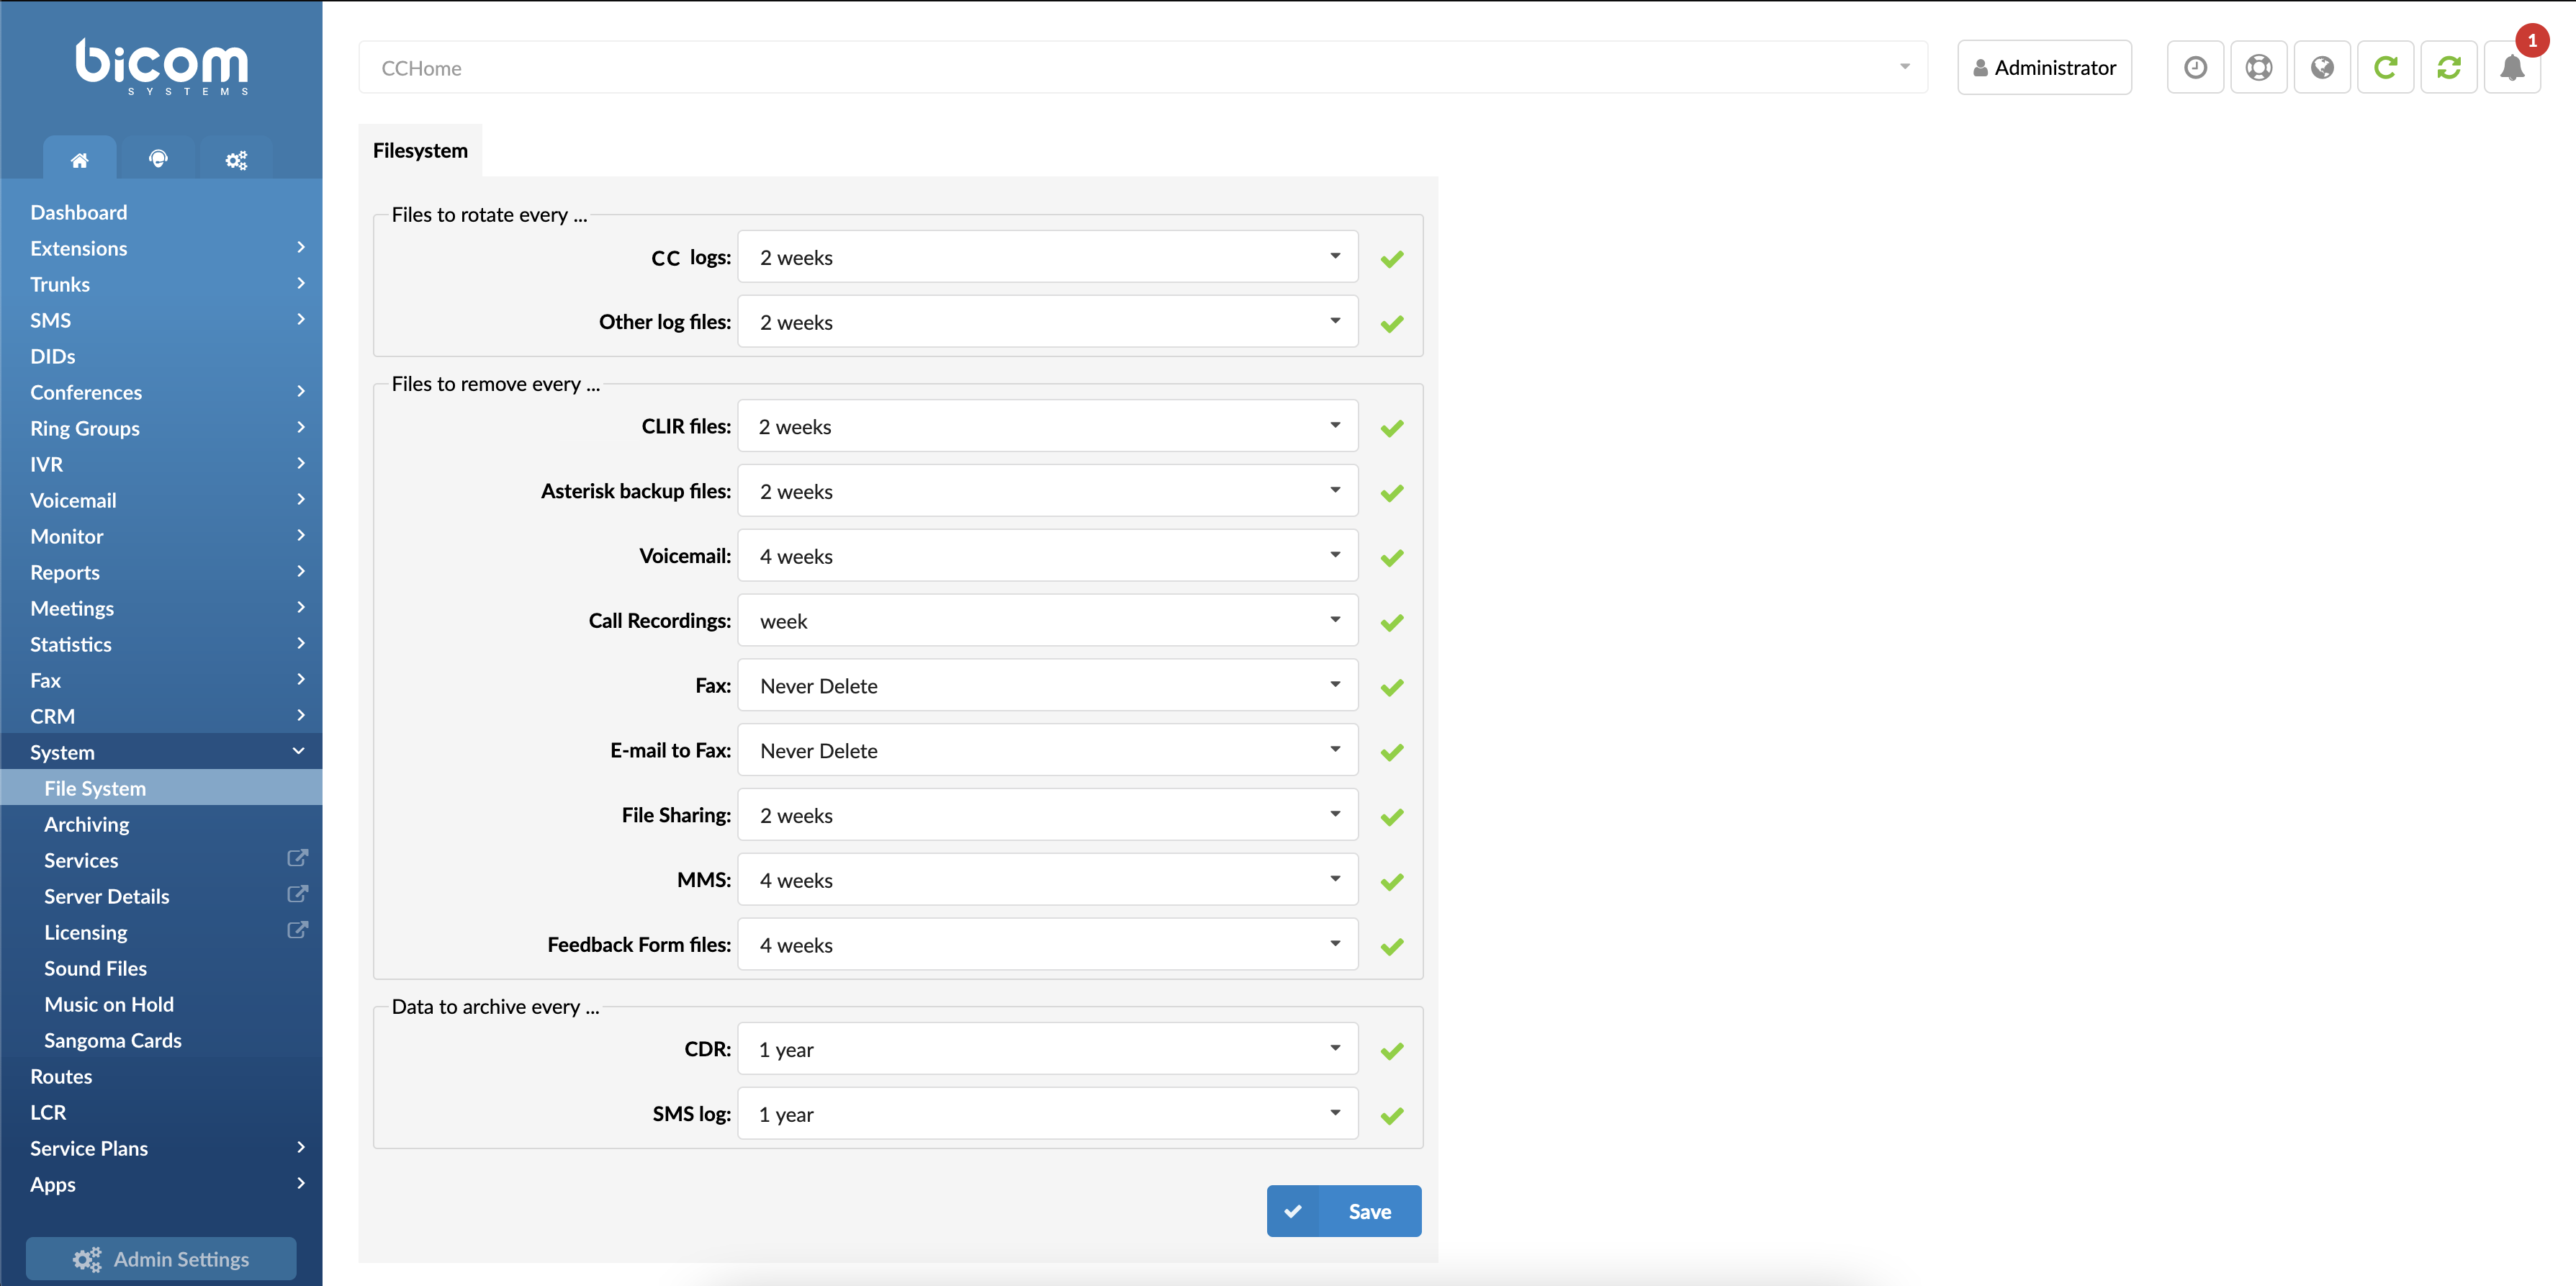
The 'System' section administers the core PBXware components such as the file system, system services, server details, licensing, sound files, MOH (Music On Hold), as well as data located on the system.
¶ File System
All PBXware logs, sound recordings, CLI, and CLIR files are stored on the local file system. These files can grow over time which can leave the system without any free space.
This section provides management of how and when these files should be rotated or deleted in order to prevent such a scenario.
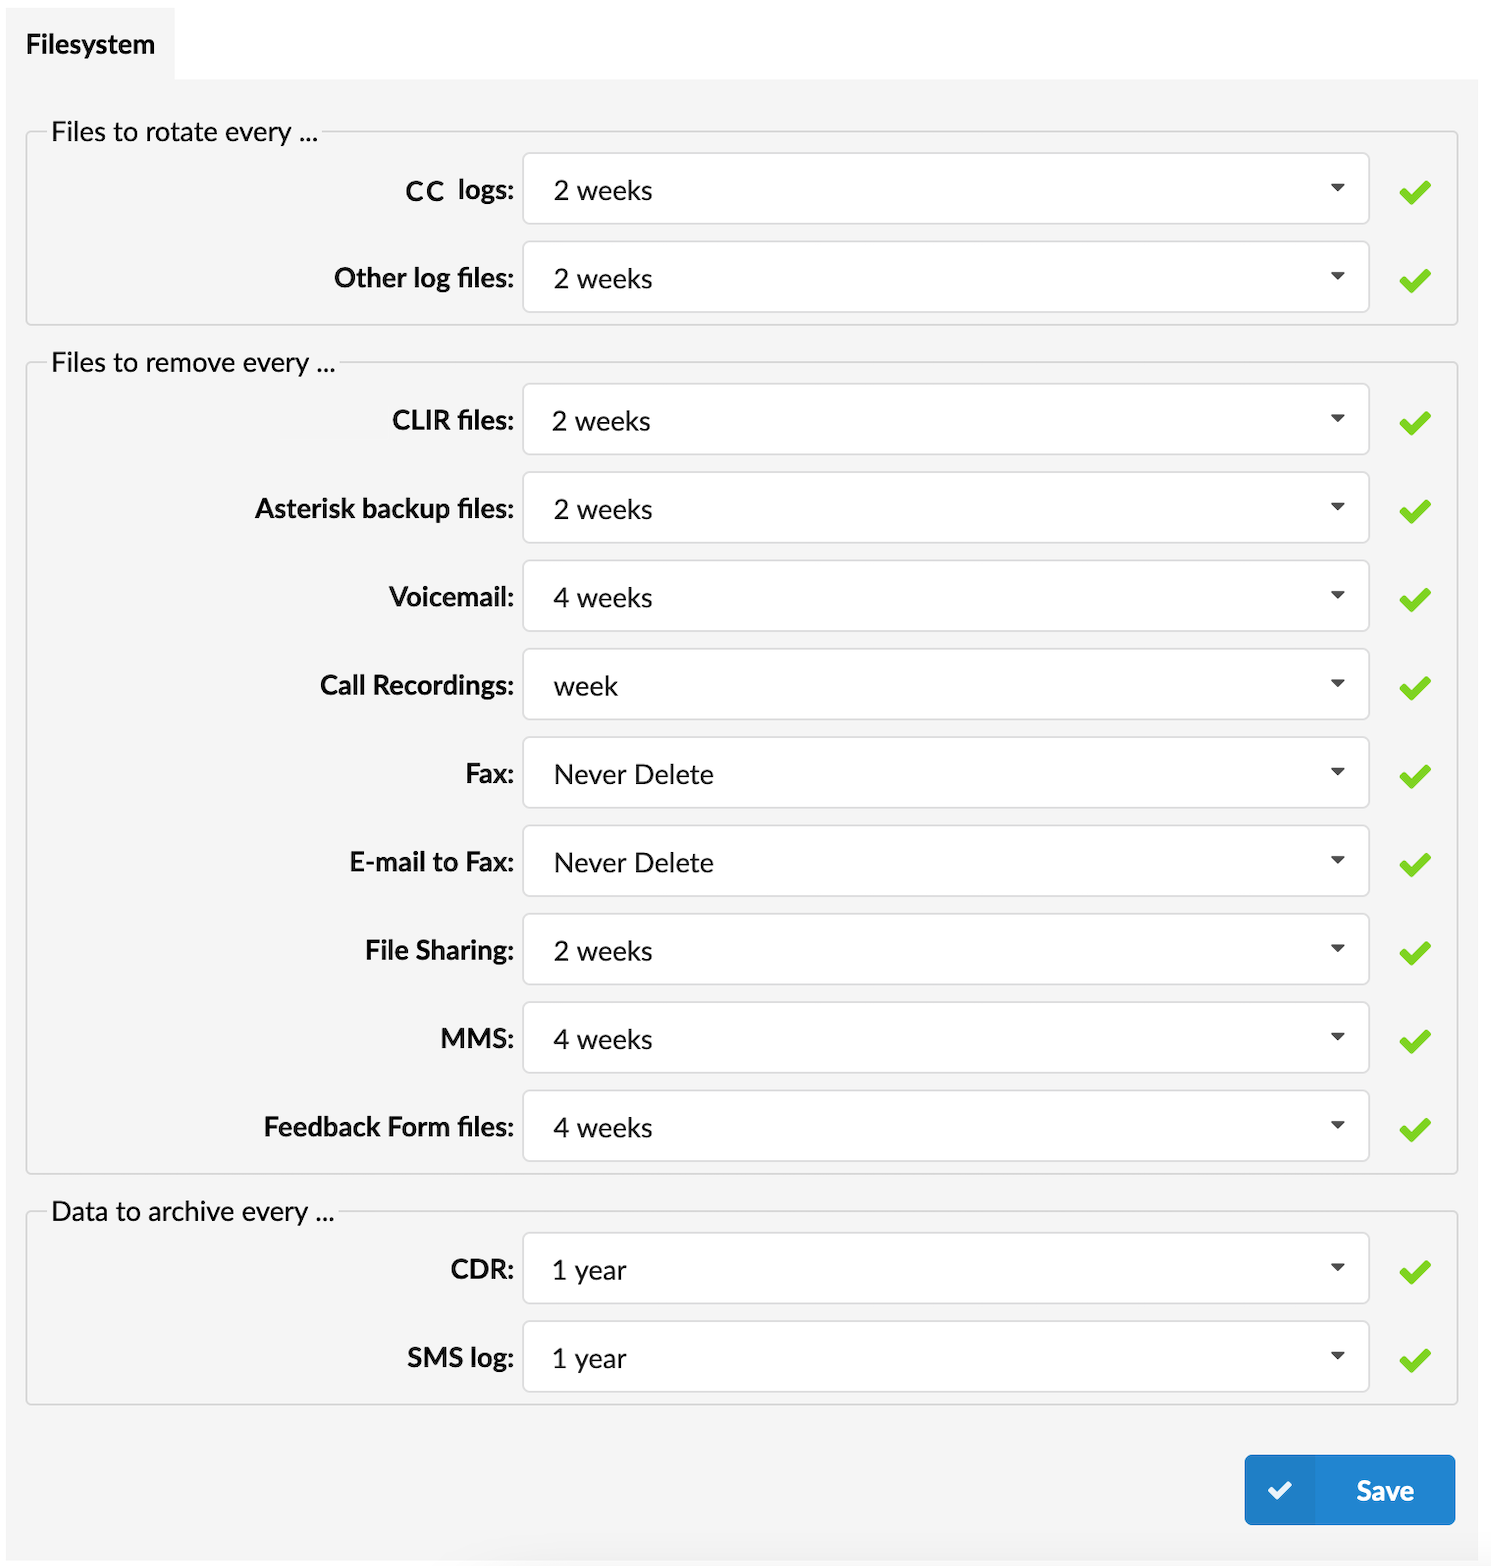
The following files are rotated after a selected period of time
- PBXware logs:
Select the time that PBXware logs are kept on the filesystem. The default value is ‘2 weeks’.
- Other log files:
Select the time that Asterisk logs are kept on the filesystem. The default value is ‘2 weeks’.
.
The following files are removed after selected period of time
- PBXware CLIR files:
Selec the time that PBXware CLIR files are kept on the filesystem. The default value is ‘2 weeks’.
- Asterisk Backup files:
Select the time that Asterisk backup files are kept on the filesystem. The default value is ‘2 weeks’.
- Voicemail:
Select the time that voicemail files are kept on the filesystem. The default value is ‘4 weeks’.
- Call Recordings:
Select the time that recording files are kept on the filesystem. Limit for keeping call recordings is extended to 7 years. The default value is ‘week’.
- Fax:
Select the time that fax files are kept on the filesystem. By default fax files will never be deleted.
- E-mail to Fax:
Select the time that fax files are kept on the filesystem. The default value is ‘4 weeks’.
- File Sharing:
Select the time that files from the file sharing service are kept on the system. The default value is ‘2 weeks’.
- MMS:
Select the time that MMS files are kept on the system. The default value is ‘4 weeks’.
- Feedback Form file:
Select the time that Feedback Forms are kept on the system. The default value is ‘4 weeks’.
NOTE: If any of the above resources is configured to be offloaded by Archiving, their configuration in this section will be ignored.
.
The following data is archived after a selected period of time
- CDR:
Database entries of the CDR table older than the specified time. The default value is ‘1 year’.
- SMS log:
Database entries of the SMS log table older than the specified time. The default value is ‘1 year’.
¶ Archiving
Archiving is a feature that can be used to move local files to a remote location. This service is provided by the user.
It can either keep these files on both locations (your PBXware server and remote location) or set the files to be removed after a successful offload. The feature can be configured to run automatically at certain times (daily, weekly) or in specified hour intervals.
On the configured service, files are stored in folders with the following structure:
.
/resource/year/month/day/hour/filename
| resource | Type of resource offloaded (E.g. 'Recordings') |
| year | Year in which the resource was created (E.g. '2019') |
| month | Month in which the resource was created, in a numeric form. (E.g. '11' for all resources created in November) |
| day | Day of the month in which the resource was created. (E.g. '23') |
| hour | Hour of the day in which the resource was created. (E.g. '11') |
| filename | Resource-specific file name format described below. |
¶ Client
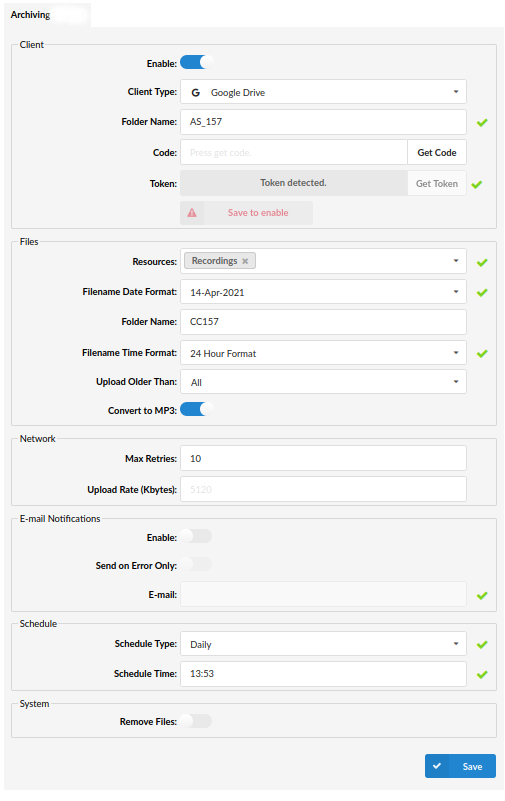
Users can here configure the service that will be used as a destination for offloaded files.
Click this toggle button to enable the configuration for a specific Client
- Client Type
Select the Client to be used
NOTE: Please note that depending on the selected client (SFTP, FTP, Google Drive, Amazon S3, Dropbox), different required fields will be shown and enabled.
After selecting a Client, all required fields need to be populated in order for configuration to be saved.
Click this button to run a test for the selected Client.
NOTE: In case the provided options are valid, the pop-up window will appear saying that "Test finished successfully".
.
.
¶ Amazon S3
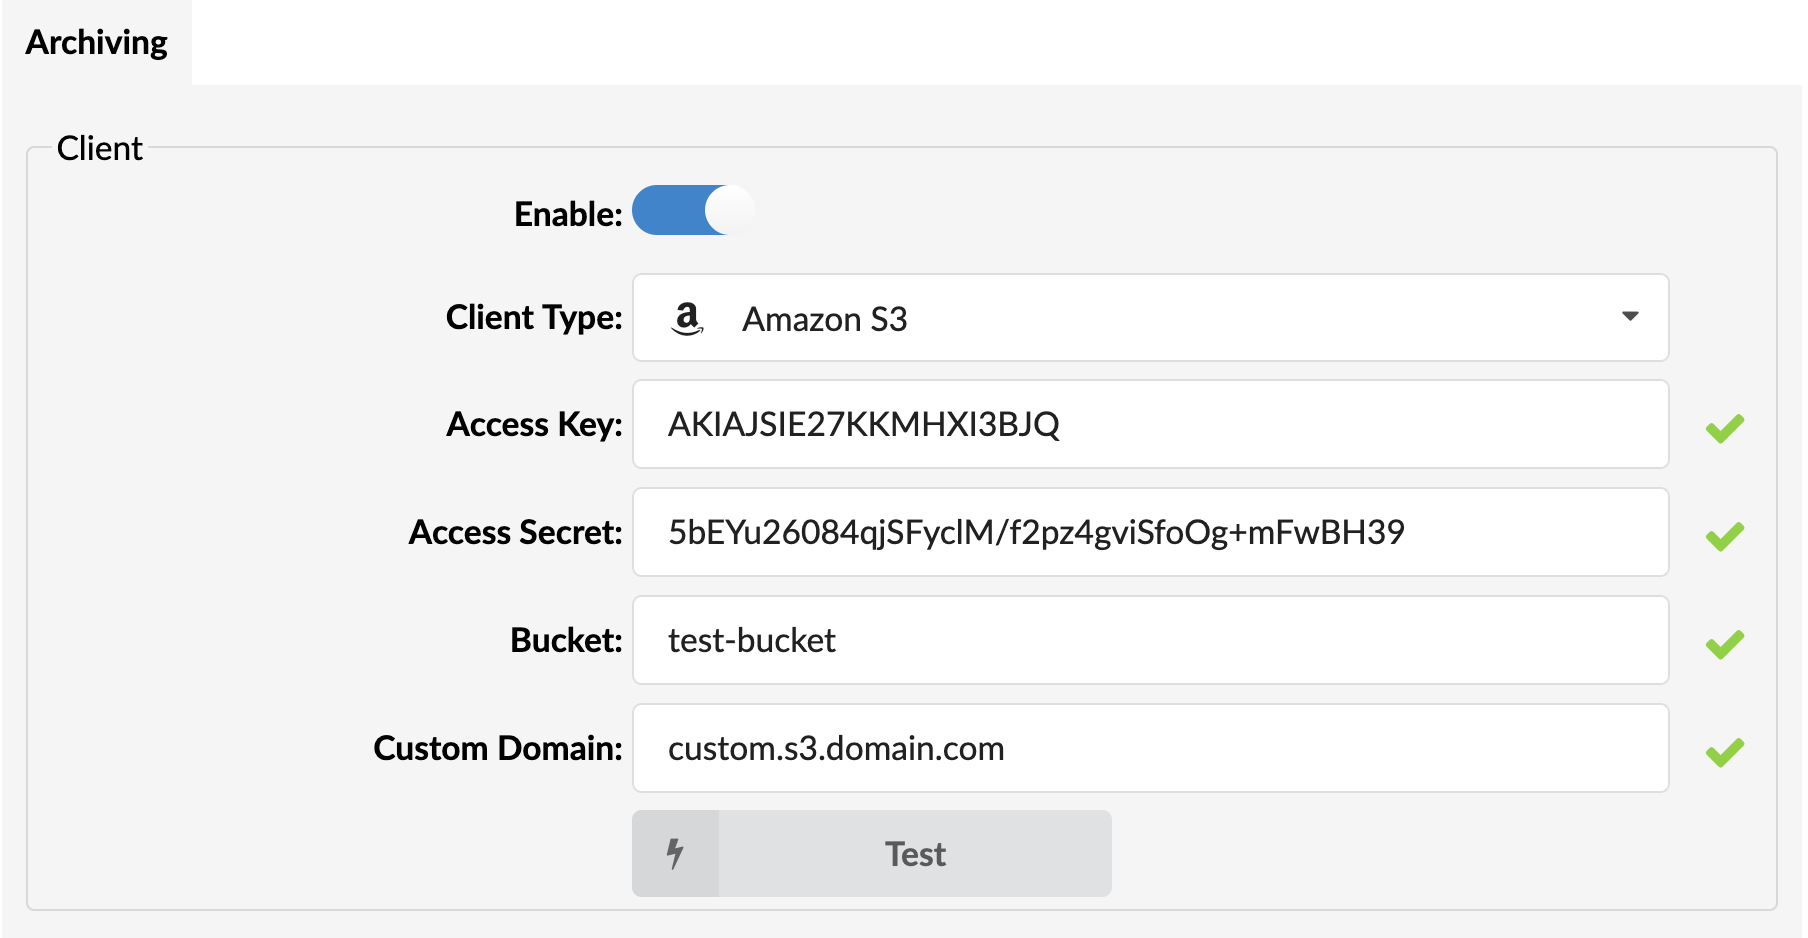
In case users press the 'Enable' toggle button and select 'Amazon S3' as a 'Client Type', these following required fields need to be populated:
- Access Key
Enter the Access Key.
NOTE: This is acquired from the Amazon account.
- Access Secret
Enter the Access Secret
NOTE: This is acquired from the Amazon account.
- Bucket
Define the S3 bucket to be used
- Custom Domain (6.7.4)
In case the PBXware administrator would like to use a custom S3 archiving service, other than Amazon, for storing PBXware files, a custom domain and port can be configured in this field, using format domain-name.org:999, where 999 represents a port archiving service is running on. For this to work, the service must have a valid SSL certificate installed.
If this field is left empty, Amazon S3 archiving service will be used, but in case it is populated, PBXware will try to connect to provided address/port.
.
¶ Dropbox

In case users press the 'Enable' toggle button and select 'Dropbox' as a 'Client Type', these following required fields need to be populated:
- Code
Press 'Get Code' to acquire a code.
NOTE: This is acquired from the Dropbox authentication window.
- Token
Press 'Get Token' after the code is set.
NOTE: This token is automatically generated.
.
Setup Procedure
To set up the Dropbox service, please do the following:
- Press the Get Code button after which the pop-up window will appear.
- Log in to the Dropbox account.
- Press the Allow button.
- Copy the code displayed.
- Populate the 'Code' field with the code.
- Press the Get Token button.
.
NOTE: Dropbox does not support remote playback and download of the call recordings from PBXware GUI.
NOTE: Dropbox has certain limitations for standard and advanced accounts (25,000 API calls/month for data transport partners).
For more information, please refer to their website: https://www.dropbox.com/plans?trigger=nr
.
¶ FTP
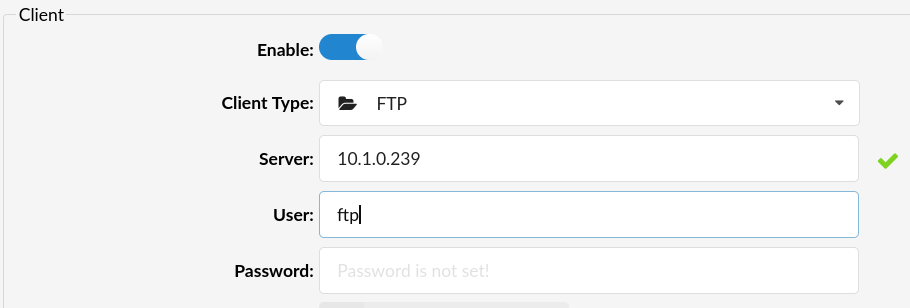
In case users press the 'Enable' toggle button and select 'FTP' as a 'Client Type', these following required fields need to be populated:
- Server:
Enter the FTP server's address/IP.
- User:
Enter the username to be used for registration
- Password:
Enter the password to be used for registration
NOTE: After saving the configuration for FTP, the password will be hidden in the GUI.
NOTE: For FTP servers with allowed anonymous users, only the Server field is required.
.
¶ SFTP
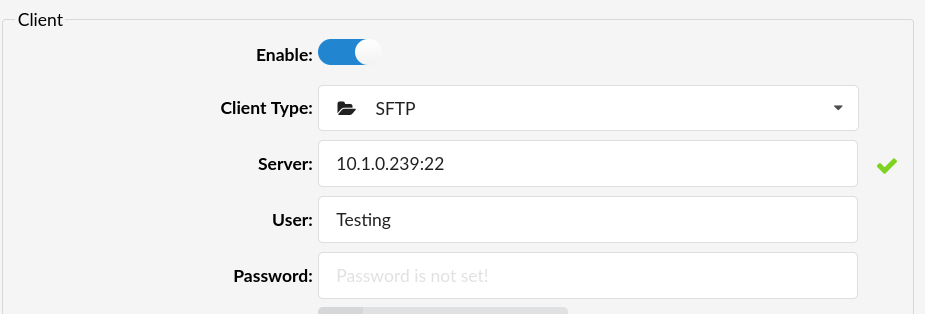
In case users press the 'Enable' toggle button and select 'SFTP' as a 'Client Type', these following required fields need to be populated:
- Server:
Enter the server's address/IP
NOTE: Users can populate this field with IP:Port or enter only an IP address without specifying a port in which case the default SSH port is '22'. If entering a port of your choice, please make sure that you can SSH to the system by using the port that is provided. The range of ports is from 1 to 65535.
- User:
Enter the username to be used for registration
- Password:
Enter the password to be used for registration
NOTE: After saving the configuration for SFTP, the password will be hidden in the GUI.
.
¶ Google Drive

In case users press the 'Enable' toggle button and select 'Google Drive' as a 'Client Type', these following required fields need to be populated:
- Folder Name
Defines a folder name on Google Drive in which the offloaded files will be stored.
NOTE: Please note that this folder does not need to exist. It will be created by Archiving.
- Code
Press 'Get Code' to acquire a code.
NOTE: This is acquired from the Google Drive authentication window.
NOTE: (6.6.1) Please note that both for new and already authorized Google accounts, after updating from older version to the version 6.6.1 and later, re-authorization is needed to get a new authorization code in order to continue using Archiving Storage → Google Drive as usual.
- Token
Press 'Get Token' after the code is set.
.
Setup Procedure
To set up the Google Drive service, please do the following:
- Press the Get Code button after which the pop-up window will appear.
- Log in to the Google Drive account.
- Press the Allow button.
- Copy the code displayed.
- Populate the 'Code' field with the code.
- Press the Get Token button.
.
NOTE: Please note that if both folder names are the same in the Client section and the Files section, Archiving will fail to offload files. To avoid this, please use diferent names for each section.
.
¶ BAS

NOTE: Please note that BAS has to be enabled in the PBXware license. Once enabled, it will be the only client that can be used on the system.
- URL:
Enter the URL.
- Access Key:
Enter the suitable Access key.
- Secret Key:
Enter the suitable Secret key.
.
¶ Files
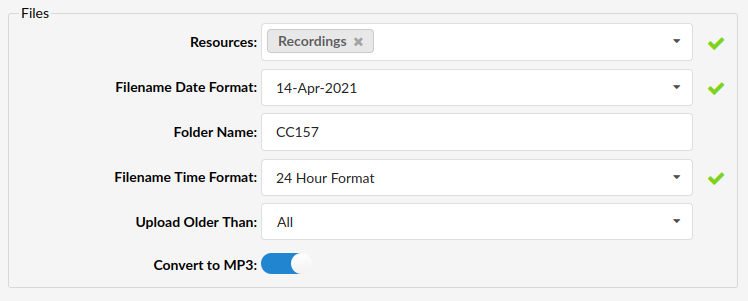
Here users can configure which files from the system will be offloaded. They can also configure how the files will be displayed on the service used.
- Resources
Select Resources which should be uploaded
(E.g. Recordings)
Each Resource has a specific format for naming files. The available options and their filename formats are as follows:
- Fax: 'date-time-src-ext-uniqueid.format'
- CLIR Reports: 'uniqueid.log.gz'
- Recordings: 'date-time-src-dst-uniqueid.format'
- Voicemail: 'date-time-src-dst-uniqueid.format'
NOTE: In order to enable offload for CLIR Reports, the Recordings Resource has to be selected as well.
NOTE: Most Resources can offload multiple files for the same Resource. They will have the same name but different file Extensions.
(E.g. Voicemails will cause 2 files to be offloaded: one audio file and one txt file.)
- Filename Date Format
Select the date format used for the date part of the above described Resource's file name
(E.g. 14 Apr 2021)
- Folder Name
Sets up a subfolder inside the configured services' starting folder where all the data for the system will be stored. This allows users to use the same service credentials on multiple systems while keeping the files separate for each system.
(E.g. Test)
The example shows a situation in which a user is utilizing 'Google Drive' as a Client.
- In the first 'Client' section, the Folder Name is set to Archiving.
- In the second 'Files' section, the Folder Name is set to MySystem.
- As a result, all files offloaded for this system will be stored on 'Google Drive' in the Archiving/MySystem folder.
. - Filename Time Format
Define a time format used for the time part of the above described Resource's file name
(E.g. 24 Hour Format)
- Upload Older Than
Define how old a file has to be for Archiving to offload it
(E.g. 1 week)
NOTE: This is checked at the configured Archiving execution time. For more information, please see the Schedule section. However, there will be files older than this configured time on the system. For example, if '2 weeks' is set and Archiving is configured to run weekly, there can be up to 3 weeks old files on the system.
- Convert to MP3
Define whether to convert files to MP3 before upload
(E.g. Yes)
NOTE: This option applies only to the Recordings Resource.
¶ Network

User can here configure the amount of system and network Resources that Archiving will use.
- Max Retries:
Define the number of retries on a failed upload in case of a non-critical error. The default number of retries is 10.
(E.g. 10)
- Upload Rate (Kbytes):
Define the upload rate limitation in kilobytes. The limit is set cumulatively for all uploads. The default upload rate is 5120.
(E.g. 200)
.
¶ E-mail Notifications

Users can here configure e-mail notifications which can be sent after Archiving has finished offloading data.
Click this toggle button to enable e-mail nofitications.
Enable Send on Error Only to generate an e-mail only in case the execution status is failed or partial.
- E-mail:
Enter the e-mail address of a user who is going to receive this e-mail notification.
(E.g. test@test.com)
.
¶ Schedule

Users can here configure the frequency of the Archiving execution.
- Schedule Type:
Select a schedule type that Archiving will use.
(E.g. Disable/Hours/Daily/Weekly)
- Schedule Interval:
Define the number of time intervals in between offloads. The minimum schedule interval is one hour.
(E.g. 5)
- Schedule Time:
Define a specific time at which Archiving should start offloads
(E.g. 03:10)
The options are as follows:

| Disable | The execution will never start automatically. |

| Hours | Archiving will start offloading every N hours, where N is defined in the Schedule Interval field. |

| Daily | Archiving will start offloading once a day at the time specified in the Schedule Time field. |

| Weekly | Archiving will start offloading once a week, during the weekend. |
NOTE: Archiving can run only once at any given point of time. Please note that if the previous offload instance is ongoing when the next execution time arrives, that execution will be skipped.
.
¶ System

- Remove Files
Enable this to remove files from the system after a successful offload
(E.g. Yes)
.
¶ Remote Recording Playback
Recordings that are offloaded to certain services with Archiving can be listened to and downloaded from the 'Reports' page.
This feature is supported for the following services:
- Amazon S3
- FTP
- SFTP
- Google Drive
For more information on this feature, please see Reports page.
NOTE: 'Listen' and 'Download' must be enabled in the PBXware license.
NOTE: Dropbox does not support remote playback and download of the call recordings from PBXware GUI.
.
¶ Services
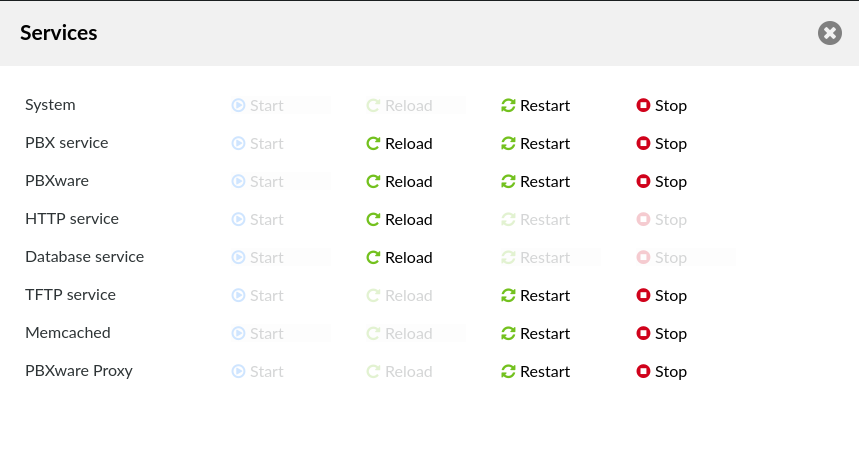
This window controls PBXware services. Available actions are:
- Start
- Stop
- Restart
- Reload
.
¶ Services
- System
This represents the system PBXware is running on (pressing restart would reboot the system).
- PBX service
This represents the main PBXware service, if the PBXware service stops for some reason you will not be able to access your system through the web interface.
- PBXware:
PBX Service is the core service PBXware is running on. In case PBX Service is not running, you will be able to access the PBXware web interface but you will not be able to make or receive calls.
- HTTP service
The HTTP service represents the webserver serving the PBXware's web user interface.
- Database service
Database service is the MySQL database server used for storing configuration and runtime data.
- TFTP service
TFTP server used for storing and serving the UAD/Phone auto-configuration files.
- Memcached
Memcached service stores information which is read by PBXware Proxy.
- PBXware Proxy
PBXware Proxy is the connecting to asterisk manager and is reading events that are then put into Memcached for later usage. Based on that data, the monitoring section will provide information users are interested in.
.
¶ Server Details
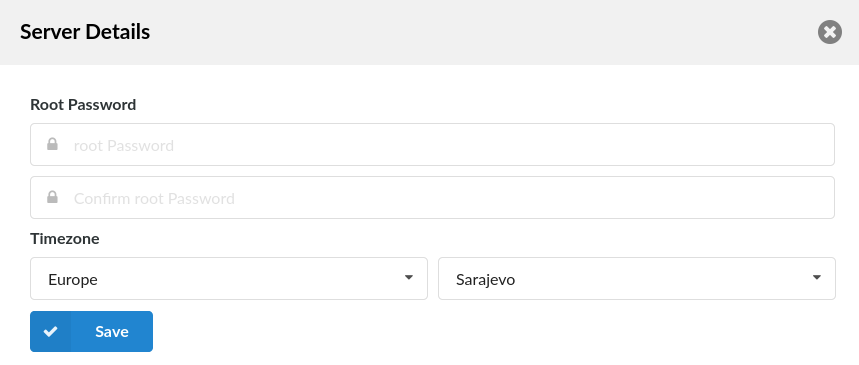
This window allows you to change the system's timezone, hostname and the root PBXware password.
.
- Root Password:
Enter new Root password. PBXware prompts for this password during the system/ssh login and when accessing system services through the interface
- Confirm Password:
Re-type the Root Password entered in the field above.
- Time zone:
Select the appropriate time zone in which PBXware is located
For information on the rest of the fields in the Server details, check section Getting Started.
¶ Licensing
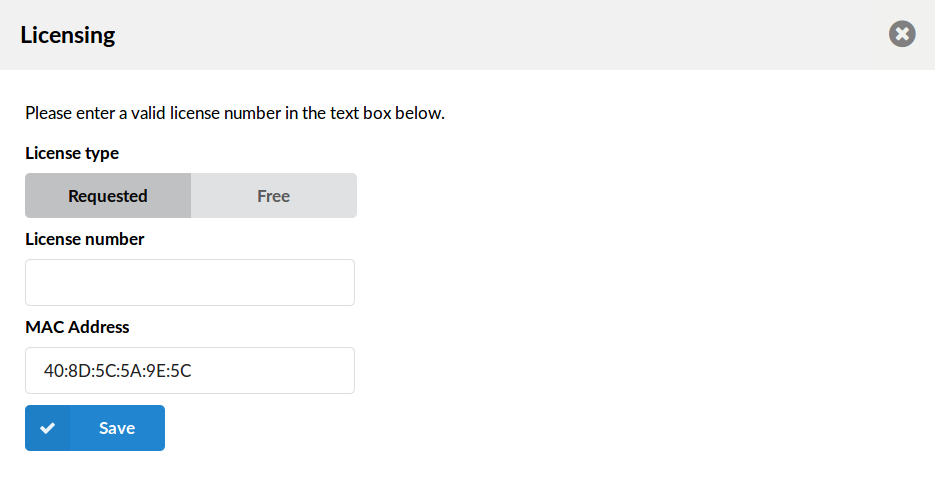
In this section, users have the option to (re)license the system. Free and requested licenses are available. If you are upgrading your license just paste the license key in 'License Number' field, select the MAC address assigned to a license key and click on the 'Save' button.
NOTE: System must have access to a fully operational Internet connection in order to license the system.
- License Type:
Select a system license type. The system comes with two license types ‘Free’ and ‘Requested’.
For ‘Requested’ license, the license number will be prompted in the field below.
- License Number:
Provide a system license number as received in the email.
(E.g. ABCDE123)
- MAC:
Provide a MAC address to which the license will be applied. This field will not be active if FREE license is requested.
(E.g. If your system has multiple MAC addresses select the one you wish to assign the license to. If this MAC address changes in the future, you will have to re-license the system)
¶ Sound Files
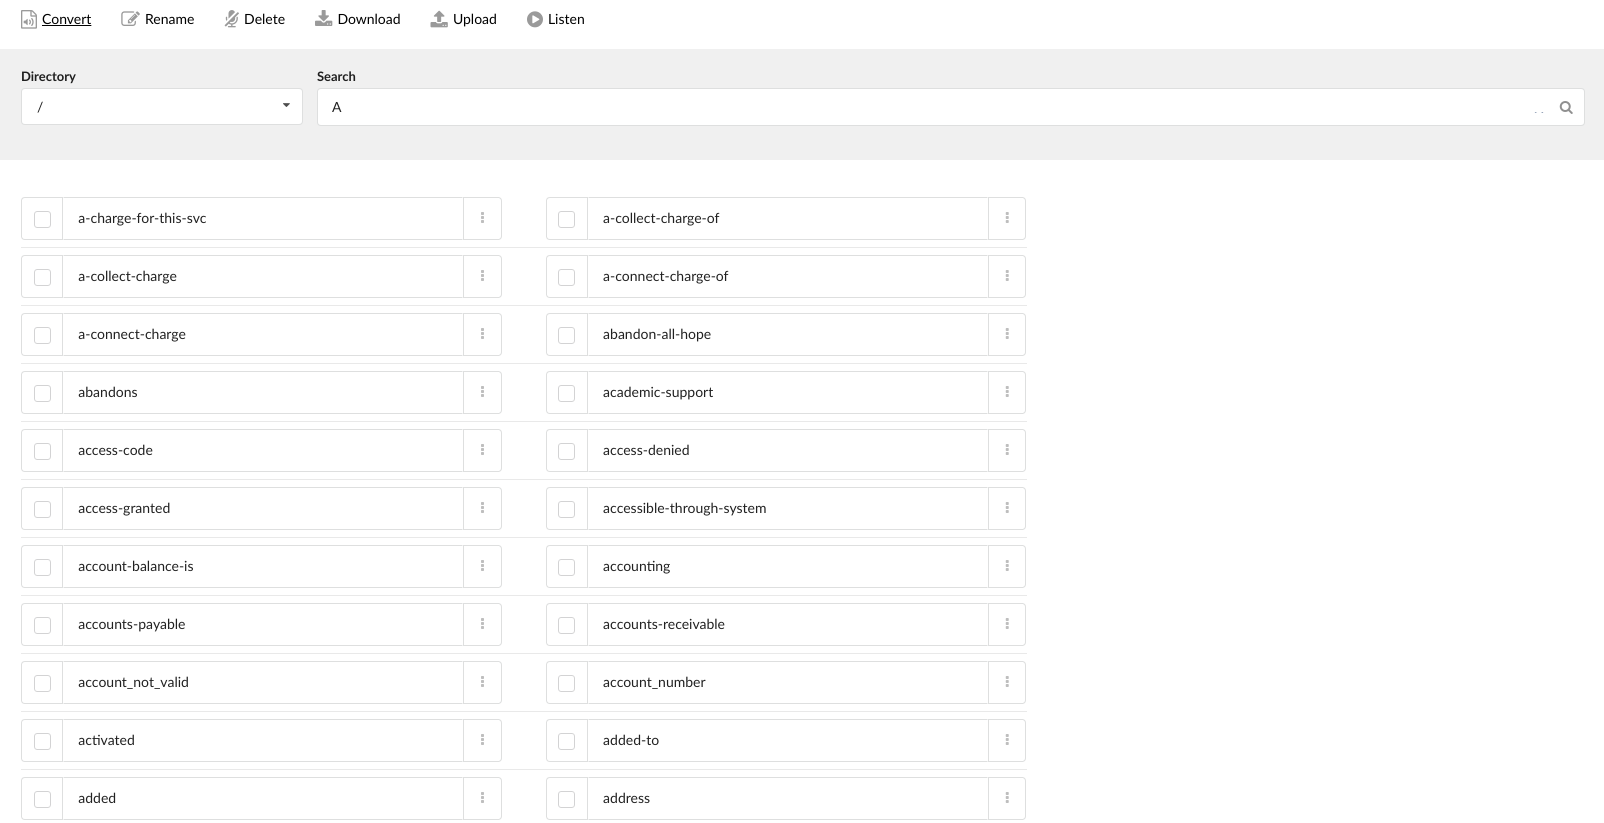
This section administers all sound files used by PBXware.
.
¶ Filter
- Directory
Select the directory from the drop-down list to display only the files located in that specific system directory.
The directory is sorted alphabetically.
- Search
A search bar to find sound files using a provided search string. The default search string is "A" and the field cannot be empty. It will search all files with name starting with the search string. Case insensitive.

¶ Type

List of all types for specific file can be shown by hovering the mouse over the 3 dots icon (as seen per the screenshot).
¶ Options

On the top of the page the following options are available to be performed on sound files:
- Convert:
Convert the selected file to the desired codec.
After selecting a sound file(s) and clicking ‘Convert’, users can choose a codec to which they want to convert file from the drop-down list. The chosen sound file will then be converted.
It is possible to convert more than one file at the same time.
- Rename:
Renames the selected sound file (characters a-zA-Z0-9-_ are allowed).
Select a box next to a sound file, and then click on the sound file name and make desired changes. After changing, click on the ‘Rename’ command button and changes will be made.
It is possible to rename more than one file at the same time.
- Delete:
Deletes the selected sound file [(this action will delete all types for the selected file(s)].
Select a box next to a sound file(s) and click ‘Delete’ command button.
It is possible to delete more than one file at the same time.
- Download:
Downloads the selected sound file to the user's computer (a drop-down menu is offered and only the available types for that file will be in the drop-down. If "All" is chosen then a ZIP file will be downloaded containing all available types for that file)
Select a box next to a sound file(s) and click the ‘Download’ command button. The user can choose which of the available audio formats to download, or all of them.
- Upload

Uploads the selected sound file from the user's desktop
Click the 'Upload' button and choose a sound file from your desktop to upload it on the system. A progress bar will be shown when uploading a file.
NOTE: If you are uploading an .mp3 or a .wav file, these will be auto-converted to other native formats. Other file formats apart from mp3 and wav will just be uploaded without automatic conversion.
- Listen

This option allows listening to a sound file. Select a box next to a sound file and click ‘Listen’ to hear it.
TIP: PBXware will play only sound file types equal to enabled codecs on dialing extension.
For example, Extension 1000 has only the gsm codec enabled. When the same Extension logs in as a Queue Agent by dialing '*202 + $AGENT_NUMBER', all sounds played by PBXware (asking for password etc...) will be in the '.gsm' format.
If multiple codecs are enabled for Extension 1000(ulaw,alaw,gsm), PBXware will play the sound files with the better sound quality (ulaw/alaw).
¶ Music on Hold

Music on Hold is music or advertisements played to callers while they are, for example, waiting for an agent or when put on hold.
.
¶ Content
MOH content window administers all PBXware MOH sound files. They are listed here with the following details
- Name:
MOH sound file name
(E.g. Motorbreath)
- Class:
MOH class sound file belongs to
(E.g. Default)
- Status:
MOH sound file status. Possible choices are ‘On’ and ‘Off’.
Edits the MOH file configuration
Deletes a MOH file from the system
.
¶ Search
- Search:
Provide a search phrase here and hit enter to filter the records. It is possible to filter MOH files/classes based on their Status, by entering ‘On’ or ‘Off’.
.
¶ Add/Edit Records
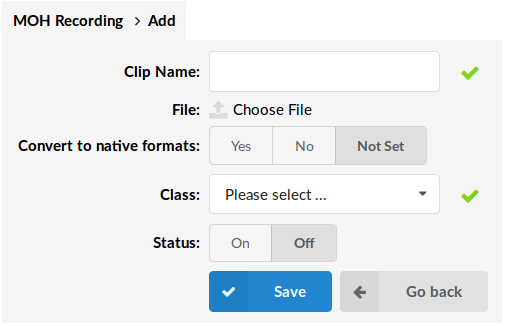
- Clip name:
Audio file name
(E.g. Für Elise)
- File:
Displays the full path to the music file on local computer. Click 'Upload file' button to select a file
(E.g. D:\Music\Ludwig van Beethoven\Ludwig van Beethoven - Für Elise.mp3)
- Class:
Select the MOH class the sound file belongs to
(E.g. default)
- Status:
Set the status of the uploaded file(active/inactive)
(E.g. On/Off)
¶ Classes

MOH classes are something like folders on a computer filled with music files. Once a MOH class is assigned to the queue, for example, all sound files that belong to that class are played back in random order. MOH classes are listed here with the following details
- Name:
MOH class name
(E.g. default)
- Status:
MOH class system status. When disabled, sound files that belong to the class will not be played anywhere on the system
Edits the the MOH file configuration
Deletes a MOH file from the system.
NOTE: 'default’ MOH Class cannot be deleted. Also, classes who contain recordings cannot be deleted. If deleting classes is needed, users should first move recordings to other classes.
¶ Search
- Search:
Enter a search phrase here to easy finding of MOH Class. Searching can be done by a Class name.
¶ Add/Edit MOH Classes
- Class Name:

Enter the MOH class name
(E.g. IVR greetings)
- Stream URL:
In PBXware we implemented support for easy MoH streaming. All you have to do is to create new MoH class and enter the link to your stream in Stream URL field.
- Status:
Set the class status
(E.g. On/Off)
- Sort files:
Whether the files assigned to this class be played alphabetically or randomly
¶ Sangoma Cards
This part of the interface is used to set Sangoma cards: PRI and Analog.

Depending on the cards inserted and the number of ports on them, appropriate row of information will show up in the list of the cards. Also whether PRI or Analog card is inserted, they will have different configuration settings.
.
¶ PRI Cards

When PRI card is inserted (like A101 which has one port) you will get as many "items" in the list as you have ports on that particular card. In this case, A101 has one port hence one item or card in the list. If you insert A102 you will get two items in the list because that card has two ports.
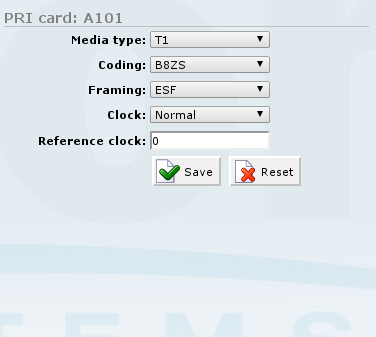
So, you need to configure every port individually, that's why there is a separate Configure button by every port.
When the card is inserted you will see 'Not connected' Status. You need to connect the cable to it and click on the Configure button.
- Media type:
This is the type of the PRI system that the card is connecting to
Example:
- T1 - PRI in US
- E1 - PRI in EU
- J1 - PRI in Japan
.
- Coding:
This is the coding type for this port. This is automatically selected with Media type, so there is no need to change this option.
(E.g. B8ZS)
- Framing:
This is the framing used for this port. This is automatically selected with Media type, so there is no need to change this option.
(E.g. ESF)
- Clock:
Select whether the card will give a clock to devices (Master), or use a clock generated from telco (Normal)
(E.g. Master)
- Reference clock:
This option allows one to use the incoming clock from a different port as a clock source to this port.
NOTE: This option works only if Clock is set to Master.
(E.g. 2)
- Hardware DTMF:
Enable/Disable Hardware DTMF detection
(E.g. Yes, No, Not Set)
When you choose which type of connection is used and whether the card will use a clock source from the provider or generating one, click on the Save button. After that, click on Apply and then Restart the PBXware button.
If the cable was connected and configuration done properly, the system will display 'Connected' by the cards port.
.
¶ Analog Cards

When you insert an analog Sangoma card, each card has one "item" in the list, regardless of the number of ports that it has on it. Under Port, it will show you how many FXS and/or FXO ports are configured.
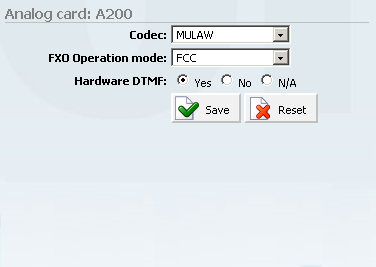
- Codec:
Codec used for this card
(E.g. MULAW)
- FXO Operation mode:
FXO Operation mode.
(E.g. FCC)
- Hardware DTMF:
Enable/Disable Hardware DTMF detection
(E.g. Yes, No, Not Set)
Procedure for configuring FXS/FXO ports is simple. Click on Configure, Save, click on Apply, and then Restart PBXware.
TIP: If you change the hardware configuration of the card (PCI slot, number of FXS/FXO modules etc.) first reset the settings by clicking on the Reset button in the Configuration window, and then Save.


