¶ Visitor App New
¶ Overview
The Visitor App is an interactive interface that connects customers to your customer support team directly from your website. When you integrate our chat widget into your web page, it manifests as a blue, clickable bubble icon. This serves as an inviting gateway for your users to engage in real-time conversations with your Agents or interact with a Chatbot for automated assistance.
¶ Getting Started
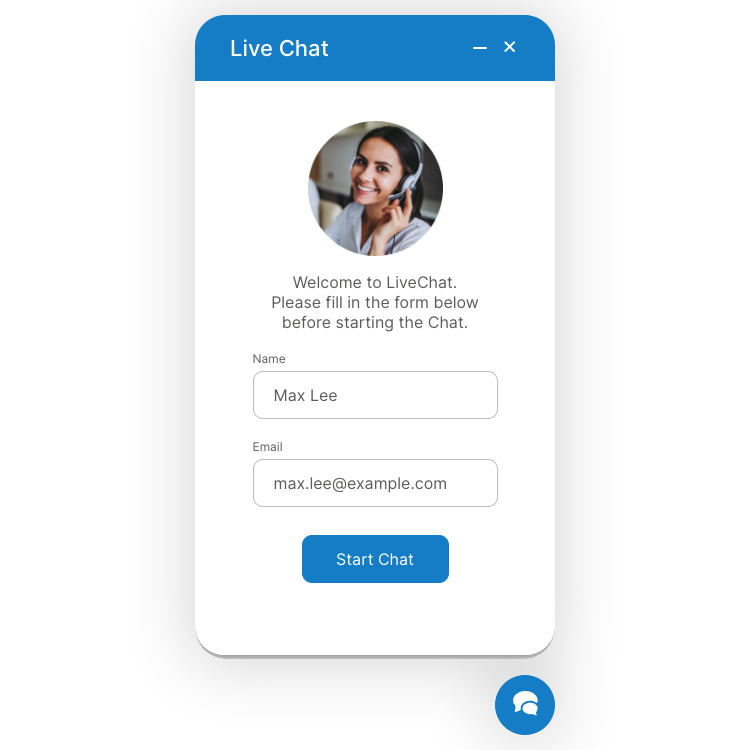
Upon clicking the blue widget icon, users are presented with a login screen. This initial step is designed to capture essential user information before proceeding to the a designated Queue or a Chatbot.
¶ Integration
Upon engaging with the Visitor App, users encounter two potential paths depending on the established channel within PBXware:
- For Live Chat, users have the option to submit their name and email address or remain anonymous. Regardless of their choice, they will be directed to a specific queue where they can begin a conversation with an agent.
- With Chatbot integration, post-registration, users are presented with a tailored list of options. Selecting an option steers them toward a relevant Queue, subsequently connecting them with an Agent for further assistance.
¶ Configuration
Administrators can configure the Visitor App to determine its behavior and interaction flow. Customizing the Chatbot's dialogue options, and directing the flow of conversations.
¶ User Interaction
Depending on whether they choose to stay anonymous or provide their name and email, users can engage in a chat session moderated by a live agent or automated by a Chatbot. The intuitive interface ensures a seamless user experience, fostering effective communication and prompt resolution of queries.
¶ Visitor App Chat Screen
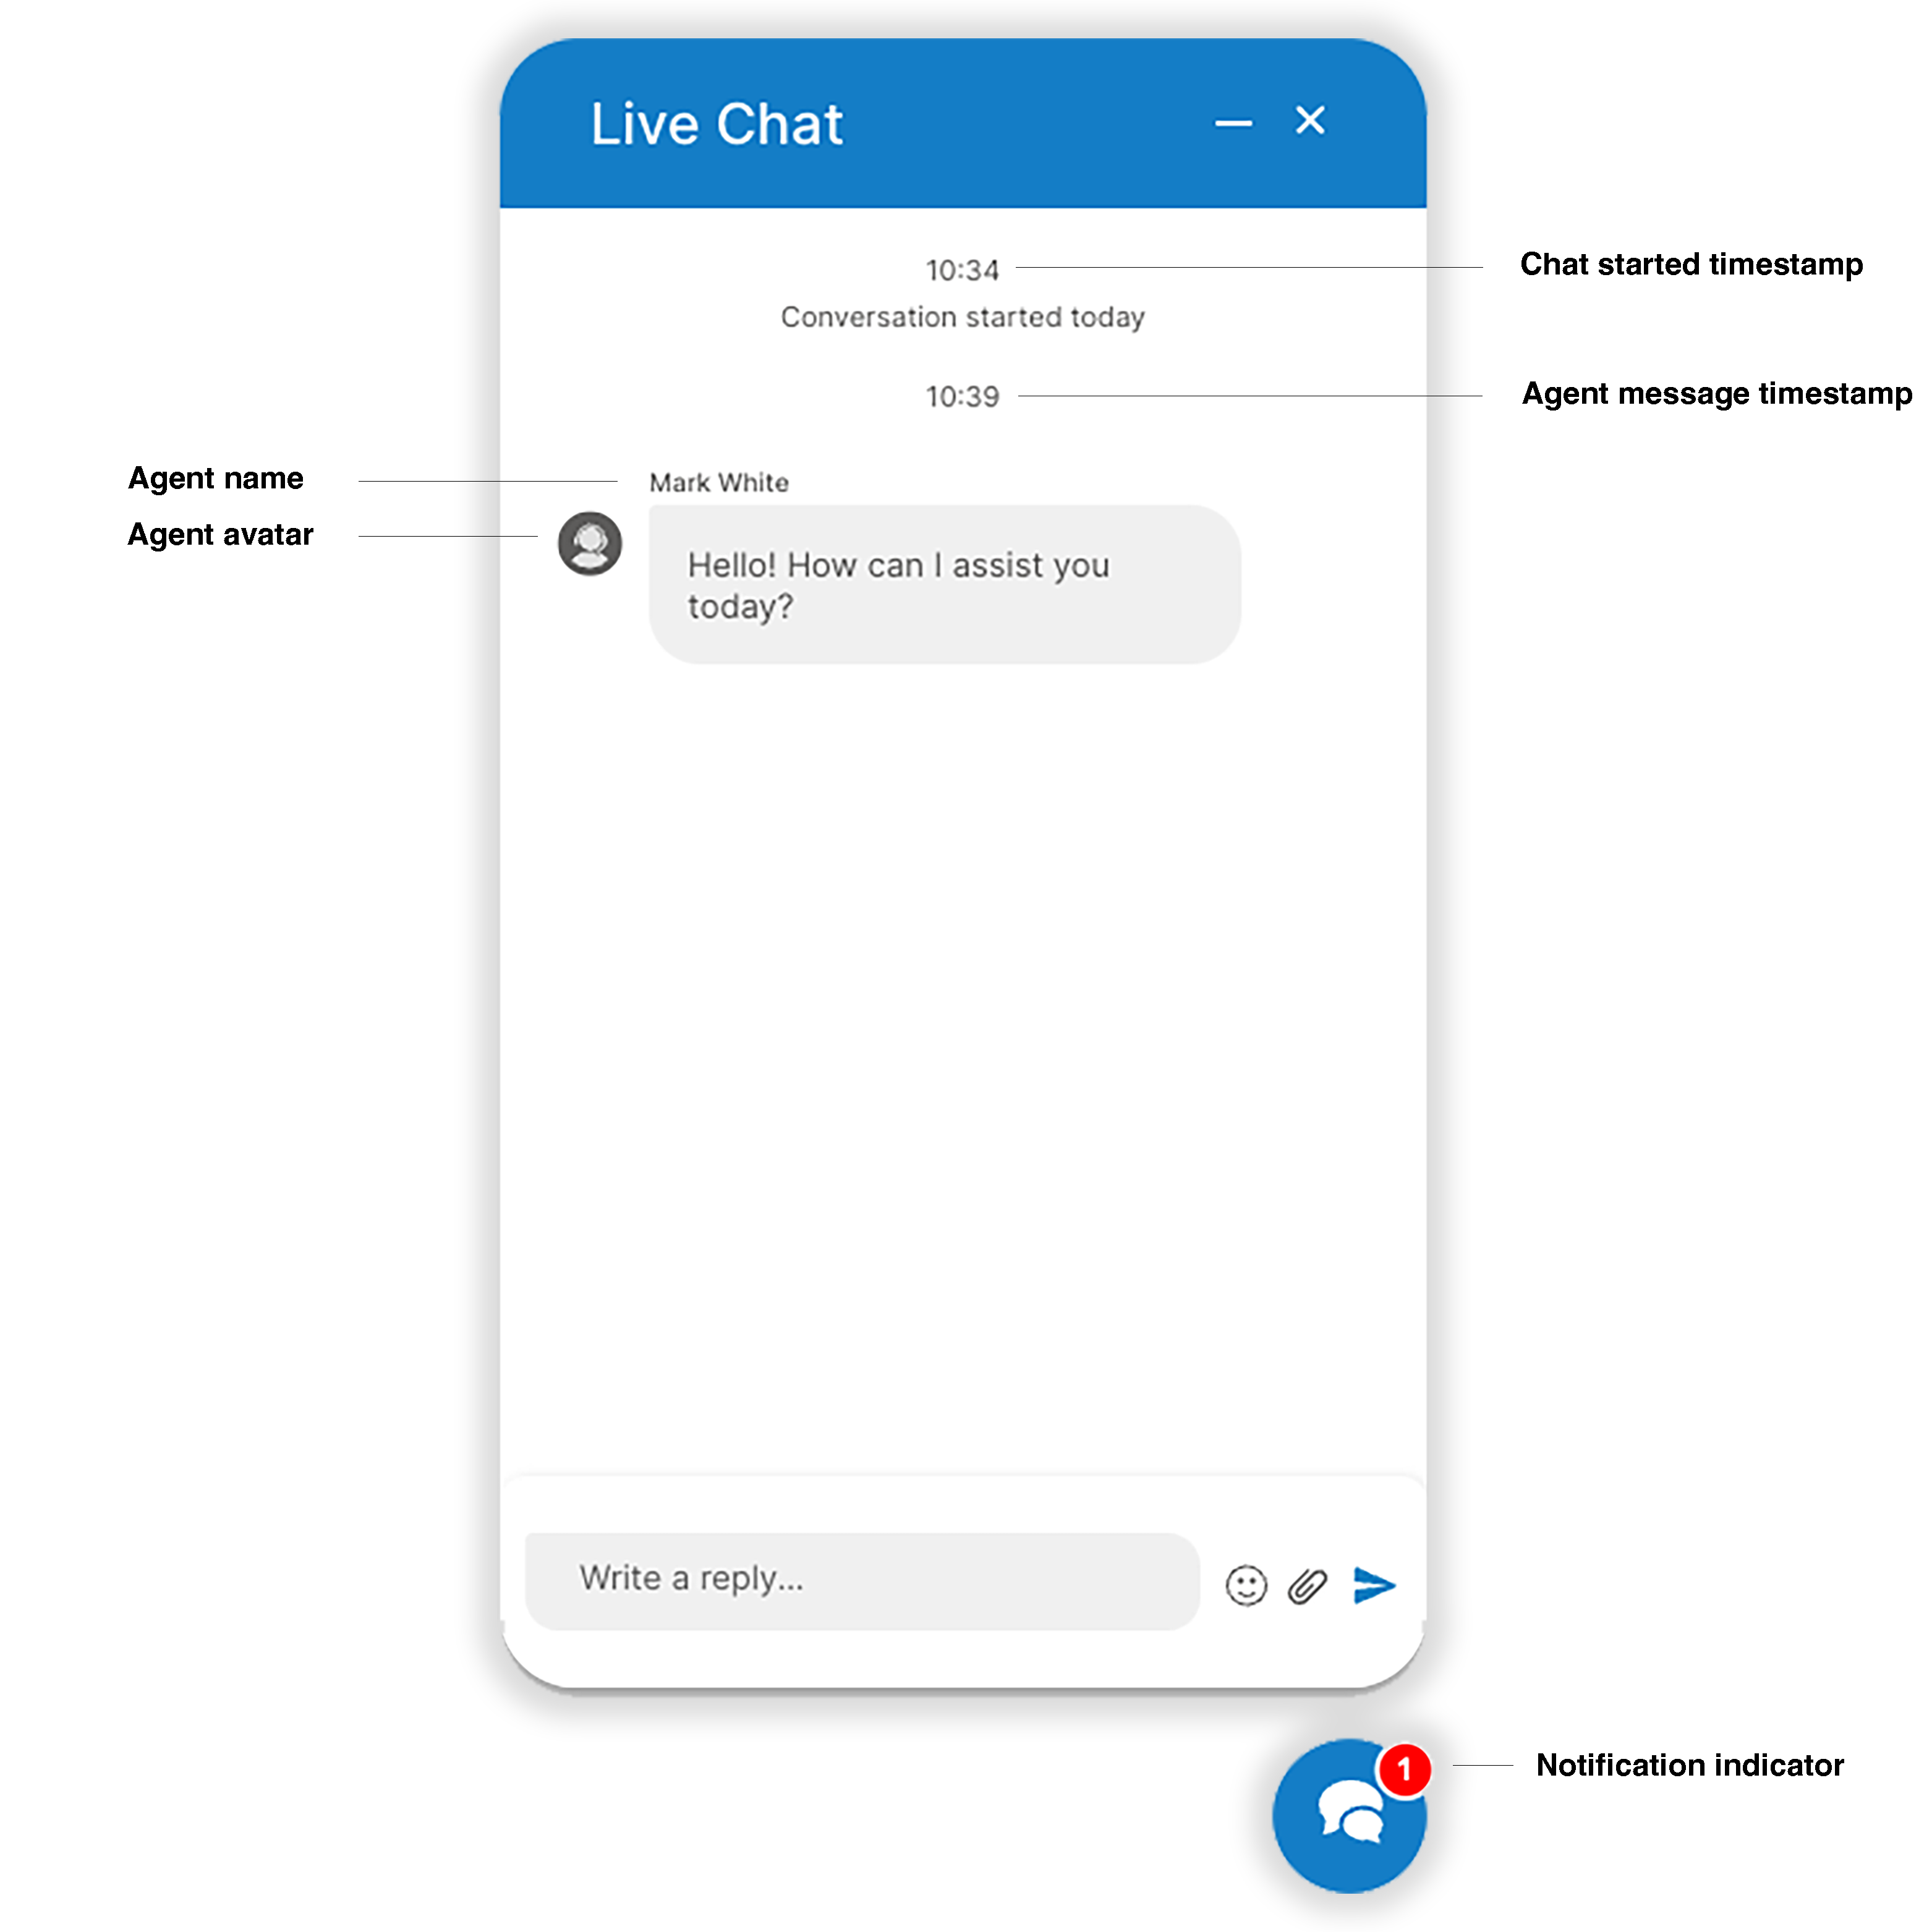
To initiate a new conversation via the Visitor app, users can look for the blue bubble icon in the bottom right corner of the page. Clicking on the icon will open the Live Chat window.
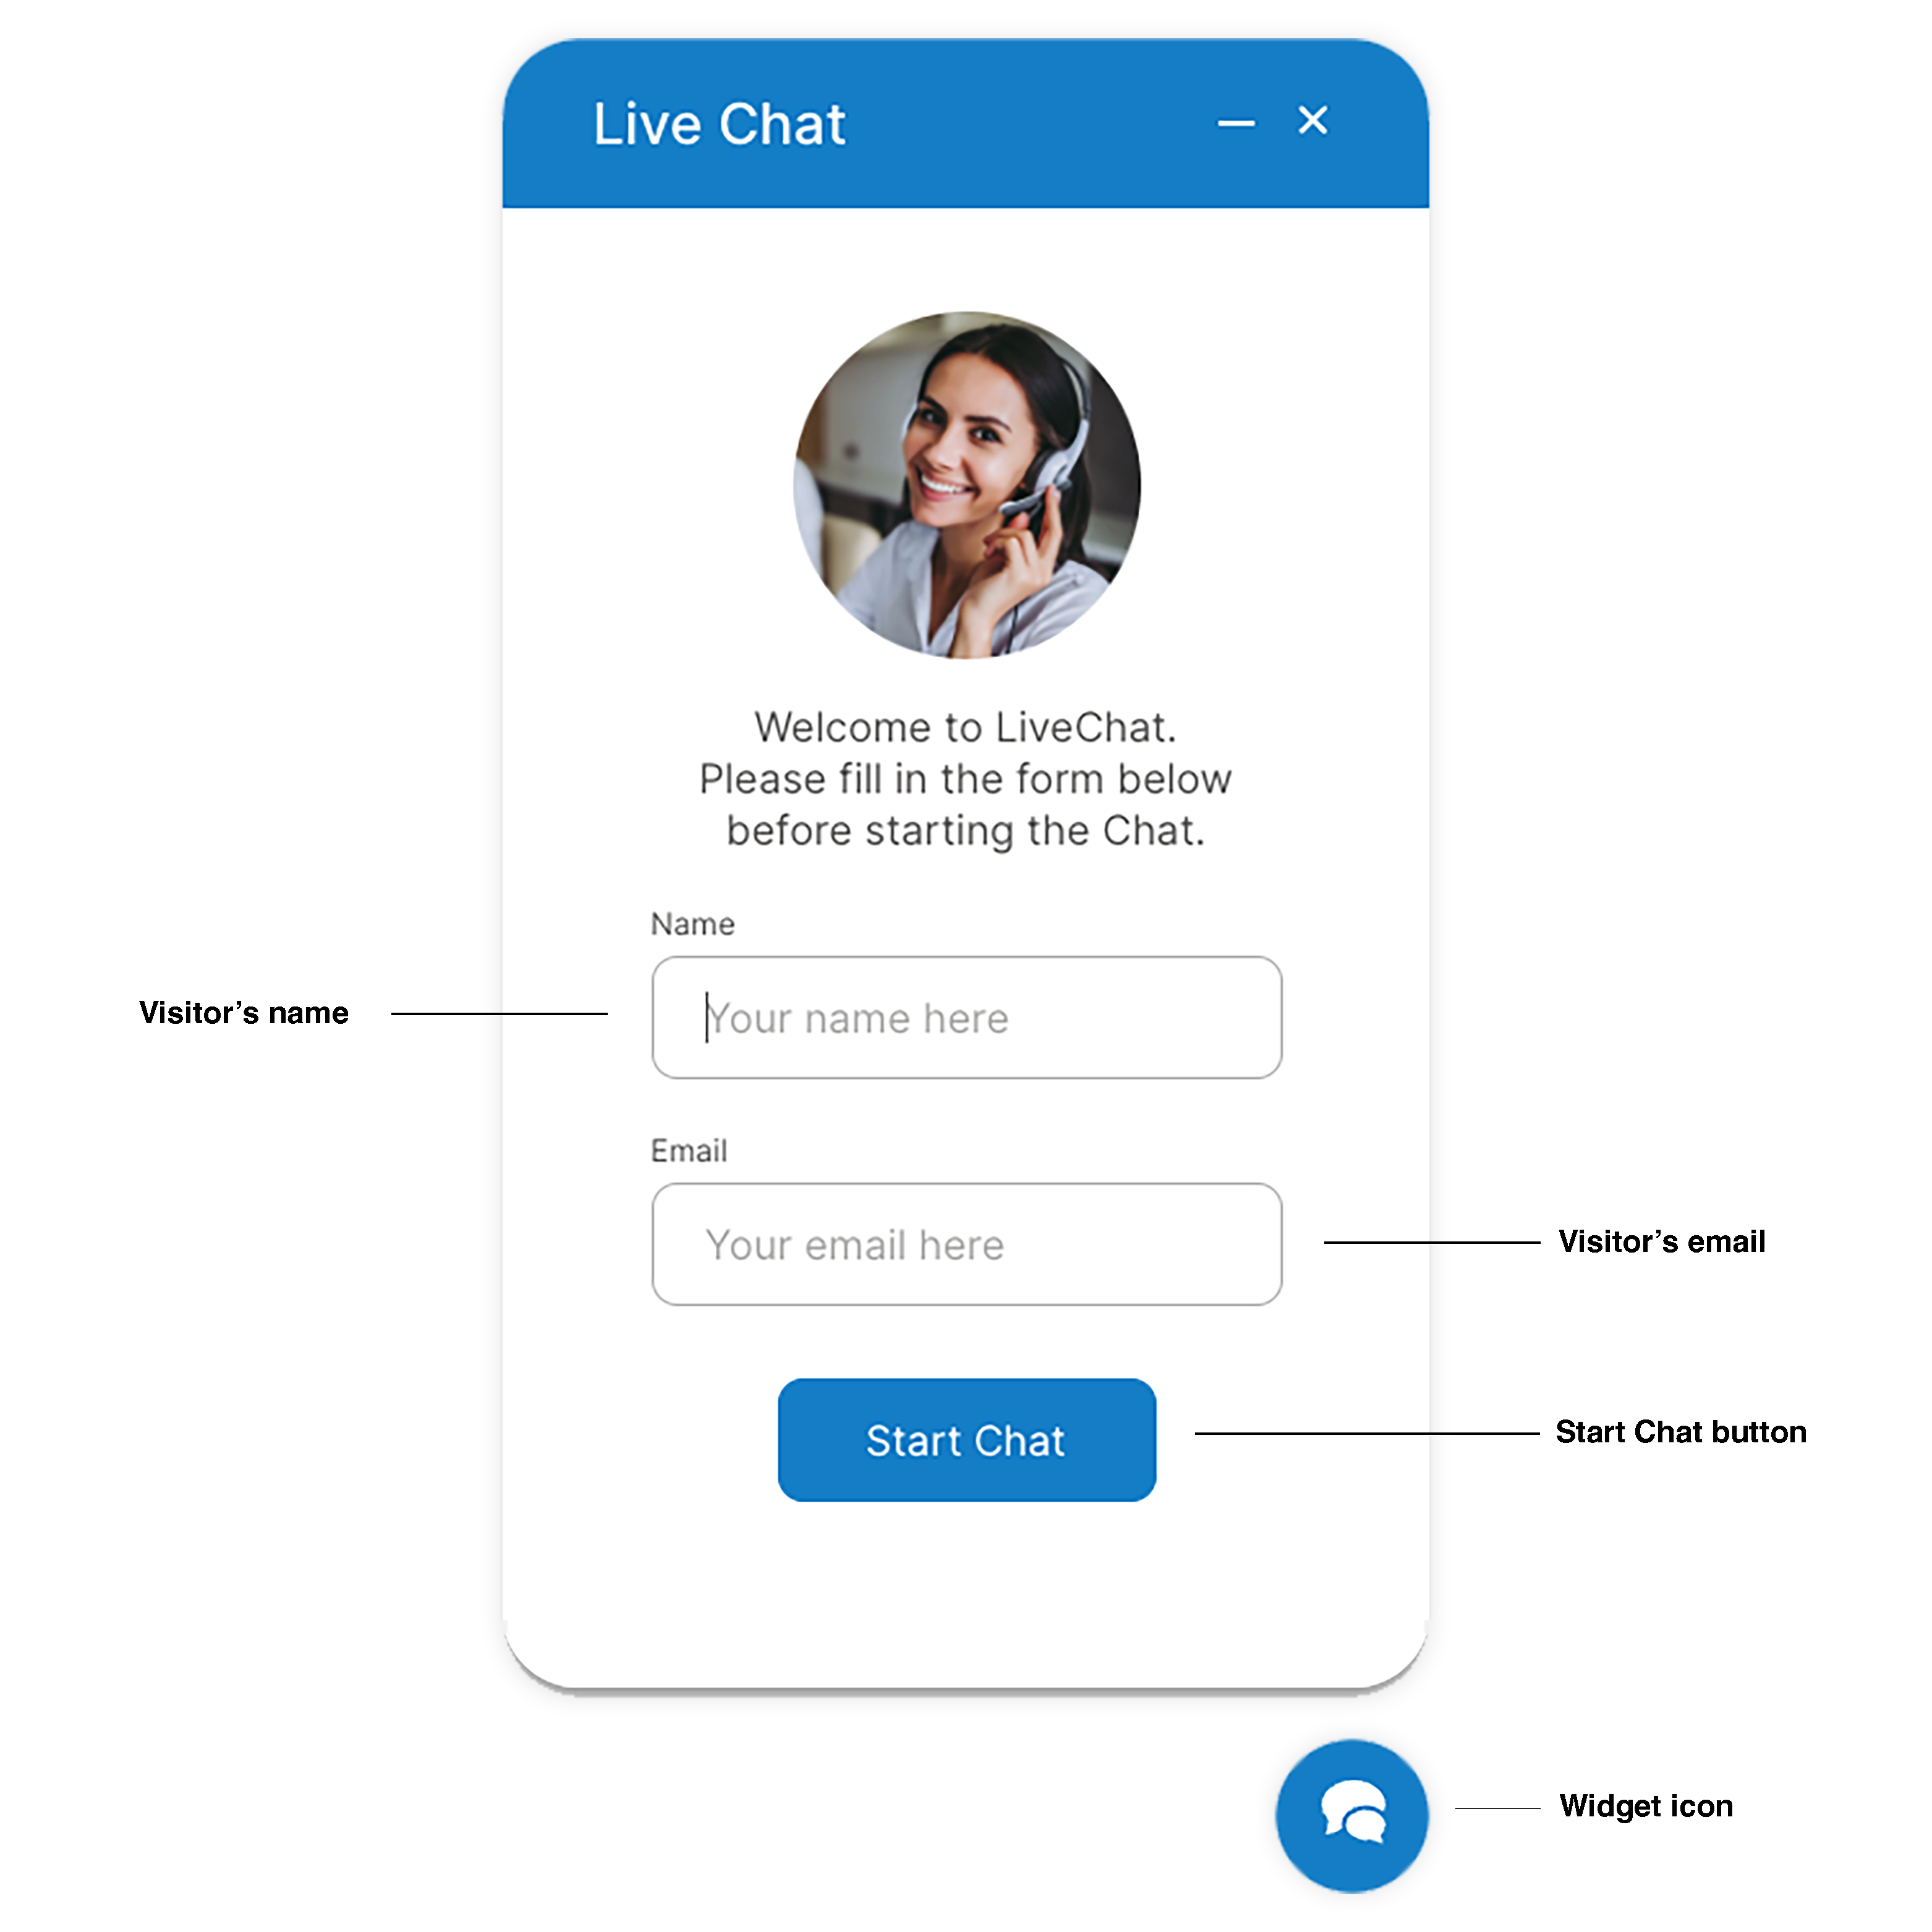
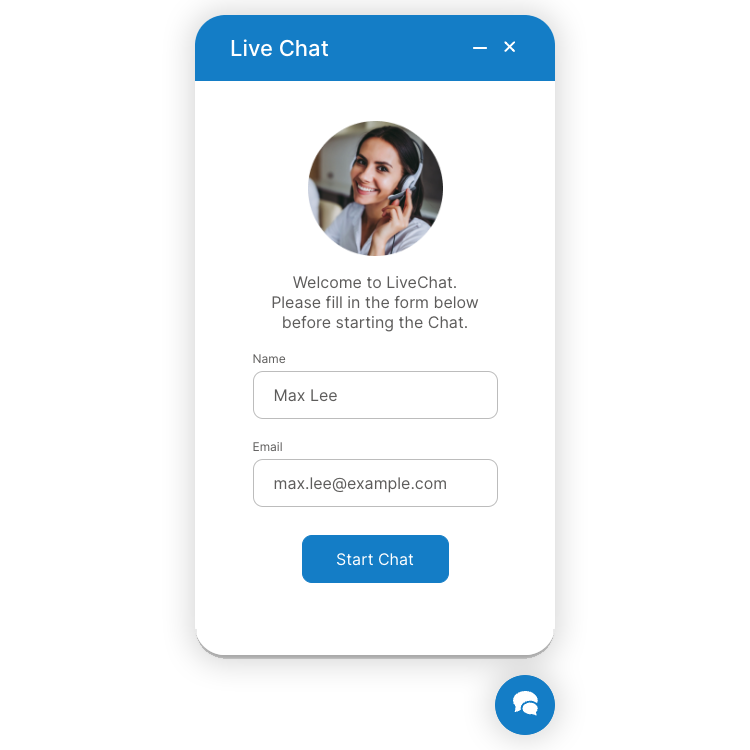
¶ Starting a Conversation with Pre-Chat Form
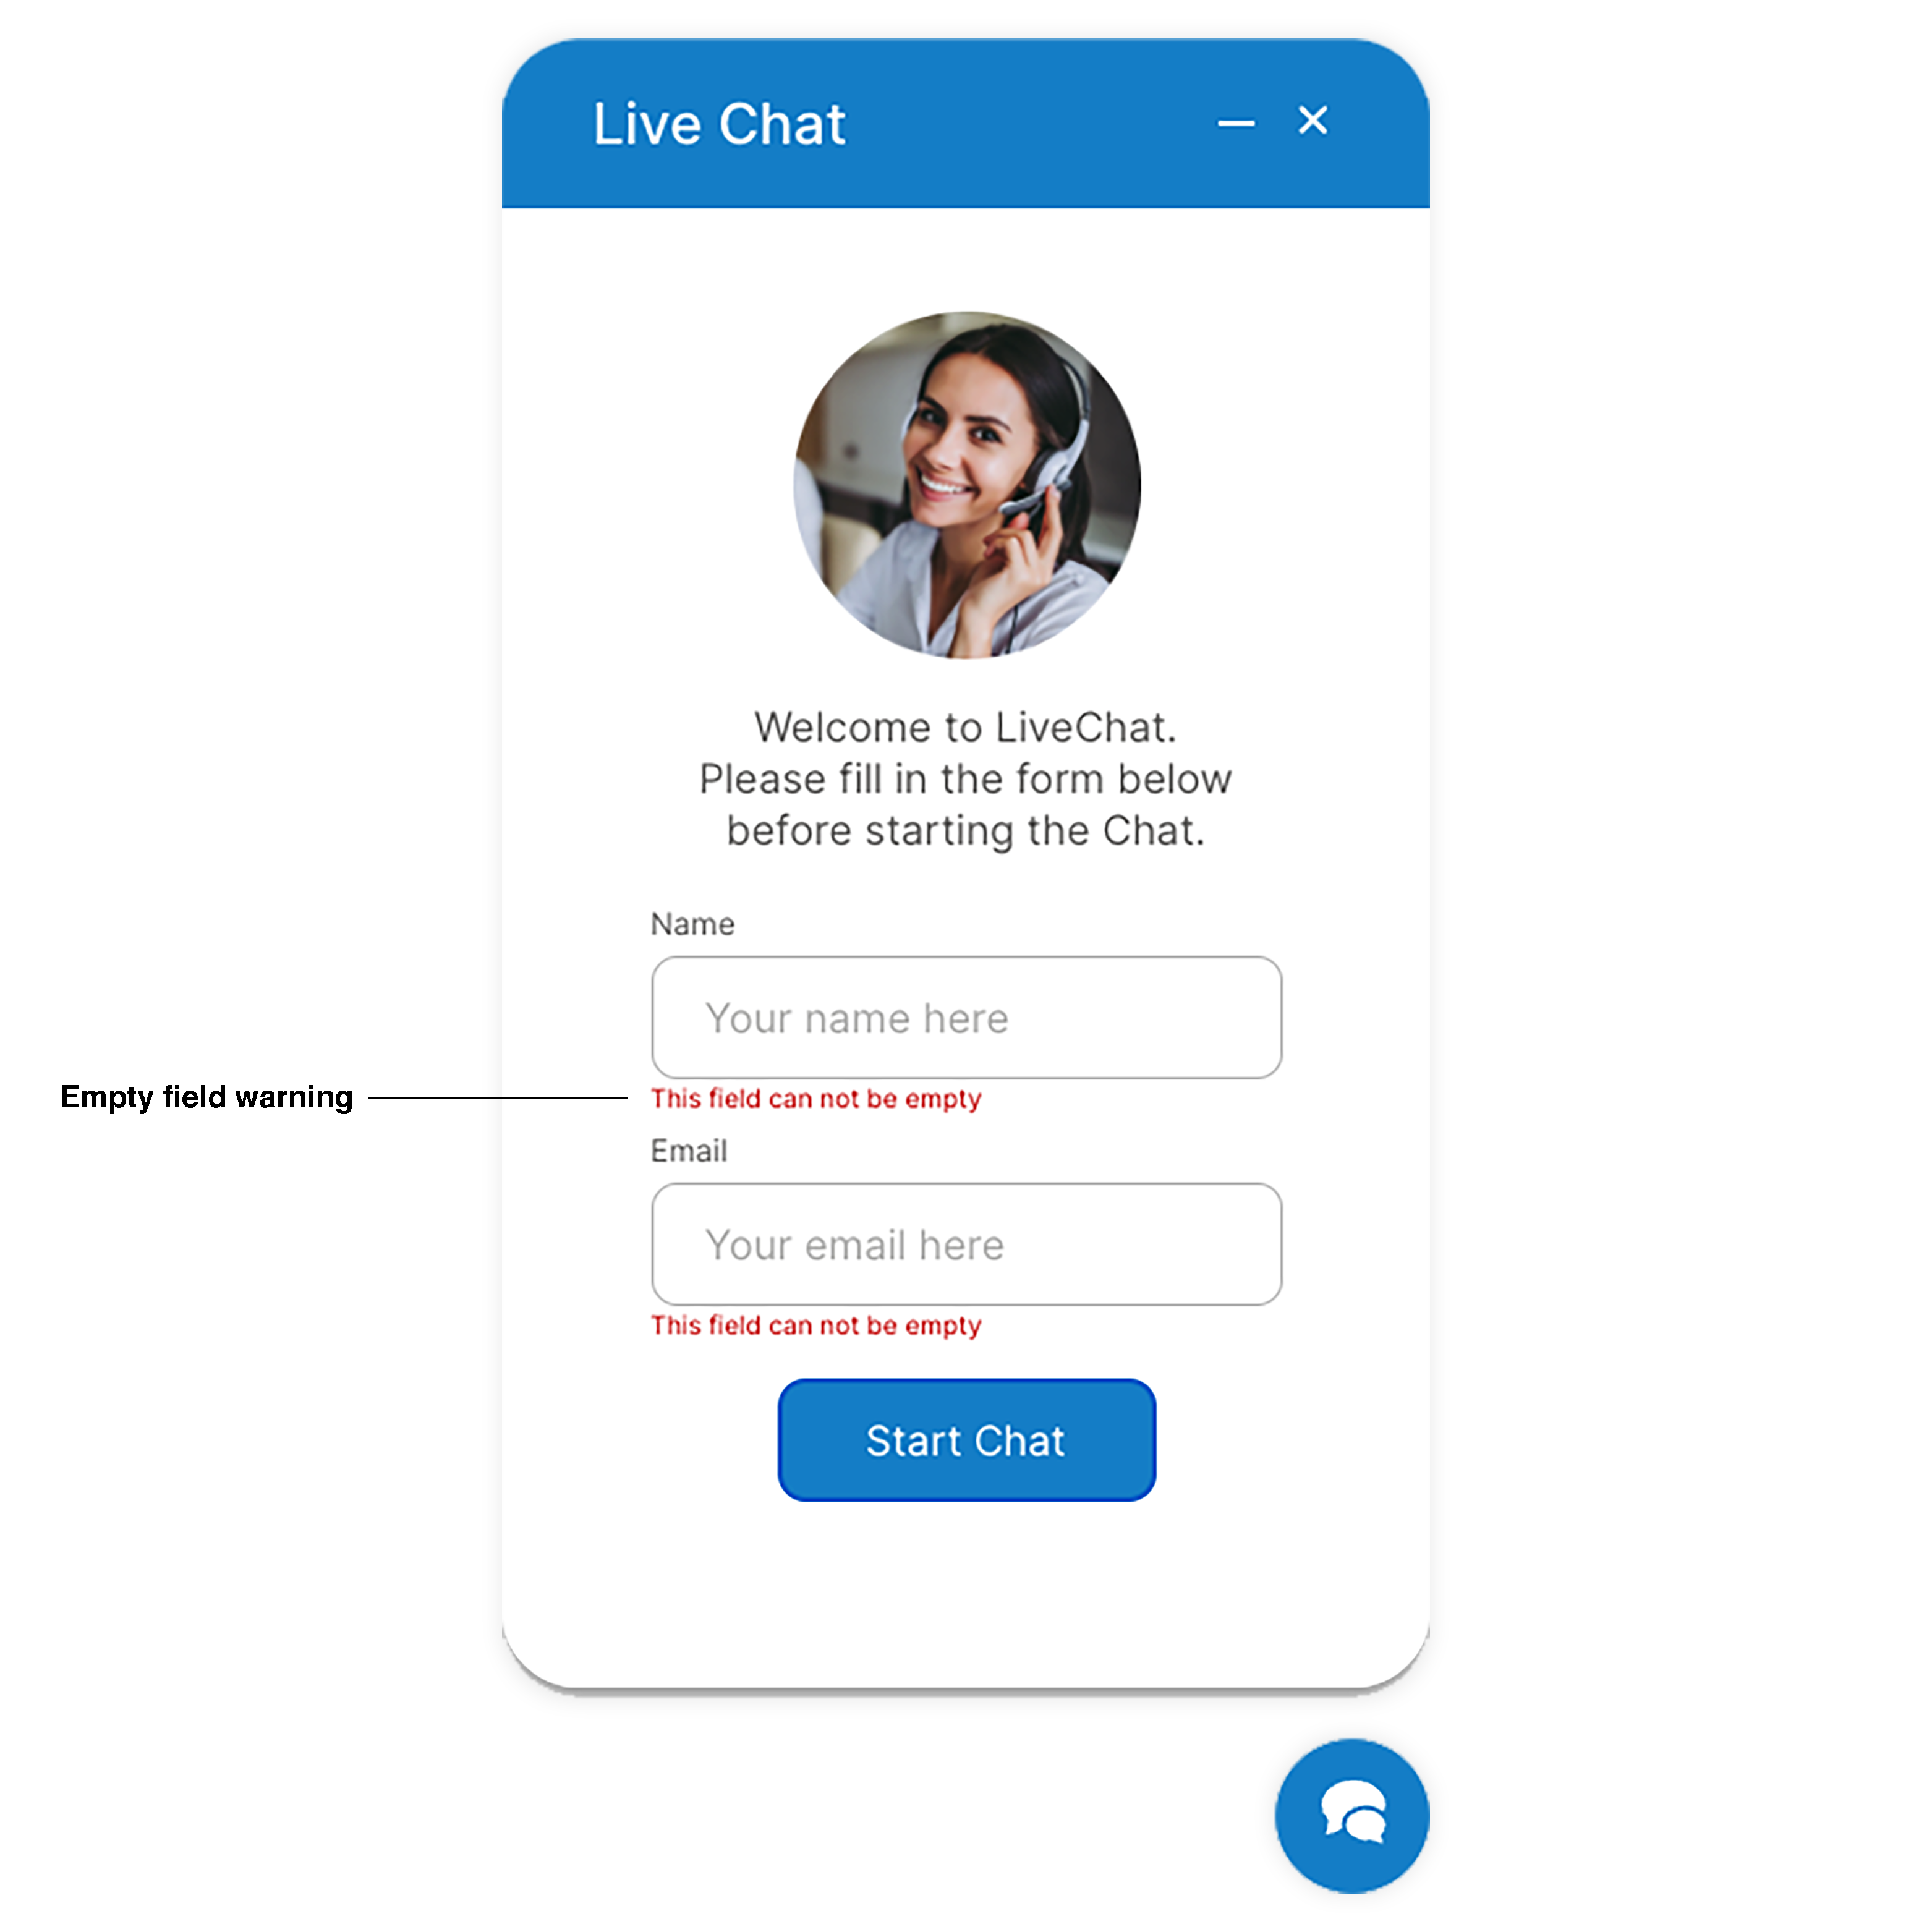
A pre-chat form can be enabled within the PBXware system in the Channels section. If enabled, the form will prompt users to enter their name and email address.
- A warning message will indicate that the fields cannot be empty if either field is left blank and the user attempts to proceed.
- After the user fills out both the name and email fields, clicking the 'Start Chat' button will initiate a new conversation.

- Users will be directed to a destination queue where they can start chatting with an agent.
¶ Starting a Conversation without Pre-Chat Form
A pre-chat form can be enabled within the PBXware system in the Channels section. If the pre-chat form is disabled within the PBXware system, users can start conversations anonymously.
After clicking on the blue icon, the chat window will appear, allowing users to initiate a conversation with an agent or chatbot by selecting the "Start Chat" button.

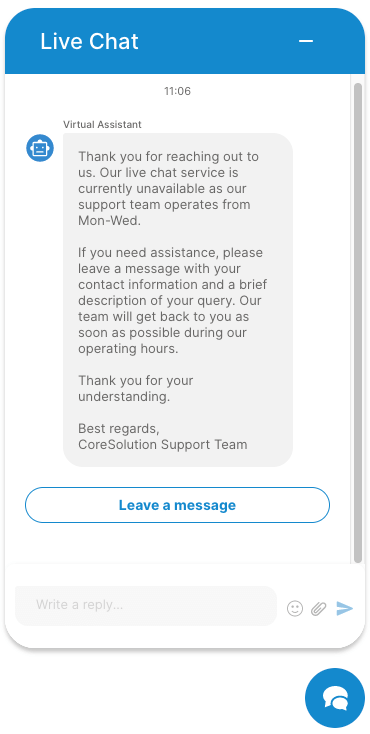
¶ Starting a Conversation in Non-working Hours
To allow customers to leave a message during non-working hours via the Visitor App, the "Leave a Message" form must be set within the PBXware system.
Here's how it works:
Starting a Conversation
- Customers can start a conversation either with or without a pre-chat form.
- During non-working hours, they will see a message informing them that live chat is unavailable.
- Under the message about non-working hours, customers will see a "Leave a Message" button.
Prompting for a Message
- When they click this button, a new form will appear.
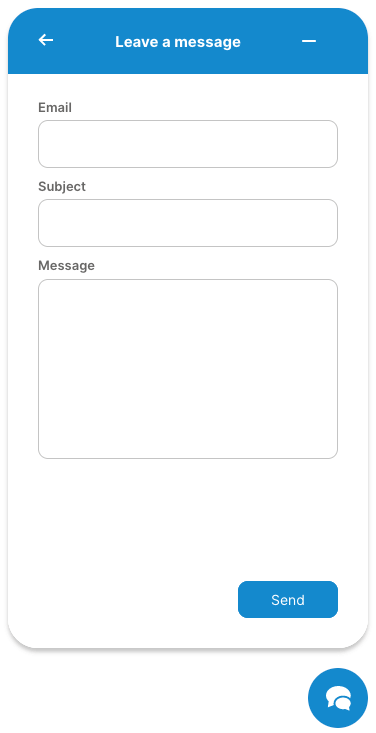
Filling Out the Form
- The form will ask for the customer's email address, the subject of the message, and a short description of their query.
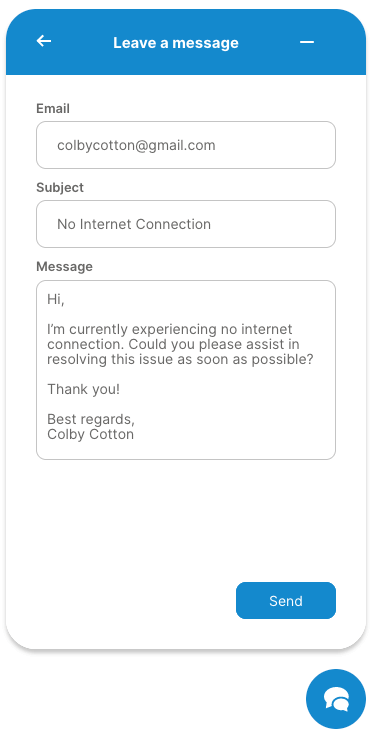
Sending the Message
- After filling out the form, customers can click the "Send" button.
- This action will send an email containing their message to the designated queue set within the PBXware system.
This setup ensures that customers can leave a message during non-working hours, and their queries will be directed to the appropriate support team for follow-up.
¶ Engaging in a Conversation and Exchanging Files with an Agent
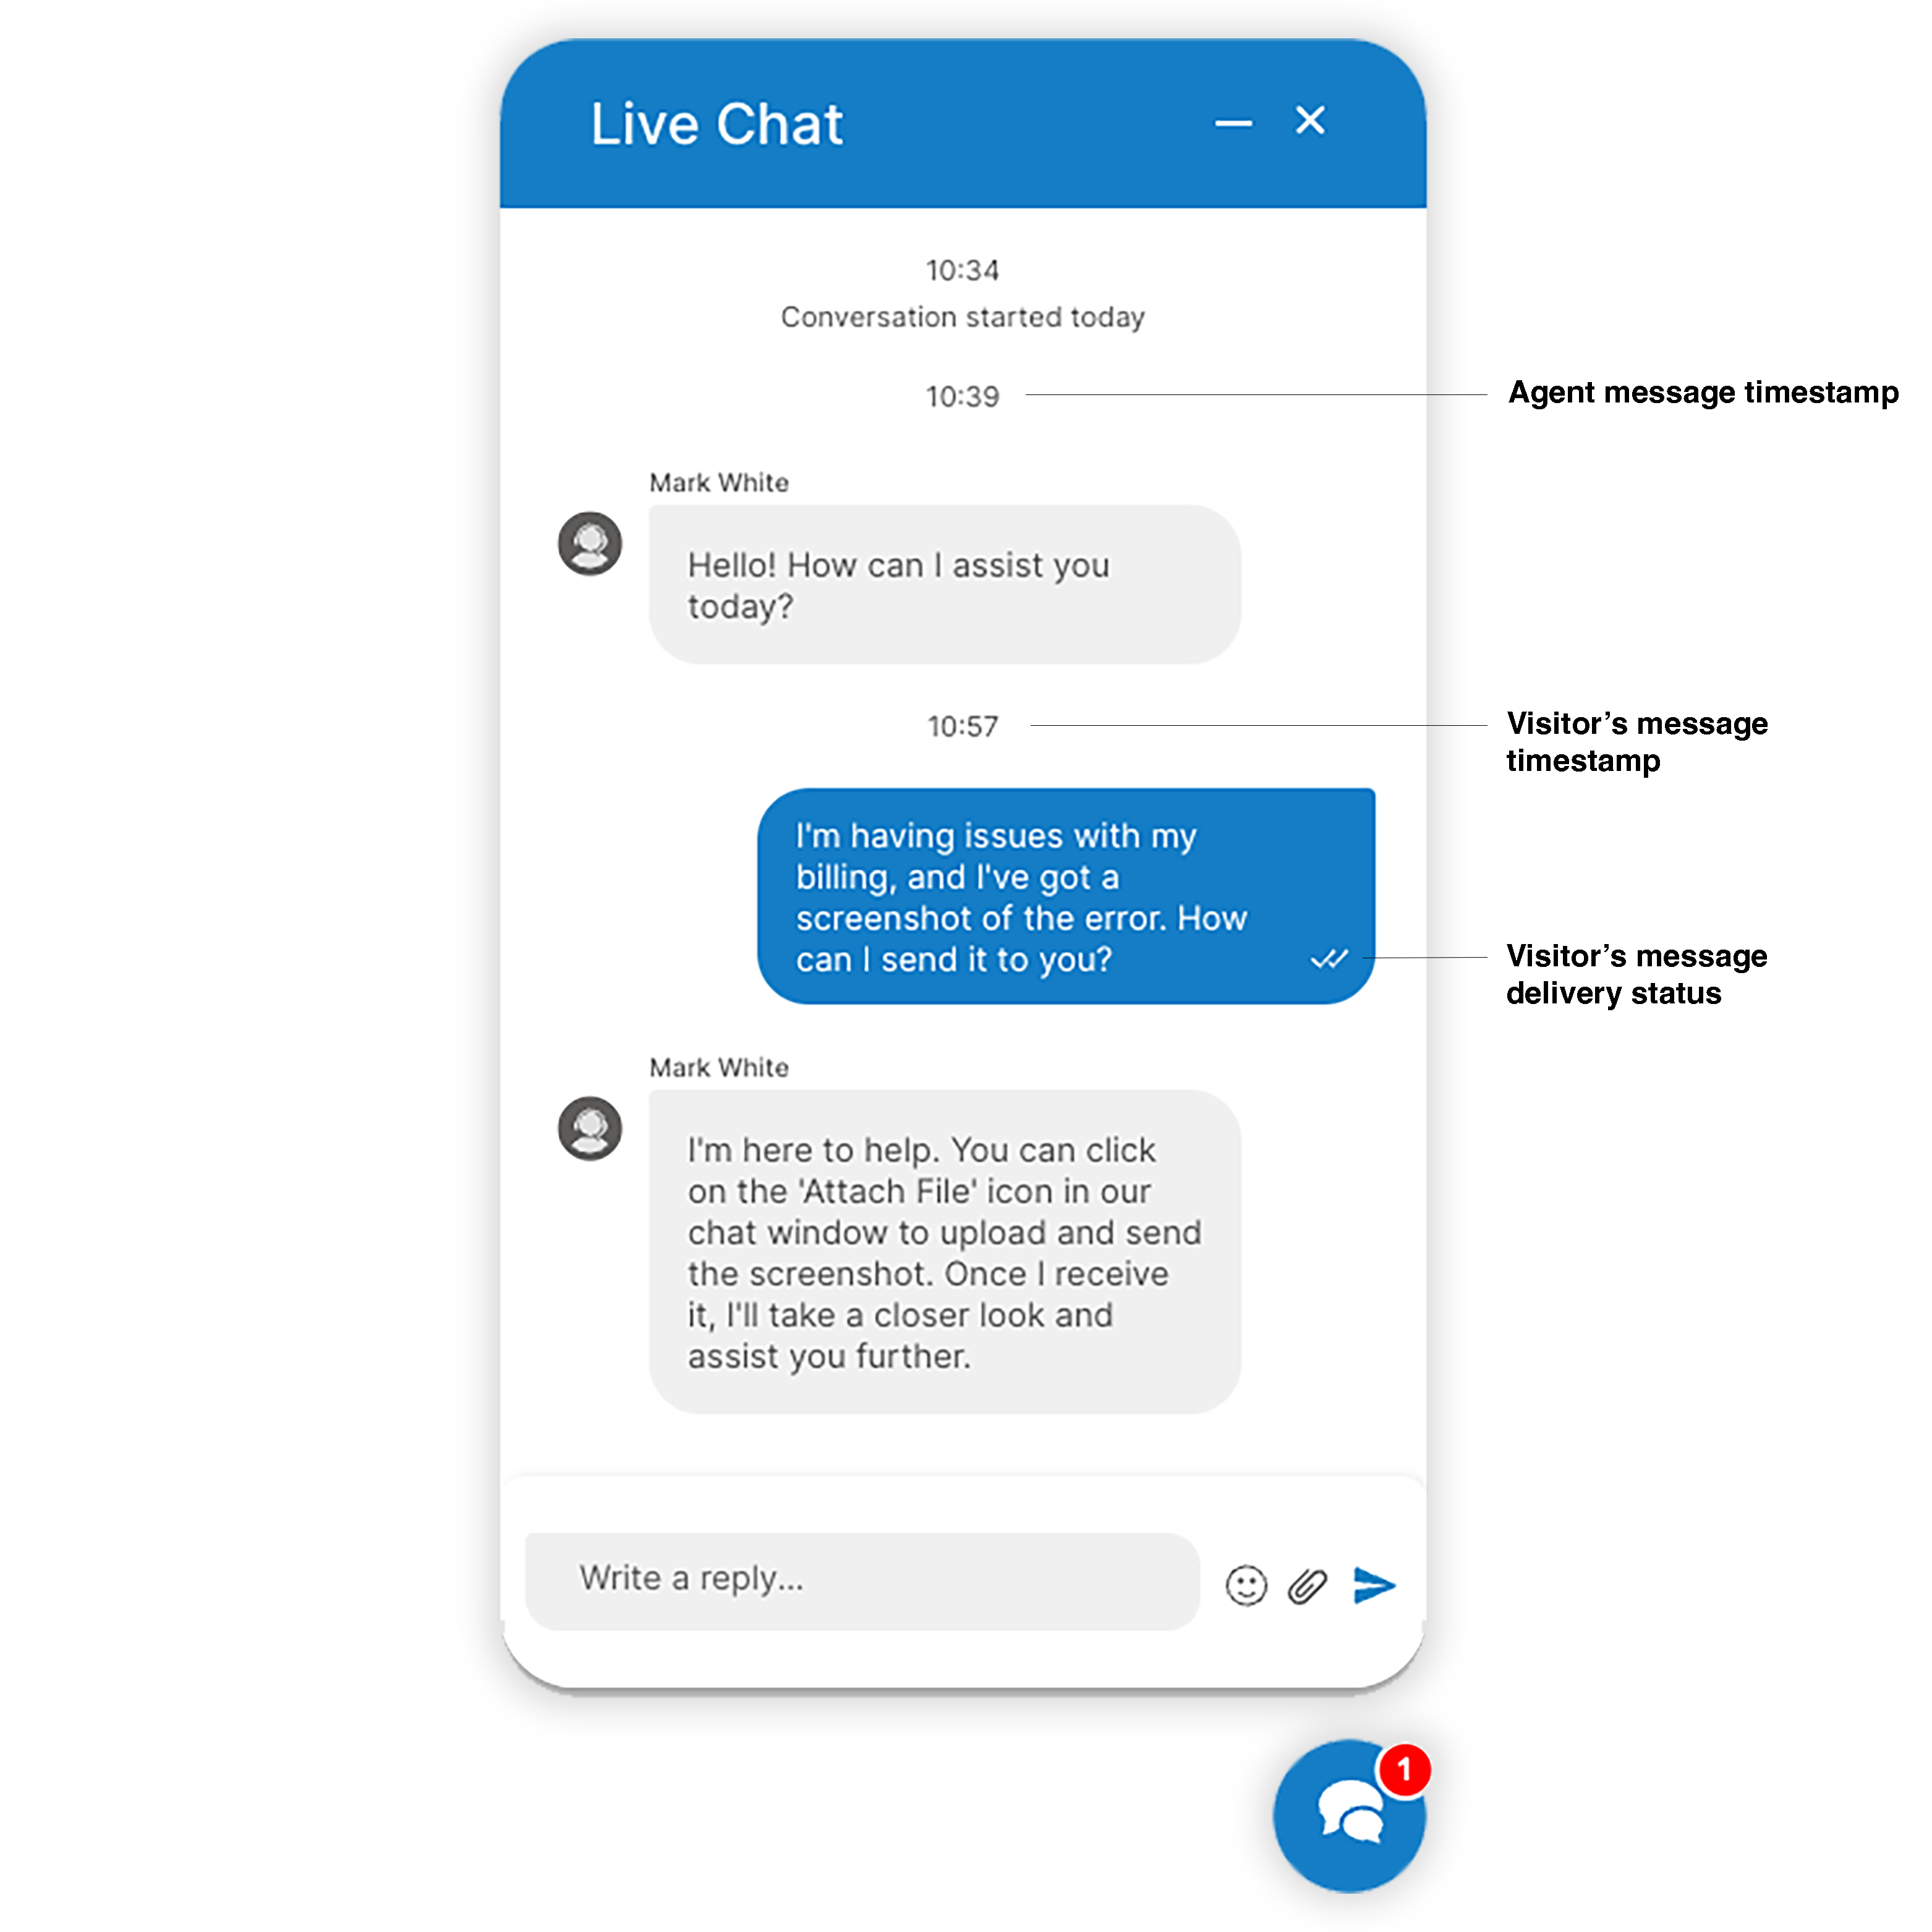
- Starting the Conversation: Once a user enters a Live Chat, they're ready to start a dialogue. Simply typing a message into the chat window and pressing 'Enter' will send the message to the connected Agent.
-
Sending Files: To send files, click the 'Attach File' icon, select the desired files, and confirm. Users can attach various types of files, enhancing the chat experience.
-
Editing File Selection: Users can review and edit their selection, ensuring only the intended files are sent.
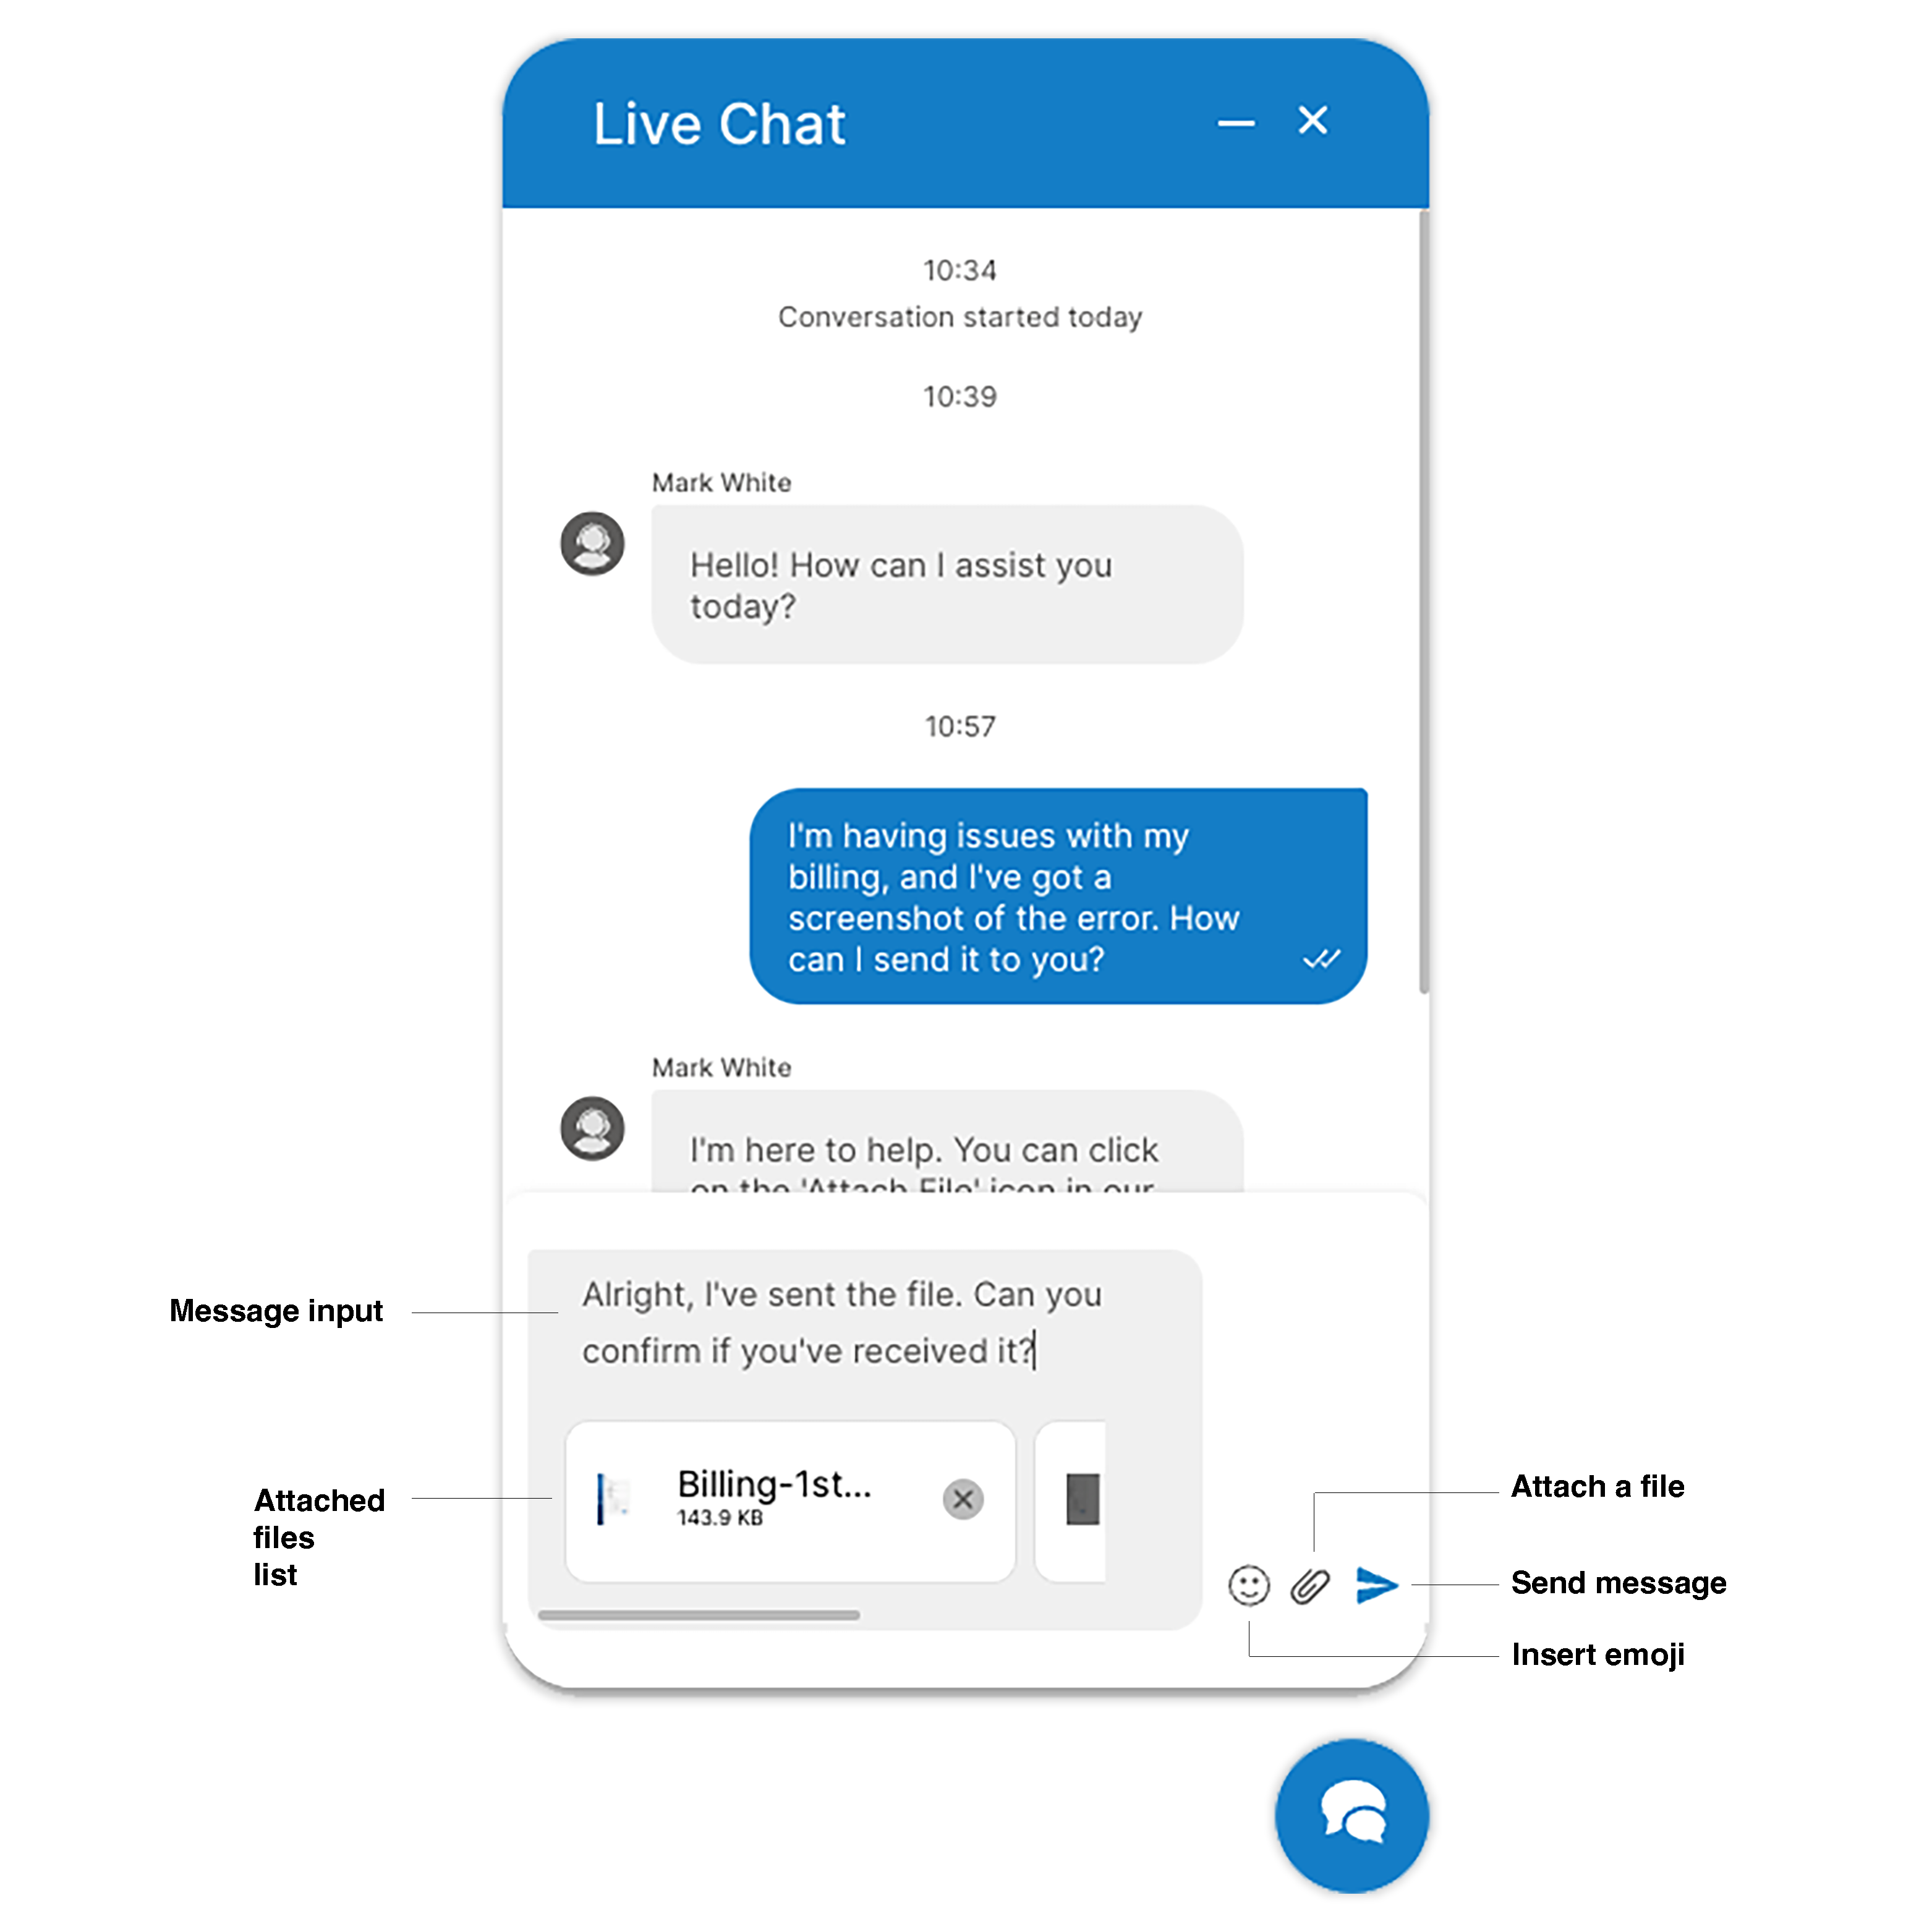
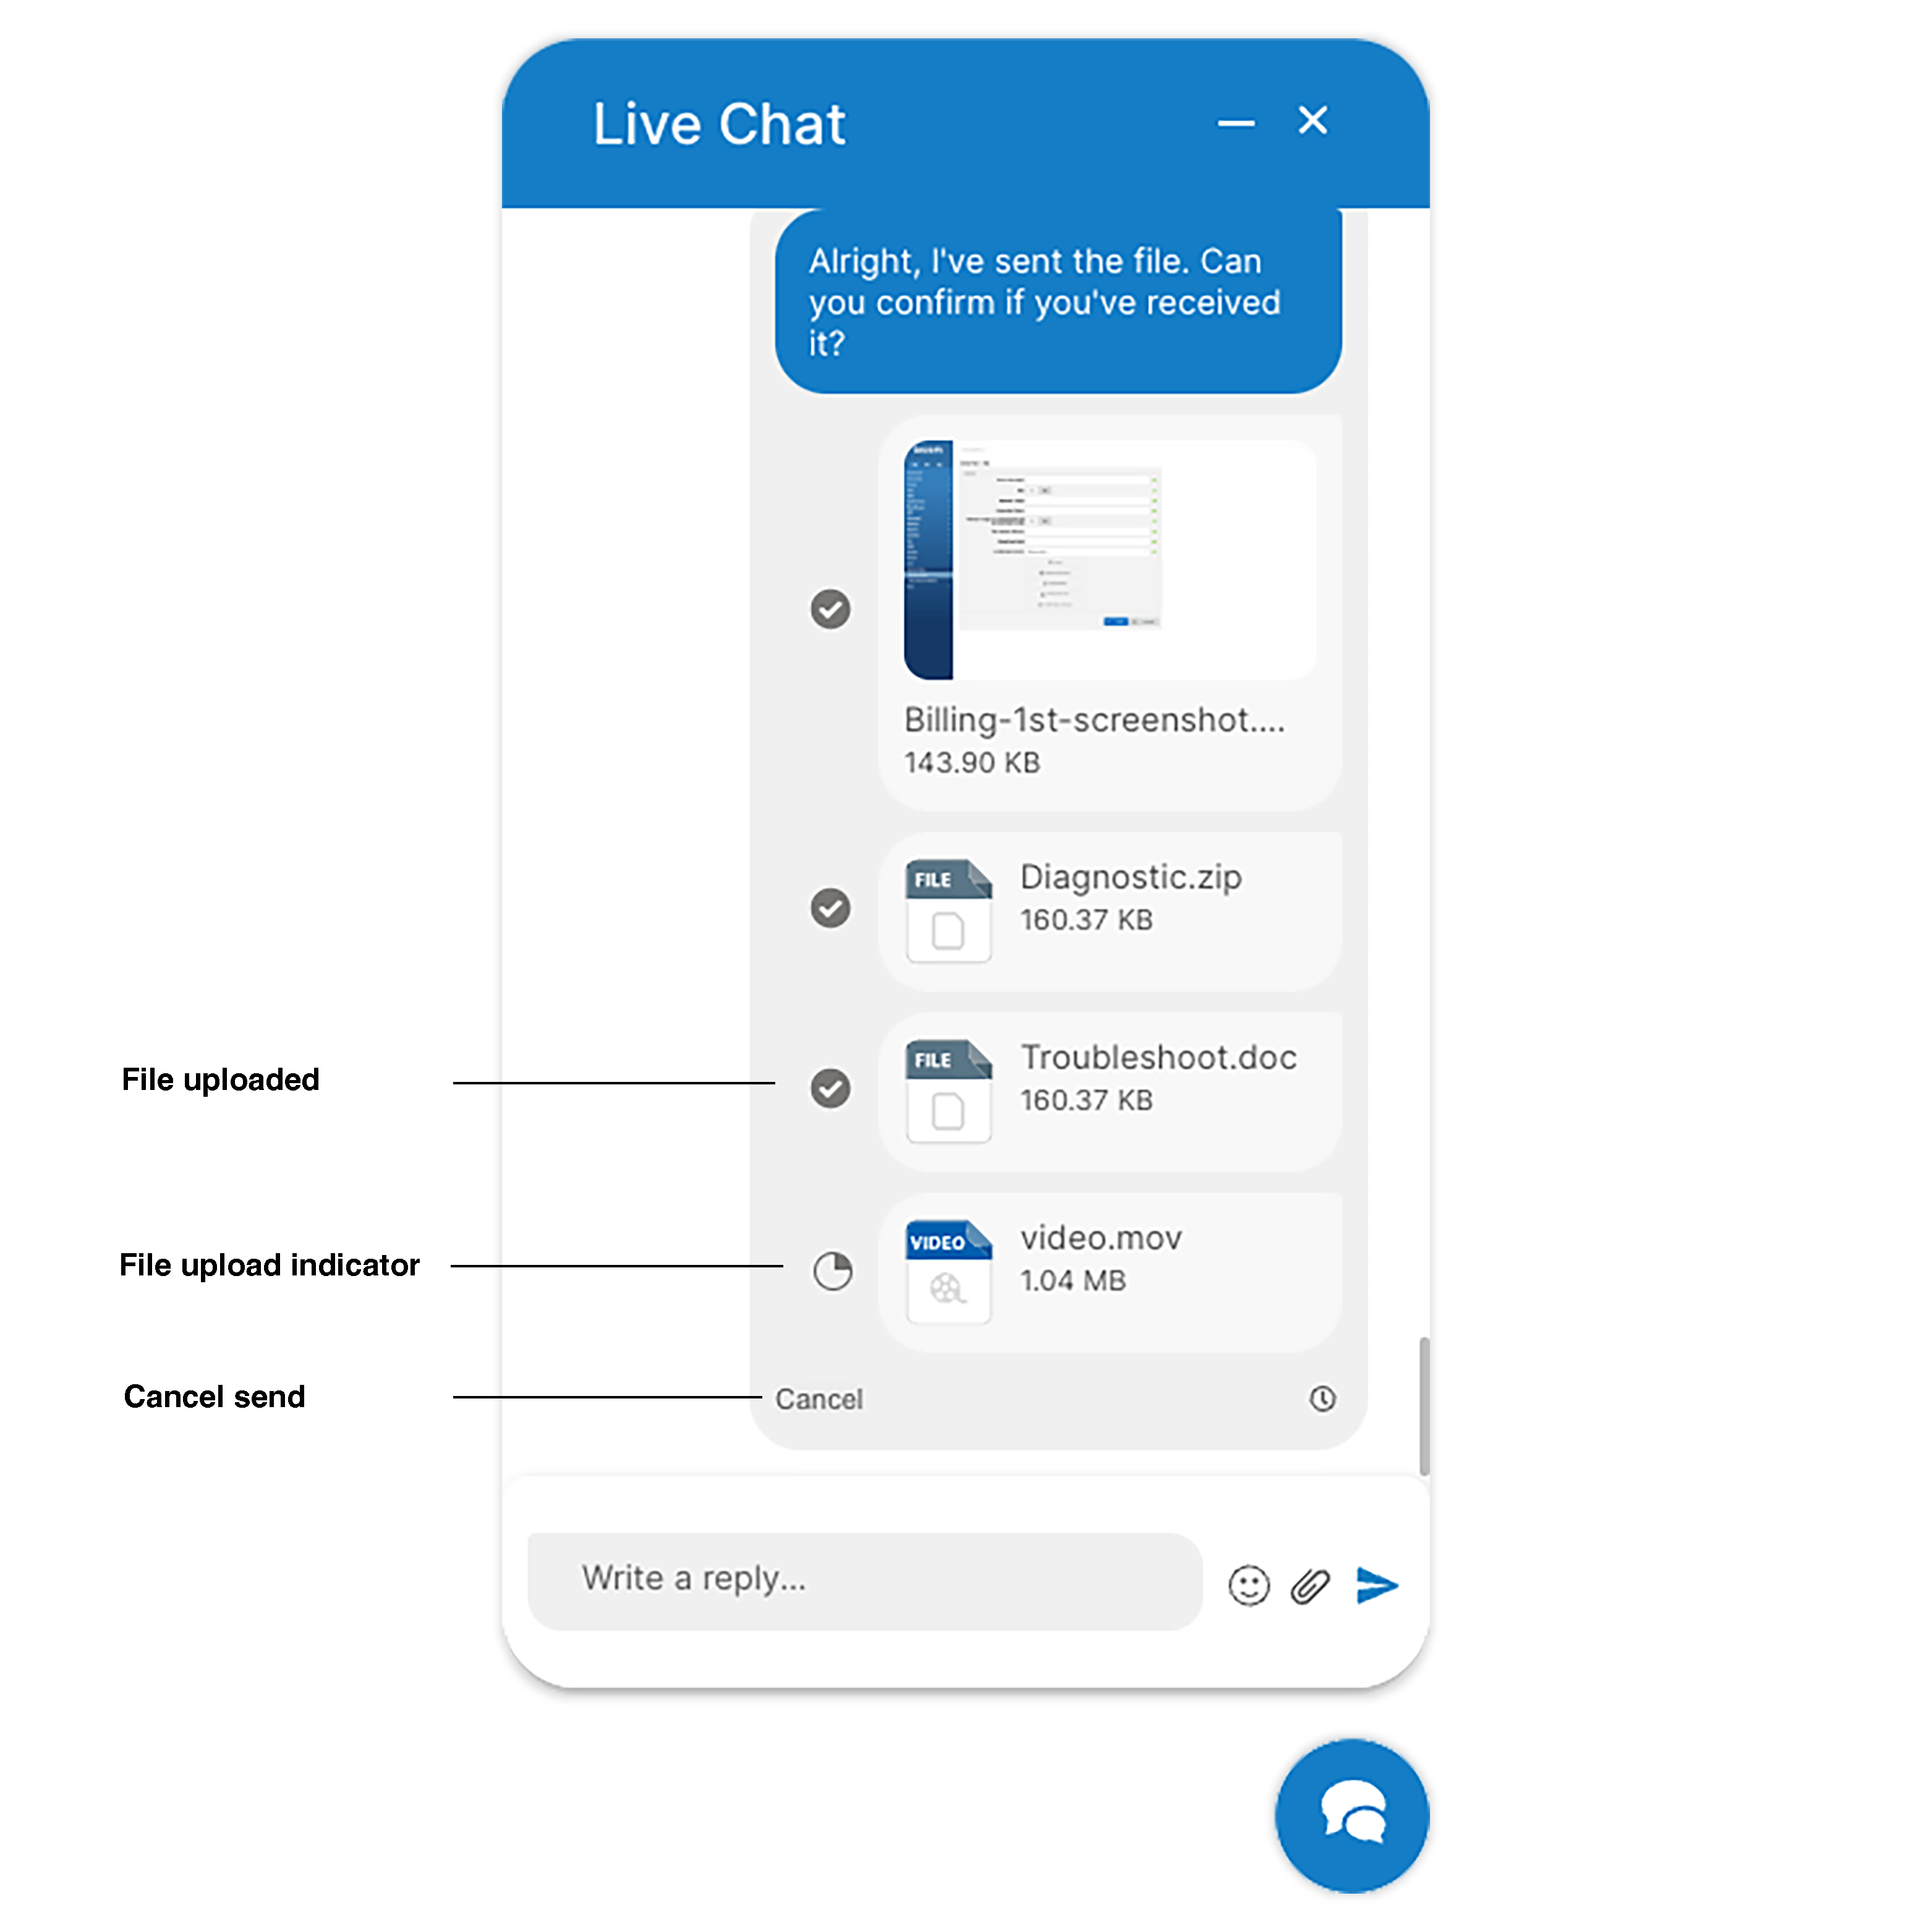
- Monitoring File Upload: As files are being uploaded, a progress indicator will show the upload status. If necessary, users can cancel the upload before it completes.
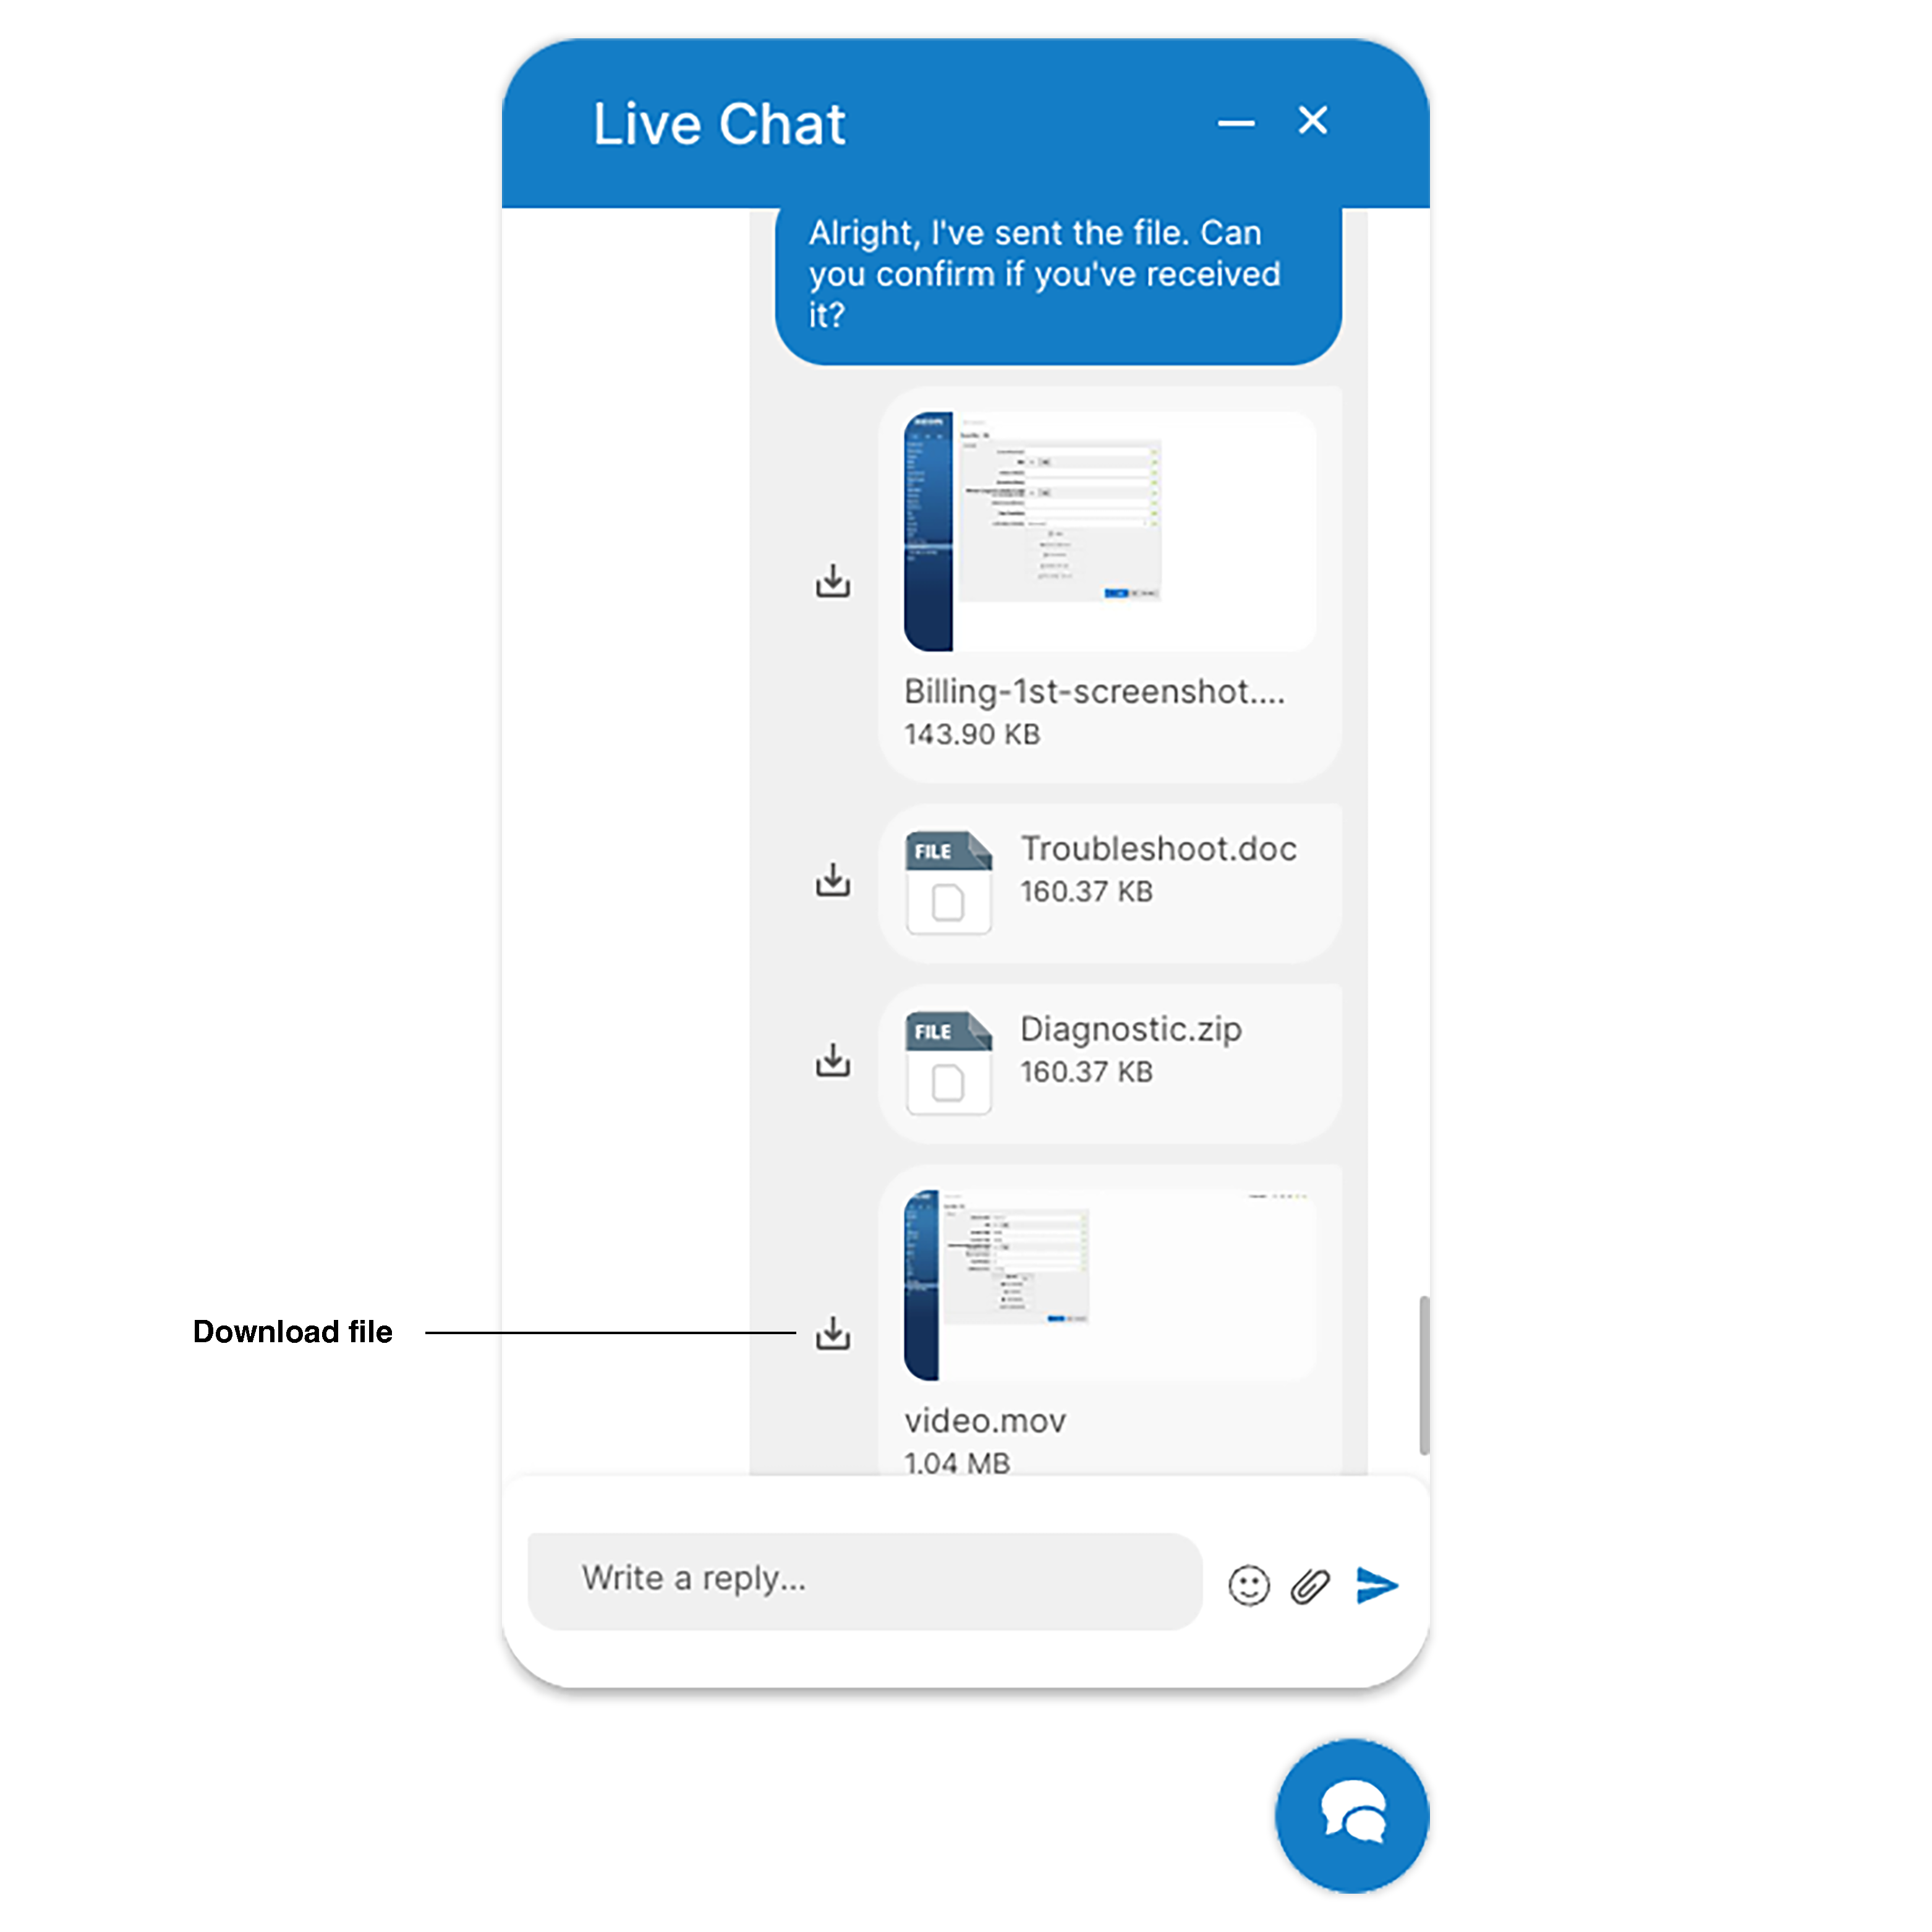
- Downloading Files: After files are sent, both the user and the Agent can download them directly from the chat window, indicated by a 'Download' icon next to the file.
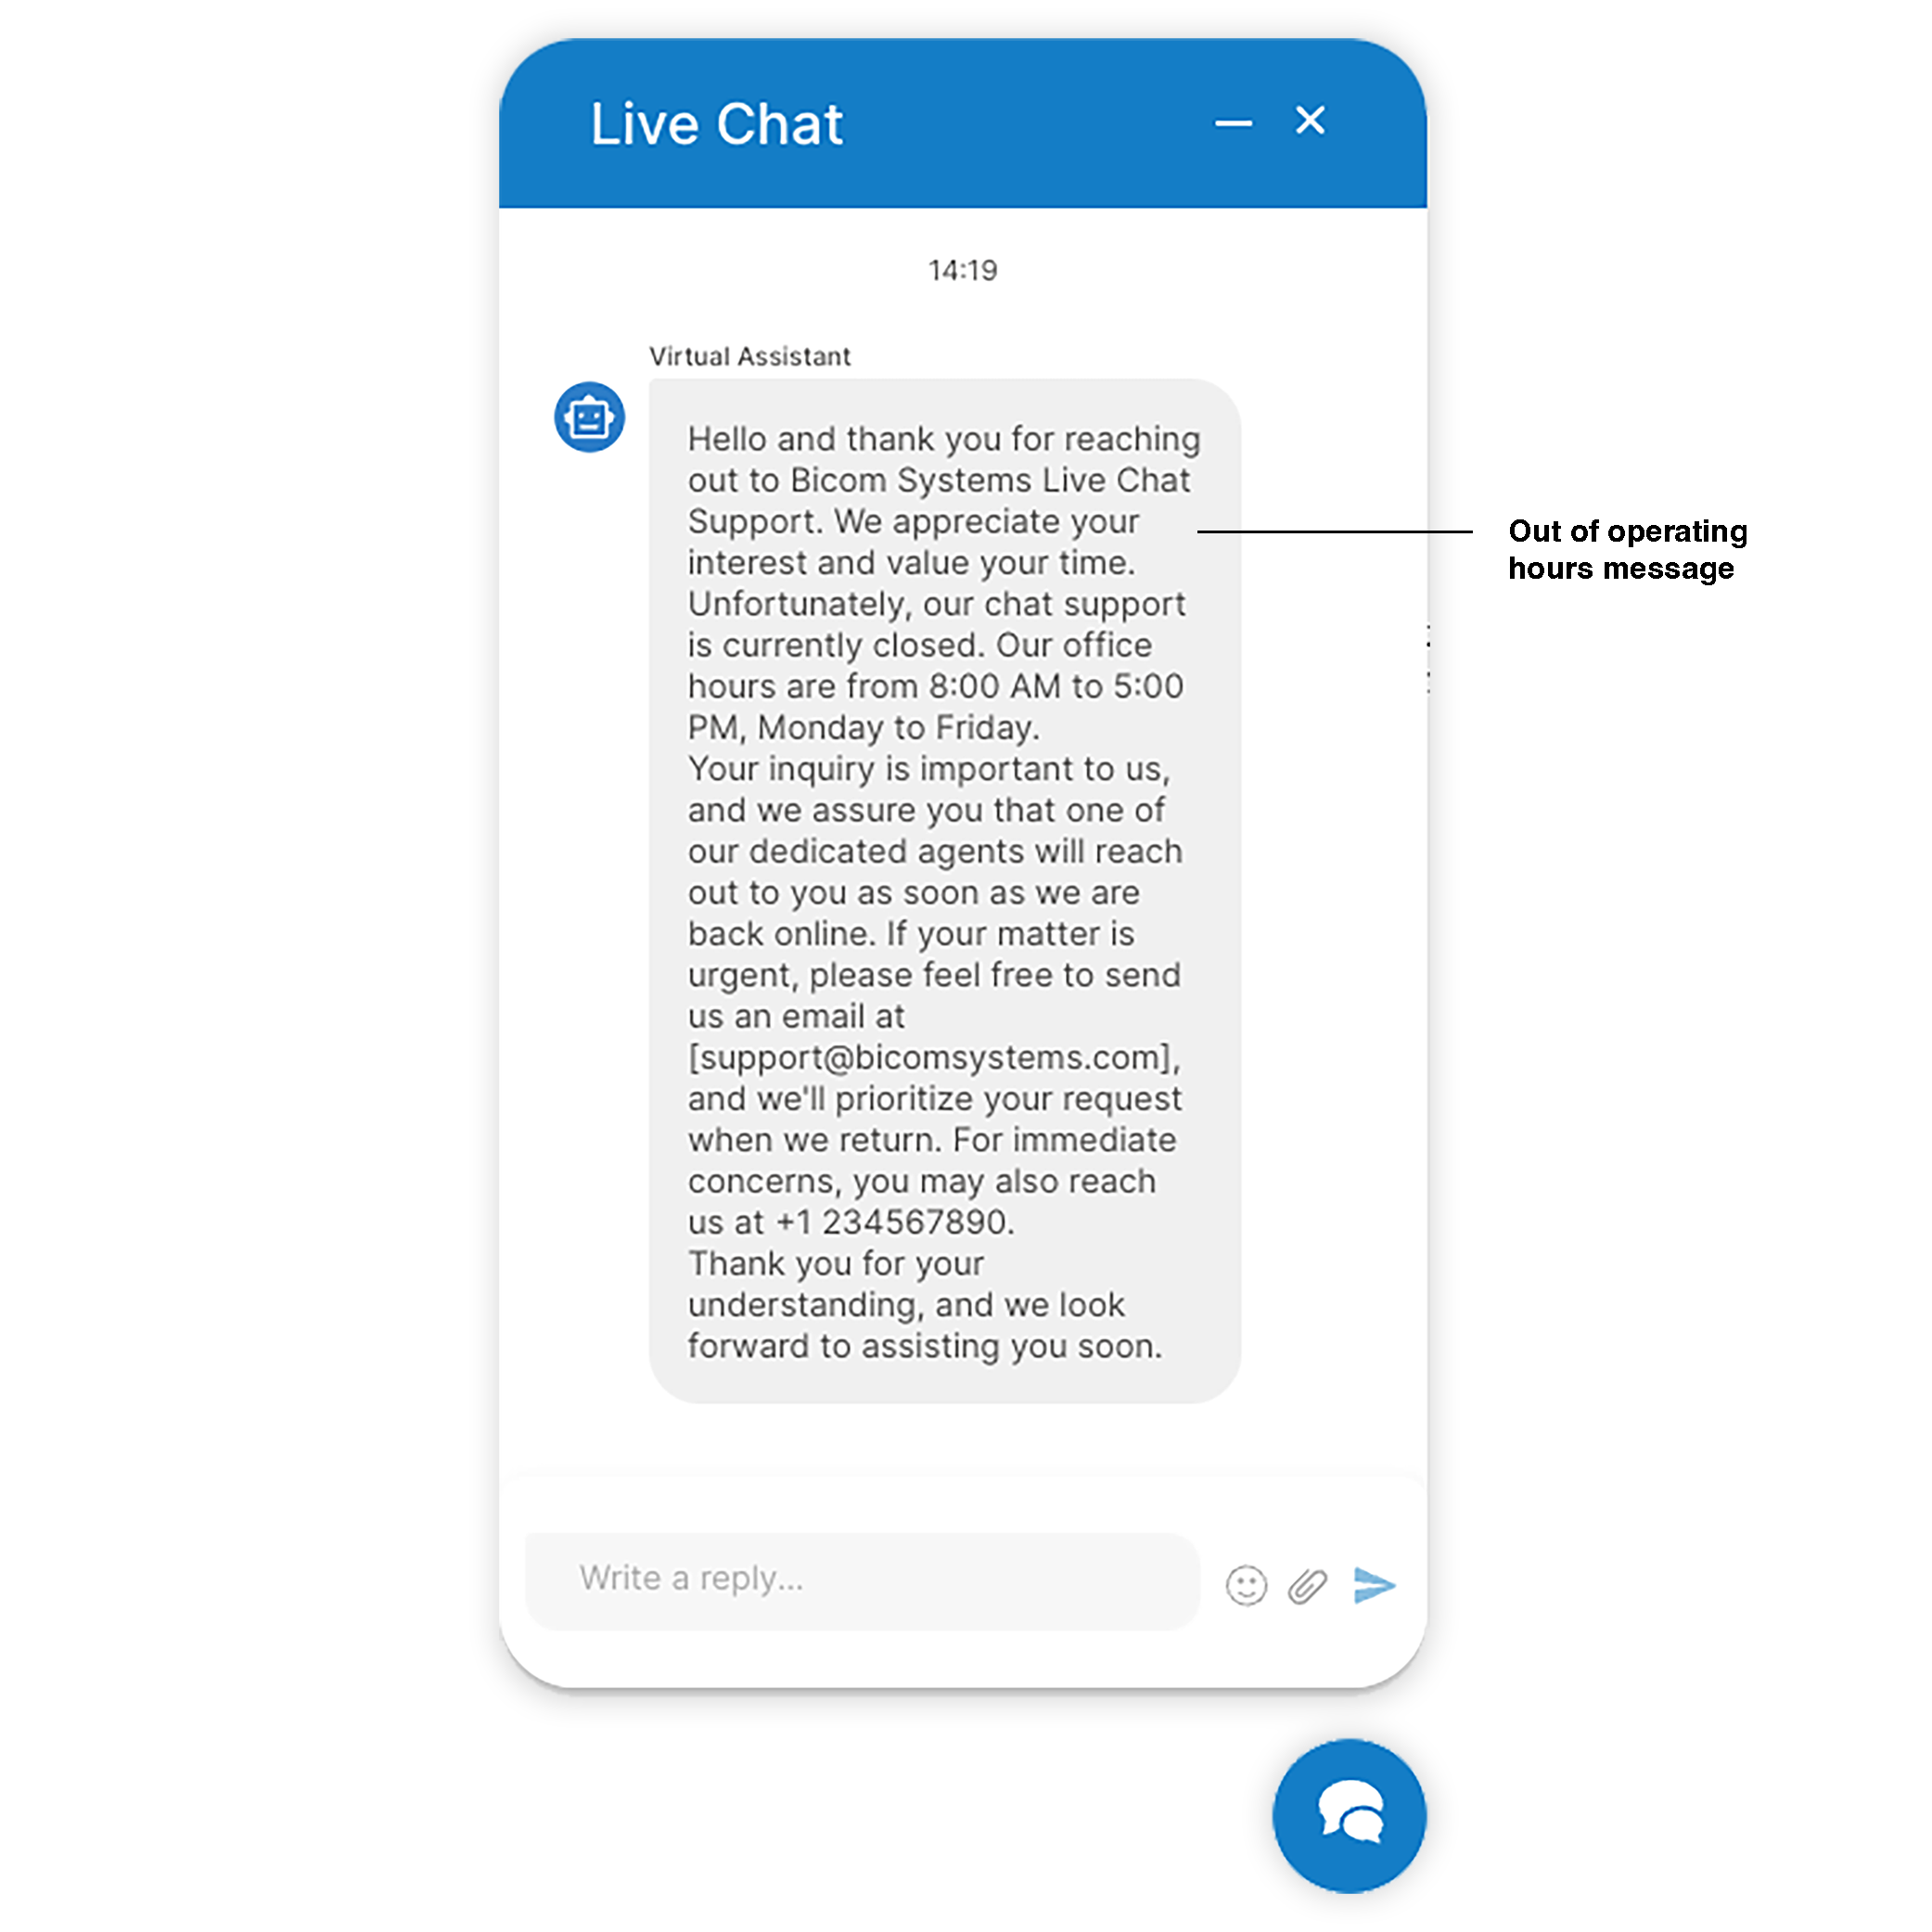
¶ Entering the Live Chat from Visitor App Outside Operating Hours
- Initial Attempt: When a user attempts to initiate a Live Chat session outside the designated operating hours, they will be automatically presented with a notification.
- Receiving the Message: The system will display a message informing the user that they have accessed the chat outside of operating hours. This message is designed to set the correct expectations immediately.
-
Providing Alternatives: Alongside the notification, the user will be offered alternative ways to get in touch, such as using other contact methods suggested by the system.
-
Encouraging Reconnection: The message may also inform users of the next available time to chat live, encouraging them to return during operational hours for direct assistance.
-
Customization Options: Administrators have the ability to customize this out-of-hours message, tailoring the communication to match the company's voice and providing specific instructions based on their business model.
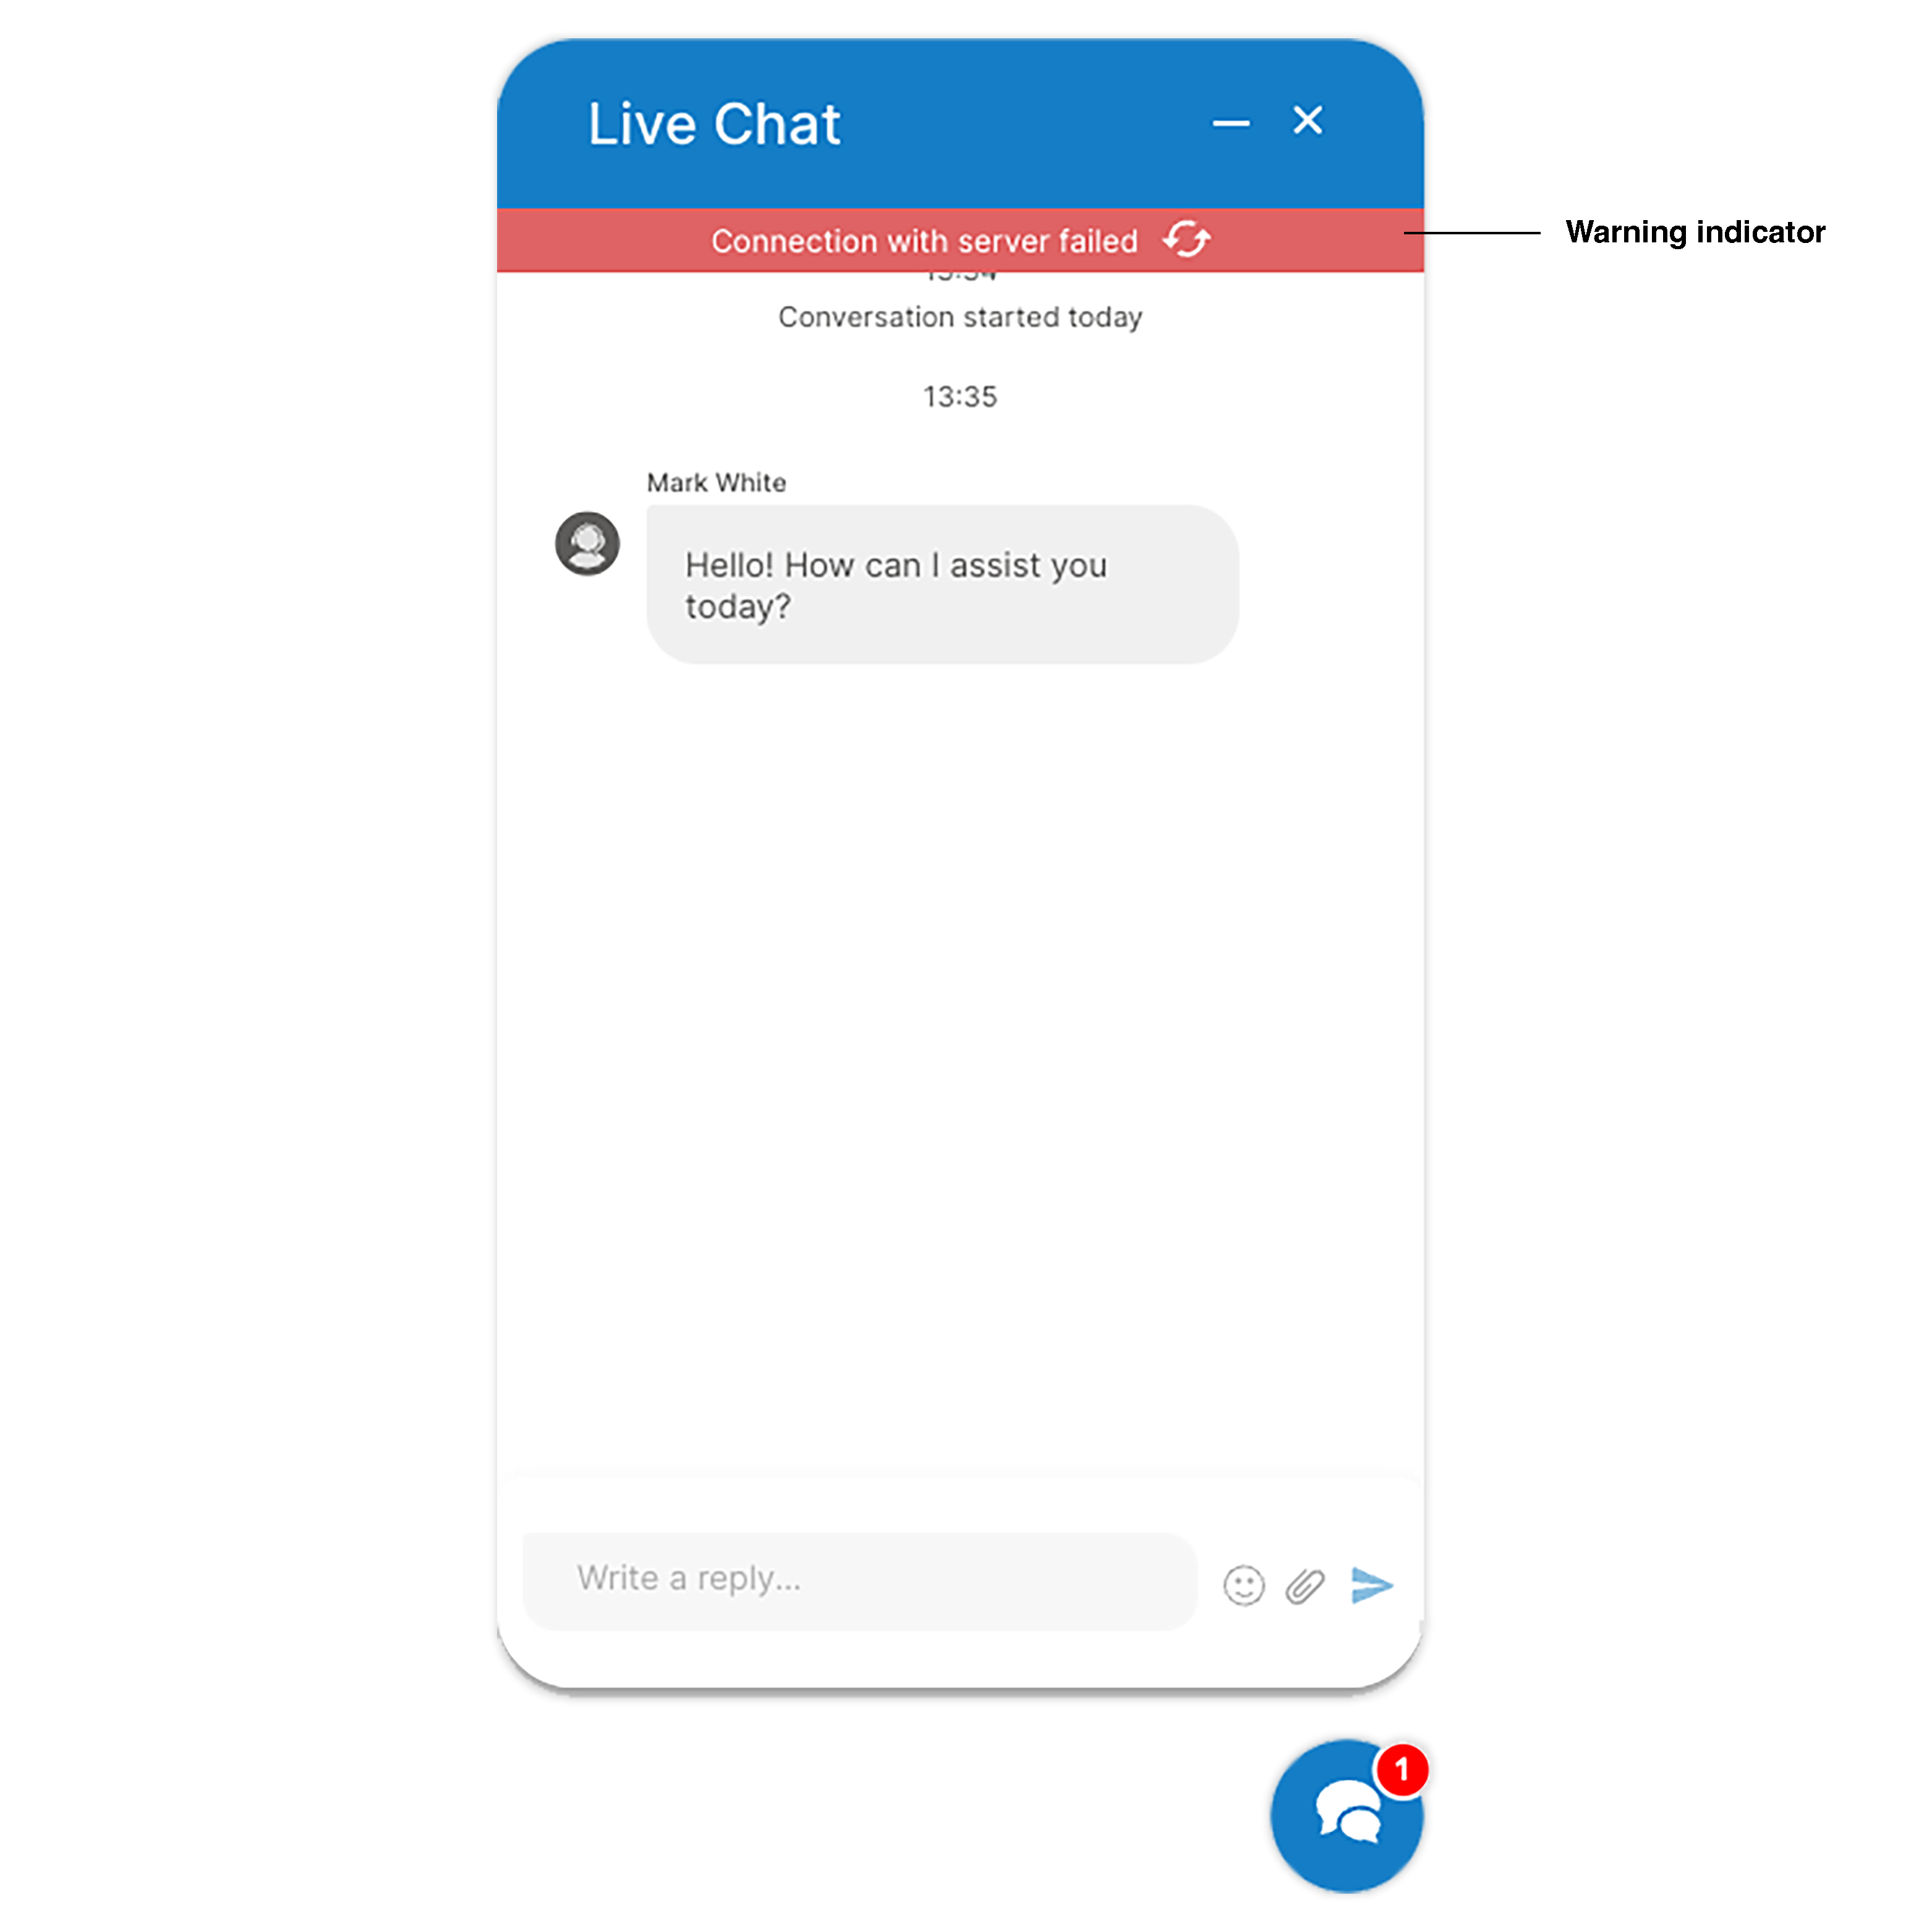
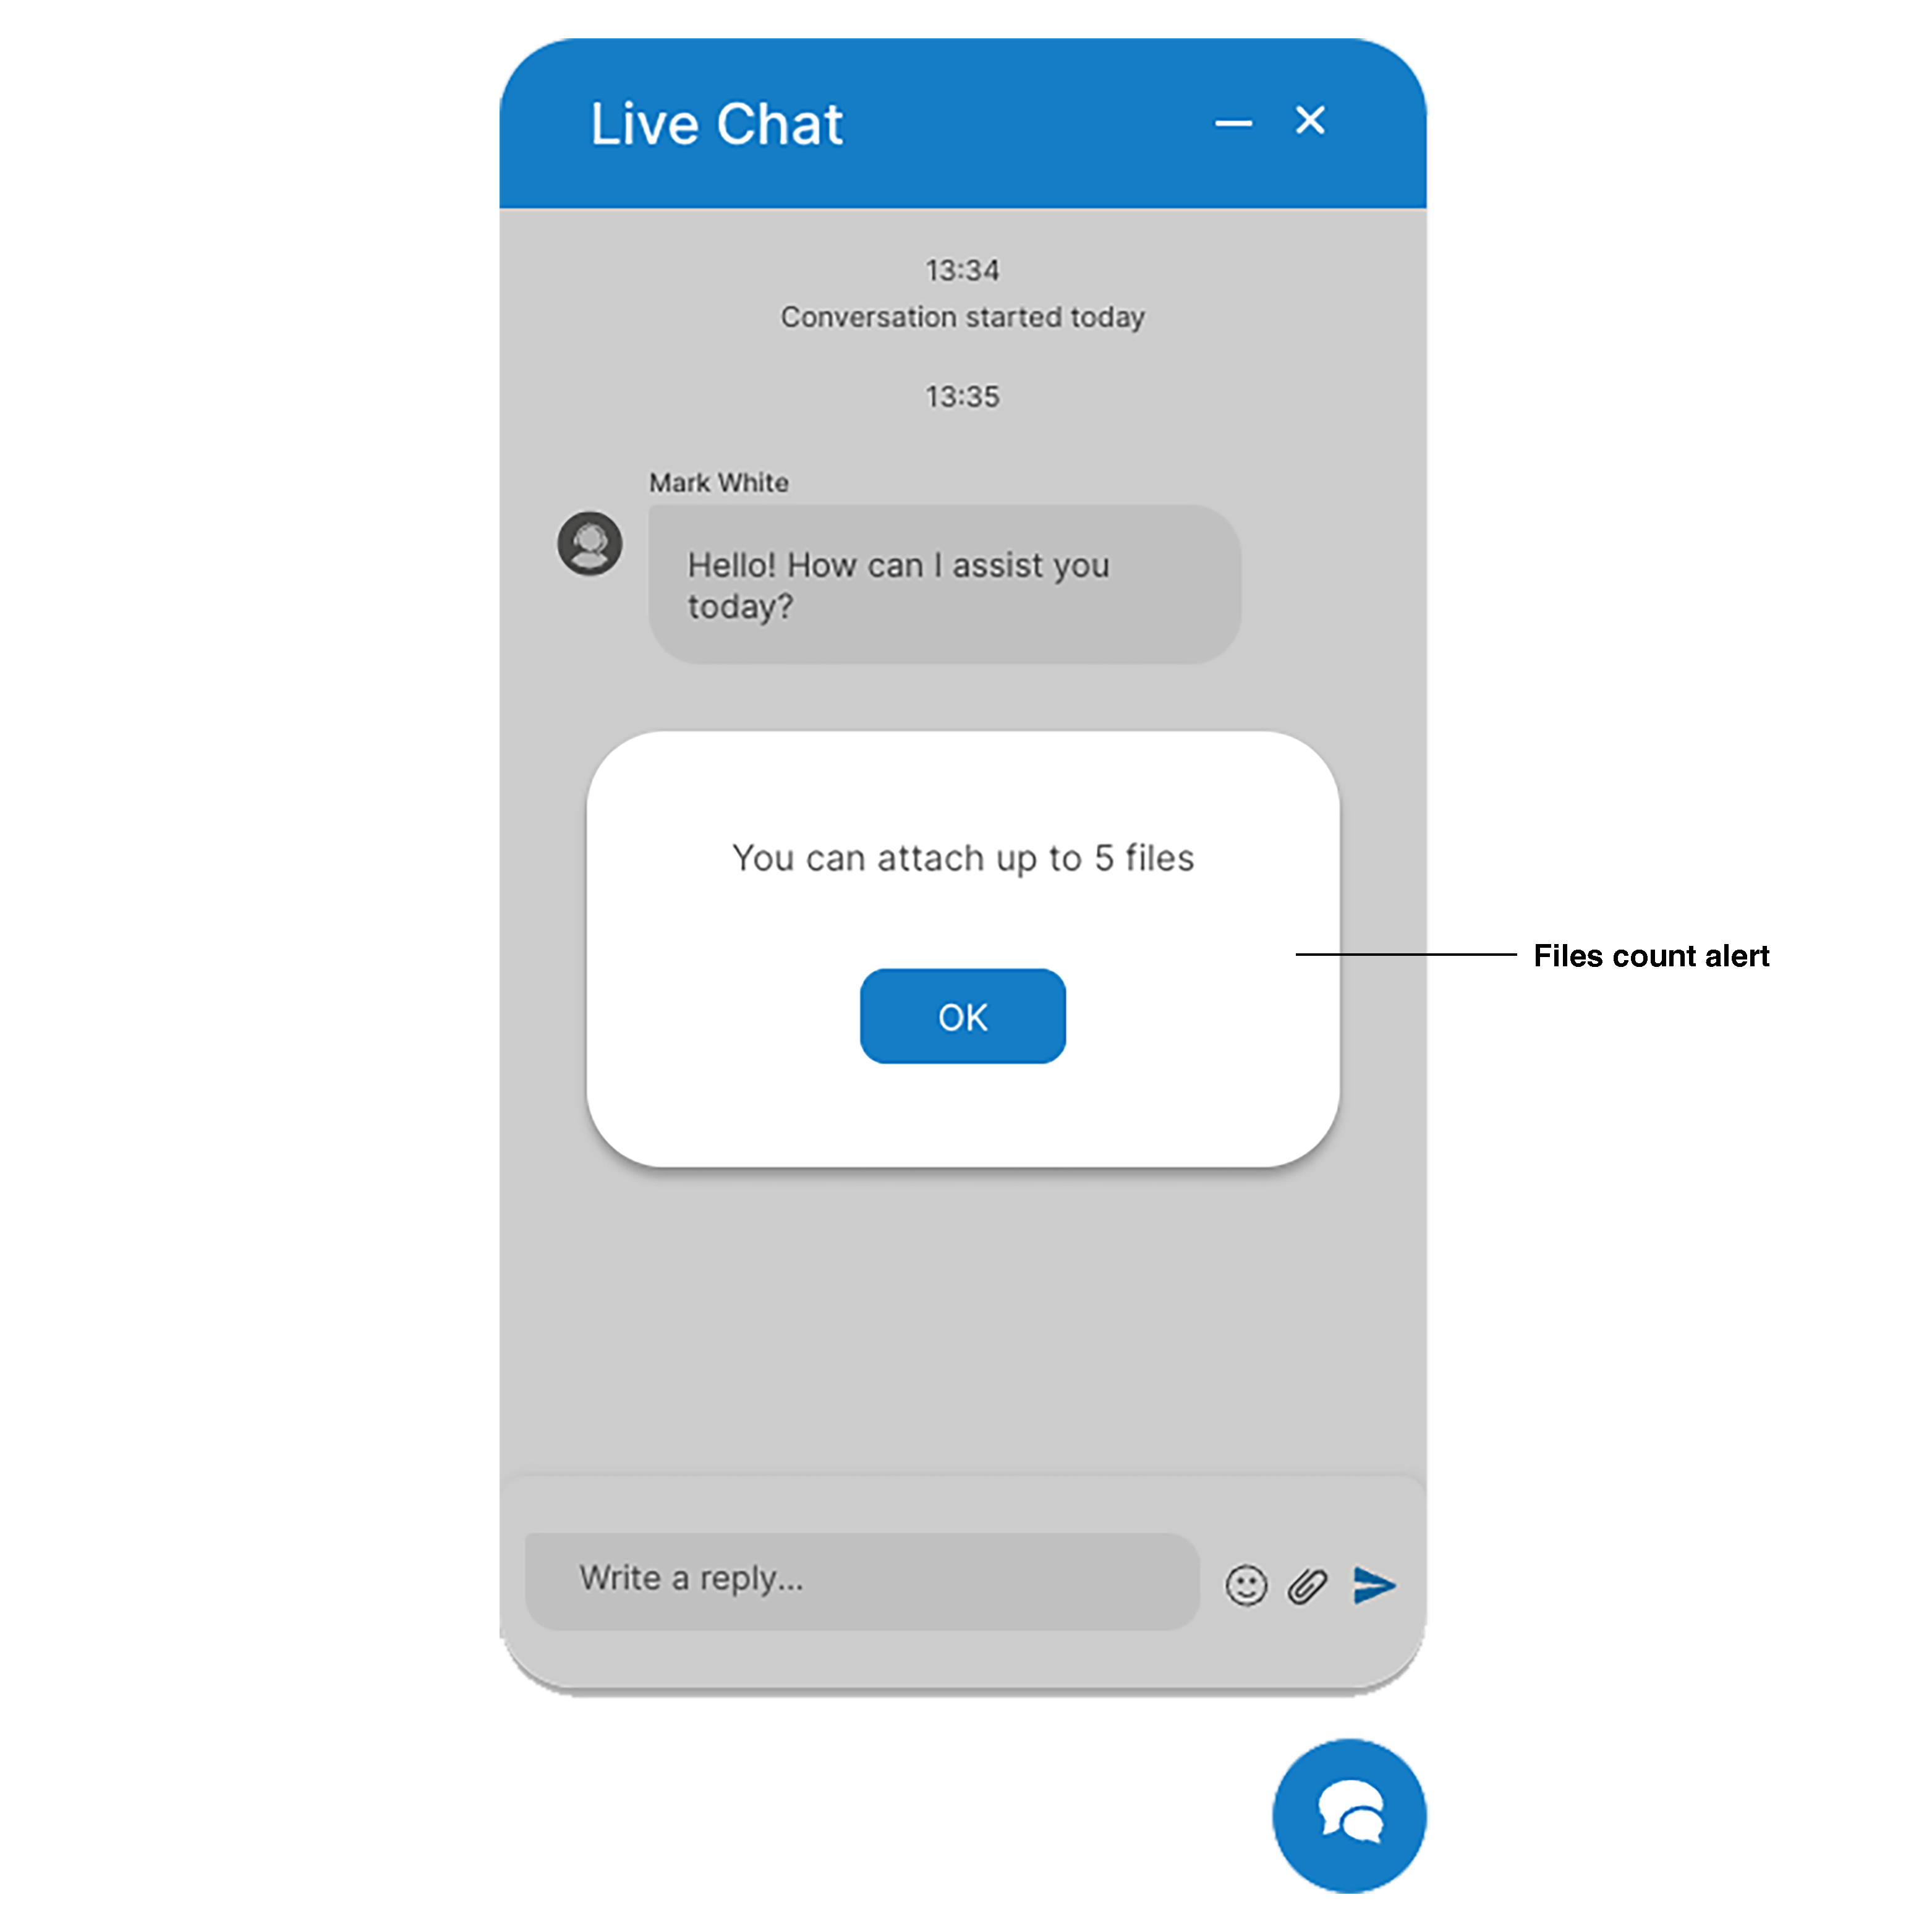
¶ Error Messages and Alerts in Live Chat
- Chat Error Notifications: A red stripe will appear at the top of the chat window to alert users about any errors that occur during the chat session, providing immediate feedback and guidance on how to proceed.
- File Size Limitations: If a user attempts to send a file larger than the 5MB limit, an alert will notify them of the size restriction, prompting them to choose a smaller file to ensure successful transmission.

- Batch File Send Limit: When trying to send more than five files at once, the user will receive an alert indicating that only five files can be sent in a single batch, asking them to reduce the number of files before proceeding.
- Message Send Failure: If a message or file fails to send, the user will be informed that the sending process was unsuccessful, allowing them to attempt to resend the message or file.

¶ Ending and Restarting a Live Chat Conversation
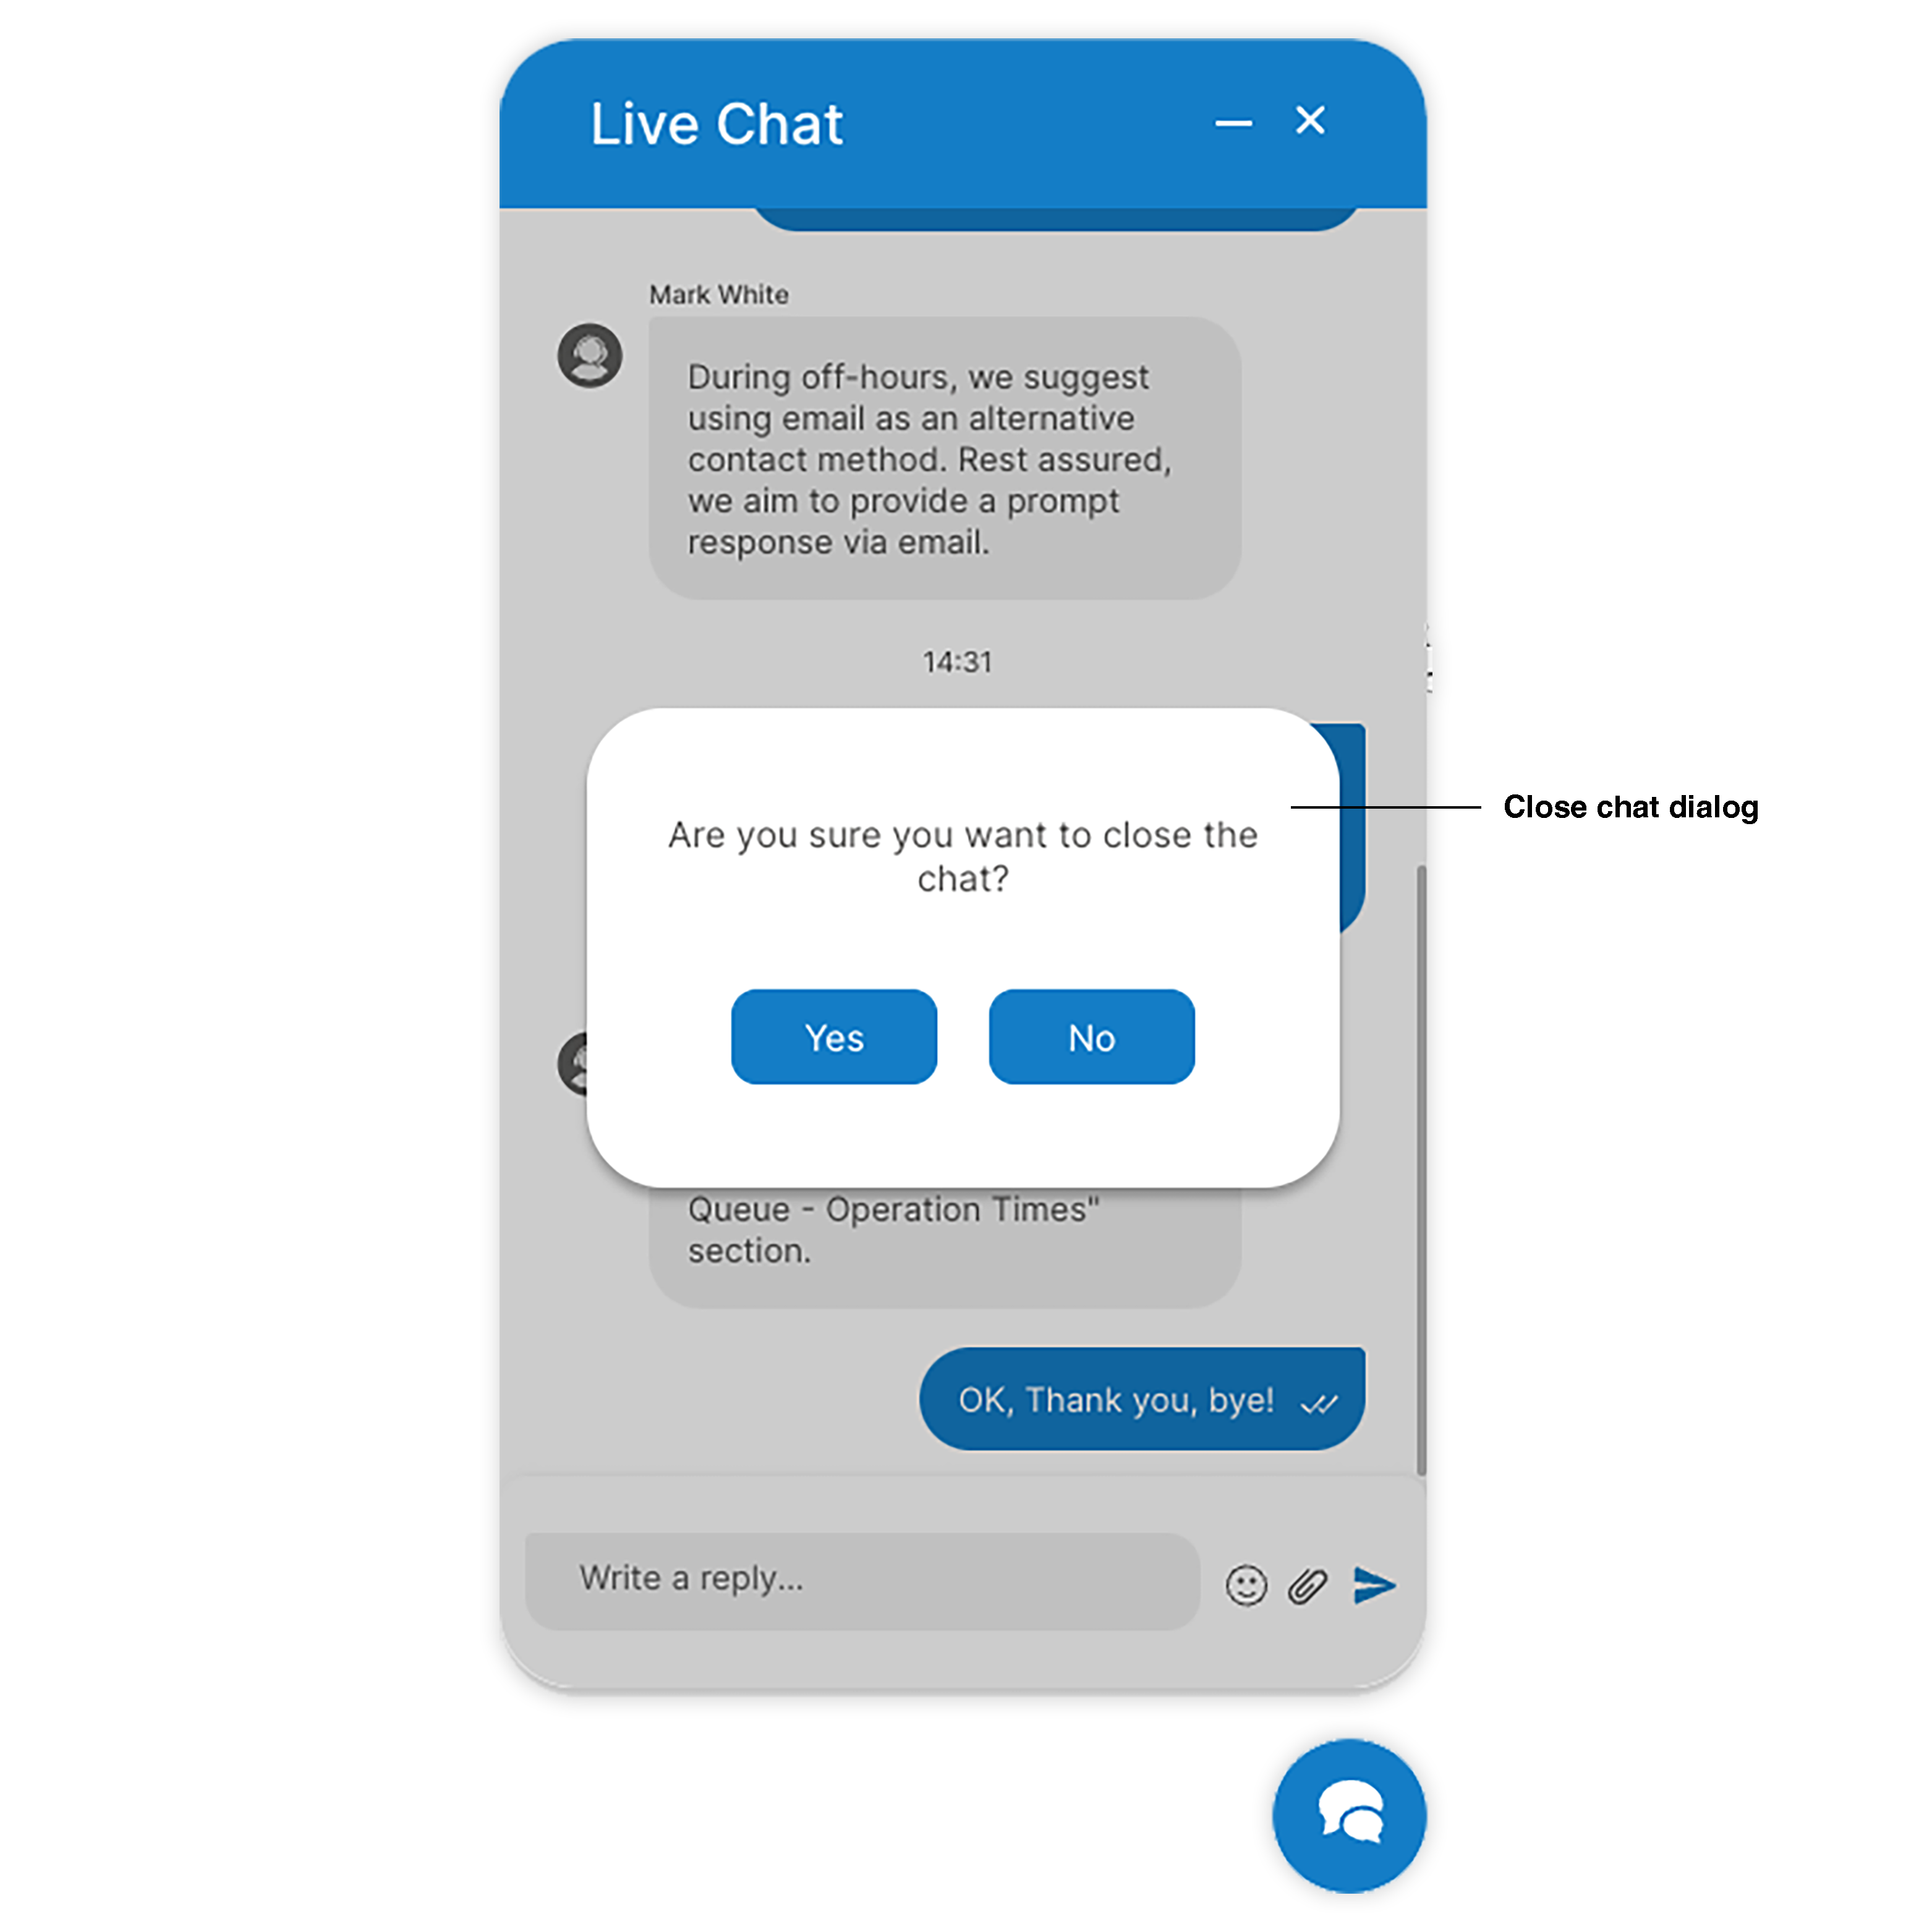
¶ Steps to End a Chat:
- Click the "X" button in the chat window to initiate the closing process.
- Read the confirmation prompt to ensure you wish to end the conversation.
- Select "Yes" to confirm and close the chat.
¶ Population the Customer Survey
When a customer closes the conversation, the customer survey will be displayed as a virtual assistant message, visually separating it from the regular conversations. A brief message will inform the customer about the survey and provide instructions on how to complete it. The survey will appear within the visitor chat, allowing customers to rate the agent's performance and leave additional comments. This survey is optional and must be enabled within the system for customers to access it.
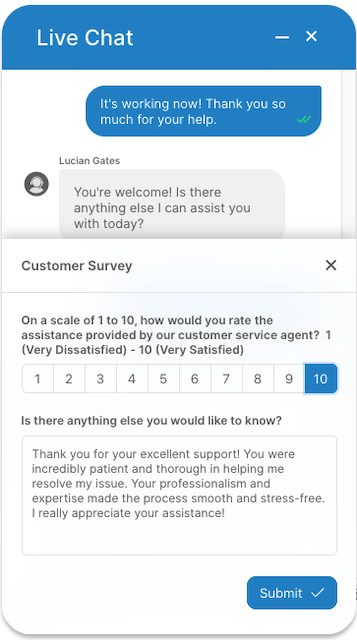
Clicking the "Submit" button will complete the customer survey and close the conversation. If users don't want to leave a comment or rate the agent's performance, they can click the "X" button to close the conversation.
¶ Steps to Re-engage in a Chat:
- After closing the chat, locate and click the "Start Chat" button in the chat interface.
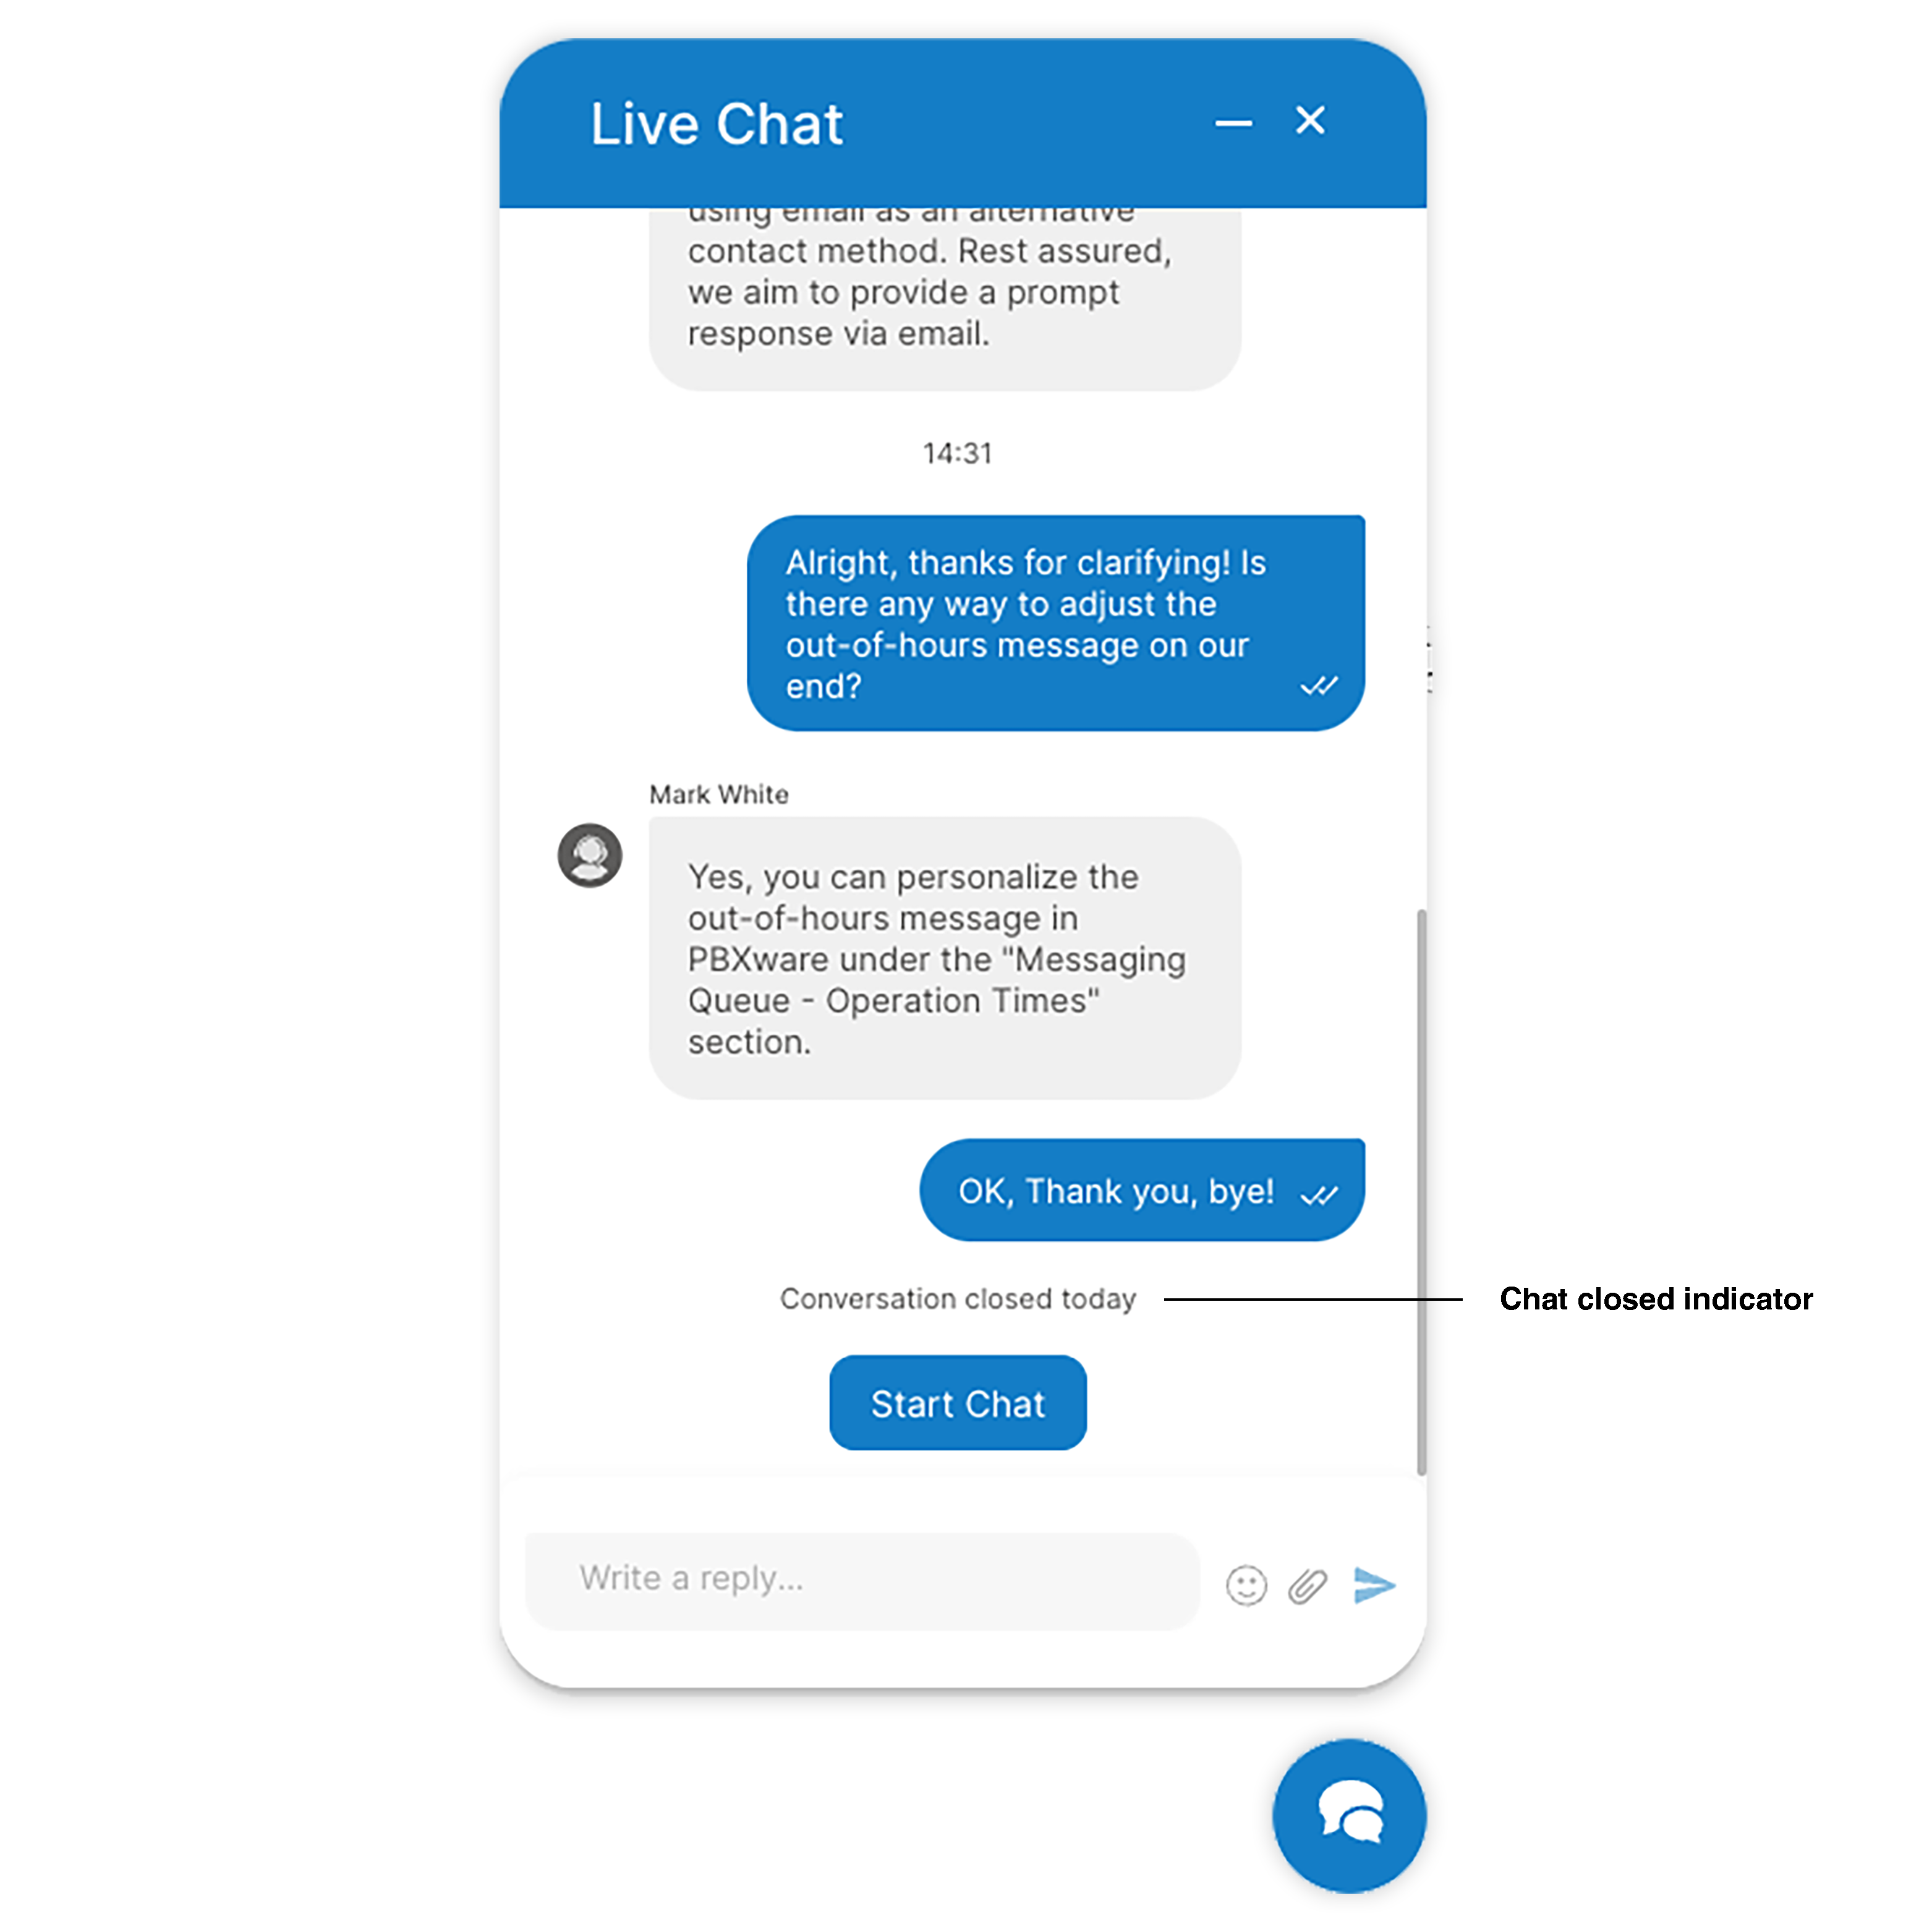
- The chat window will reopen, ready for a new conversation.
- Begin interacting with the chatbot or wait for a connection with an available agent.
¶ Navigating to Chatbot from Visitor App
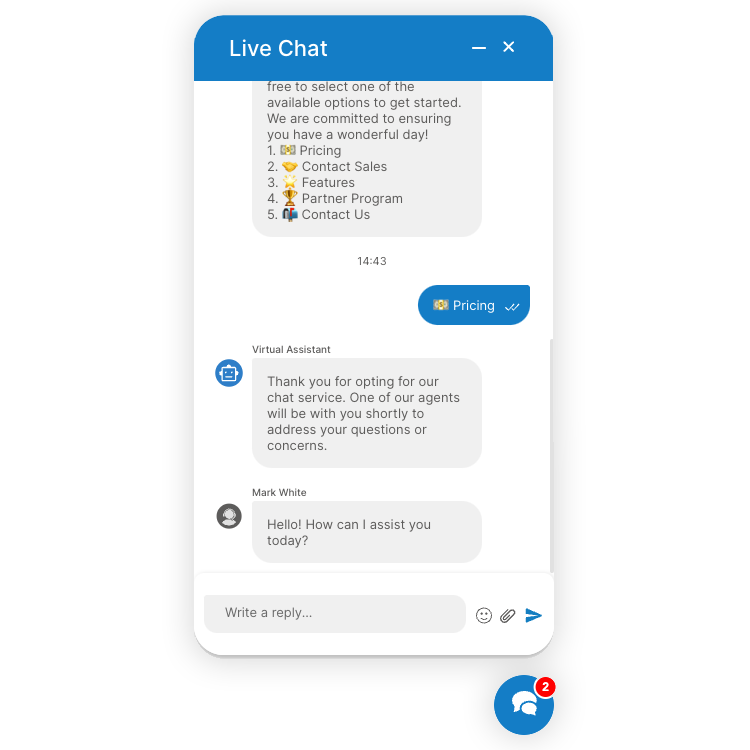
¶ Steps for Interacting with a Chatbot:
- Enter the Visitor App and input your name and email in the provided fields, after entering your details click on Start Chat.
- Browse through the Chatbot options presented to you.
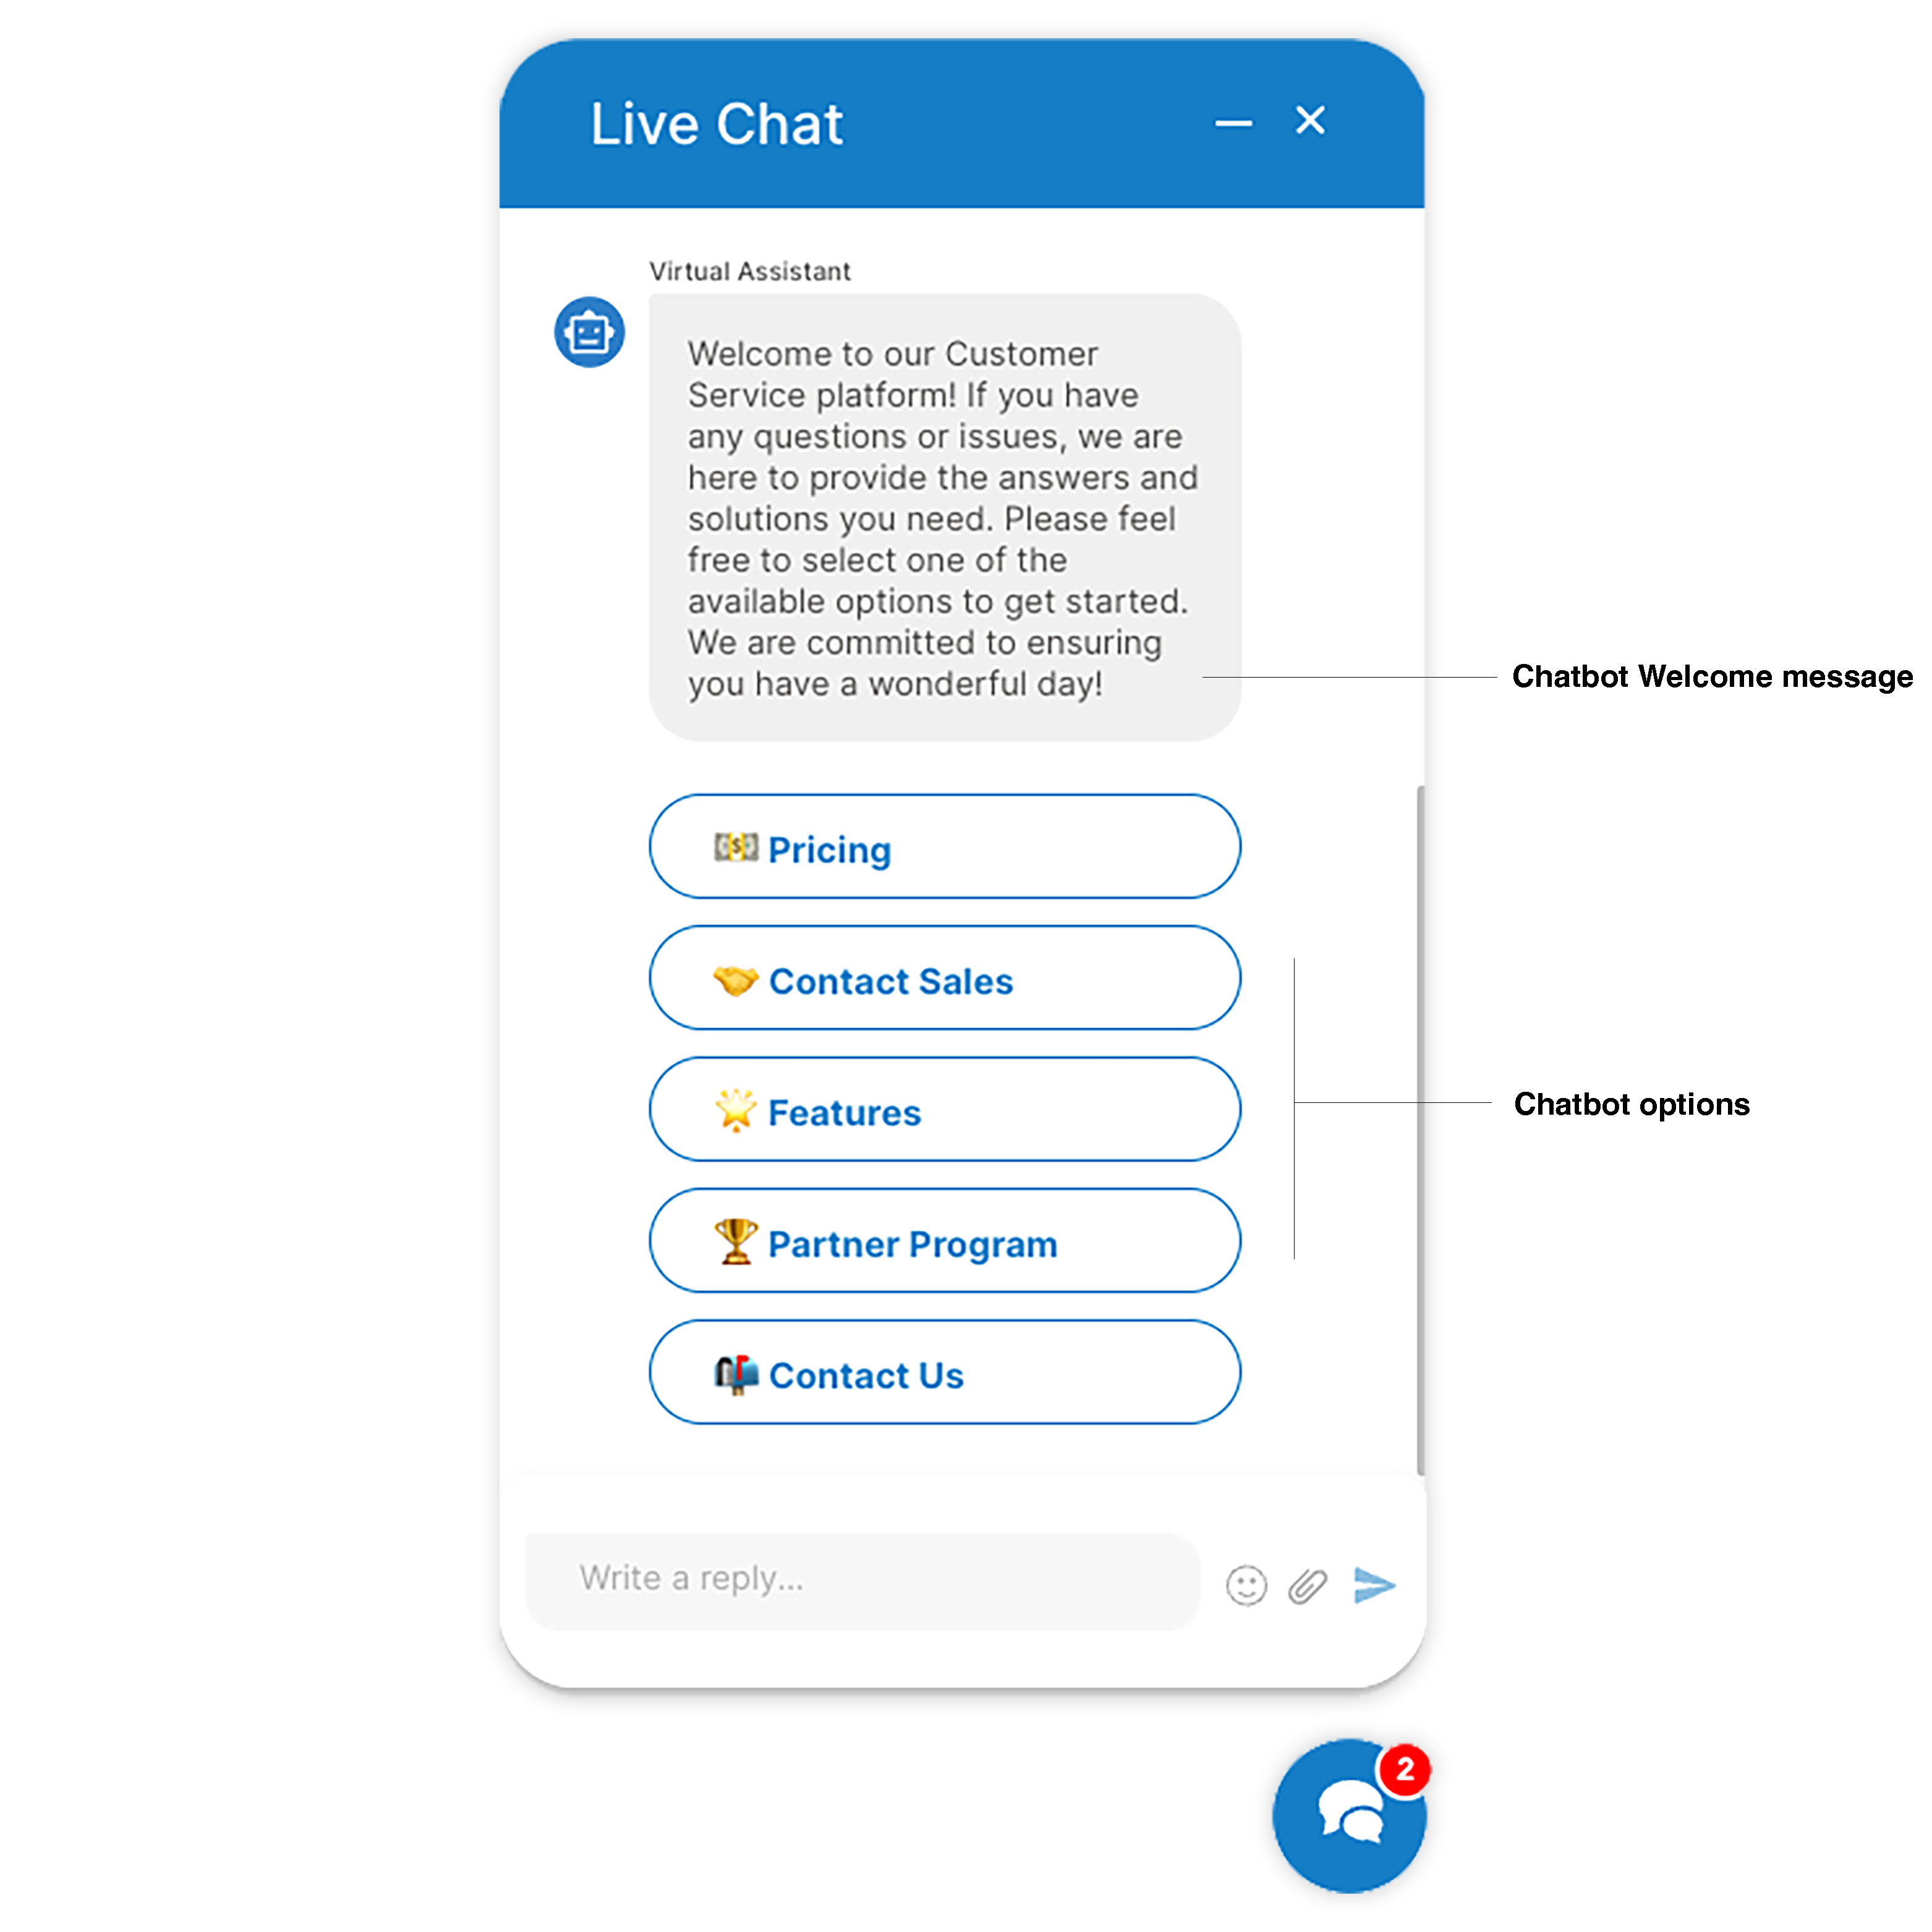
- Select the option that best matches your inquiry.
¶ Transition to Agent:
- After making a selection, receive a welcome message specific to your chosen option.
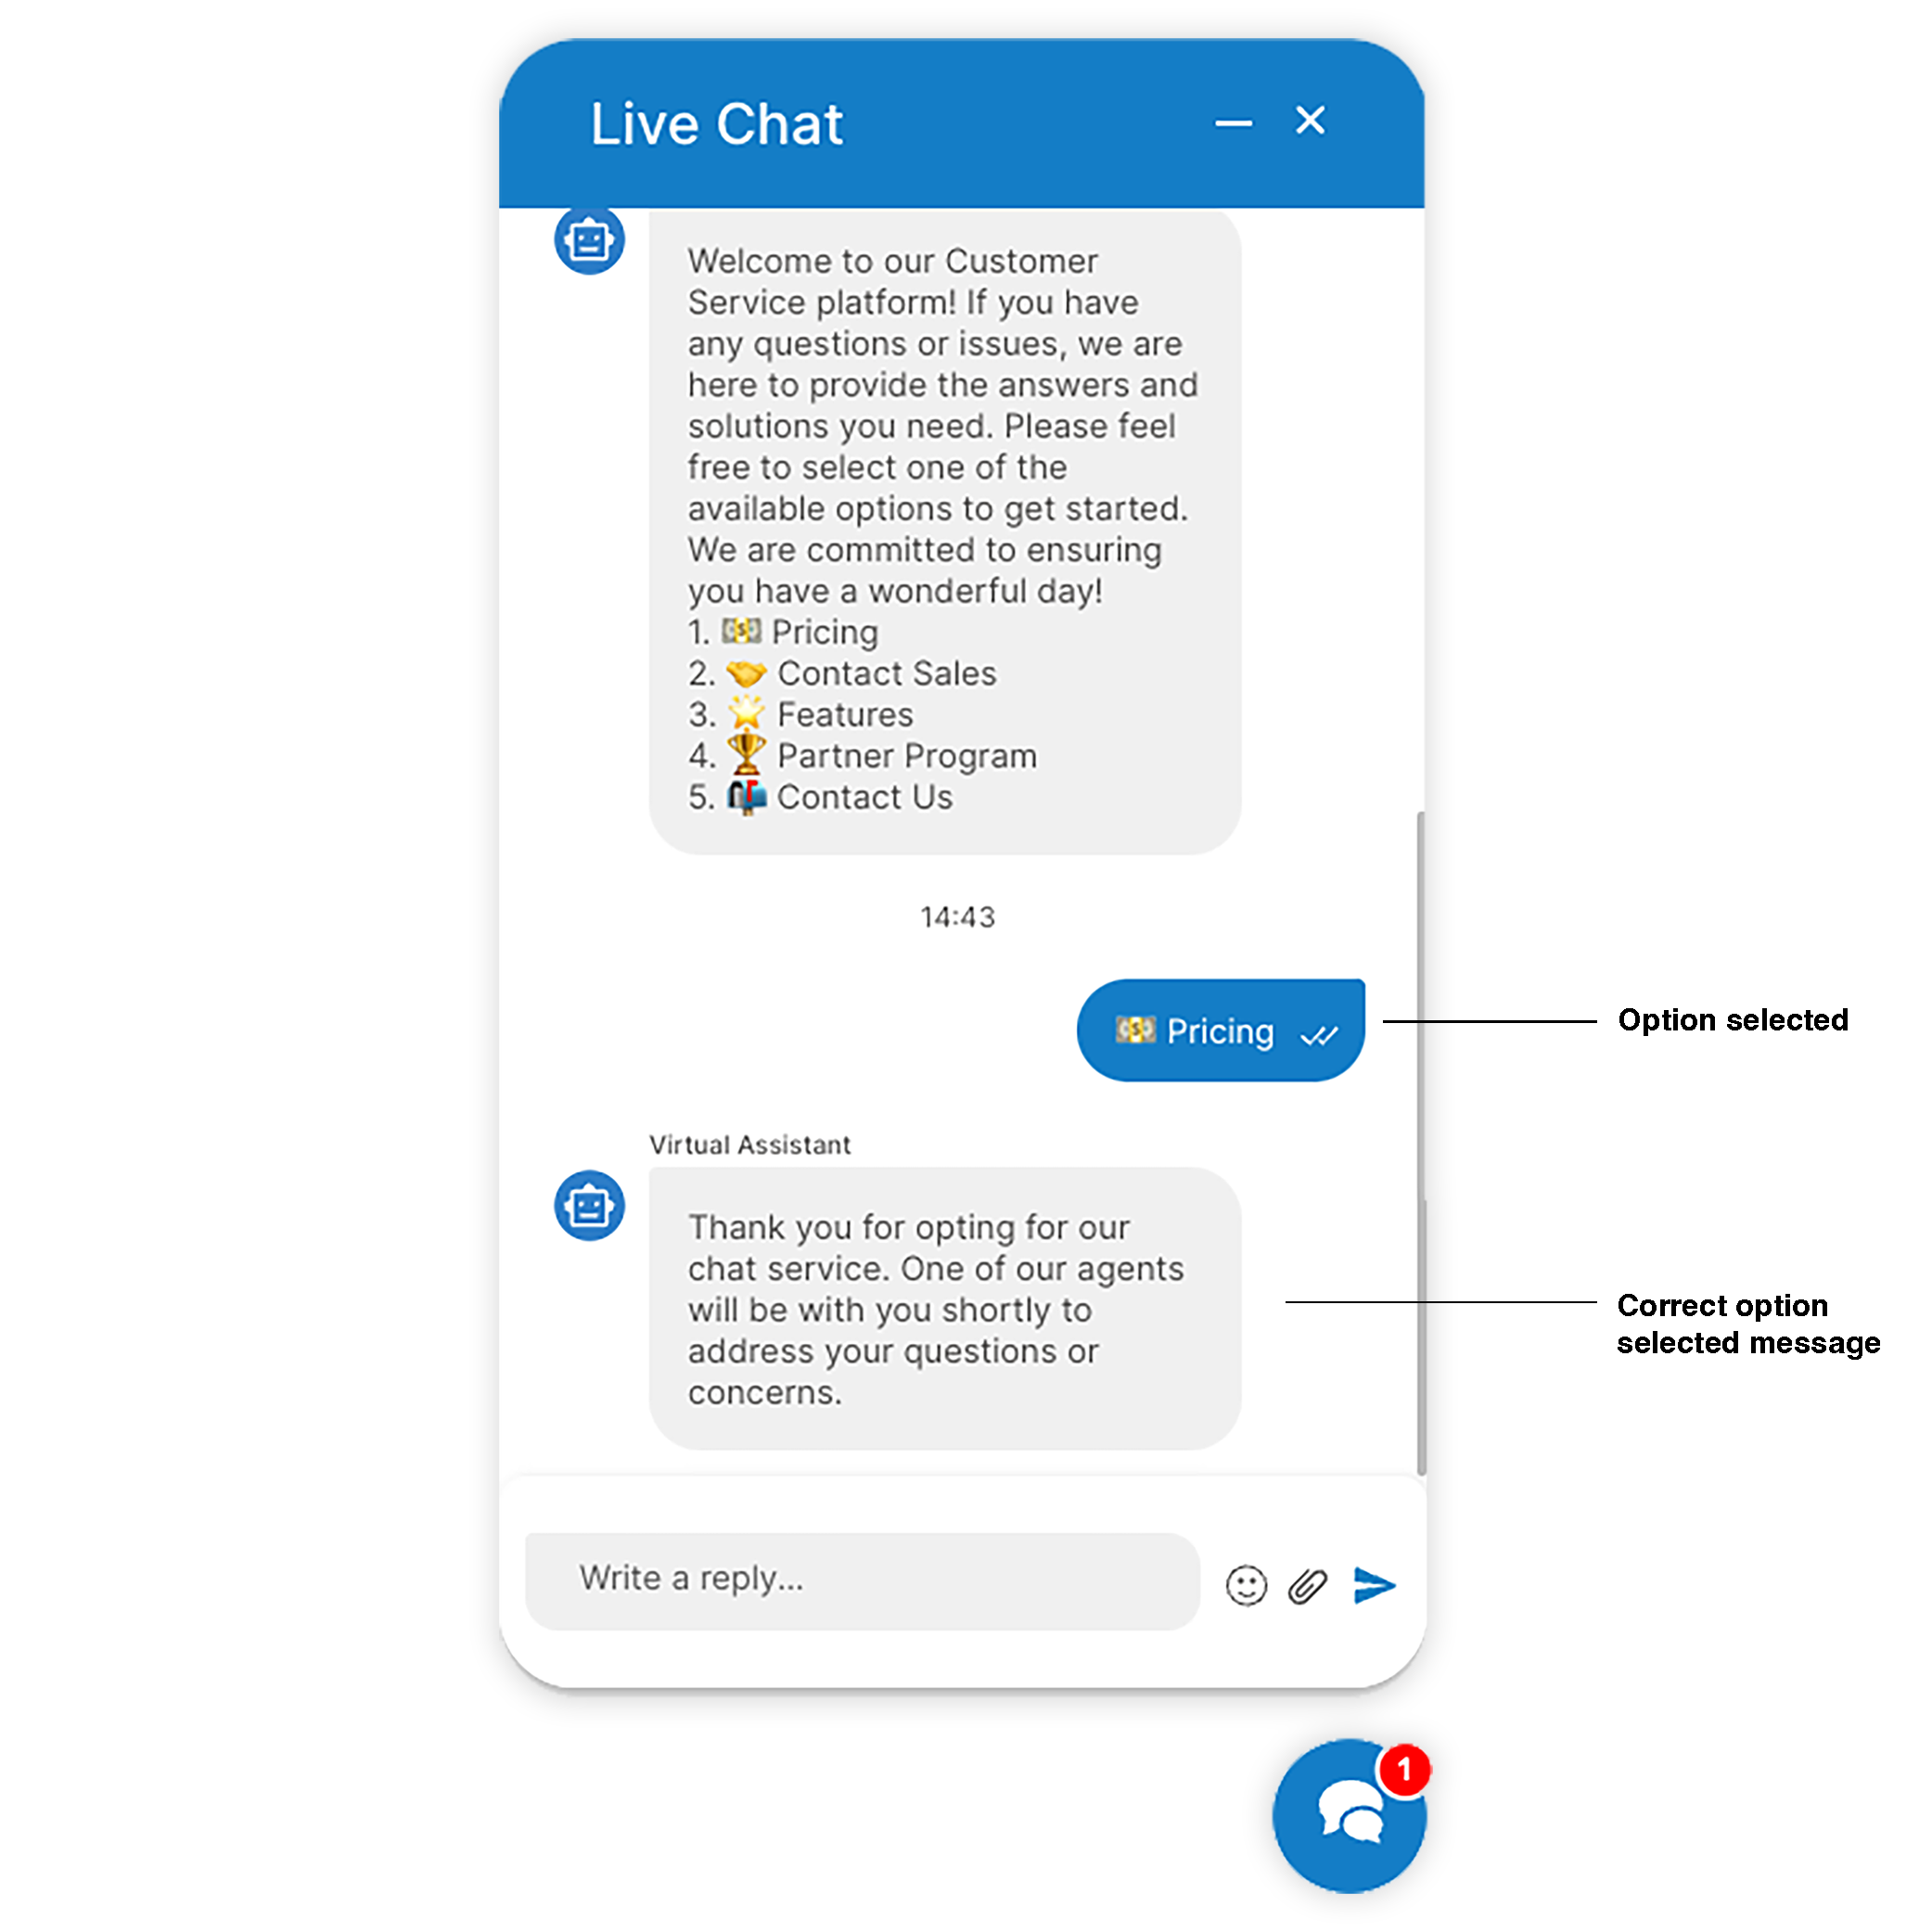
- Wait briefly as you are routed to the appropriate Queue.
- Start your conversation with the live agent who will assist you further.