¶ Contacts
The Contacts feature allows PBXware systems to synchronize and manage external contact sources such as Microsoft 365 and a Custom Contacts application. It is designed to help users easily manage their contacts—add new ones, update existing entries, and delete contacts—by integrating external directories directly into PBXware. Users can configure and manage contact sources through the PBXware GUI under the Contacts → Settings page, with options for manual and automatic synchronization. This ensures a streamlined contact management experience without needing to switch between systems. The feature is designed as a one-way sync, meaning external sources populate PBXware, but changes made locally are not pushed back to the external source.
NOTE: All synced contacts will be displayed in the gloCOM Central Phone Book and in the Contacts section of the Agent application. These contacts can be edited or deleted from the Agent interface, but such changes will not affect the original external source and will not be overwritten in the Agent panel after the next sync.
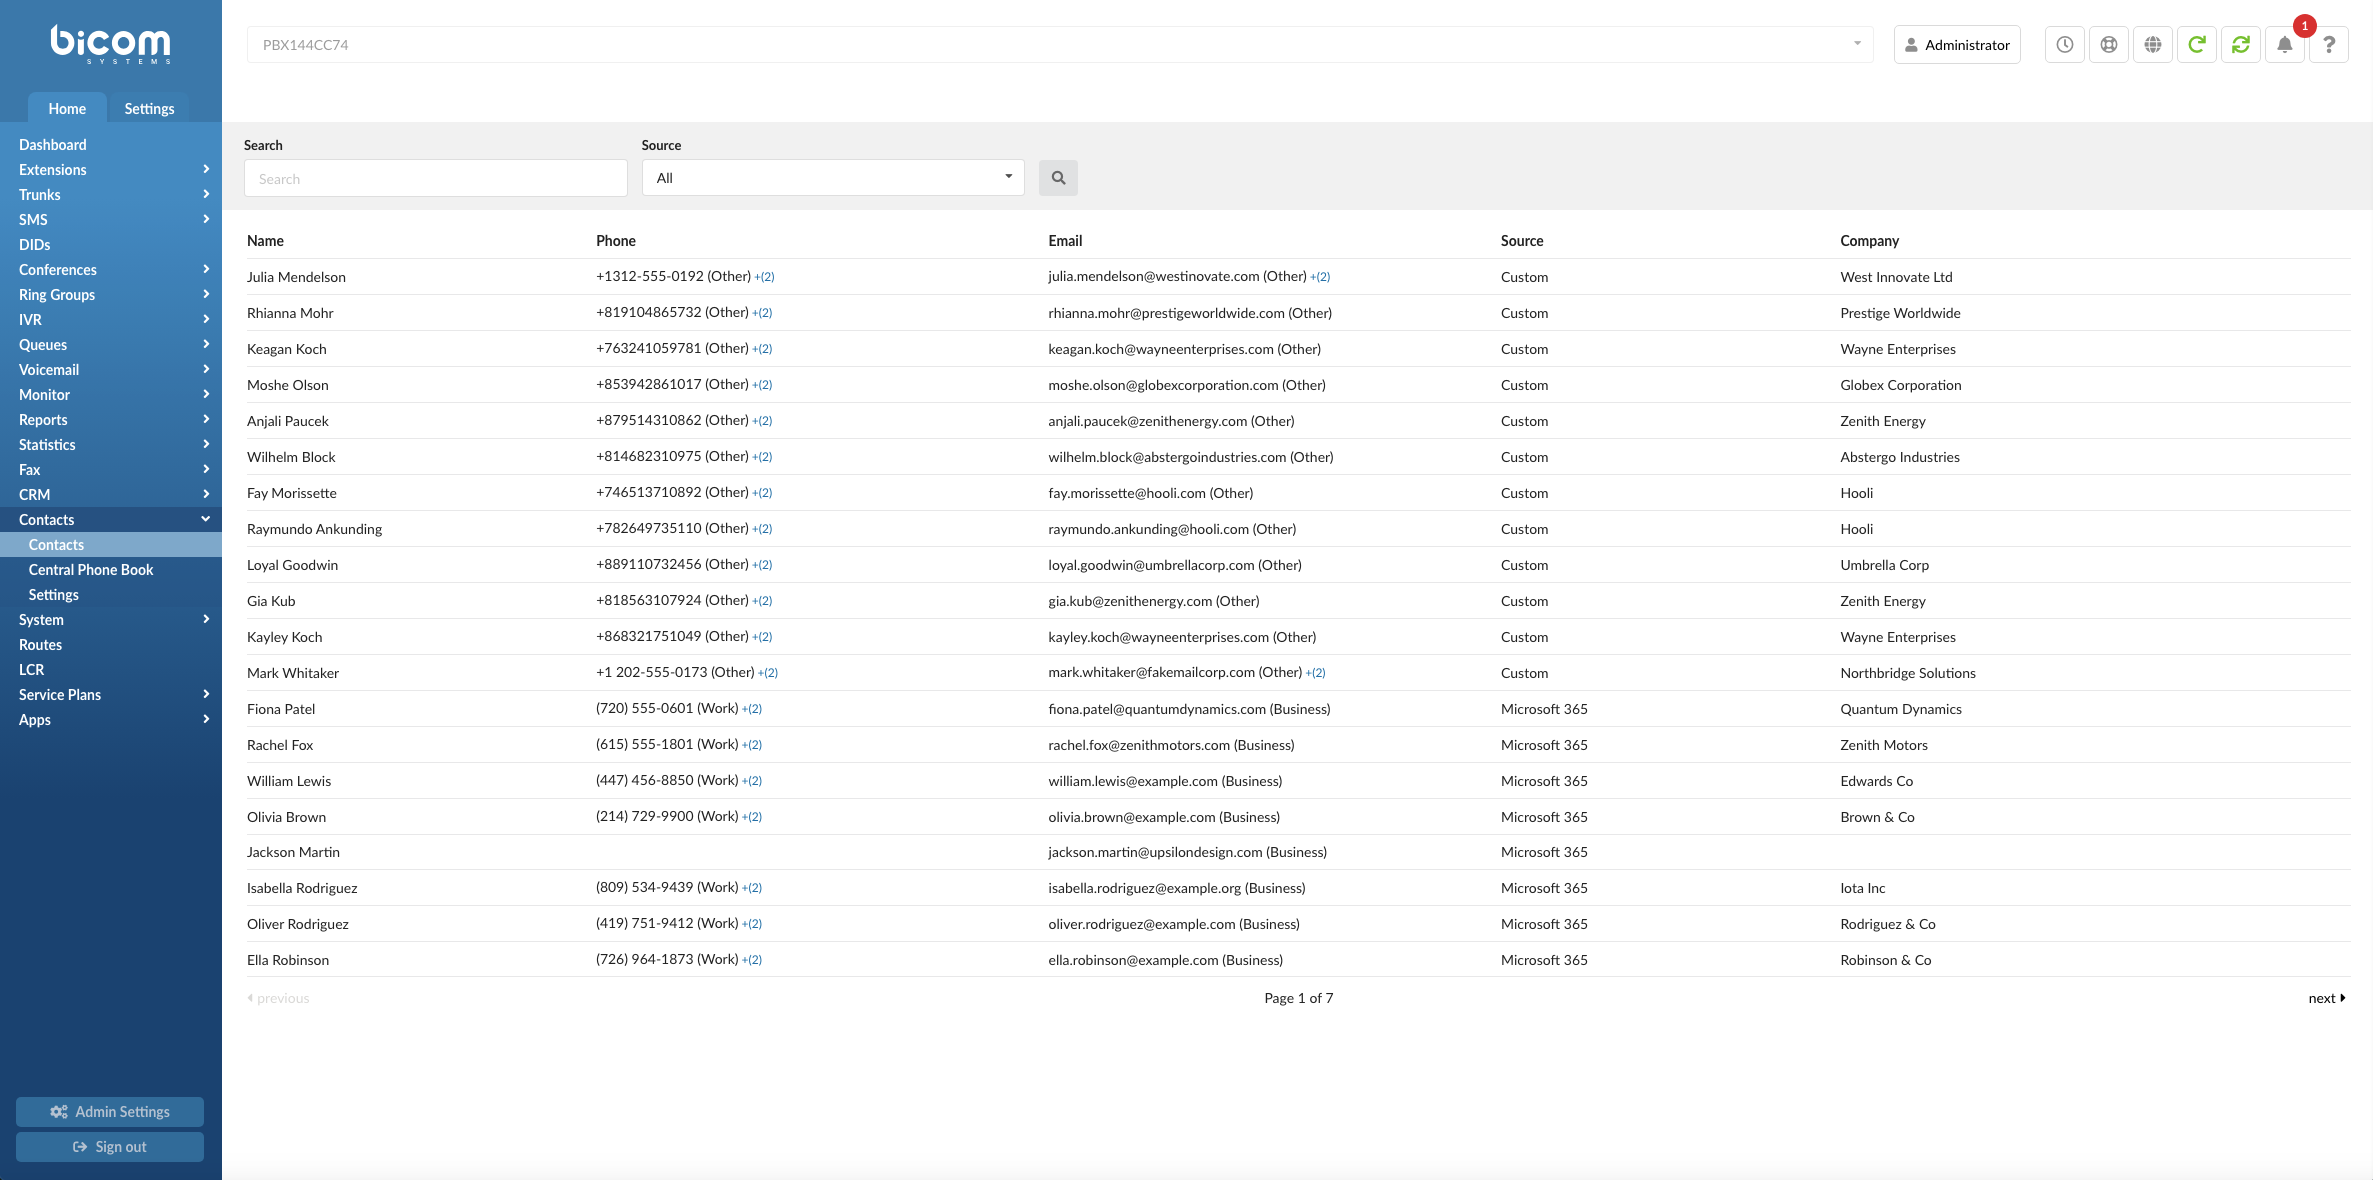
¶ Contacts List
The Contacts list in the Contact Center edition of PBXware provides administrators with a centralized overview of all contacts synchronized from external sources such as Microsoft 365 and Custom Contacts Source.
¶ Key Features
-
Search and Filter:
- A search bar allows administrators to quickly locate contacts by name, email, or phone number.
- A Source dropdown enables filtering contacts based on their origin (e.g., Microsoft 365 or Custom).
-
Contact List Table:
- Name – The contact’s full name.
- Phone – Displays the main phone number. If the contact has additional numbers, a
(+2)or similar indicator is shown, allowing the admin to view all associated numbers. - Email – Displays the primary email. Additional emails are indicated in the same way as phone numbers.
- Source – Shows the contact source, either Custom or Microsoft 365.
- Company – Lists the company or organization the contact belongs to.
¶ Settings
¶ Contact Source Settings (Microsoft 365 & Custom)
PBXware provides administrators with the ability to configure synchronization settings for external contact sources. These settings are accessible under Contacts → Settings, where two tabs are available: Microsoft 365 and Custom.
¶ Microsoft 365 Contacts Settings
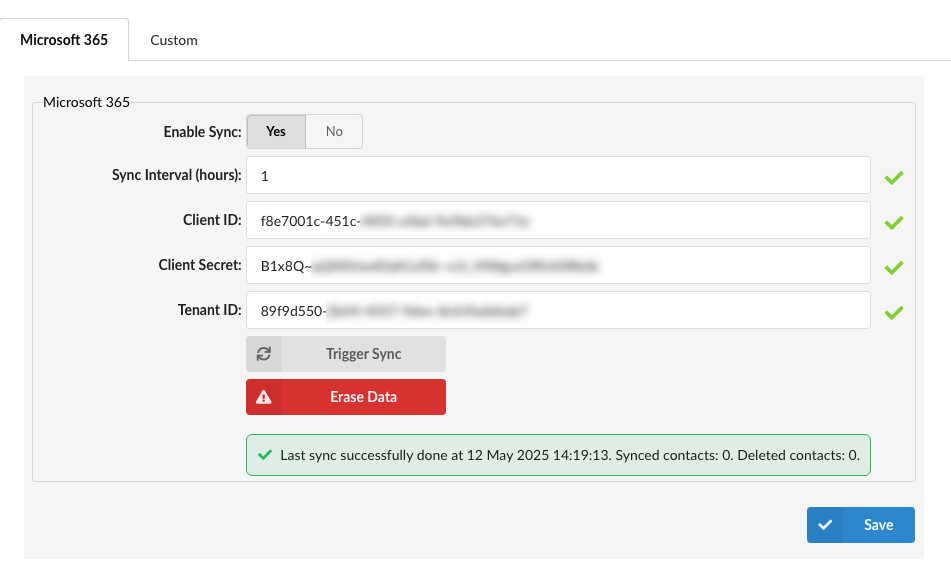
The Microsoft 365 tab allows administrators to integrate PBXware with an Azure/Microsoft tenant and set up contact synchronization. The following fields and options are available:
-
Enable Sync: This toggle controls whether automatic synchronization with the external contact source is active.
-
If set to No, the configuration will be saved, but no synchronization will occur regardless of the value set in Sync Interval (hours). In this case, contacts will not be synced until the user manually triggers the sync by clicking the Trigger Sync button.
-
If set to Yes from the beginning, the system will immediately perform a full synchronization of all contacts from the external source, and continue to sync them periodically based on the interval defined in Sync Interval (hours).
-
The default value for Sync Interval is 24 hours, meaning the sync will run once every 24 hours unless changed by the administrator.
-
After the initial full sync, all subsequent sync operations will only process newly added, edited, or deleted contacts, ensuring efficient updates without reimporting all data.
This setting gives users control over whether syncing begins immediately or remains inactive until explicitly triggered.
-
-
Sync Interval (hours): Defines how often automatic synchronization will occur when sync is enabled.
-
Client ID: Azure application client ID.
-
Client Secret: Secret key associated with the client ID.
-
Tenant ID: Microsoft 365 tenant identifier.
-
Trigger Sync: Immediately starts a manual synchronization process with the external contact source. Upon clicking, users are prompted with a confirmation dialog:
"This action will trigger sync immediately. Are you sure you want to continue with this action?"-
If this is the first time the sync is being triggered (i.e., no previous sync has occurred), the system will perform a full synchronization, importing all available contacts from the external source.
-
On subsequent uses, only newly added, edited, or deleted contacts will be processed and synchronized, minimizing load and ensuring the contact list stays up to date.
This option is useful for performing an immediate update outside of the regular sync interval or after adjusting configuration settings.
-
-
Erase Data: Removes both the contact data and the source configuration from the system. This includes all synced contacts and any associated activities. Users will be prompted with the following warning:
"This action will delete all data related to Microsoft 365, including contacts and activities related to those contacts. Are you sure you want to continue with this action?" -
Status Message: Displays the timestamp of the last successful sync along with the number of synced and deleted contacts.
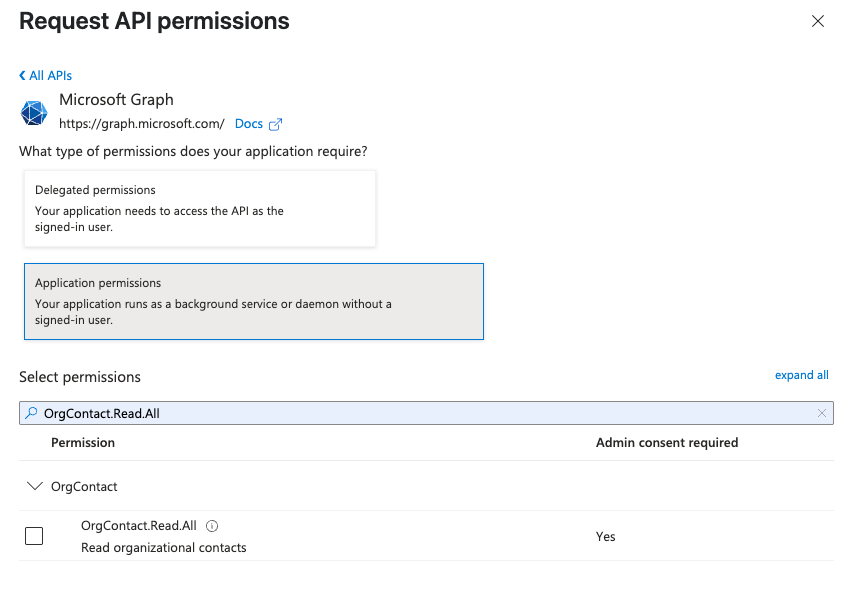
NOTE: When setting up an enterprise application in Microsoft Azure, one of the following Microsoft Graph permissions must be granted to enable contact synchronization:
OrgContact.Read.AllDirectory.Read.AllDirectory.ReadWrite.AllThese should be added as Application permissions (not Delegated) in the Azure Portal under your work account. You can find them under the Microsoft Graph category in the API permissions section of the app.
¶ Custom Contacts Settings
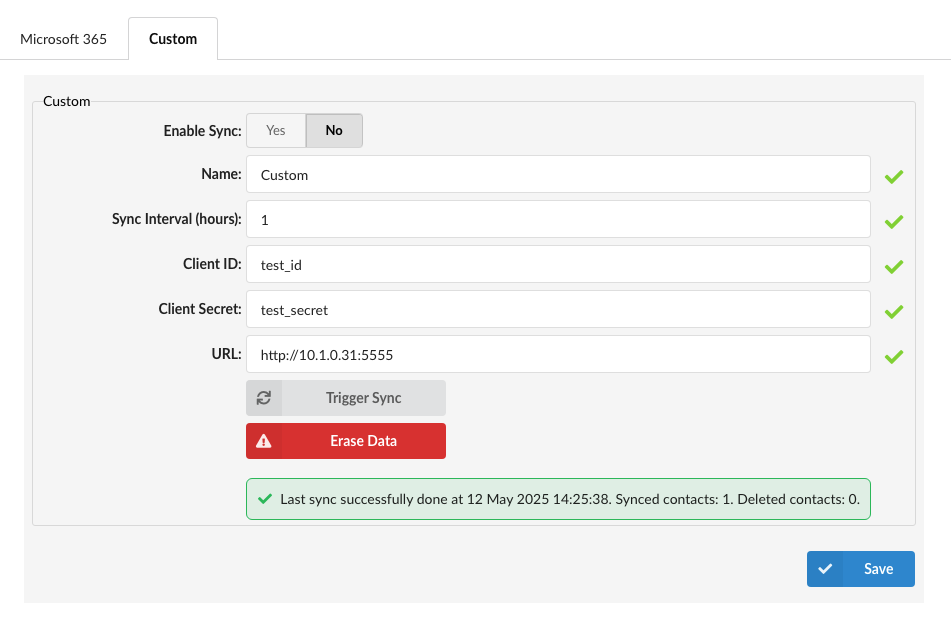
The Custom tab allows integration with a third-party or self-hosted contact management service. Administrators can define the connection details for syncing:
-
Enable Sync: This toggle controls whether automatic synchronization with the external contact source is active.
-
If set to No, the configuration will be saved, but no synchronization will occur regardless of the value set in Sync Interval (hours). In this case, contacts will not be synced until the user manually triggers the sync by clicking the Trigger Sync button.
-
If set to Yes from the beginning, the system will immediately perform a full synchronization of all contacts from the external source, and continue to sync them periodically based on the interval defined in Sync Interval (hours).
-
The default value for Sync Interval is 24 hours, meaning the sync will run once every 24 hours unless changed by the administrator.
-
After the initial full sync, all subsequent sync operations will only process newly added, edited, or deleted contacts, ensuring efficient updates without reimporting all data.
This setting gives users control over whether syncing begins immediately or remains inactive until explicitly triggered.
-
-
Name: Label or identifier for the custom source.
-
Sync Interval (hours): Time interval for periodic automatic syncs.
-
Client ID / Client Secret: Credentials used to authenticate with the custom contact service.
-
URL: Endpoint of the custom contact server (e.g.,
https://example.com:5555). -
Trigger Sync: Immediately starts a manual synchronization process with the external contact source. Upon clicking, users are prompted with a confirmation dialog:
"This action will trigger sync immediately. Are you sure you want to continue with this action?"-
If this is the first time the sync is being triggered (i.e., no previous sync has occurred), the system will perform a full synchronization, importing all available contacts from the external source.
-
On subsequent uses, only newly added, edited, or deleted contacts will be processed and synchronized, minimizing load and ensuring the contact list stays up to date.
This option is useful for performing an immediate update outside of the regular sync interval or after adjusting configuration settings.
-
-
Erase Data: Removes the source configuration and deletes all contact data retrieved from the custom source. This includes any associated activities. A confirmation prompt is shown:
"This action will delete all data related to this custom contact source, including contacts and activities related to those contacts. Are you sure you want to continue with this action?" -
Status Message: Displays information about the last sync operation, including date, time, and number of synced/deleted contacts.
📘 Custom Contacts Integrator Example
Bicom Systems provides an example application for integrating third-party contact sources into PBXware. The repository is available at:
🔗 Custom Contacts Integrator on GitHub
This repository includes:
- A sample implementation of a custom contact source integrator.
- A PDF guide detailing how to connect the application to PBXware.
The documentation covers setup instructions, configuration steps, and usage guidelines to facilitate seamless integration.
🔒 These options allow administrators to control how and when contacts from external systems are brought into PBXware, ensuring secure and consistent data synchronization.
¶ Central Phone Book
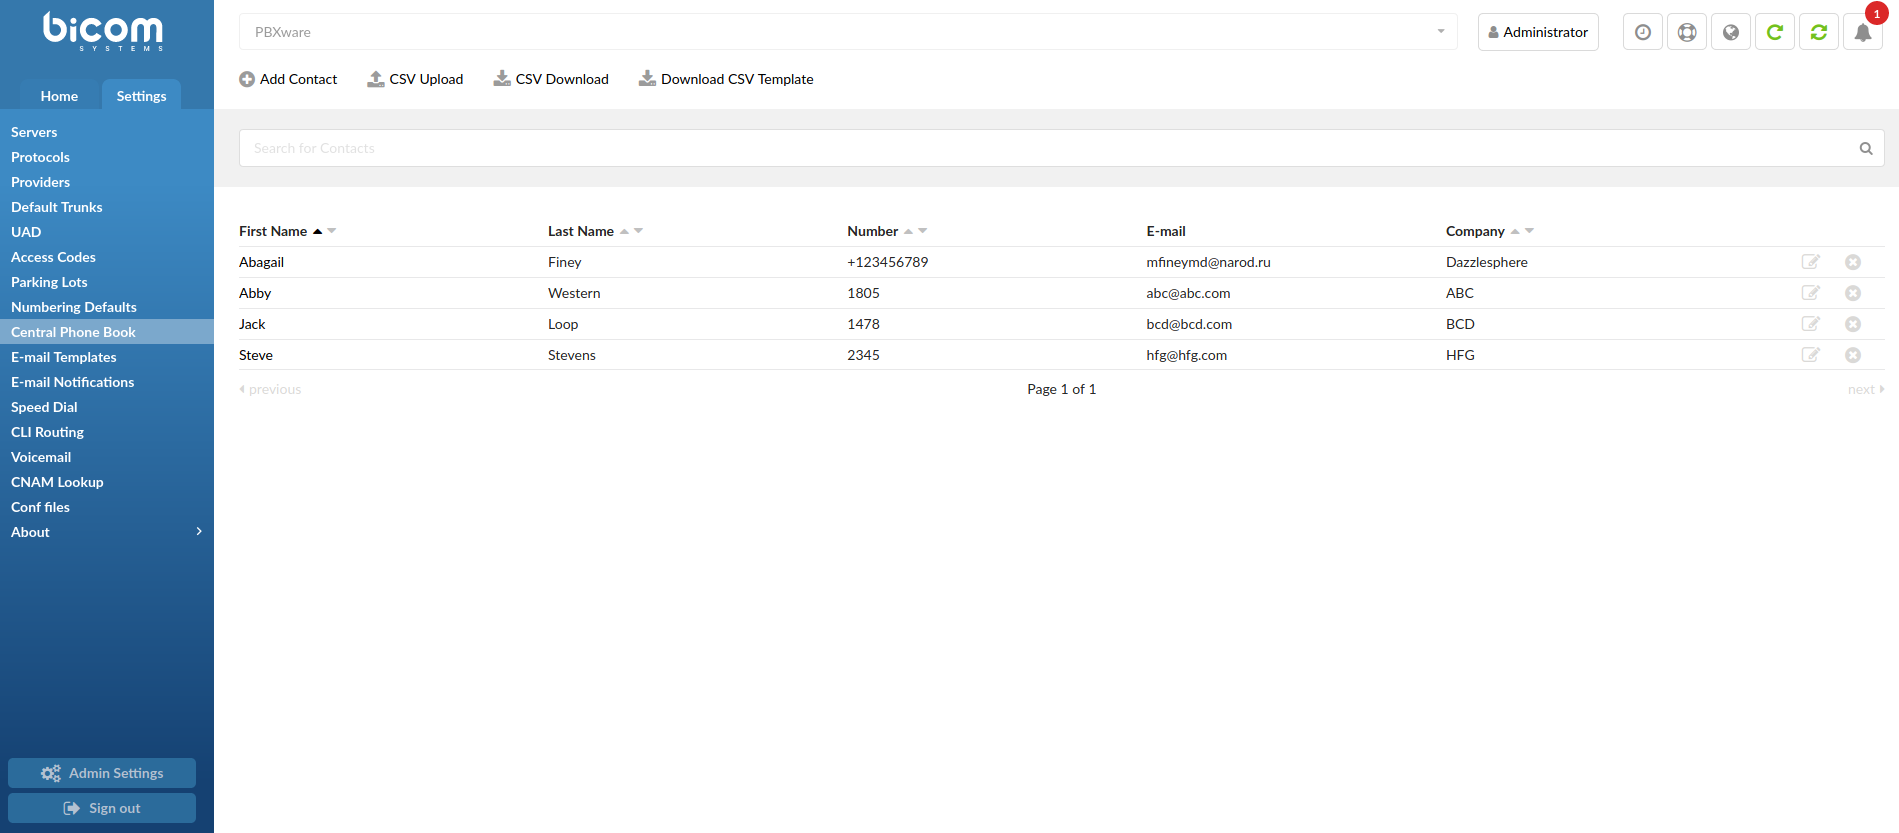
Two different types of contacts can be added:
- Global - sent to all phones and managed here
- Personal - sent to one user only together with global contacts and managed from the Extensions page
NOTE: Yealink, Cisco, and Polycom phones can work with Central Phone Book.
PBXware allows its users to manage CSV files in few different ways:
- CSV Upload
Upload a predefined list of contacts to the contacts list
(Button)
Please refer to the example of a CSV file with 5 contacts:
| 1 | Chevy,,Yesipov,cyesipov0@example.com,Jacobi and Sons,mobile:50011,work:600111 |
| 2 | Jeanine,,Tiddeman,jtiddeman1@ihg.com,Walsh Group,mobile:50012,work:600112 |
| 3 | Erasmus,,Curlis,ecurlis2@sbwire.com,Nolan-Kris,mobile:50013,work:600113 |
| 4 | Caresa,,Bremmell,cbremmell3@php.net,Mayert Inc,mobile:50014,work:600114 |
| 5 | Romy,,Hedling,rhedling4@latimes.com,"Ankunding,Weissnat",mobile:50015,work:600115 |
NOTE: If a value (first_name, last_name etc.) has a comma, it has to be put under quotes. In the example of a CSV file shown above, the 5th contact with its company name has a comma - "Ankunding, Weissnat".
NOTE: In case the number type is not 'Work', 'Mobile', 'Home', or 'Fax', the number will be skipped. Also, the number type is case insensitive which means that all of these examples are acceptable - 'Work', 'WORK', and/or 'wOrK'.
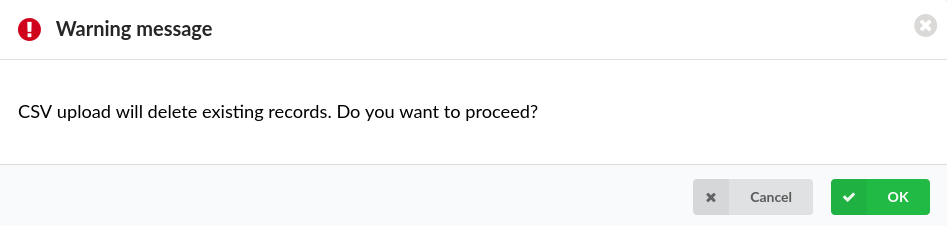
NOTE: Upon uploading a new CSV file, all existing contacts on the system will be deleted, which ensures that a user's contact list stays up-to-date. However, in order to prevent any potential and unintentional data loss, upon uploading a new CSV file, the warning message will appear saying "CSV upload will delete existing records. Do you want to proceed?". If a user presses 'OK', it will result in a new CSV file being uploaded and all previous contacts being deleted.
For more information, please refer to the screenshot.
- CSV Download
Download all the global/personal contacts as a CSV file
(Button)
- Download CSV Template
Download a CSV template which can be used to create a CSV file with contacts and upload it instead of adding contacts one by one
(Button)
- Search bar
Search contacts by entering specific information into the search bar
([0-9][+])
NOTE: Contacts can be searched by using the '+' (plus) sign.
NOTE: On the Central Phone Book page, 1000 (one thousand) is the maximum number of contacts that can be displayed. To narrow down the range of contacts, the search bar should be used.
The Central Phone Book list contains all global/personal contacts with following details:
- First Name
Contact's first name
(E.g. Abagail)
(Display)
- Last Name
Contact's last name
(E.g. Finey)
(Display)
- Number
Contact's number
(E.g 1805)
(Display)
Contact's e-mail address
(E.g. mfineymd@narod.ru)
(Display)
- Company
Contact's company
(Dazzlesphere)
(Display)
 Edit the configuration of the Contact.
(E.g. Click the 'Edit' button to edit the Contact's configuration.)
(Button)
 Delete the Contact from the system.
(E.g. Click the 'Delete' button to delete the Contact from the system.)
(Button)
¶ Add/Edit Contact
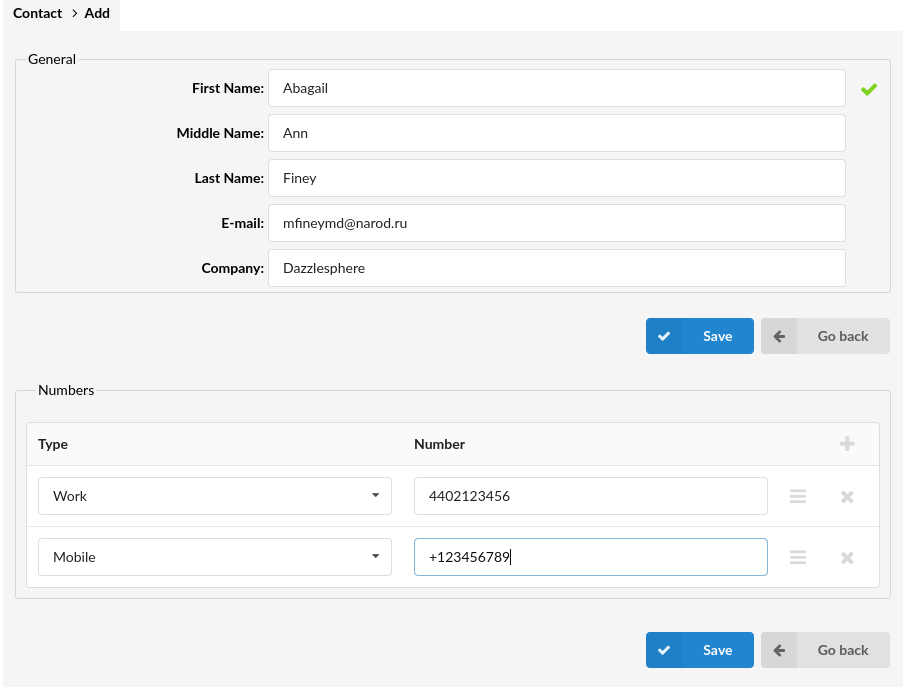
¶ General
- First Name
Contact's first name
(E.g. Abagail)
([a-z])
- Middle Name
Contact's middle name
(E.g. Ann)
([a-z])
- Last Name
Contact's last name
(E.g. Finey)
([a-z])
Contact's e-mail address
(E.g. mfineymd@narod.ru)
([a-z][0-9])
- Company
Contact's company
(E.g. Dazzlesphere)
([a-z])
¶ Numbers
- Type
Number type
(E.g. Work)
(Select box)
- Number
Contact's phone number
(E.g. 061111111)
([0-9])
NOTE: Central Phone Book accepts numbers starting with the '+' (plus) sign.