¶ SMS
SMS (Short Message Service) is a feature in PBXware that enables users to send and receive messages in order to achieve faster communication. It has become a globally accepted communication channel and an effective way to deliver information in a matter of seconds due to its simplicity and precision. SMS implementation in PBXware allows users to communicate efficiently and have their messages at their disposal at anytime.
¶ Numbers
The Numbers section allows users to add numbers to the system and assign them to specific Extensions. From this section, it is possible to manage the configuration of numbers by editing or deleting it.
Numbers can be added in two ways:
- By uploading a CSV file that is either created by using the PBXware's CSV template or the provider's CSV template.
- By adding the numbers manually.
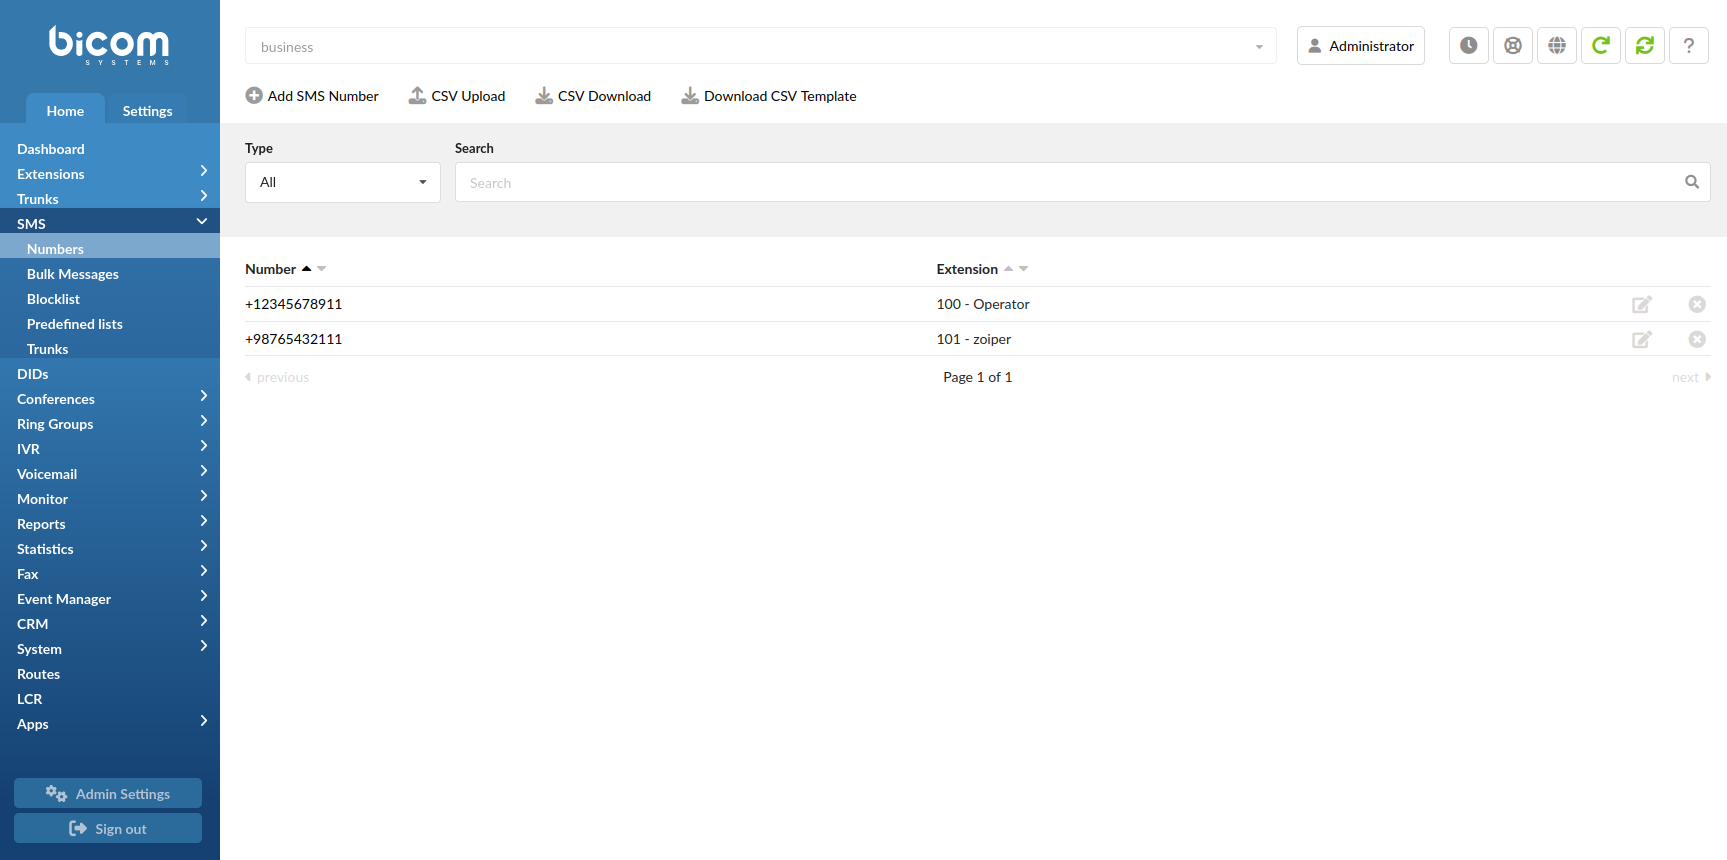
 Click this button to add a new SMS number.
For more information on the page's content, please refer to the Add SMS Number page.
(Button)
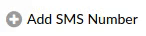
 Click this button to upload a CSV file.
(Button)
NOTE: CSV files can be uploaded by using one of the two following templates:
PBXware's CSV Template:
In order for this template to be successfully uploaded, a user needs to populate the following fields: '
sms_number'
and '
extension'
.
Provider's CSV Template:
If this template is used (e.g. Telnyx's), the CSV file downloaded from the Telynx website already
contains
all the necessary data
, so the next step would be just to upload the CSV file.
Additionally, since the SMS feature allows for various CSV upload methods, certain restrictions exist in order to ensure data protection and provide users with supplementary information regarding the software operations. Therefore, once a user uploads a desired CSV file, s(he) will be presented with this messages regarding the upload procedure:

This CSV message will appear after the CSV file has been successfully uploaded to the system. The further explanation shows that there were three numbers in the CSV file and all three numbers were imported. Additionally, no numbers were skipped, which shows that these numbers are nowhere to be found on the system. In case the user accidentally adds the already existing number, the number that was previously on the system will be deleted and added again through this upload, which ensures no data loss.
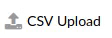
 Click this button to download a CSV file.
NOTE: This CSV file contains the data displayed on the 'Numbers' list. It can be used for faster management of numbers and Extensions on the system.
(Button)
 Click this button to download a CSV template.
NOTE: In order to successfully manage the CSV file, the following should be done:
1. Download an empty CSV template
2. Populate the fields with specific information
3. Save the settings
4. Upload it by using the 'CSV Upload' button
6. Data is now displayed on the list.
(Button)

- Search
Enter a piece of information and press Enter to have results filtered accordingly
(E.g. 101)
[(0-9)]
NOTE: Users can search entries by using 'Number', 'Extension', and 'Extension Name'.
- Number
Displays a Number added to the system
(E.g. +1234567890)
(Display)
NOTE: Hovering the mouse over the Number section and clicking it will prompt users to the Add SMS Number window. A user cannot edit numbers from there but Extensions. For more information on this, click the link provided.
- Extension
Displays an Extension and Extension Name to which the number has been previously assigned to
(E.g. 100 - Operator)
(Display)
 Click this button to edit the SMS Number configuration.
NOTE: Upon clicking this button, users will be prompted to the Add SMS Numbers window where they can edit Extensions accordingly. Please note that the numbers cannot be edited from here. For more information on this, click the link provided.
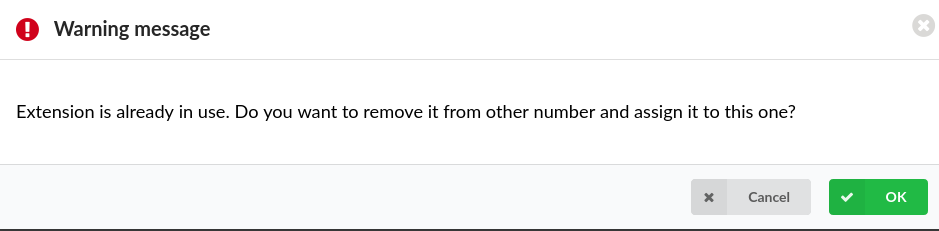
If a user decides to edit the configuration and assign the existing number to another Extension, the following warning message will appear: "Extension is already in use. Do you want to remove it from another number and assign it to this one?". If users click the Cancel button, then the action will be abandoned. On the contrary, if OK is clicked, the number will be assigned to a different Extension and deleted from the old one. Please refer to the screenshot.
(Button)
- Click this button to delete the SMS Number configuration.
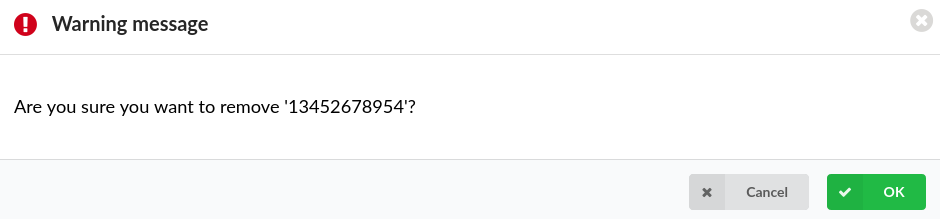
NOTE: Upon clicking the button, the following warning message will appear: "Are you sure you want to delete XYZ*?"*. If users click the Cancel button, then the action will be abandoned. On the contrary, if OK is clicked, the selected configuration will be deleted.
For more information, please refer to the screenshot.
(Button)
¶ Add SMS Number
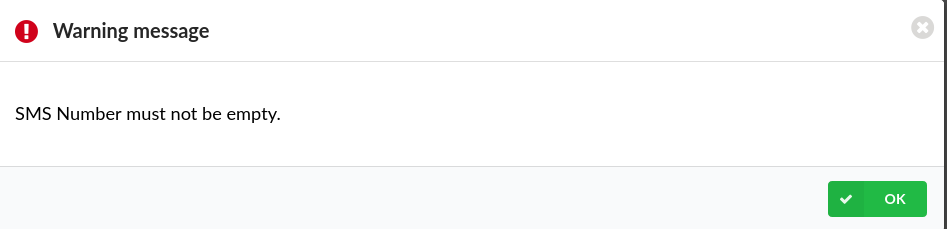
NOTE: The 'Number' field is required and it has to be populated. Not defining that field will result in the warning messages being shown. Please refer to the screenshot.
¶ General
- Number
Enter the number to which SMS messages will be sent
(E.g. +1234567890)
([0-9])
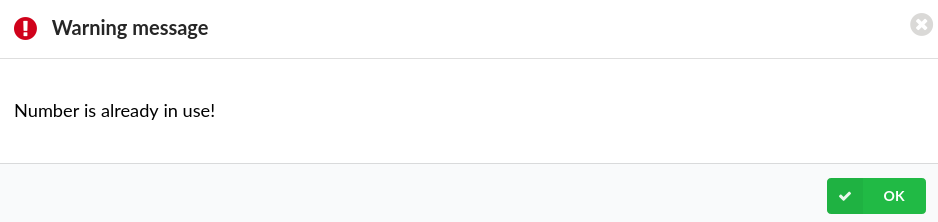
NOTE: If a user tries adding the number that already exists on the system, the following warning message will appear: "Number is already in use!". Please refer to the screenshot.
NOTE: Please note that the number has to be in the E.164 format.
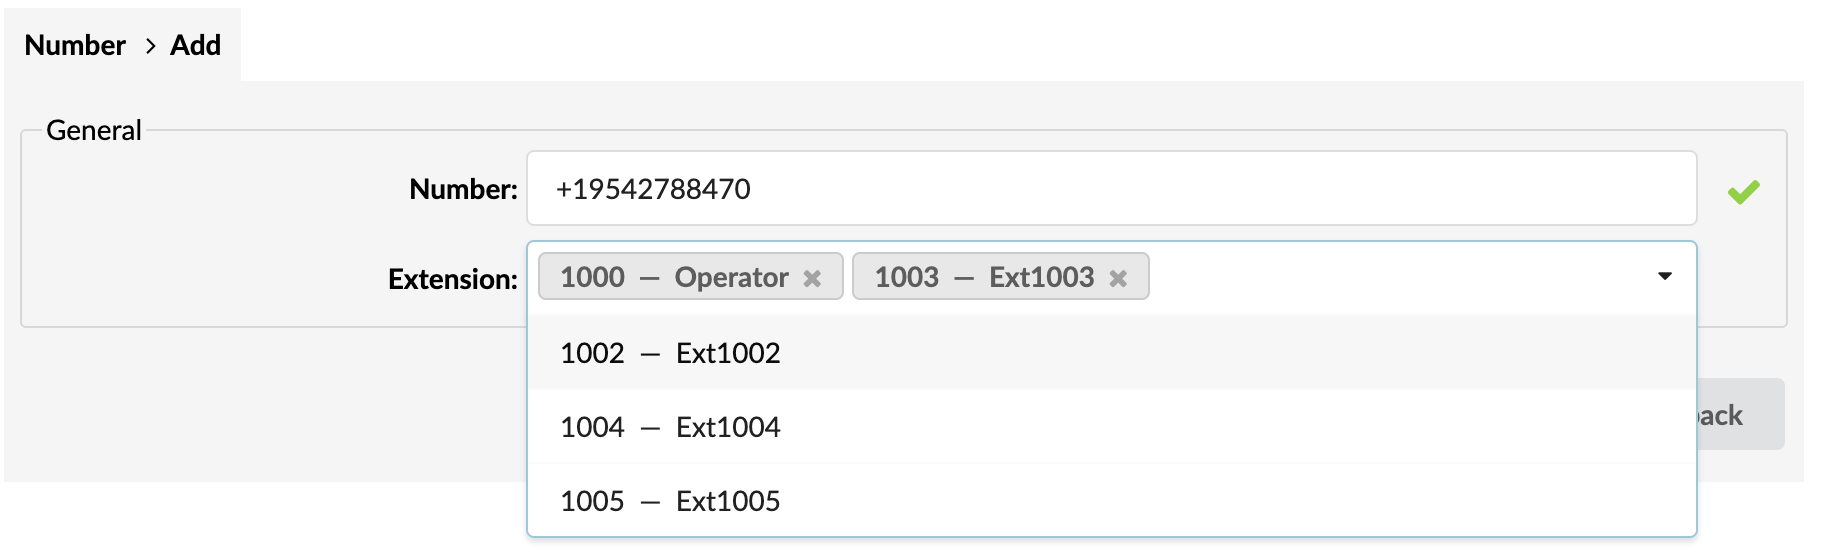
- Extension
Assign SMS number to one or more extensions.
(E.g. 101 - test)
(Select box)
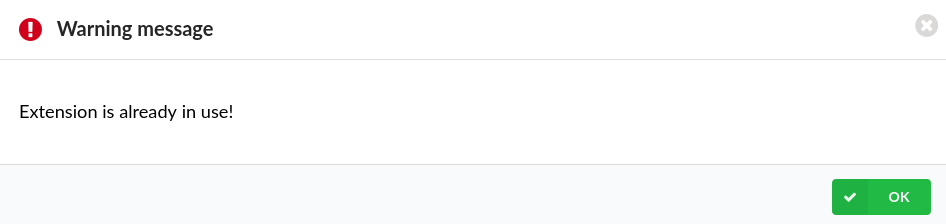
NOTE: Since this is not a required field, it can be left empty and seen in the list as such. In case a user tries selecting the Extension to which a number has been assigned previously, the following warning message will appear: "Extension is already in use!". Please refer to the screenshot.
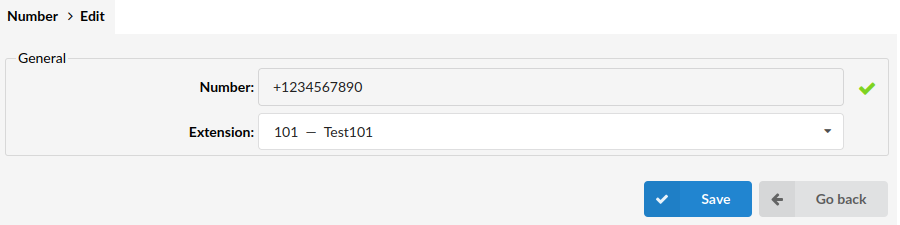
The example below represents how the configuration should look like after being completed and saved:
NOTE: Once users save the settings, editing a number is not possible. However, if there is an input mistake, the following has to be done:
1. Click Go back,
2. Delete the configuration from the list by clicking Delete,
3. Add the number again,
4. Assign an Extension to it and click Save.
The SMS feature allows for DIDs from PBXware to be entered in this field as well.
NOTE: These steps should be followed in case a user has already added a DID and populated all other required fields. Once that is completed, a user should do the following:
1. Go to the 'DIDs' section
2. Find the DID to be used for SMS
3. Hover over the DID and click it in order to be prompted to a different window
4. Click 'Show Advanced options'
5. Assign a desired DID to a specific Extension
6. Set the 'Enabled SMS' to 'Yes'
7. Click Save.
For more information on the 'Enabled SMS' option found on the 'DIDs' section, please refer to this page.
Assuming the user completed the procedure as described above, s(he) needs to do the following:
1. Go to the 'Numbers' section
2. Check whether the configuration is set up correctly
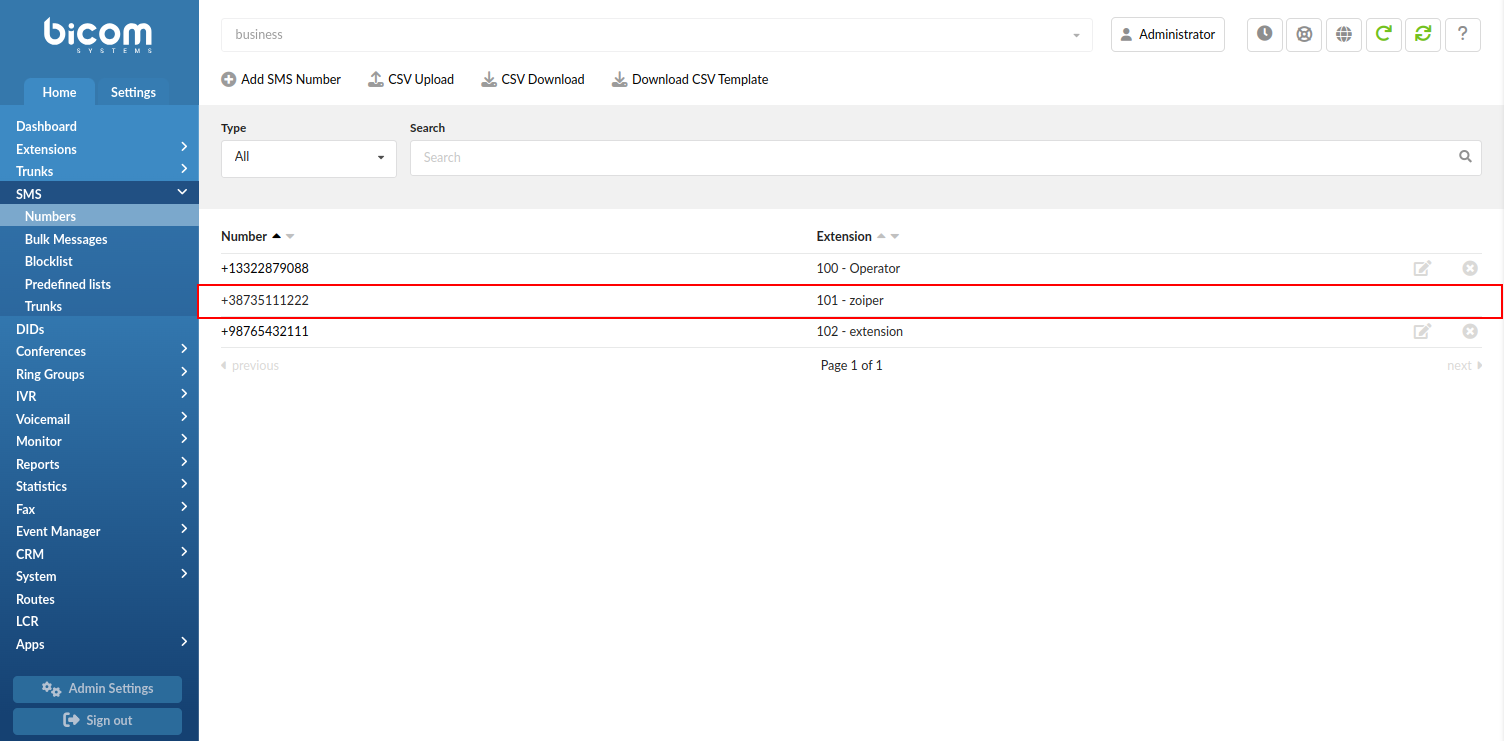
After adding a DID from PBXware, this is how the list on the 'Numbers' section should look like. As it can be seen, PBXware offers an easy way to monitor which DIDs have been added from the system. Such numbers have no 'Edit' or 'Delete' options due to the fact that they have been added to this list in a different way, (i.e. through the DIDs section on PBXware).
¶ Bulk Messages
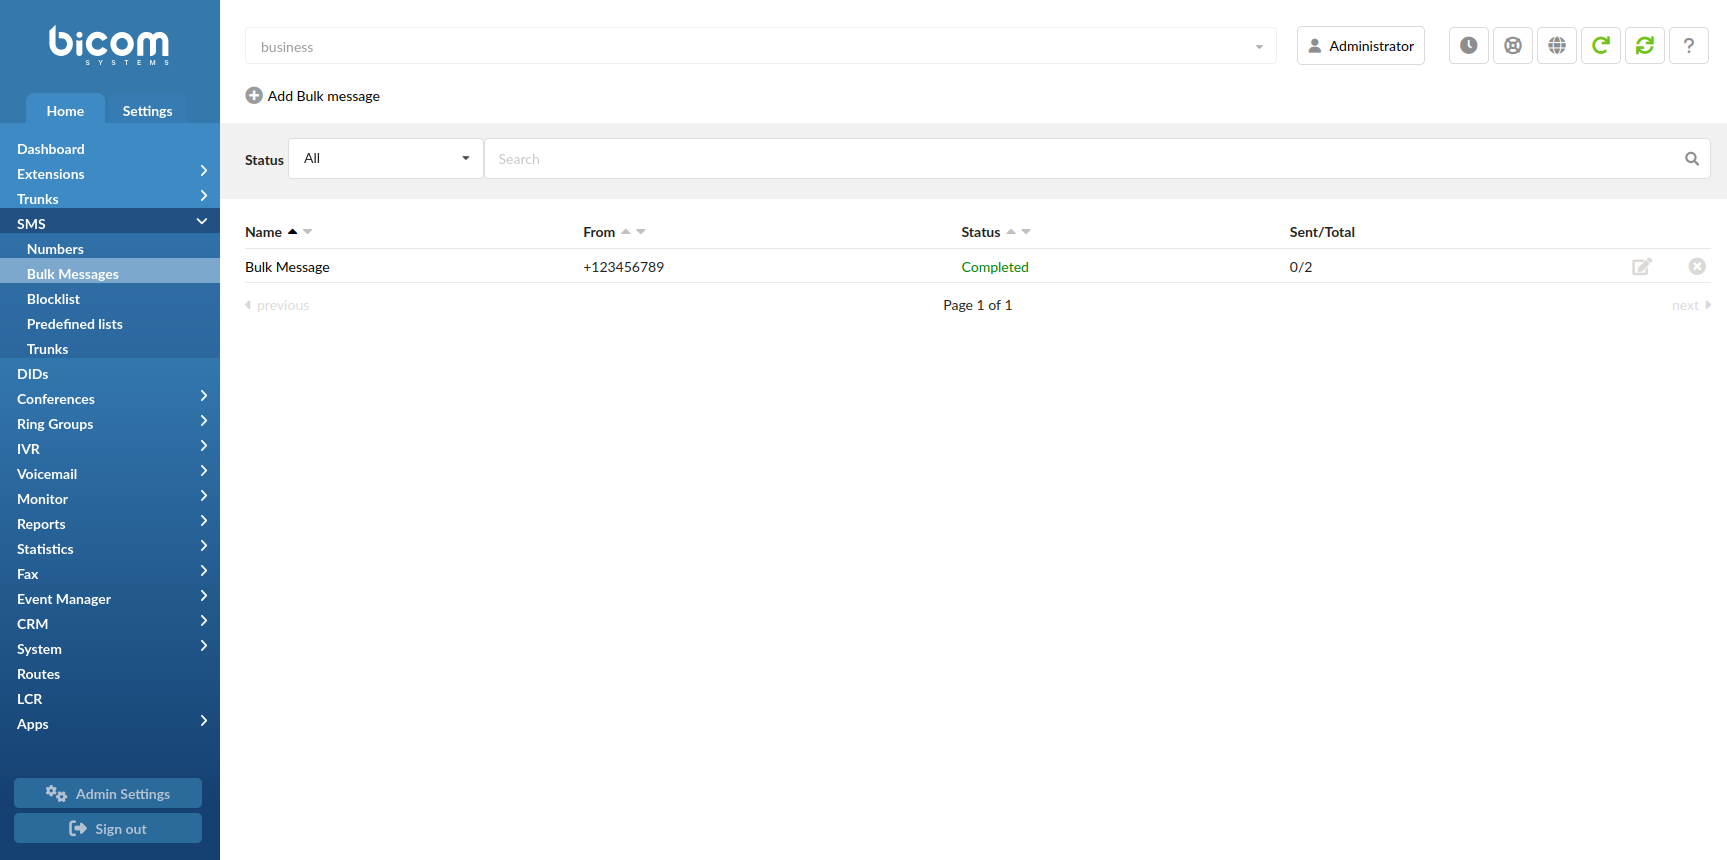
The 'Bulk Messages' section allows users to send bulk SMS messages. By using this feature, users can send important information to a larger number of people. Apart from adding Bulk SMS messages through the GUI, users can easily upload their data by using CSV files or filter their Bulk SMS messages by status. They can start Bulk messages or stop the active ones. There is also a possibility to restart them.
Users can utilize the 'Search' option and filter their data accordingly. Please refer to the drop-down list:
- All
- Active
- Not Active
- Paused
- Stopped
- Completed
This page displays the following information:
- Name
Displays the name of the Bulk message
(E.g. BulkSMS2)
(Display)
- From
Displays the number/alphanumeric the Bulk message was sent from
(E.g. +1234567890)
(Display)
- Status
Displays the status
(E.g. Completed)
(Display)
- Sent/Total
Displays the number of sent messages and the total amount of numbers that the message should be sent to
(E.g. 4/4)
(Display)
NOTE: 'Sent' refers to the number of successfully sent messages. 'Total' refers to the total amount of numbers uploaded via CSV file. For example, '4/4' means that there were four numbers in the CSV file and all four messages were successfully sent to these numbers.
 Click this button to add a Bulk message.
(Button)
¶ Add Bulk Messages
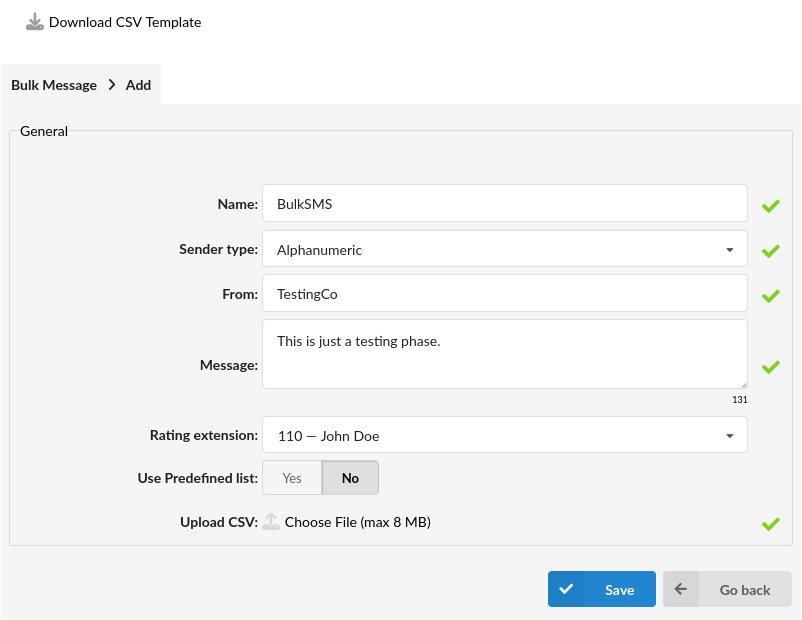
- Name
Enter a name of a Bulk message
(E.g. BulkSMS2)
([a-z][0-9])

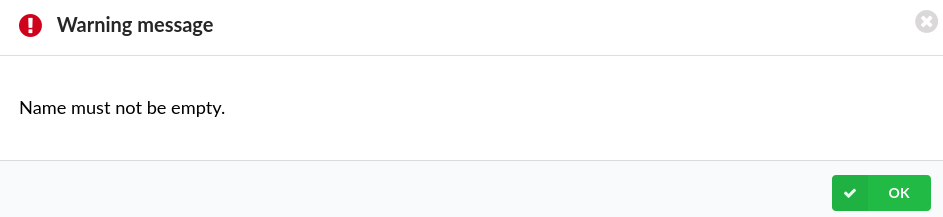
NOTE: This is a required field. If it is not populated, the warning message will be displayed. Please refer to the screenshot.
- Sender type
Select a sender type
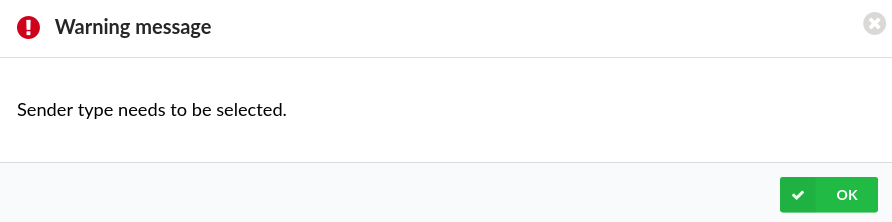
(E.g. Number/Alphanumeric)
(Select box)
NOTE: This is a required field. If it is not populated, the warning message will be displayed. Please refer to the screenshot.
- From
Populate the 'From' field with specific information
(E.g. TestingCo)
NOTE: This is a required field. If it is not populated, the warning message will be displayed. Please refer to the screenshot.
NOTE: When creating bulk messages users will not be able to select shared SMS numbers in From field.
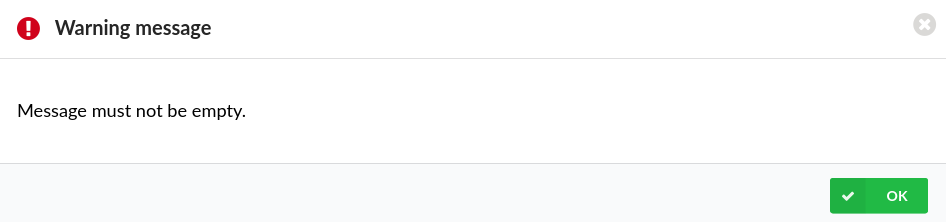
- Message
Populate the 'Message' field with specific information
(E.g. This is just a test.)
([a-z][0-9])
NOTE: This is a required field. If it is not populated, the warning message will be displayed. Please refer to the screenshot.
- Rating Extension (7.5)
Select the extension to which bulk messages will be billed. All SMS messages from a specific bulk campaign will be charged to the selected extension.
(E.g. 110 - John Doe)
NOTE: If the selected extension runs out of funds at any point, messages to the remaining numbers will not be sent.
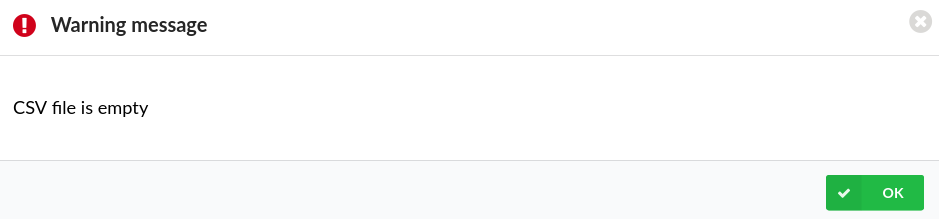
- Upload CSV
Click this button to upload a CSV file
(File Upload Button)
NOTE: This is a required field. If it is not uploaded properly, the warning message will be displayed. Please refer to the screenshot.
INFO: Users can upload CSV files in the following format:
| HEADERS | to_number,Name,LastName,Account | ||
| EXAMPLE | +1234567890,John,Smith,Basic+ | ||
| EXAMPLE | +1112223334,Ann,Doe,Pro+ |
NOTE: Please note that name of the 'to_number' field is required, while other column names can be custom.
After uploading the CSV file, users can create a special message in the 'Message' field by using the values from the uploaded CSV file. Please refer to the example:

These are the examples of SMS delivered:
SMS Example 1
"Dear John Smith, with number +1234567890, we want to inform you that your Basic+ account has been activated."
SMS Example 2
"Dear Ann Doe, with number +1112223334, we want to inform you that your Pro+ account has been activated."
¶ Blocklist (7.6)
This section allows administrators to define SMS delivery restrictions between system-assigned SMS numbers (DIDs) and external numbers. There are two ways an external number can be added to the Blocklist:
An administrator can manually add an external number to the Blocklist using the "Add Number to Blocklist" option or by uploading a predefined CSV file. Alternatively, an external recipient can block incoming messages by replying to an SMS with a predefined Opt-Out keyword, which will result in their number being automatically added to the Blocklist with the configured Opt-Out Scope. Both the Opt-Out keyword and the Opt-Out Scope can be configured under Settings → SMS Settings → Options. This allows for both administrator-controlled and user-initiated SMS blocking, with flexible scope.
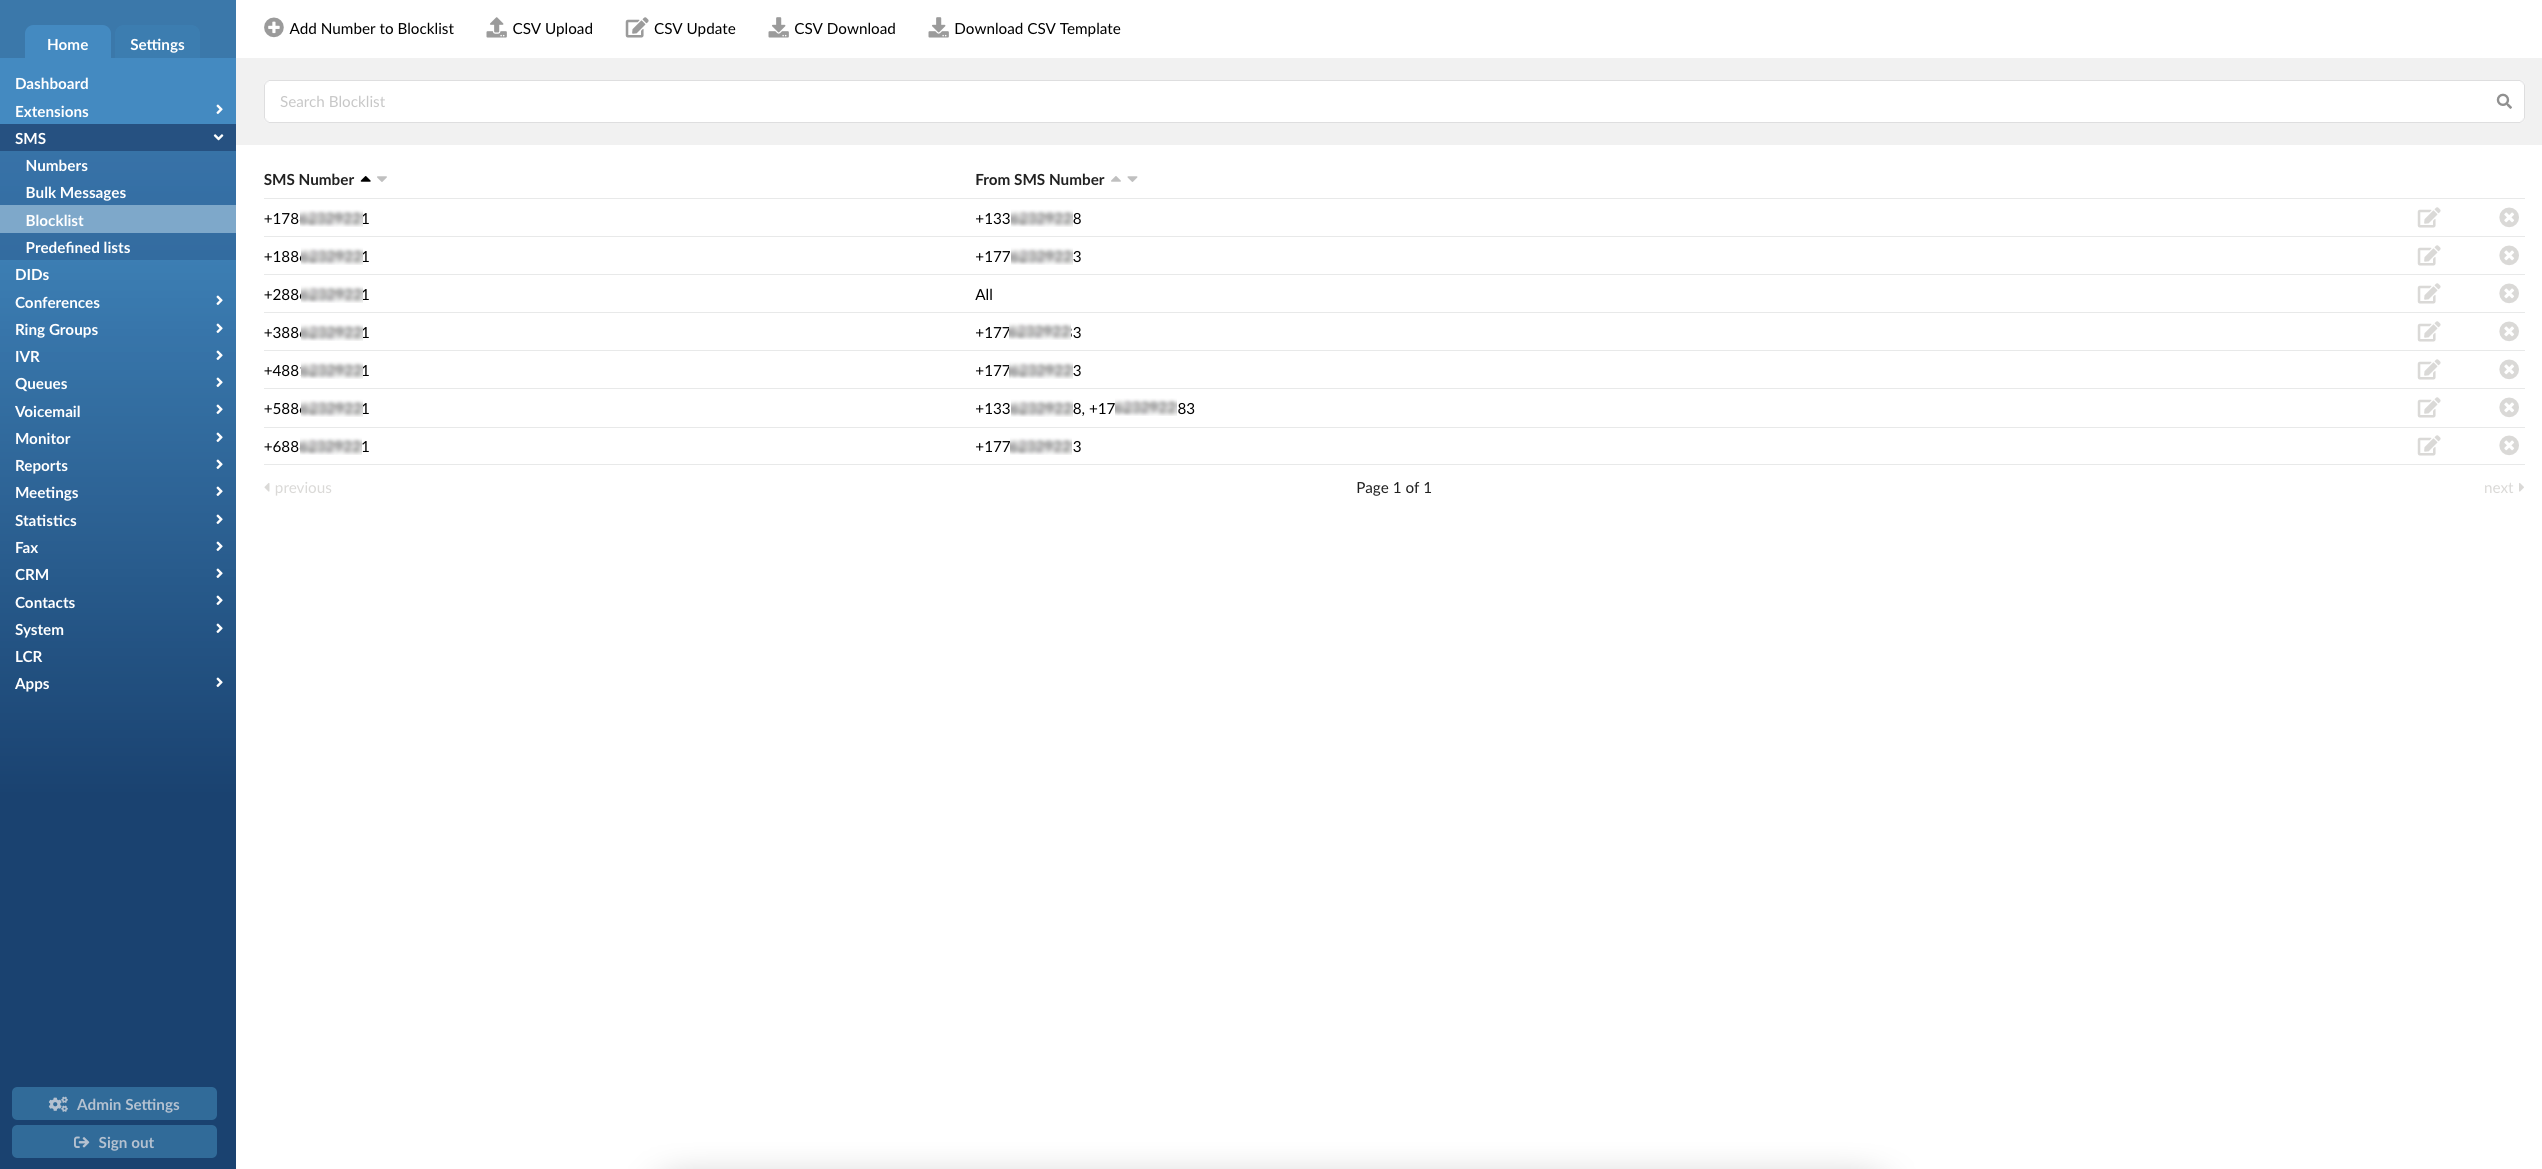
- Add Number to Blocklist
This option allows you to add a specific external number to the Blocklist to prevent it from receiving Bulk SMS campaigns and/or direct SMS messages from the system.
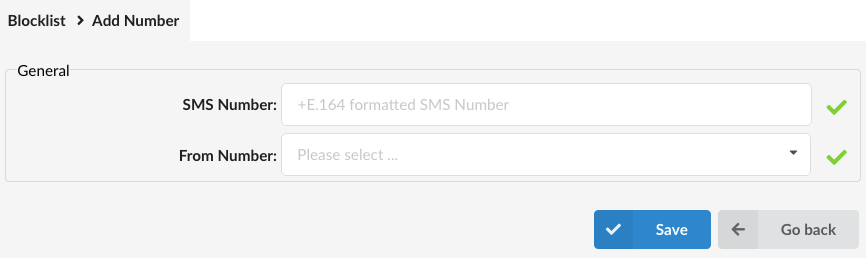
Once you click "Add Number to Blocklist," a new form will appear, allowing you to enter the external SMS Number. You will also be prompted to select the 'From Number' — either a specific SMS number(s) from your tenant, or ALL - which blocks the external number from receiving messages from any SMS number assigned to the system.
NOTE: The system will accept external numbers in the +E.164 format, whether entered with a leading "+" or "00". However, once the saving is completed, any number starting with "00" will be automatically converted to use the "+" prefix.
All numbers in the Blocklist will be displayed in the standard +E.164 format (e.g., +1234567890) to ensure consistency and compatibility across the system.
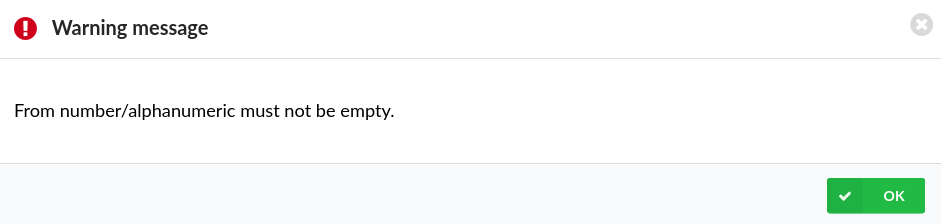
NOTE: Adding an SMS number that is not in the +E.164 format will result in a warning message.
- CSV Upload
CSV Upload enables PBXware administrators to add a large volume of SMS numbers to the Blocklist by importing them from a CSV file, eliminating the need to add each number manually.
A valid CSV file should look like this:
sms_number,from_number
"+17733372555","+19542788470"
The CSV file must contain a header, including 'sms_number' and 'from_number'. A list of SMS numbers in +E.164 format should be entered below, ensuring that each SMS number and From number are enclosed in double quotation marks.
To add ALL numbers available on the system to 'From numbers', a valid CSV file should look like this:
sms_number,from_number
"+38761321654",""
Clicking on the CSV Upload button will open a file selection window, allowing you to select the CSV file you want to upload from your computer’s drive. Selecting the file and clicking the Open button will upload the list of numbers to the PBXware. Once the upload is completed, the Blocklist will be populated with the SMS numbers from the CSV file. Any number not entered in the valid format will be skipped.
NOTE: When using the CSV Upload option, all numbers on the Blocklist will be removed, and the Blocklist will be populated with numbers entered in the file.
- CSV Update
The CSV Update feature works similarly to the CSV Upload, except that using this option will only add new SMS numbers to the Blocklist while preserving previous entries.
Clicking on the CSV Update button will open a file selection window, allowing you to select the CSV file you want to upload from your computer’s drive. Selecting the file and clicking the Open button will add the numbers from the CSV file to the numbers already in the Blocklist. Any number not entered in the valid format will be skipped.
- CSV Download
The CSV Download option enables you to download a CSV file containing the list of SMS numbers already entered in the Blocklist. This file can be used to upload or update the Blocklist on another system.
- Download CSV Template
Clicking the Download CSV Template button will download the CSV Blocklist template to your computer’s drive.
The template file will only contain the headers, and new SMS and From numbers should be entered below, in +E.164 format, enclosed in double quotation marks like in the example below:
sms_number,from_number
"+17733372555","+19542788470"
"+17733372444","+13322349123"
"+17733372211","+13324558999"
Numbers starting with + and 00 are considered valid entries, but once the list is uploaded, “00“ will be replaced with “+ ", and all numbers in the list will be displayed in +xxxxxxxxx format to ensure compatibility.
- Search
To find a specific SMS number in the Blocklist, enter the full number, or only part of the number, and press Enter. The system will filter the list and only display numbers that match the search pattern.
- Edit
You can edit SMS numbers on the Blocklist by clicking the edit icon located at the right of the number you want to edit. On edit, users can change the 'SMS Number' and 'From Number'(s).
- Delete
You can delete SMS numbers from the Blocklist by clicking on the X icon located at the far right of the number you want to delete. Clicking the X icon will display the warning message that allows you to confirm before the number is permanently removed from the Blocklist. To delete the number from the Blocklist, press the OK button. To abort the deletion, press Cancel.
¶ SMS trunk provider Blocklist
Please note that it is likely that the SMS trunk provider you are using already has its own block list management system in place, including specific keywords that allow end-users to opt in or opt out of receiving SMS messages. This means that if users opt out of receiving the SMS messages using the SMS provider management system, they will be prevented from receiving SMS messages sent from PBXware, even if they are not added to the Blocklist on your system.
This will vary between different SMS trunk providers, so we recommend checking your SMS trunk provider’s documentation or consulting with their representatives for more detailed information on this subject.
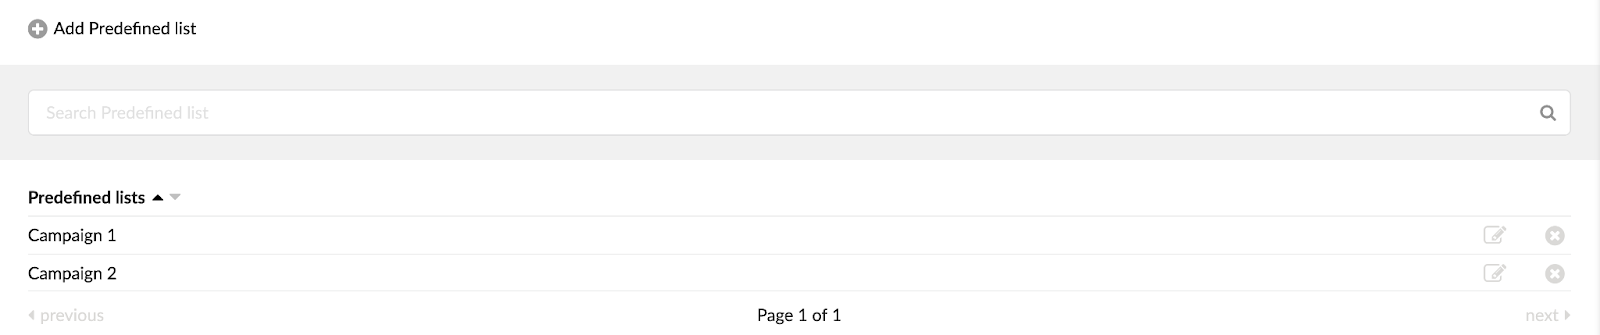
¶ Predefined Lists (7.3)
From PBXware version 7.3, administrators can use the Predefined list section to create lists of SMS numbers which will be used for Bulk SMS campaigns.
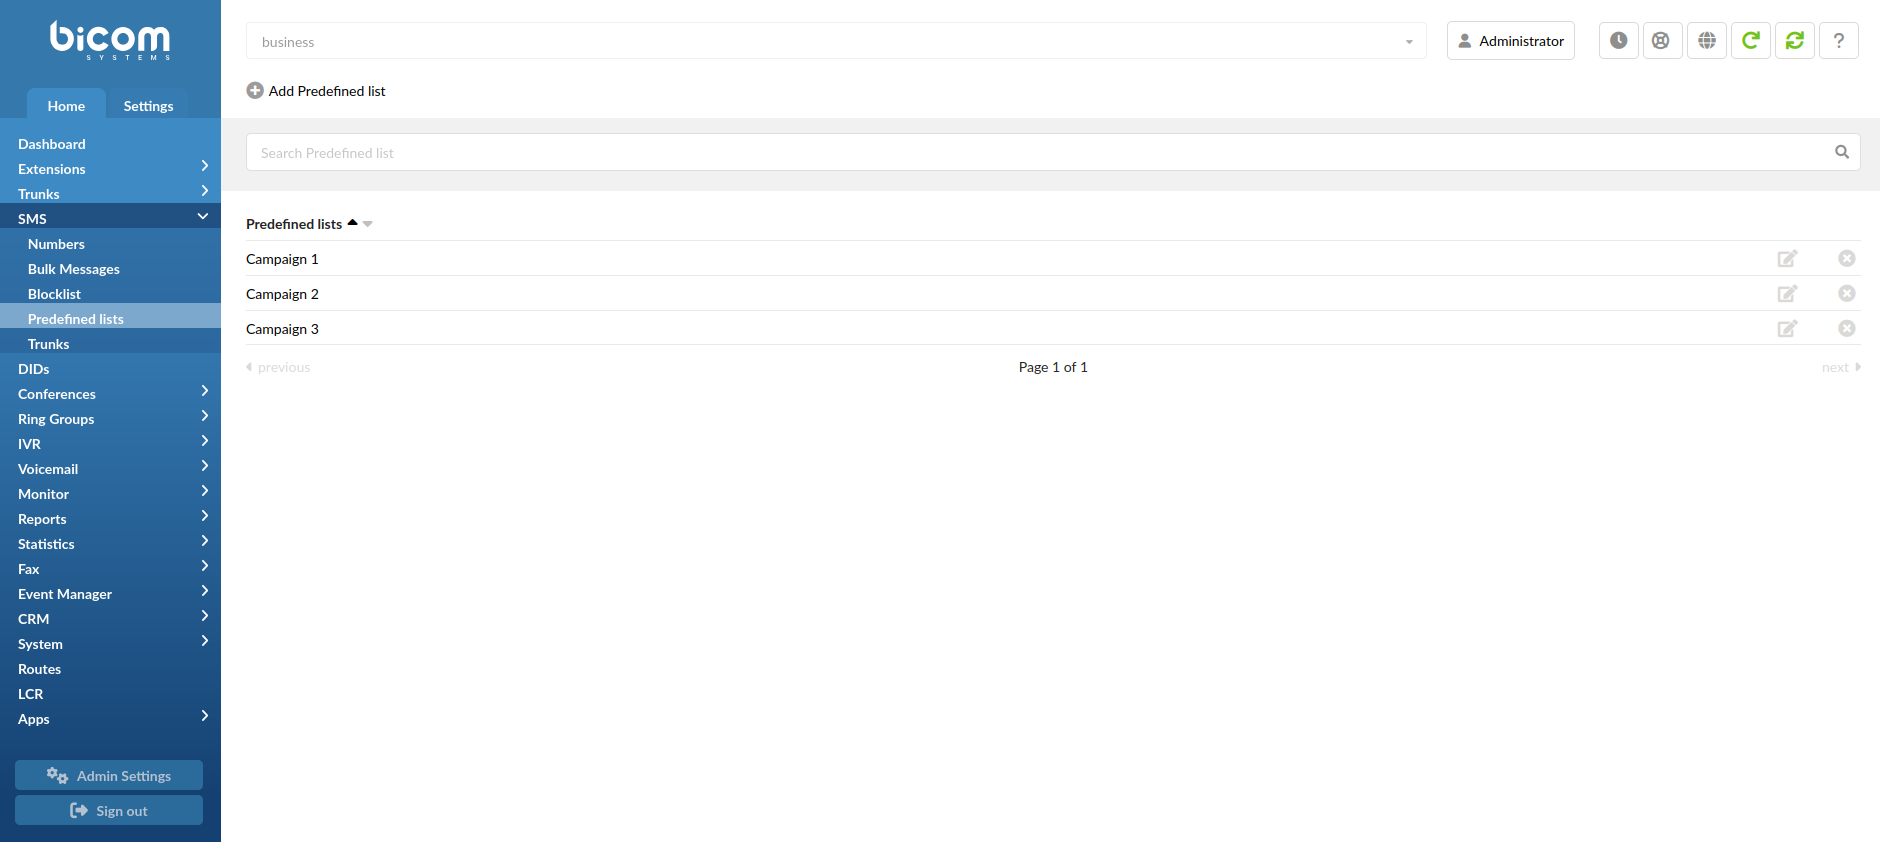
- Add Predefined list
Click this option to create a new list of SMS numbers used for Bulk SMS Campaigns.
- Search
The search bar allows you to filter Predefined lists based on a search pattern. To filter the lists, enter the name or part of the name of the list(s) you would like to edit and press enter.
- Predefined lists
This column displays the names of the available Predefined lists. You can click on the list name to edit the selected list.

Clicking on the edit icon will take you to the edit Predefined list page where you can add or remove SMS numbers.
Click the delete icon next to the Predefined list name to permanently delete the list.
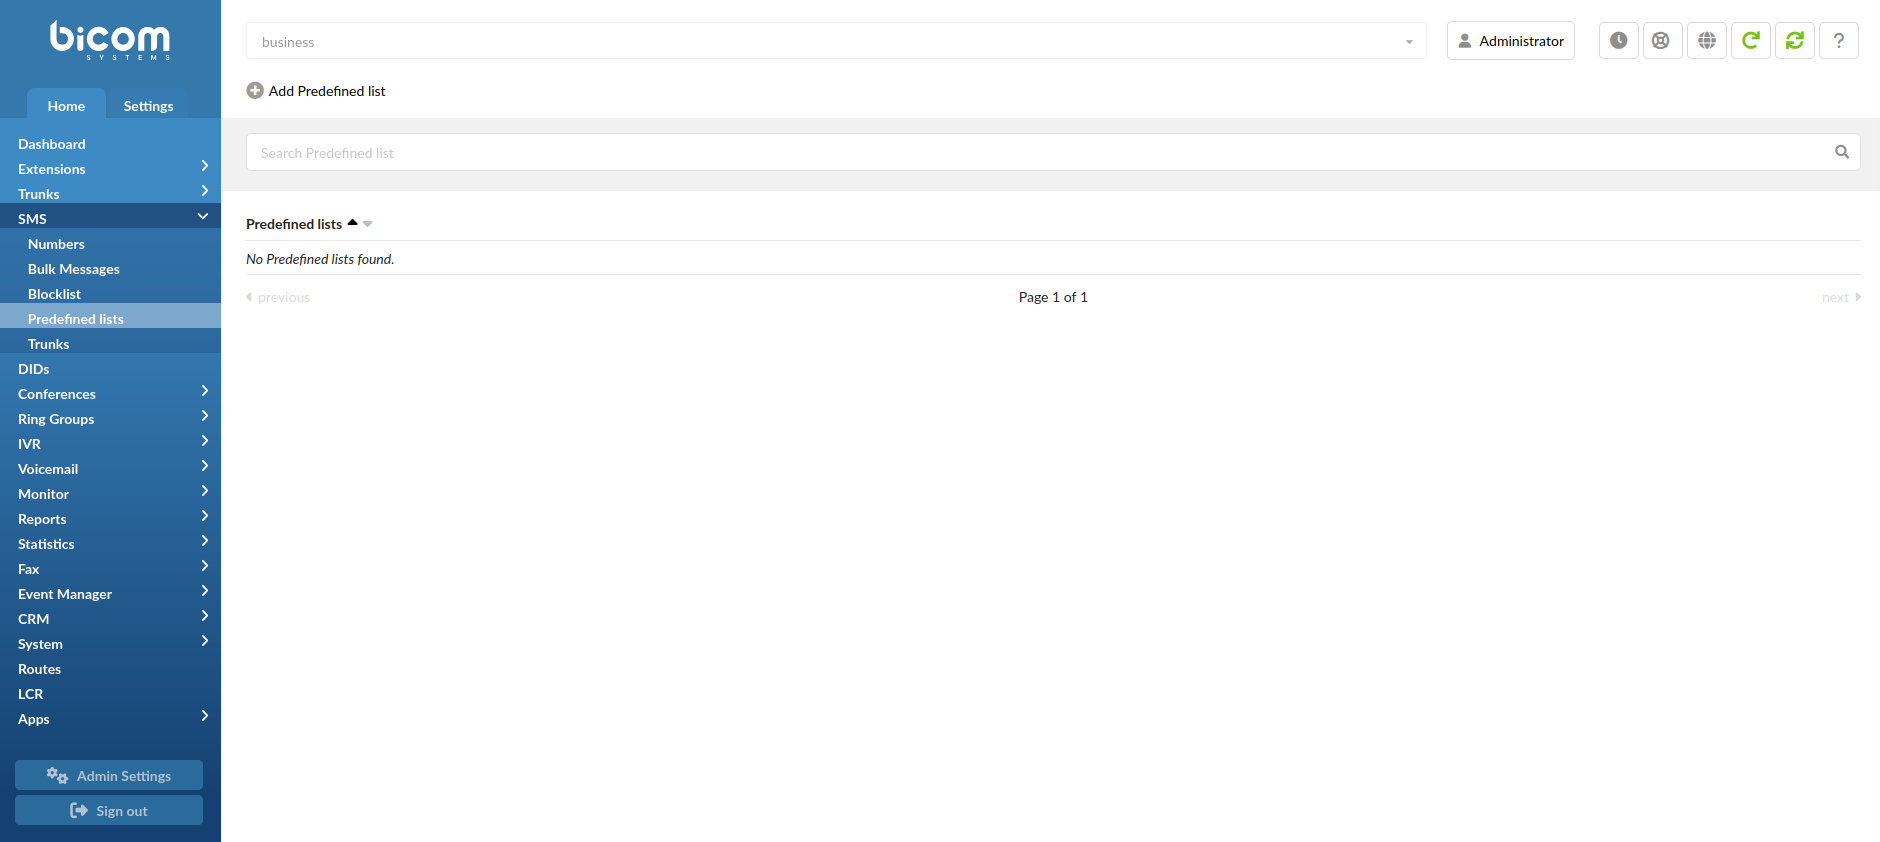
Clicking on the Predefined lists page for the first time will open a new page with no lists created.
To create a new list click on Add Predefined list. This will open the Add window, allowing you to assign a name to the new Predefined list you are creating. You can later edit the list if you want to manually add SMS numbers. Alternatively, you can use the option Upload CSV and add the list of SMS numbers using a CSV file at this step.
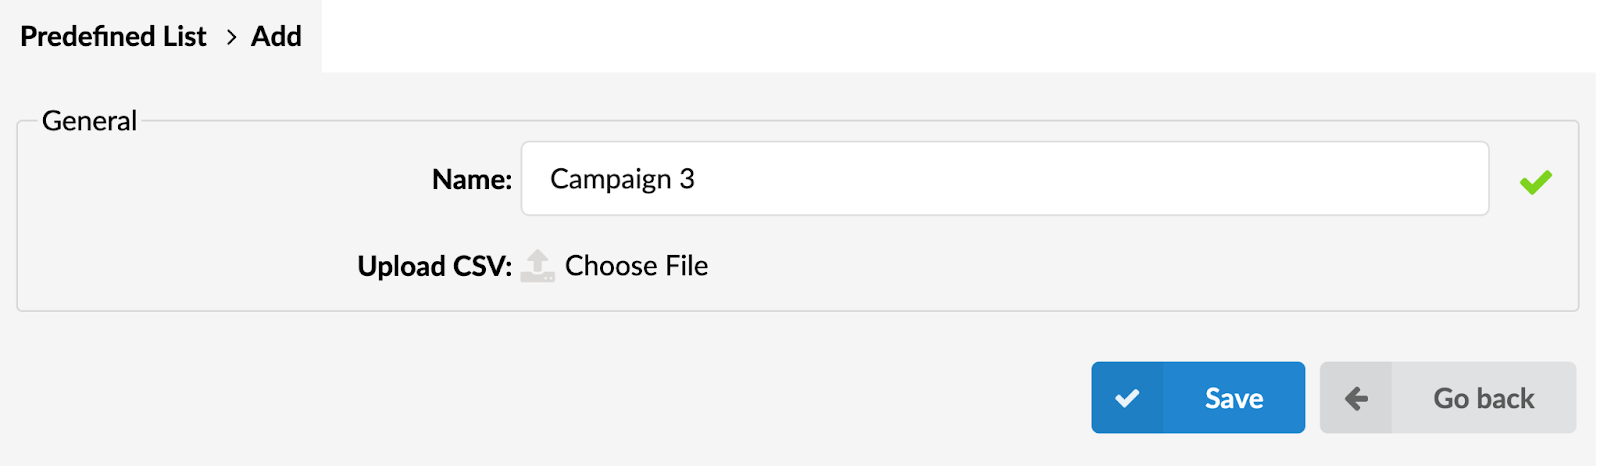
- Download CSV Template
Clicking on this option will download a Predefined List CSV template with the header sms_number. You can populate the file with a large number of SMS numbers, which must be in full E.164 format, and upload them to the list without having to enter the numbers manually.
- Name
Create a name for the new Predefined list.
- Upload CSV
This option allows you to upload a CSV file with SMS numbers you would like to add to the Predefined list.
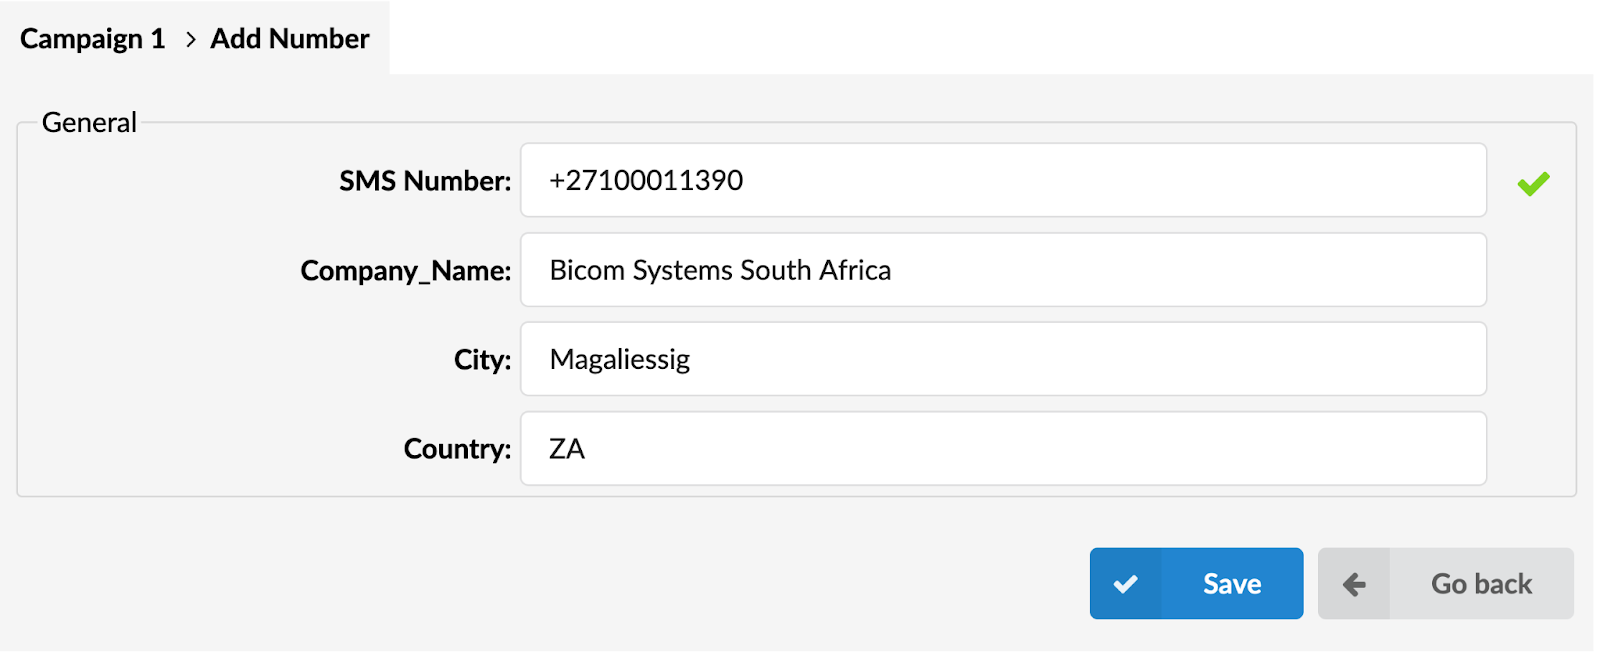
The only header required for the Predefined list CSV file to be valid is “sms_number”. However, when you add SMS numbers to a new CSV file, you can also create custom headers to add new fields and provide additional information about the numbers. These custom headers can be used as variables to customize the bulk message according to the information that's associated with the SMS number.
To meet the requirements, the first line in the file is reserved for headers and will start with the sms_number header. Additional custom headers can be added after the sms_number header. They must be comma-separated and cannot include spaces. If you want to add a header constituted of two words, you can use the underscore ( _ ) symbol instead of space.
For example, we can add new headers for Company Name, City and Country:
sms_number,Company_Name,City,Country
"+19542788470","Bicom Systems","Hollywood","US"
"+442033998800","Bicom Systems","London","UK"
"+16473131515","Bicom Systems","New Brunswick","CA"
"+33185001000","Bicom Systems","Paris","FR"
Once the new list is created, it will be displayed on the Predefined list page.
To edit a specific list, click on its name or on the edit icon left of the Predefined list’s name. This will take you to the Predefined list edit page.
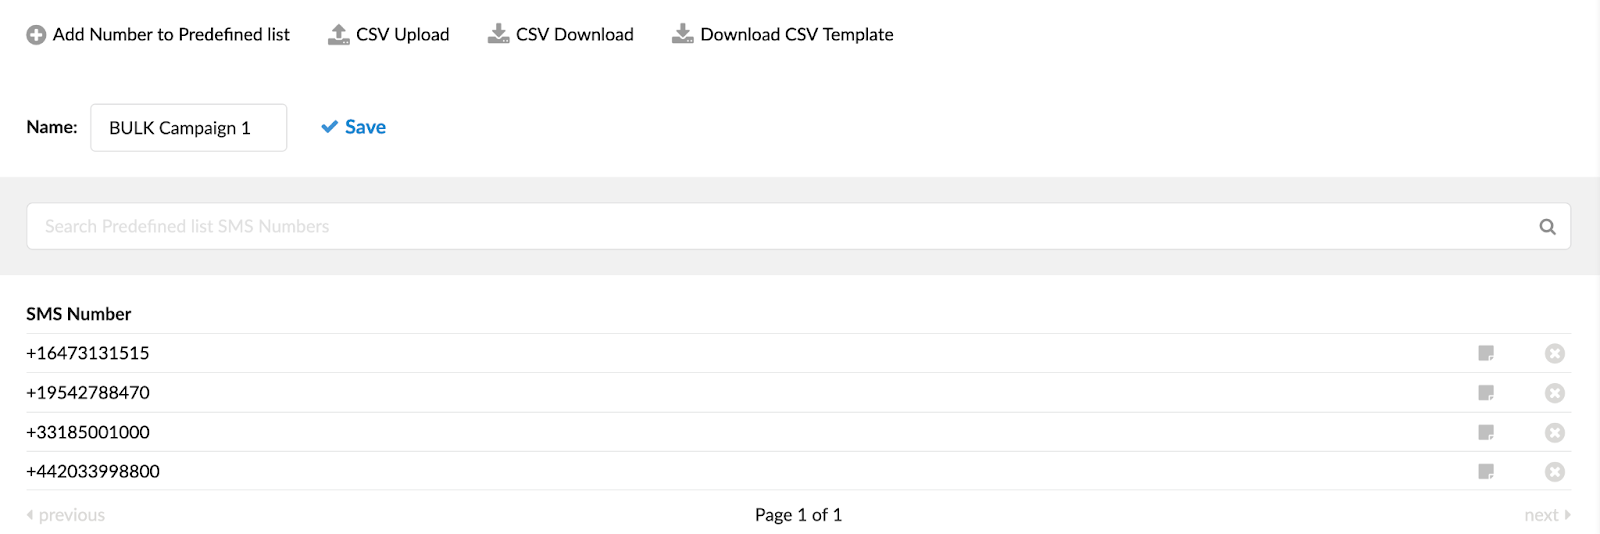
- Add Number to Predefined list
Click this button to add a new number to the existing list.
This will open a new page allowing you to add a new SMS number to the list and to populate any other fields you might have created by uploading a CSV file containing custom headers.
- CSV Upload
This option allows you to upload a CSV file containing SMS numbers you would like to add to the Predefined list.
The only header required for the Predefined list CSV file to be valid is “sms_number”. However, when you add SMS numbers to a new CSV file, you can also create custom headers to add new fields and provide additional information about the numbers. These custom headers can be used as variables to customize the bulk message according to the information that's associated with the SMS number.
To meet the requirements, the first line in the file is reserved for headers and will start with the sms_number header. Additional custom headers can be added after the sms_number header. They must be comma-separated and cannot include spaces. If you want to add a header constituted of two words, you can use the underscore ( _ ) symbol instead of space.
For example, we can add new headers for Company Name, City and Country:
sms_number,Company_Name,City,Country
"+19542788470","Bicom Systems","Hollywood","US"
"+442033998800","Bicom Systems","London","UK"
"+16473131515","Bicom Systems","New Brunswick","CA"
"+33185001000","Bicom Systems","Paris","FR"
NOTE: Using this feature in will delete all SMS numbers already in the list and then add new entries from the uploaded CSV file.
- CSV Download
Clicking on the CSV Download button will download the CSV files containing all the SMS numbers already added to the Predefined list, which can be used to re-upload numbers to another system.
- Download CSV Template
Clicking on this option will download a Predefined List CSV template with the header sms_number. You can populate the file with a large number of SMS numbers, which must be in full E.164 format, and upload them to the list without having to enter the numbers manually.
- Search
The search bar allows you to filter the SMS numbers on the list based on a search pattern. To filter the lists, enter the full number or part of the number from the list you would like to edit and press enter, which will display all the matching entries.
- Name
The name of the Predefined list you are editing. If you would like to edit the list’s name, edit the entry in the Name field and click the Save button.
- Save
Press the Save button to apply changes made to the list’s name.
- SMS Number
This column displays the SMS numbers added the the list.

Information stored in the fields created from custom headers will be displayed when you mouse over the additional information icon located at the right of the SMS number on the Predefined list edit page.
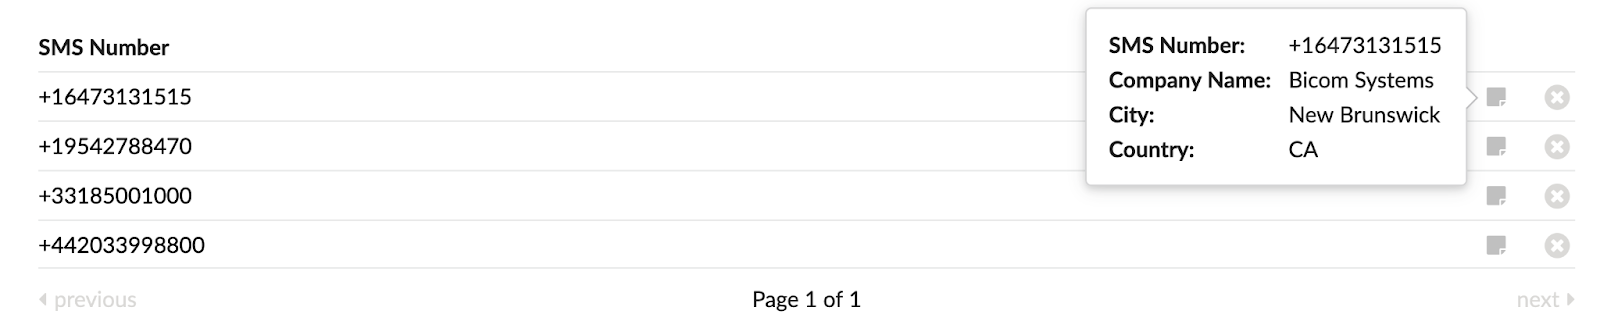
Click on the delete icon next to the SMS number to permanently delete it from the list.
¶ Trunks
The 'Trunks' section allows users to create SMS Trunks and specify configuration details. Users can here configure a new Trunk and/or edit the existing one.
¶ SMS Trunk
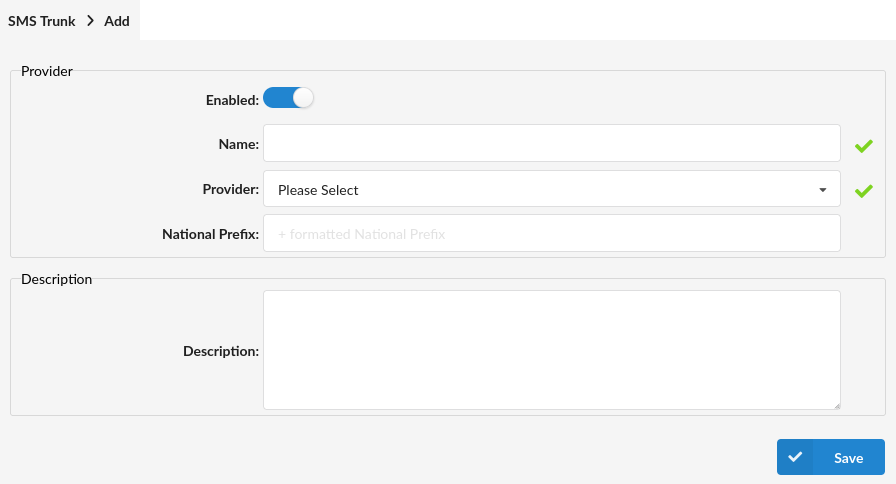
NOTE: The 'Provider' field is required. Depending on the chosen provider, the additional fields will appear that have to be populated. Not defining those fields will result in the warning messages being shown. Please refer to the screenshots.
- National Prefix (7.5):
This prefix enables the system to distinguish between national and international outbound messages for billing purposes, using the pricing rules defined in Service Plan > SMS Rates.
(E.g. If the National Prefix is set to +387 on a specific trunk, messages sent over that trunk to numbers starting with +387 will be treated as national.)
NOTE: If this field is left empty, all outbound messages will be treated as national.
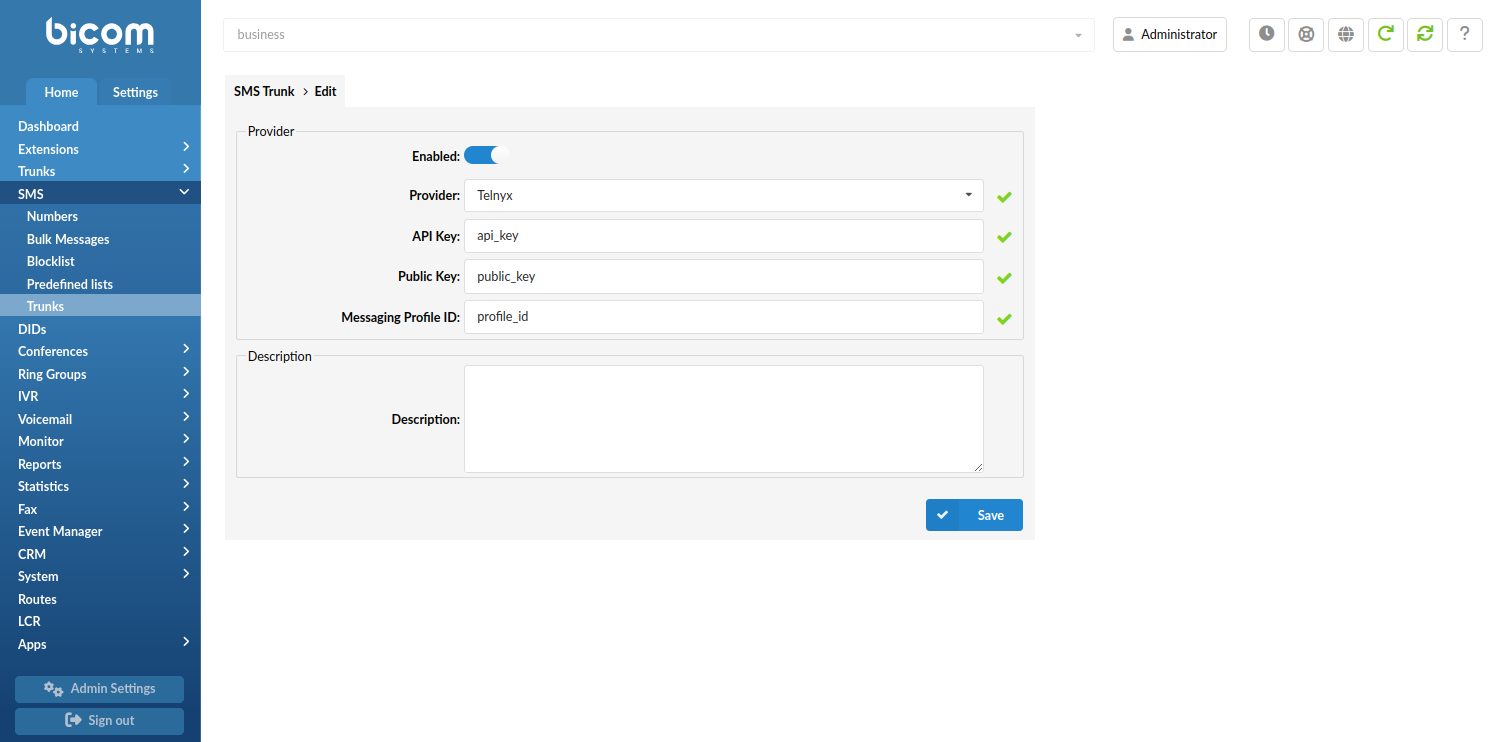
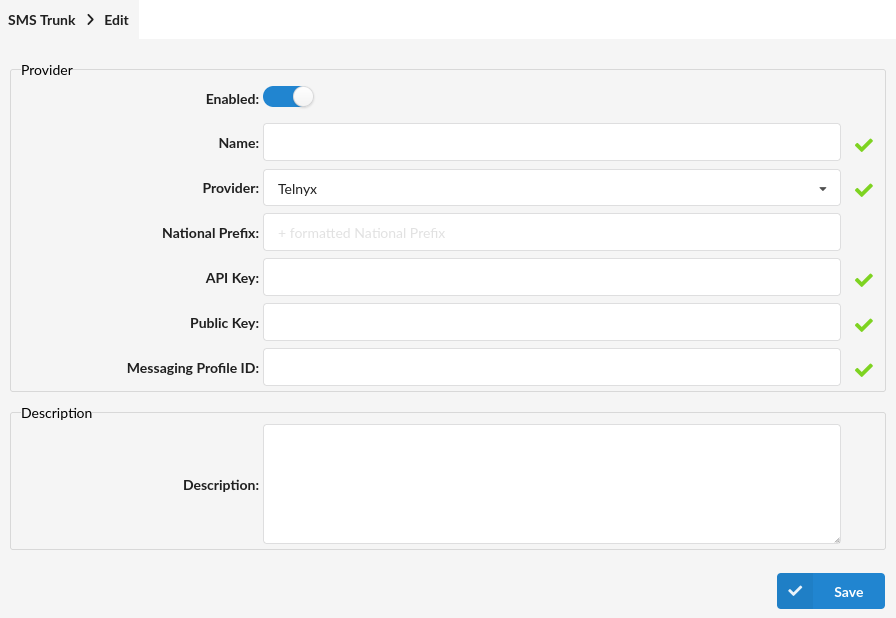
¶ Telnyx Provider
 Click this toggle button to enable the SMS service
(Toggle button)
- Provider:
Select Telnyx from the drop-down menu
(Select box)
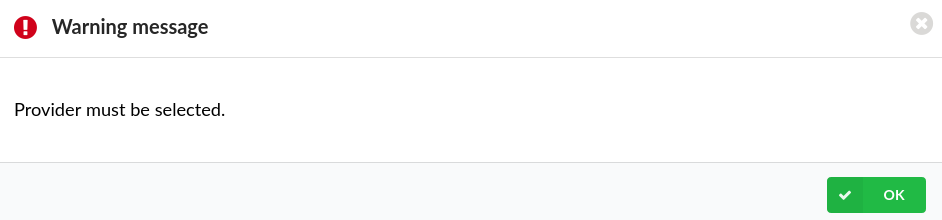
NOTE: The provider must be selected.
- National Prefix (7.5):
This prefix enables the system to distinguish between national and international outbound messages for billing purposes, using the pricing rules defined in Service Plan > SMS Rates.
(E.g. If the National Prefix is set to +387 on a specific trunk, messages sent over that trunk to numbers starting with +387 will be treated as national.)
NOTE: If this field is left empty, all outbound messages will be treated as national.
- API Key:

Populate the field with a suitable API Key
(E.g. **********************************************************)
[(a-z)(0-9)]
NOTE: This field is visible when a suitable provider is selected. In order for configuration to be set up correctly, this field must not be empty.
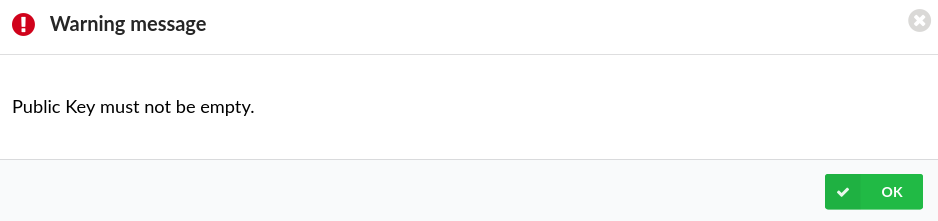
- Public Key:
Populate the field with a suitable Public Key
(E.g. **********************************************************)
[(a-z)(0-9)]
NOTE: This field is visible when a suitable provider is selected. In order for configuration to be set up correctly, this field must not be empty.
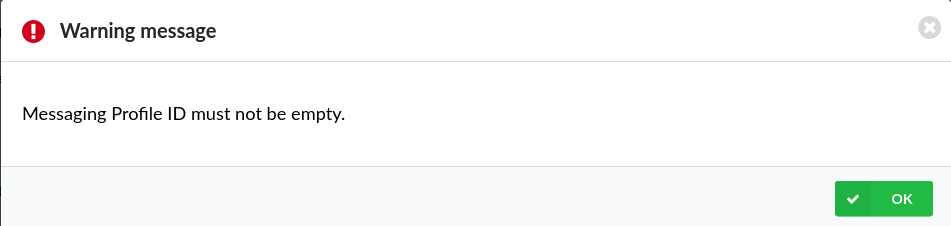
- Messaging Profile ID:
Populate the field with a suitable Messaging Profile ID
(E.g. **********************************************************)
[(a-z)(0-9)]
NOTE: This field is visible when a suitable provider is selected. In order for configuration to be set up correctly, this field must not be empty.
The example below shows the configuration layout for reference:
¶ Bandwidth Provider
Click this toggle button to enable the SMS service
(Toggle button)
NOTE: In order to use Bandwidth as a provider, it has to be enabled in a licence.
- Provider:
Select Bandwidth from the drop-down menu
(Select box)
NOTE: The provider must be selected.
- National Prefix (7.5):
This prefix enables the system to distinguish between national and international outbound messages for billing purposes, using the pricing rules defined in Service Plan > SMS Rates.
(E.g. If the National Prefix is set to +387 on a specific trunk, messages sent over that trunk to numbers starting with +387 will be treated as national.)
NOTE: If this field is left empty, all outbound messages will be treated as national.
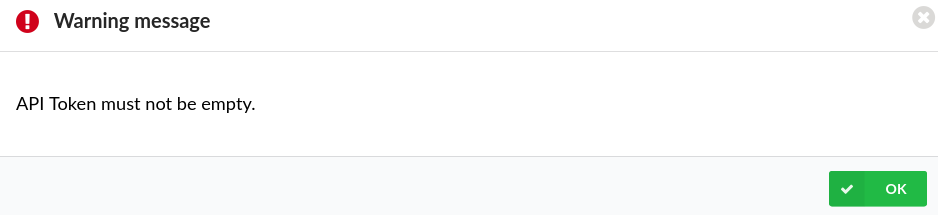
- API Token:
Populate the field with a suitable API token
(E.g. ***************)
[(a-z)(0-9)]
NOTE: This field is visible when a suitable provider is selected. In order for configuration to be set up correctly, this field must not be empty.
- API Secret:

Populate the field with a suitable API secret
(E.g. ***************)
[(a-z)(0-9)]
NOTE: This field is visible when a suitable provider is selected. In order for configuration to be set up correctly, this field must not be empty.
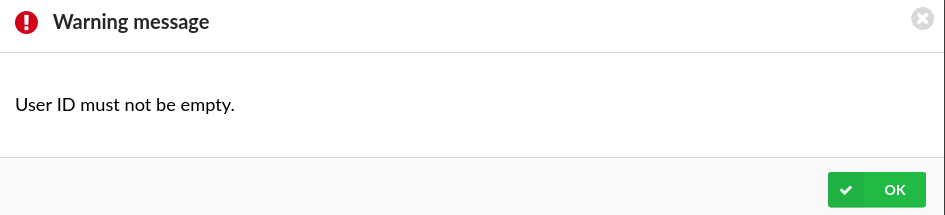
- User ID:
Populate the field with a suitable User ID
(E.g. **********************************************************)
[(a-z)(0-9)]
NOTE: This field is visible when a suitable provider is selected. In order for configuration to be set up correctly, this field must not be empty.
- Application ID:

Populate the field with a suitable Application ID
(E.g. **********************************************************)
[(a-z)(0-9)]
NOTE: This field is visible when a suitable provider is selected. In order for configuration to be set up correctly, this field must not be empty.
- Description:
Enter a suitable description regarding this Trunk.
NOTE: The description can contain any information that is necessary to differentiate this Trunk from others. Since this is not a required field, it can be left empty.
The example below shows the configuration layout for reference:

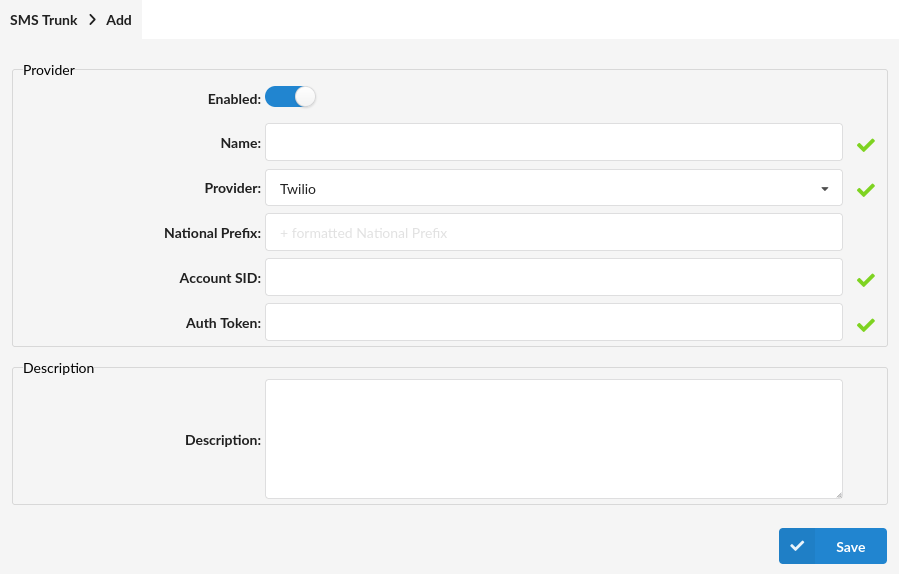
¶ Twilio Provider
Click this toggle button to enable the SMS service
(Toggle button)
NOTE: In order to use Twilio as a provider, it has to be enabled in a licence. If using the Multi Tenant Edition, Tenant Code(s) have to be provided.
- Provider:
Select Twilio from the drop-down menu
(Select box)
NOTE: The provider must be selected.
- National Prefix (7.5):
This prefix enables the system to distinguish between national and international outbound messages for billing purposes, using the pricing rules defined in Service Plan > SMS Rates.
(E.g. If the National Prefix is set to +387 on a specific trunk, messages sent over that trunk to numbers starting with +387 will be treated as national.)
NOTE: If this field is left empty, all outbound messages will be treated as national.
- Account SID:

Populate the field with a suitable Account SID
(E.g. **********************************)
[(a-z)(0-9)]
NOTE: This field is visible when a suitable provider is selected. In order for configuration to be set up correctly, this field must not be empty.
- Auth Token:

Populate the field with a suitable Auth Token
(E.g. ********************************)
[(a-z)(0-9)]
NOTE: This field is visible when a suitable provider is selected. In order for configuration to be set up correctly, this field must not be empty.
The example below shows the configuration layout for reference:
- Description:
Enter a suitable description regarding this Trunk.
(E.g. "This is a new SMS Trunk, but it should be used in certain cases.")
[(a-z)(0-9)]
NOTE: The description can contain any information that is necessary to differentiate this SMS Trunk from other Trunks on the system. Since this is not a required field, it can be left empty.
¶ VoIP Innovations Provider
NOTE: Please note that this feature is part of the beta release and is only visible to beta testers. Once the stable version is released, it will be available for general use.
Click this toggle button to enable the SMS service
(Toggle button)
NOTE: In order to use VoIP Innovations as a provider, it has to be enabled in a licence. If using the Multi Tenant Edition, Tenant Code(s) have to be provided.
- Name:
Enter a name of the provider. This is relevant only for easier navigation in the GUI.
(E.g. Test)
[(a-z)(0-9)]
NOTE: The name of a provider must be entered.
- Provider:
Select VoIP Innovations from the drop-down menu
(Select box)
NOTE: The provider must be selected.
- National Prefix (7.5):
This prefix enables the system to distinguish between national and international outbound messages for billing purposes, using the pricing rules defined in Service Plan > SMS Rates.
(E.g. If the National Prefix is set to +387 on a specific trunk, messages sent over that trunk to numbers starting with +387 will be treated as national.)
NOTE: If this field is left empty, all outbound messages will be treated as national.
- API Login:

Populate the field with a suitable API Login
(E.g. **********************************)
[(a-z)(0-9)]
NOTE: This field is visible when a suitable provider is selected. In order for configuration to be set up correctly, this field must not be empty.
- API Secret:
Populate the field with a suitable API Login
(E.g. ********************************)
[(a-z)(0-9)]
NOTE: This field is visible when a suitable provider is selected. In order for configuration to be set up correctly, this field must not be empty.
The example below shows the configuration layout for reference:

- Description:
Enter a suitable description regarding this Trunk.
(E.g. "This is a new SMS Trunk, but it should be used in certain cases.")
[(a-z)(0-9)]
NOTE: The description can contain any information that is necessary to differentiate this SMS Trunk from other Trunks on the system. Since this is not a required field, it can be left empty.
¶ OZSMS Provider (6.7) (7.0)
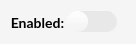
Click this toggle button to enable the SMS service.
NOTE: To use the OZSMS with PBXware it must be enabled in your PBXware license, if this is not the case please contact your account manager.
- Name:
Enter the name of the provider. This is relevant only for easier navigation in the GUI.
(E.g. Test)
NOTE: The name of a provider must be entered.
- Provider:
Select OZSMS from the drop-down menu.
NOTE: The provider must be selected.
- National Prefix (7.5):
This prefix enables the system to distinguish between national and international outbound messages for billing purposes, using the pricing rules defined in Service Plan > SMS Rates.
(E.g. If the National Prefix is set to +387 on a specific trunk, messages sent over that trunk to numbers starting with +387 will be treated as national.)
NOTE: If this field is left empty, all outbound messages will be treated as national.
- API Login:
Populate the field with a suitable API Login.
(E.g. **********************************)
NOTE: This field is visible when a suitable provider is selected. It must not be empty for the configuration to be set up correctly.
- API Secret:
Populate the field with a suitable API Secret.
(E.g. ********************************)
NOTE: This field is visible when a suitable provider is selected. It must not be empty for the configuration to be set up correctly.
The example below shows the configuration layout for reference:
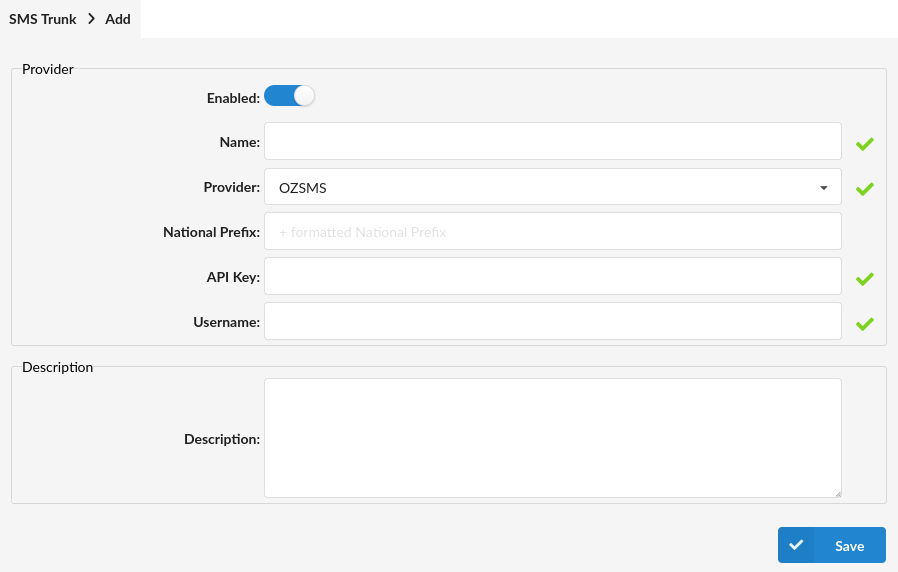
- Description
Enter a suitable description regarding this Trunk.
(E.g. "This is a new SMS Trunk, but it should be used in certain cases.")
NOTE: The description can contain information necessary to differentiate this Trunk from others. Since this is not a required field, it can be left empty.
¶ SMS Connector (7.2)
One of the major additions in version 7.2 is the introduction of the SMS Connector API, which is a flexible and standardized interface used for sending and receiving SMS and MMS messages on PBXware using custom SMS Trunks.
This feature allows our customers to develop middleware applications and connect PBXware's SMS Service with SMS Providers even if they are currently not supported in PBXware.
With a middleware application operational, further PBXware configuration is straightforward.
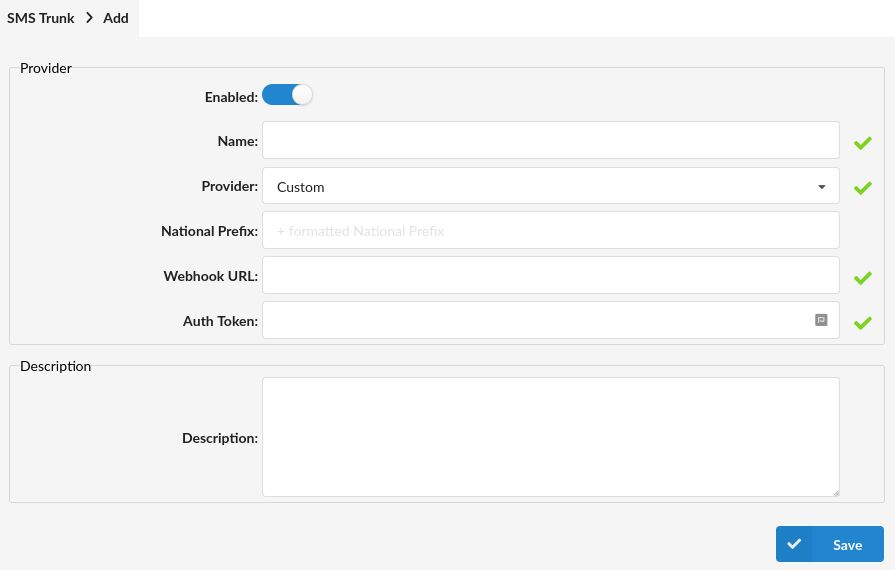
In your PBXware GUI navigate to SMS -> Trunks and click add SMS Trunk.
In the Provider field, select Custom.
With the Custom selected for the provider, these are the fields you will be presented with which will allow you to configure custom connection to the middleware application:
- Enable
Click this toggle button to enable or disable this SMS trunk
- Name
Displays a Trunk's name
- Provider
Displays the the provider selected for this Trunk. (i.e. Custom)
NOTE: For the Custom option to be available when creating a new SMS trunk, the SMS Connector feature has to be enabled in your PBXware license.
- National Prefix (7.5):
This prefix enables the system to distinguish between national and international outbound messages for billing purposes, using the pricing rules defined in Service Plan > SMS Rates.
(E.g. If the National Prefix is set to +387 on a specific trunk, messages sent over that trunk to numbers starting with +387 will be treated as national.)
NOTE: If this field is left empty, all outbound messages will be treated as national.
- Webhook URL
The address of the middleware application used for interfacing with the custom trunk provider all SMS/MMS messages will be sent to.
- Auth Token
A token used for authentication with the middleware application. Enter the existing or generate a new token by pressing the icon at the far right of the field.
The example below shows the configuration layout for reference:
For more specific information on how to configure Custom SMS Trunk please check our SMS Connector HOWTO.