¶ CMP Service
¶ Introduction
The COMMSware Messaging Platform (CMP) service is a bespoke solution designed to function as a proxy between your omnichannel system and meta-information related to messaging interactions.
The CMP service is a vital intermediary component within your omnichannel architecture, facilitating communication and data exchange between the omnichannel system and various messaging platforms. It acts as a bridge, allowing your omnichannel system to efficiently manage and process messaging interactions while abstracting the complexities of handling meta-information associated with these interactions.
¶ Key Components
Main Services
The core of the platform consists of three primary services:
- core - includes the webhook handler and static file server, both of which are essential for the system's operation. It is crucial to have at least one instance of this service running at all times.
- worker - responsible for processing inbound messages. Running multiple instances of this service can enhance throughput and efficiency.
- sender - dedicated to sending outbound messages. Unlike the worker service, the sender service is restricted to a single instance.
Channel Adapters
This key component is designed to work seamlessly with popular communication channels like Facebook and WhatsApp. It offers a unified interface for interacting with these platforms, making integration easier and more straightforward.
¶ CMP Service Deployment for PBXware Systems Below v7.4
Below are two methods for deploying the CMP service for PBXware systems under version 7.4. One method is to deploy the CMP service using Docker Compose on any VPS, and the other is to deploy the CMP service on SERVERware using the official template. Regarding PBXware v7.4 and higher, the CMP service will be integrated into the system; it will not be needed for installation. Users can set up the CMP service via a GUI interface.
The following two methods outline the deployment of the CMP service for PBXware versions prior to 7.4. For a comprehensive installation guide covering both pre- and post-7.4 versions, please refer to this link. (https://downloads.bicomsystems.com/guides/omnichannel/CMP_userguide.pdf)
¶ Deploying the CMP on any VPS
Deploying the COMMSware Messaging Platform (CMP) on any Virtual Private Server (VPS) using Docker Compose is a straightforward process. This tutorial will walk you through the step-by-step setup, ensuring a seamless deployment and efficient utilization of CMP's powerful communication capabilities.
¶ Requirements
To successfully deploy the COMMSware Messaging Platform (CMP) on your Linux host, ensure it meets the following general requirements:
-
64-bit Kernel and CPU Support for Virtualization:
Verify that your host system supports 64-bit architecture and has the necessary hardware virtualization support. This is essential for running virtualized environments effectively.
-
KVM Virtualization Support:
Ensure that Kernel-based Virtual Machine (KVM) virtualization support is enabled on your host system. KVM provides the necessary framework for virtualizing your environment efficiently.
-
Systemd Init System:
The host system should utilize the systemd init system. systemd is a modern init system and service manager, widely adopted in modern Linux distributions. It ensures efficient management of system services, including those required for running CMP.
-
Minimum 4 GB of RAM:
Allocate a minimum of 4 GB of RAM for optimal performance of CMP and its associated services. Sufficient memory ensures smooth operation and responsiveness of the platform.
¶ Additional Requirements
Obtain a domain name and public IP address for your CMP instance. For example, you can use a domain like cmp.example.org. The domain and IP address are essential for accessing CMP from external networks and ensuring proper routing of communication traffic.
NOTE Docker offers extensive support across major platforms and distributions, including CentOS, Ubuntu, Debian, and Fedora. For convenient installation, Docker provides binaries for the manual setup of Docker Engine. These binaries are statically linked, ensuring compatibility with any Linux distribution. This flexibility allows you to seamlessly deploy Docker across various environments without encountering compatibility issues.
¶ Installation
Before deploying a COMMSware Messaging Platform (CMP), several preparatory steps are necessary.
¶ Install Docker and Docker Compose
NOTE In this tutorial, we'll utilize Ubuntu 22.04. Refer to the official Docker documentation for installation instructions tailored to your specific platform.
To commence, let's establish an SSH connection to our freshly provisioned VPS and proceed with Docker installation using the official APT repositories.
- Set up Docker’s apt repository
# Add Docker's official GPG key:
sudo apt-get update
sudo apt-get install ca-certificates curl gnupg
sudo install -m 0755 -d /etc/apt/keyrings
curl -fsSL https://download.docker.com/linux/ubuntu/gpg | sudo gpg --dearmor -o /etc/apt/keyrings/docker.gpg
sudo chmod a+r /etc/apt/keyrings/docker.gpg

# Add the repository to Apt sources:
echo \
  "deb [arch=$(dpkg --print-architecture) signed-by=/etc/apt/keyrings/docker.gpg] https://download.docker.com/linux/ubuntu \
  $(. /etc/os-release && echo "$VERSION_CODENAME") stable" | \
  sudo tee /etc/apt/sources.list.d/docker.list > /dev/null
sudo apt-get update
- Install packages
sudo apt-get install docker-ce docker-ce-cli containerd.io docker-buildx-plugin docker-compose-plugin
- Verify the status of the Docker service to ensure it's running using the following command:
systemctl status docker.service
If the Docker service isn't running, it might be due to issues with iptables. You can resolve this by switching to legacy implementations. Here's how:
update-alternatives --set iptables /usr/sbin/iptables-legacy
update-alternatives --set ip6tables /usr/sbin/ip6tables-legacy
update-alternatives --set arptables /usr/sbin/arptables-legacy
update-alternatives --set ebtables /usr/sbin/ebtables-legacy
Once you have completed all the steps, it's recommended to restart the VPS to ensure that all changes take effect properly.
¶ Configure Environment Variables
You can utilize the example environment file provided to create your own .env file. Ensure to remove all comments from the file.
File .env - Example
# Docker
CMP_DOMAIN              = cmp.example.org # your domain [required]
CMP_HTTP_PORT           = 8080 # on which port is cmp running, for docker [required for dev]
LETS_ENCRYPT_EMAIL      = email@example.org # production only, email for LE certificate, for docker [required for prod]
NGROK_AUTHTOKEN         = YOUR_TOKEN # if you are using ngrok container (--profile dev), for docker [required for dev]
# General
CMP_ADMIN_USER          = admin # username for administration [required]
CMP_ADMIN_PASSWORD      = admin # password for administration [required]
CMP_CHANNELS            = facebook, whatsapp # comma-separated list, defaults to: facebook, whatsapp
CMP_PUBLIC_BASE_URL     = https://mydomain.com # base endpoint for webhooks, defaults to https://${CMP_DOMAIN}
CMP_WHATSAPP_API_TYPE   = cloud # type of whatsapp api implementation: cloud or on-premise, default cloud
CMP_WHATSAPP_BSP        = 360dialog # Business Solution Provider for WhatsApp: 360dialog or empty for Meta Cloud API, default 360dialog
CMP_FALLBACK_AVATAR_URL = /assets/profile.png # URL of the profile picture for agent, if not sent, absolute or relative, optional
# NATS
NATS_TOKEN              = mytoken # Authentication token for NATS clients (defaults to no authentication)
¶ Use Docker Compose to Pull and start Services
To obtain the required compose configuration files, you can download them directly from the specified URL, downloads.bicomsystems.com. Here's how you can do it using the wget command:
wget -O https://downloads.bicomsystems.com/pbxware-support/cmp/compose.yaml
wget -O https://downloads.bicomsystems.com/pbxware-support/cmp/compose.prod.yaml
These commands will download the compose.yaml and compose.prod.yaml files from the provided URL and save them in your current directory.
After downloading the compose files, you will need to start Docker Compose with the following command:
docker compose -f compose.yaml -f compose.prod.yaml up -d
This command simultaneously utilizes both compose.yaml and compose.prod.yaml files for configuration. It initiates the Docker Compose services in detached mode (-d), enabling them to operate in the background. This process includes pulling the necessary images and starting the containers. Following successful deployment, the web admin interface should be accessible at your designated domain.

To check running containers, you can use the following command:
docker ps
This command lists all the currently running Docker containers on your system.
Update
To update any or all CMP services, stop the service or all services, pull the image(s), and start them again.
docker compose -f compose.yaml -f compose.prod.yaml down
docker pull registry.bicomsystems.com/itnernal/cmp-core
docker pull registry.bicomsystems.com/internal/cmp-worker
docker pull registry.bicomsystems.com/itnernal/cmp-sender
docker compose -f compose.yaml -f compose.prod.yaml up -d
Checking Logs
To view logs for all CMP services, specify the same compose files and use the logs command.
docker compose -f compose.yaml -f compose.prod.yaml logs
You may also access logs for a single service:
docker compose -f compose.yaml -f compose.prod.yaml logs core
Since all Docker Compose logs are sent to journald on the host machine (as configured in compose.prod.yaml), logs can be accessed using the journalctl tool like any other journald logs by specifying the container name:
journalctl CONTAINER_NAME=cmp-worker-1 --since "1 hour ago" --no-pager
To list containers by name, you can use the following command:
docker ps --format '{{.Names}}'
¶ Deploying the CMP on SERVERware
Here’s how you can set up the COMMSware Messaging Platform (CMP) on your SERVERware
¶ Requirements
To get started with installing the CMP service on SERVERware, please ensure you have the following:
- SERVERware 4.5 with KVM support.
- A domain and public IP, for example, cmp.example.org.
- An SSL certificate is required, but one will be automatically installed from Let’s Encrypt.
¶ **Installing the VPS **
Before deploying CMP, complete the following steps:
¶ Install Official CMP OCI Template
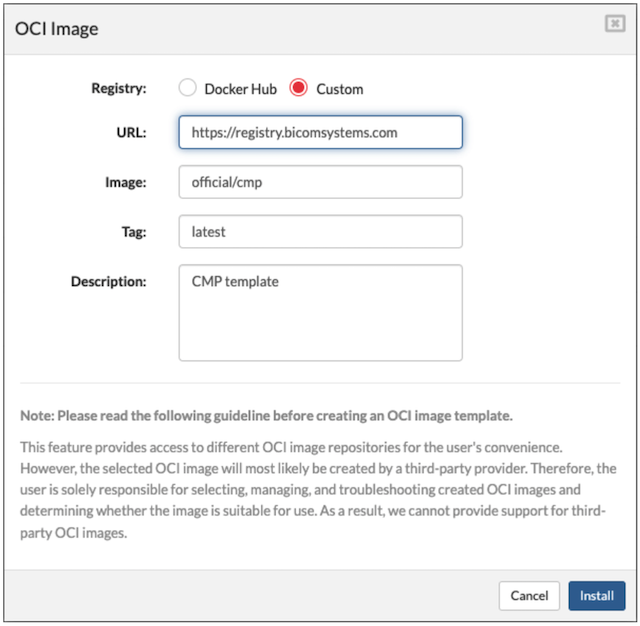
- Go to System settings, then Templates, and select OCI Image.
- Check if "official/cmp" is available and enabled. If not, click on Install New Template.
- Choose Custom as your registry option, and enter registry.bicomsystems.com.
- For the image name, input official/cmp, and for the tag, type in latest.
- Optionally, you can add a description if you wish, then click Install.
¶ Create a New VPS
Once you’ve confirmed that the CMP OCI template is available, follow these steps:
- Navigate to VPSs and click on Create VPS.
- Choose the OCI type and select the official/cmp installation option.
- Select KVM as the engine for virtualization.
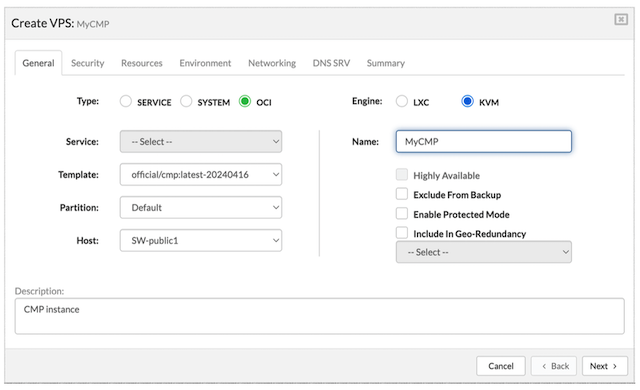
- After selecting the virtualization, click on the "Next" button. Then, proceed to generate a secure password for your VPS.
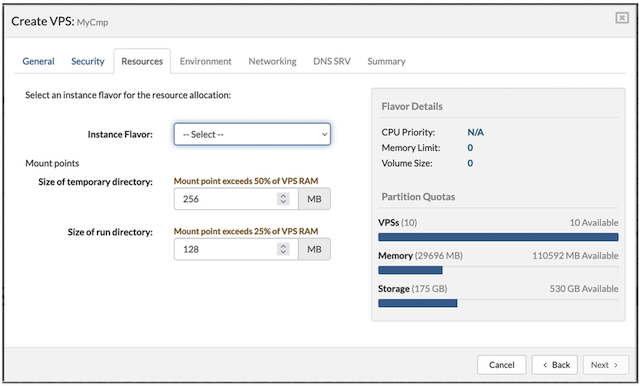
-When selecting the instance size, it’s recommended to choose the 'Large instance flavor' for the best performance.
In the "Environment" tab, customize the values to suit your instance needs and add them as environment variables. Below are examples of configuration parameters for the CMP service:
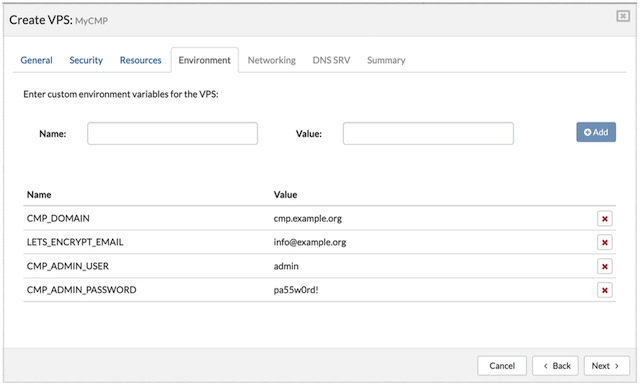
List of available variables:
- CMP_DOMAIN: your domain, e.g. cmp.example.org - REQUIRED
- LETS_ENCRYPT_EMAIL: email for LE certificate (for automatic SSL certificate) - REQUIRED • CMP_ADMIN_USER: username for administration - REQUIRED
- CMP_ADMIN_PASSWORD: password for administration - REQUIRED
- CMP_HTTP_PORT: on which port should CMP run (default: 80)
- CMP_CHANNELS: comma-separated list, optional (default: facebook, whatsapp)
- CMP_PUBLIC_BASE_URL: base endpoint for webhooks, (default: https://${CMP_DOMAIN}) • NATS_TOKEN: authentication token for NATS clients (defaults to no authentication)
- CMP_FALLBACK_AVATAR_URL: facebook only, default avatar for agents (example: /assets/profile.png), defaults to no avatar
¶ **Running the VPS **
Start the VPS and allow a minute for it to download and initiate all the services. Please note that the initial start may take longer, but subsequent launches will be quicker, with CMP becoming ready as soon as the VPS is running.
¶ Menaging the VPS
SSH access is essential for managing CMP services, performing updates, checking logs, and more.
¶ CMP Service
CMP is installed as a systemd service, which means it operates like any other service on your system. You can start, stop, restart, enable, disable, and check the status of the CMP service using standard systemd commands.
¶ Update
- Stop the service or all services.
docker compose -f compose.yaml -f compose.prod.yaml down
- Pull the image(s) containing the updates.
docker pull registry.bicomsystems.com/internal/cmp-core
docker pull registry.bicomsystems.com/internal/cmp-worker
docker pull registry.bicomsystems.com/internal/cmp-sender
- Start the service(s) again.
docker compose -f compose.yaml -f compose.prod.yaml up -d
By following these steps, you can ensure that your CMP services are up to date with the latest changes and improvements.
¶ Logs
To view logs for all CMP services, specify the same compose files and use the "logs" command. This command will display the logs for each service, allowing you to monitor their activity and troubleshoot any issues.
docker compose -f compose.yaml -f compose.prod.yaml logs
Additionally, you can access logs for a single service by specifying the service name along with the logs command.
docker compose -f compose.yaml -f compose.prod.yaml logs core
As all Docker Compose logs are directed to the journald on the host machine (configured in compose.prod.yaml), you can access these logs using the journalctl tool, just like any other journald logs. Simply specify the container name to retrieve the logs you need.
journalctl CONTAINER_NAME=cmp-worker-1 --since "1 hour ago" --no-pager
¶ Configuring Channel Settings
To configure the settings for each channel, follow these steps using the provided web interface:
-
Ensure your system is running with at least the core service active.
-
Open a web browser and go to the settings page of your domain. The URL should be in the format:
http://yourdomain/settings. -
You can enter and adjust the configuration data for each enabled channel on the settings page. Below are instructions for configuring Facebook and WhatsApp channels:
Facebook Integration
- Meta/Facebook Developer Account: You’ll need a developer account with Meta/Facebook. Create one if you don’t have it already.
- Meta/Facebook App and Page: Set up a Meta/Facebook app and associate it with a Facebook page.
WhatsApp Integration
- Choose API Implementation: Decide between two API implementations for WhatsApp, cloud, and on-premise before starting the services. Note that you can’t change this without restarting.
- Meta Cloud API: For the Meta Cloud API, set up your Meta app following the instructions provided in the official documentation.
By following these steps, you’ll be able to configure the settings for each channel using the web interface provided by the system.
¶ CMP Service Deployment for PBXware Systems v7.4 and Above
From ver. 7.4, the CMP service will be deployed as part of the PBXware system, where all necessities regarding the CMP service itself are pre-configured. So, when users install the PBXware system, it will be ready for integration with Facebook and WhatsApp, with small adjustments that need to be made via the GUI interface.
The newer versions (7.4 and higher) allow users to run the CMP service locally on their PBXware system or to connect to a remote CMP service.
¶ Running the CMP Service
After installing or upgrading the PBXware system, users must navigate to the Admin Settings and select the CMP Configuration option.
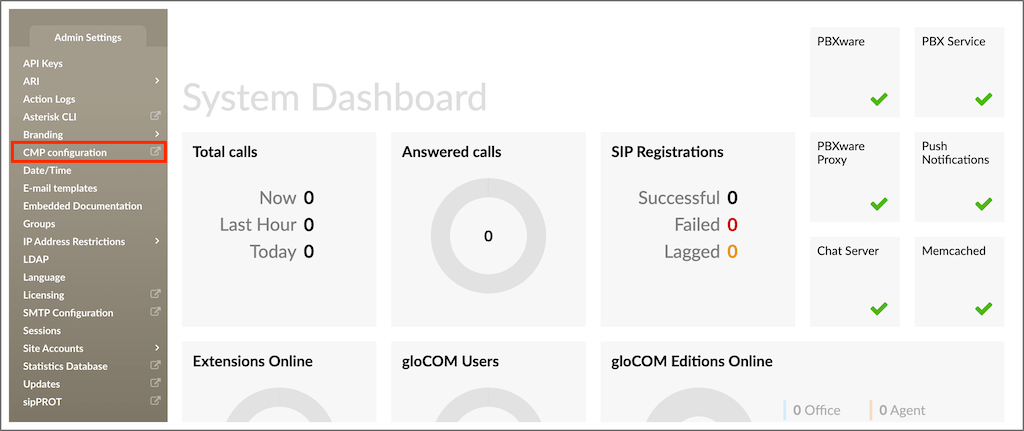
From there, users can start the CMP service by simply clicking the 'Start Service' button. Once initiated, they will be directed to the next landing page.
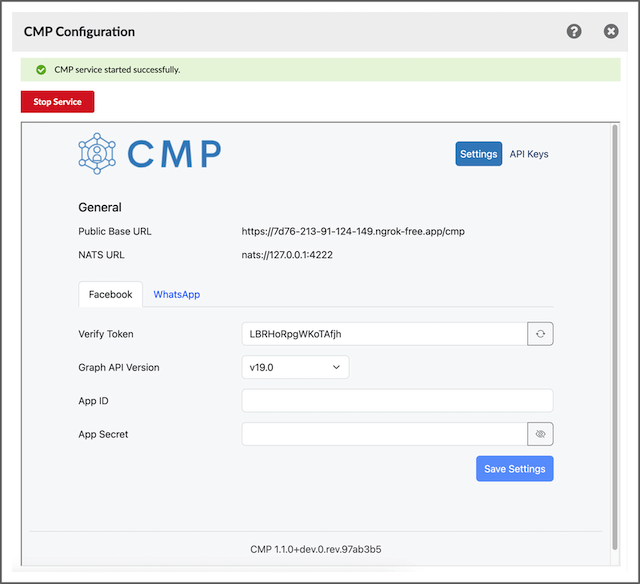
NOTE To run everything smoothly, users must ensure that the PBXware system's domain name is set within Settings > Servers.
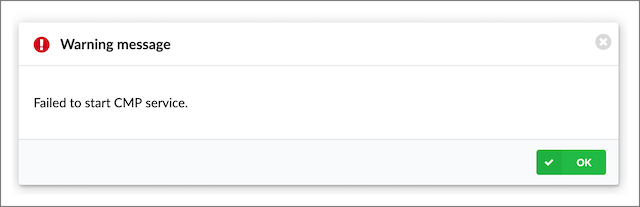
If the CMP service fails to start, a warning message will appear within the CMP window.
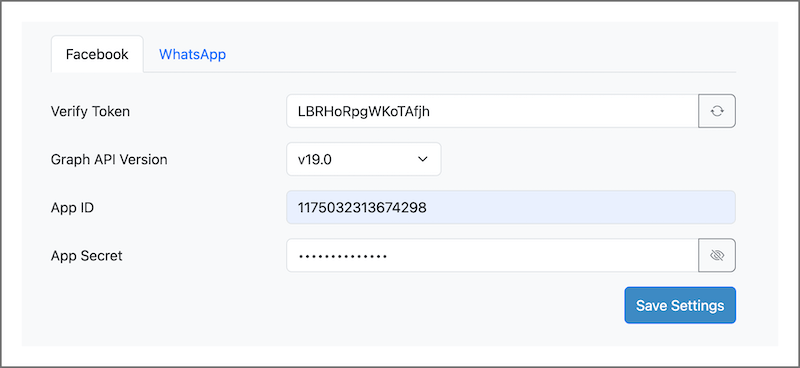
To integrate with Facebook, users have to provide credentials for the Facebook app (App ID and App secret). This app credential can be acquired from the user's Facebook App.
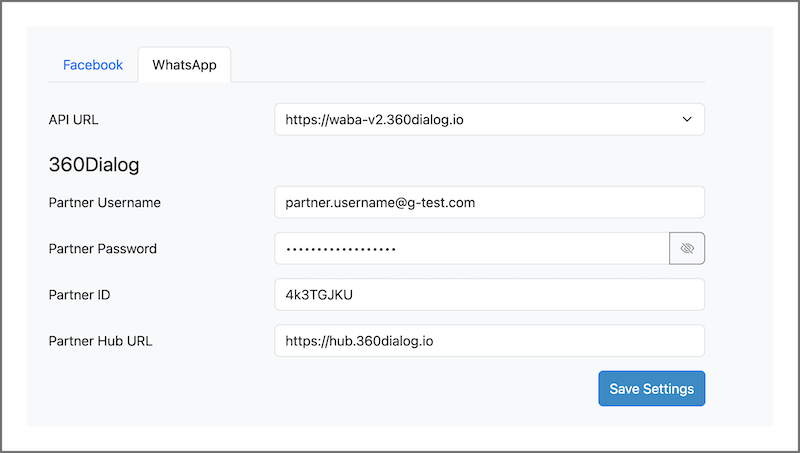
To set up CMP for integration with WhatsApp, users must switch to the WhatsApp tab and enter the corresponding credentials. Partner Username, Partner Password, and Partner ID can be obtained from your 360Dialog account.
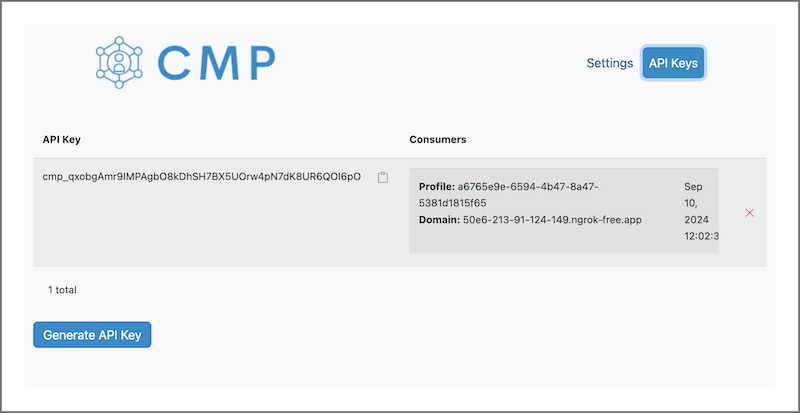
The next step is to select the tab for generating API keys (top-right) and create an API key that will be used to configure CMP settings locally. By clicking on the "Generate API Key" button, users will be provided with a unique API key for their CMP service.
After populating all necessary credentials, users must navigate to the Contact Center Home page and select Settings from the Messaging section of the navigation bar. When the prompting window is displayed, locate the CMP section.
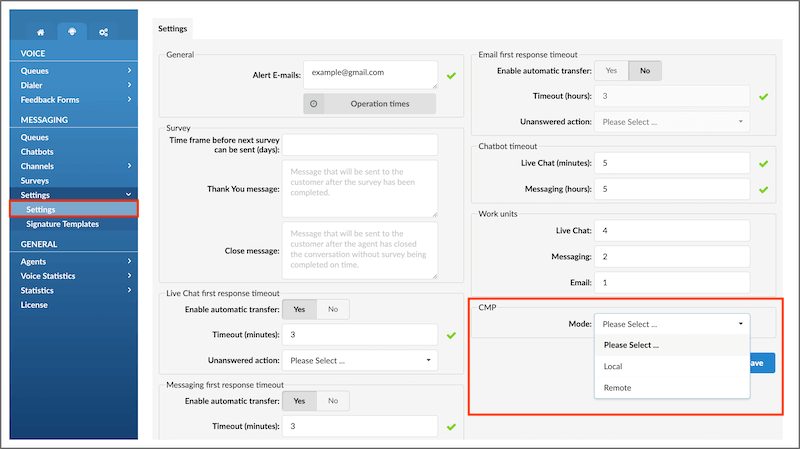
Most likely, within this section, it will be displayed "Please select" option where users can click and select from two available:
- Local - to run the CMP service locally on the user's PBXware system
- Remote - to connect to the CMP service on a remote server
NOTE If users have upgraded from a version lower than v7.4 to version v7.4 or higher and have already configured CMP settings on their previous PBXware system, this option, "Please select," will be automatically set to "Remote" with the configuration of the prior PBXware system.
To create Facebook or WhatsApp channels, users must select options for running the CMP service. The corresponding error message will be displayed when the channel is created if these options are not set.

The locally running CMP service can be stopped if needed by navigating to Admin Settings and selecting the CMP Configuration option. Users can click the Stop Service button to halt the CMP service. A corresponding message will be displayed within the CMP window.

¶ CMP Local
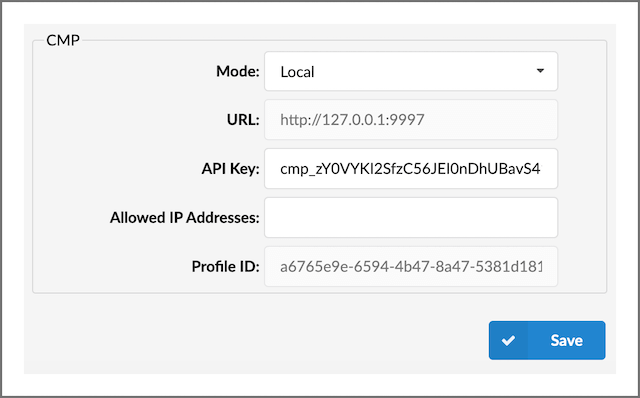
Configuring CMP to run on a local PBXware system is straightforward. Enter the previously generated API key into the API key field and save the configuration. The CMP URL will automatically be set to the local address (http://127.0.0.1:9997), and the Profile ID will be configured accordingly. Users can also manually specify allowed IP addresses for the CMP service.
After clicking the "Save" button, a corresponding message will be displayed within the PBXware system.
¶ CMP Remote
To configure CMP to connect to a remote PBXware system, users need to enter the URL of the remote CMP service, appending "/cmp" to the end (e.g., https://user.cmp.com/cmp). Then, they should input the API key and, if necessary, configure the allowed IP addresses for the CMP service.

NOTE If "/cmp" is not added to the end of the URL (e.g., https://user.cmp.com/cmp), the configuration will not work, and users will be unable to save the settings. Make sure to include it to ensure proper functionality.
After clicking the "Save" button, a corresponding message will be displayed within the PBXware system.
¶ Changing CMP Operation Mode
If users want to switch between local and remote CMP service configurations, they will be unable to do so if they have any configured channels for Facebook or WhatsApp. When attempting to switch from local to remote, PBXware will display an error message indicating that all channels must be removed or deleted before switching.

The same restriction applies when switching from remote to local; all channels must be cleared beforehand to proceed with the configuration change.
NOTE Switching between local and remote CMP configurations should be done with caution, as all Facebook and WhatsApp channels must be removed before making the switch.
¶ Using Another PBXware System as Remote CMP Service
Starting with PBXware version 7.4, users can connect to a CMP service running on either a dedicated server or another PBXware system with the CMP service running locally. When choosing to connect to another PBXware system, users must:
- Configure the CMP service to run smoothly on PBXware A (i.e., For PBXware A, start the CMP service, add the necessary credentials for Facebook and WhatsApp, set the CMP mode to Local, and ensure that everything is functioning as expected).
- On PBXware B, users need to set the CMP mode to Remote to establish the connection with PBXware A.
- On PBXware B, enter the URL of the PBXware A that will serve as the CMP service. (i.e. https://cmp.pbxwareA.com/cmp)
- Enter the API key from the CMP on PBXware A into the CMP settings on PBXware B.
- Save the configuration.
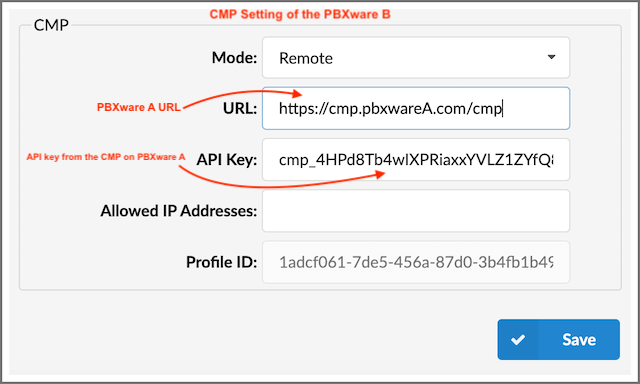
Before attempting the connection, it's important to ensure that the local CMP service (on PBXware A) is properly configured , running, and functioning as expected.