¶ CRM
In today's business world, customer data is a critical asset. You likely use a Customer Relationship Management (CRM) platform to track every interaction, from emails to meetings, ensuring your team has a comprehensive picture of every client and prospect.
But what about phone calls and messages? Too often, these critical interactions live in a separate system, forcing your team to manually log calls, guess who's calling, or lose valuable context.
This is where integrating PBXware (your business phone system and contact center solution) with your CRM platform becomes essential. The integration connects your system directly to your CRM, ensuring they work together seamlessly as a single system.
Imagine this:
- Instant Recognition: An existing customer calls, and their contact record pops up on your screen before you even answer.
- Automatic Logging: New prospects are automatically saved as "Leads" or "Contacts" in your CRM after a call, complete with the call history.
- Seamless Access: A sales representative can review a call from the previous week by clicking a direct link in the CRM record to listen to the recording.
To make all of this possible, the CRM section of PBXware covers everything you need from start to finish. You'll begin by setting up and activating your CRM integration, then configure exactly what gets logged, which users have access, and what data fields are mapped. From there, you'll define permission groups to control what each team member can see and do, connect your users through the gloCOM Next application, and finally put your CRM data to work with intelligent call routing — including the option to route calls through your own custom middleware without a full CRM integration. Each part of this guide walks you through one step of that journey.
¶ Integrations
PBXware is designed for flexibility, supporting a wide range of popular CRM platforms. Depending on the provider you use, the system will connect using one of these methods:
- OAuth 2.0 (Secure Token-based): These require you to create an "OAuth App" within PBXware first. This includes: HubSpot, Microsoft Dynamics 365, Pipedrive, Salesforce, Zendesk Sell (scheduled for deprecation on August 31, 2027), and Zoho CRM.
- Basic Authentication (Credential-based): These use your CRM instance details and login credentials directly. This includes: Odoo CRM, SugarCRM, SuiteCRM, and Vtiger Cloud.
Note: Before beginning the integration, ensure you have an Administrative Account for your CRM. This account is essential for managing other user permissions, roles, and organizational access. These settings directly affect how your team members will interact with the CRM through the gloCOM Next application.
Keep in mind that every CRM handles user types and roles differently. It is your responsibility to ensure that the users you connect have the appropriate permissions within the CRM to view, create, or modify records. If a user lacks the required permissions in the CRM, the integration will not be able to perform those actions on their behalf in gloCOM Next.
Note: Starting with PBXware version 8.0, all customers receive a 12-month free trial of the CRM integration, valid until May 1, 2027. This gives you full access to explore and test the integration at no cost.
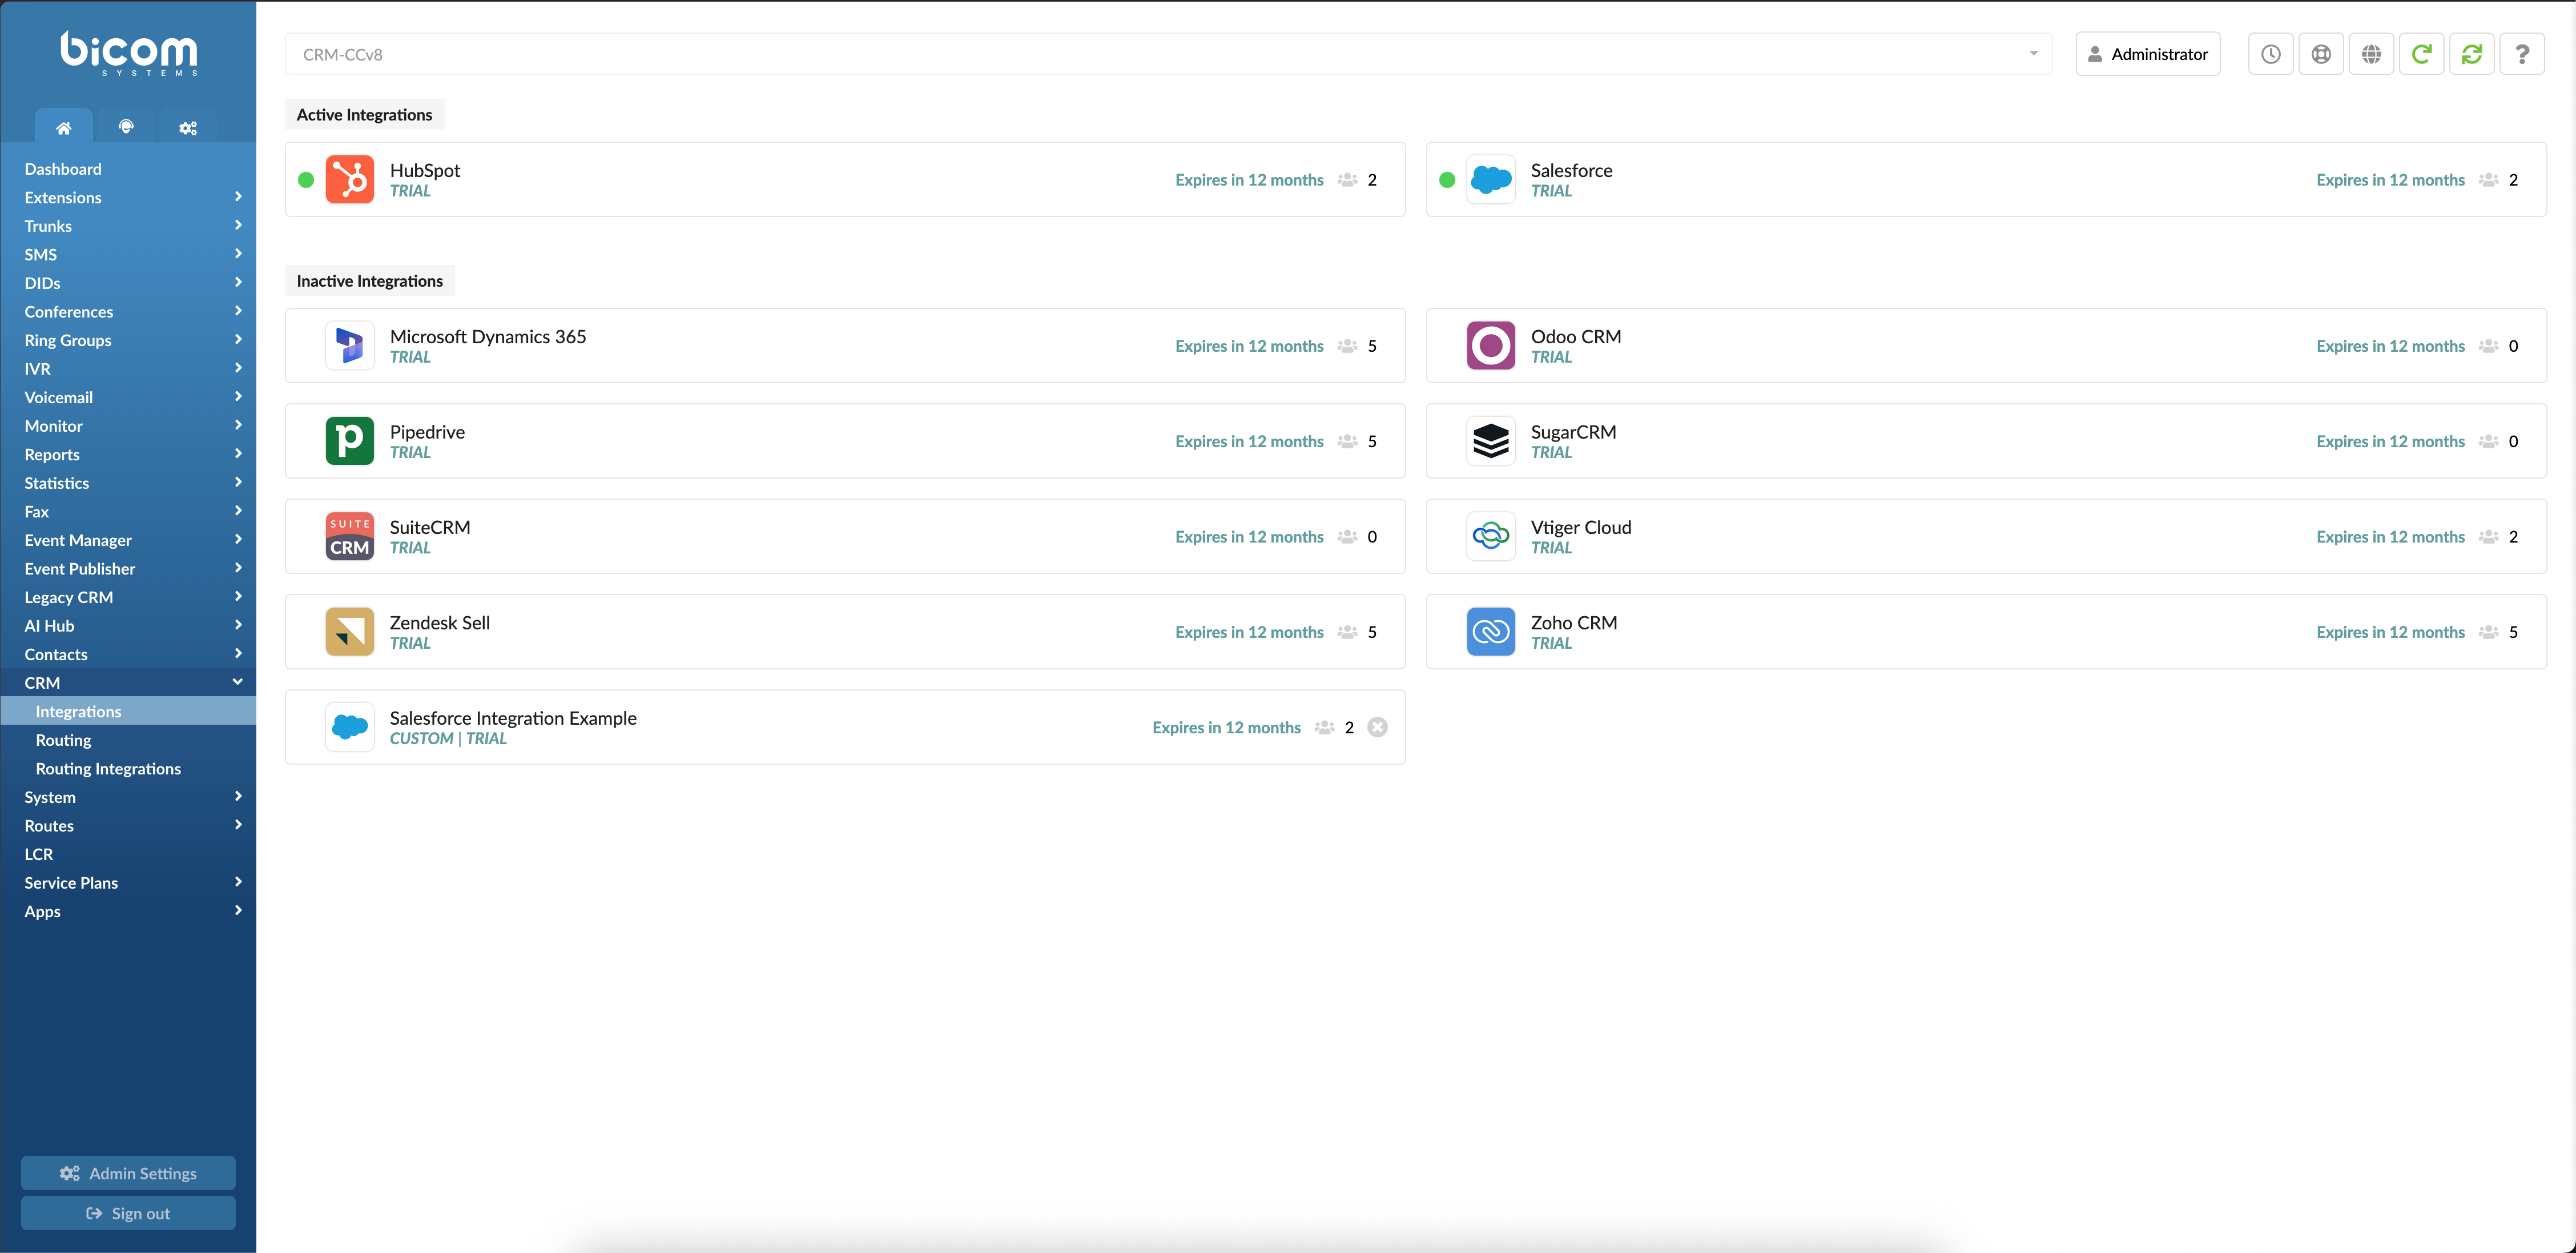
On the dashboard, each integration card displays a TRIAL banner indicating the current license status, an expiration label showing how much time remains, and a user count showing how many users are currently assigned to that integration — giving you a quick overview without opening each one individually.
¶ Preparing Your CRM Application
Regardless of the authentication type, you will generally need to create an application within your CRM portal. This application serves as the secure link between your PBXware system and the CRM, providing the necessary "keys" (such as a Client ID and Client Secret) that PBXware needs to communicate with your system.
For detailed instructions on setting up the application side for your specific provider, please refer to our Integrations Authentication Methods Guide.
Now that your CRM account is ready and you have your credentials, it's time to tell PBXware how to talk to it.
¶ Part 1: Create an OAuth App (for OAuth 2.0-supported CRMs)
Before your PBXware phone system and CRM can communicate, they require a secure and trusted connection. We achieve this by creating an OAuth App on your system. This is a standard, secure method that allows two systems to authorize access without sharing passwords.
Note: If you are using integrations that support only Basic Authentication or Custom Integration, you can skip this step and continue to Part 2: Activate the CRM Integration → Adding a Custom CRM.
Your journey starts in the PBXware administrator settings.
- Navigate to System → Settings → OAuth → Apps.
- Click on Add OAuth App.
- You'll now see a new form, the blueprint for your secure connection.
Let's fill it out:
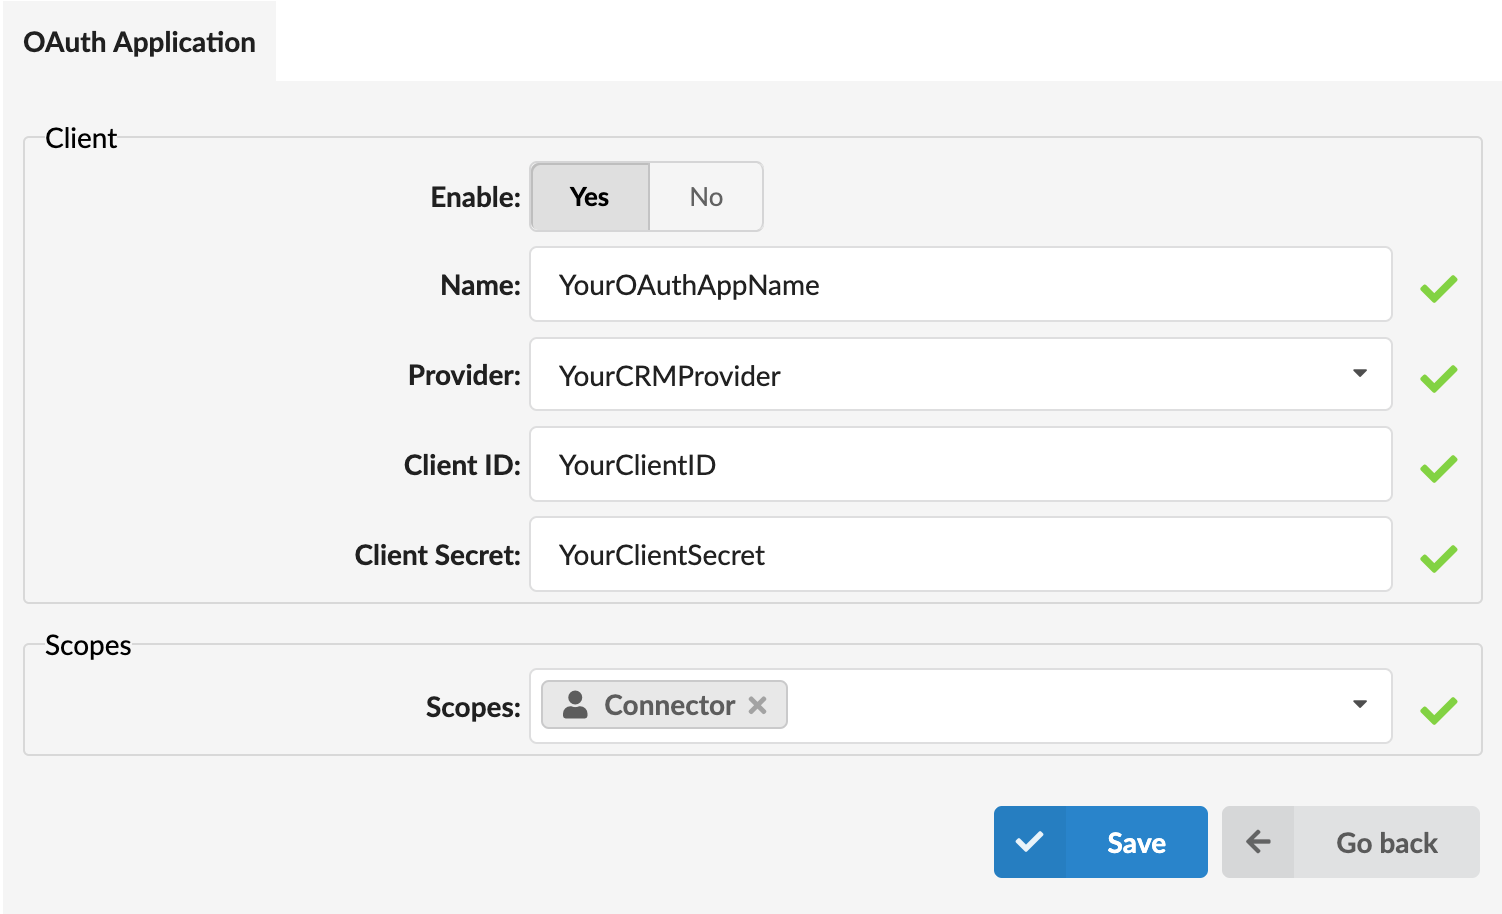
- Enable: A toggle button that turns your connector application on or off. Set this to Yes.
- Name: Give your app a clear name, like
CRM_Connector. - Provider: Select your CRM provider from this drop-down list. Only providers that support OAuth will be on the list.
- Client ID & Client Secret: These are unique credentials provided by your CRM that allow PBXware to securely access it. These credentials are obtained from the specific application you previously created within your CRM portal. You can find them by logging into your CRM and navigating to the application's settings.
- Scopes: This defines the permissions PBXware will have. For this purpose, select Connector from the dropdown menu to grant the necessary permissions.
Click Save, and your secure connection app is now created.
¶ Part 2: Activate the CRM Integration
With your preparation complete, you can now activate the specific integration module within PBXware.
- Navigate to Home → CRM → Integration.
- You'll see a clean dashboard showing all the CRM integrations PBXware can connect with, sorted into Active and Inactive sections.
- Find your CRM in the Inactive Integrations list, then click on the CRM label or the gear icon. This will open the main control panel for your new integration.
¶ Adding a Custom CRM
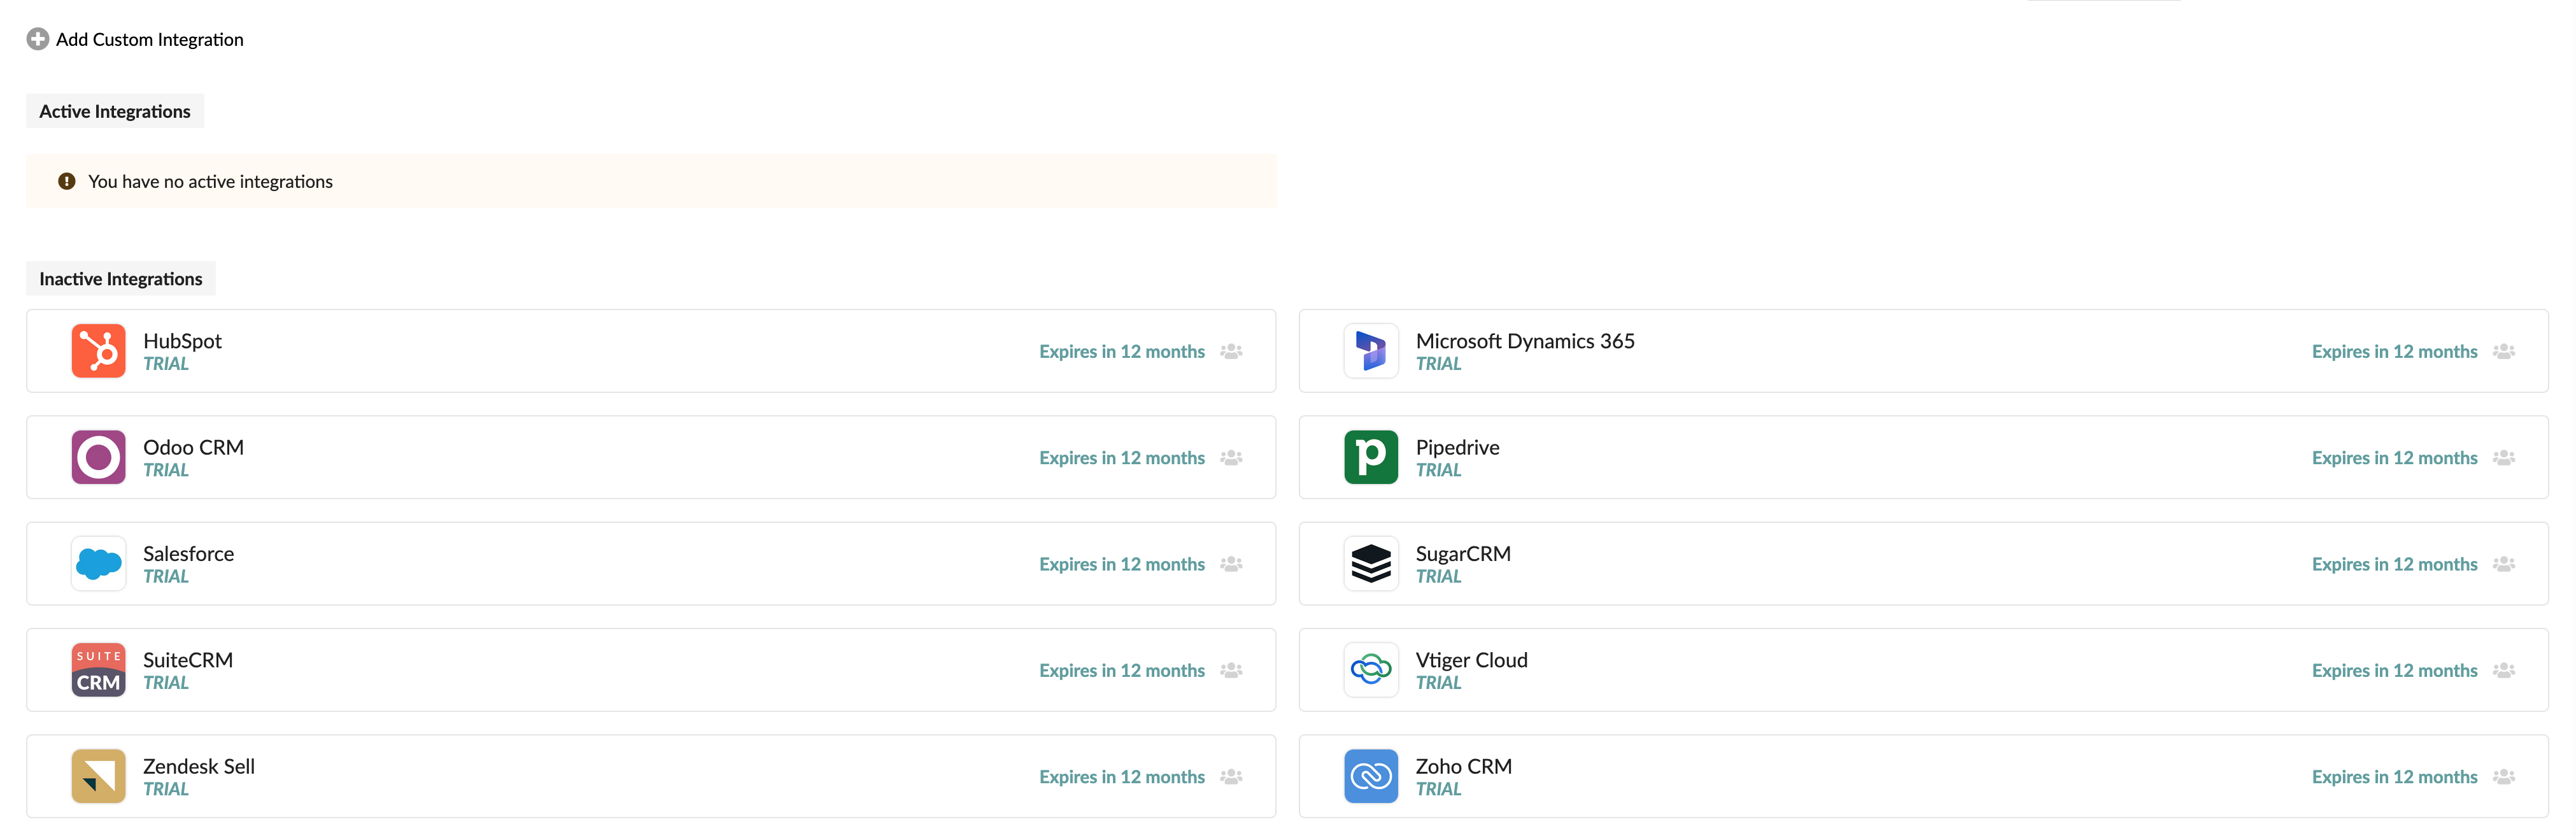
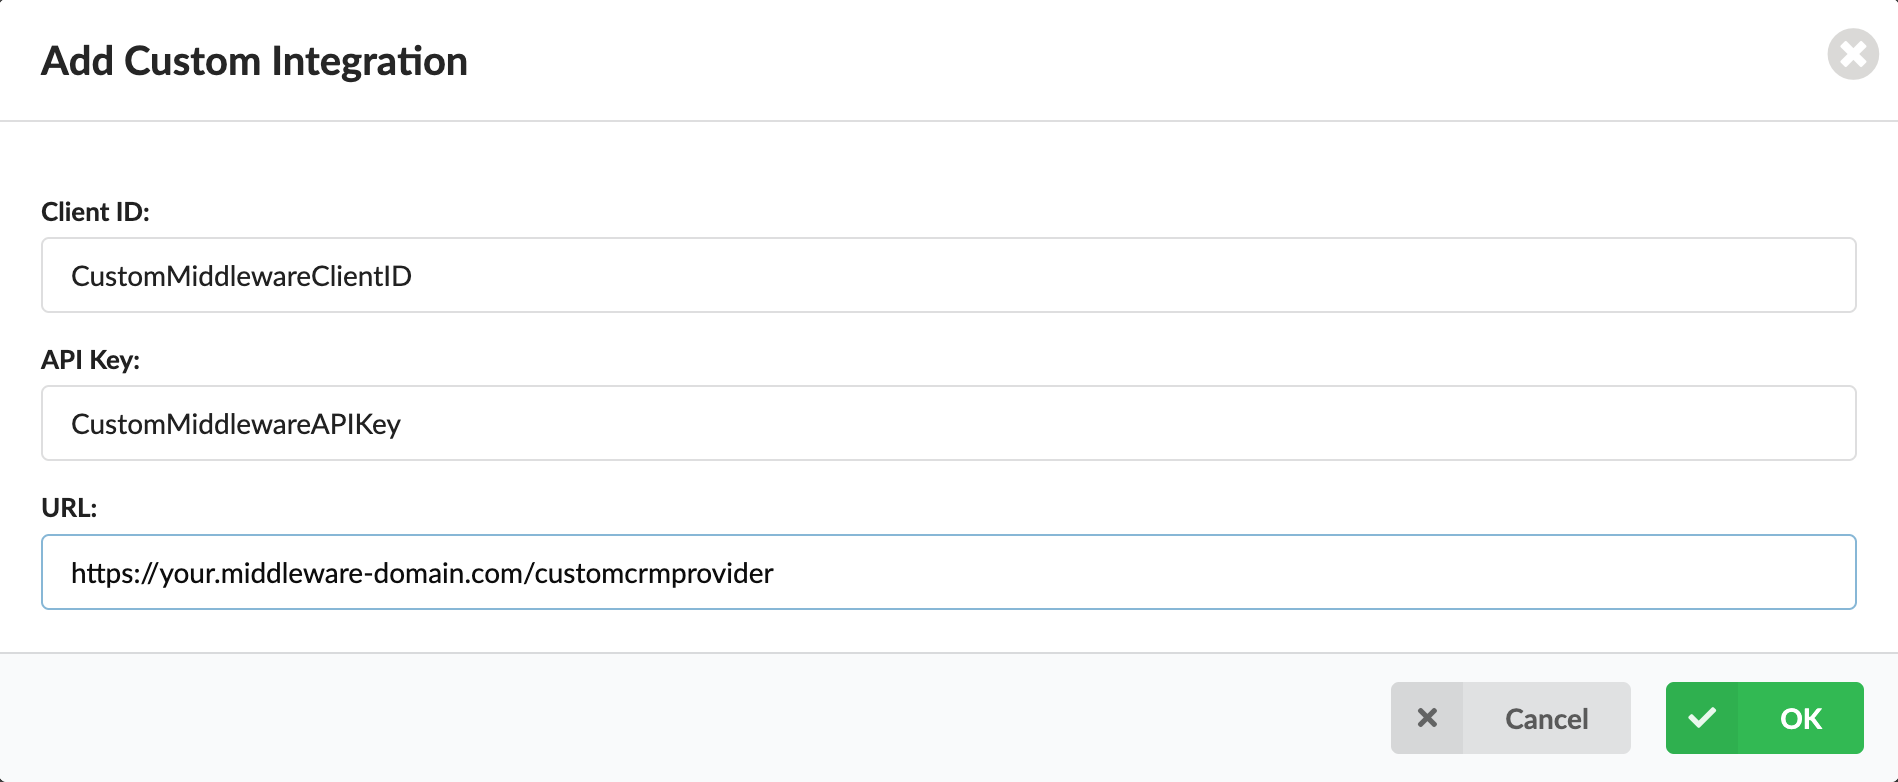
If your provider isn't on the list, PBXware also allows you to connect any CRM platform of your choice via a custom middleware solution. This gives you the flexibility to integrate with providers that aren't natively supported, as long as you have a middleware layer handling the communication. To do this, click the Add Custom Integration button located at the top of the page.
Note: Wondering how to build that middleware layer? The CRM Middleware API documentation describes the complete API your middleware needs to implement for PBXware to communicate with it. And you don't have to start from scratch either — Bicom Systems provides a CRM Middleware example that connects Salesforce to PBXware, which you can use as the foundation for your own integration.
This requires:
- Client ID: Your unique identifier for the custom app.
- API Key: The secure key for authentication.
- URL: Enter the exact location where your CRM middleware is hosted (e.g.,
https://crm.middleware.com/yourcustomcrm).
Once you complete these fields and click OK, the custom CRM creation is finalized. The system will then automatically navigate to the configuration page, which is covered in the next section of this guide.
¶ Part 3: Configure the Integration Settings
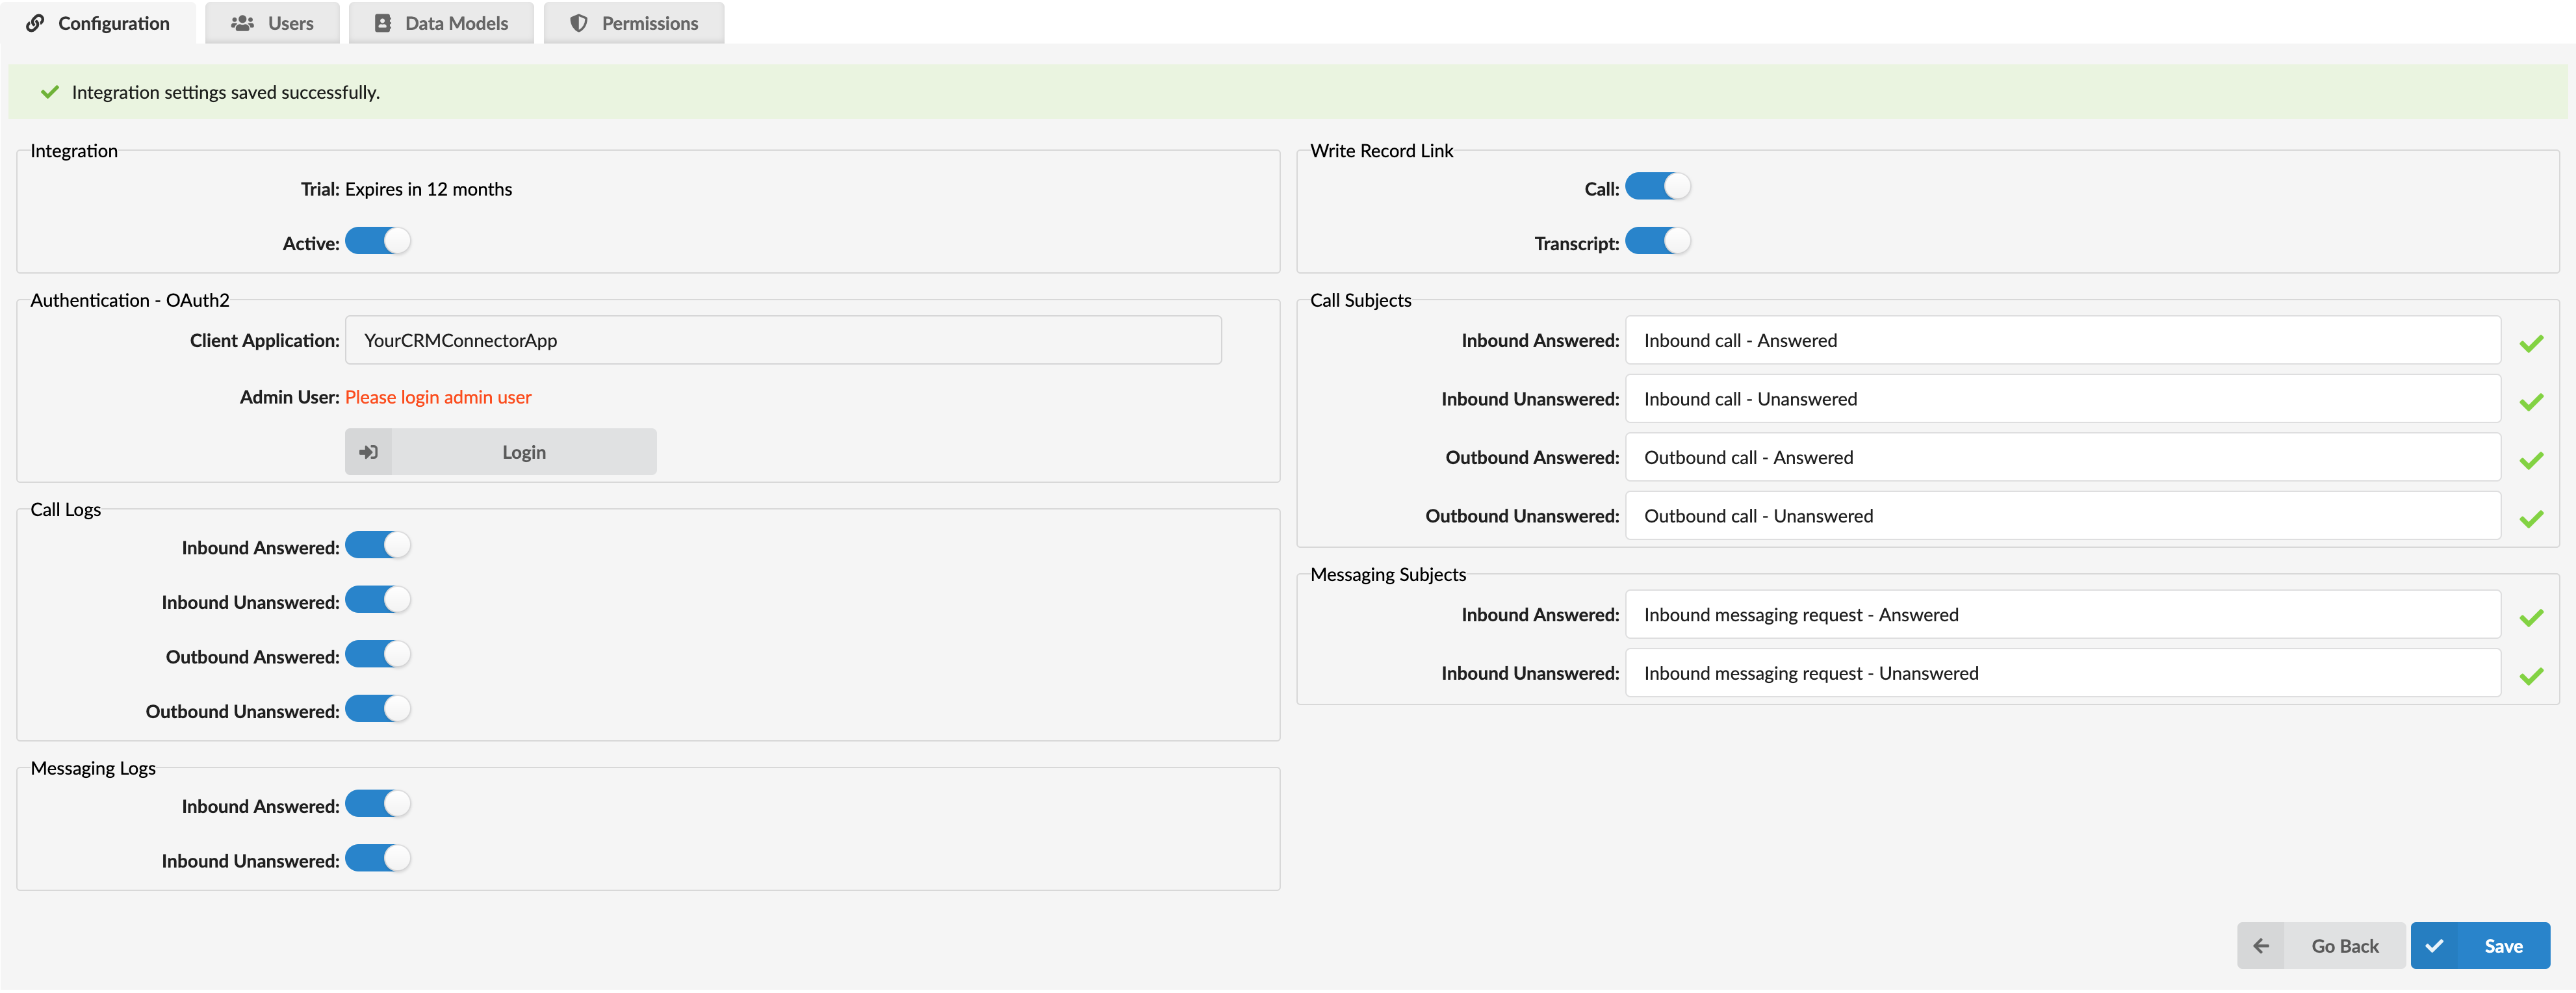
Once you select your provider, you will be directed to the Configuration tab. This is the central hub where you set up the connection between PBXware and your CRM. PBXware maintains a consistent setup experience, automatically displaying the settings required for your specific integration — whether your CRM connects through OAuth 2.0, Basic Authentication, or a Custom CRM Middleware.
Let's break it down section by section.
¶ Integration & Authentication: Establishing the Connection
To finalize the link between PBXware and your CRM, you must complete the configuration process based on the authentication method and integration type supported by your CRM provider. While the layout remains familiar, the available fields will vary slightly depending on whether your CRM uses OAuth 2.0, Basic Authentication, or a Custom CRM integration.
1. OAuth 2.0 Authentication: The setup is straightforward:
- Integration Section:
- Active: A toggle button that turns the integration on or off. Switch it to the On position.
- Authentication Section:
- Client Application: Select the OAuth App you created earlier in Part 1.
Note on Microsoft Dynamics 365 and Salesforce: These providers follow the OAuth workflow but require additional configuration:
- Microsoft Dynamics 365: You will see an additional Instance ID field in the Integration section. Please enter your Dynamics 365 Organization URL (e.g.,
company.crmXX.dynamics.com). You can find this in your browser's address bar when logged into the CRM.
- Salesforce: These include an API Version dropdown in the Integration section. While you can select a specific version, we recommend leaving this at the default setting for the best stability.


2. Basic Authentication: For CRMs that support Basic Authentication, credentials are entered directly within the configuration page.
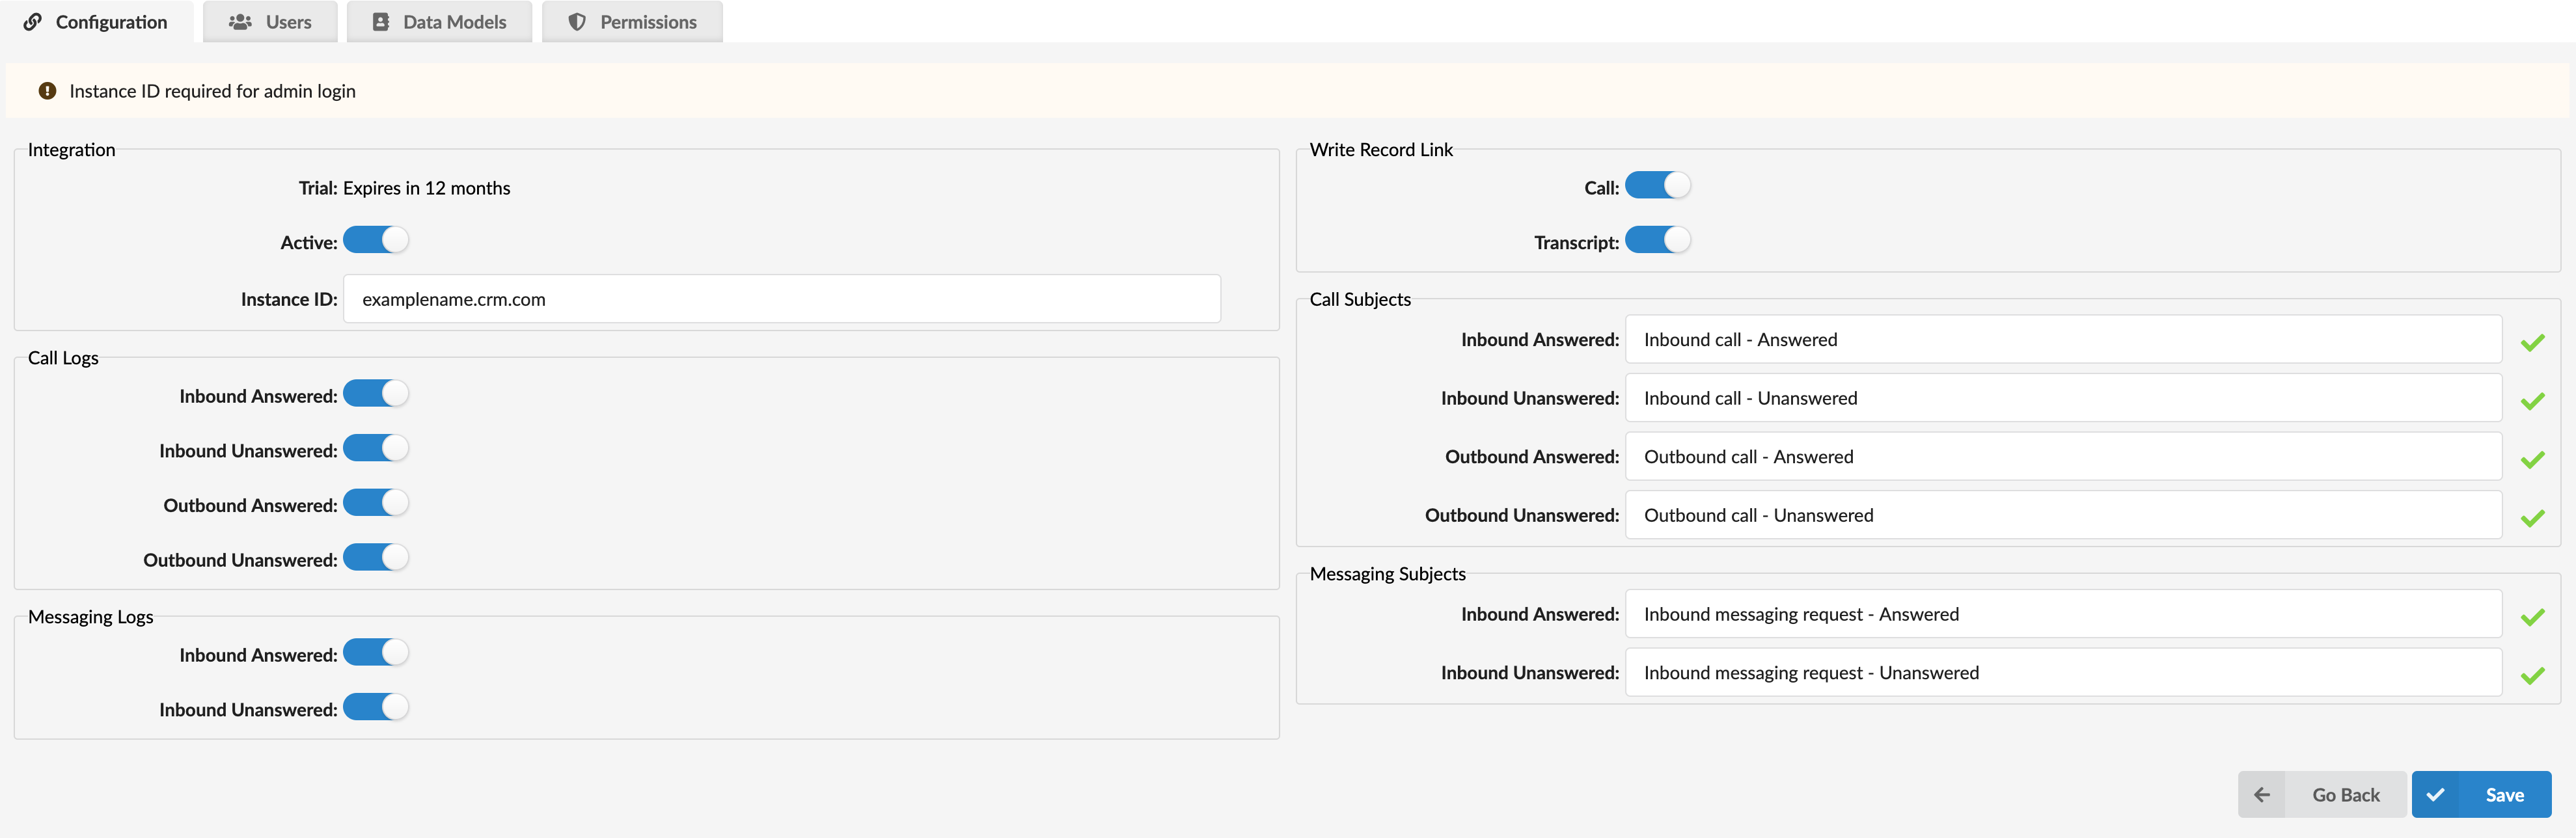
- Integration Section:
- Active: Switch the toggle to On.
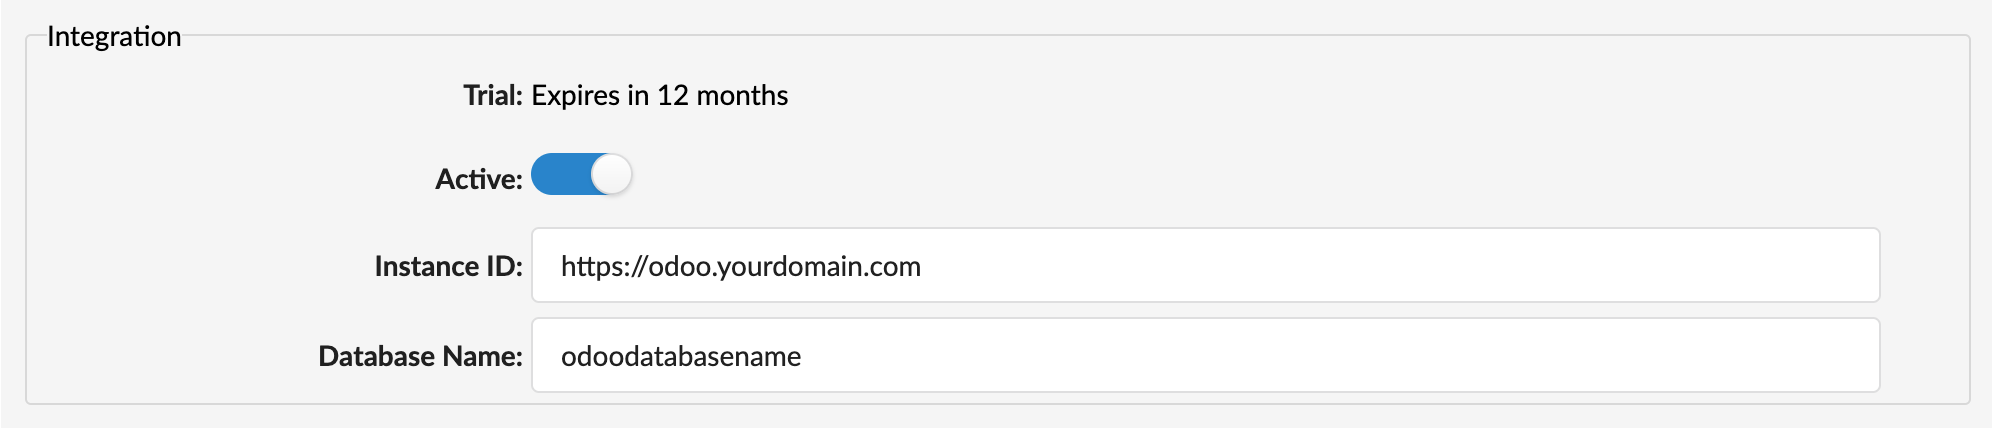
- Instance ID: Enter the instance identifier required by your CRM provider. Depending on the provider, this may be a domain, a URL, or an organization ID (e.g.,
companyname.crm.com,https://crm.example.com,https://domain.zendesk.com). - Database Name (Odoo CRM Only): Odoo users will see this additional field. Enter the exact name of the database created within your Odoo environment.
- Authentication Section:
- SugarCRM & SuiteCRM: These providers display an additional Authentication - OAuth2 Private section. You must manually enter the Client ID and Client Secret generated inside your CRM administration portal.

3. Custom CRM Integration: After creating the custom integration in Part 2, PBXware automatically opens a dedicated Configuration page tailored for this connection.
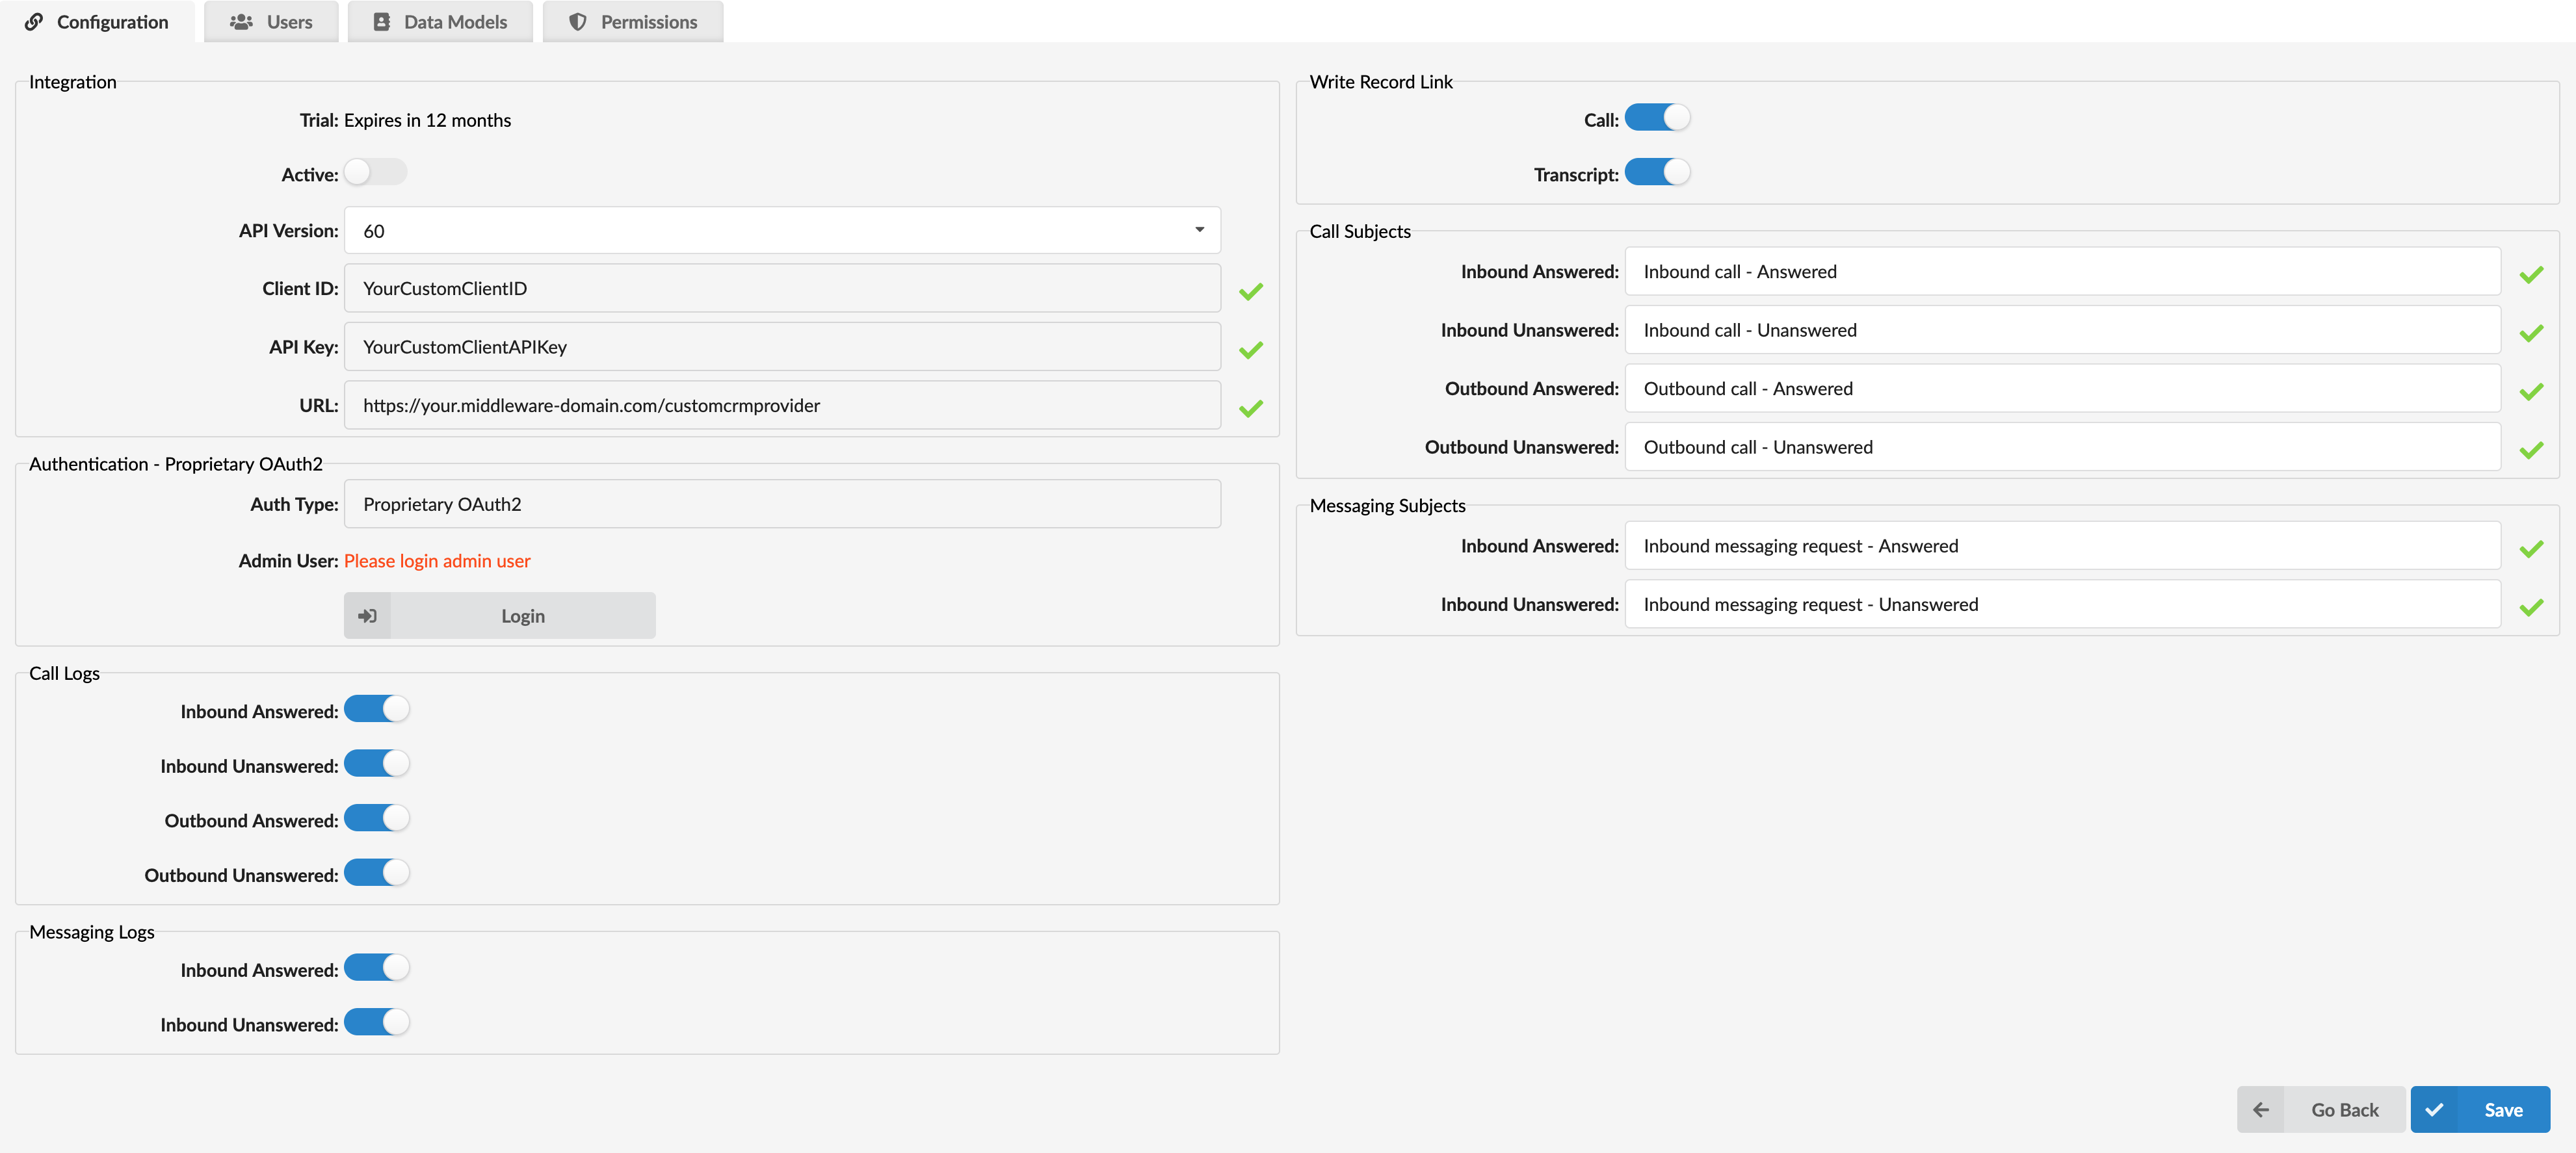
Integration Section:
- Active: A toggle button that enables or disables the integration. Switch it to On.
- API Version: A dropdown field that allows you to select the API version supported by your custom CRM middleware.
- Client ID: The unique identifier assigned during the custom integration creation process.
- API Key: Displays the authentication key associated with your custom CRM middleware.
- URL: This field is automatically populated based on the middleware URL entered when creating the custom integration.
Note: The Client ID, API Key, and URL fields are read-only and cannot be modified from this page.
Authentication Section:
- Auth Type: Displays Proprietary OAuth2. This value is predefined and cannot be changed, as custom integrations rely on a dedicated OAuth-based authentication mechanism handled by the middleware.
- Admin User: This field remains empty and displays the message "Please login admin user" until the authentication process is completed. Once authorization is finished, the field will automatically display the account used to log in (if available).
- Login Button: Initiates the authentication process between PBXware and the custom CRM middleware.
¶ Finalizing the Handshake (Logging In)
After you click Save, the page will reload, and two new options will appear:
- A Login button will appear in the Authentication section.
- A Check Connection button will appear at the bottom of the Integration section.
Your integration is now configured, but it still needs to be authorized. Let's complete that step.
Click the Login button.
What happens next depends on the authentication method used by your CRM integration, but the goal remains the same: successfully authenticate PBXware with your CRM account.
- OAuth 2.0 Integrations: A new browser window or pop-up will open, redirecting you to your CRM provider's login and authorization page. Sign in and approve the requested permissions for PBXware.
- Basic Authentication Integrations: A pop-up window will appear prompting you to enter your CRM username and password. Enter the required credentials and confirm.
- Custom CRM Integrations: A pop-up window will appear, allowing you to authenticate through your custom CRM middleware. The login process may vary depending on how the middleware handles authentication.
Note: During this step, it is strongly recommended to use an administrator or dedicated integration account with full CRM permissions. This ensures PBXware can properly access contact data, create activity records, and perform synchronization tasks without restrictions.
Once authentication is successfully completed, you will receive a confirmation pop-up message:
"Admin user successfully logged in."
Click OK to finalize the integration activation.
Back on the PBXware configuration screen, you may notice that the Admin User field (in the Authentication section) is now populated with the authenticated account and is read-only, indicating that authorization was successful.
Note: Some CRM providers do not return authenticated user details. In these cases, the Admin User field may remain empty. This is expected behavior and does not indicate a problem, provided the login process completes successfully.
You can now click the Check Connection button to verify communication between PBXware and your CRM.
- If the connection is successful, you will receive a confirmation message indicating that the integration is fully operational.
- If the connection fails, an error message will be displayed. In this case, verify your credentials, permissions, and CRM connectivity before attempting to reconnect.
With the handshake complete and the connection verified, you can now confidently continue configuring the remaining integration settings.
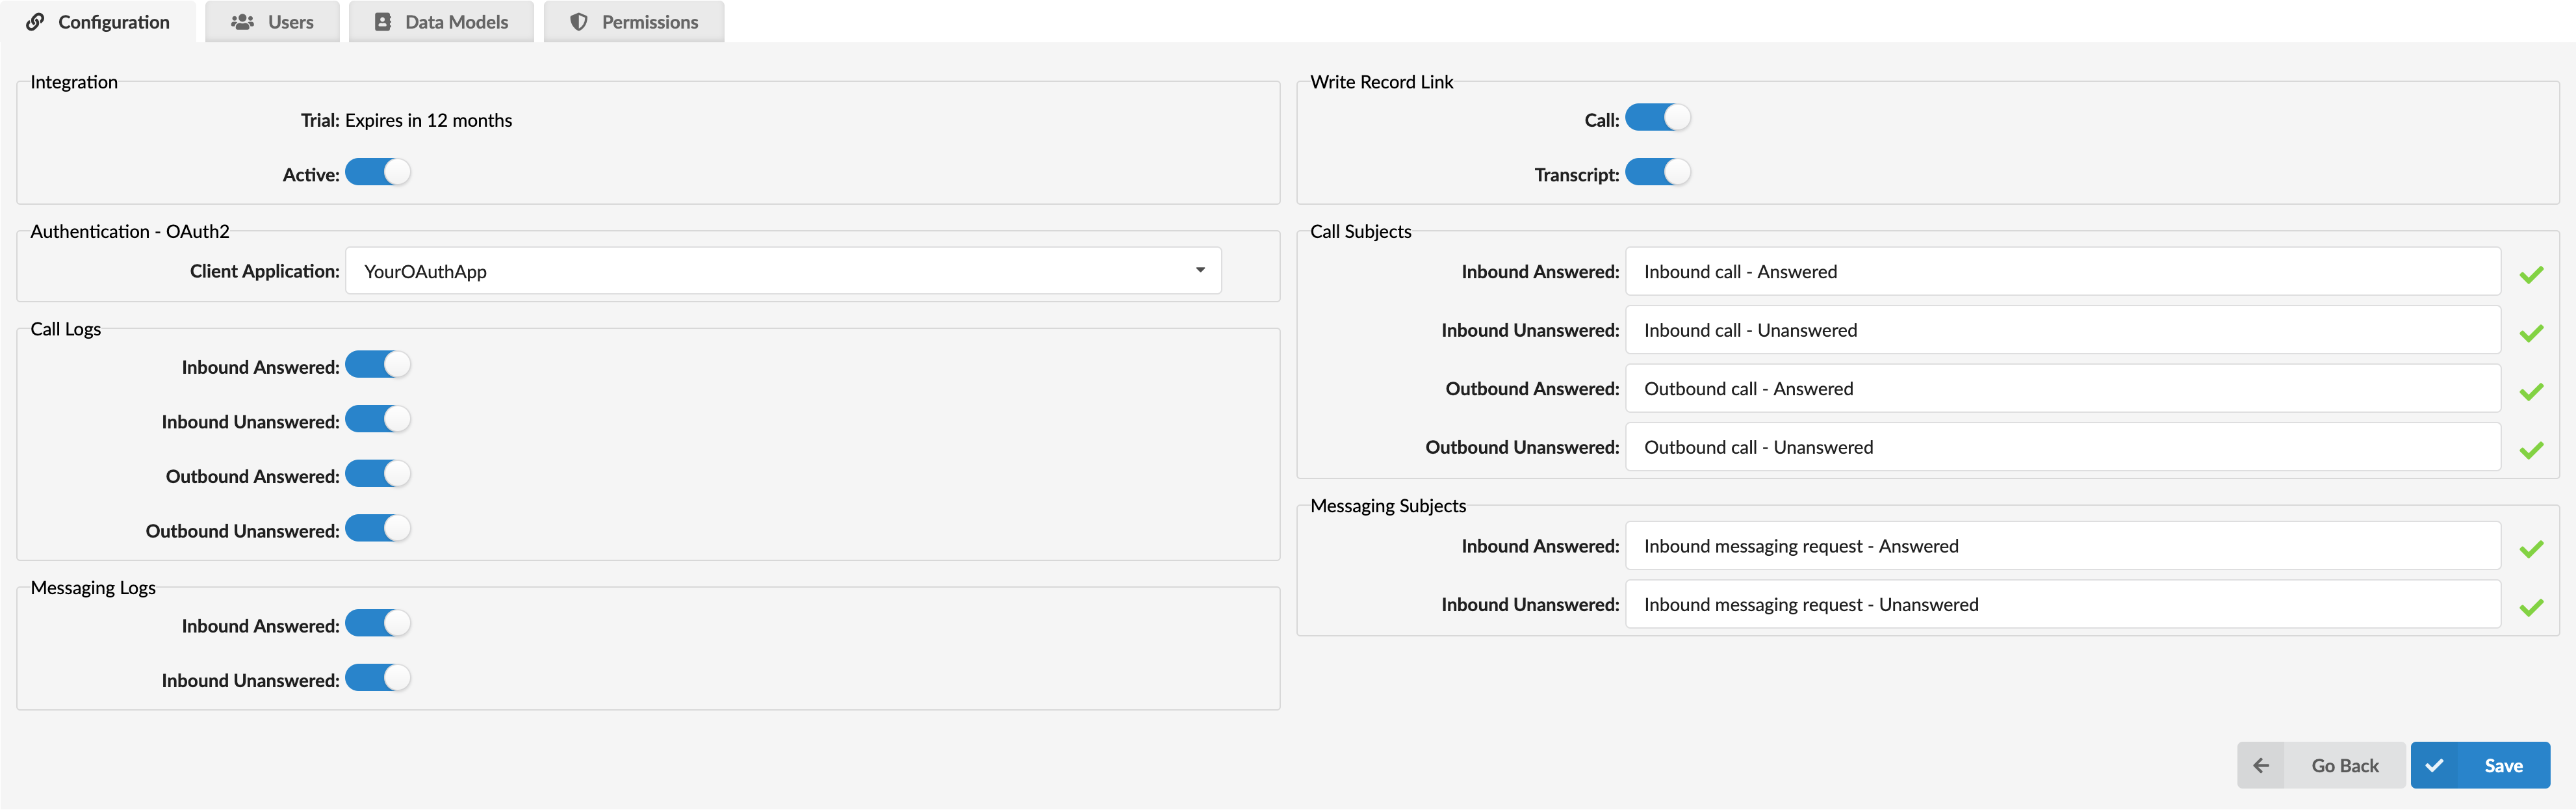
¶ Call & Messaging Logs: What to Record
This is where you decide what information you want to log in your CRM. You have simple On/Off toggles for:
- Call Logs: Do you want to log Inbound Answered/Unanswered calls? What about Outbound Answered/Unanswered calls? You have full control over all four call types.
- Messaging Logs: Similarly, you can choose to log inbound answered or unanswered messages.
¶ Write Record Link: Creating a Shortcut
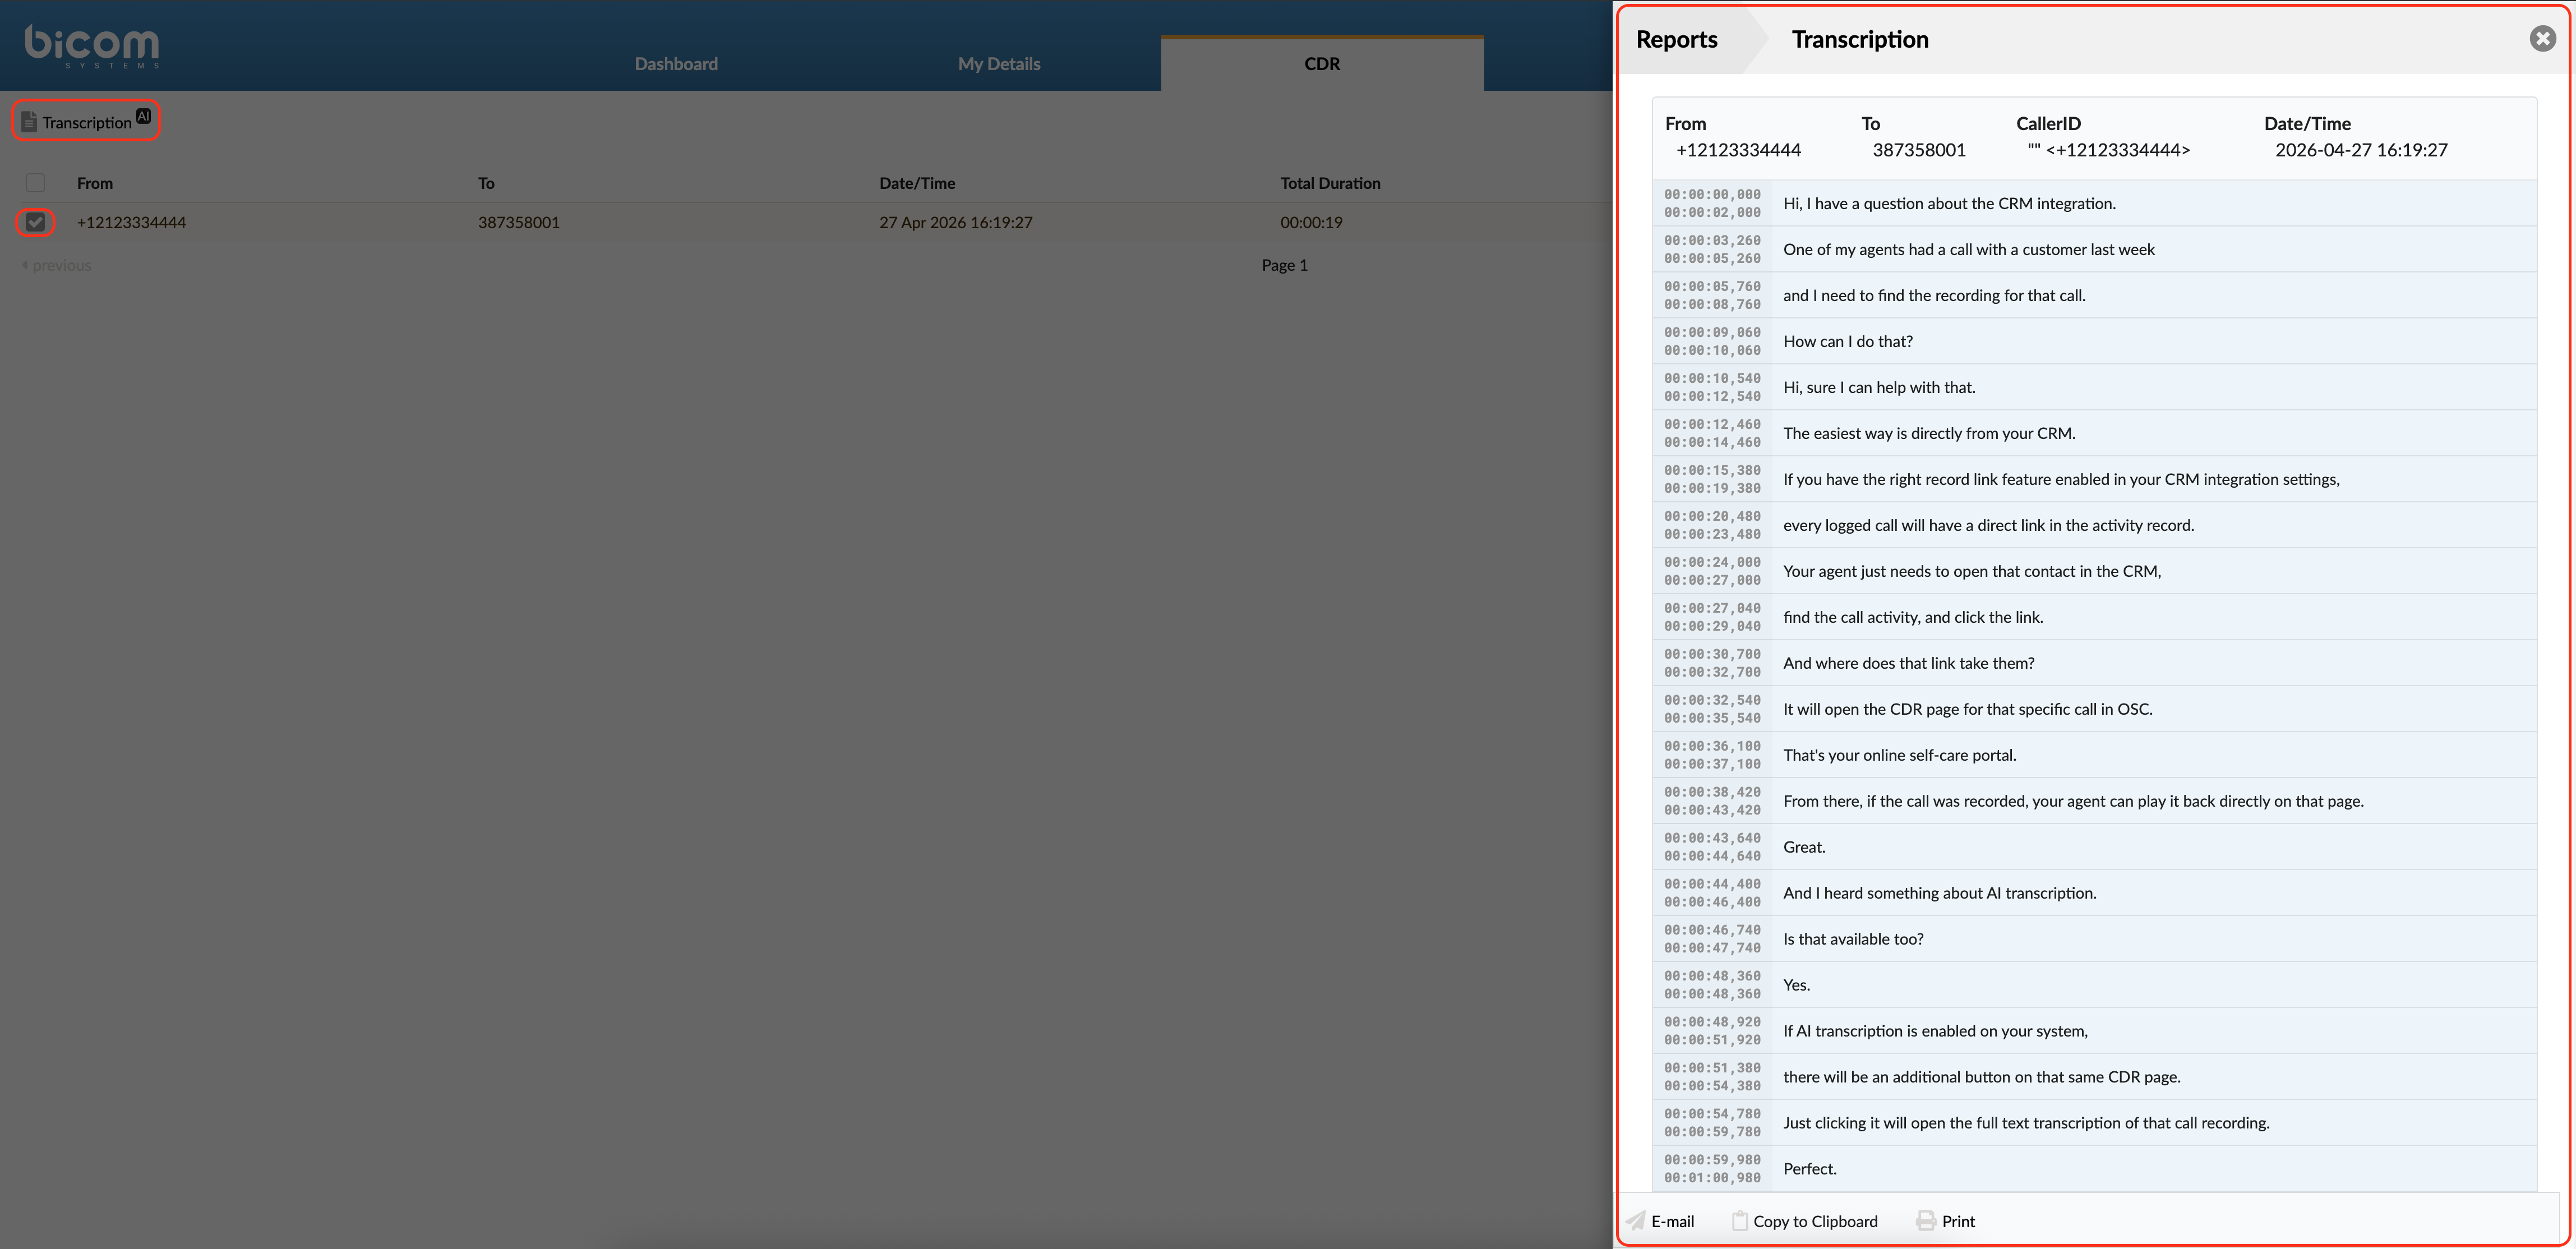
This is a powerful feature. If you turn these toggles ON, PBXware will add a direct link in your CRM that opens the relevant record directly in OSC.
- Call: Your sales representative, viewing a contact in the CRM, can click this link and be taken directly to that specific call record in the CDR page in OSC. From there, if a call recording is available, it can be played back directly. If AI transcription is enabled on the system, a transcription of that recording is also accessible with a single click.
- Transcript: For messaging channels such as LiveChat, Facebook, WhatsApp, etc., this option creates a direct link in your CRM that opens the full conversation transcript page in OSC.
¶ Call & Messaging Subjects: Naming Your Logs
Every call and message logged in your CRM gets a subject line so your team can instantly identify the activity type. By default, these are, for example, Inbound call - Answered or Inbound messaging - Unanswered, etc.
This section lets you customize each label to better fit your team's workflow. For example, you could rename them to:
[Sales] Inbound Call - Answered[Missed] Follow Up Required[Support] Chat - Answered
This makes your CRM activity feed instantly clear and easy to read, and you can even translate it into your local language if needed.
¶ Part 4: Assign Users (The Users Tab)
The integration is active; now you must specify which team members can access it. The Users tab is where you grant this access on an individual basis.
Why is this important? Only the users you add here will receive CRM features in their gloCOM Next application.
This tab is straightforward and the same for all providers:
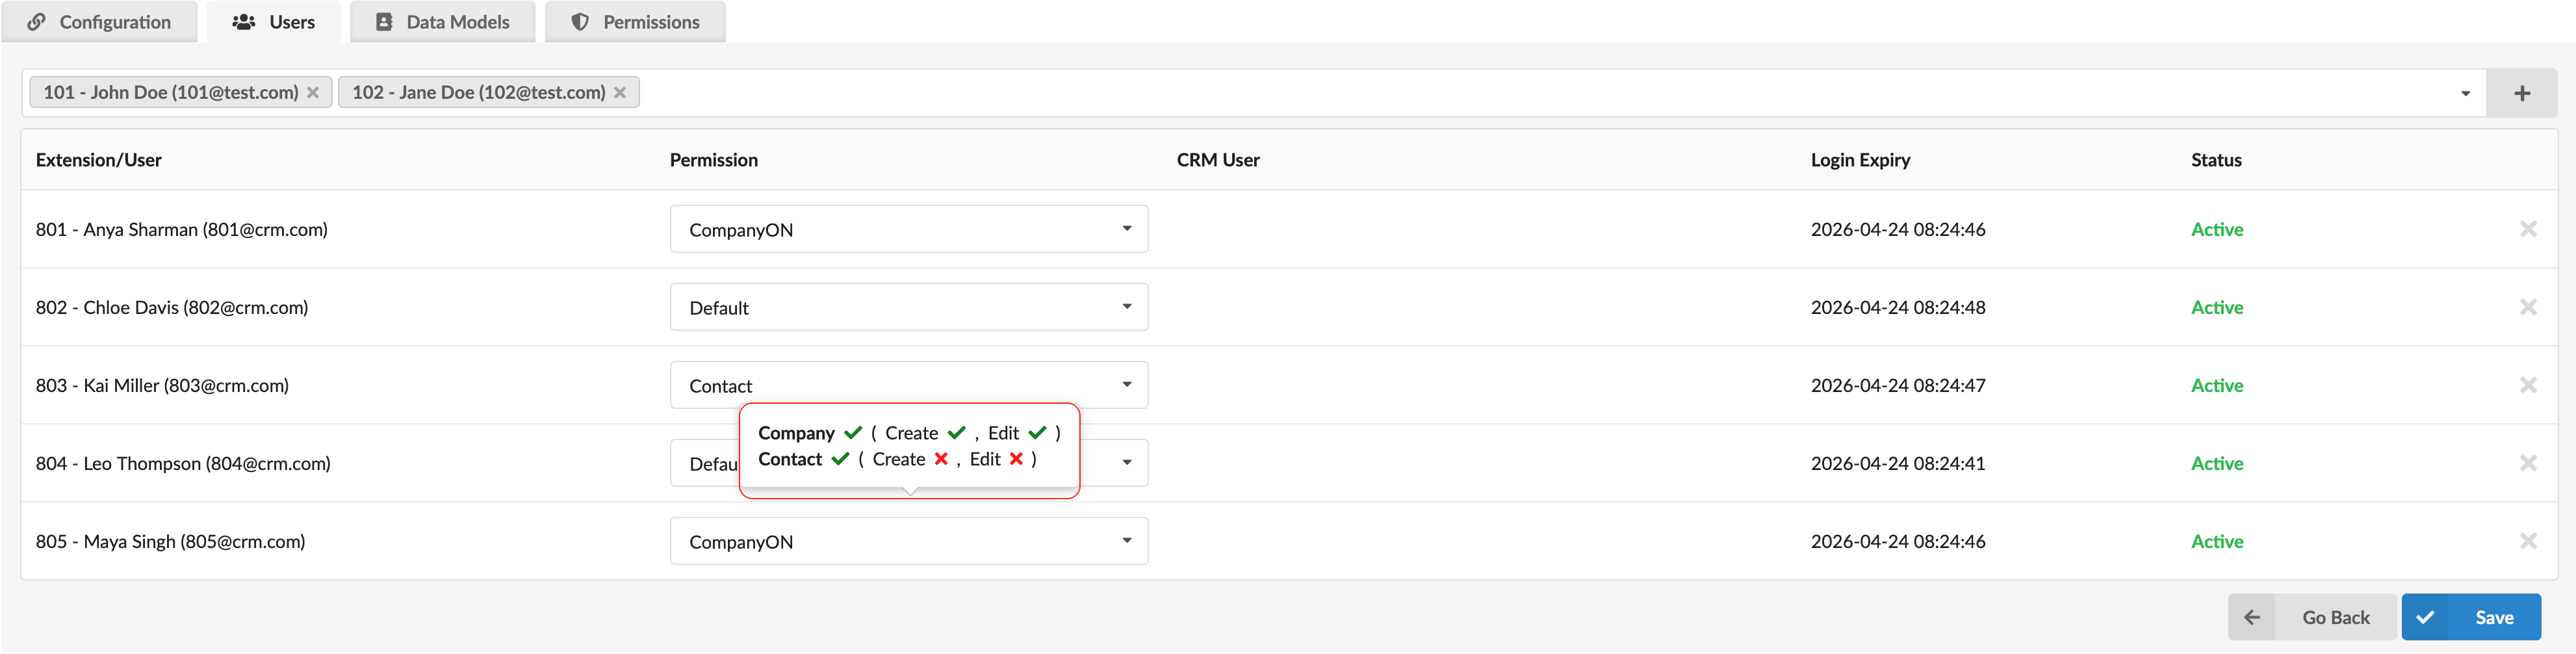
Add Users: At the top, you'll find a search bar to find and select the extensions you want to add. Once you've selected all the extensions you need, click the + button at the end of the search bar to add them all to the list at once. Newly added users will be automatically assigned the Default permission set.
User List: Below that is a table of all users who already have access, with the following columns:
- Extension/User: The extension number and name of the added member.
- Permission: The permission set currently assigned to this user. You can change this directly in the list via the dropdown. Hovering over the dropdown displays a tooltip with a quick visual overview of which modules are active in that permission set and which actions (Create, Edit) are allowed for each.
- CRM User: The account this user used to log in to the integration. This column label may vary depending on your CRM provider.
- Login Expiry: Indicates when the user's secure authentication token expires and needs to be refreshed. The token will be refreshed automatically in the background.
- Status: Active if the user is successfully logged into the integration via their gloCOM Next application, or Inactive if they are not.
Note: The Login Expiry and Status columns may not be visible for providers that don't use OAuth authentication, such as Odoo and Vtiger Cloud.
¶ Part 5: Map Your Data (The Data Models Tab)
This tab serves as a "data map," specifying which CRM fields PBXware should read, display, and write. Because CRM platforms structure data differently, this section varies the most between providers.
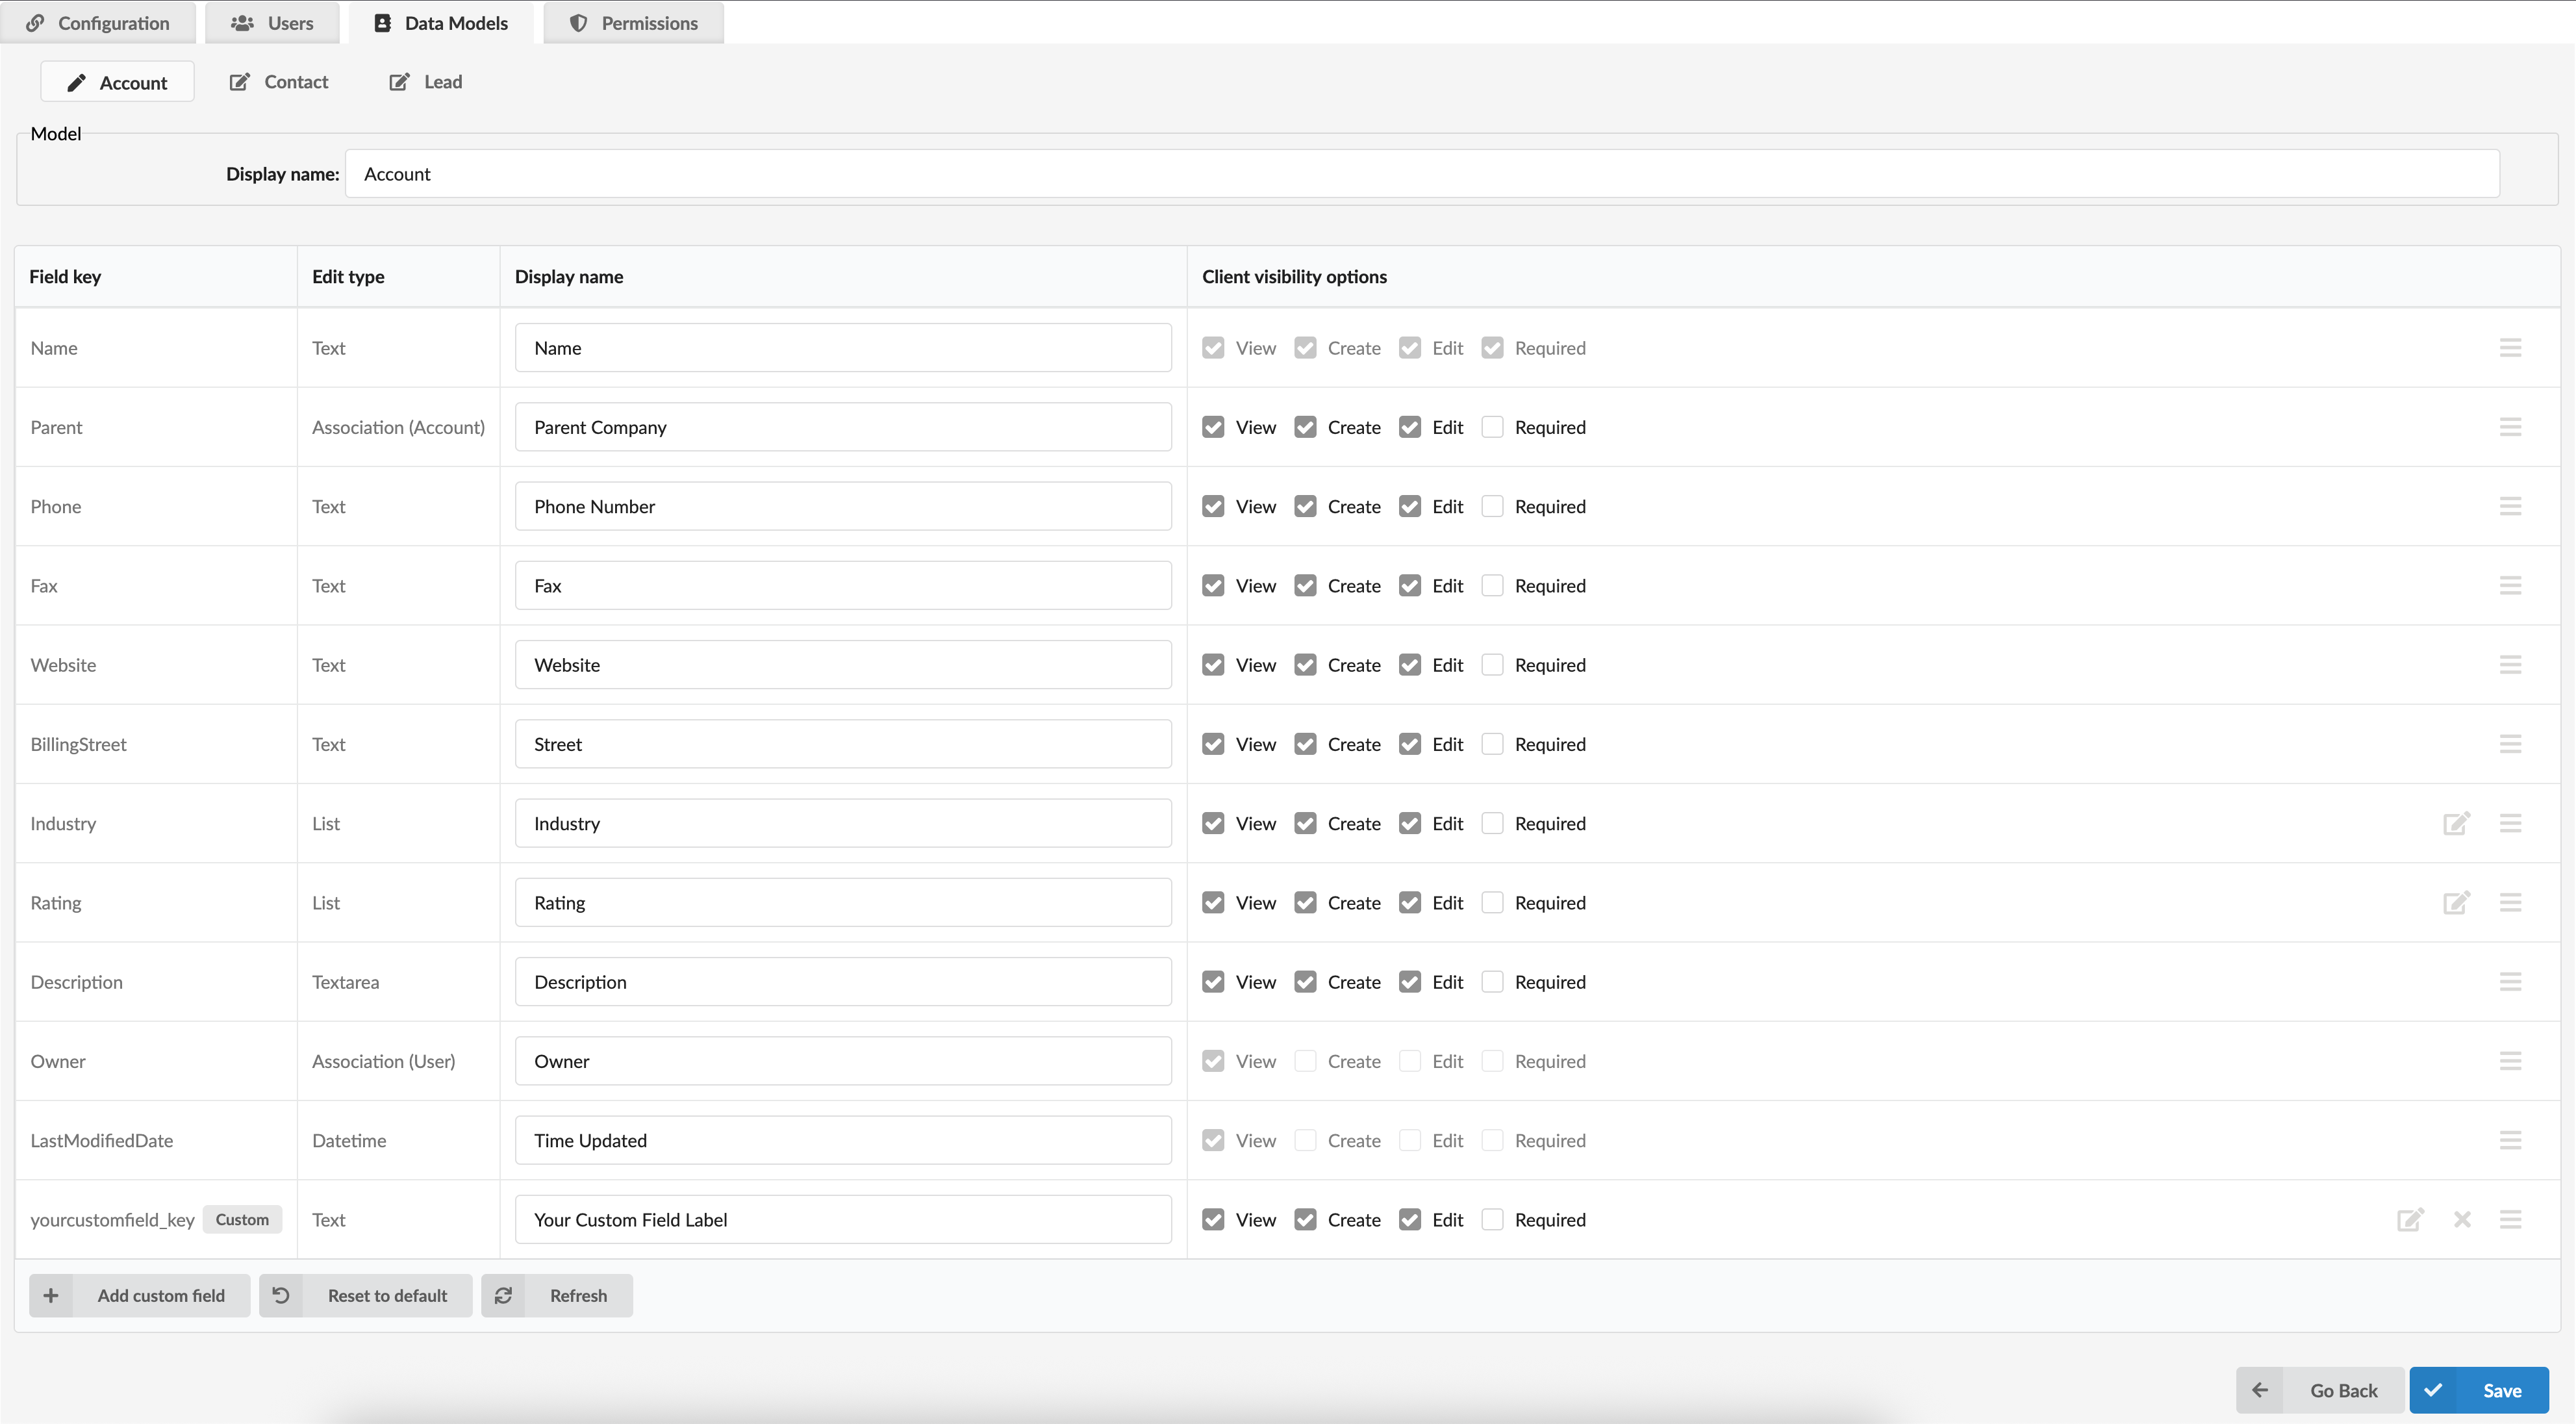
When you click this tab, you'll see a new set of sub-tabs; the most common are Account, Contact, and Lead, but for some providers, you may also see Company, Person, etc. These are the "Data Models" your CRM supports, and vary from provider to provider.
Let's click on one, like Contact, to see how it works.
For every model (Contact, Lead, etc.), you have two sections:
1. The Model Section
- Display Name: The friendly name for this model, which you can change.
2. The Fields Table Section
This table is the "map" itself. It lists every single data field for that model with the following columns:
- Field Key: The exact, technical field name as defined in your CRM's API. This is the most important field.
- Edit Type: The type of data that will be written in that specific field (e.g., text, list, datetime).
- Display Name: The "friendly" name for this field that your users will see. You can edit this directly from this page.
- Client Visibility: A set of checkboxes that gives you fine-grained control over what your gloCOM Next users can do with this specific field:
- View: Can the user see this field?
- Create: Can the user fill in this field when creating a new record?
- Edit: Can the user change the data in this field?
- Required: Must the user fill in this field when creating a new record?
Note: Some fields may have checkboxes greyed out — these are mandatory fields defined by your CRM provider and cannot be modified.
At the bottom of the table, you'll find three buttons — Add Custom Field, Reset to Default, and Refresh.
If your team relies on specific data points to identify, differentiate, or route customers — fields that aren't part of the standard CRM setup — you can add them by clicking Add Custom Field. A modal window will open with the following fields:
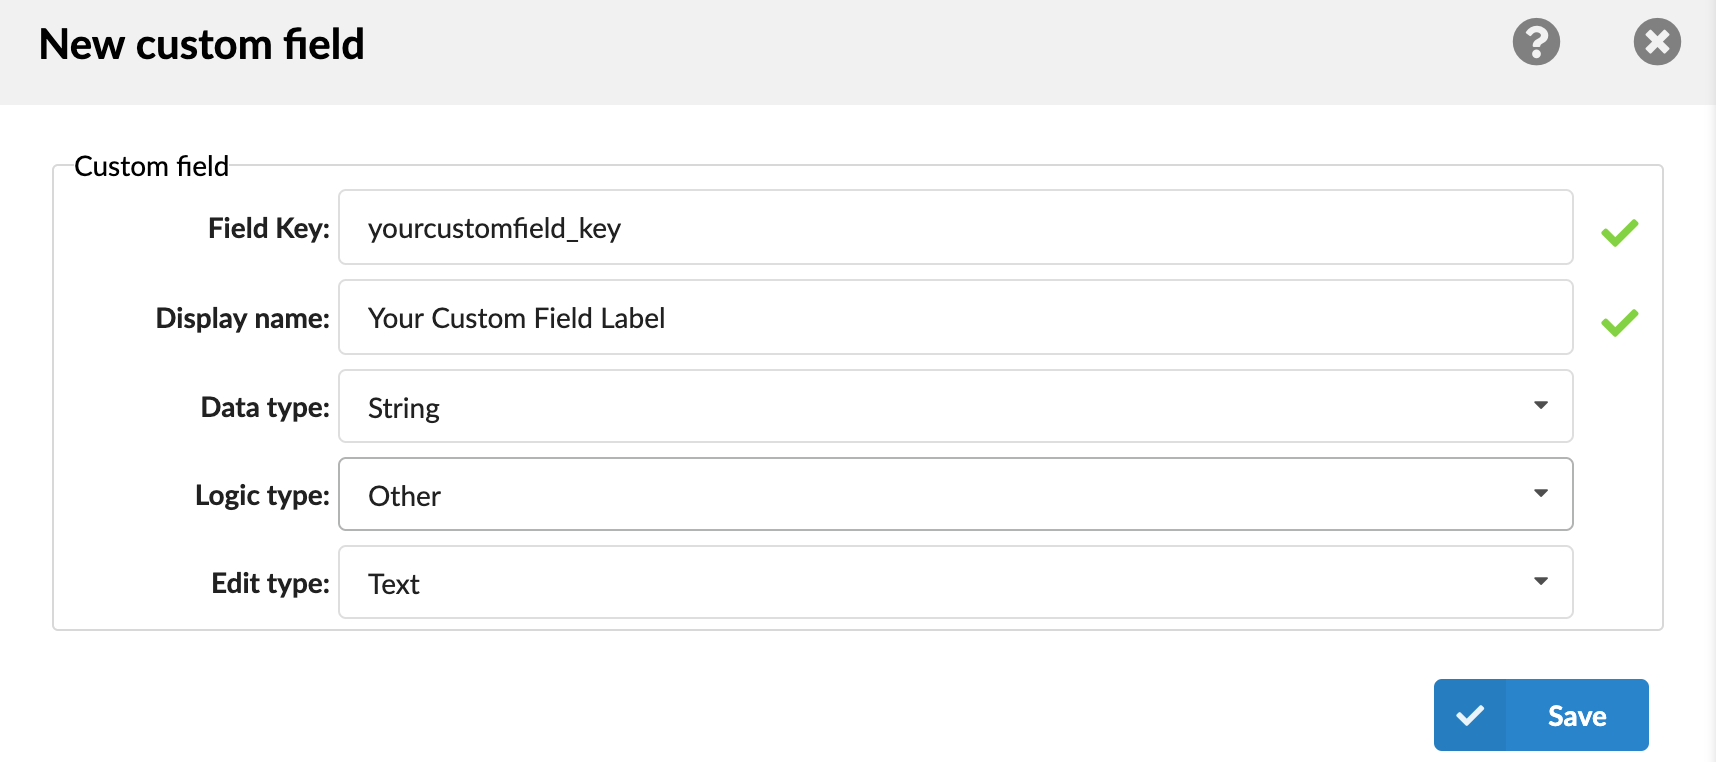
- Field Key: The exact API name of the field as defined in your CRM. This must match precisely — see the note below.
- Display Name: The friendly label for this field that your users will see in gloCOM Next.
- Data Type: The type of data this field contains — for example, String, Number, or Boolean.
- Logic Type: Defines how this field is logically categorized for condition matching purposes.
- Edit Type: Defines how this field is presented in the interface — for example, Text.
Click Save to add the field to the table.
CRITICAL: When you add a custom field, you must already have it created inside your CRM provider's settings. The Field Key you type here must exactly match the API name or key of that field in your CRM. The way custom field keys are defined and exposed varies by CRM provider, so always refer to your CRM provider's documentation to identify the correct field key to enter in PBXware.
If the Field Key here and the Field Key in your CRM do not match exactly, the data will not be found, and the custom field will not function properly.
You can repeat this process for every Data Model tab (Contact, Lead, Company, etc.), and map only the fields that matter to you.
Note: Zendesk CRM provider doesn't support the Custom Fields option and is scheduled for deprecation.
If you ever need to undo your changes, Reset to Default will revert all field settings back to their original configuration. The Refresh button syncs your field list with the latest default field definitions maintained by PBXware for your CRM provider. Any new default fields added in a PBXware update will be pulled in, while your existing custom fields and any modifications to field names or visibility settings are preserved.
With your data fields mapped, there is one final step — defining exactly what each user is allowed to see and do with that data.
¶ Part 6: Define Access Rules (The Permissions Tab)
With your users added, it's time to define what each can actually do in the CRM. The Permissions tab is where you create and manage permission groups — sets of rules that control which data models a user can access, and what actions they are allowed to perform on each.
Think of it this way: your support team might only need to view contacts, while your sales team needs to create and edit leads. Rather than configuring this user by user, you create a permission group for each scenario and assign it to the right people.
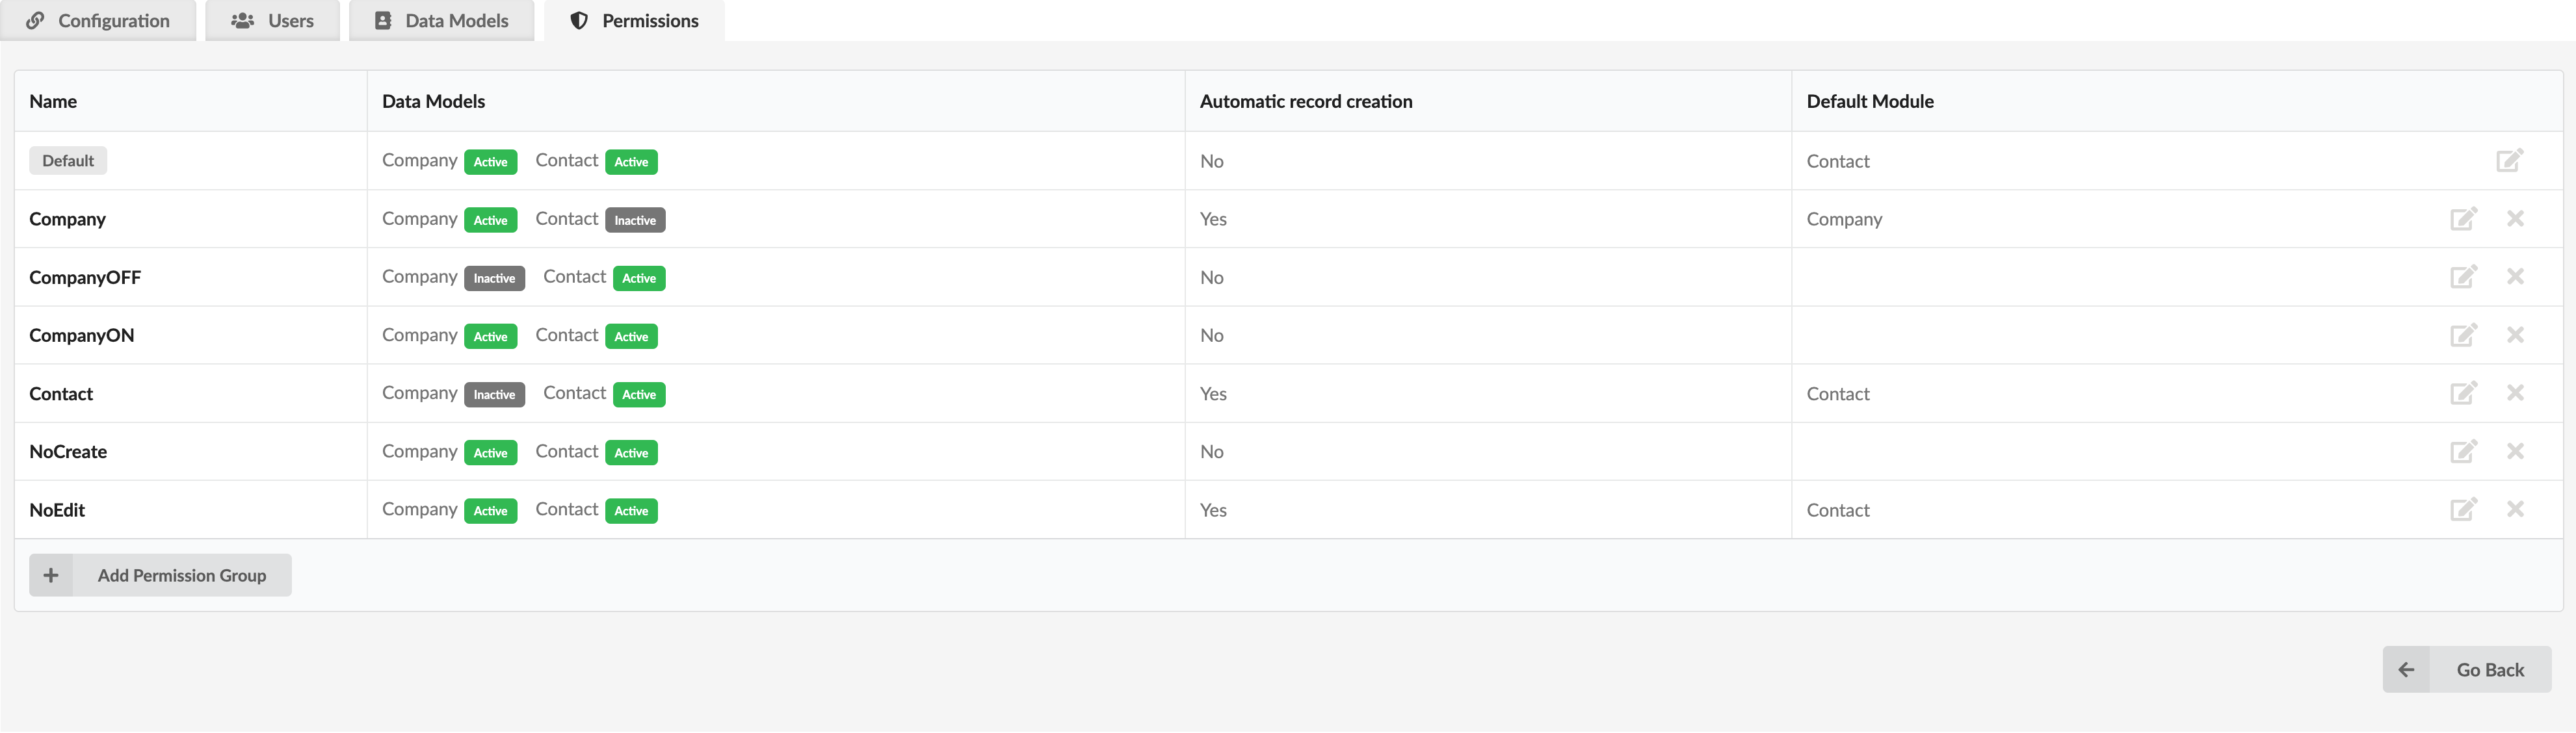
When you open this tab, you'll see a table listing all created permission groups. Each row contains the following:
- Name: The name given to the permission group.
- Data Models: A quick overview of the models this integration supports, each showing whether it is Active or Inactive within this group.
- Automatic Record Creation: Indicates whether automatic record creation is enabled for this group — displayed as Yes or No.
- Default Module: The module that will be used when a new record is automatically created for an unknown contact, whether from a call or a messaging channel.
At the end of each row, you'll find an Edit icon to modify the group. For manually created groups, a Delete button will also appear next to them. If the group you are deleting is currently assigned to one or more extensions, a warning will appear: "Are you sure you want to delete the 'TestPermissions' permission group? Please note that all users assigned to this permission group will be automatically reassigned to the Default permission group." If the group has no users assigned, the message will simply ask: "Are you sure you want to delete permission group 'Test'?"
The default permission group will always be present at the top of the list. This group is created automatically and cannot be deleted. It is also the group that is automatically assigned to any new extension you add on the Users tab, unless you manually change it. It can, however, be edited to match your needs.
Note: The Admin user always uses the Default permission group, and this cannot be changed. This is important to keep in mind when configuring your permissions - if an admin user requires a specific action, such as automatic record creation, it must be enabled in the Default permission group. Keep in mind that the Admin user is also required for CRM Routing to function, and the Default permission group is what gets applied during the routing process.
¶ Adding a New Permission Group
To create a new group, click the Add Permission Group button at the bottom of the table. A modal window will open with the following sections:
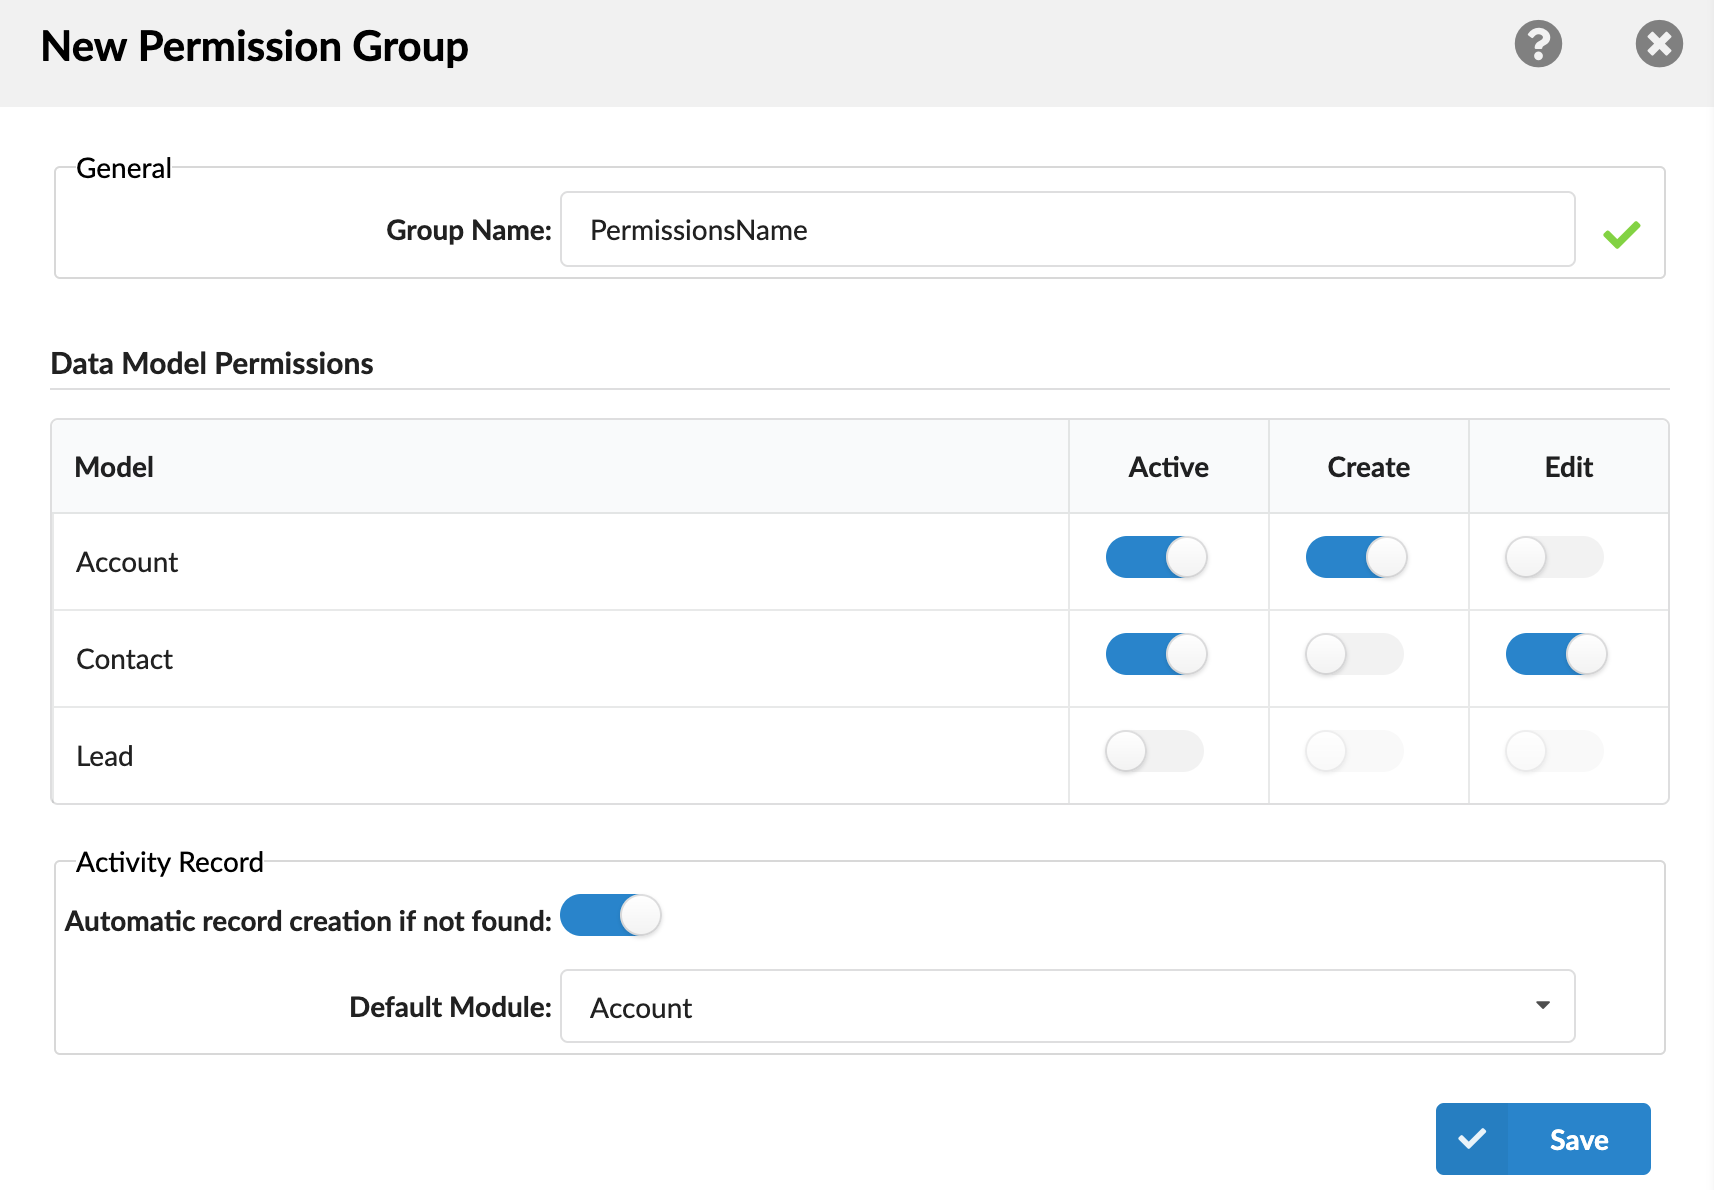
General
- Group Name: Give this group a clear, recognizable name — for example, "Sales Team" or "Support Read-Only."
Data Model Permissions
This table lists all the data models supported by your CRM integration. Keep in mind that the models available here match those configured in the Data Models tab and may vary depending on your CRM provider.
For each model, you have three toggle controls:
- Active: Enables or disables this model for the group entirely. When Active is turned ON, it is assumed that extensions in this group have read access to this model. When turned OFF, the Create and Edit toggles become unavailable.
- Create: When enabled, users in this group can create new records of this type directly from the gloCOM Next application.
- Edit: When enabled, users can modify existing records of this type found in the CRM from the gloCOM Next application.
For example, if you want a group that can only view contacts and nothing else, set Active to ON for Contact, leave Create and Edit OFF, and set Active to OFF for all other models.
Activity Record
This section covers the same functionality that controls automatic record creation for unknown callers, now managed at the permission group level:
- Automatic record creation if not found: If a call or messaging request comes in from a contact that doesn't exist in your CRM, turning this ON will automatically create a new record for that contact using default values.
- Default Module: If you've enabled the setting above, this dropdown allows you to choose the type of record to create. Should all new callers be saved as a Lead? A Contact? Or an Account? The choice is yours. Only modules supported by the selected CRM provider will appear on the list.
Important: The module you select as the Default Module must have the Create toggle enabled in the Data Model Permissions table above. If it doesn't, you will see an error message when saving: "The selected default module must be set as active in Data Model Permissions."
Once you've configured everything, click Save. The new group will appear in the Permissions table and will be available for assignment in the Users tab.
With your permission groups defined, your integration is now fully configured. You've built the connection, authorized it, set up your logging preferences, assigned your users, mapped your data fields, and established exactly what each team member can see and do. Your PBXware and CRM systems are now truly working as one.
¶ CRM Integration with the gloCOM Next Application
With everything configured on the PBXware side, it's time to bring it all to life in the gloCOM Next application. This is where your team will actually experience the CRM integration in their day-to-day work — seeing caller details pop up, creating records, and managing contacts without ever leaving the application.
Here's how each user gets connected:
1. Log in to the gloCOM Next application or web application with the extension that has been added to at least one active CRM integration in PBXware.
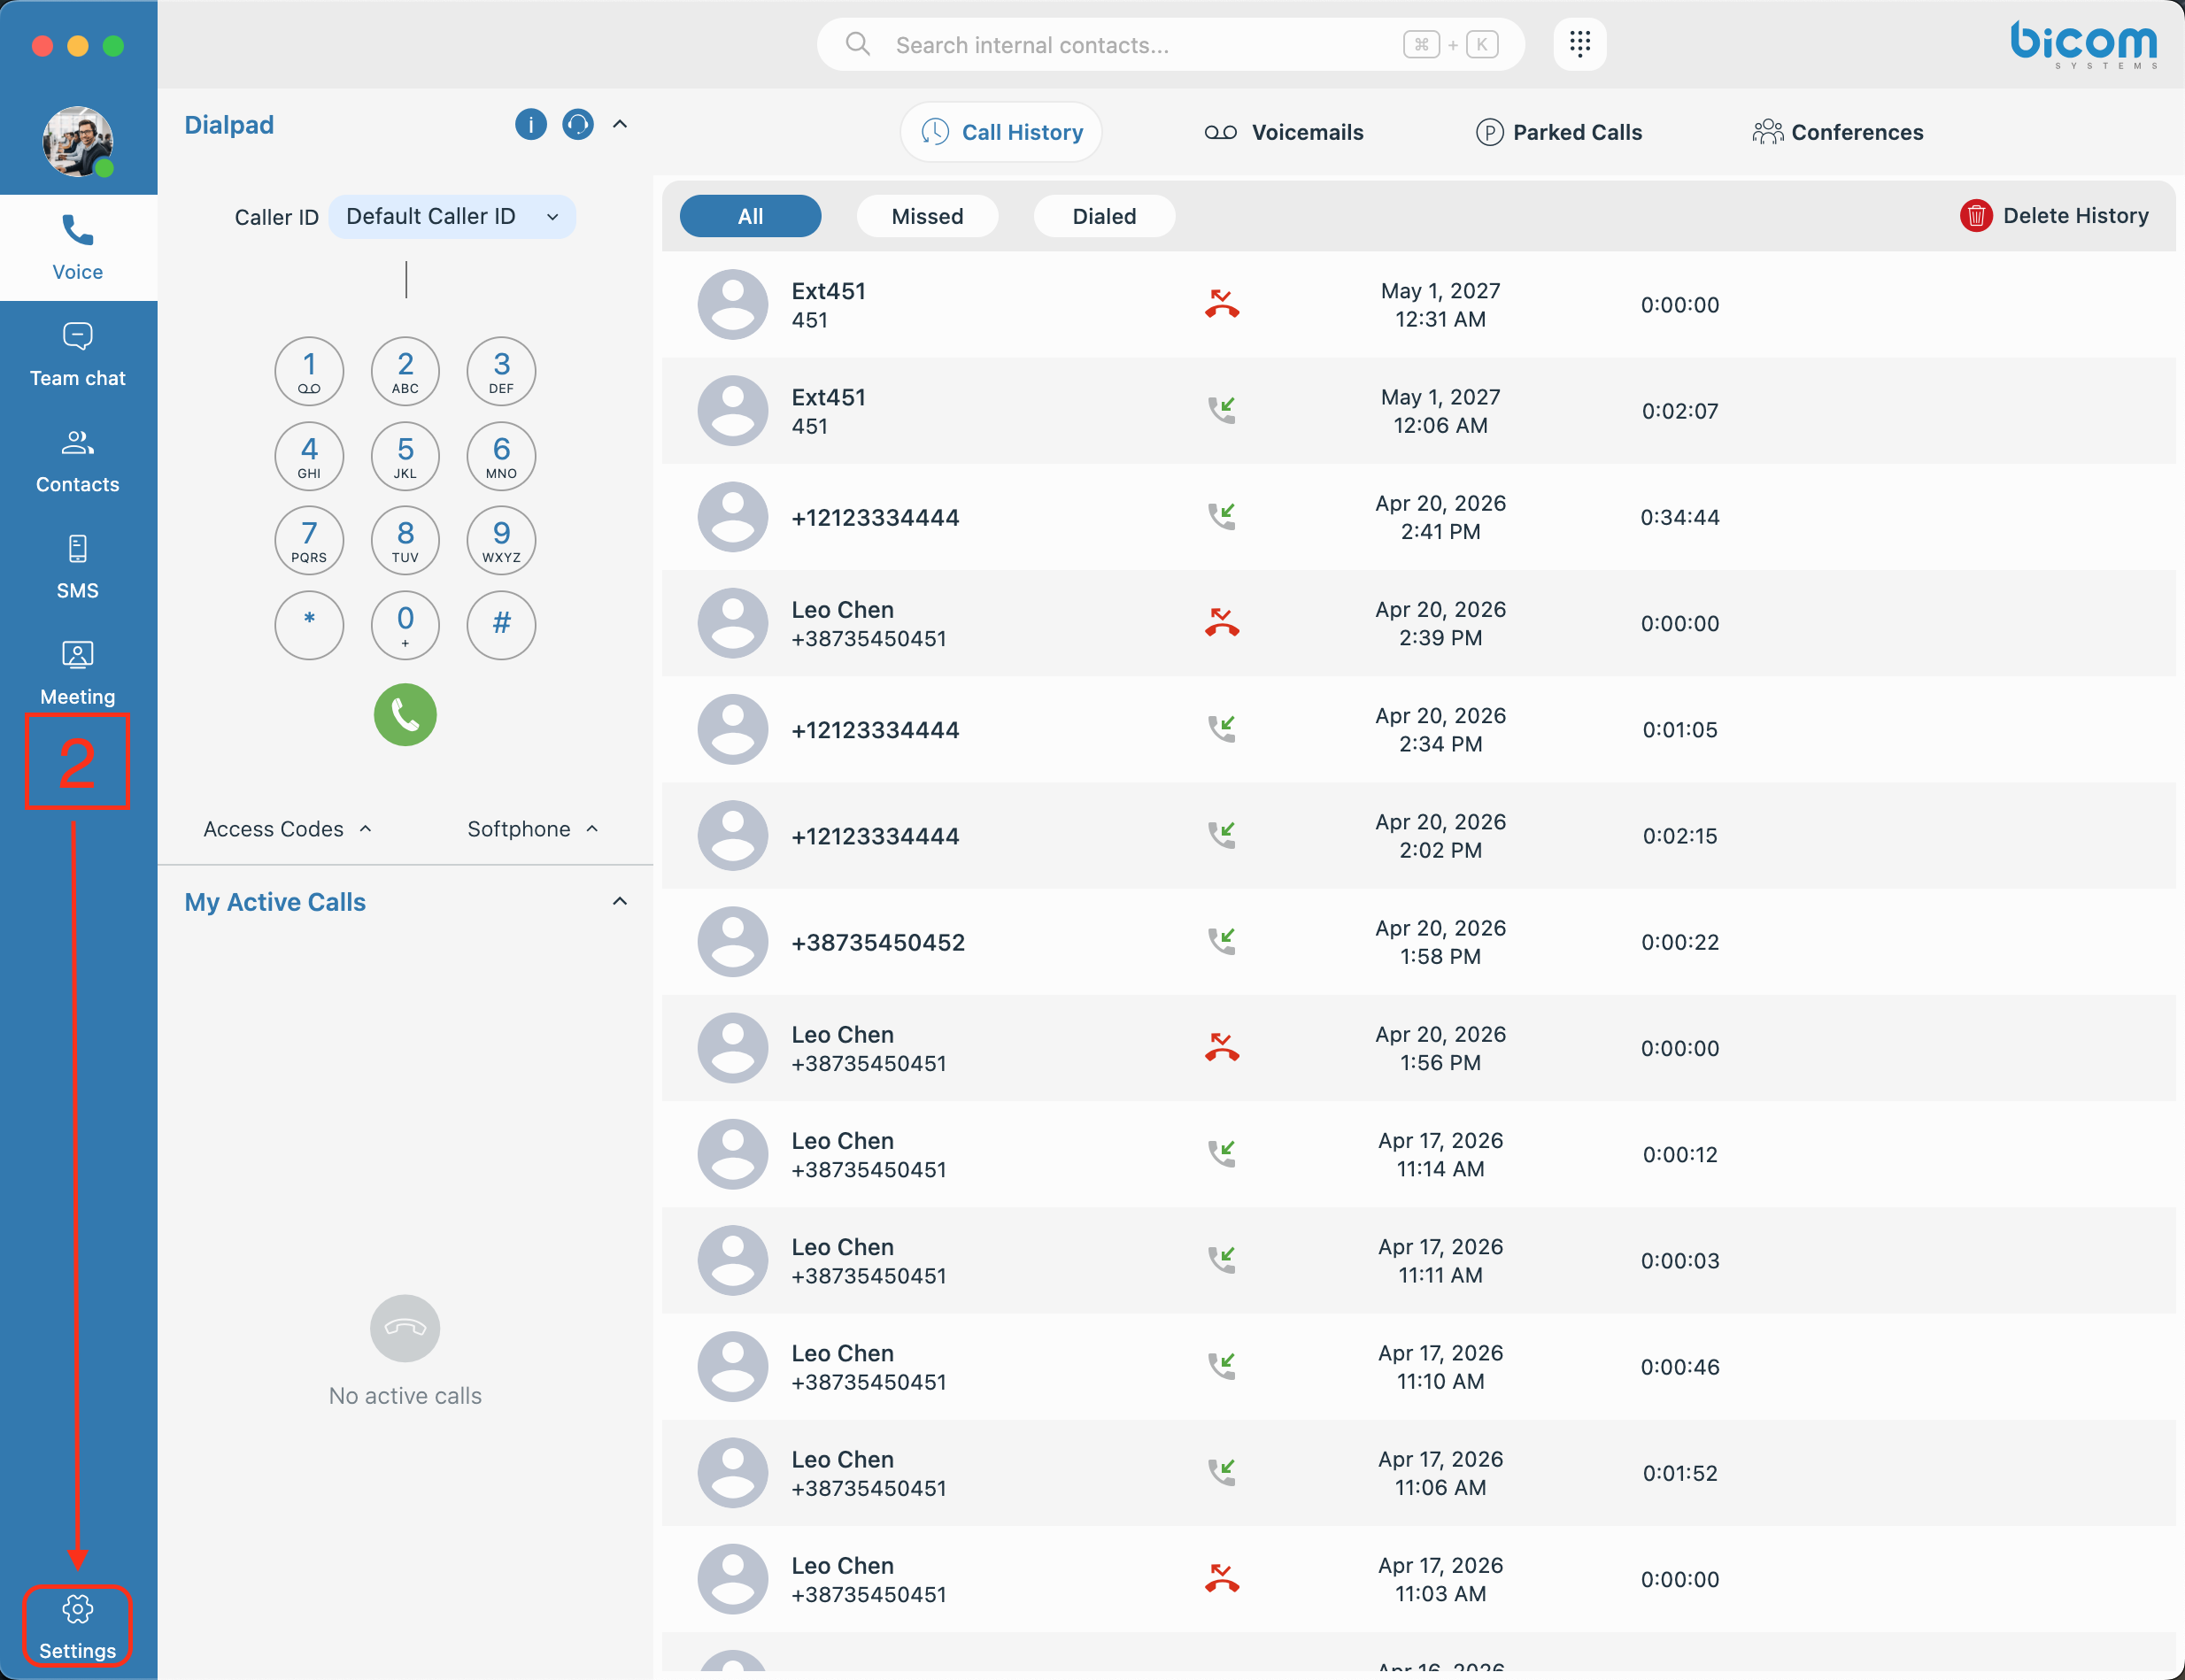
2. Navigate to Settings using the gear icon in the bottom left corner of the application.
3. Click on CRM from the settings menu. A new page will open showing all active CRM providers to which this extension has been granted access.
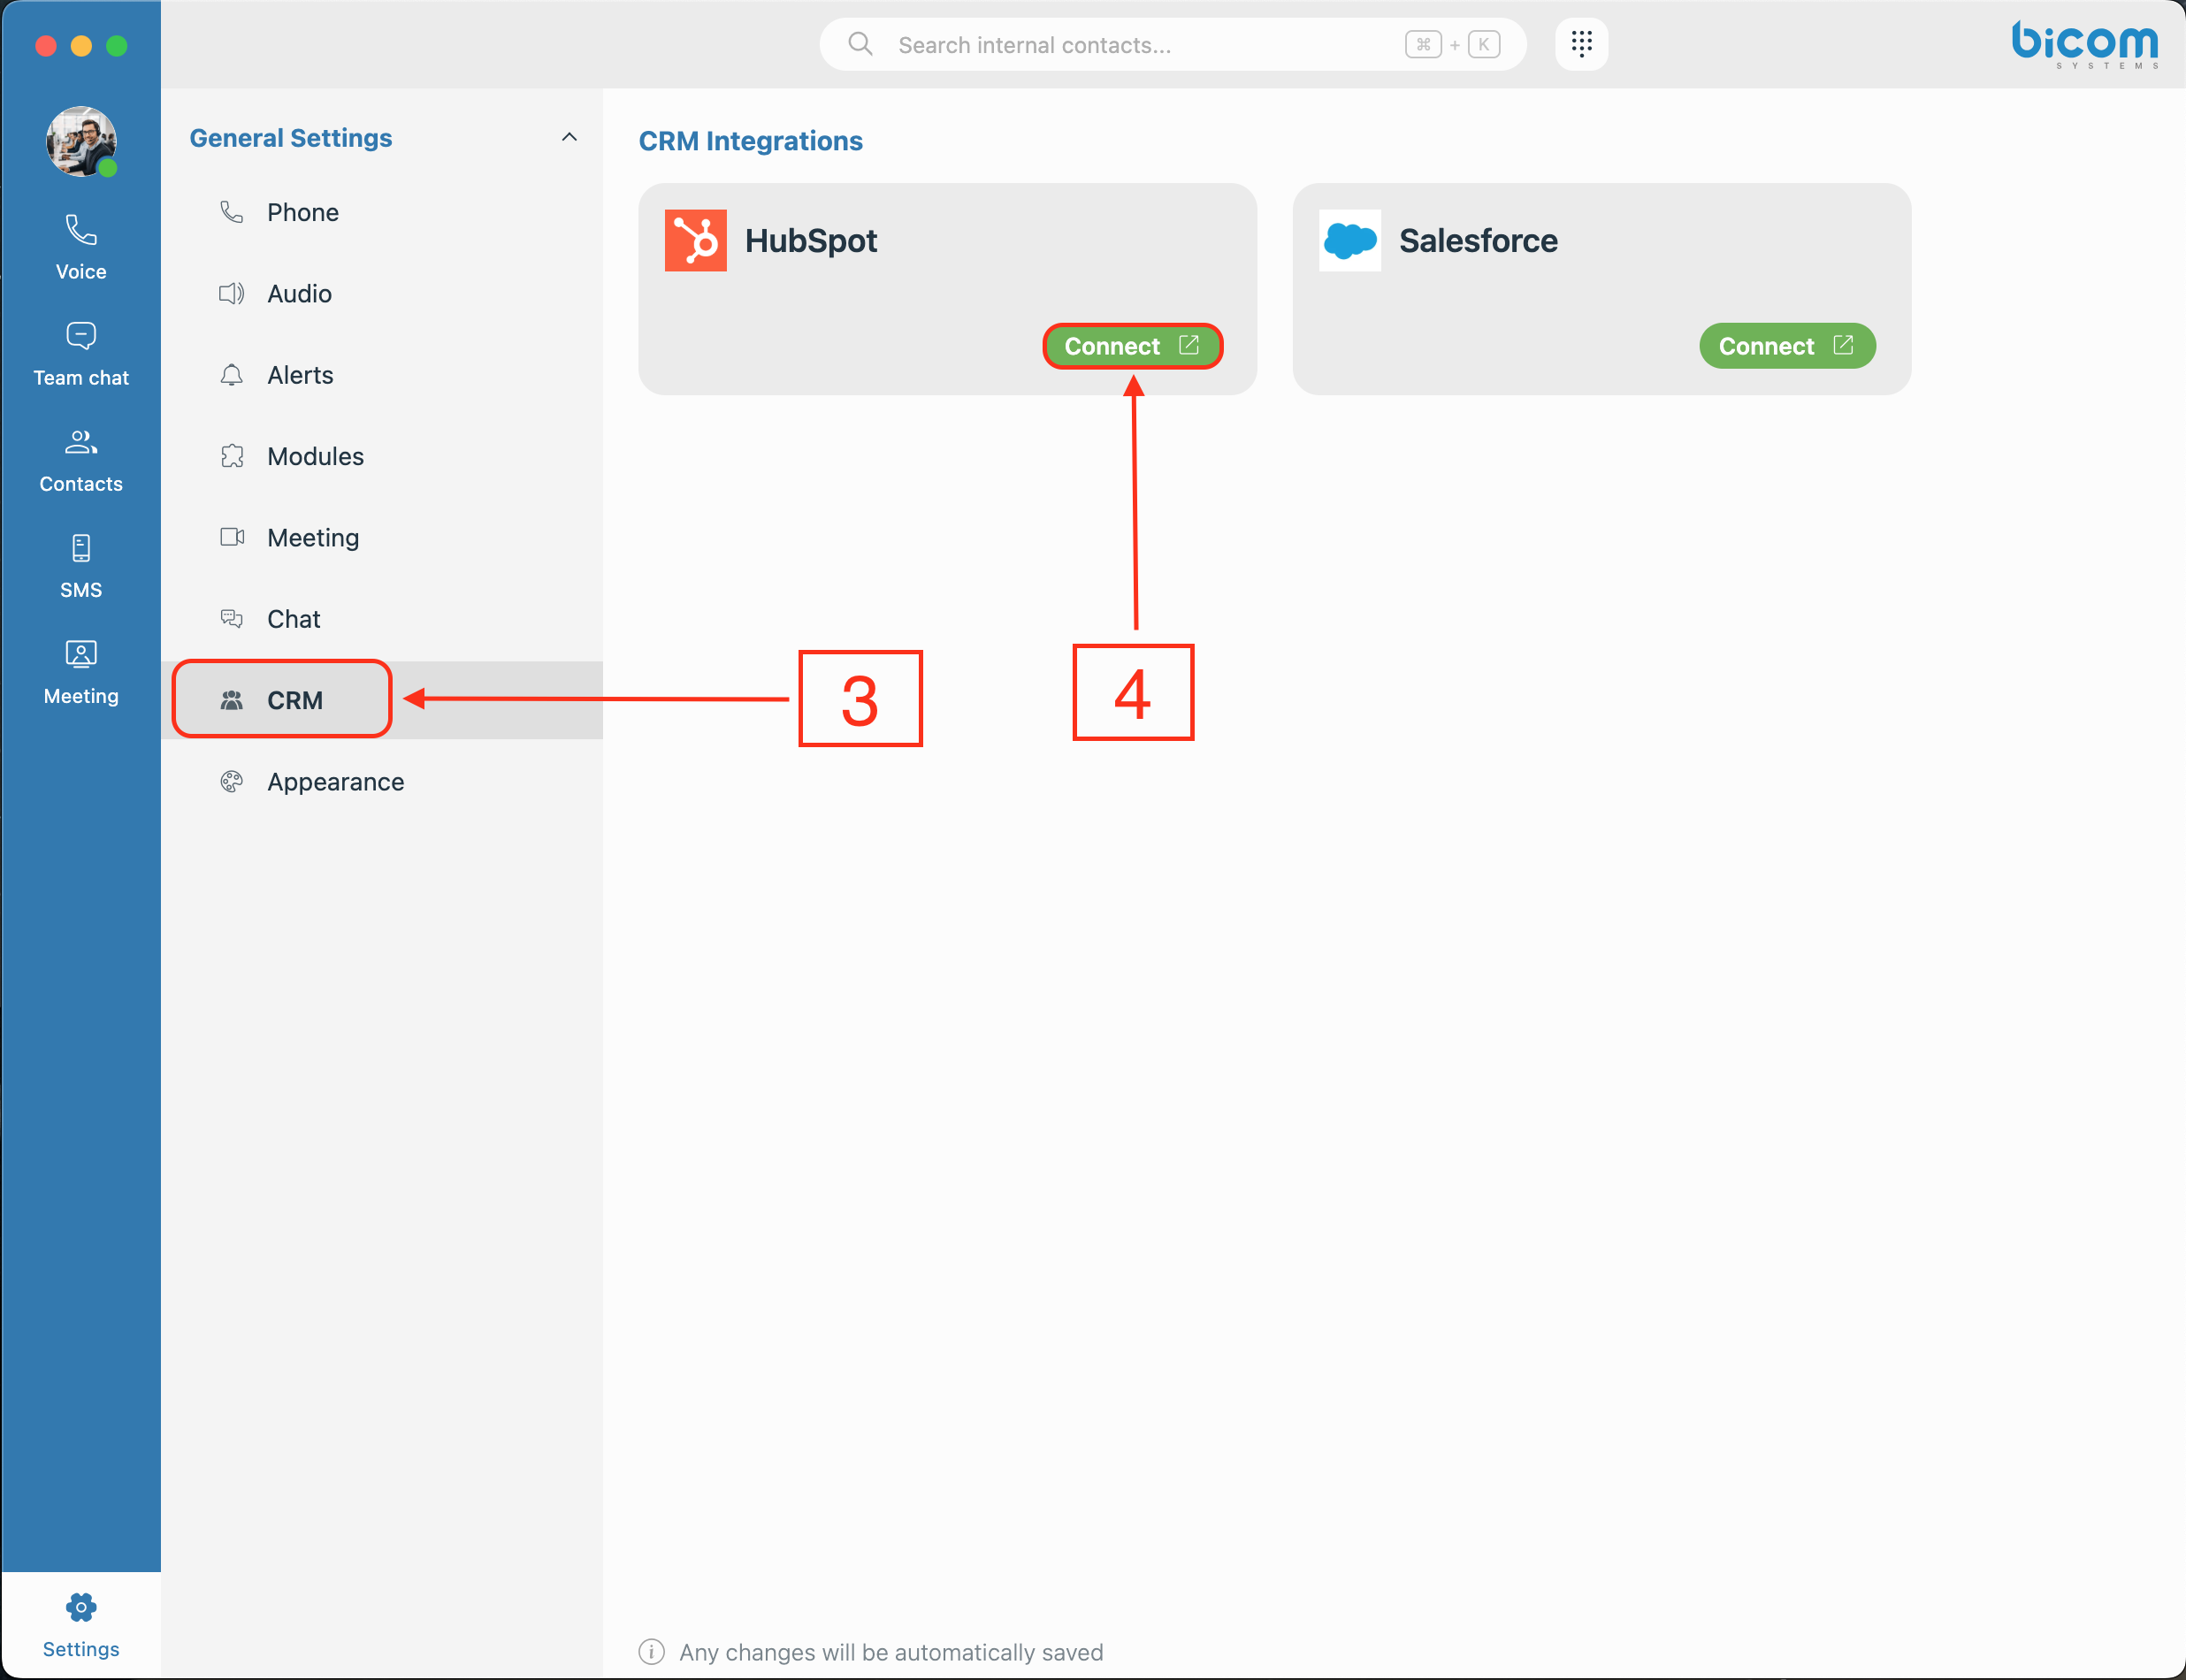
4. Click the Connect button next to the desired CRM provider. A login window will open — the exact process will vary depending on the provider and its authentication method. OAuth-based providers will redirect you to your CRM's login page, while others will prompt you for a username and password directly.
Once the login is completed successfully, the integration card will update to show a Connected status, and a Disconnect button will appear in place of the Connect button.
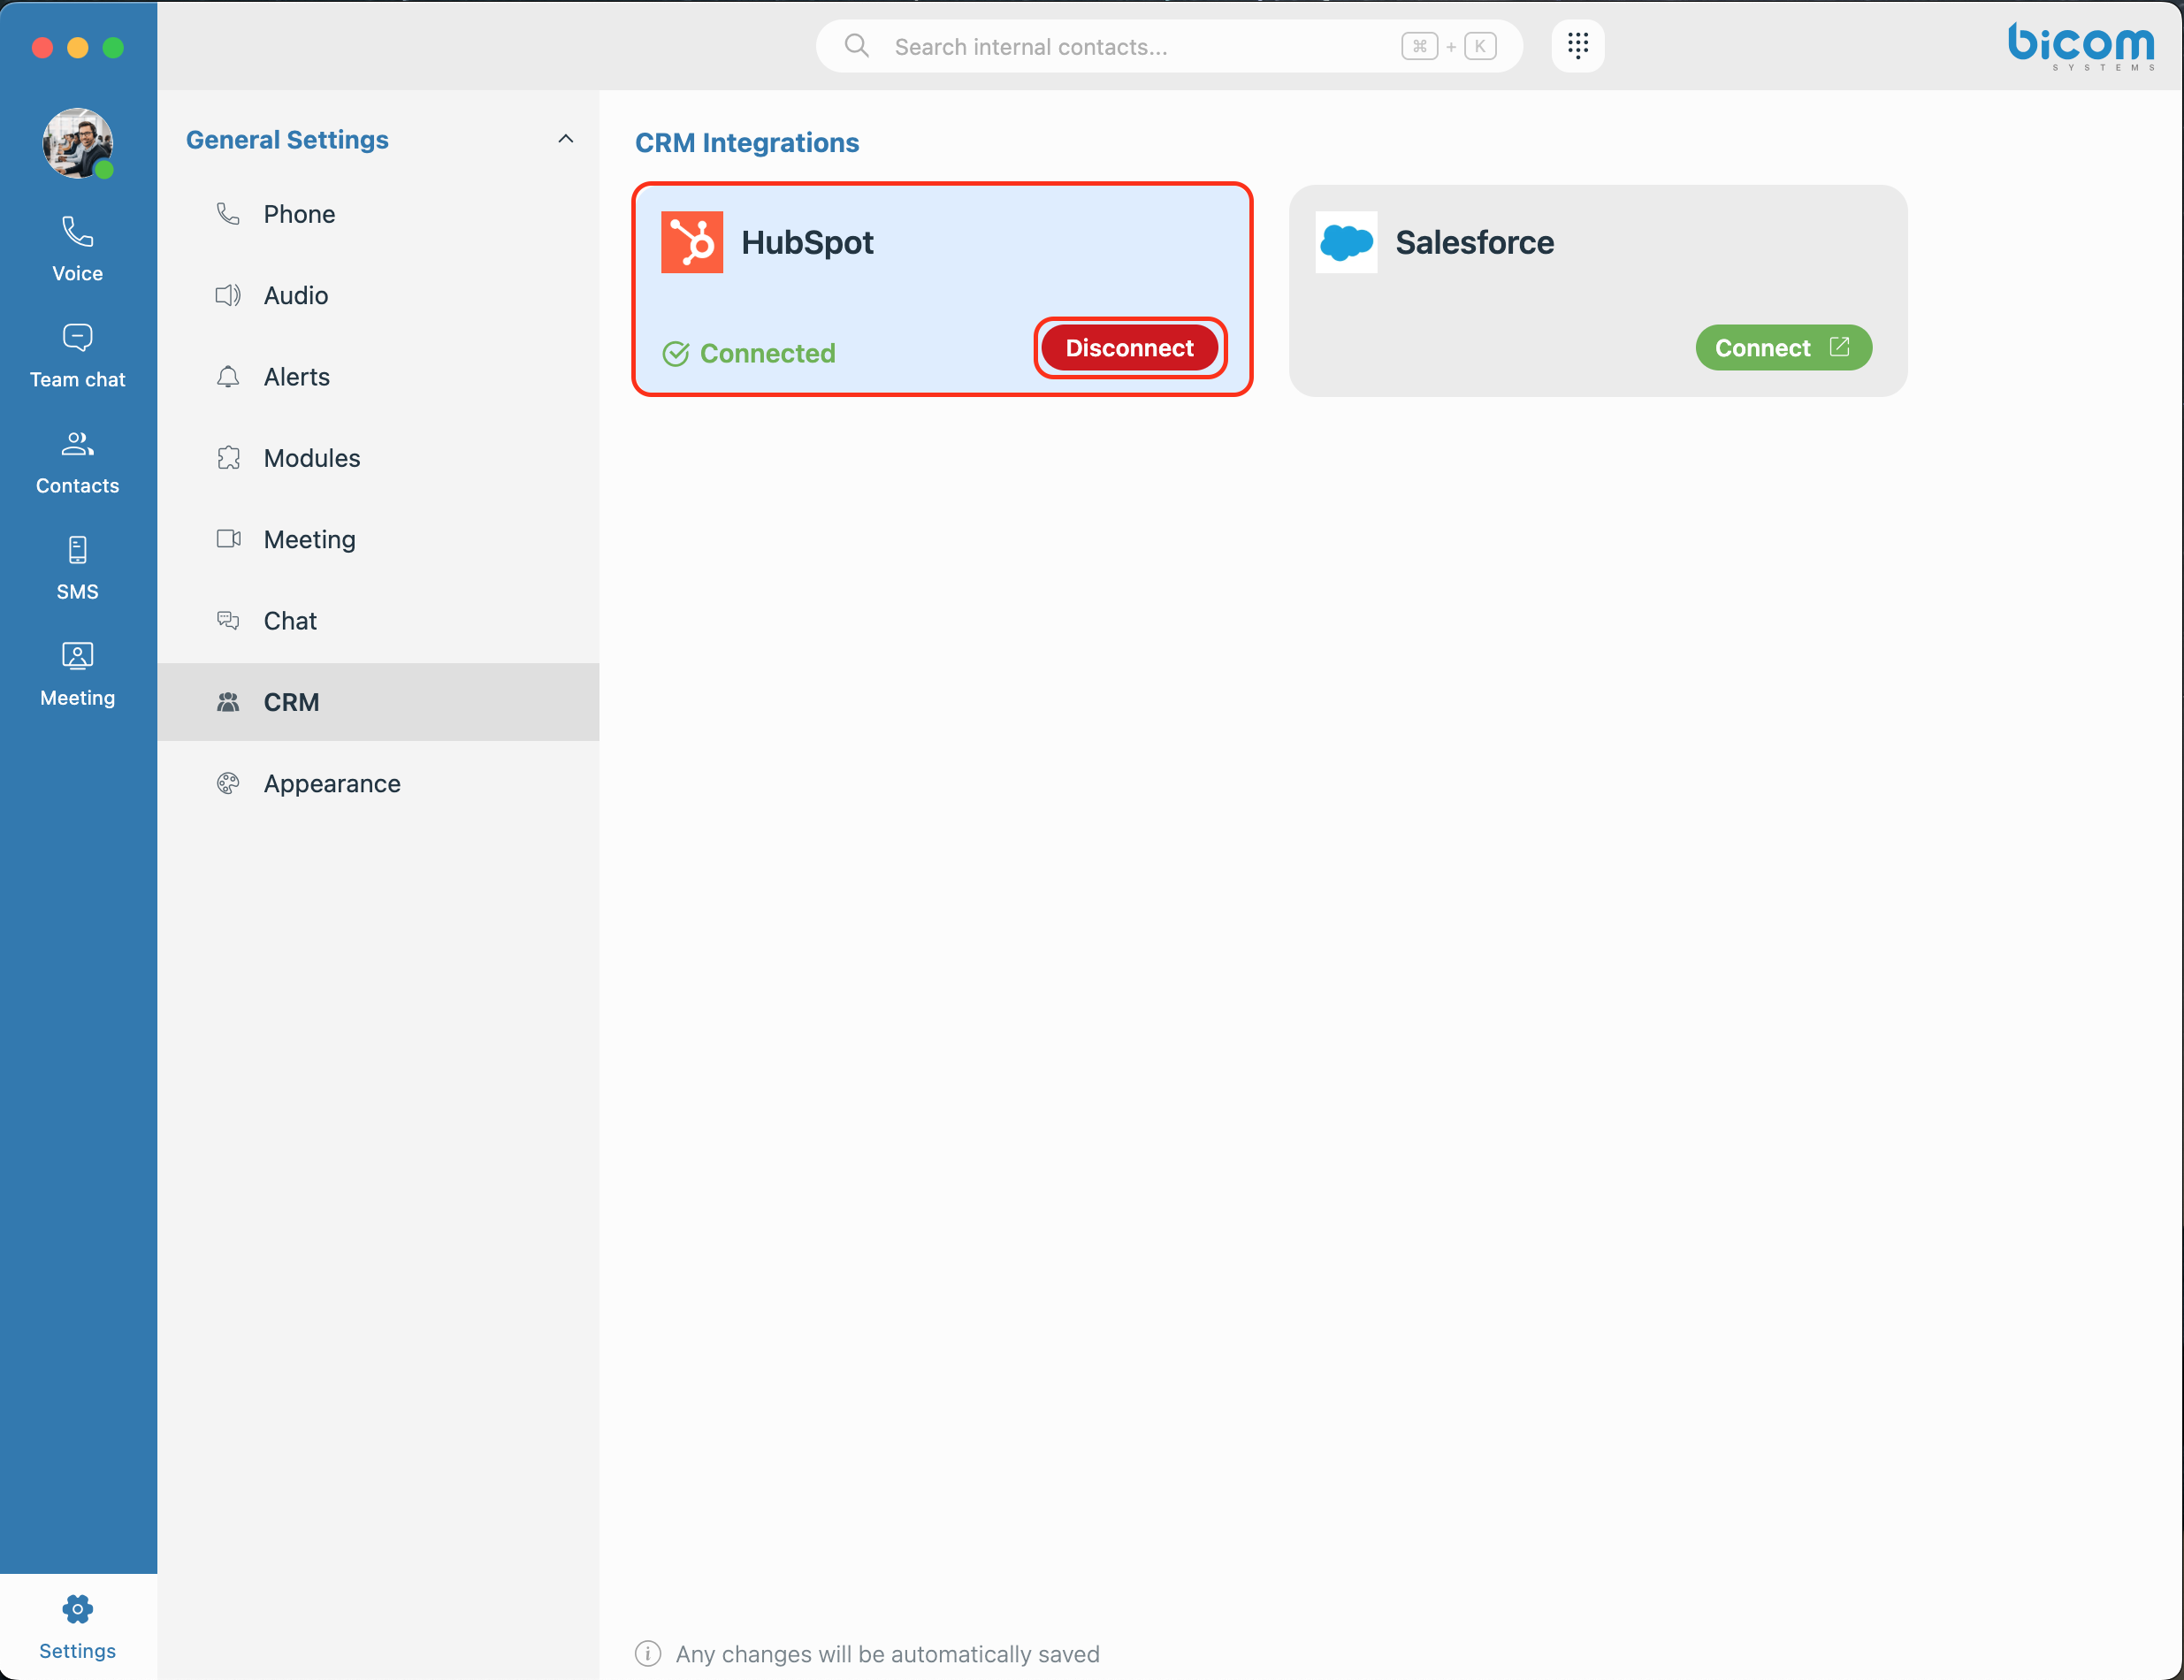
That's it — the user is now connected and ready to use the CRM features.
¶ Using the CRM During a Call
From this point on, the CRM works automatically. When a call, chat, or any other interaction comes in, a CRM widget will appear on the right side of the screen, displaying the data your CRM has on file for that contact - name, contact details, and any other fields configured in your Data Models.
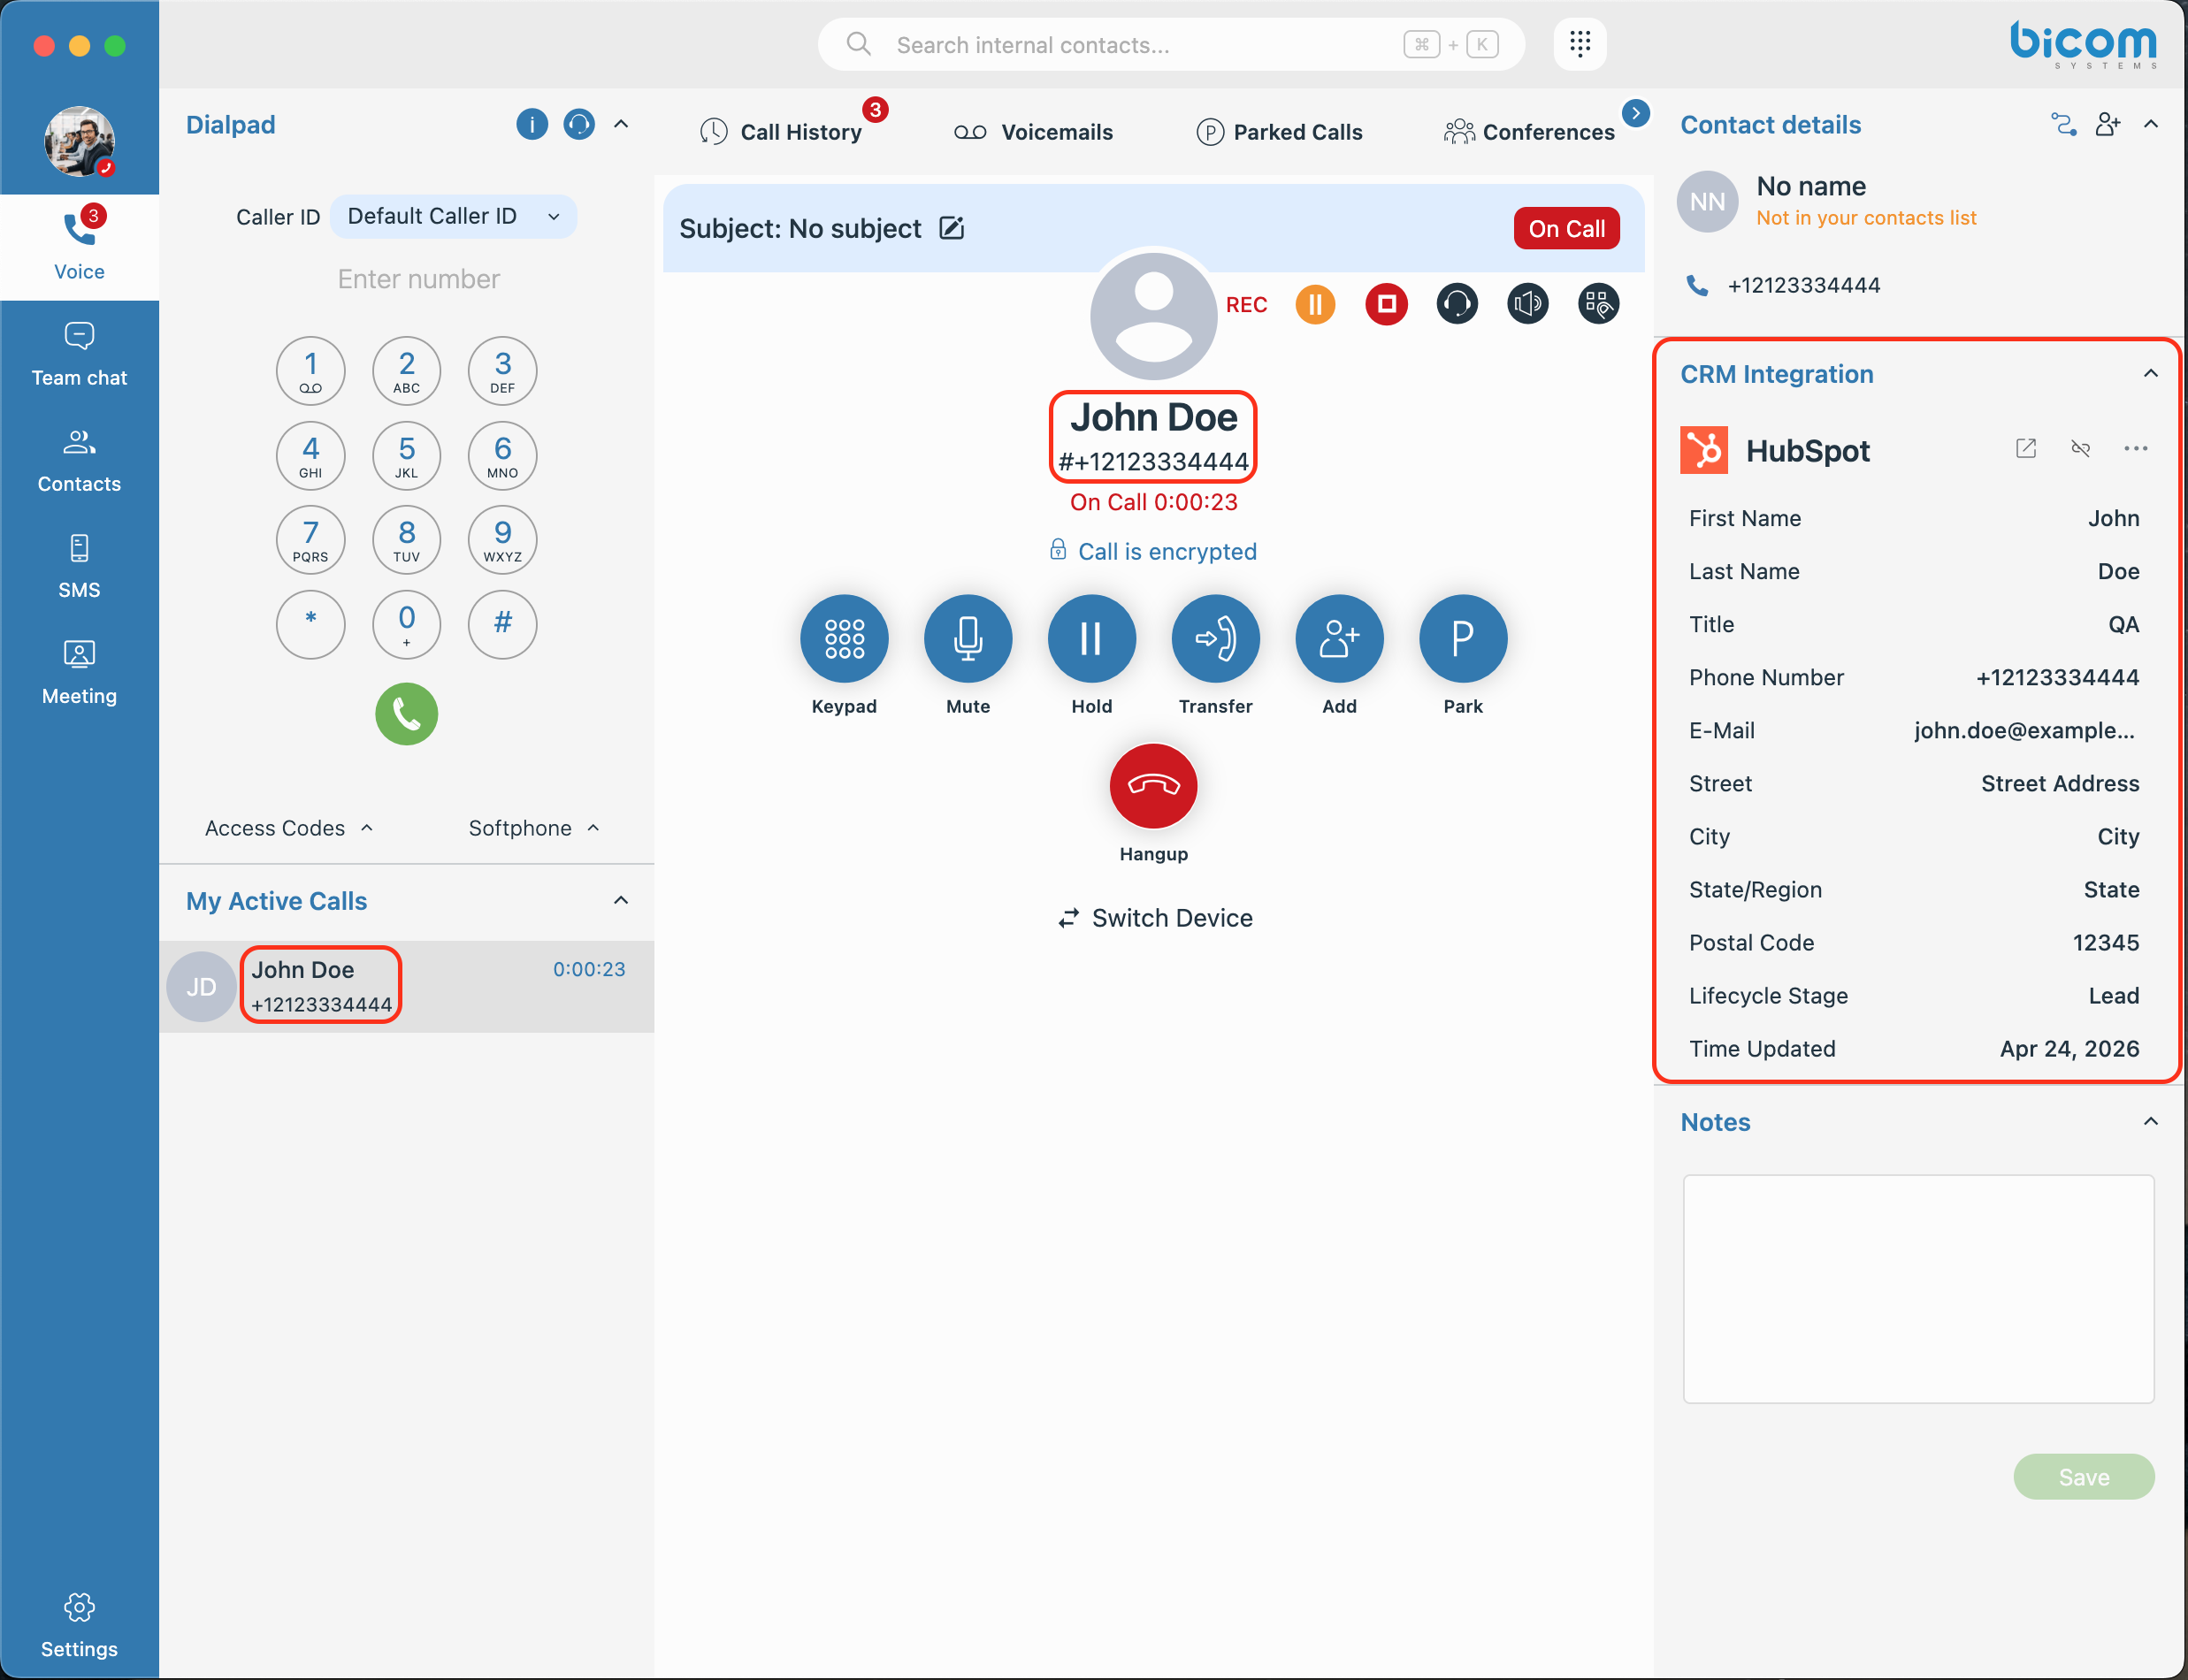
Depending on the permissions assigned to this user, they can view, create, or edit records directly from this panel without interrupting the call. If multiple active integrations are running at the same time, each will appear in the widget, and the user can scroll through them to switch between them.
If the contact is not found in your CRM, the widget will display a Create/Link record option if the user has the Create permission enabled, or just a Link record option if they don't. This allows the user to either create a new record directly in the application or link the interaction to an existing contact.

On the other hand, if the contact is already in your CRM and their details are displayed, clicking the three dots in the upper right corner of the widget gives you two additional options: Rematch, to link the call to a different contact, or Edit, to modify the existing record, if you have the permission for that.
¶ Routing
With your CRM integration live and your team receiving calls with full CRM context in the gloCOM Next application, there's one more powerful step available — putting that CRM data to work even before a call reaches an agent. That's exactly what CRM Routing does — it allows you to define rules that automatically route incoming calls to the right destination based on information already stored in your CRM.
Think of it this way: when a call arrives, PBXware searches your CRM for that caller's record. Depending on what it finds — their account type, region, assigned agent, or any other field you choose — the call is automatically sent exactly where it needs to go, without anyone having to manually intervene.
CRM Routing works with inbound calls arriving over a DID or IVR, and relies directly on your active CRM integrations. For a routing rule to work correctly, the integration it references must be active and have a logged-in admin user.
¶ The Routing Page
Navigate to CRM → Routing to see a list of all your created routing rules. At the top of the page, you'll find the Add Routing button to create new rules. Below that are two filters to help you navigate your list — an Integration dropdown to filter rules by a specific CRM provider or show only rules without an integration assigned, and a Search field to find rules by name.

The table below lists all created routing rules with their Name and assigned Integration. At the end of each row, you'll find three icons: an Eye icon to preview the rule, a Pencil icon to edit it, and an X icon to delete it.
¶ Creating a New Routing Rule
Click Add Routing to get started. A setup window will open with two fields:
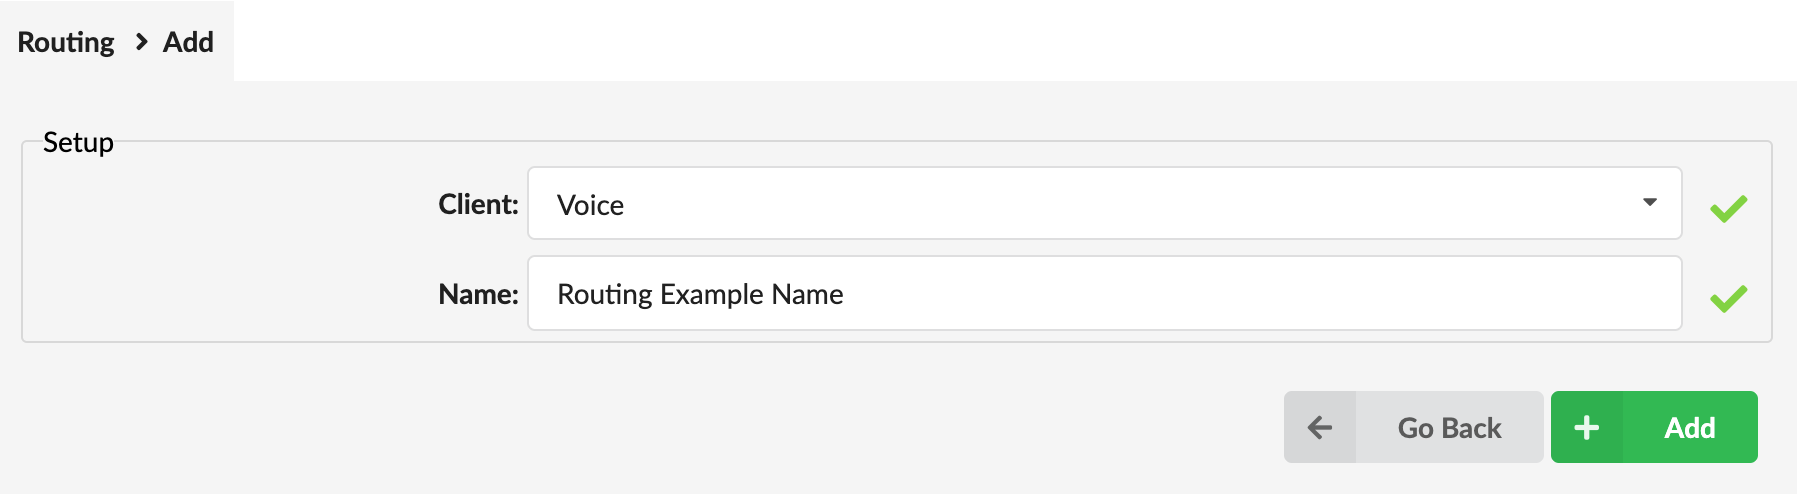
- Client: A dropdown currently offering Voice as the only option, covering inbound calls.
- Name: Give your rule a clear, meaningful name that describes its purpose — for example, "VIP Customers" or "Regional Sales Routing."
Click OK to confirm, and the full routing editor will open.
¶ Configuring the Rule
The editor is divided into several sections:
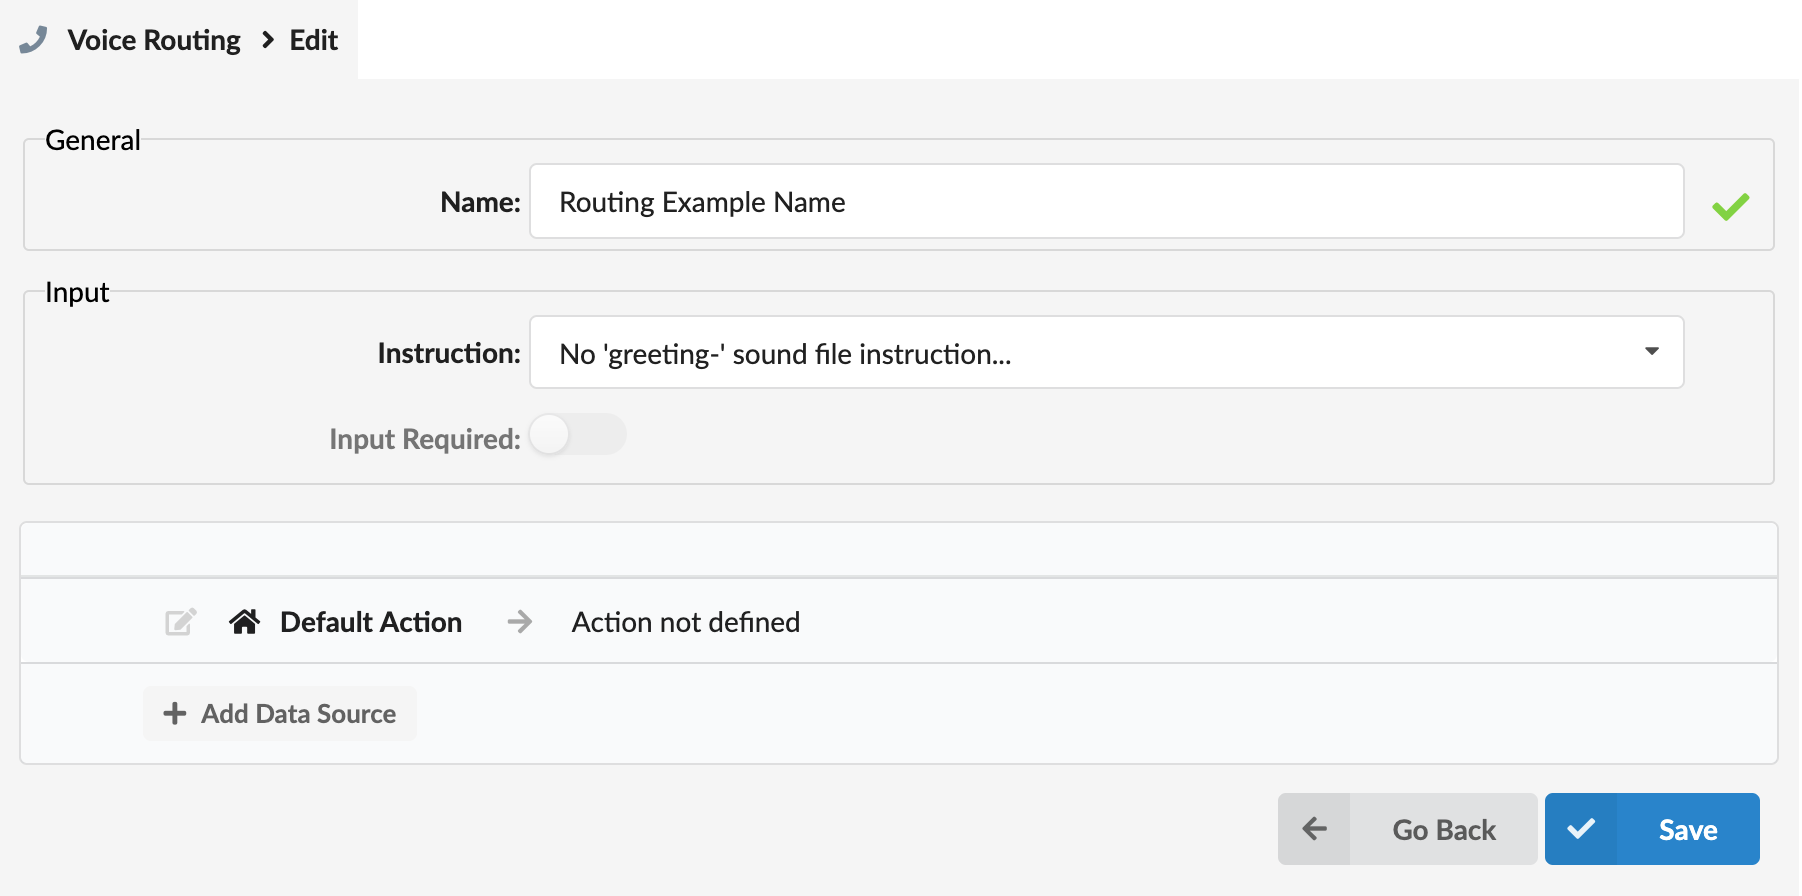
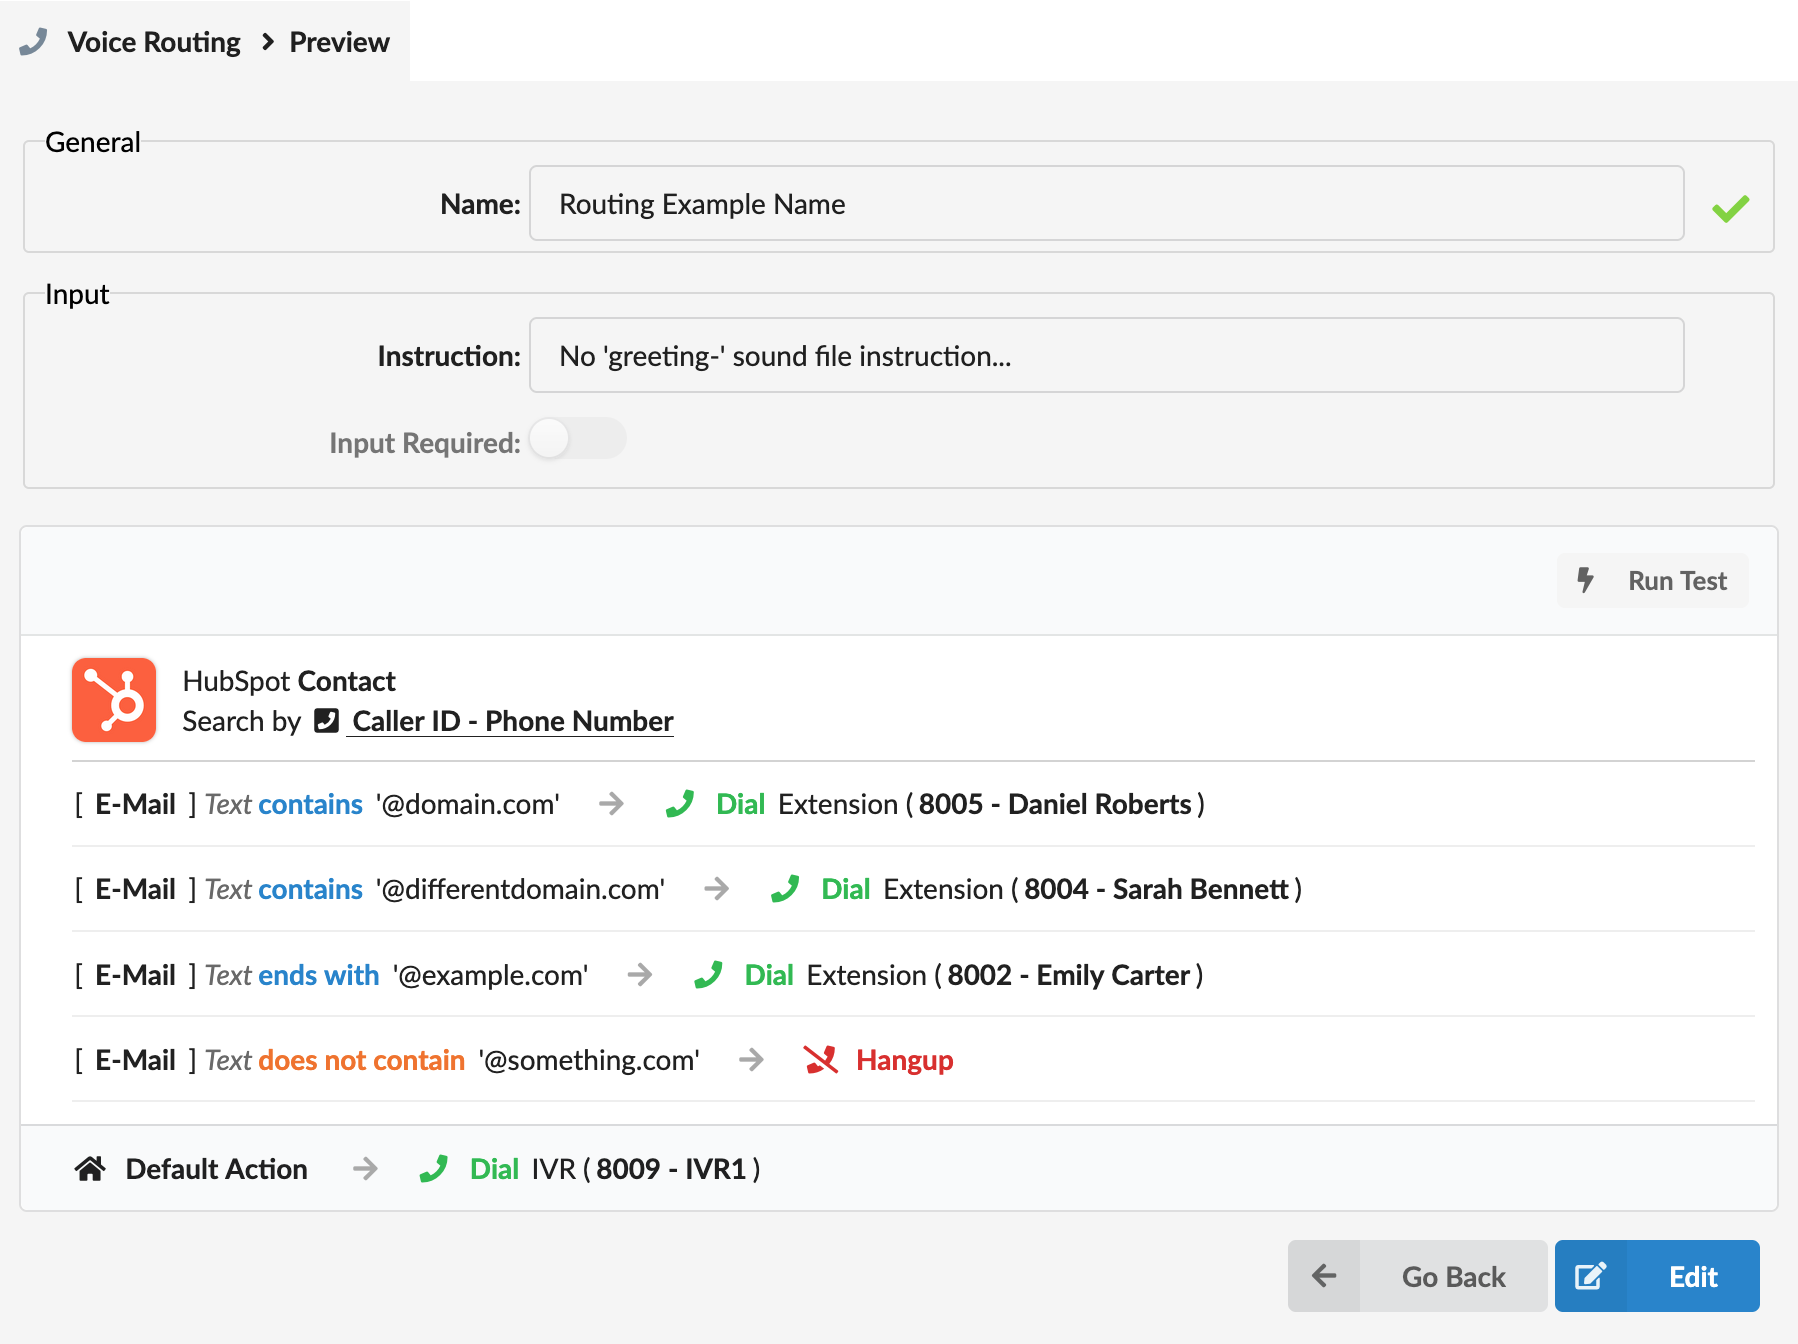
¶ General
- Name: Edit the name you gave the rule if needed.
¶ Input
- Instruction: A dropdown field where you can select a greeting sound to play when the call is received. Note that only sound files saved with the
greeting-prefix will appear in this list — for example, a file namedgreeting-welcomewould be available here. - Input Required: A toggle that should be turned on if any of your rules rely on Caller Input (DTMF) — meaning the caller will be asked to enter a number that will be used for matching.
¶ Default Action
This is a mandatory setting that acts as the safety net — it is the action that will be executed if none of your defined rules match. Click on the field to expand it, and you'll see two dropdowns:
- Action: Choose one of three options: Dial, Hang Up, or Play Recording.
- Destination / Target: Depends on what you selected for Action. Dial opens a full list of available destinations on your system, including extensions, ring groups, external numbers, etc. Hang Up requires no additional selection. Play Recording replaces the Destination field with a Target dropdown where you select a pre-saved audio file. Note that audio files used here must be saved with the
crm_routing-prefix — for example, a file namedcrm_routing-no-matchwould appear in this list.
¶ Adding a Data Source
This is where the real power of CRM Routing comes in. A Data Source tells PBXware which CRM integration to search when a call arrives, which data model to look in, and what value to use for the search.
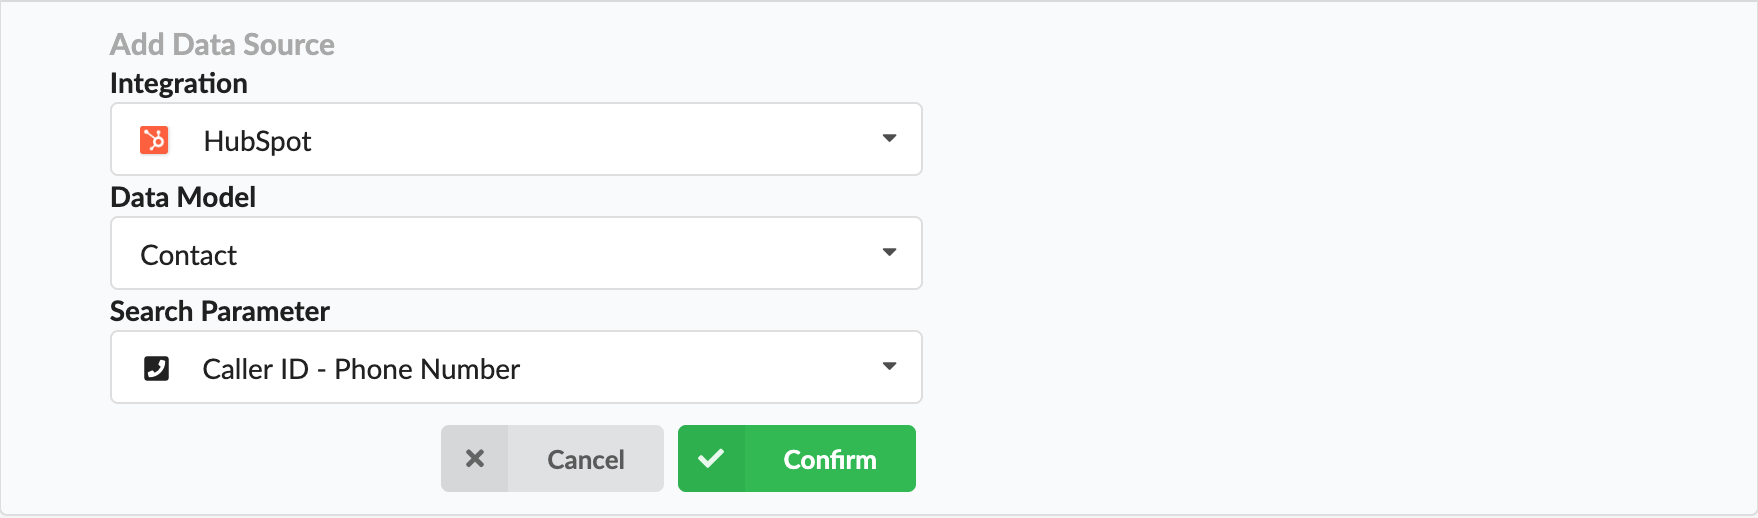
Click Add Data Source to expand the section and fill in the following:
- Integration: Select one of your active CRM integrations from the dropdown. If an integration is not currently active, you will see an orange warning triangle next to it; hovering over it displays a "Not Active" message. You can still add an inactive integration to your routing configuration, but it will never return a match, meaning the routing will always fall through to the Default Action.
- Data Model: Once an integration is selected, this dropdown lists the available data models supported by that integration. The available models will vary depending on the provider — for example, some integrations may offer Account, Contact, and Lead models, while others may have a different set entirely. Any inactive model will be flagged with the same orange warning triangle as inactive integrations.
- Search Parameter: After selecting a model, choose how PBXware should search for the caller's record. You have two options: Caller ID - Phone Number, which searches by the incoming number, or Caller Input (DTMF), which searches using a value the caller enters on their keypad. If you select Caller Input, an additional Input Field dropdown will appear, allowing you to select which model field the entered value should be matched against. Keep in mind that while all available model fields will appear in the list, only fields that accept numeric values are suitable for DTMF input, as callers can only enter numbers on their keypad.
Click Confirm to add the data source to the list.
¶ Adding Rules to a Data Source
Once a data source is added, an Add Rule button will appear below it. Rules define what action to take when a match is found in that data source. Click Add Rule to expand and configure:

- Argument: Select one of the fields available for the chosen data model — these are the same fields listed in the Data Models tab of your integration. This is the field whose value will be checked.
- Operator: Appears after you select an Argument and depends on the data type of that field. For text fields, you'll see options like matches, contains, starts with, etc. For numeric fields, you'll see options like equals, less than, greater than, and so on.
- Constant: The value you want to match against. For example, if your Argument is "Region" and your Operator is "matches," your Constant might be "Canada."
- Action: The same three options as the Default Action — Dial, Hang Up, or Play Recording — with the same sub-fields depending on your selection. This is the action executed when this specific rule is matched.
You can add as many rules as needed to each data source, and as many data sources as your routing scenario requires.
¶ How Matching Works
The routing logic is straightforward but important to understand. Matching always works top to bottom — both across data sources and within each data source's rules.
When a call arrives, PBXware starts from the top of the routing rule. If an Instruction sound file is configured, it will be played first. If Input Required is enabled, PBXware will then wait for the caller to enter a value on their keypad. The caller has 3 attempts to enter a valid input; if no input is provided after all 3 attempts, the routing automatically falls through to the Default Action without checking any data sources or rules.
Once all required inputs are collected, PBXware traverses your data sources from top to bottom, searching each integration in turn. The moment a matching record is found, the search stops there — remaining data sources further down the list are ignored. PBXware then moves into that data source's rules, again checking from top to bottom, and executes the action of the first rule that matches. If no rule matches, the Default Action is executed.
For example, if you have three data sources — Salesforce, HubSpot, and Zoho — and the caller's record exists in HubSpot, PBXware will search Salesforce first, find nothing, then search HubSpot, find the record, and stop. It will then check HubSpot's rules and execute the first matching one. Zoho will never be searched in this scenario.
It's also worth noting that your data sources don't have to be different integrations. You can add the same integration multiple times, but configure each instance to search a different data model — for example, searching Salesforce's Account model first, then its Contact model, then its Lead model.
¶ Previewing and Testing a Rule
Once you've finished configuring your rule and click Save, you'll be taken to the Preview window, which shows a full summary of everything you've set up. From here, you can also use the Run Test button to verify your routing logic directly from the PBXware GUI without needing to make a real phone call.
Clicking Run Test opens a small window with one or two input fields:
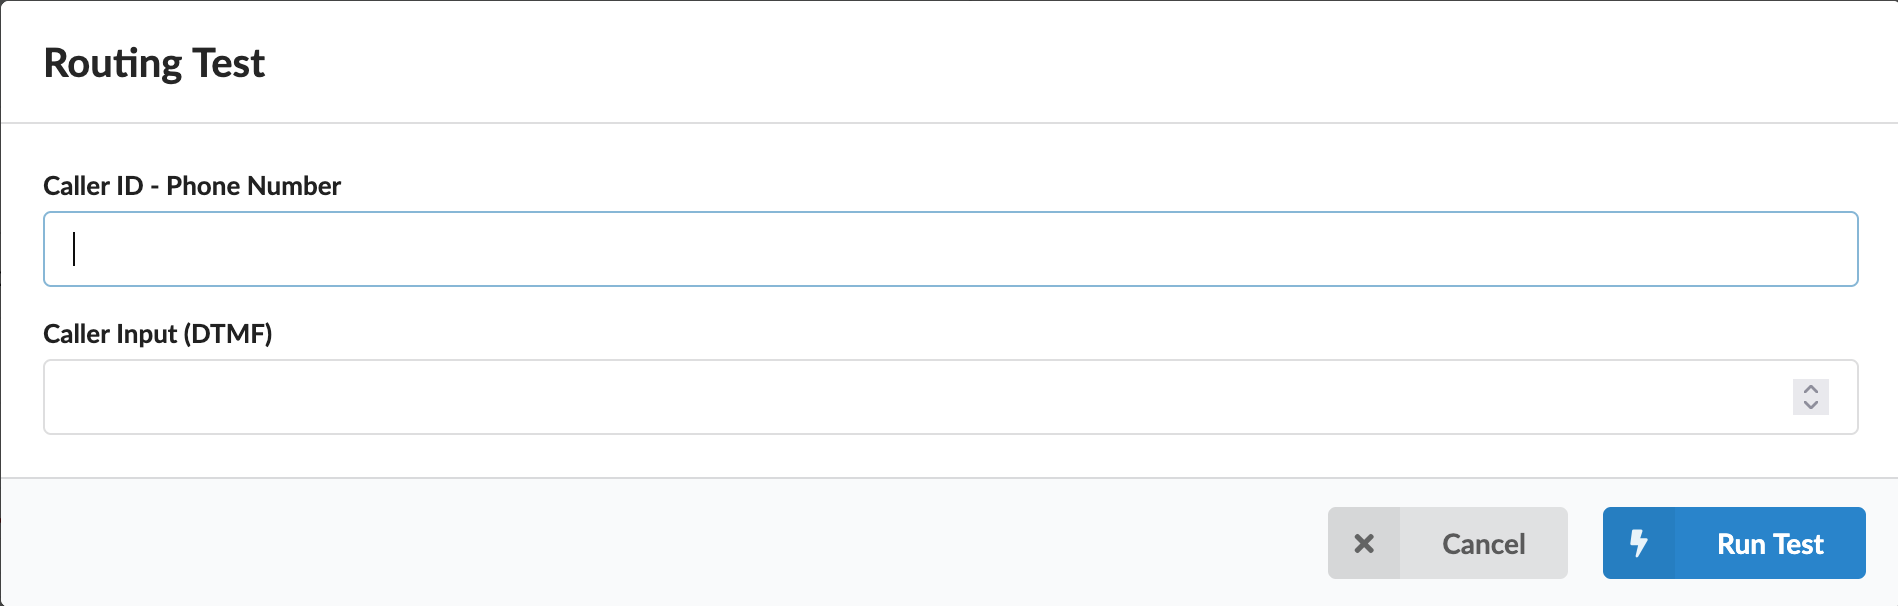
- Caller ID - Phone Number: Enter a phone number that exists in your CRM to simulate an incoming call from that caller.
- Caller Input (DTMF): This field appears only if your routing configuration uses Caller Input anywhere in its rules. Enter the value you'd expect the caller to type on their keypad.
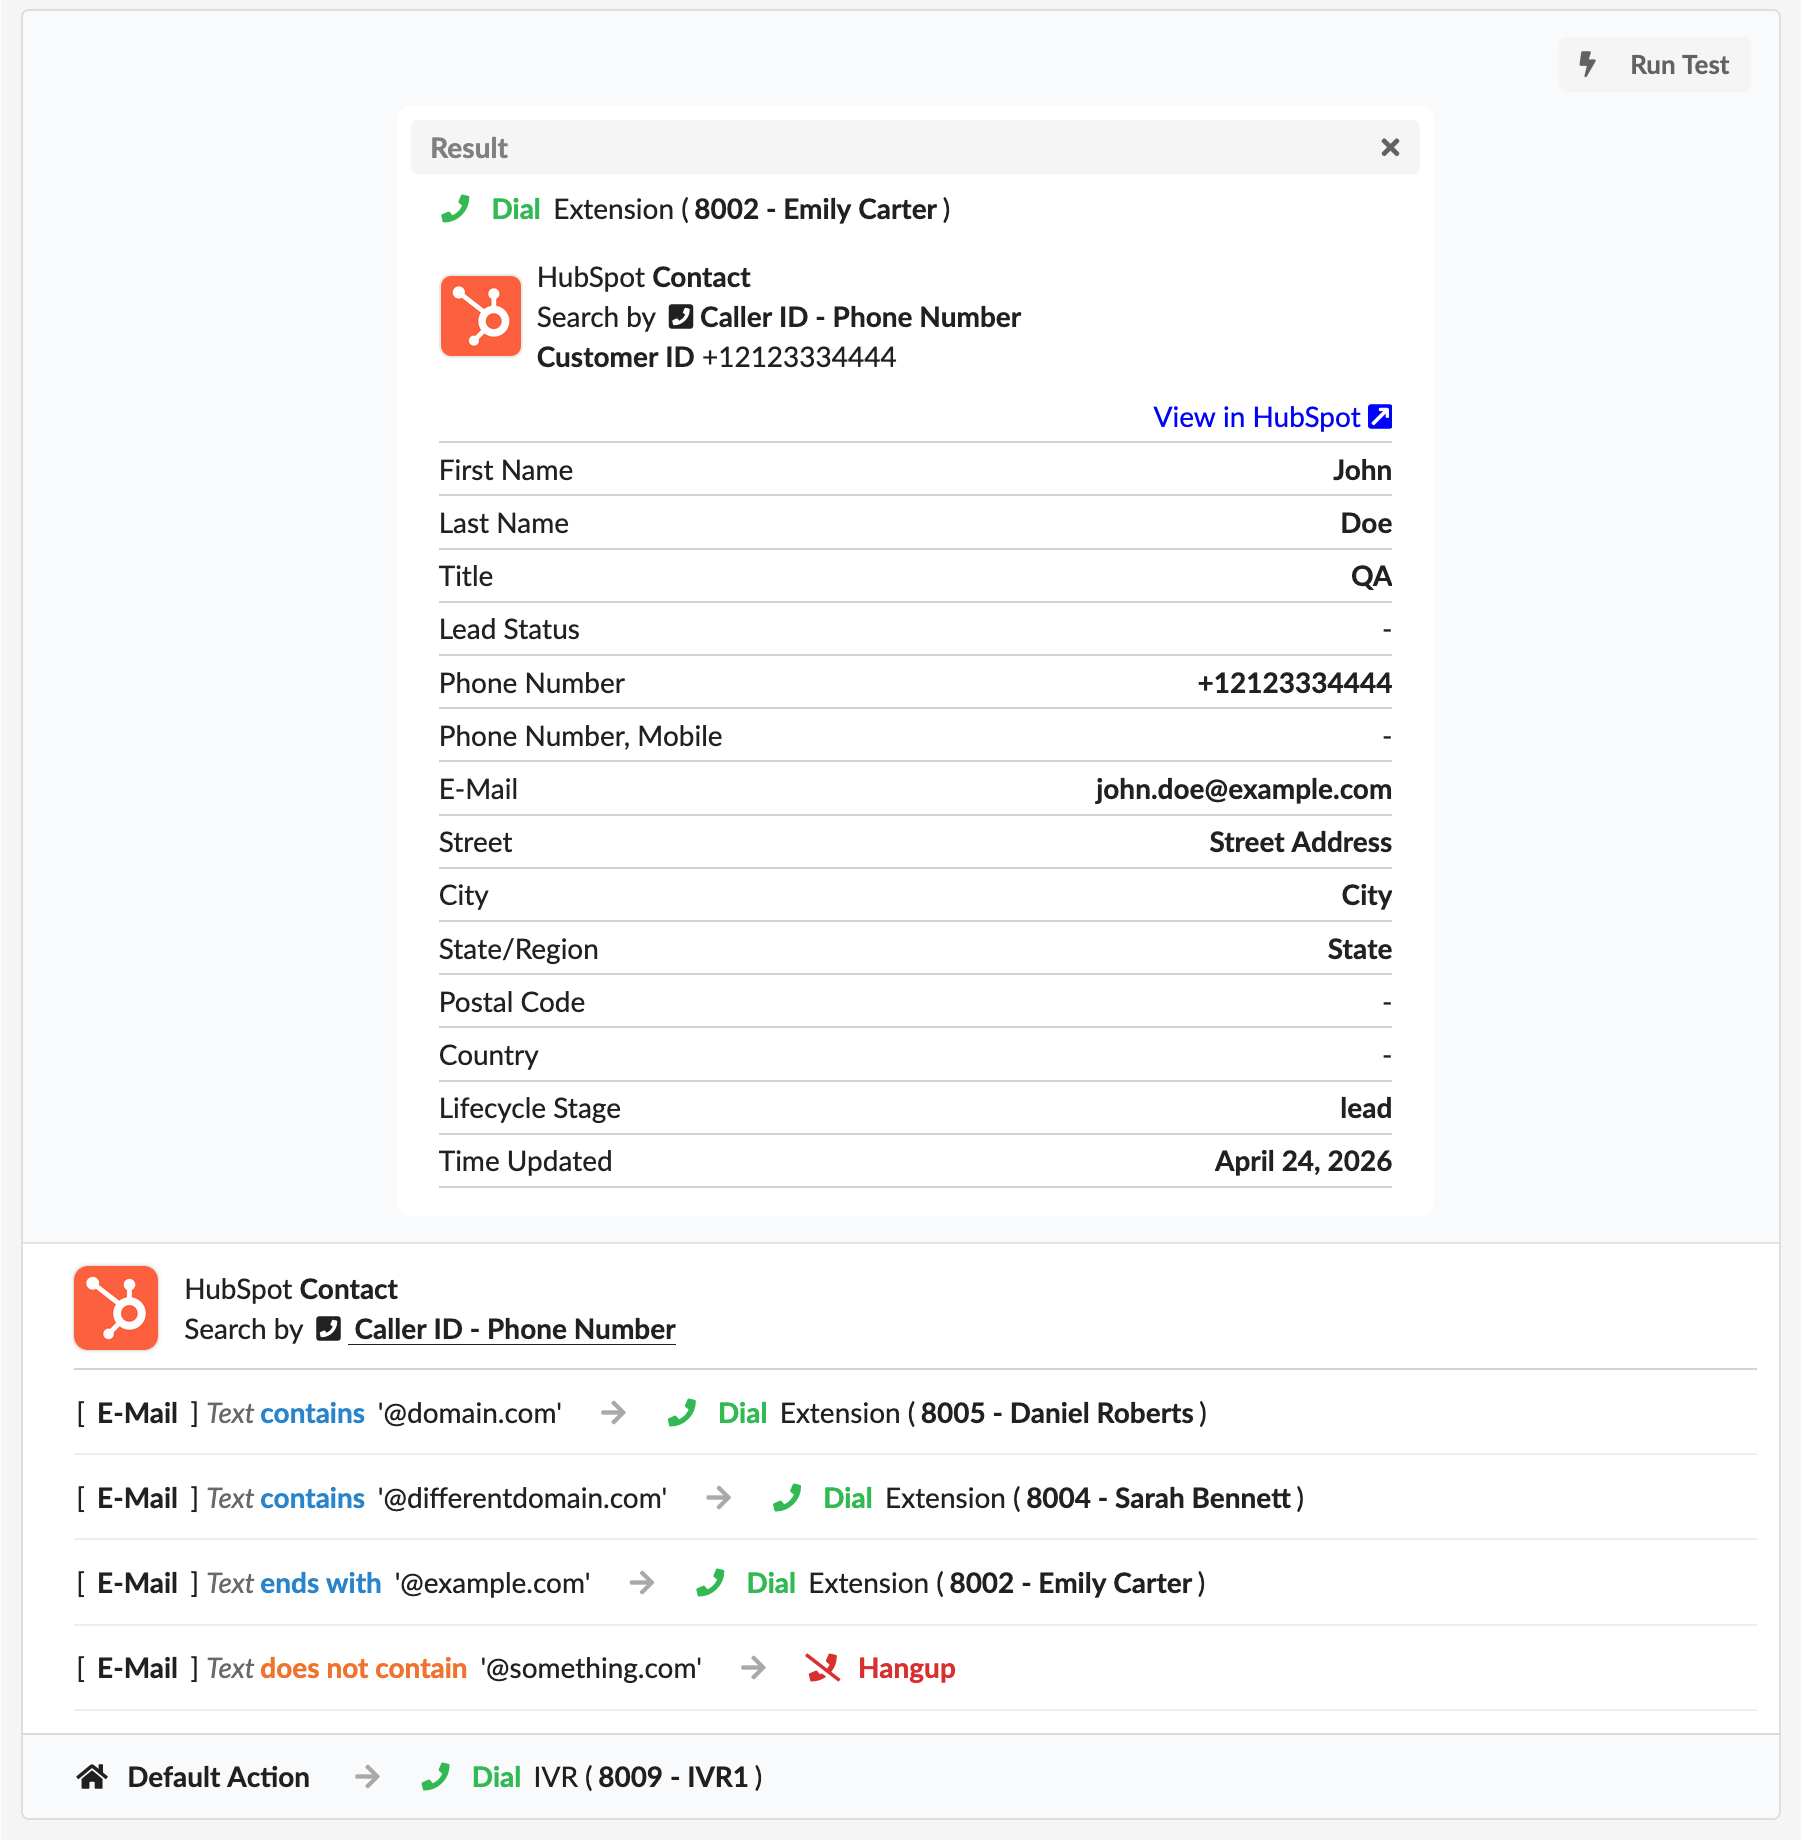
Click Run Test, and a results panel will appear showing the full test results. At the top, you'll see the action that would be executed for this call. Below that, you'll see the full CRM record that was found — including all the fields from the configured Data Model and a View in [CRM] link that takes you directly to that record in your CRM. This makes it easy to verify not just that the routing logic is correct, but also that the right CRM record is being matched. If no record is found or no rule is matched, the Default Action will be shown as the result.
¶ Routing Integrations
The Routing section we just covered works hand in hand with your active CRM integrations — Salesforce, HubSpot, Zoho, and the rest. But what if your organization uses a system that isn't on that list, or you simply don't need the full CRM integration with call logging, contact management, and the gloCOM Next widget? That's exactly where Routing Integrations come in.
Routing Integrations allow you to route incoming calls based on data fetched from any external HTTP endpoint — your own middleware — without requiring a full CRM integration or any paid license for a specific provider. Everything is defined on your middleware side, and here in PBXware, you simply configure how to connect to it and which fields to use. The routing logic itself works exactly the same way as described in the Routing section — the same rules, the same top-to-bottom matching, the same actions. The only difference is the source of the data.
Note: Routing Integrations are intended solely for routing. They do not provide a CRM widget in the gloCOM Next application and do not enable call logging or contact management.
¶ The Routing Integrations Page
Navigate to CRM → Routing Integrations to manage your custom routing data sources. When you first open this page with no integrations created yet, you'll see a simple message indicating that no routing integrations are available. At the top of the page, you'll find the Add Custom Routing Integration button, and below that a Search bar to find integrations by name once your list grows.

Once integrations are created, they appear in a table with three columns: Name, Endpoint, and Data Model. At the end of each row, you'll find an edit icon to modify the integration and a circle X icon to delete it. If you delete an integration referenced in an existing routing rule, the routing configuration must be updated manually, as the integration will no longer be available as a data source.
¶ Creating a New Routing Integration
Click Add Custom Routing Integration to get started. A first form will open with the basic setup fields:
- Name: A clear, recognizable name for this integration so you can identify it when building routing rules.
- Field: An optional field you can add at this stage — you can also add fields later on the edit page.
- Endpoint: The full URL of your middleware endpoint that PBXware will call to fetch data during routing (e.g.,
https://middleware.example.com/custom-source/routing/erp/customer). - HTTP Method: Choose between GET and POST based on how your middleware expects requests.
Click Add to confirm, and the full edit page will open where you can complete the remaining configuration.
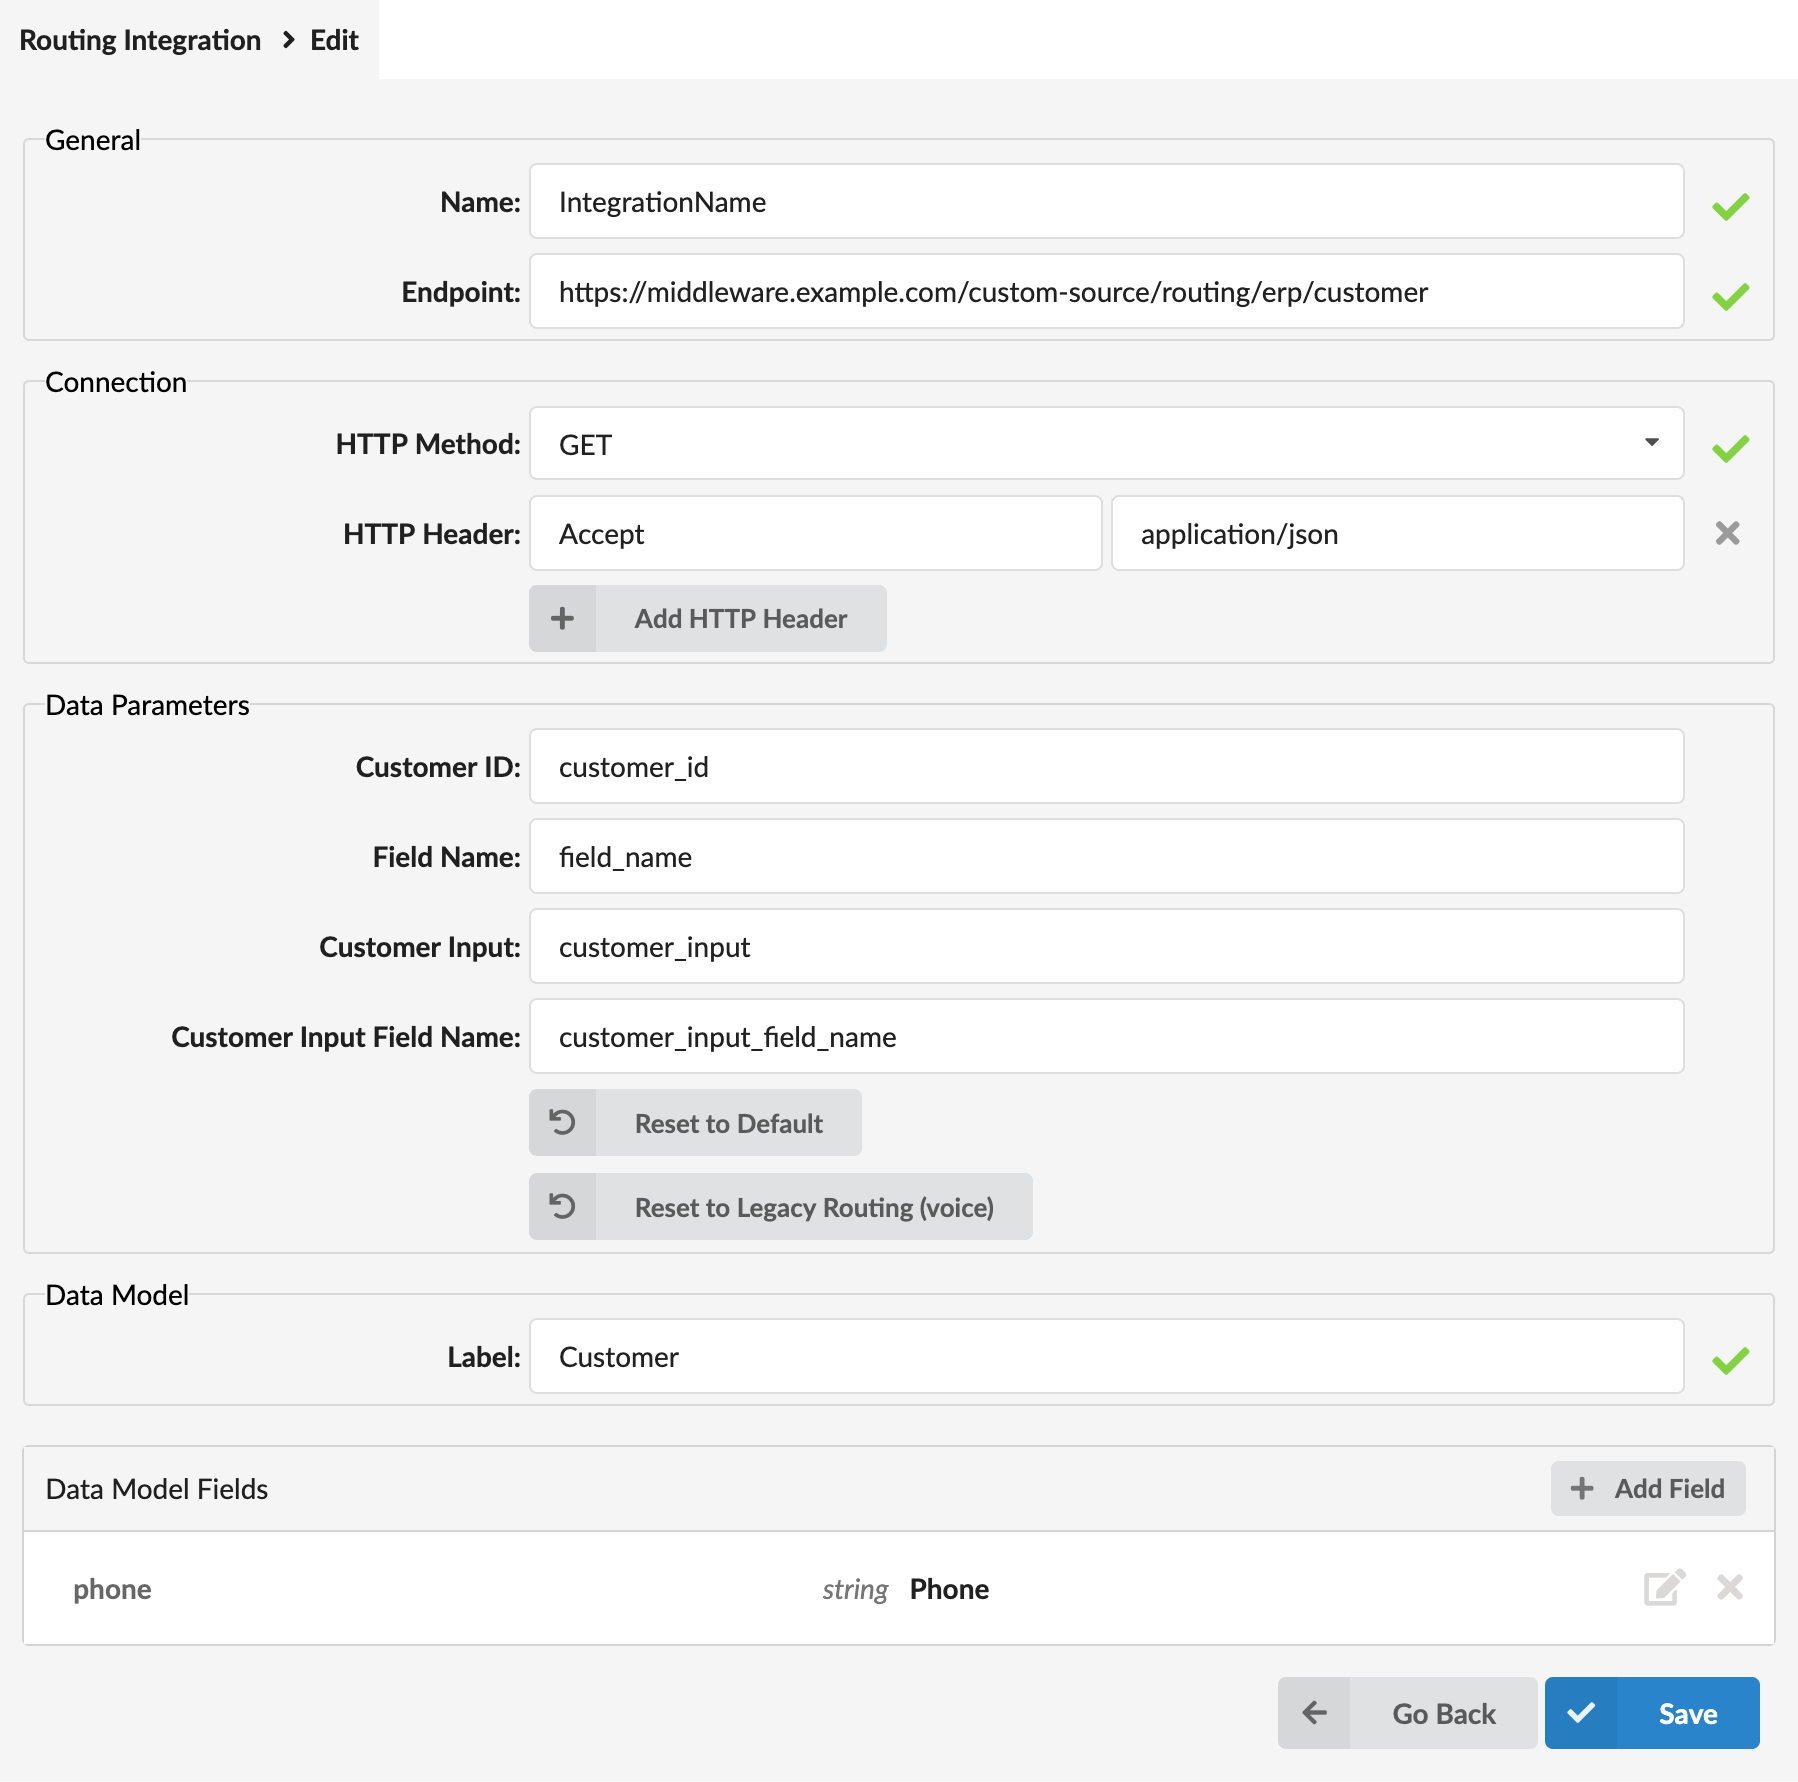
¶ Configuring the Routing Integration
The edit page is divided into four sections:
¶ General
- Name: Edit the name if needed.
- Endpoint: Edit the middleware URL if needed.
¶ Connection
- HTTP Method: Choose between GET and POST based on how your middleware expects requests. When set to GET, data parameters are appended to the URL as query string parameters. When set to POST, they are sent as a JSON request body with the Content-Type header set to
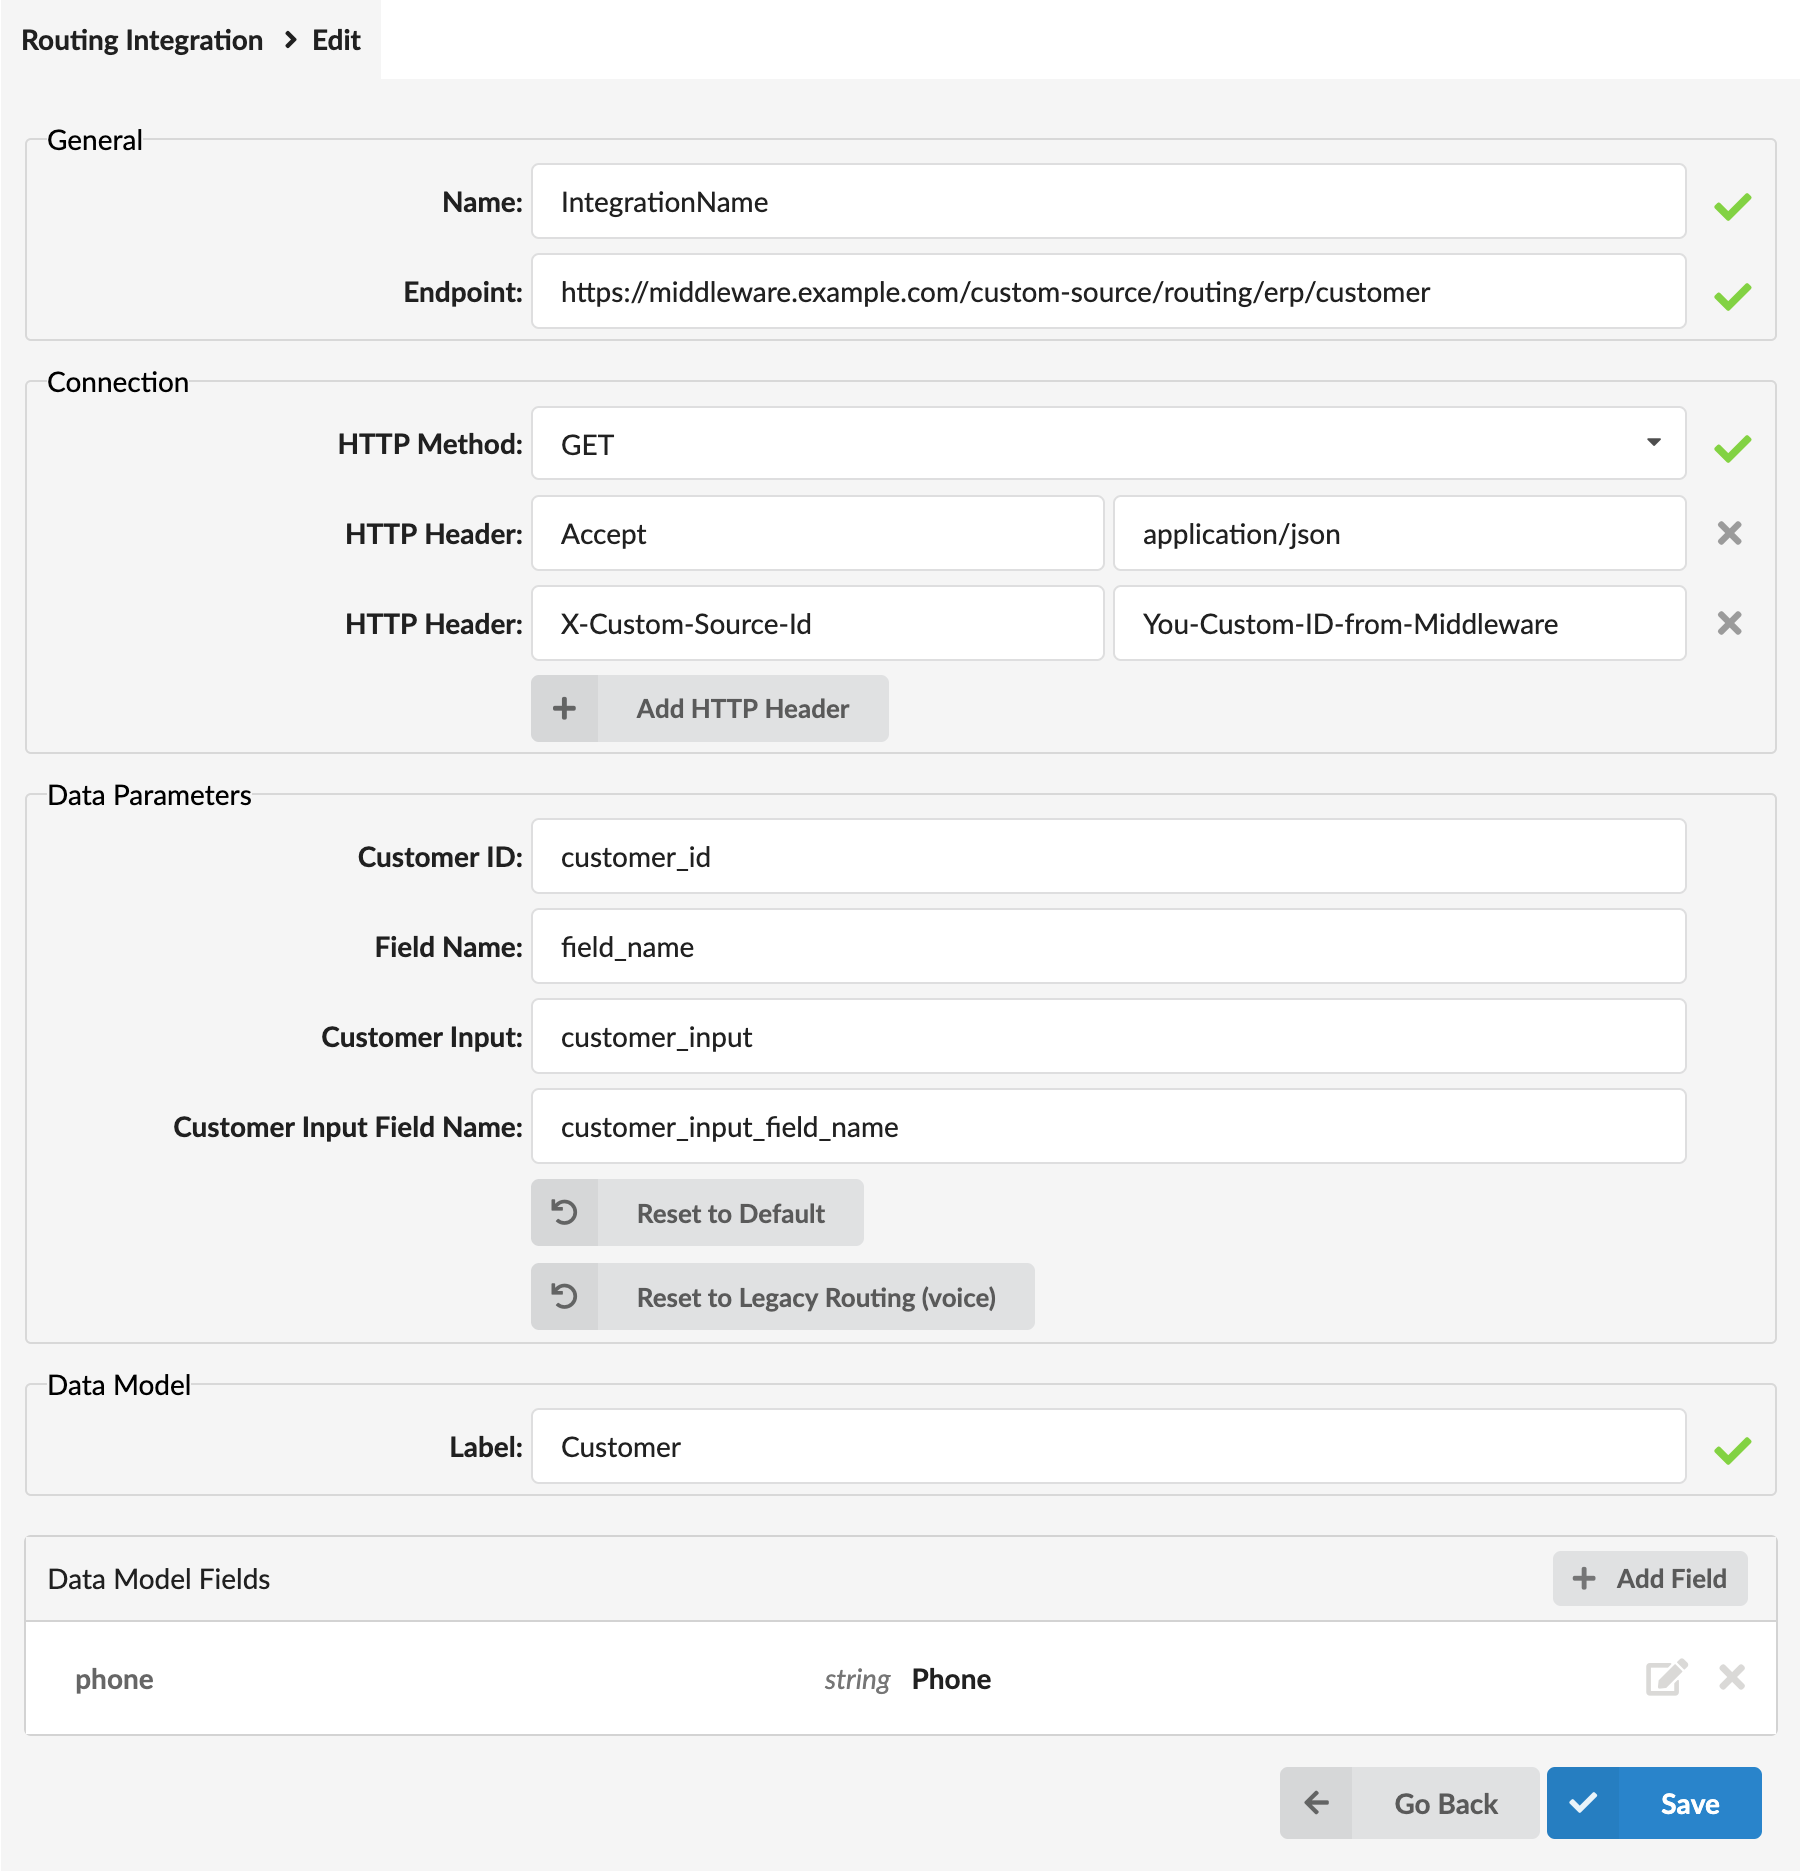
application/json. TheAccept: application/jsonheader is automatically added, regardless of the method you choose. - HTTP Headers: Add any custom headers your middleware requires — authentication tokens, instance identifiers, or any other key-value pairs. Click Add HTTP Header to add as many as needed. The Accept and Content-Type headers are included automatically.
¶ Data Parameters
This section defines the parameter names that PBXware uses when sending data to your middleware endpoint. These must match exactly what your middleware expects to receive. The default values are pre-filled and match the reference middleware implementation, but if your middleware uses different parameter names, you can update them here:
- Customer ID: The parameter name used to pass the caller's phone number to the endpoint. Default:
customer_id - Field Name: The parameter name used to pass the comma-separated list of fields PBXware is requesting from the endpoint. For example, if your routing rule needs to check the caller's email and first name, the request will include something like
field_name=firstname,lastname,email,address, or justfield_name=emailif only one field is needed. Default:field_name - Customer Input: The parameter name used to pass DTMF input collected from the caller, sent only when Input Required is active in the routing rule. Default:
customer_input - Customer Input Field Name: The parameter name used to pass the specific field to search by when using customer input. Default:
customer_input_field_name
At the bottom of this section, you'll find two buttons — Reset to Default, which restores all parameter names to their default values, and Reset to Legacy Routing (voice), which restores the parameter names used by the Legacy CRM Routing feature, useful if you are migrating from a legacy setup.
Note: If a parameter name is left empty, that parameter will not be included in the request sent to your middleware.
¶ Data Model
- Label: A friendly name for the data model this integration represents — for example, "Salesforce Contacts" or "ERP Customers." This label will be displayed when selecting this integration as a data source in your routing rules.
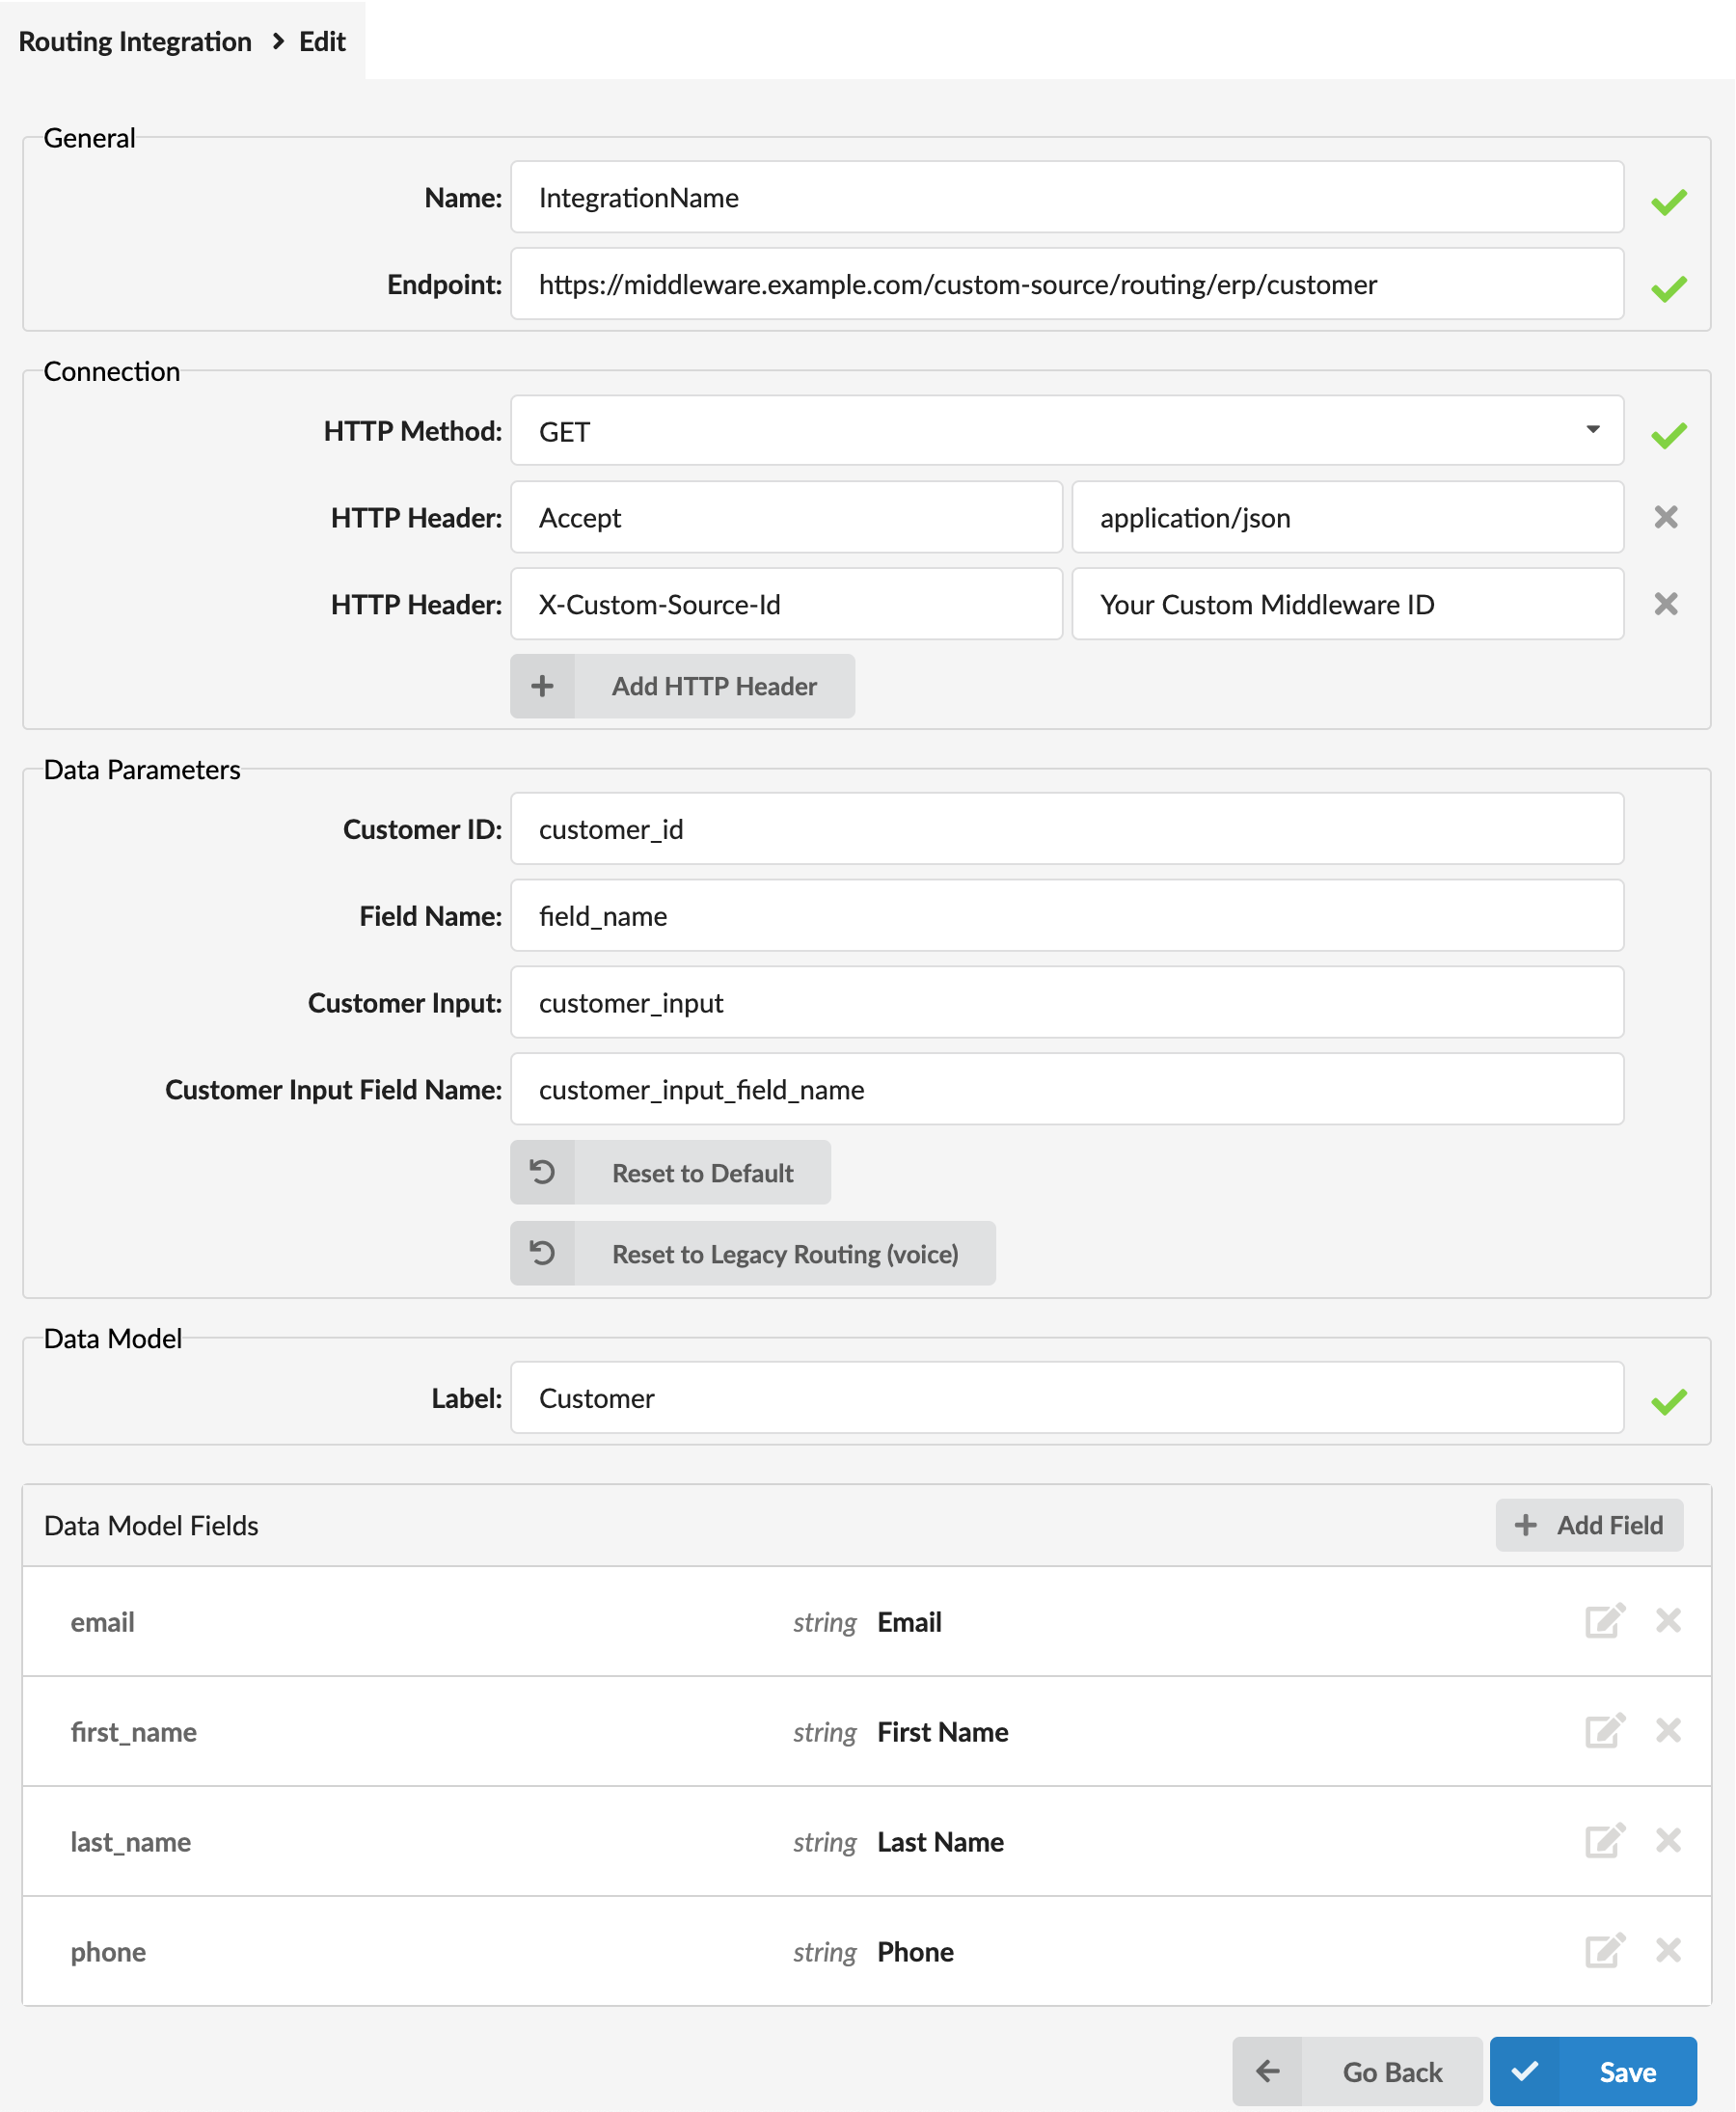
¶ Data Model Fields
This table defines the fields that PBXware will request from your middleware and use in routing rule conditions. Any field you entered on the first page during creation will already appear here. Click Add Field to add more, and a modal window will open with the following fields:
- Field Key: The exact identifier of the field as it is returned in your middleware's JSON response. This must match exactly — the same rule applies here as with custom fields on standard CRM integrations.
- Display Name: A human-readable label for this field, used for display purposes in the routing rule editor.
- Data Type: The type of data this field contains — for example, String, Number, or Boolean.
- Logic Type: Defines how this field is logically categorized for condition matching purposes.
- Edit Type: Defines how this field is presented in the interface — for example, Text.
Click Save to add the field to the list.
Once you have saved your Routing Integration, it becomes available as a data source when building routing rules under CRM → Routing, and works in exactly the same way as any standard CRM integration data source — the same search logic, the same rule matching, and the same actions apply.