¶ Event Publisher
Feature overview
The Event Publisher is a new feature that allows users to configure webhooks, where the events are designed around call legs, with multiple event options. Once a webhook is configured, the webhook URL gets triggered according to the events it is subscribed to, which will further be explained in the remainder of the page.
When one of the events that is selected for the webhook occurs, a request will be sent to the specified URL.Depending on the call type and event, certain information will be sent in the body of the request relating to the call.
This is an especially powerful new tool that can be integrated with a custom back-end server which will handle the generated data.
Event Publisher tracks changes in real time, meaning that with every change to the call a new event will be generated to match the new change, with correct data regarding the call change. Additionally, the Event publisher tracks events from all sides of the call, so information will be available on call events from the caller and the callee.

The Event Publisher feature can be found in the Home tab, with the name ‘Event Publisher’. Underneath this tab there is a subtab titled ‘Webhooks’, where everything can be configured.
The landing page for Event Publisher is the Webhooks tab, with a list of all the webhooks that exist on the system.
On Multi-tenant systems, on the main tenant, the Webhooks page displays a complete overview of all the Webhooks and their details relating to the system.
Note: Here, webhooks can be configured system-wise, and also per tenant. Those that are created on the main tenant can be used on sub-tenants, but those created on a specific tenant cannot be used on other tenants.
¶ Main Tenant

The page displays the following:
Add webhook
Clicking this button will prompt adding a new webhook, which will open a new screen
Search bar
Use this bar to search for webhooks by using either the webhook name, or tenant name on MT editions on the system
Name
Name of the webhook
Description
This column displays a short preview of the description of the webhook
Tenant Origin
This column displays the tenant on which the webhook was created.
URL
This column displays a short preview of the URL
Enabled
This column displays whether the webhook is enabled or not by using the tick and X marks
Edit button
Click this button next to a webhook to edit the webhook/its details
Delete button
Click this button next to a webhook in order to delete it
¶ Add/Edit Webhook
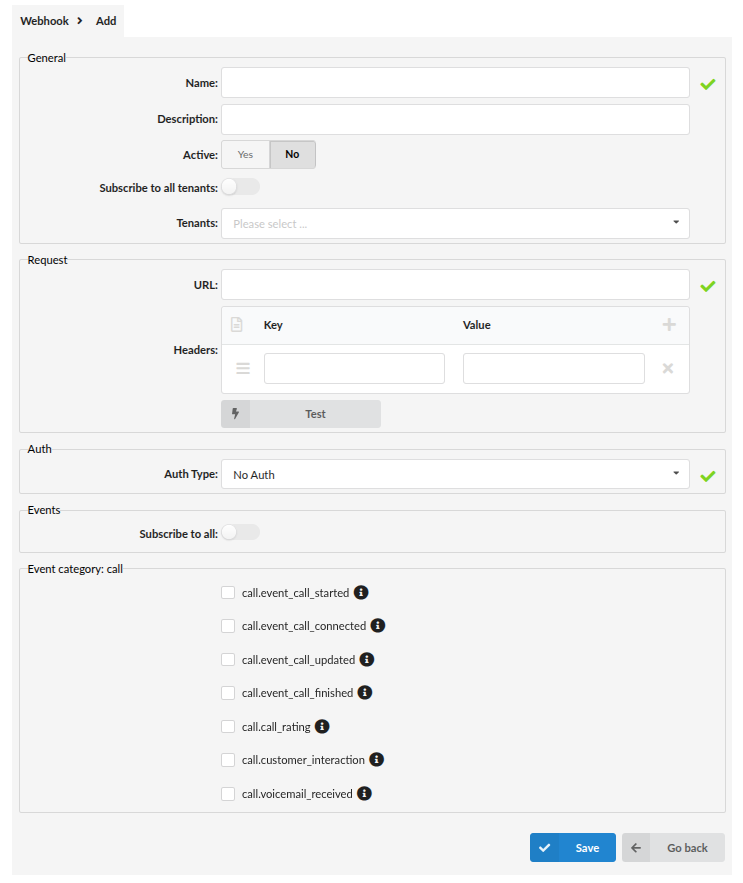
After clicking the ‘Add Webhook’ button, or clicking the edit button next to a webhook, a new window will show up prompting users to configure details regarding the webhook they wish to create.
NOTE: The Webhook should be configured carefully for it to work properly.
When adding/editing a webhook, the window is divided into several sections:
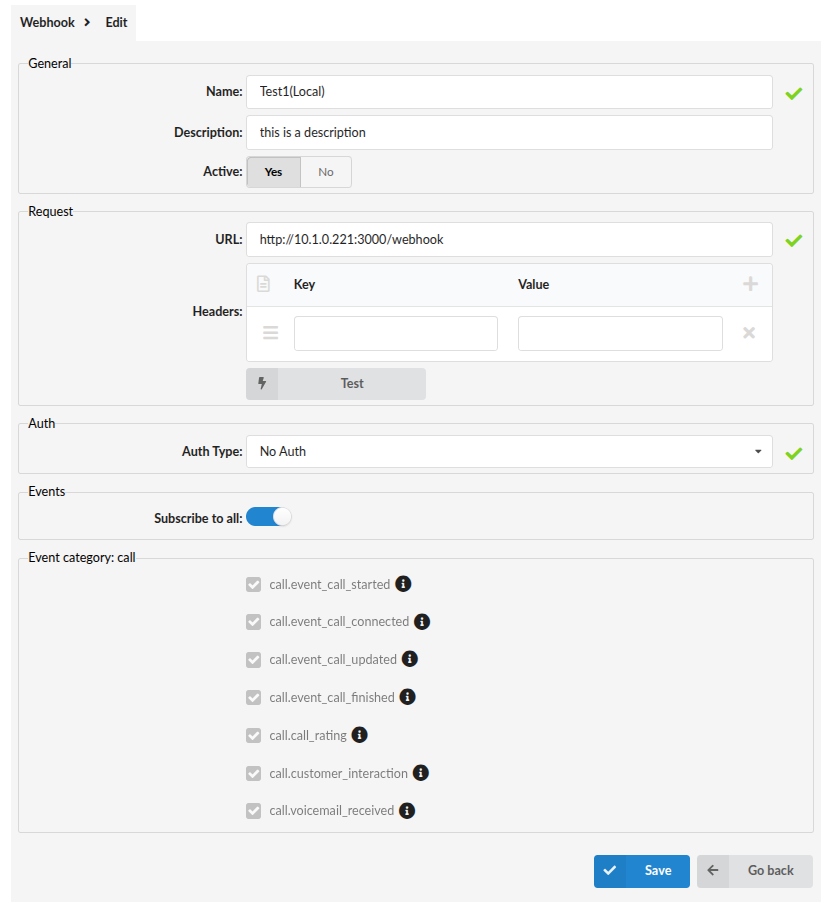
General
In this section, general information such as the Name, Description and Active status can be configured.
- Name
Configure the name of the webhook here. The webhook name must be unique. In case of a Multi Tenant system, the name must be unique per tenant. It is a required field.
- Description
Write the description for the webhook here. The limit for this field is 1000 characters.
- Active
In this field, you can either activate or deactivate the webhook. Once the webhook is active, it will be triggered for each of the events it is subscribed to. For example: if it is subscribed to the call.event_call_started event, once the event has been detected, the webhook will be fired/triggered. By default, it is set to no.
- Subscribe to all tenants
This is a toggle that enables the webhook to be triggered on all of the tenants, given that the selected events from Event category:call have occurred (more about events will be explained in the rest of the document). By default, it is disabled. When this field is toggled on, the field underneath it, Tenants, will be grayed out and unclickable.
- Tenants
In this dropdown, choose the tenants which will be able to trigger the webhook you are currently configuring when the selected events have occurred (more on events in the remainder
Request
In this section, basic request settings can be configured.
-
URL
Configure the URL of the webhook in this field. This is required, and the entered URL will be checked to confirm that it is a valid URL. -
Headers
In the context of webhooks, headers consist of key-value pairs that provide additional information about the HTTP request being sent from the source to the webhook endpoint. In Event Publisher, headers are hard-coded and will be sent as such.
- Key
The key refers to the name or identifier of a specific header in an HTTP request.
-
Value
refers to the content associated with a specific header key in a request sent as part of a webhook. -
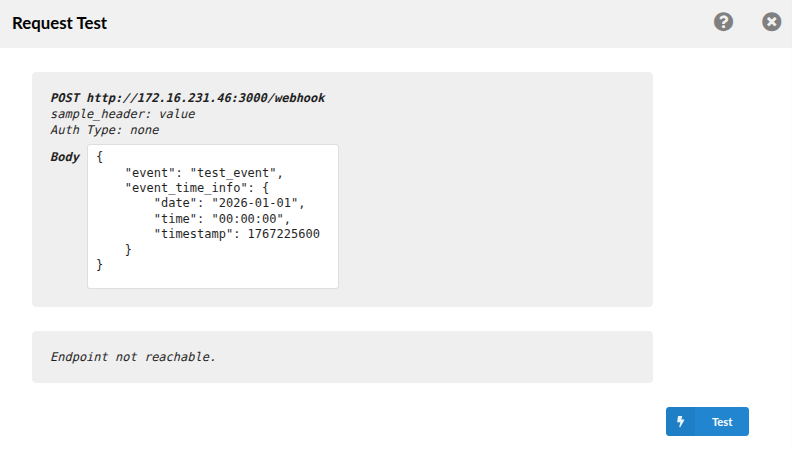
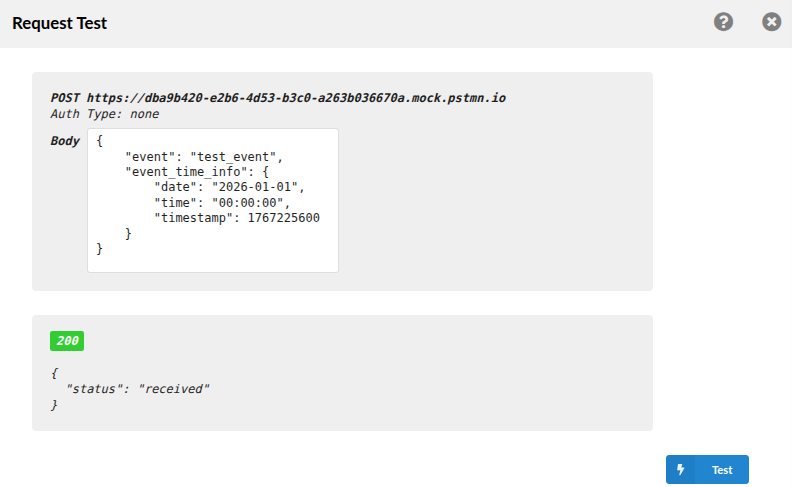
Test
This button can be clicked in order to test if the URL is reachable and configured properly. When clicked, an iFrame will open up.
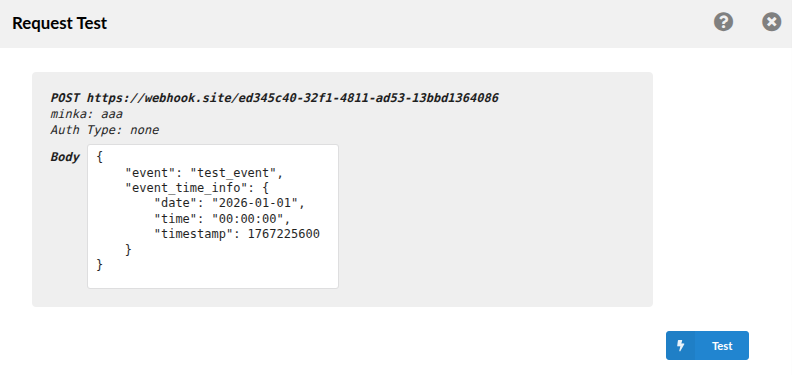
In this iFrame, there is a sample Body that will be sent to the URL specified above, in the Request section within the URL field. The Body can be edited. After clicking the blue ‘Test’ button, the request will be sent. A response will appear informing the user if the endpoint is reachable or not, and if it is reachable the response will depend on the server and how it is configured.
Example of an endpoint that is not reachable:
Example of a successful test:
Auth

In this section, auth type can be configured for the webhook. In the dropdown menu, one of the options can be selected. The following options are available:
-
No Auth
-
Basic Auth
-
Bearer Token
-
OAuth Client Credentials
-
OAuth Resource Owner Password Credentials
-
No Auth
Select this option if the webhook requires no authentication
- Basic Auth

Basic authentication requires a username and password to be sent with the webhook request. The webhook consumer validates the credentials before processing the request.
- Bearer Token

Some webhook URLs may use custom tokens for authentication purposes. These tokens are unique to the provider and consumer and are used to validate the authenticity of the webhook request. The Token should be entered in the Token field in order for the webhooks to work, if this type of authentication is used on the backend server.
- OAuth Client Credentials
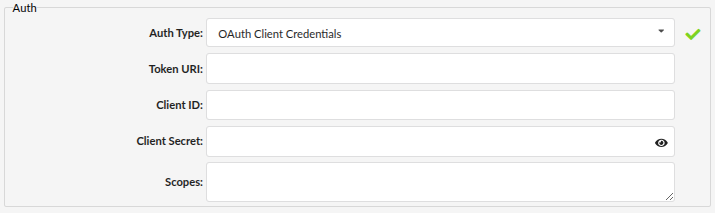
Some webhook URLs may require OAuth 2.0 Client Credentials authentication. In this flow, the webhook authenticates using a Client ID and Client Secret to obtain an access token. This token is then included in each request to verify the identity of the calling application. The Token URL, Client ID, and Client Secret must be provided for the webhook to successfully authenticate if this type of authentication is required by the backend server. This method is recommended for server-to-server communication where no user context is needed.
- OAuth Resource Owner Password Credentials
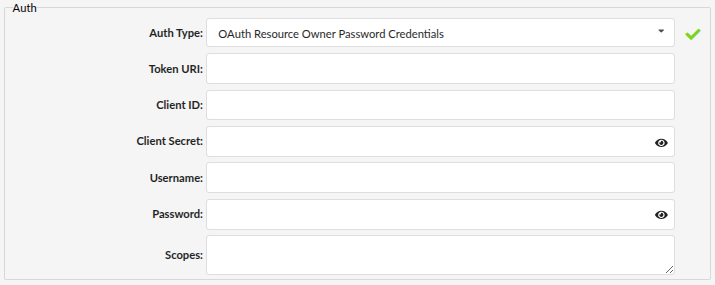
Webhook URLs may require OAuth 2.0 Resource Owner Password Credentials authentication. In this flow, the webhook authenticates using a username and password to obtain an access token that represents a specific user. The Token URL, Client ID, Client Secret, Username, and Password must be provided for the webhook to successfully authenticate if this type of authentication is required by the backend server. Scopes are optional, and mostly aren’t used.
NOTE: This method should only be used in trusted or legacy environments, as it requires handling user credentials directly.
Events
- Subscribe to all
In this section there is a "Subscribe to all” toggle which, when on, subscribe to all current and future events for the selected webhook. By default it is not enabled.
Event category: call
In this section there are some call related events which can be enabled/disabled for the selected webhook.
Currently, the following are available:
*call.event_call_started - the webhook gets triggered when the call starts
*call.event_call_connected - webhook will be triggered when the call gets connected
*call.event_call_updated - webhook gets triggered on call update (when the call changes state, for example, call exits the queue)
*call.event_call_finished - webhook triggers when the call is finished
*call.call_rating - webhook triggered when call rating is enabled and calculated
*call.customer_interaction - triggers a webhook when the call is completed and it includes an external number
*call.voicemail_received - triggers the webhook when a voicemail is received on the system
Next to all of these events is an event details button. When this button is clicked, an iFrame should open, revealing more information about each event and all the data available from it.
- Save
Click this button to save the changes made on the current webhook.
- Cancel
Click this button to discard the changes made on the current webhook.
¶ Tenant
The page displays the following:
Add webhook
Clicking this button will prompt adding a new webhook, which will open a new screen
Search bar
Use this bar to search for webhooks by using either the webhook name, or tenant name on MT editions on the system
Name
Name of the webhook
Description
This column displays a short preview of the description of the webhook
URL
This column displays a short preview of the URL
Enabled
This column displays whether the webhook is enabled or not by using the tick and X marks
Edit button
Click this button next to a webhook to edit the webhook/its details
Delete button
Click this button next to a webhook in order to delete it
¶ Add/Edit Webhook
After clicking the ‘Add Webhook’ button, or clicking the edit button next to a webhook, a new window will show up prompting users to configure details regarding the webhook they wish to create.
NOTE: The Webhook should be configured carefully for it to work properly.
When adding/editing a webhook, the window is divided into several sections:
General
In this section, general information such as the Name, Description and Active status can be configured.
- Name
Configure the name of the webhook here. The webhook name must be unique. In case of a Multi Tenant system, the name must be unique per tenant. It is a required field.
- Description
Write the description for the webhook here. The limit for this field is 1000 characters.
- Active
In this field, you can either activate or deactivate the webhook. Once the webhook is active, it will be triggered for each of the events it is subscribed to. For example: if it is subscribed to the call.event_call_started event, once the event has been detected, the webhook will be fired/triggered. By default, it is set to no.
Request
In this section, basic request settings can be configured.
-
URL
Configure the URL of the webhook in this field. This is required, and the entered URL will be checked to confirm that it is a valid URL. -
Headers
In the context of webhooks, headers consist of key-value pairs that provide additional information about the HTTP request being sent from the source to the webhook endpoint. In Event Publisher, headers are hard-coded and will be sent as such.
- Key
The key refers to the name or identifier of a specific header in an HTTP request.
-
Value
refers to the content associated with a specific header key in a request sent as part of a webhook. -
Test
This button can be clicked in order to test if the URL is reachable and configured properly. When clicked, an iFrame will open up.
In this iFrame, there is a sample Body that will be sent to the URL specified above, in the Request section within the URL field. The Body can be edited. After clicking the blue ‘Test’ button, the request will be sent. A response will appear informing the user if the endpoint is reachable or not, and if it is reachable the response will depend on the server and how it is configured.
Example of an endpoint that is not reachable:
Example of a successful test:
Auth
In this section, auth type can be configured for the webhook. In the dropdown menu, one of the options can be selected. The following options are available:
-
No Auth
-
Basic Auth
-
Bearer Token
-
OAuth Client Credentials
-
OAuth Resource Owner Password Credentials
-
No Auth
Select this option if the webhook requires no authentication
- Basic Auth
Basic authentication requires a username and password to be sent with the webhook request. The webhook consumer validates the credentials before processing the request.
- Bearer Token
Some webhook URLs may use custom tokens for authentication purposes. These tokens are unique to the provider and consumer and are used to validate the authenticity of the webhook request. The Token should be entered in the Token field in order for the webhooks to work, if this type of authentication is used on the backend server.
- OAuth Client Credentials
Some webhook URLs may require OAuth 2.0 Client Credentials authentication. In this flow, the webhook authenticates using a Client ID and Client Secret to obtain an access token. This token is then included in each request to verify the identity of the calling application. The Token URL, Client ID, and Client Secret must be provided for the webhook to successfully authenticate if this type of authentication is required by the backend server. This method is recommended for server-to-server communication where no user context is needed.
- OAuth Resource Owner Password Credentials
Webhook URLs may require OAuth 2.0 Resource Owner Password Credentials authentication. In this flow, the webhook authenticates using a username and password to obtain an access token that represents a specific user. The Token URL, Client ID, Client Secret, Username, and Password must be provided for the webhook to successfully authenticate if this type of authentication is required by the backend server. Scopes are optional, and mostly aren’t used.
NOTE: This method should only be used in trusted or legacy environments, as it requires handling user credentials directly.
Events
- Subscribe to all
In this section there is a "Subscribe to all” toggle which, when on, subscribe to all current and future events for the selected webhook. By default it is not enabled.
Event category: call
In this section there are some call related events which can be enabled/disabled for the selected webhook.
Currently, the following are available:
*call.event_call_started - the webhook gets triggered when the call starts
*call.event_call_connected - webhook will be triggered when the call gets connected
*call.event_call_updated - webhook gets triggered on call update (when the call changes state, for example, call exits the queue)
*call.event_call_finished - webhook triggers when the call is finished
*call.call_rating - webhook triggered when call rating is enabled and calculated
*call.customer_interaction - triggers a webhook when the call is completed and it includes an external number
*call.voicemail_received - triggers the webhook when a voicemail is received on the system
Next to all of these events is an event details button. When this button is clicked, an iFrame should open, revealing more information about each event and all the data available from it.
- Save
Click this button to save the changes made on the current webhook.
- Cancel
Click this button to discard the changes made on the current webhook.