¶ Introduction to sipPROT
Depending on the setup you are running sipPROT can be installed in two possible locations:
-
PBXware - in case you are running standalone PBXware installation on dedicated hardware.
-
SERVERware host - If you are running PBXware as a VPS in a SERVERware virtual environment, sipPROT should be installed on all SERVERware hosts.
Brute-force break-in attempts are quite frequent, and VOIP PBX systems that are not protected are susceptible to this attack. The most common consequence of this kind of network attack can be:
- VOIP service downtime and unreachability
- The possibility of password stealing (SIP registration)
This kind of attack on unprotected systems can lead straight to financial loss. To avoid this situation, we developed the sipPROT module for PBXware and SERVERware.
sipPROT is protection against brute-force SIP attacks coming from the network.
How does sipPROT work?
After an attack is detected, sipPROT updates firewall rules and blocks the IP addresses from which the attack is detected for a specific amount of time. Unlike other similar solutions, sipPROT works with live SIP traffic and blocks attacks more efficiently than others.
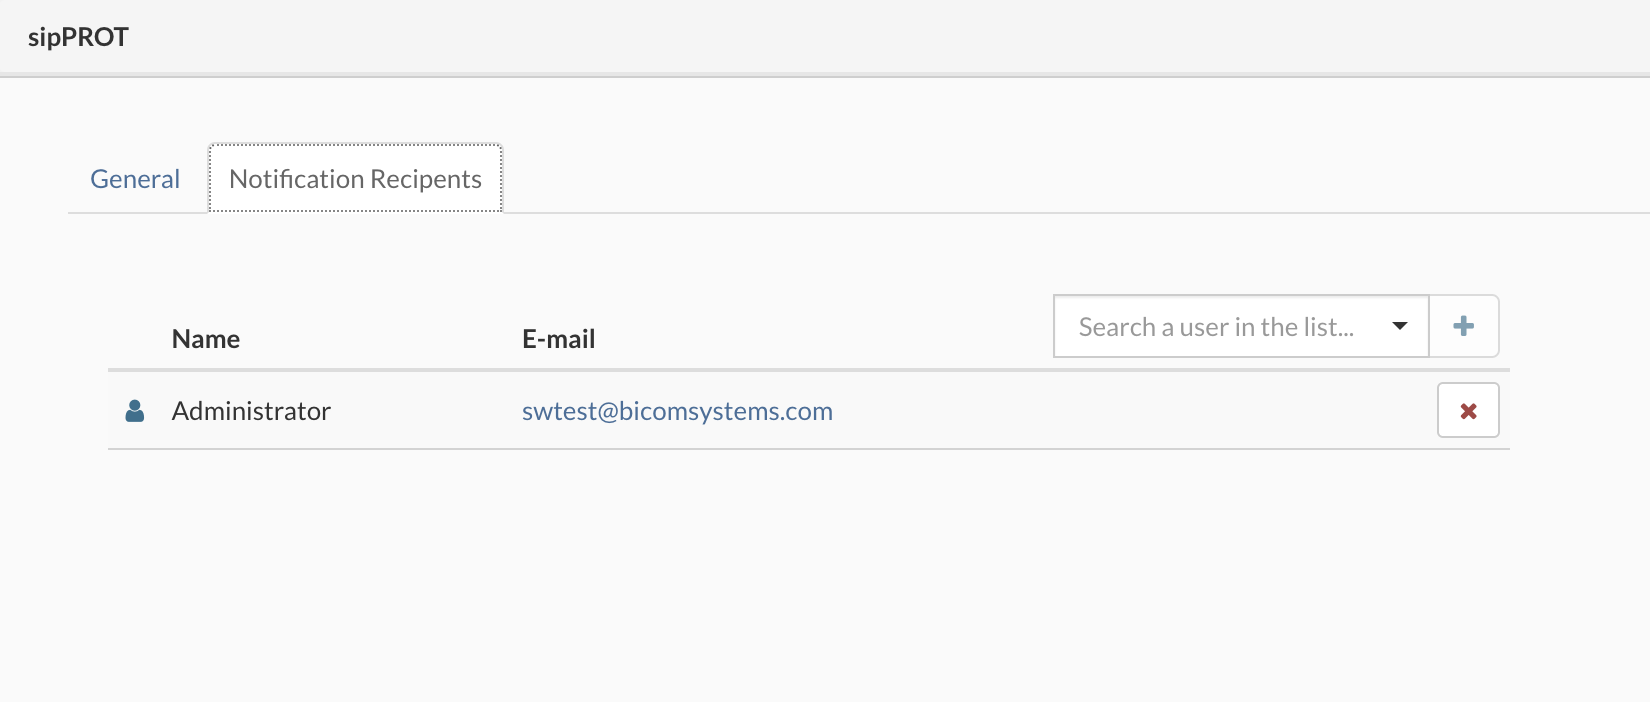
When sipPROT is running, please DO NOT delete any "extension" on PBXware before registered phone on extension is "RESET" to factory settings; otherwise, sipPROT will block IP addresses along with all the phones registering from that IP. Notification about blocked IPs will be sent to the e-mail, set under the Notification Recipients tab, assuming that SMTP settings are correct.
¶ Configuration page in SERVERware GUI
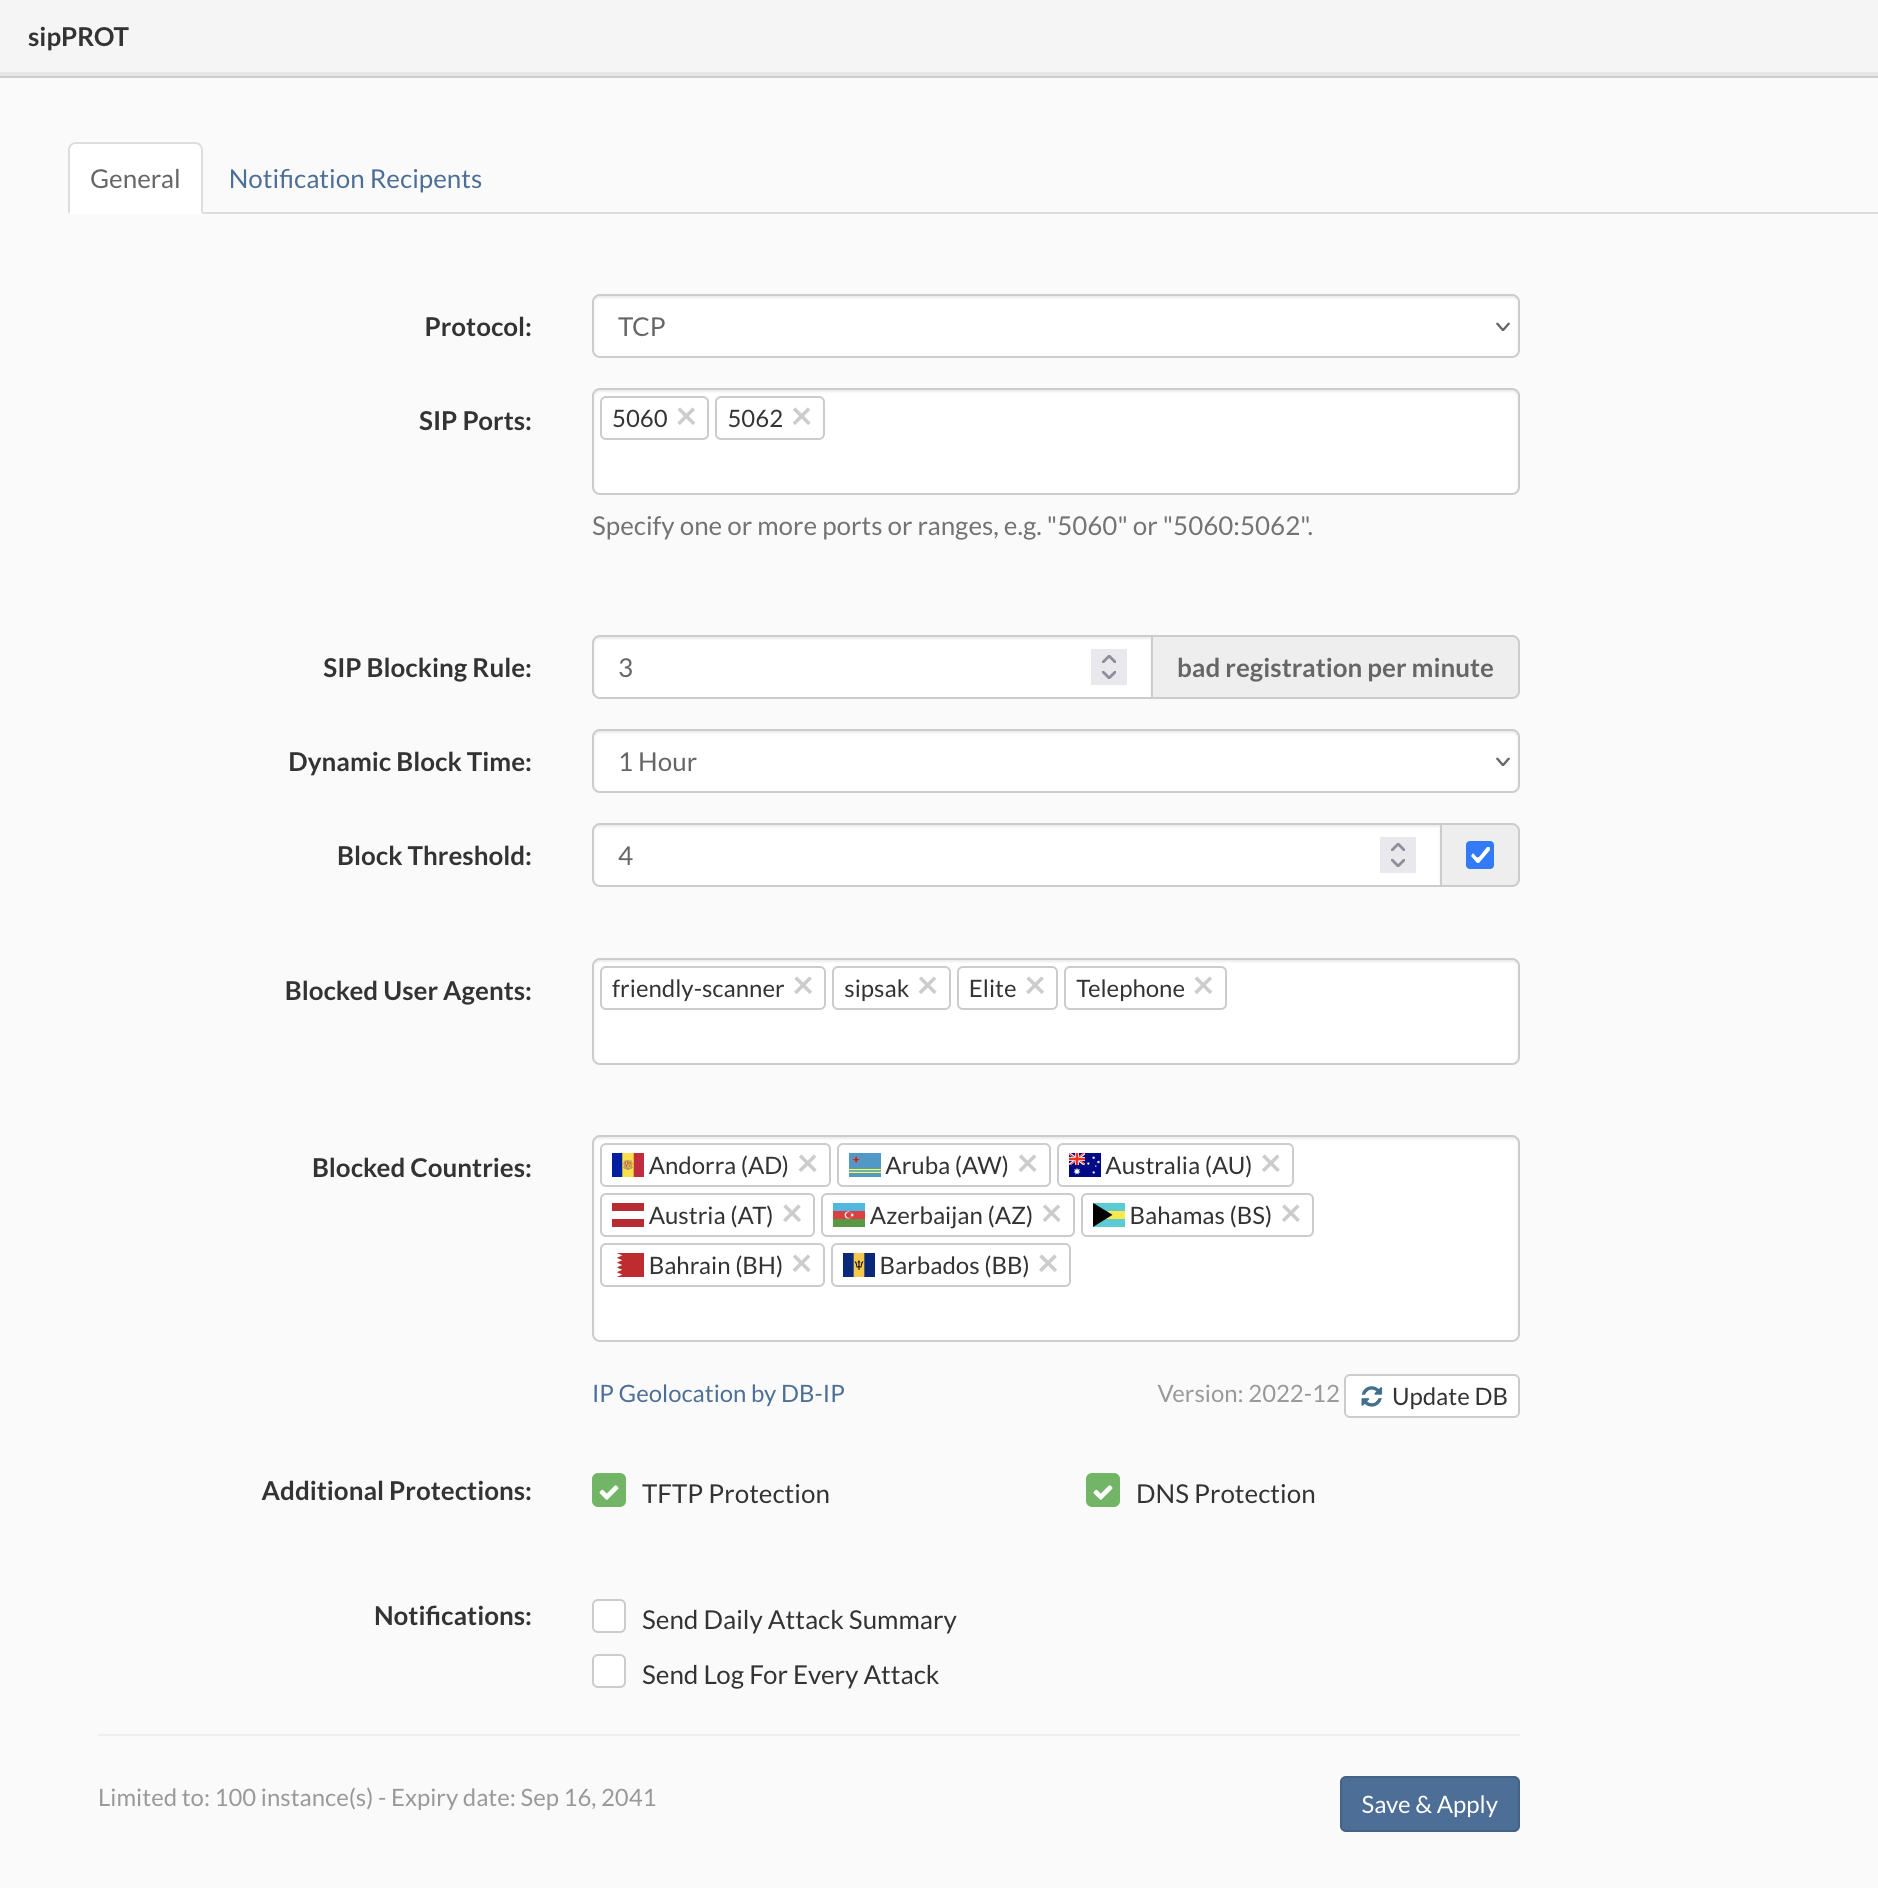
Under the sipPROT > General, we can find configuration options for sipPROT.

| Field | Description |
|---|---|
| Protocols: | Specify what protocols to watch for attacks TCP, UDP, or both. |
| SIP Ports: | Specify one or more ports or ranges, e.g., "5060" or "5060:5062". |
| SIP Blocking Rule: | Specify the maximum number of unauthorized registration attempts per minute before blocking the attacker's IP for the time selected. |
| Dynamic Block Time: | Select, for how long the IP addresses will remain blocked after successfully preventing the attack. |
| Block Threshold: | Block threshold defines how many times an IP will be dynamically blocked before it is permanently blocked by appending it to the deny list. The acceptable range is (1-20). |
| Blocked User Agents: | Specify the User-agent/scanner for sipPROT to match and block incoming traffic. The scanners parameter contains a comma-separated list of available SIP scanners (user agents) immediately stopped if detected. IMPORTANT: Try to hold the list of scanners as short as possible, given that it could affect overall system performance if the list is too long. |
| Blocked Countries: | Pick the countries to block incomming traffic from. sipPROT will block the whole range of addresses belonging to the selected countries. The list of countries automatically updates across the SERVERware hosts. There is also a button for manual updates of the GEO-IP database. |
| Additional Protections: | |
| TFTP option allows you to protect your server against TFTP brute force attacks, using rate limit. The default rate limit is 10/minute, allowing a maximum of 100 burst requests. | |
| DNS feature is vulnerability protection for older systems that might be affected by glibc stack-based buffer overflow in getaddrinfo() security flaw, otherwise named CVE-2015-7547. It is enabled by default. | |
| If you are unsure what the feature is for, you should not modify this option under no circumstances. | |
| Notifications: | |
| - Send Daily Attack Summary will send notifications to the selected recipients if checked. | |
| - Send Log For Every Attack will send notifications for every attack (Attention frequent logs).The default value is 1/ hour, meaning it will send a message every hour in case of some SIP attack. | |
| SERVERware/PBXware must have a working SMTP account set for notifications to work. | |
| Notification recipients | |
| To update Notification Recipients List, select Notification Recipients tab in General menu, select or search a user in the list and click on Add button. To remove Notification Recipient from the List, click on the Remove button in the same line. Confirmation dialog appears. Click Yes to remove Notification Recipient. | |
 |
|
¶ Allow list
Allow list is the list of IP addresses allowed uninterrupted access to the system; this list is manually populated via form or CSV file upload.

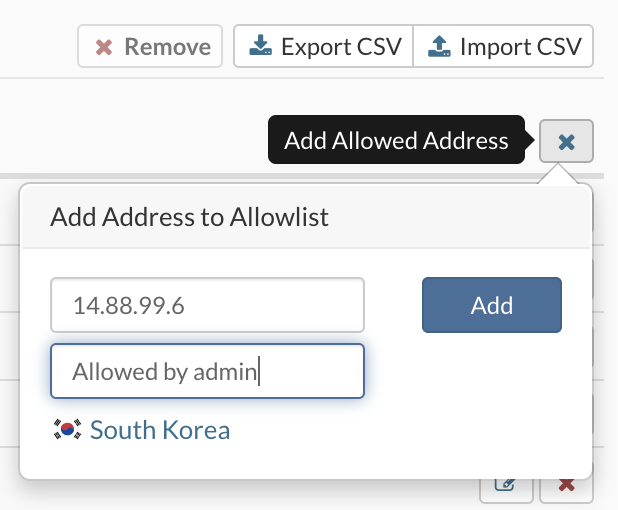
To add an IP address to the lists, select the Allowlist IP Addresses tab, press the "+" button enter Network or IP Address, enter Note (not mandatory), and click the Add button.

To add multiple IP addresses into Allowlist, there is an Import CSV option in the upper right corner. Select the CSV file with the list of IP addresses you wish to add to the Allowlist and click on the Upload button. There is also an option to export all Allowlist IP addresses to a CSV file.

Removing a Network or IP Address from the List can be executed in two ways. First, there is an option to remove one or multiple IP addresses by selecting one or multiple IP addresses and then clicking on the Remove button. And there is another option to remove all IP addresses from the list by clicking on the select all checkbox and then clicking on the Remove button. A confirmation dialog appears. Click Yes to remove the Network or IP Address. Changes made to the Lists are applied automatically.
Download CSV templates ---> link to Template
The Allow list has a priority over other lists, e.g., if we add the same IP to deny list and allow list, the IP will be granted access to the system, and the deny list is ignored.
This is often a use case, when one is bloking network or range of IPs "192.168.50.0/24" and we want to allow only one IP from the range "192.168.50.15" to access the system.
¶ Deny list
Deny list is the list of IP addresses with the restricted access to the system; this list is manually populated via form or CSV file upload.

To add an IP address to the lists, select the Allowlist IP Addresses tab,press the "+" button enter Network or IP Address, enter Note (not mandatory), and click the Add button.

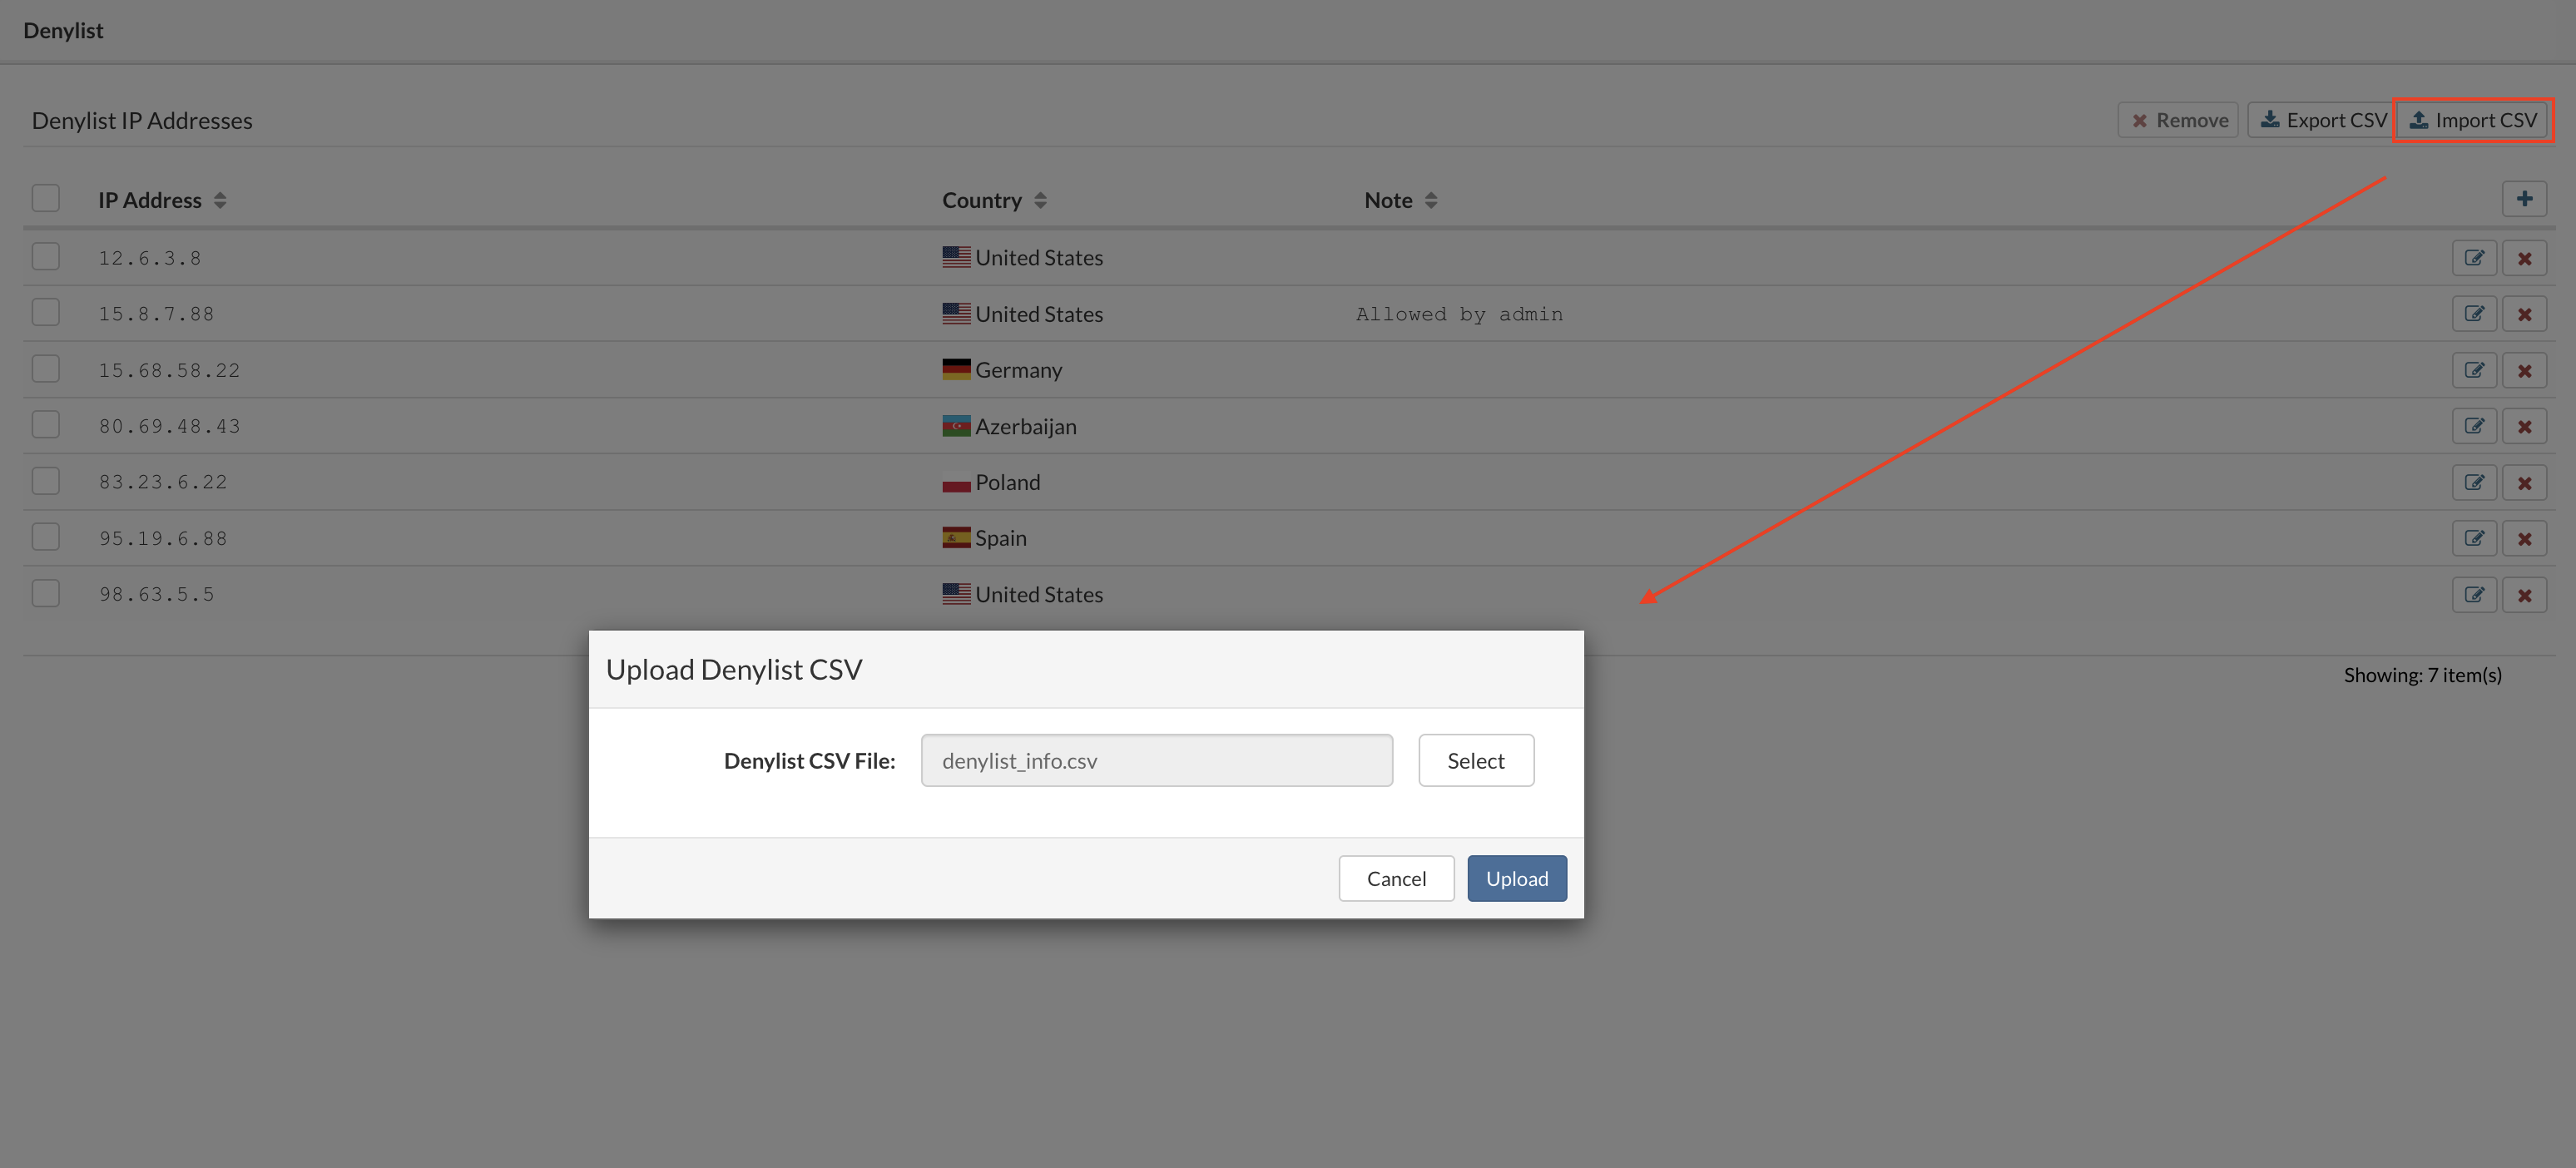
To add multiple IP addresses into Denylist, there is an Import CSV option in the upper right corner. Select the CSV file with the list of IP addresses you wish to add to the Denylist and click on the Upload button. There is also an option to export all Denylist IP addresses to a CSV file.

Removing a Network or IP Address from the List can be executed in two ways. First, there is an option to remove one or multiple IP addresses by selecting one or multiple IP addresses and then clicking on the Remove button. And there is another option to remove all IP addresses from the list by clicking on the select all checkbox and then clicking on the Remove button. A confirmation dialog appears. Click Yes to remove the Network or IP Address. Changes made to the Lists are applied automatically.
Download CSV templates ---> link to Template
¶ Dynamic deny list
sipPROT > Dynamic Denylist, from list of blocked dresses in this menu one can unblock IP address manually or wait for timeout and block will be removed automatically.
For easier management of the sipPROT-blocked IPs and inspection/debugging, the sipPROT dynamic deny list displays the exact user agent (scanner) and country of origin for every successfully stopped attack.

¶ Working with sipPROT CLI
The new updated version of sipPROT comes with updated CLI commands and outputs. CLI autocomplete is added for the sipPROT commands.
# sipprot --help
# Usage:
     sipprot [status|report|version|check]
# status:
         prints number of IPs per list
     --all  prints allow, deny, and dynamic deny lists
     --allow prints allow list
     --deny  prints deny list
     --dynamic prints dynamic deny list
# report:
     prints out daily attack report
# version:
     prints out sipPROT version
# check:
     checks if the provided IP is in any of the following: allowlist, denylist, dynamic denylist
     example: sipprot check 192.168.0.1
- start/stop sipPROT
In order to start, stop or check status of sipPROT daemon use following command:
/etc/init.d/sipprotd [start|stop|status]
To mannualy start the sipPROT use the following command:
- /etc/init.d/sipprotd start
sipPROT will automatically be started on system restart. After sipPROT is started the configuration variable will be loaded from the configuration file. This is the location of the configuration file:
- /home/sipprot.conf
During the startup sipPROT will also read IP addresses from the Allow and Deny lists. IP addresses listed in the deny list will be permanently blocked and IP addresses listed in the white list will be permanently allowed.
To add an IP address to the deny list you have to add the IP address in file
/home/sipprot.denylist
Only one IP address per line is allowed. Lines that which starts with character # will be ignored. Here is an example of a black list file:
# One IP Address per line
192.168.1.1
192.168.1.2
In the above example, IP addresses 192.168.1.1 and 192.168.1.2 are in the deny list and those IP will be permanently blocked.
To add an IP address to the white list you have to add the IP address in file
/home/ sipprot.allowlist
Only one IP address per line is allowed. Lines which starts with character # will be ignored. Here is an example of a allow list file:
# One IP Address per line
192.168.2.1
192.168.2.2
In this example IP addresses 192.168.2.1 and 192.168.2.2 will not be blocked by sipPROT.
To stop sipPROT manually run following command:
- /etc/init.d/sipprotd stop
This command will stop sipPROT module and disable firewall rules created by sipPROT.
To get information about sipprot status use the following command:
- sipprot status
This command will give the following information:
> ~# sipprot status
> +---------------------+------------+
> |        LIST         | NUM OF IPS |
> +---------------------+------------+
> | Allow               |          0 |
> +---------------------+------------+
> | Deny                |          0 |
> +---------------------+------------+
> | Dynamic (permanent) |          0 |
> +---------------------+------------+
> | Dynamic (temporary) |          0 |
> +---------------------+------------+
The list of IPs dynamically blocked by sipPROT is a list of IPs that are blocked in the moment you execute the sipPROT status command.
These IPs will be blocked if the period between two attacks from that IP is less than the time defined by BLOCKTIME. BLOCKTIME is a variable defined in the configuration file "/home/sipprot.conf". For example, if BLOCKTIME is 600 seconds, the dynamically blocked IP will be blocked for the next 600 seconds. If there is no new attack from that IP after 600 seconds, sipPROT will unblock that IP. So for the IP to be blocked, there must be an occurrence of an attack during BLOCKTIME.
If an IP address is in the "List of IPs in the allow list," that IP will not be blocked by sipPROT.
If an IP address is in the "List of IPs blocked by the deny list," IP will be blocked regardless of whether an attack is coming from that IP.