Depending on the setup you are running sipPROT can be installed in two possible locations:
-
PBXware - in case you are running standalone PBXware installation on dedicated hardware.
-
SERVERware host - If you are running PBXware as a VPS in a SERVERware virtual environment, sipPROT should be installed on all SERVERware hosts.
Brute-force break-in attempts are quite frequent, and VOIP PBX systems that are not protected are susceptible to this attack. The most common consequence of this kind of network attack can be:
- VOIP service downtime and unreachability
- The possibility of password stealing (SIP registration)
This kind of attack on unprotected systems can lead straight to financial loss. To avoid this situation, we developed the sipPROT for PBXware and SERVERware.
sipPROT is protection against brute-force SIP attacks coming from the network.
How does sipPROT work?
When sipPROT detects an attack, it immediately takes action by updating the firewall rules and preventing access from the IP addresses the attack originated from. This keeps your system safe from any further harm. Unlike other similar security solutions, sipPROT is able to work with live SIP traffic and is more effective at stopping attacks.
In addition, sipPROT has a GEO IP blocking feature. This means that it compares incoming IP addresses with a database of GEO IP addresses, and if the incoming IP address is found to belong to a blocked country, sipPROT will automatically block access from that IP. This extra layer of protection ensures that your system is safeguarded from attacks originating from specific geographic locations.
Before you delete any extensions on PBXware, it's important to reset the phone registered on that extension to its factory settings. If you don't, you may end up with many failed "REGISTER" packets, which can cause sipPROT to block the IP addresses associated with those phones. If this happens, you'll receive an email notification at the address you've set under the Notification Recipients tab (assuming your SMTP settings are correct). So, to avoid any issues, make sure you reset the phone to factory settings before deleting any extensions.
¶ Configuration page in PBXware GUI
Under the PBXware > Admin settings > sipPROT > Settings, are configuration options for sipPROT.
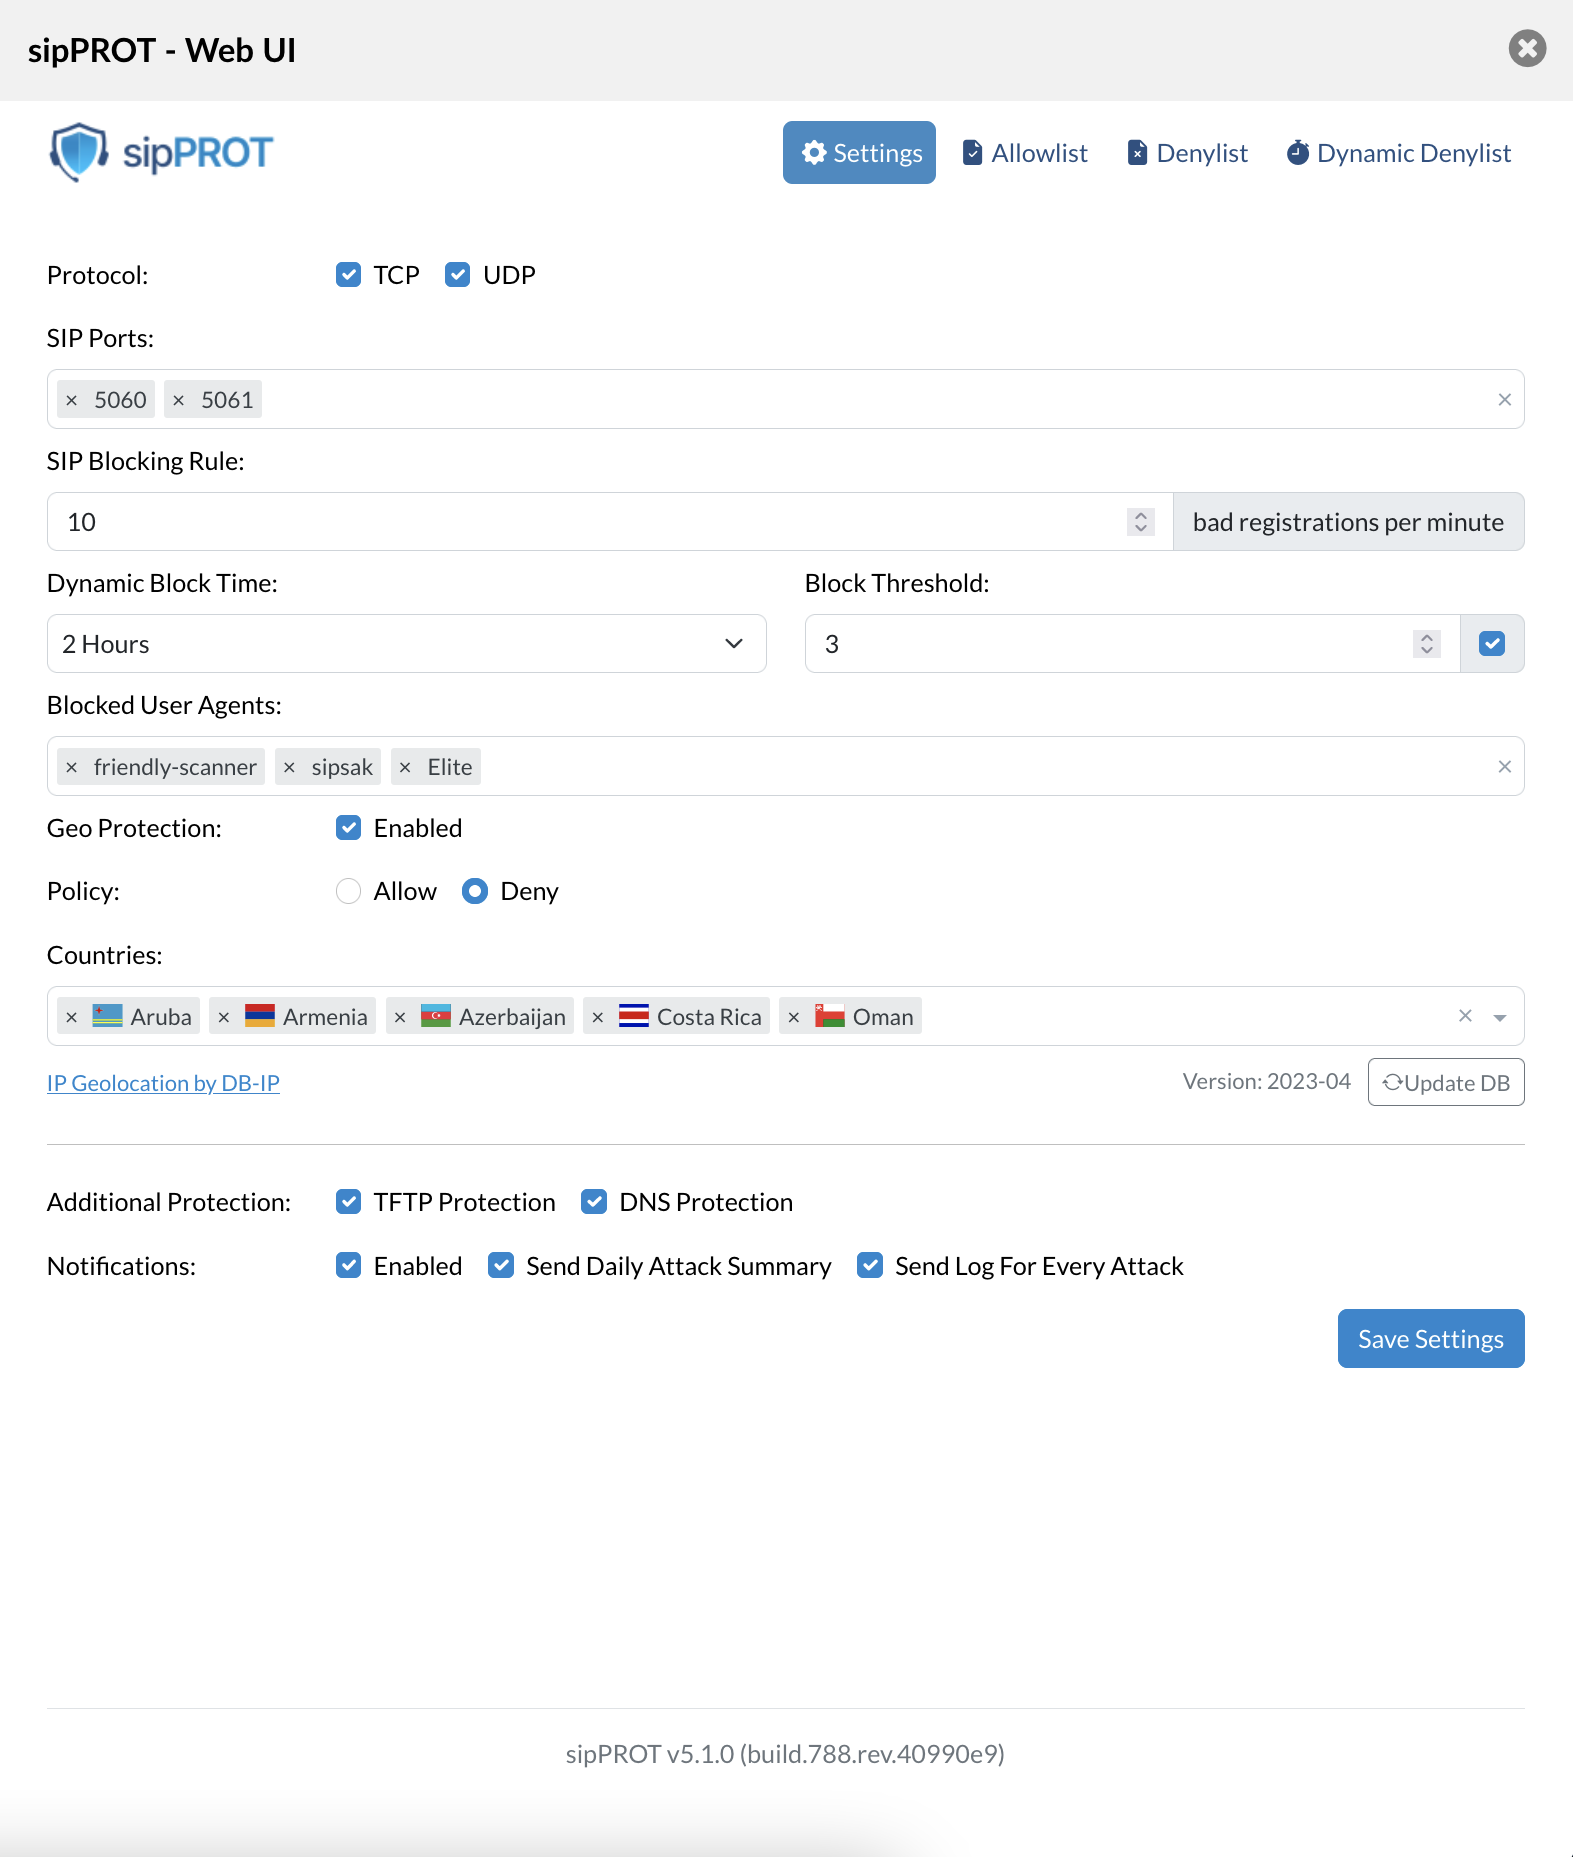
¶ The description fot the options available:
| Field | Description |
|---|---|
| Protocols: | Choose which protocols to monitor for attacks (TCP, UDP, or both). |
| SIP Ports: | Specify one or more ports or ranges to monitor, such as "5060" or "5060:5062". |
| SIP Blocking Rule: | Set the maximum number of unauthorized registration attempts per minute before blocking an attacker's IP address for a specified amount of time. |
| Dynamic Block Time: | Choose how long blocked IP addresses will remain blocked after preventing an attack. |
| Block Threshold: | Define how many times an IP address will be dynamically blocked before it is permanently blocked by being added to the denylist. The acceptable range is (1-20). |
| Blocked User Agents: | Specify the SIP user agents to block incoming traffic from. Keep the list as short as possible to avoid affecting system performance. |
| Geo Protection: | Enable or disable GEO blocking, and select either the Allow or Deny option. |
| Allow: If Allow is selected, only traffic from selected countries will be allowed, and all other traffic will be denied. Note that resources that the server needs to access outside of the selected country range, such as email or external archiveing servers, must be explicitly allowed. | |
| Deny: If Deny is selected, all traffic from the blocked countries will be denied. | |
| Blocked Countries: | Select the countries to block incoming traffic from. sipPROT will block the entire range of IP addresses belonging to the selected countries or allow it if different method is selected above |
| Additional Protections: | |
| TFTP: Protect your server against TFTP brute force attacks using a rate limit. The default rate limit is 10 requests per minute, with a maximum of 100 burst requests. | |
| DNS: Protect older systems from the glibc stack-based buffer overflow in getaddrinfo() security flaw. This feature is enabled by default and should not be modified unless you know what it is for. | |
| If you are unsure what the feature is for, you should not modify this option under no circumstances. | |
| Notifications: | |
| Enable: Enable or disable notifications from sipPROT. | |
| Send Daily Attack Summary: Receive an email with a daily report of attacks if this option is ticked. | |
| Send Log For Every Attack Receive a notification for every attack. The default value is once per hour. | |
| Notification recipients: | |
| sipPROT uses the SMTP configuration provided by PBXware and requires working SMTP settings. The default recipient for notifications is the PBXware Administrator. | |
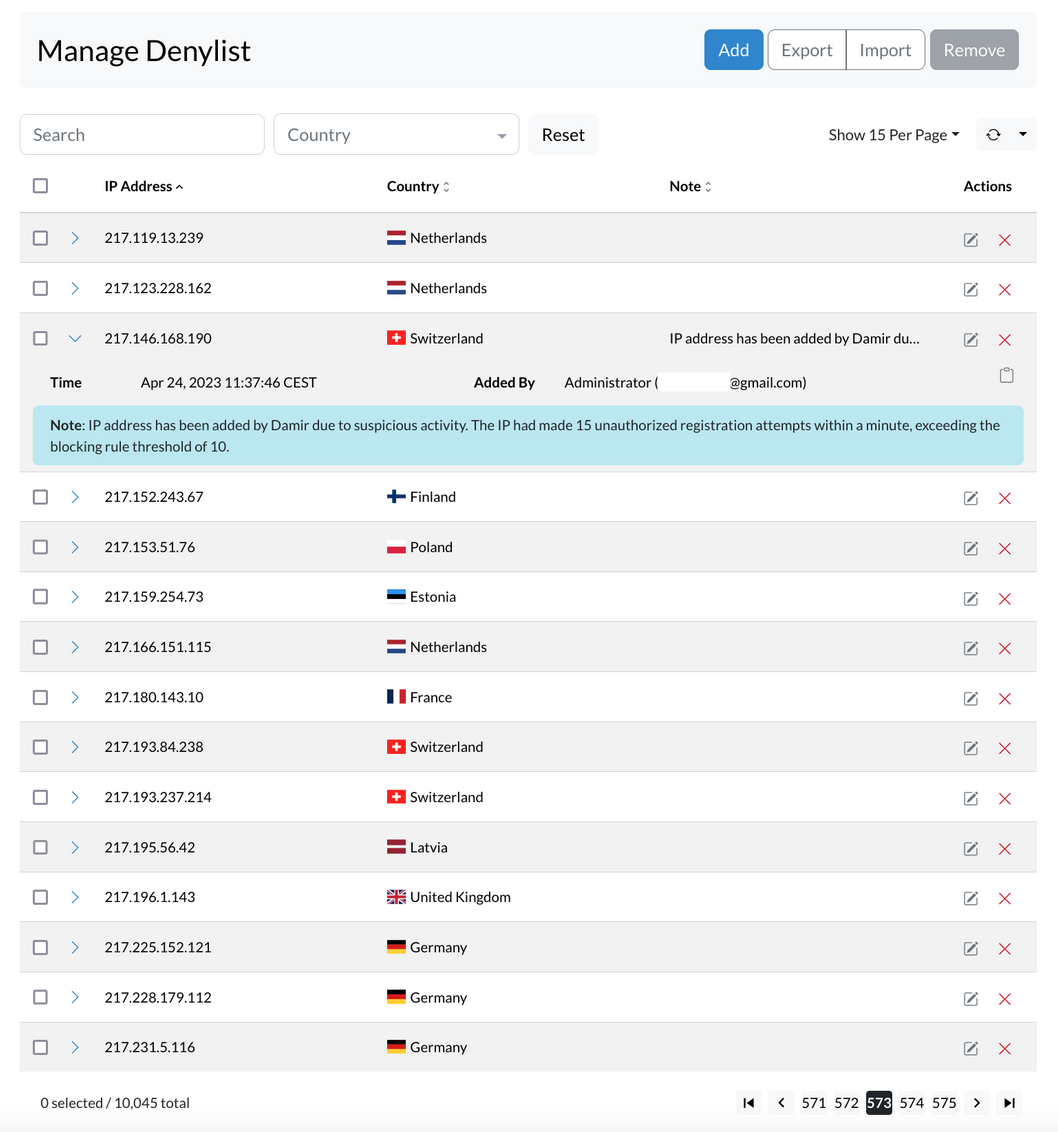
The Allow/Deny lists provides several options for managing the list, including search, export, import, and delete functions. Users can also expand the additional information for each record with a single click, providing valuable data to better manage their list.
-
Buttons

- Add (Mannualy add single IP record to the list)
- Export (export the whole list to a CSV file)
- Import (import the list from a CSV file)
- Delete (delete selected IP record)
-
Search

- Search (Search the list by ip record or note)
- Country (Search ip records by Country)
- Reset (Clear the country and reset the search)
-
Display and refresh options

- Show per page (dropdown to select number of records displayed per parge)
- Refresh (The "Refresh" option in the allow list is a dropdown that allows users to set the refresh interval for the list. When a refresh interval is set, the list will automatically refresh at the specified interval. However, it's important to keep in mind that this action may clear any current selections in the list. )
At the bottom of the list, users can find:

-
Number of selected/total records
-
Page numbers with selector
Also for the convinience additional information regarding the specific IP can be found with a single click on the arrow on the beggining of the record to expand the additional information for the record, containing

- Note: the note for the record if awailable
- Added By: the user who added the record
- Copy button: copy the record data in the clipboard in json format
   {
   "ip": "217.146.168.190",
   "note": "IP address has been added by Damir due to suspicious activity. The IP had made 15 unauthorized registration attempts within a minute, exceeding the blocking rule threshold of 10.",
   "time": 1682329066,
   "added_by": "Administrator (damir.smigi@gmail.com)",
   "geo_data": {
      "country_code": "CH",
      "country_name": "Switzerland"
   }
   }
- Edi: edit the record button
- Delete: delete the record button.
¶ Allowlist
The allowlist is a list of IP addresses that are allowed uninterrupted access to the system. This list can be manually populated via a form or uploaded using a CSV file. It is important to keep the allowlist up-to-date to ensure that legitimate users are not blocked from accessing the system.
The allowlist provides an additional layer of security to the system and helps to prevent unauthorized access.
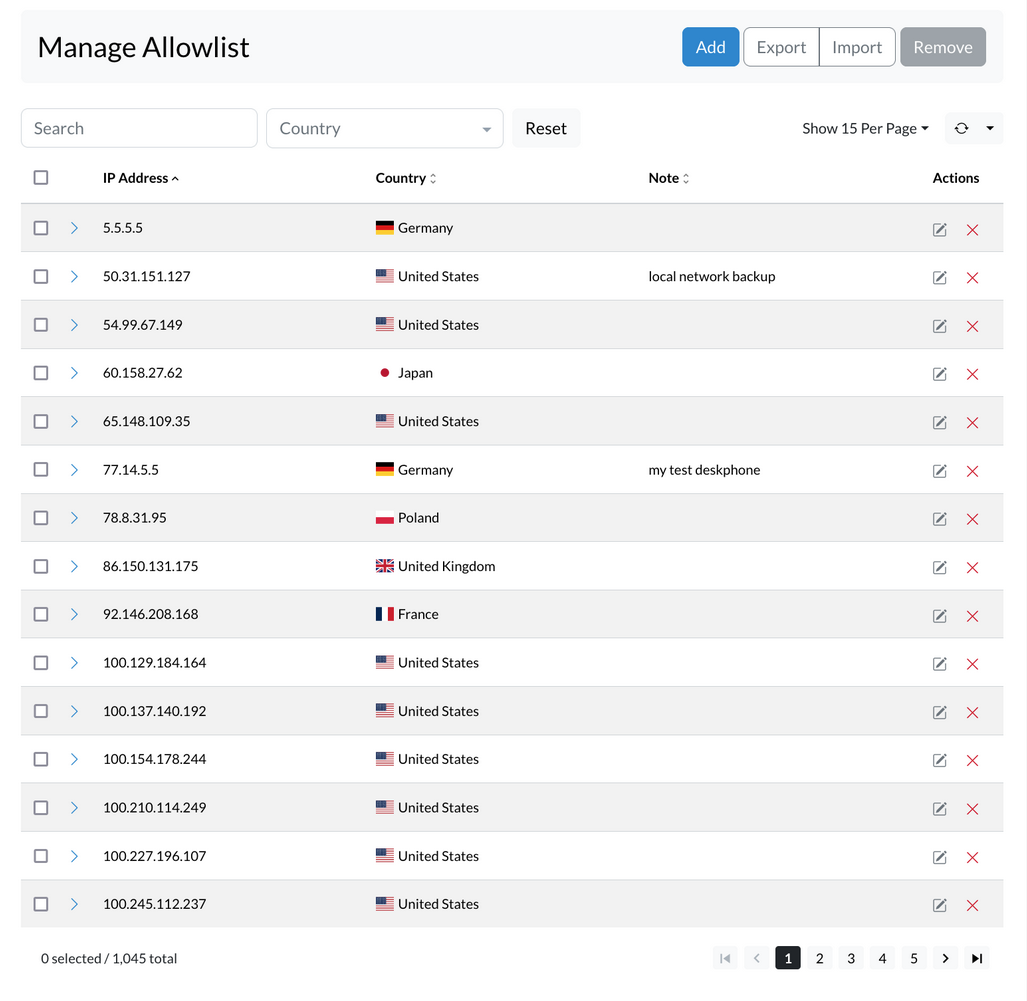
ADD IP records to Allowlist
To add an IP address to the Allowlist, follow these steps:
- Open the Allowlist sipPROT tab in your system.
- Click on the "ADD" button.
- Enter the Network or IP address in the designated field.
- Enter any optional notes to help you remember why this address was added.
- Click the "Add" button to add the IP address to the Allowlist.
It's important to ensure that the entered IP address is accurate and valid. Once an IP address is added to the Allowlist, it will be allowed uninterrupted access to the system.
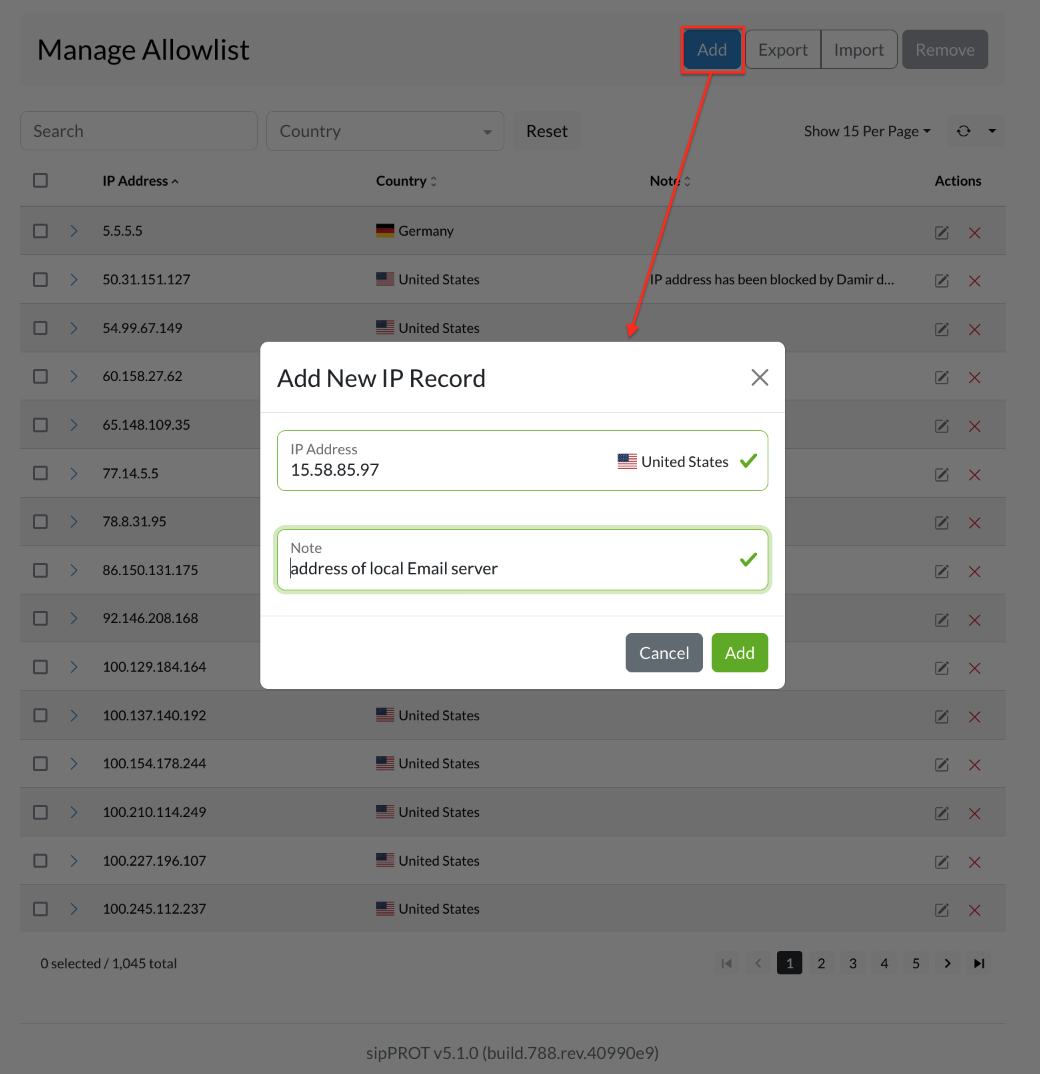
IMPORT / EXPORT Multiple IP records to Allowlist
To import multiple IP addresses into the Allowlist, you can use the Import CSV option located in the upper right corner of the Allowlist IP Addresses tab. To use this feature, you will need to have a CSV file that contains the list of IP addresses you wish to add to the Allowlist.
To create the CSV file, you can download the provided template file that contains headers and examples to help you get started. Once you have the file, open it in a spreadsheet program like Microsoft Excel or Google Sheets. Then, add the IP addresses you want to allow access to the system under the "IP_ADDRESS" column. You can also add an optional note for each IP address in the "NOTE" column.
Example CSV file :
IP_ADDRESS,NOTE
192.168.x.x,"example note1"
77.14.x.x,"example note2"
Save the file as a CSV and make sure it is in the correct format. Then, go back to the Allowlist sipPROT tab in the system and click on the "Upload" button. Select the CSV file you just created and click on "Upload" again. The system will import the IP addresses from the file and add them to the Allowlist.
If you need to export the list of IP addresses from the Allowlist, you can also use the "Export CSV" option to download a file that contains all of the IP addresses currently on the Allowlist.
Remove IP address from the list
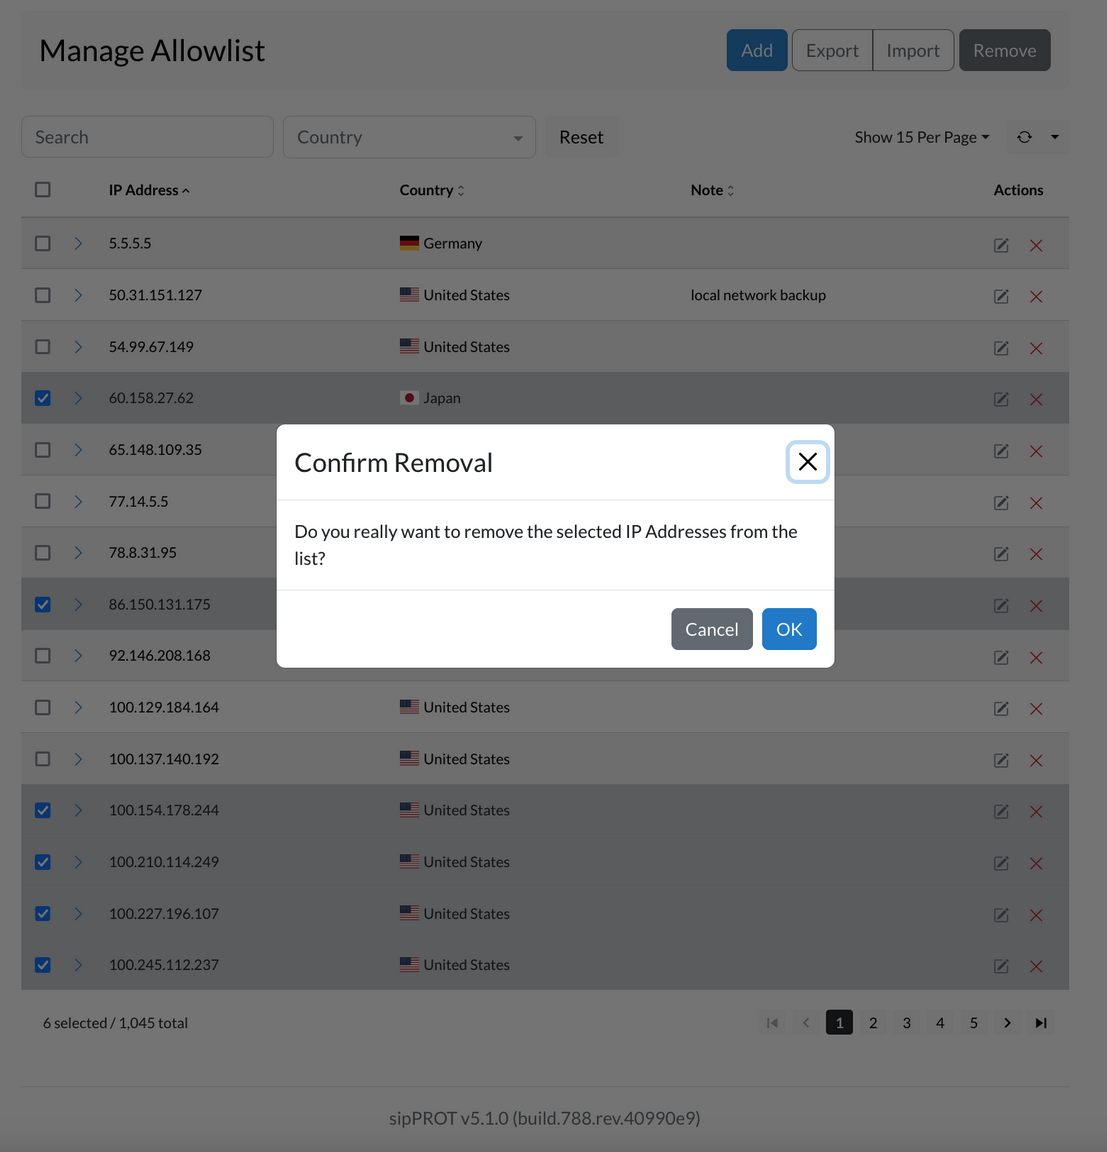
There are two ways to remove a network or IP address from the list. First, you can select one or multiple IP addresses by checking the box next to each one, then clicking on the "Remove" button. A confirmation dialog will appear, and you can click "Yes" to remove the selected network or IP addresses.
Secondly, you can remove all IP addresses from the list by clicking the "Select all" checkbox, then clicking the "Remove" button. A confirmation dialog will appear, and you can click "Yes" to remove all network or IP addresses from the list.
Changes made to the list are applied automatically. If you need to remove a large number of IP addresses, you can also use a CSV file to make bulk changes. A link to a template file with headers and examples is provided to help you get started.
The Allowlist takes precedence over other lists. If an IP address is present in both the Allowlist and a different list (such as the Denylist), the IP address will still be granted access to the system, and the other list will be ignored.
This can be useful when blocking a network or range of IPs (such as "192.168.50.0/24") but needing to allow access for a specific IP address within that range (such as "192.168.50.15"). By adding the allowed IP address to the Allowlist, it will be granted access to the system despite the broader network block in the Denylist.
¶ Denylist
The Deny list is a collection of IP addresses that have restricted access to the system. This list can be populated manually by entering an IP address and an optional "note" through a GUI or by importing a list of IP addresses via a CSV file. Additionally, the Deny list can be dynamically populated with IP addresses from "dynamic deny list" if they are identified as being associated with persistent attacks on the system.
IPORTANT - The Allowlist has precedence over the Deny list. If an IP address is present in both the Allowlist and the Deny list, the IP address will be granted access to the system.
ADD IP records to Denylist
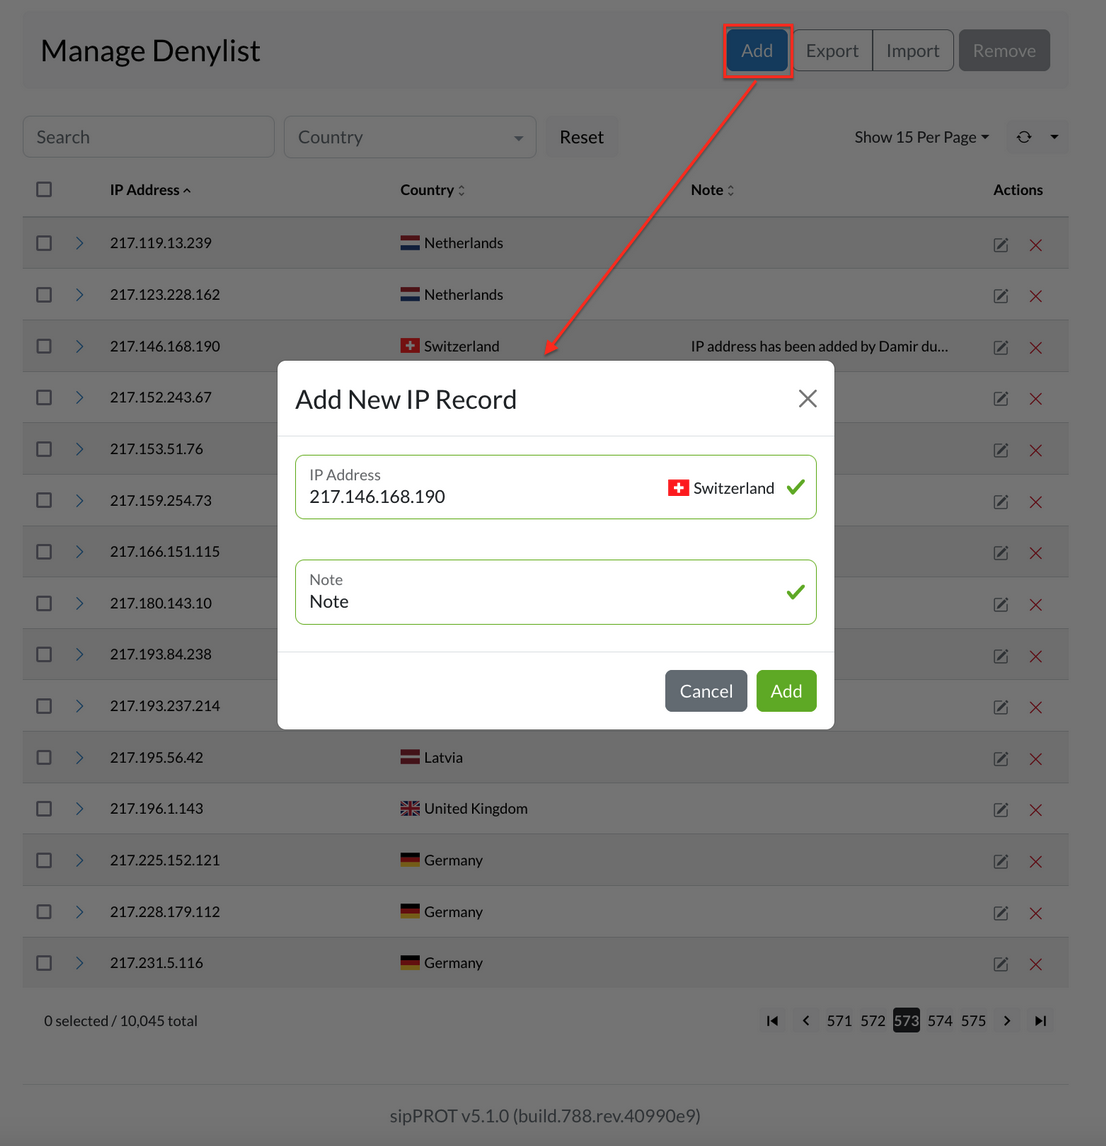
To add an IP address to the denylist, follow these steps:
- Open the Denylist sipPROT tab in your system.
- Click on the "ADD" button.
- Enter the Network or IP address in the designated field.
- Enter any optional notes to help you remember why this address was added.
- Click the "Add" button to add the IP address to the Denylist.
IMPORT / EXPORT Multiple IP records to Denylist
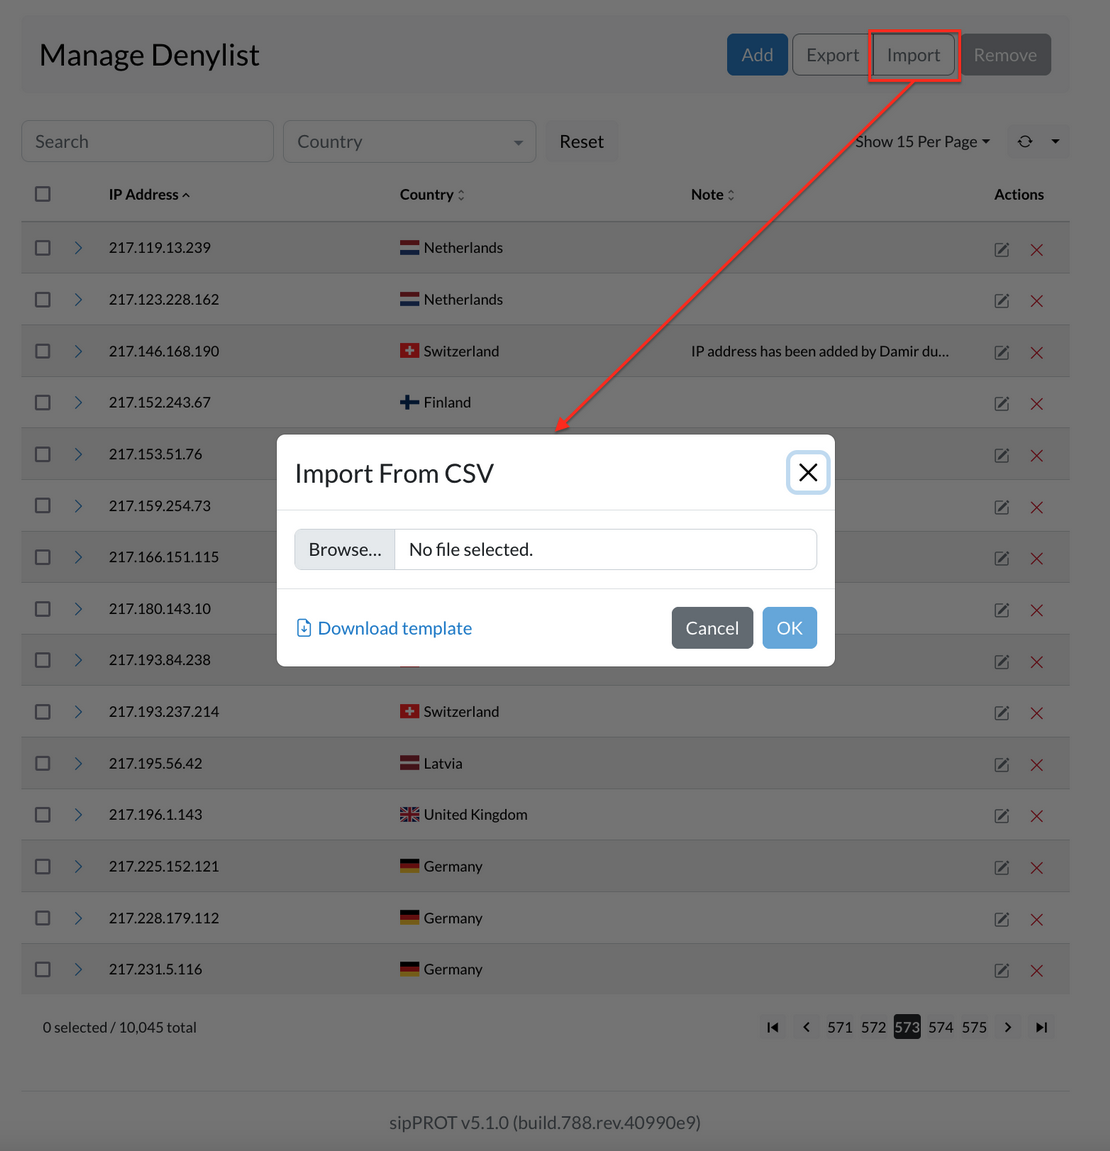
To import multiple IP addresses into the Denylist, you can use the Import CSV option located in the upper right corner of the Denylist tab. To use this feature, you will need to have a CSV file that contains the list of IP addresses you wish to add to the Denylist.
To create the CSV file, you can download the provided template file that contains headers and examples to help you get started. Once you have the file, open it in a spreadsheet program like Microsoft Excel or Google Sheets. Then, add the IP addresses you want to allow access to the system under the "IP_ADDRESS" column. You can also add an optional note for each IP address in the "NOTE" column.
Example CSV file :
IP_ADDRESS,NOTE
192.168.x.x,"example note1"
77.14.x.x,"example note2"
Save the file as a CSV and make sure it is in the correct format. Then, go back to the Denylist sipPROT tab in the system and click on the "Upload" button. Select the CSV file you just created and click on "Upload" again. The system will import the IP addresses from the file and add them to the Denylist.
If you need to export the list of IP addresses from the Denylist, you can also use the "Export CSV" option to download a file that contains all of the IP addresses currently on the Denylist.
Remove IP address from the list
There are two ways to remove a network or IP address from the list. First, you can select one or multiple IP addresses by checking the box next to each one, then clicking on the "Remove" button. A confirmation dialog will appear, and you can click "Yes" to remove the selected network or IP addresses.
Secondly, you can remove all IP addresses from the list by clicking the "Select all" checkbox, then clicking the "Remove" button. A confirmation dialog will appear, and you can click "Yes" to remove all network or IP addresses from the list.
Changes made to the list are applied automatically. If you need to remove a large number of IP addresses, you can also use a CSV file to make bulk changes. A link to a template file with headers and examples is provided to help you get started.
¶ Dynamic denylist
The Dynamic Denylist display automatically blocked IP addresses that are identified as sources of malicious traffic or attacks. These IP addresses are added to the Denylist automatically without any manual intervention. The Dynamic Denylist is constantly updated with the latest information on malicious IP addresses, ensuring that the system remains protected against new threats.
Administrators have the option to manually unblock the IP address or wait for the timeout period to expire, at which point the block will be automatically removed.
One of the advantages of the Dynamic Denylist is that it provides detailed information on the user agent/scanner used in the attack, as well as the country of origin of the attack. This information can be used for inspection and debugging purposes, as well as to better understand the nature of the attack and take appropriate measures to prevent future attacks.
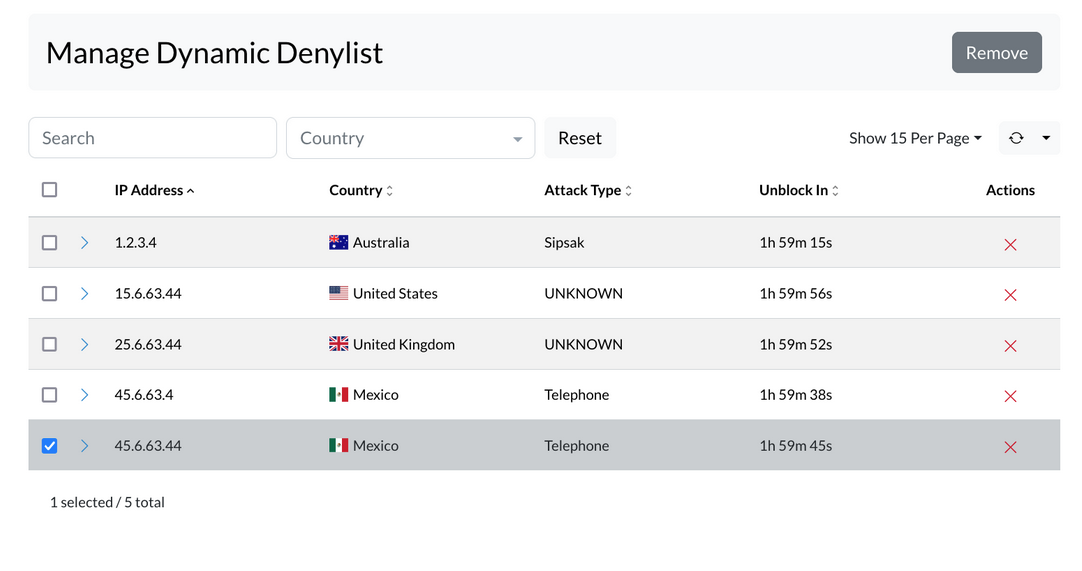
Dynamic deny is a feature in sipPROT that allows the software to automatically block IP addresses that are attempting to attack your system. When an IP address is dynamically blocked, it means that it has violated the rules set by the administrator in the settings page. The Dynamic Block Time is a variable that determines how long an IP will be blocked if it violates the rules.
For instance, if the Dynamic Block Time is set to 1/hour and an IP address violates the rules, sipPROT will block that IP for the next hour. If no new attacks come from that IP after the hour is up, sipPROT will unblock it. However, if there is a new attack from that IP during the blocked period, the Dynamic Block Time will reset, and the IP address will remain blocked for an additional hour.
It's worth noting that for an IP address to be blocked, it must violate the rules during the Dynamic Block Time. Conversely, if an IP address is on the denylist, it will be blocked by sipPROT regardless of whether it is currently attacking your system.
In summary, dynamic deny is an automated blocking feature in sipPROT that allows the software to block IP addresses that violate your system's rules.
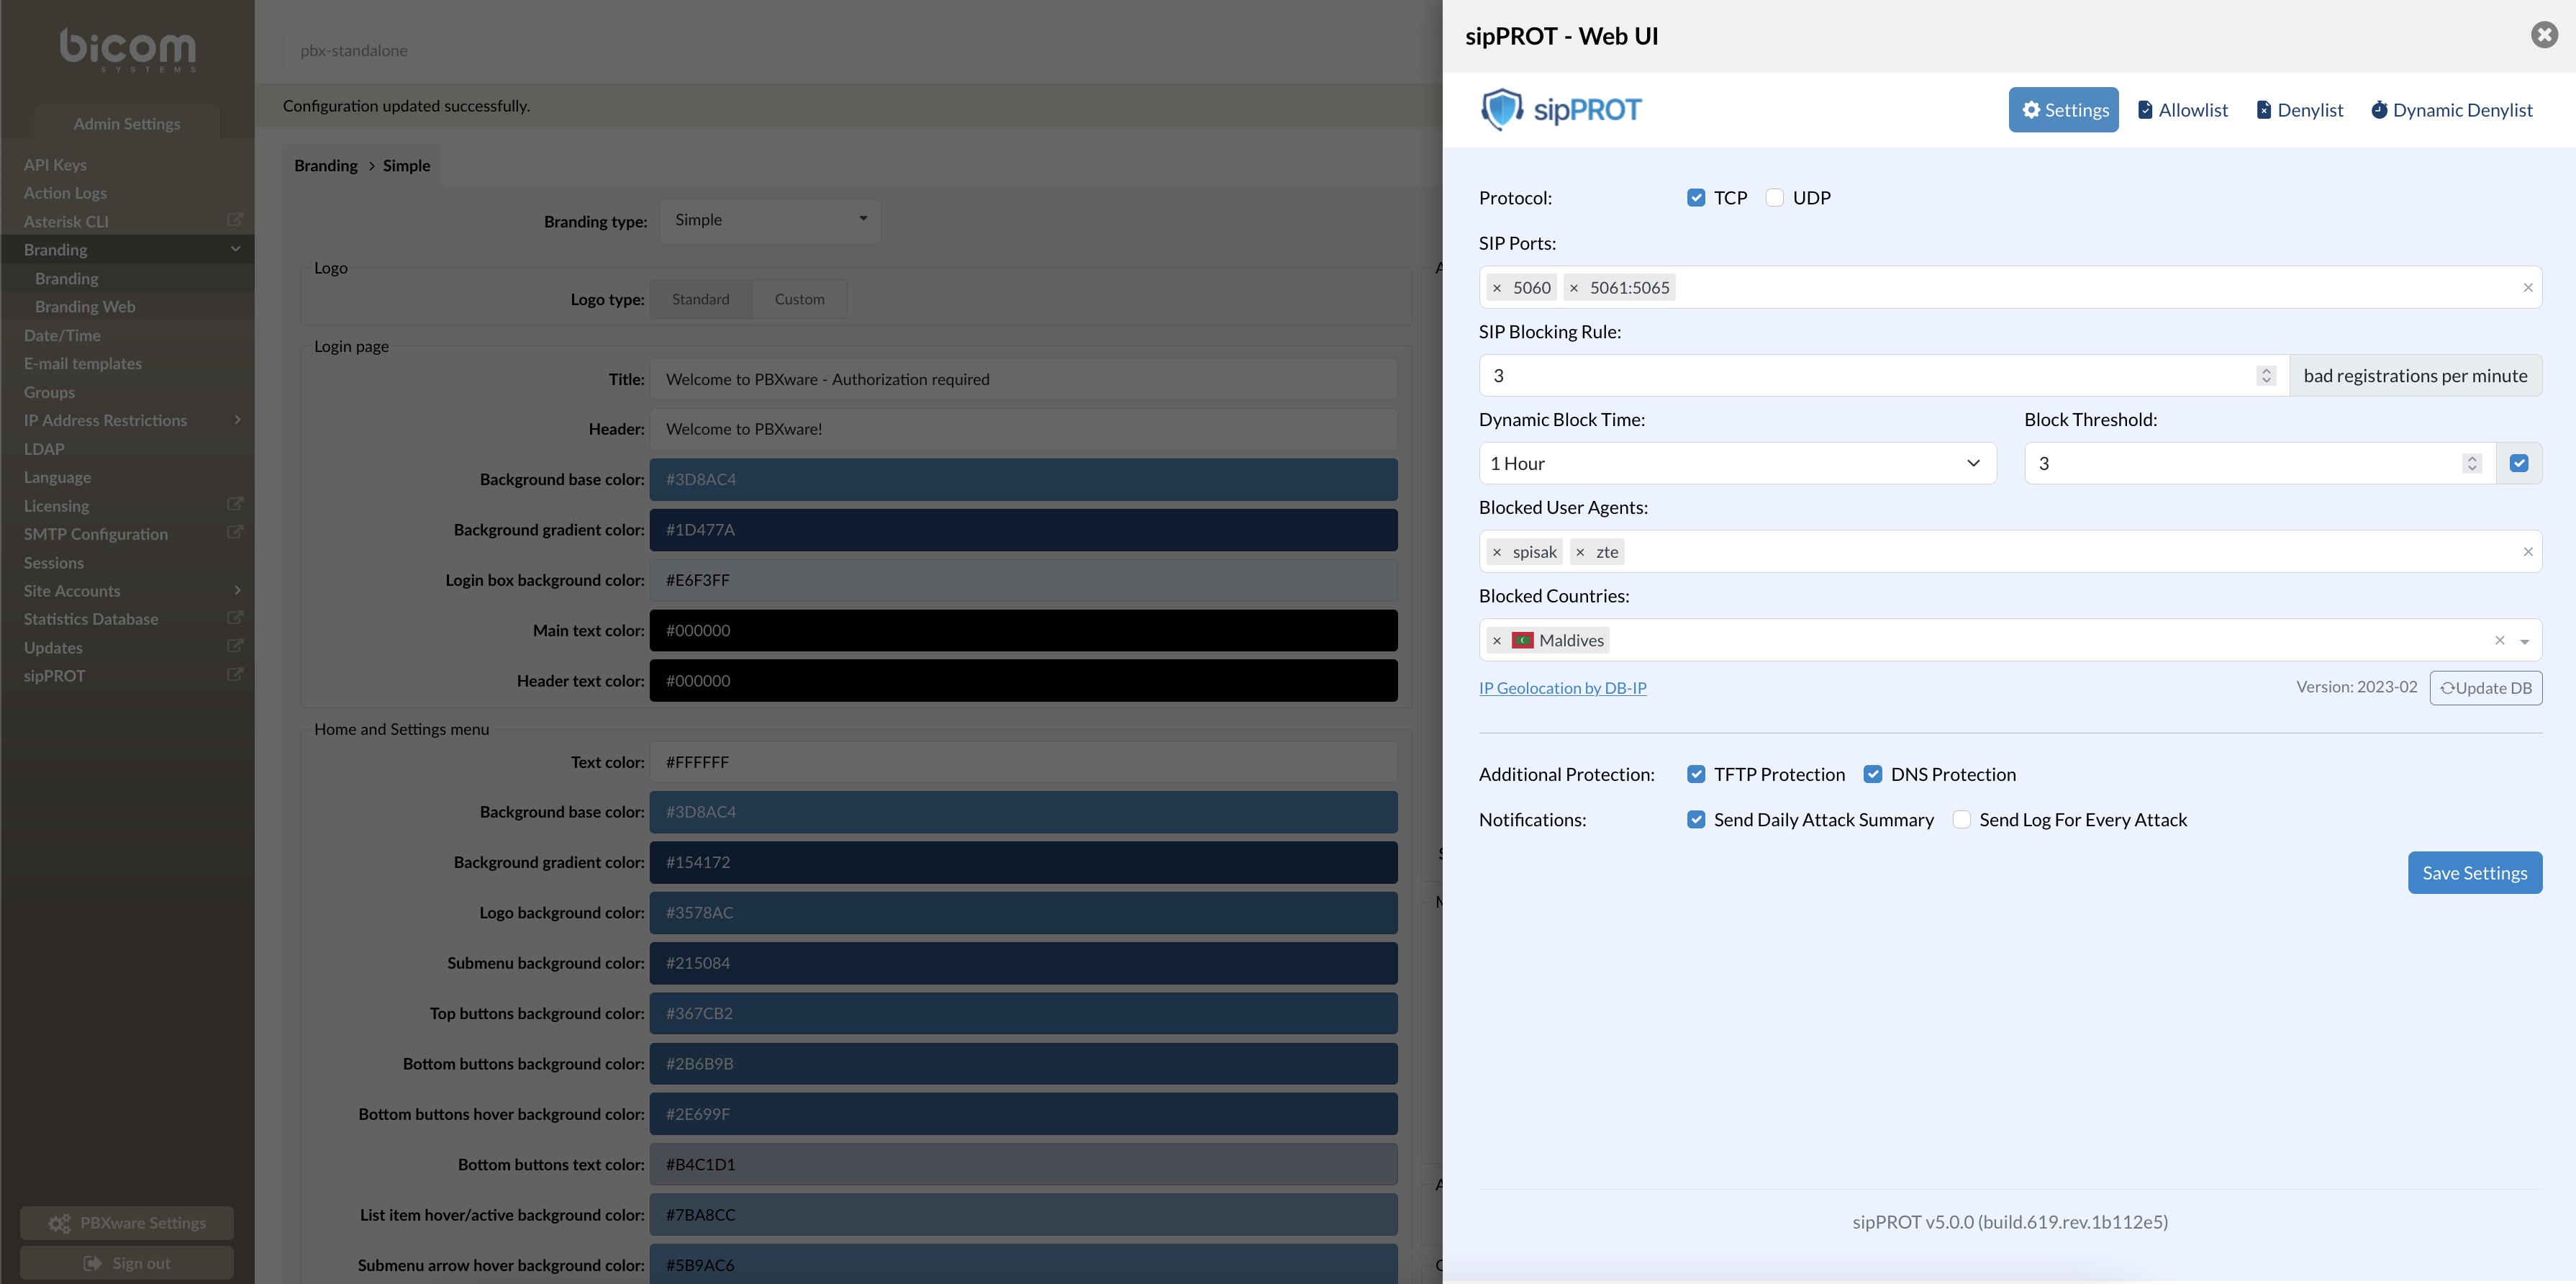
sipPROT instaled in the PBxware standalone will use PBXware brandingand and language options
¶ Update sipPROT
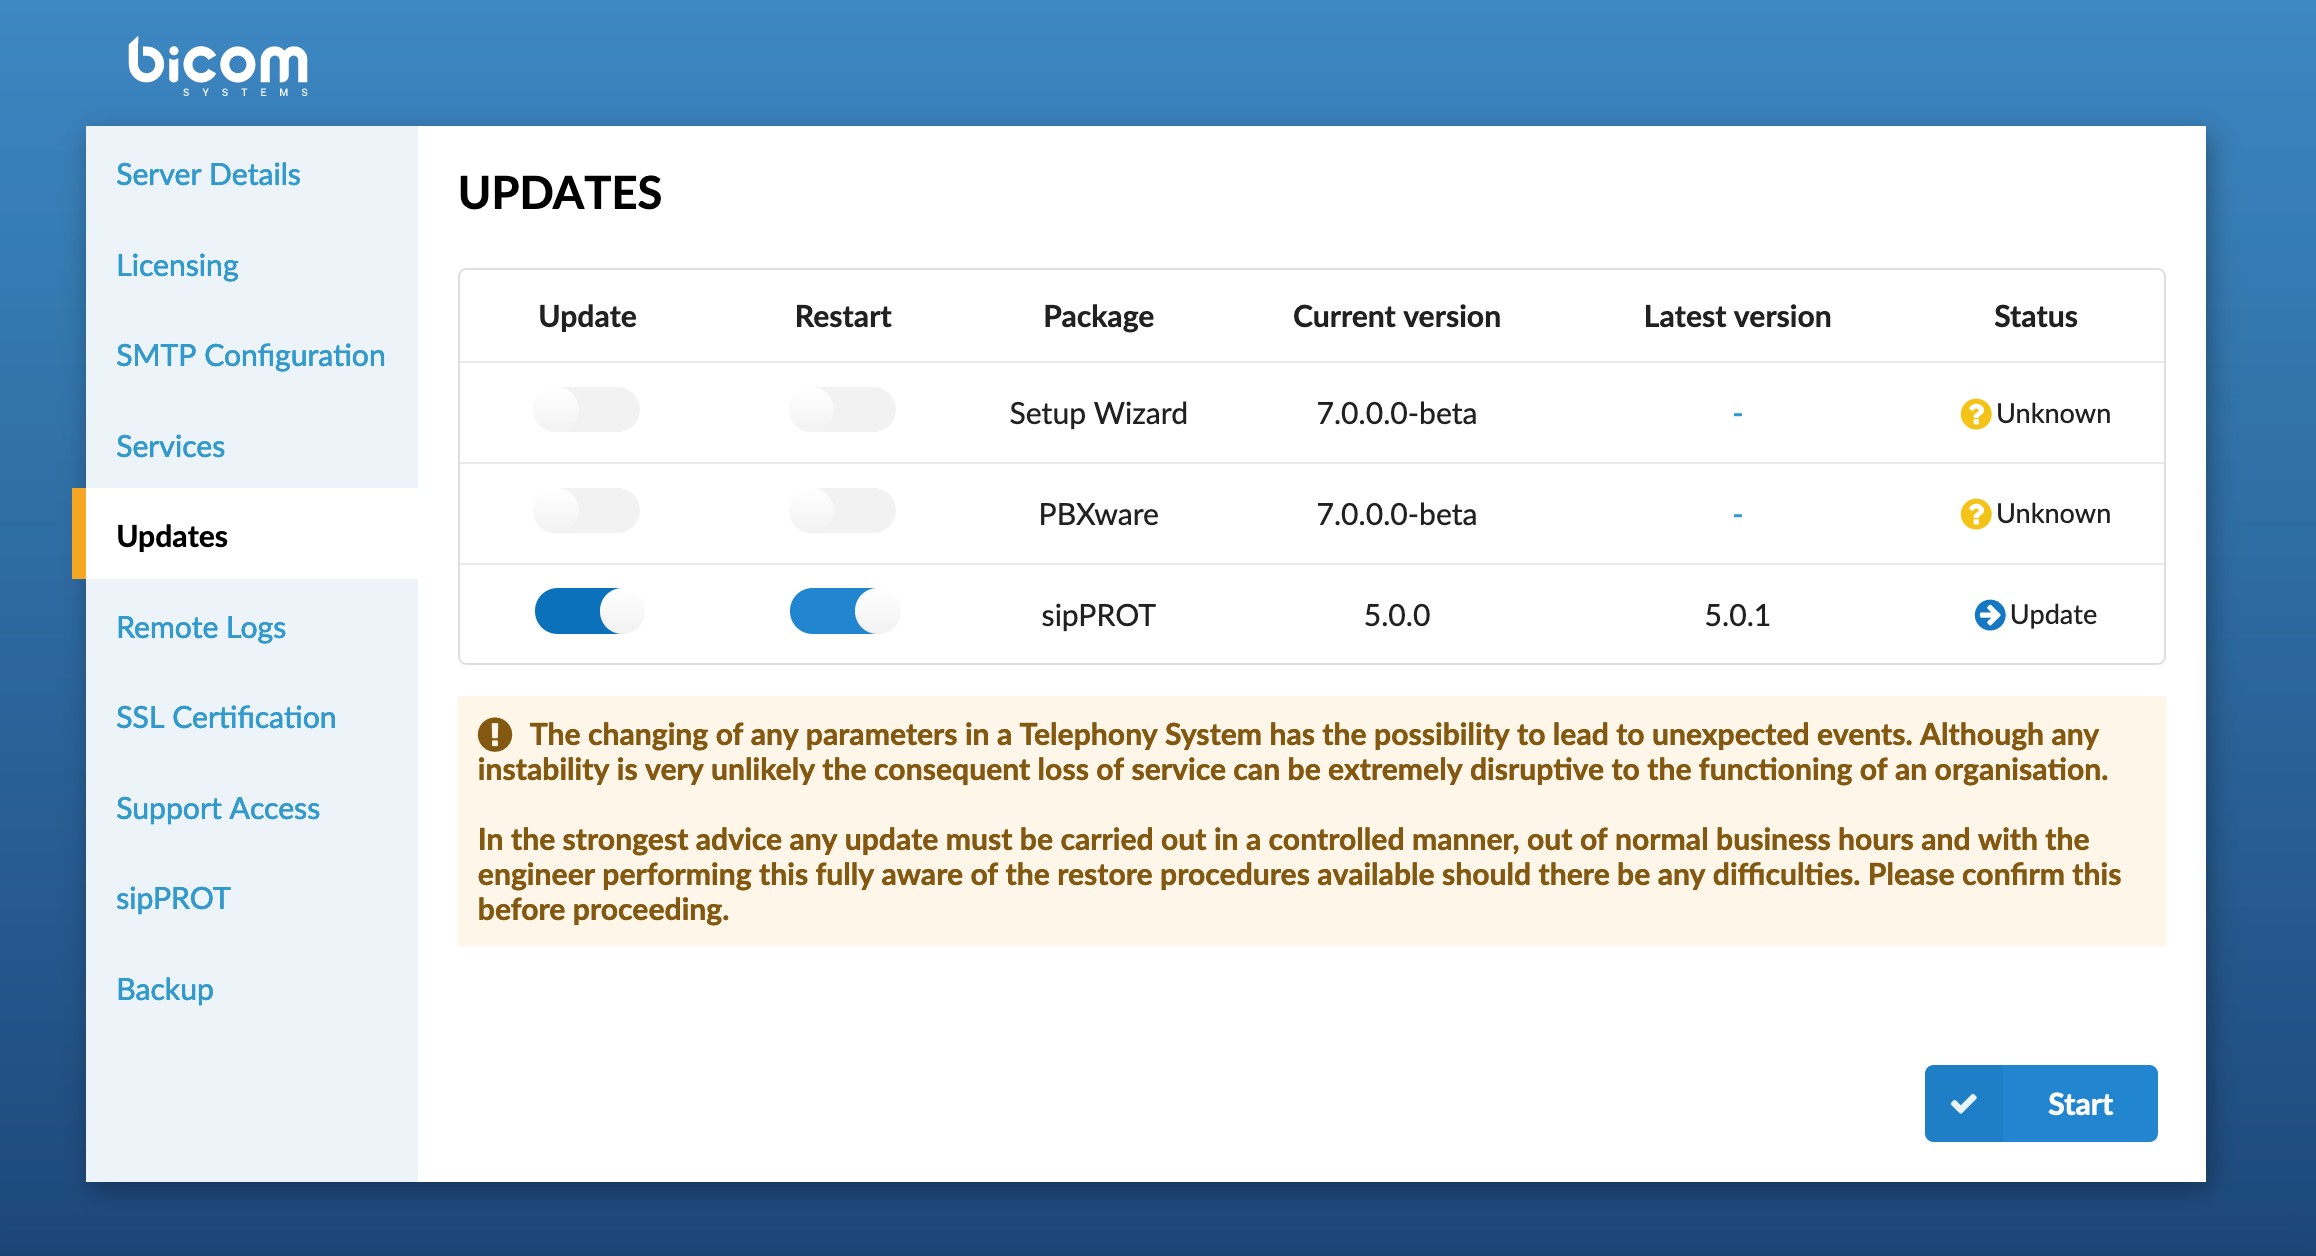
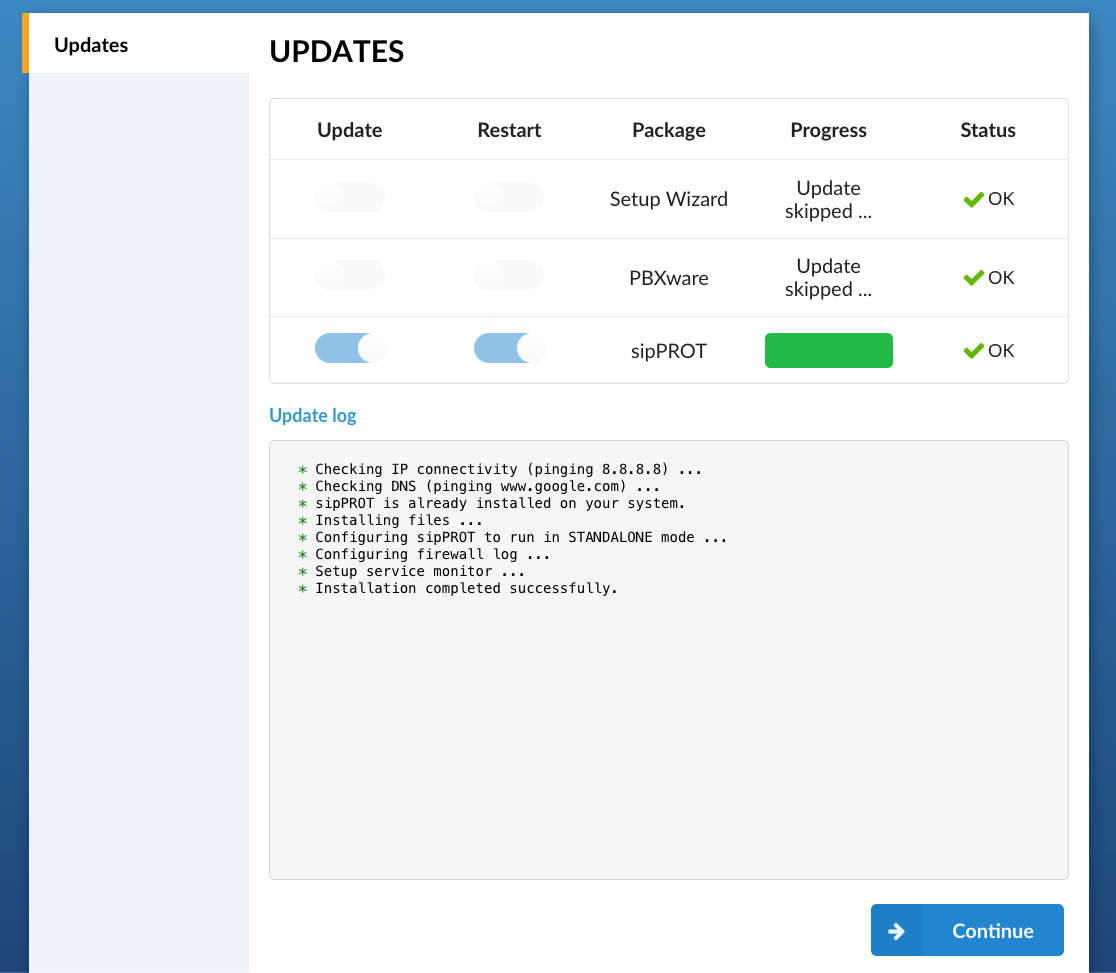
The sipPROT update can be done from the PBXware setup wizard in the same manner as other PBXware packages.
¶ Working with sipPROT CLI
The new updated version of sipPROT comes with updated CLI commands and outputs. CLI autocomplete is added for the sipPROT commands.
 # sipprot --help
NAME:
   sipPROT - CLI

USAGE:
   sipPROT [global options] command [command options] [arguments...]

VERSION:
   5.1.0+build.777.rev.5ad785a

COMMANDS:
   status, s  Prints number of IPs per list
   report, r  Prints out daily attack report
   setup,     Setup redis repositories. If the repositories already exist, this is no-op.
   version,   Print only the version
   list, l    Manages IP lists
   help, h    Shows a list of commands or help for one command

GLOBAL OPTIONS:
   --config FILE  load configuration from FILE (default: "/opt/sipprot/conf/sipprot.conf")
   --log value    log URI e.g. stdout://, syslog:// or file:///var/log/sipprotd.log (default: "stdout://")
   --debug        include debug logs (default: false)
   --help, -h     show help
   --version, -v  print the version
¶ sipPROT status
To get information about sipprot status use the following command:
- sipprot status
This command will give the following information:
# sipprot status
+---------------------+------------+
|        LIST         | NUM OF IPS |
+---------------------+------------+
| Allow               |        493 |
+---------------------+------------+
| Deny                |        482 |
+---------------------+------------+
| Dynamic (temporary) |        100 |
+---------------------+------------+
To list detailed information use flags --all, --allow, --deny, --dynamic
Example:|
# sipprot status -allow

Allowlist:
+-----------------+----------------+
|   IP ADDRESS    |    COUNTRY     |
+-----------------+----------------+
| 191.85.106.233  |   Argentina    |
+-----------------+----------------+
| 165.191.222.98  |   Australia    |
+-----------------+----------------+
|  175.35.61.159  |   Australia    |
+-----------------+----------------+
|  83.164.34.163  |    Austria     |
+-----------------+----------------+
|  178.127.91.72  |    Belarus     |
+-----------------+----------------+
| 178.116.223.166 |    Belgium     |
+-----------------+----------------+
| 109.140.180.239 |    Belgium     |
+-----------------+----------------+
¶ sipPROT report
To Print daily attck report use:
# sipprot report
Daily Firewall Report

Host:  PBXware-Standalone
Date:  Tue, 28 Feb 2023

 +-----------------+-----------------------+-----------------+----------------+--------+
| ATTACKER IP | COUNTRY | METHOD | VICTIM IP | BLOCKS |
+-----------------+-----------------------+-----------------+----------------+--------+
| 45.93.16.32 | Palestinian Territory | SCANNER:21da605 | 45.141.164.106 | 1 |
+-----------------+-----------------------+-----------------+----------------+--------+
| 45.93.16.228 | Palestinian Territory | SCANNER:21da605 | 45.141.164.106 | 5 |
+-----------------+-----------------------+-----------------+----------------+--------+
| 45.93.16.239 | Palestinian Territory | SCANNER:21da605 | 45.141.164.106 | 1 |
+-----------------+-----------------------+-----------------+----------------+--------+
| 45.134.144.31 | Netherlands | SCANNER:21da605 | 45.141.164.106 | 1 |
+-----------------+-----------------------+-----------------+----------------+--------+
| 51.159.91.192 | France | SCANNER:21da605 | 45.141.164.106 | 2 |
+-----------------+-----------------------+-----------------+----------------+--------+
| 207.154.225.217 | Germany | SCANNER:21da605 | 45.141.164.106 | 1 |
+-----------------+-----------------------+-----------------+----------------+--------+
| 212.129.7.65 | France | SCANNER:21da605 | 45.141.164.106 | 1 |
+-----------------+-----------------------+-----------------+----------------+--------+
| 212.129.58.7 | France | SCANNER:21da605 | 45.141.164.106 | 1 |
+-----------------+-----------------------+-----------------+----------------+--------+
| 45.93.16.228 | Palestinian Territory | SCANNER:21da605 | 45.141.164.109 | 1 |
+-----------------+-----------------------+-----------------+----------------+--------+
| 51.159.199.3 | France | SCANNER:21da605 | 45.141.164.109 | 1 |
+-----------------+-----------------------+-----------------+----------------+--------+
| 104.167.222.98 | United States | SCANNER:21da605 | 45.141.164.109 | 1 |
+-----------------+-----------------------+-----------------+----------------+--------+
| 212.129.7.65 | France | SCANNER:21da605 | 45.141.164.109 | 1 |
+-----------------+-----------------------+-----------------+----------------+--------+
| 45.93.16.228 | Palestinian Territory | SCANNER:21da605 | 45.141.164.111 | 2 |
+-----------------+-----------------------+-----------------+----------------+--------+
| | | | TOTAL | 13 |
+-----------------+-----------------------+-----------------+----------------+--------+
To print sipprot version information use:
# sipprot version
sipPROT: 5.0.0+build.619.rev.1b112e5
Additional quck check, if the provided IP is in any of the following: allowlist, denylist, dynamic denylist
Example:
# sipprot check 83.221.171.193
IP address '83.221.171.193' found in Allowlist
IP address '83.221.171.193' found in Denylist
"The IPs used on this wiki are not real and are only for demonstration purposes. They do not pose any real threats."