¶ Introduction

This Congifuration Guide is written as a general guide on how to configure the Cisco phone model 8841 to work with PBXware 5.3.8.
¶ Video Tutorial
Please refer to the video tutorial explaining the auto-provisioning setup for a Cisco phone on PBXware 5.
¶ Requirements
¶ Identifying Phone Model
To start and successfully complete the registration of your Cisco phone, you need to know which phone model to set up.
On the back of each Cisco phone, there is model information that you should check. Although various phone models can have exactly the same requirements and installation procedures, phone models can also have significantly different requirements and installation procedures, so that is why it is important to know the model you own which results in you setting up the device successfully.
¶ Phone Firmware
- Make sure that your phone is loaded with an appropriate firmware version, 11-3-3.
- To find out the software version for Cisco 8841, press the menu button, then type 61.
¶ DHCP Server
- Fully configured and operational DHCP server.
¶ PBXware Version
PBXware version 5.3.8
In order to find out the PBXware version:
- Log in to PBXware
- Navigate to Settings: About.
On the top of About page is a code similar to this one Edition: Multi-Tenant, Release: 5.3.8.0 (2223ce45), Running: 13.23.1-gc-040bbaca, Proxy v5.3.8 (231c5f3), API: 5.3, libmemcached version: 1.0.18, where Release denotes the current version of your PBXware.
¶ Installation
This section describes how to install and connect the phone to the electrical power and data network as well as how to apply factory settings.
The following topics are covered:
- Power Adapter
- Factory Settings
¶ Power Adapter
Connect the Network and Power
- Connect the DC plug on the power adapter to the DC port on the phone and connect the other end of the power adapter into an electrical power outlet.
- Connect the Ethernet cable between the Internet port on the phone and the network port on a router or switch to access LAN.
¶ Find the Phone's IP Address
Find out your Cisco phone's IP Address
- Press the Settings button
- Type 62 to check the phone's IP address
IP address should be displayed on the phone.
¶ Reset to Factory Settings
This step is not required for brand new out-of-the-box phones, however, if the phone has been already used, then it is a must.
- Press the Settings button
- Type 55
- Confirm with OK to factory reset the phone
- Wait some time for the phone to reboot.
NOTE: Do not unplug or remove power to the device while it is updating firmware and configuration.
¶ Registering Phone
This section describes how to identify the Cisco phone model, requirements that must be met and how to register the phone using manual configuration or auto provisioning.
The following topics are covered:
- Manual Configuration
- Auto Provisioning
¶ Manual Configuration
This section describes how to set UAD settings, create a PBXware Extension and register the phone.
The following topics are covered:
- UAD Settings
- Creating an Extension
- Registering a Phone
¶ UAD Settings
Log in to PBXware web administration interface
- Open a new browser window and enter the IP address in order to access the PBXware's web administration login screen. Example: http://192.168.1.10
- Log in to PBXware with the e-mail address and password.
UAD settings
- Navigate to Settings: UAD.
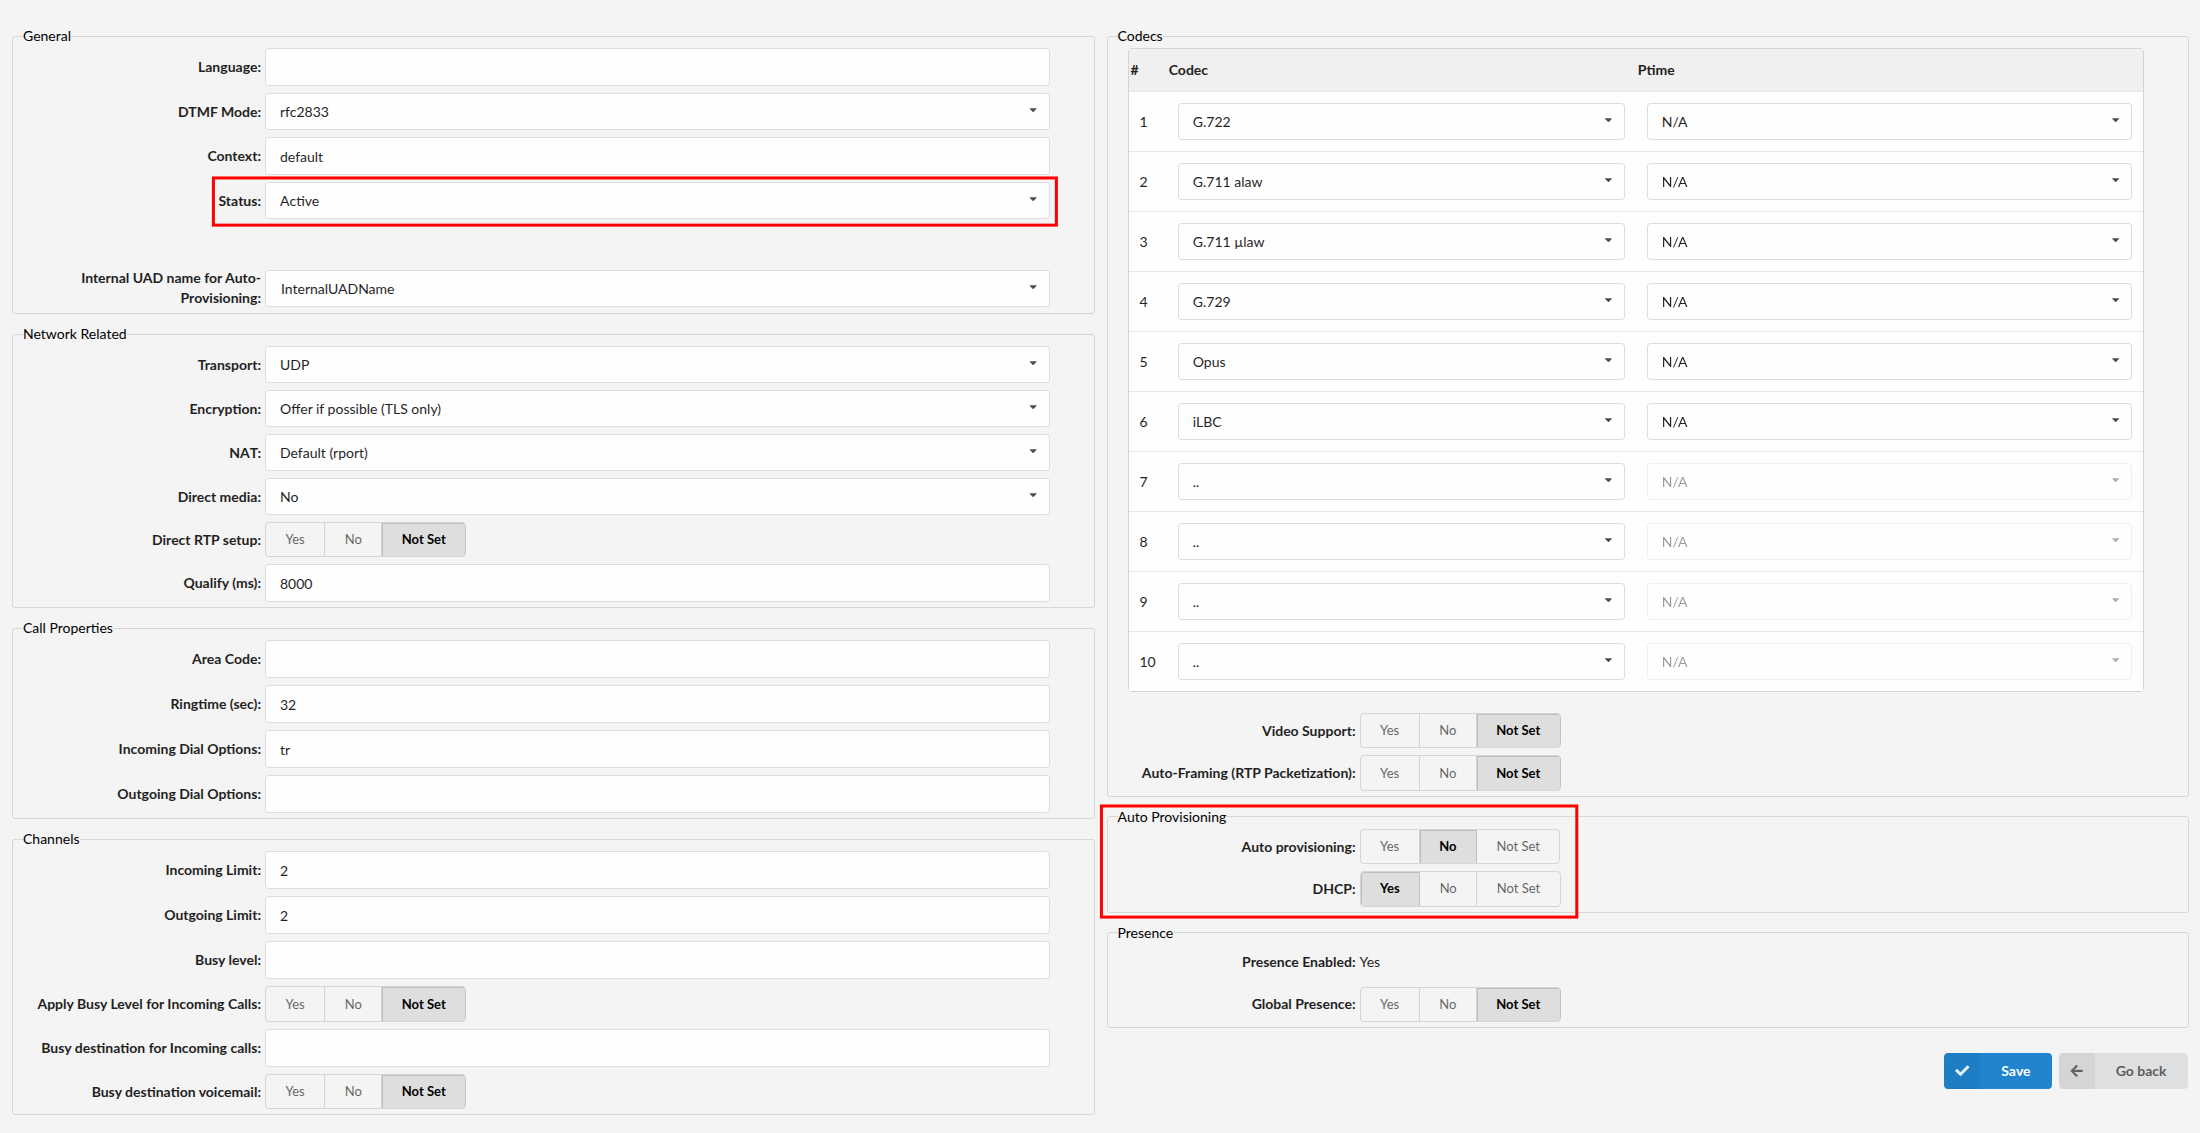
- Make sure that Cisco UAD is enabled. To check the UAD status, click the Edit icon corresponding to the Cisco phone.
- Make sure Status is set to Active, Auto provisioning is set to No, and DHCP is set to Yes.
- Click the Save button to save changes.
¶ Creating an Extension
Add an Extension
- Navigate to Extensions. Click Add Extension.
- The standard options window will be shown below.
- Select the Cisco phone model from the UAD select box.
- Select Location: Local or Remote.
Local is for all Extensions registered on the LAN and Remote is for all Extensions registered from remote networks, WAN, Internet, etc.
- Click the Next step button.
Extension Values
Enter values into the required field text boxes.
REQUIRED FIELDS:
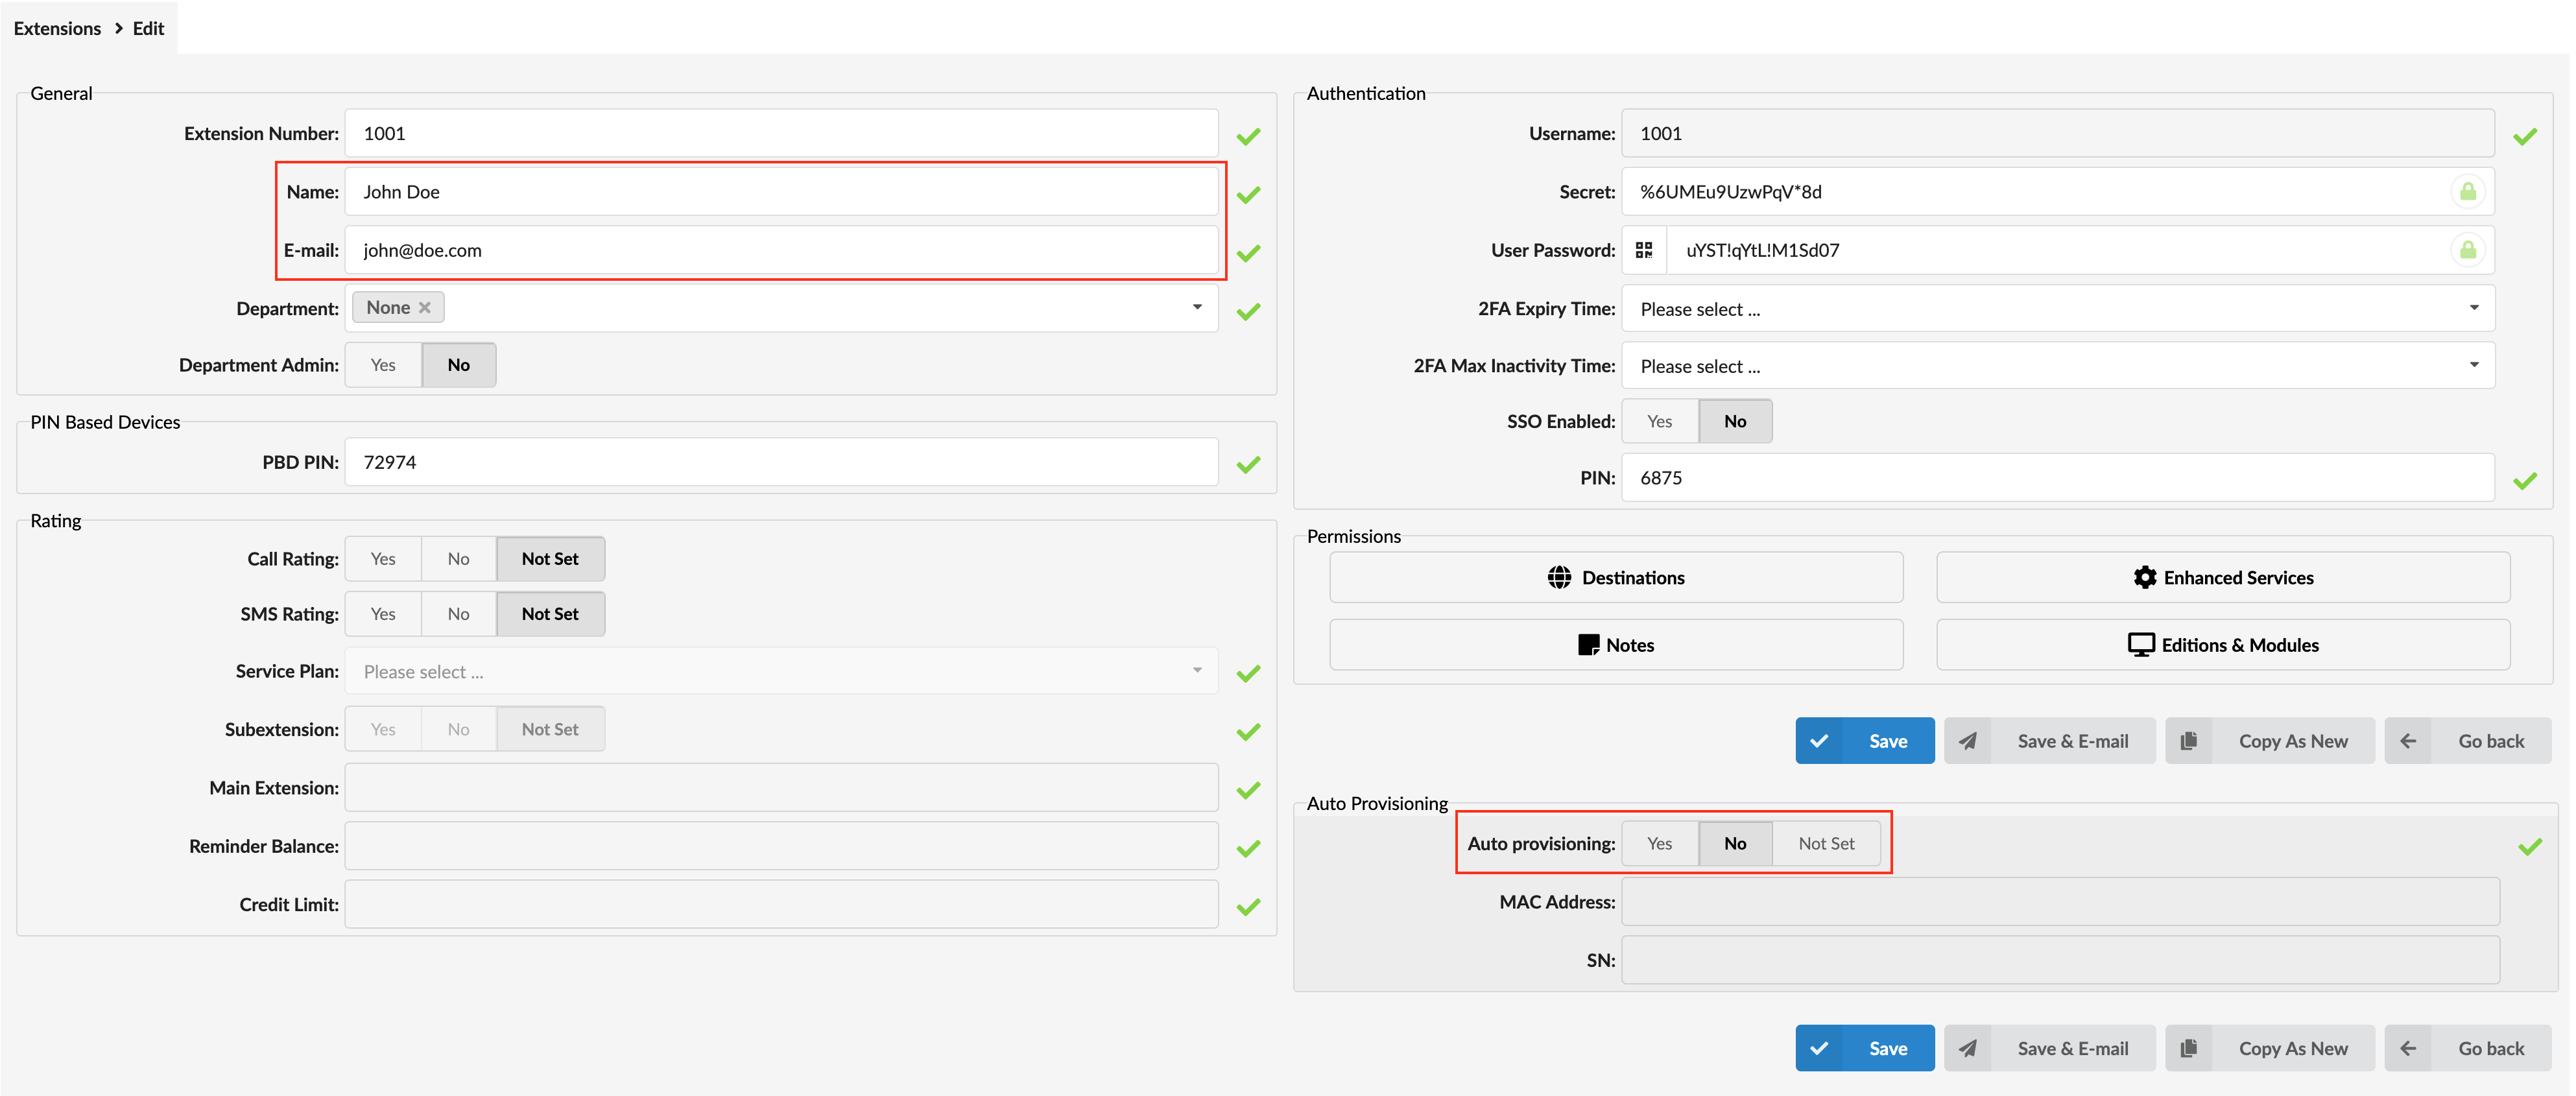
- Name
Enter a name for the Extension being created. Example: John Smith.
Enter the e-mail address associated with this Extension. This e-mail address will receive all system notification messages. Example: john.smith@bicomsystems.com
- Click the Save button.
- Optionally, click the Save & E-mail button. The account details will be sent to the e-mail address associated with this Extension.
OPTIONAL FIELDS
- Extension
An auto-generated Extension number based on the next available sequential number. An Extension value can be changed. Example: '1003'.
- Secret
A secret value associated with the UAD is auto-generated in order to allow the UAD to successfully register with the system. The secret value can be changed, however it is highly recommended not to change the system generated value to a simple value like "1234" or "1003" or others.
- PIN
An auto-generated PIN will allow access to voicemail and online self-care (OSC).
¶ Registering a Phone
This section describes how to register a Cisco phone using Hostname or IP Address.
¶ Hostname or IP Address
Log in to the phone's web administration interface
- Open a new browser window and enter the phone's IP address in order to access the phone's web administration interface login screen. Example: http://192.168.1.22.
- Click Admin Login in the top right corner of the administration interface.
- Click Advanced in the top right corner of the administration interface.
- Click Voice found in the main menu.
- Click Ext 1 found in the sub menu.
- Enter or set the following details into the respective fields.
REQUIRED FIELDS:
- Proxy (Proxy and Registration section)
Enter the Hostname or IP Address of PBXware.
- Example of a Hostname: voip.bicomsystems.com
- Example of an IP Address: 192.168.1.10
- User ID (Subscriber Information section)
PBXware Extension number. Example: 1003.
- Password
The Secret of the Extension as received in the e-mail associated with this Extension. Example: _%Z4M3*Ts9y7. A password is generated automatically for each newly created Extension.
- Navigate down to the "Dial Plan" section. Clear the Dial Plan field, then copy and paste the following value.
(*x.|**x.|*xx|[3469]11|0|00|[2-9]xxxxxx|1xxx[2-9]xxxxxx|xxxxxxxxxxxx.)
- Click the Submit button.
- You will have to wait some time for the phone to reboot. If everything is done as described above, you should have successfully registered your phone to PBXware.
¶ Auto Provisioning
This section describes how to set UAD settings, create a PBXware Extension and register the phone using DHCP or Static IP address.
The following topics are covered:
- UAD Settings
- Creating an Extension
- Registering a Phone
¶ UAD Settings
Log in to the PBXware's web administration interface
- Open a new browser window and enter the IP address in order to access the PBXware's web administration login screen. Example: http://192.168.1.10.
- Log in to PBXware with the e-mail address and password.
UAD settings
- Navigate to Settings: UAD.
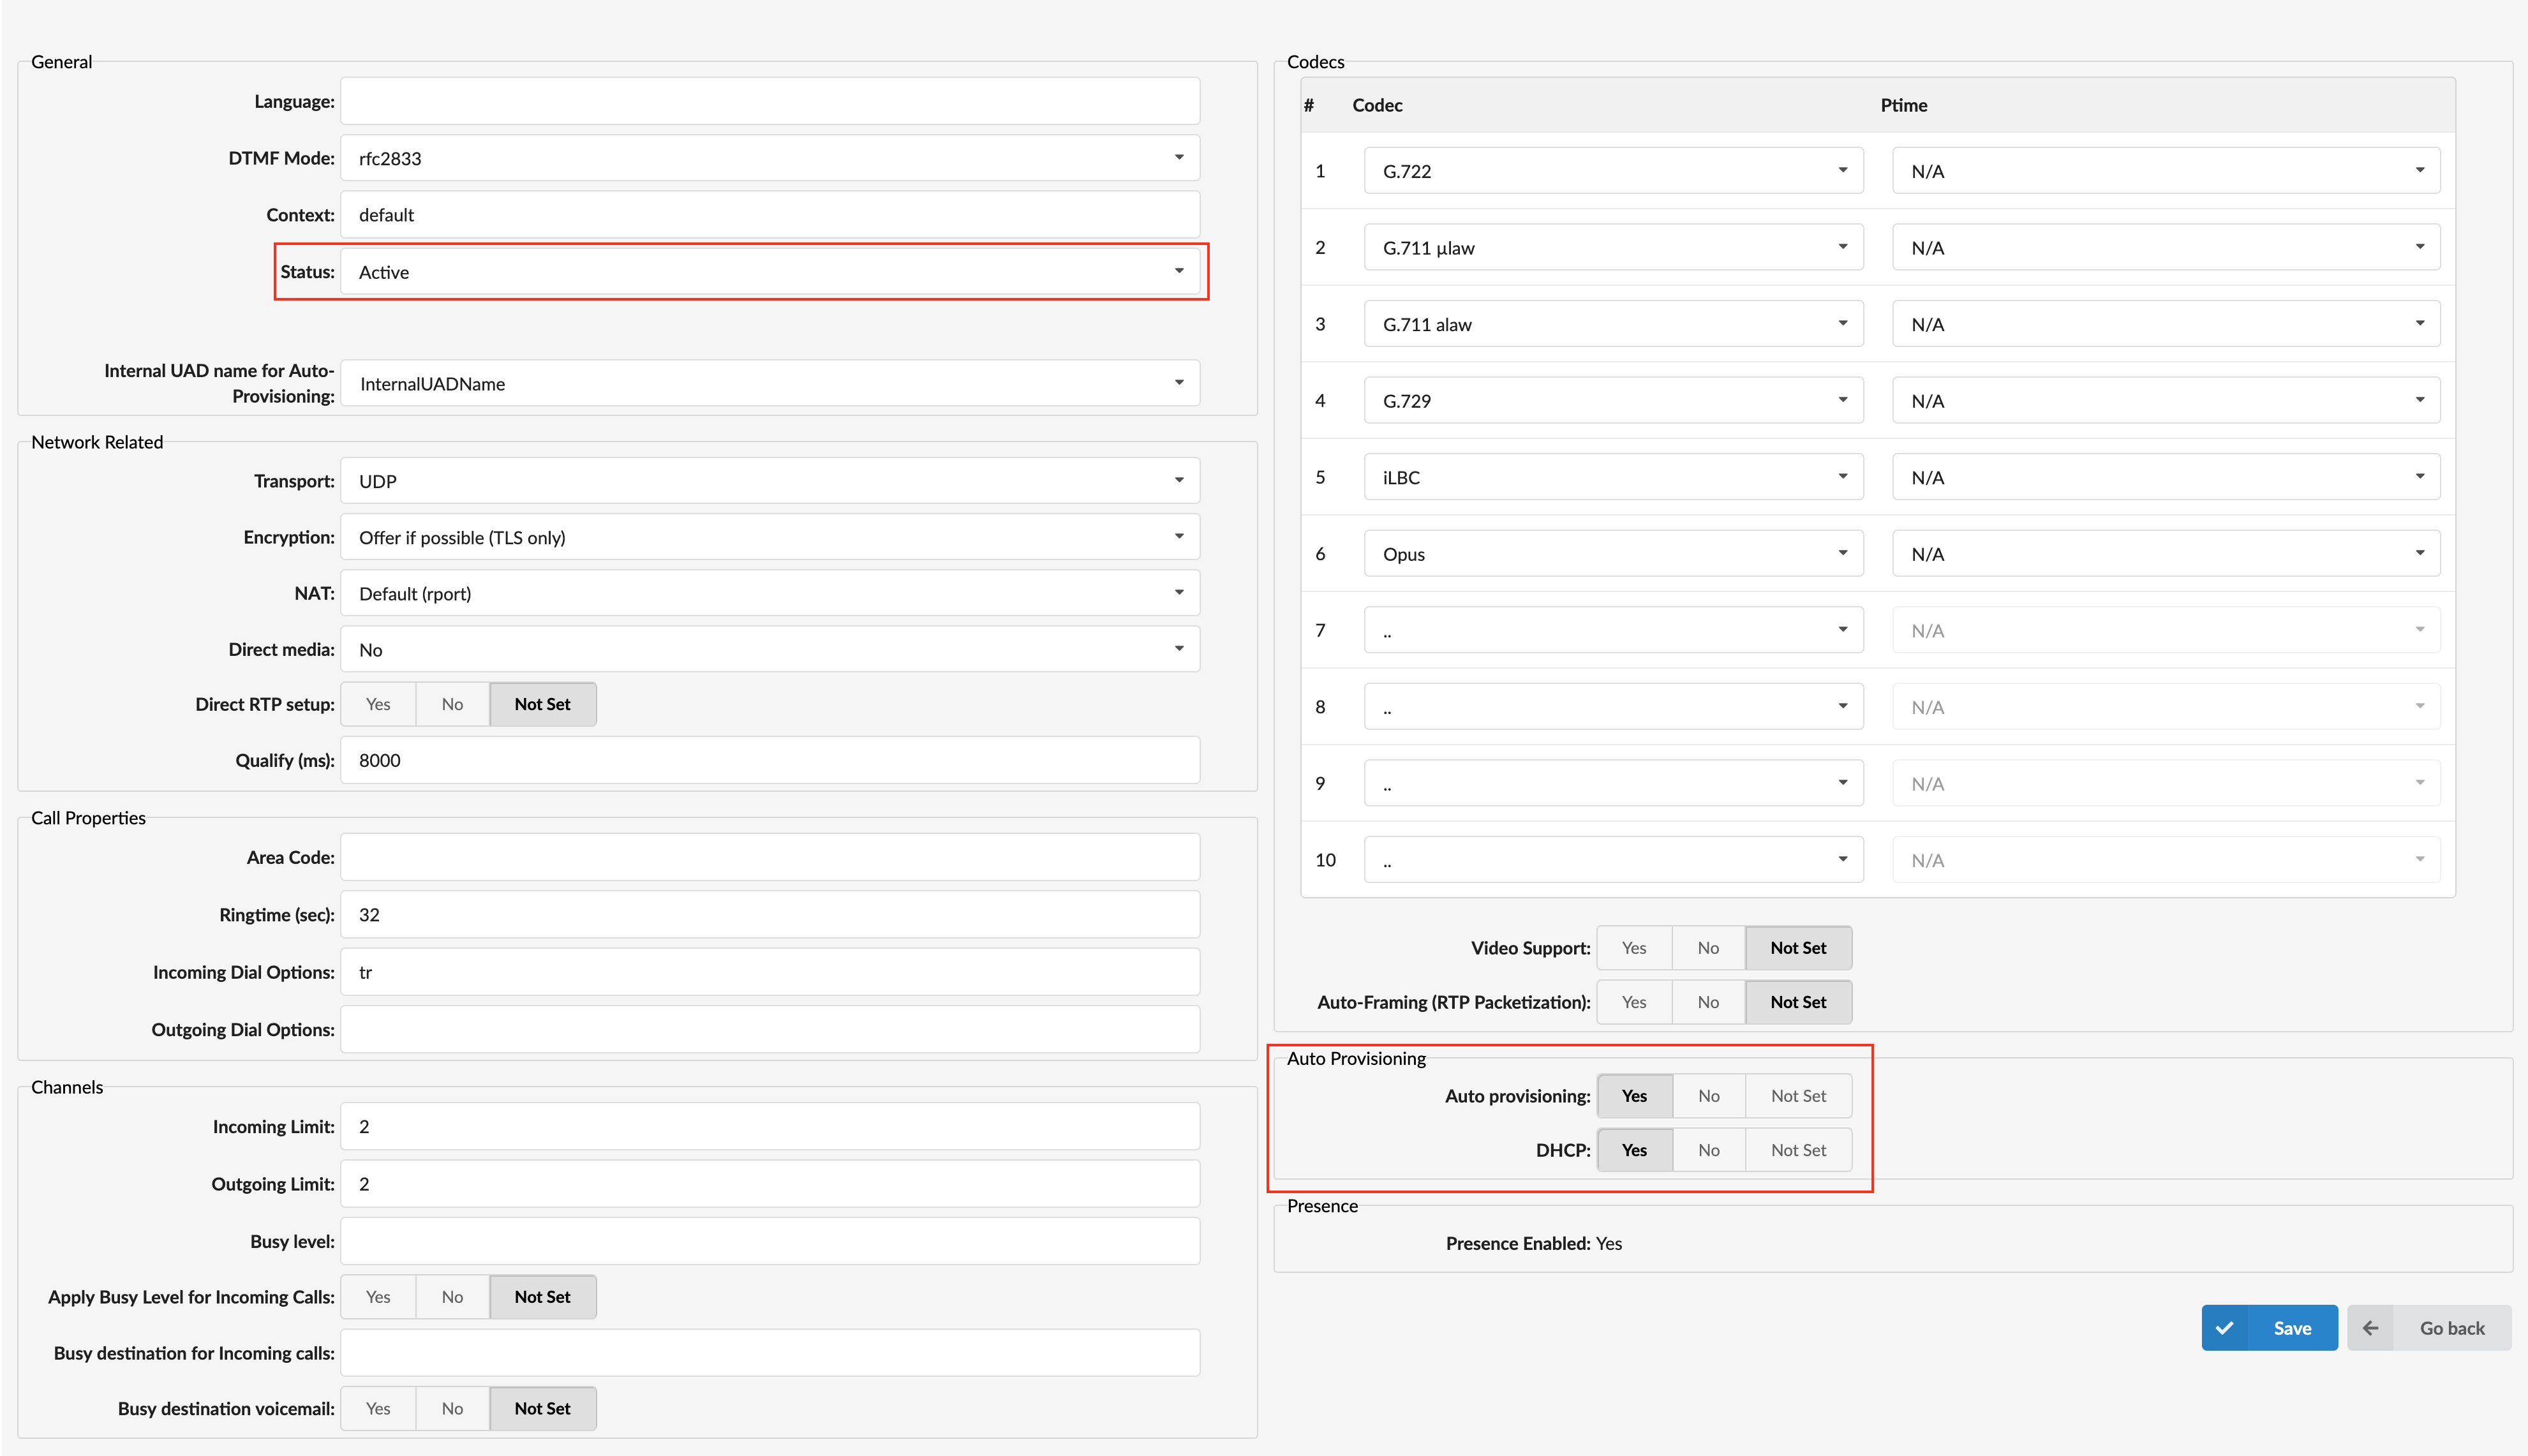
- Make sure Cisco UAD is enabled. To check the UAD status, click the Edit icon corresponding to the Cisco phone.
- Make sure Status is set to Active, Auto provisioning is set to Yes, and DHCP is set to Yes.
- Click the Save button to save changes.
¶ Creating an Extension
Add an Extension
- Navigate to Extensions. Click Add Extension.
- The standard options window will be shown below.
- Select a Cisco phone model from the UAD select box.
- Select Location: Local or Remote.
Local is for all Extensions registered on the LAN and Remote is for all Extensions registered from remote networks, WAN, Internet, etc.
- Click the Next step button.
Extension Values
Enter values into the required field text boxes.
REQUIRED FIELDS:
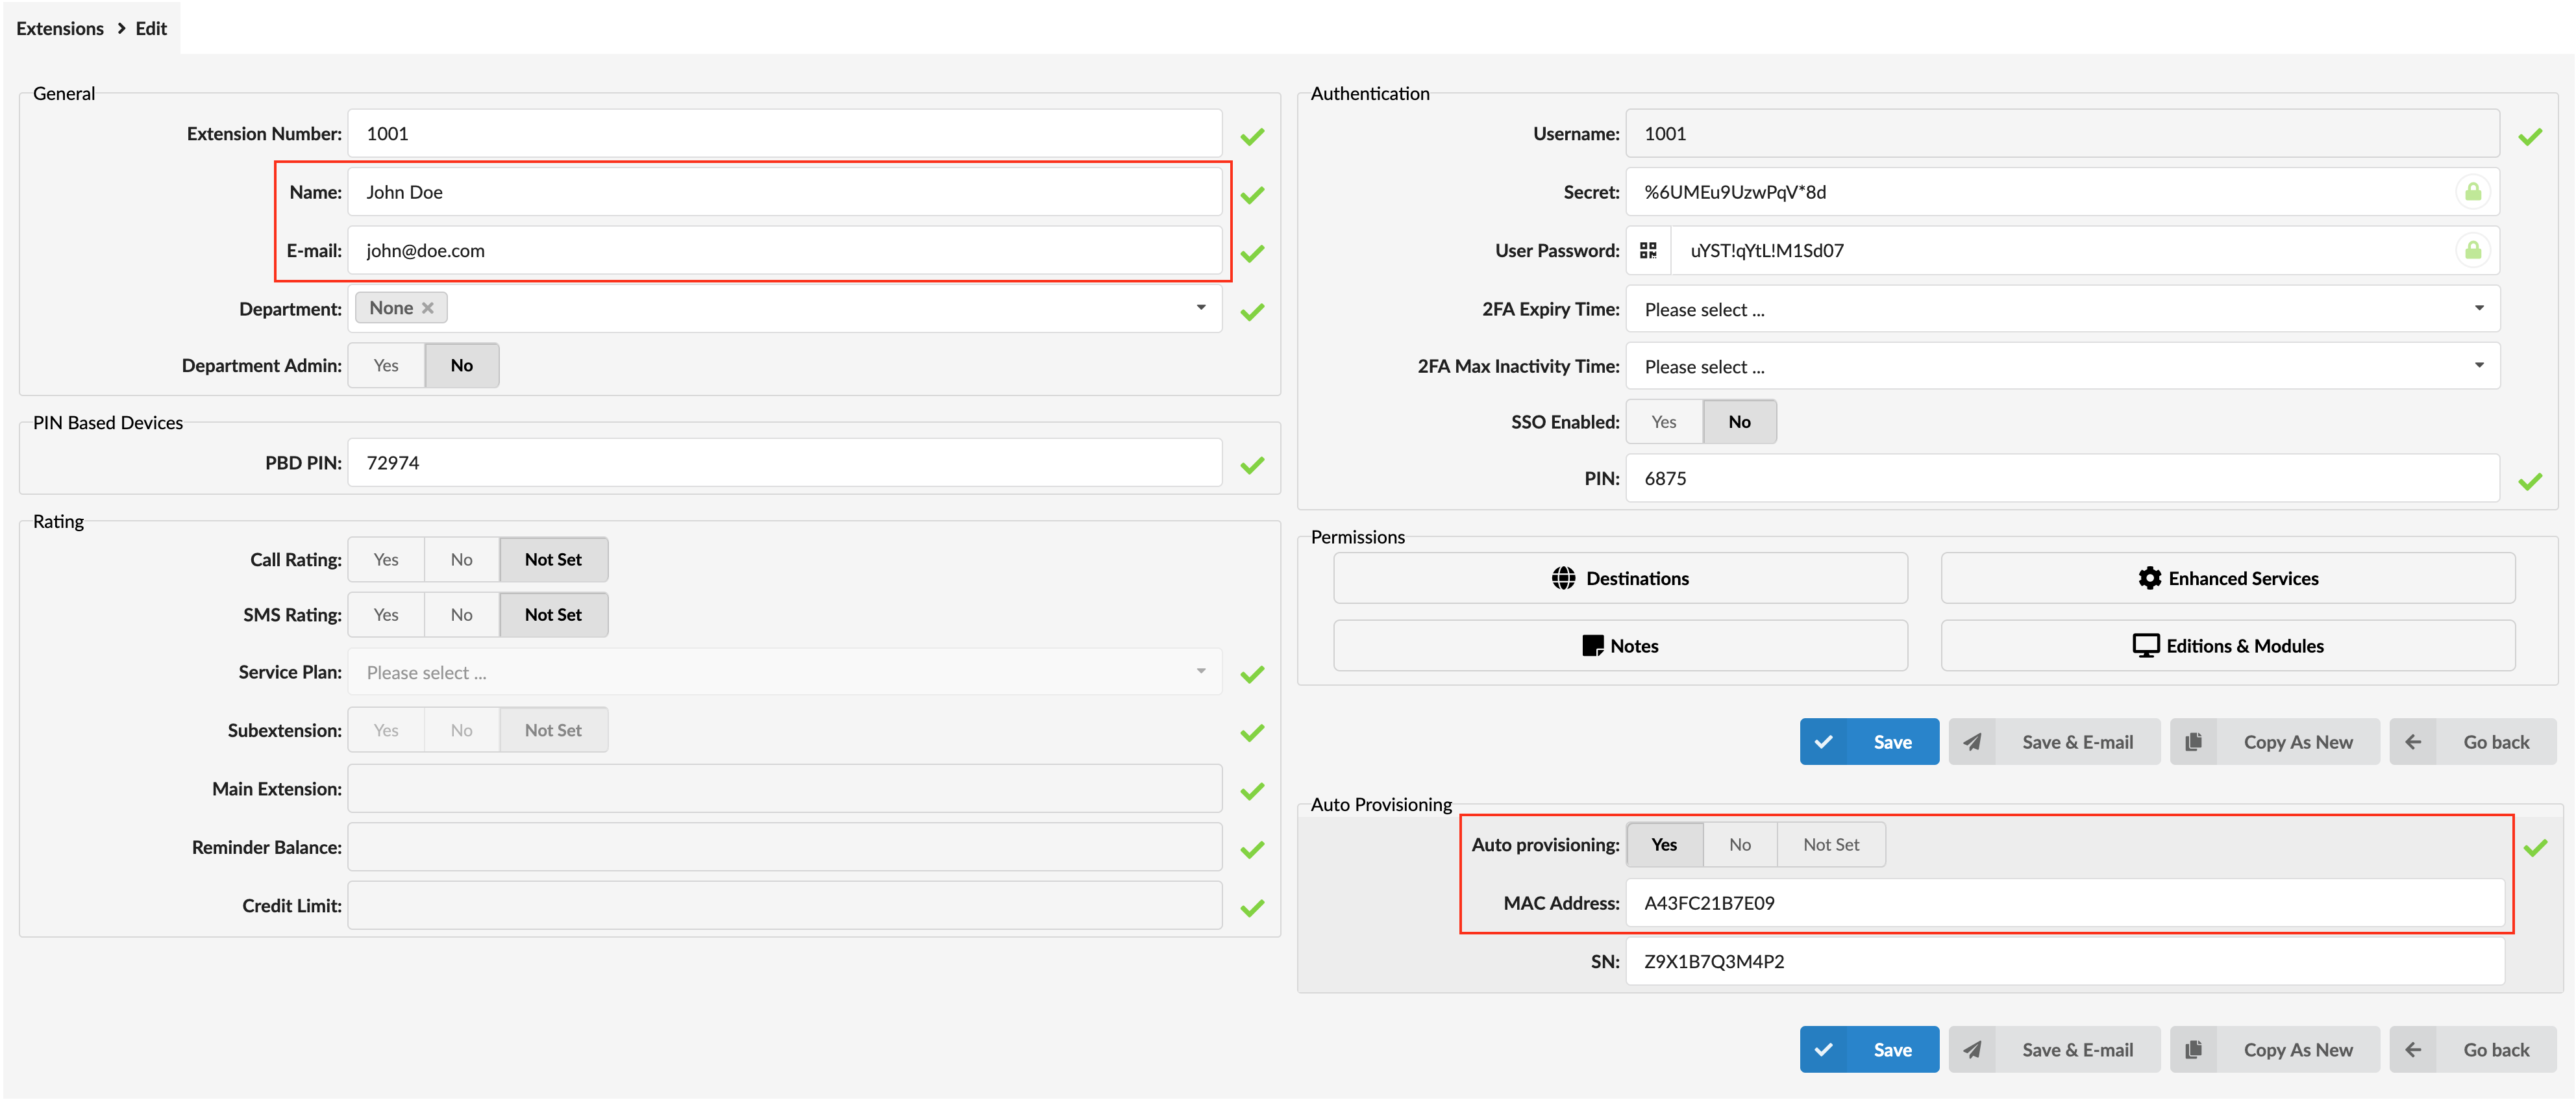
- Name
Enter a name for the Extension being created. Example: John Smith.
Enter the e-mail address associated with this Extension. This e-mail address will receive all system notification messages. Example: john.smith@bicomsystems.com
- Auto Provisioning
Set to Yes.
- MAC Address
Enter the Cisco phone's MAC address. Example: 0002FDFF1536. The MAC address can be found at the back of the phone.
- Click the Save button.
¶ Registering a Phone
This section describes how to register a Cisco phone using DHCP, TFTP, or HTTP & HTTPS.
The following topics are covered:
- DHCP
- TFTP or HTTP & HTTPS
¶ DHCP
Configure DHCP
- Make sure that your DHCP router is configured to use option 66 to automatically instruct devices with the URL for auto provisioning. For more information, please refer to your router documentation or contact your network administrator.
Phone's first boot or user-initiated reboot
- The auto-provisioning process will start during the phone's first boot or after the reboot process has been initiated by the user. The DHCP server will instruct the phone from where to pick up an appropriate configuration file. If everything is done as described above, you should have successfully registered your phone to PBXware.
¶ TFTP or HTTP & HTTPS
Log in to the phone's web administration interface
- Open a new browser window and enter your phone's IP address in order to access the phone's web administration interface login screen. Example: http://192.168.1.22
- Click Admin Login in the top right corner of the administration interface.
- Click Advanced in the top right corner of the administration interface.
- Click Voice at the top of the navigation menu.
- Click Provisioning found in the sub-menu.
- You can use TFTP or HTTP & HTTPS protocols in order to auto-provision your Cisco phone.
¶ TFTP
This section describes how to use TFTP protocol in order to register the Cisco phone.
In the Profile Rule field, enter tftp:// followed by a Hostname or an IP Address, then followed by /$MA.cfg.
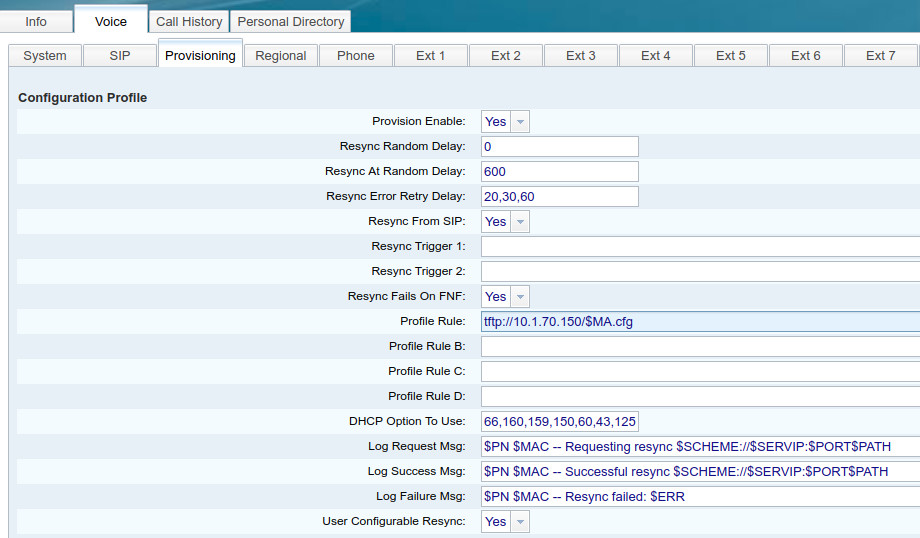
- Example of a Hostname: tftp://voip.bicomsystems.com/$MA.cfg
- Example of an IP Address: tftp://10.1.70.150/$MA.cfg
- Click Submit and wait for 35 seconds. The phone may reboot.
- The auto-provisioning process will start during the phone's reboot process. The phone will pick up an appropriate configuration file from PBXware. If everything is done as described above, you should have successfully registered your phone to PBXware.
¶ HTTP & HTTPS
This section describes how to use HTTP & HTTPS protocol in order to register the Cisco phone.
NOTE: Your PBXware needs to be configured correctly for HTTP to work. Please make sure that HTTP username and HTTP passwords are set in the auto-provisioning section in 'Settings' -> 'Servers/Tenants' -> 'Server/Tenant Name'.
Please contact your PBXware administrator. Bicom Systems can provide a service to set this up for you.
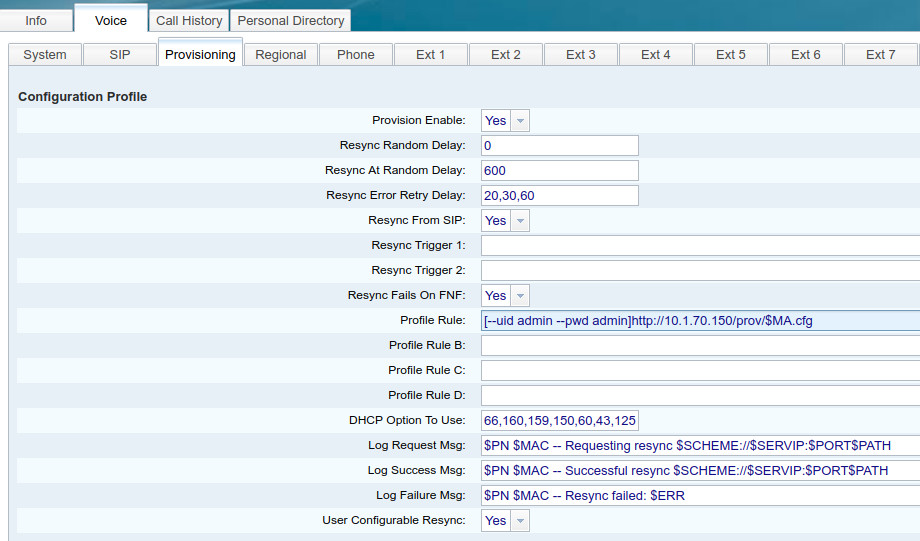
- In the Profile Rule field, enter the following:
- Example of a Hostname using HTTP: [--uid username --pwd password]http://voip.bicomsystems.com/prov/$MA.cfg
- Example of a Hostname using HTTPS: [--uid username --pwd password]https://voip.bicomsystems.com/prov/$MA.cfg
- Example of an IP Address using HTTP: [--uid username --pwd password]http://10.1.70.150/prov/$MA.cfg
- Example of an IP Address using HTTPS: [--uid username --pwd password]https://10.1.70.150/prov/$MA.cfg
- Make sure that you replace Hostname or IP Address from this example with your PBXware's 'Hostname' or 'IP address'.
- Click Submit and wait 35 seconds. The phone may reboot.
- The auto-provisioning process will start during the phone's reboot process. The phone will pick up an appropriate configuration file from PBXware. If everything is done as described above, you should have successfully registered your phone to PBXware.
¶ Configure BLF
This section describes how to configure BLF (Busy Lamp Field) for Cisco 8841.
¶ Extension Settings
Log in to the PBXware's web administration interface
- Open a new browser window and enter the IP address in order to access the PBXware's web administration login page. Example: http://192.168.1.10.
- Log in to PBXware with the e-mail address and password.
Edit an Extension
- On the Extensions page, click the Edit icon corresponding to your Extension.
- Click Advanced Options.
- Navigate down to the Auto Provisioning and Presence group of settings.
- Make sure that Auto Provisioning is set to Yes.
- Make sure that Presence is set to "Yes".
- Click Save.
- Click Enhanced Services.
- Click the Directory/BLF List check box.
- Click the Save button in order to enable this feature.
- Click the Directory/BLF List Edit button.
- Enter the user Extension number.
- Click the BLF check box.
- Click Save.