¶ Introduction
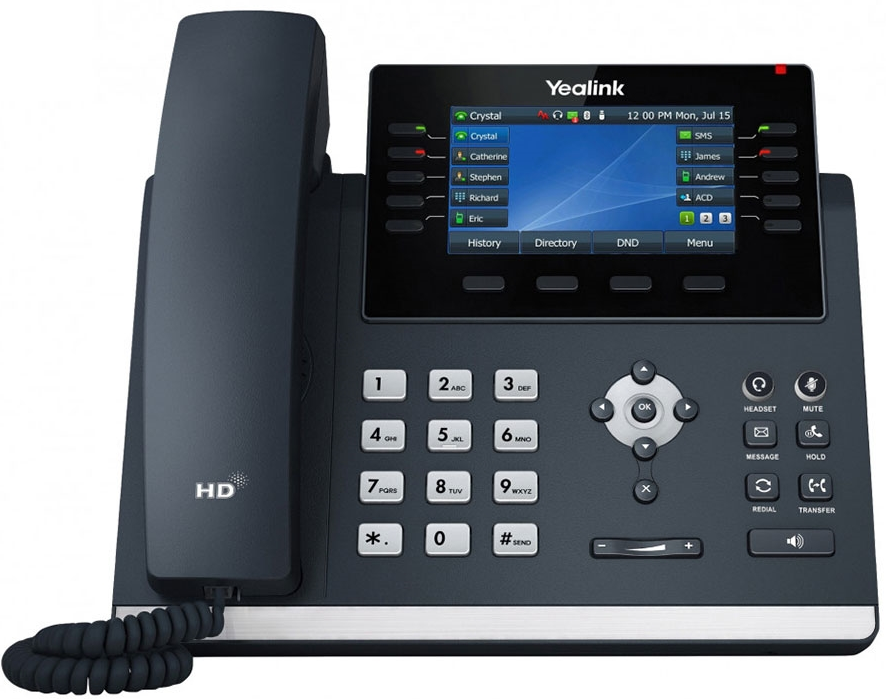
This Configuration Guide is written as a general guide on how to configure the Yealink phone model SIP-T46U to work with PBXware 5.3.6.
¶ Video Tutorial
Please refer to the video tutorial explaining the Auto Provisioning setup for the Yealink Phone on PBXware 5.
¶ Requirements
¶ Identifying Phone Model
To start and successfully complete registration of your Yealink phone you need to know which phone model to set up.
On the back of each Yealink phone, there is model information that you should check. Although various phone models can have exactly the same requirements and installation procedures, phone models can also have significantly different requirements and installation procedures, so that is why it is important to know the model you own which results in you setting up the device successfully.
¶ Phone Firmware
- Make sure that your phone is loaded with an appropriate firmware version, 108.84.0.30.
- To find out the firmware version of your Yealink phone model, open a new browser window and enter your phone IP address in order to access the phone's web administration interface login screen. Example: http://192.168.1.22.
- Log in to the phone's web administration interface with your username and password. Please note that the factory default login details are as follows: username is admin and password is admin.
¶ DHCP Server
Fully configured and operational DHCP server.
¶ PBXware Version
PBXware version 5.3.6
In order to find out the PBXware version:
- Log in to PBXware
- Navigate to Settings: About.
On the top of About page, you may see a code similar to this one PBXware Edition: Business, Release: 5.3.6 (387597b7), Running: 1.8.32.1-gc-b47edc45, PBXware Proxy v5.3.6 (62b7bcd), API: 5.3, libmemcached version: 1.0.14, where Release denotes the current version of your PBXware.
¶ Installation
This section describes how to install and connect the phone to the electrical power and data network as well as how to apply factory settings.
The following topics are covered:
- Power Adapter
- Power over Ethernet (PoE)
- Factory Settings
¶ Power Adapter
Connect the Network and Power
- Connect the DC plug on the power adapter to the DC port on the phone and connect the other end of the power adapter into an electrical power outlet.
- Connect the Ethernet cable between the Internet port on the phone and the network port on a router or switch to access LAN.
NOTE: If you are using Power over Ethernet (PoE), you don't need to connect the AC adapter. Make sure that the Ethernet cable and router or switch is Power over Ethernet (PoE) compliant.
¶ Power over Ethernet (PoE)
Connect the Network (only)
Using a regular Ethernet cable, your phone can be powered from a Power over Ethernet (PoE) compliant router or switch.
- Connect the Ethernet cable between the Internet port on the phone and an available port on the in-line power router or switch.
NOTE: If you are using Power over Ethernet (PoE), you don't need to connect the AC adapter. Make sure that the Ethernet cable and router or switch is Power over Ethernet (PoE) compliant.
¶ Find the phone IP address
Find out your Yealink phone IP Address.
- Press the Menu keysoft.
- Press the Enter keysoft to enter 1. Status.
The IP address will be displayed on the top of the display.
¶ Reset to Factory Settings
This step is not required for brand new out-of-the-box phones, however, if the phone has been already used then it is a must.
- Open a new browser window and enter your phone's IP address in order to access the phone's web administration interface login screen. Example: http://192.168.1.22.
- Log in to the phone's web administration interface with your username and password. Please note that the factory default login details are as follows: username is admin and password is admin.
- Click the Upgrade tab.
- Click the Reset button in order to reset the phone to factory settings. A phone will reset to the factory settings and reboot.
- Wait some time for a device to reboot.
NOTE: Do not unplug or remove power from the phone while it is updating firmware and configuration..
¶ Registering Phone
This section describes how to identify the Yealink phone model, requirements that must be met, and how to register a phone using Manual configuration or Auto provisioning.
The following topics are covered:
- Manual Configuration
- Auto Provisioning
¶ Manual Configuration
This section describes how to set UAD settings, create the PBXware Extension, and register the phone.
The following topics are covered:
- UAD settings
- Creating Extension
- Registering Phone
¶ UAD Settings
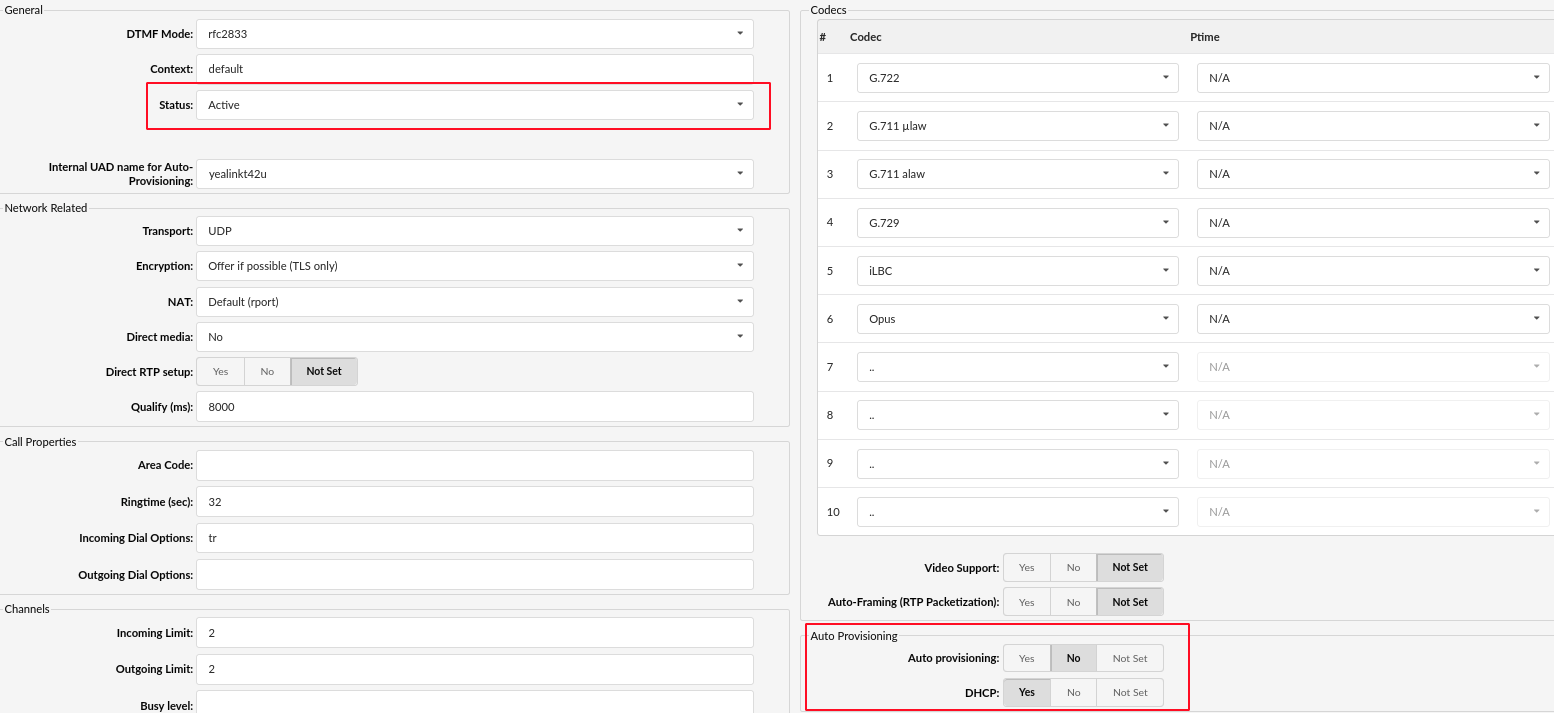
Log in to the PBXware's web administration interface
- Open a new browser window and enter the IP address in order to access the PBXware web administration login screen. Example: http://192.168.1.10.
- Log in to PBXware with your e-mail address and password.
UAD Settings
- Navigate to Settings: UAD.
- Make sure that the Yealink UAD is enabled. To check the UAD status, click the Edit icon corresponding to your Yealink phone.
- Make sure that Status is set to Active, Auto provisioning is set to No, and DHCP is set to Yes.
- Click the Save button to save changes.
¶ Creating Extension
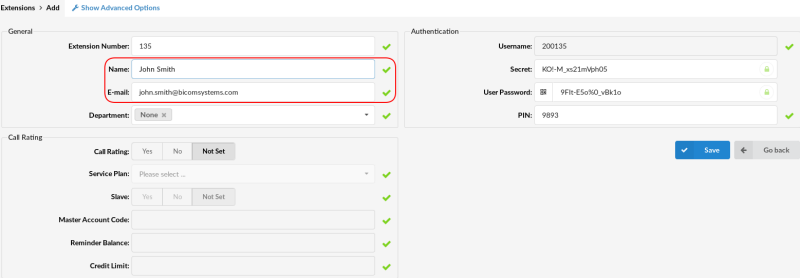
Add the Extension
- Navigate to Extensions. Click the Add Extension button.
- The standard options window will be shown below.
- Select the Yealink phone model from the UAD select box.
- Select Location: Local or Remote.
Local is for all Extensions registered on the LAN and Remote is for all Extensions registered from remote networks, WAN, Internet etc.
- Click the Next step button.
Extension Values
Enter values into the required field text boxes.
REQUIRED FIELDS:
- Name
Enter a name for the Extension being created. Example: John Smith.
Enter the e-mail address associated with this Extension. This e-mail address will receive all system notification messages. Example: john.smith@bicomsystems.com
- Department
Define the Department to which the Extension belongs to. Example: Sales.
- Click the Save button.
¶ Registering Phone
This section describes how to register the Yealink phone using Hostname or IP Address, or DNS SRV.
The following topics are covered:
- Hostname or IP Address
- DNS SRV
¶ Hostname or IP Address
Log in to the phone's web administration interface
- Open a new browser window and enter your phone IP address in order to access the phone's web administration interface login screen. Example: http://192.168.1.22
- Log in to the phone's web administration interface with your username and password. Please note that for factory default login details, the username is admin and the password is admin.
- Click Accounts.
- Enter or set the following details into the respective fields.
REQUIRED FIELDS:
- Account Active
Make sure that the On radio box is selected.
- Register Name
Enter the PBXware Extension number. Example: 1003
- User Name
Usually refers to the same number as the Phone Number.
- Password
The Secret of the Extension as received in the e-mail associated with this Extension. Example: _%Z4M3*Ts9y7. A password is generated automatically for each newly created Extension.
- Sip Server
Enter the Hostname or IP Address of PBXware.
- Example of a Hostname: voip.bicomsystems.com
- Example of an IP Address: 192.168.1.10
- Click the Confirm button.
- You will have to wait some time for the device to reboot. If everything is done as described above, you should have successfully registered your phone to PBXware.
Dial *123 to verify registration.
¶ DNS SRV
This section describes how to use a DNS SRV record which specifies the location of PBXware.
NOTE: Your DNS Server needs to be configured correctly in order for this to work. Bicom Systems can provide service to set up this for you.
Log in to the phone's web administration interface
- Open a new browser window and enter your phone IP address in order to access the phone's web administration interface login screen. Example: http://192.168.1.22
- Log in to the phone's web administration interface with your username and password. Please note that the factory default login details are as follows: username is admin and password is admin.
- Click Account.
- Enter or set the following details into the respective fields.
REQUIRED FIELDS:
- Account Active
Make sure that the On radio box is selected.
- Register Name
Enter the PBXware Extension number. Example: 1003
- User Name
Usually refers to the same number as the Phone Number.
- Password
The Secret of the Extension as received in the e-mail associated with this Extension. Example: _%Z4M3*Ts9y7. A password is generated automatically for each newly created Extension.
- Sip Server
In the Sip Server field, enter the Hostname.
- Example of a Hostname: bicomsystems.com
- Make sure that you replace Hostname from this example with your PBXware Hostname.
- Make sure that DNS server is configured to automatically route registration request to PBXware which is actually under another domain name. Example: newbicomsystems.com.
- Transport
Select DNS SRV from the drop-down menu.
- Click the Confirm button.
- You will have to wait some time for the device to reboot. If everything is done as described above, you should have successfully registered your phone to PBXware.
Dial *123 to verify registration.
¶ Auto Provisioning
This section describes how to set UAD settings, create the PBXware Extension, and register the phone using DHCP or Static IP address.
The following topics are covered:
- UAD Settings
- Creating Extension
- Registering Phone
¶ UAD Settings
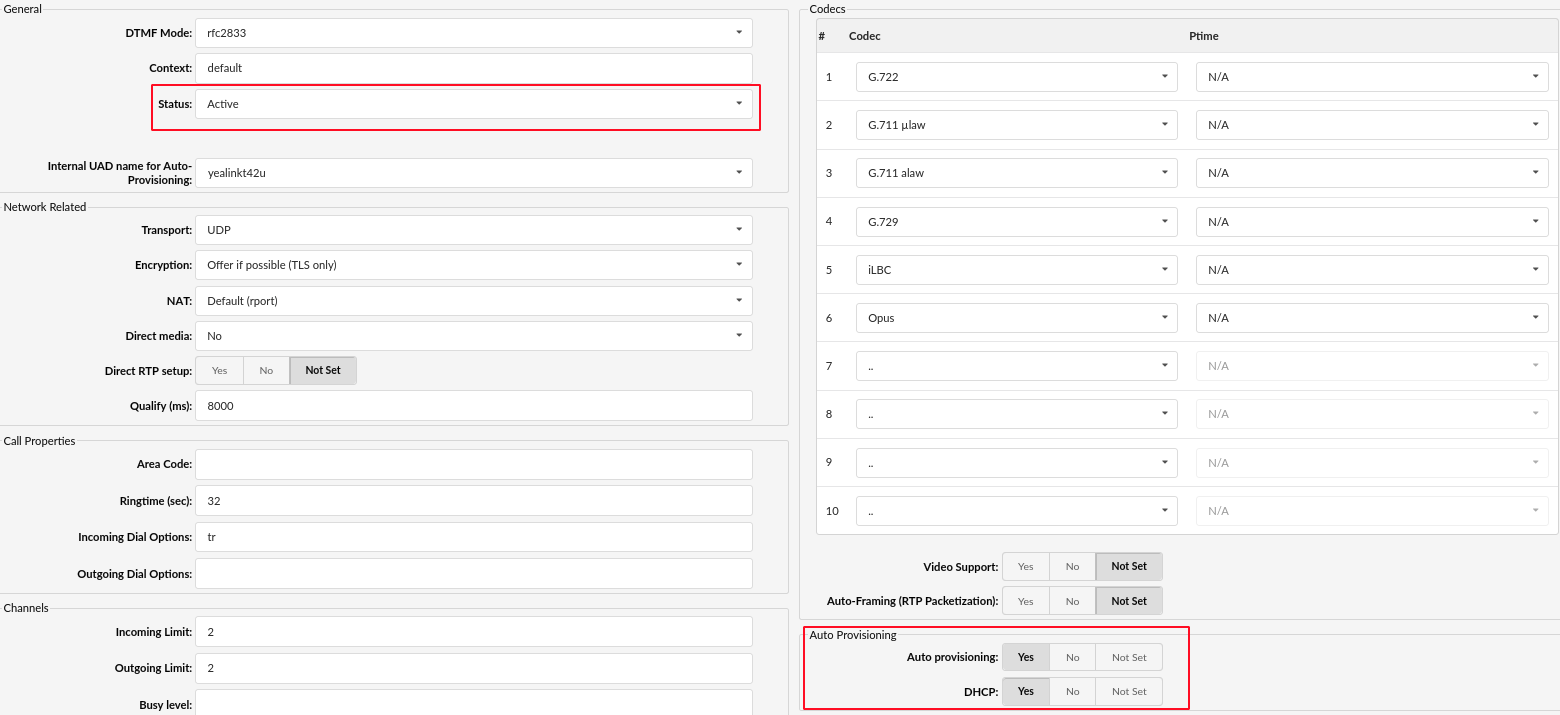
Log in to the PBXware's web administration interface.
- Open a new browser window and enter the IP address in order to access the PBXware web administration login screen. Example: http://192.168.1.10.
- Log in to PBXware with your e-mail address and password.
UAD Settings
- Navigate to Settings: UAD.
- Make sure that the Yealink UAD is enabled. To check the UAD status, click the Edit icon corresponding to your Yealink phone.
- Make sure that Status is set to Active, Auto provisioning is set to Yes, and DHCP is set to Yes.
- Click the Save button to save changes.
¶ Creating Extension
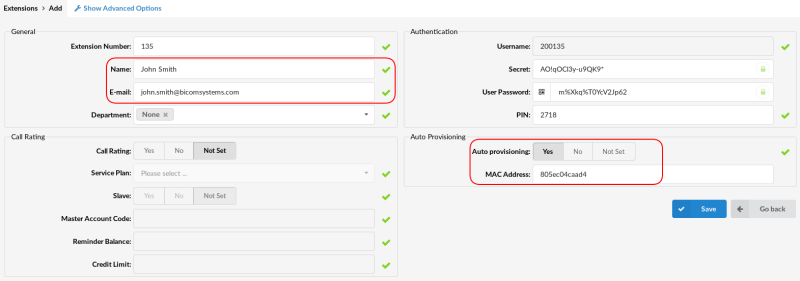
Add the Extension
- Navigate to Extensions. Click the Add Extension button.
- The standard options window will be shown below.
- Select the Yealink phone model from the UAD select box.
- Select Location: Local or Remote.
Local is for all Extensions registered on the LAN and Remote is for all Extensions registered from remote networks, WAN, Internet etc.
- Click the Next step button.
Extension values
Enter values into the required field text boxes.
REQUIRED FIELDS:
- Name
Enter a name for the extension being created. Example: John Smith.
Enter the e-mail address associated with this extension. This e-mail address will receive all system notification messages. Example: john.smith@bicomsystems.com
- Auto Provisioning
Set to Yes.
- MAC Address
Enter Yealink phone MAC address. Example: 001565FF1536. MAC address can be found at the back of the phone.
- Click on the Save button.
¶ Registering Phone
This section describes how to register Yealink phone using DHCP, TFTP, HTTP & HTTPS, or DNS SRV.
The following topics are covered:
- DHCP
- TFTP or HTTP & HTTPS
- DNS SRV
¶ DHCP
Configure DHCP
- Make sure that your DHCP router is configured to use option 66 to automatically instruct phones with the URL for Auto provisioning. For more information, please refer to your router documentation or contact your network administrator.
Phone's first boot or user initiated reboot
- The Auto provisioning process will start during the phone's first boot or after the reboot process has been initiated by the user. The DHCP server will instruct the phone from where to pick up an appropriate configuration file. If everything is done as described above, you should have successfully registered your phone to PBXware.
Dial *123 to verify registration.
¶ TFTP or HTTP & HTTPS
- Open a new browser window and enter your phone IP address, e.g. http://192.168.1.22.
- Enter username and password and press the Confirm button. NOTE: Factory default login details are as follows: username is admin and password is admin.
- Click on the Settings tab.
- Click the Auto Provision link on the left hand navigation menu.
- Choose what server type you intend to use: HTTP, HTTPS, and Trivial FTP. NOTE: Our recommendation is to use HTTP.
If you choose to use HTTP or HTTPS server type, enter http:// or https:// followed by Hostname or IP Address, and then followed by /prov.
Example of a Hostname using HTTP: http://abc.bicomsystems.com/prov
Example of a Hostname using HTTPS: https://abc.bicomsystems.com/prov
Example of an IP Address using HTTP: http://192.168.1.10/prov
Example of an IP Address using HTTPS: https://192.168.1.10/prov
- Enter the Auto Provisioning username and password into the User Name and Password fields.
If you choose to use TFTP server type, enter tftp:// followed by Hostname or IP Address
Example of a Hostname: tftp://voip.bicomsystems.com
Example of an IP Address: tftp://192.168.1.10
- Click the Autoprovision Now button.
- A pop up window will show up.
- Click the OK button to confirm your action.
- You will have to wait for a couple of seconds for the configuration to be updated. NOTE: Do not power off your phone.
- The Auto provisioning process will start during the phone's reboot process, the phone will pick up an appropriate configuration file from PBXware. If everything is done as described above, you should have successfully registered your phone to PBXware.
Dial *123 to verify registration.
¶ Using TLS
NOTE: If you choose to use HTTPS as a protocol for registering your phone, please do the following:
- Open a new browser window and enter your phone IP address, e.g. http://192.168.1.22.
- Enter username and password and press the Confirm button. NOTE: The factory default login details are as follows: username is admin and password is admin.
- Click the Security tab and go to Trusted certificates and disable the Only Accept Trusted Certificates option.
¶ DNS SRV

This section describes how to use a DNS SRV record which specifies the location of PBXware. NOTE: Your DNS Server needs to be configured correctly for this to work. Bicom Systems can provide service to set up this for you.
Check if the DNS SRV is enabled in your PBXware
- Contact your PBXware administrator to find out if the DNS SRV is enabled in your PBXware, or if you have access to PBXware. You can also check this on your own.
- Open a new browser window and enter the IP address in order to access the PBXware's web administration login screen. Example: http://192.168.1.10.
- Log in to PBXware with your e-mail address and password.
- Navigate to Settings ---> Servers. Click the server corresponding with the Edit button. NOTE: On MT, navigate to Settings ---> Tenants ---> Master Tenant.
- In Auto Provisioning group, make sure that Use DNS SRV when possible: is set to Yes. If it is set to No or N/A, set to Yes and click the Save button. NOTE: You must re-save all your Extensions configured for Auto Provisioning.
Log in to the phone's web administration interface
If there is no DHCP in your network, you can still auto provision your Yealink phone. Please refer to your Yealink phone model User Guide for instructions about setting the static IP address. After you configure your Yealink phone to use a static IP address, continue with the following steps.
- Open a new browser window and enter your phone IP address in order to access the phone's web administration interface login screen. Example: http://192.168.1.22
- Log in to the phone's web administration interface with your username and password. Please note that the factory default login details are as follows: username is admin and password is admin.
- Click the Upgrade tab.
- Click the Advanced tab.
- URL
In the URL field, enter the Hostname.
- Example for of a Hostname: bicomsystems.com
- Make sure that you replace the Hostname from this example with your PBXware Hostname.
- Make sure that DNS server is configured to automatically route registration request to PBXware which is actually under another domain name. Example: newbicomsystems.com.
- Check New Config
Select Power on + Repeatedly.
- Click the Confirm button.
You will have to wait some time for the device to save changes.
- Click the Auto Provision button to run the Auto provisioning process, after which you will be asked to confirm the action. To continue, click the OK button.
- The Auto provisioning process will start during the phone's reboot process, The phone will pick up an appropriate configuration file from PBXware. If everything is done as described above, you should have successfully registered your phone to PBXware.
Dial *123 to verify registration.
¶ Configure BLF
This section describes how to configure BLF (Busy Lamp Field) for Yealink T46U.
The following topics are covered:
- Extension Settings
- Phone Settings
¶ Extension Settings
Log in to the PBXware's web administration interface
- Open a new browser window and enter the IP address in order to access the PBXware's web administration login page. Example: http://192.168.1.10.
- Log in to PBXware with your e-mail address and password.
Edit Extension.
- On the Extensions page, click the Edit icon corresponding to your Extension.
- Click the Advanced Options button.
- Navigate down to the Auto Provisioning and Presence group of settings.
- Make sure that Auto Provisioning is set to Yes.
- Make sure that Presence is set to "Yes".
- Click the Save button in order to save changes.
- Click the Enhanced services.
- Click the Directory / BLF List check box and click the Save button in order to enable this feature.
- Click the Directory / BLF List Edit button.
- Please select the type of DSS key you want to use.
NOTE: For more information about DSS keys please visit HOWTO DSS KEY page. - Enter Value and Label for DSS key.
- Click on Save button.
¶ Phone Settings
Log in to the phone's web administration interface
- Open a new browser window and enter your phone IP address in order to access the phone's web administration interface login screen. Example: http://192.168.1.22.
- Log in to the phone's web administration interface with your username and password. Please note that the factory default login details are as follows: username is admin and password is admin.
- Click Phone.
- Click DSS Keys.
- Configure 1 to 10 DSS Keys from the list.
Type: Select BLF.
Value: Enter the user's Extension. Example: 1005
- Click the Confirm button to save changes.
¶ Additional Configuration Template
If you want to include some additional UAD configuration for Yealink T46U, just add fields to User Agent General Auto Provisioning Template in the Settings -> UAD -> Yealink T46U menu, or add them directly to the Extension in the UAD Auto Provisioning Template section.