¶ Agent Panel (available in gloCOM Agent/Supervisor edition)
¶ gloCOM Agent Edition
The Agent edition offers a wide range of features that allow agents to provide exceptional customer service and manage their workload efficiently. However, in order to access these features, users must have the Contact Center edition enabled within their license.
By enabling the Contact Center edition, users will gain access to powerful tools such as conversation history, queue management, and real-time metrics that help agents make data-driven decisions. With these tools at their disposal, agents can streamline their workflows and provide better service to their customers, leading to increased customer satisfaction and loyalty.
Do not hesitate to contact Support for more information on enabling and purchasing the Contact Center edition.
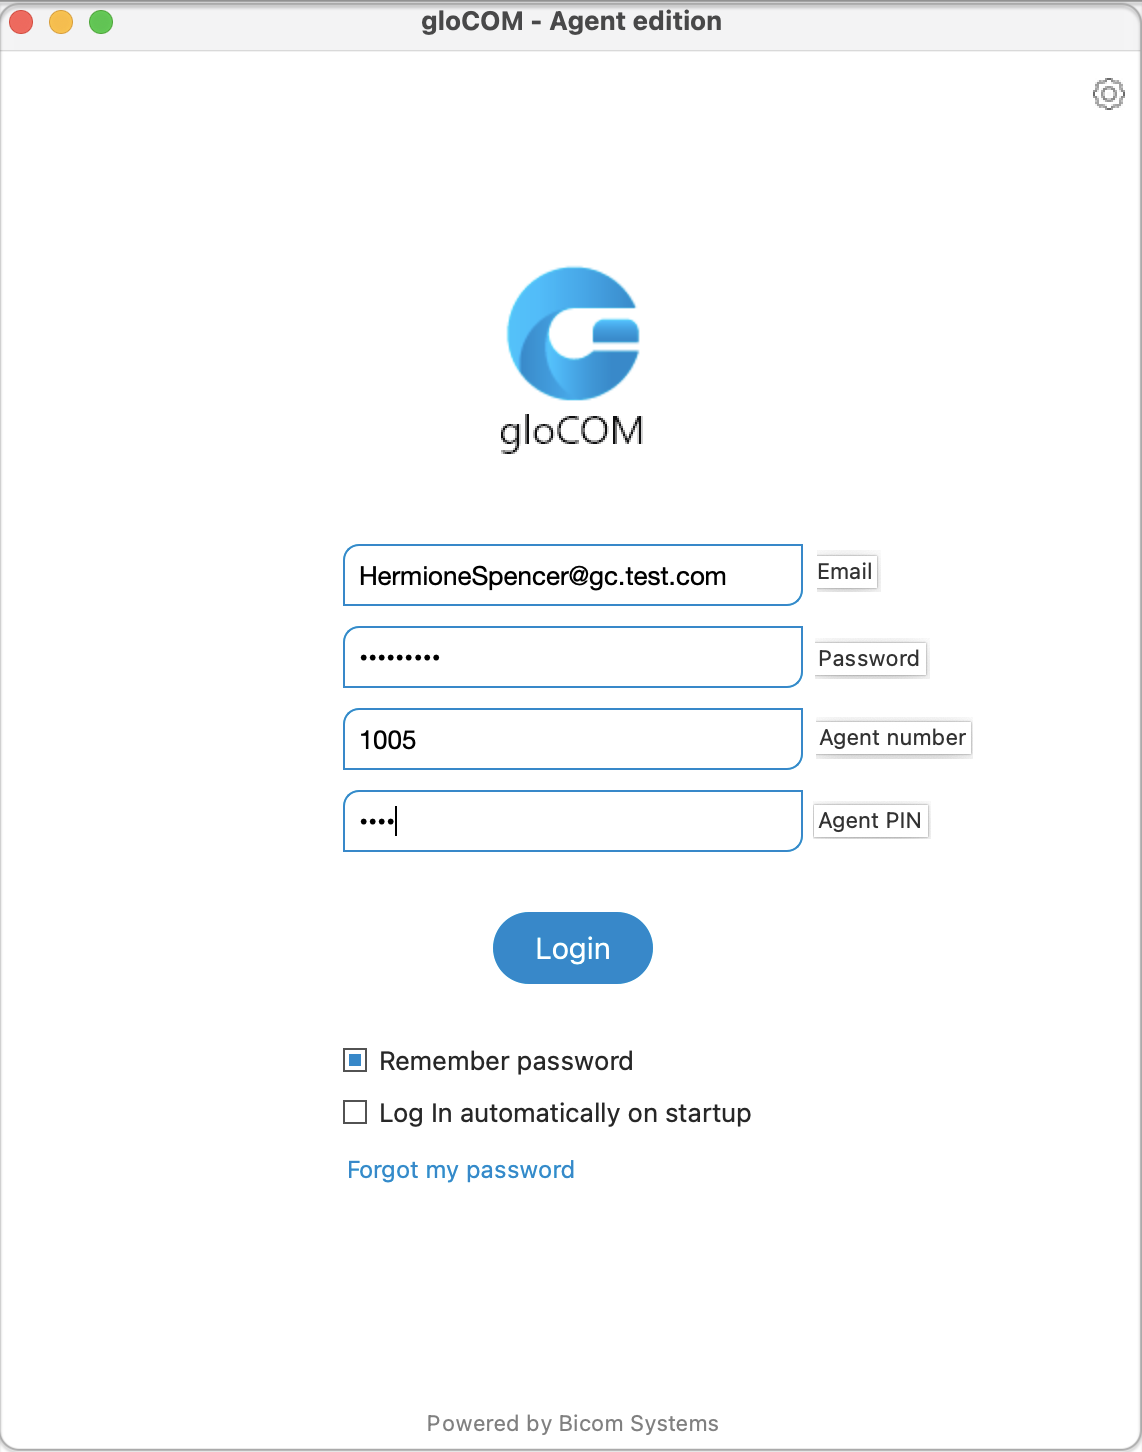
To use this application, users need to provide their login information, such as their Agent number, PIN, Email, and Password. Once agents log in, they can access a variety of features to manage their workload and handle customer interactions. They can use the app to manage conversations on multiple channels, track performance metrics, and access important information in real-time.
The user-friendly interface and useful functions of the gloCOM Agent Edition help agents work better and provide exceptional customer service. Overall, it's an important tool for any Contact Center looking to enhance their performance and keep their customers happy.
Please note that the Agent panel is fully accessible in the Supervisor edition, including all related features.
¶ Agent Login Window
After entering the login credentials and clicking on the "Login" button, the Agent login window will appear, providing the following information:
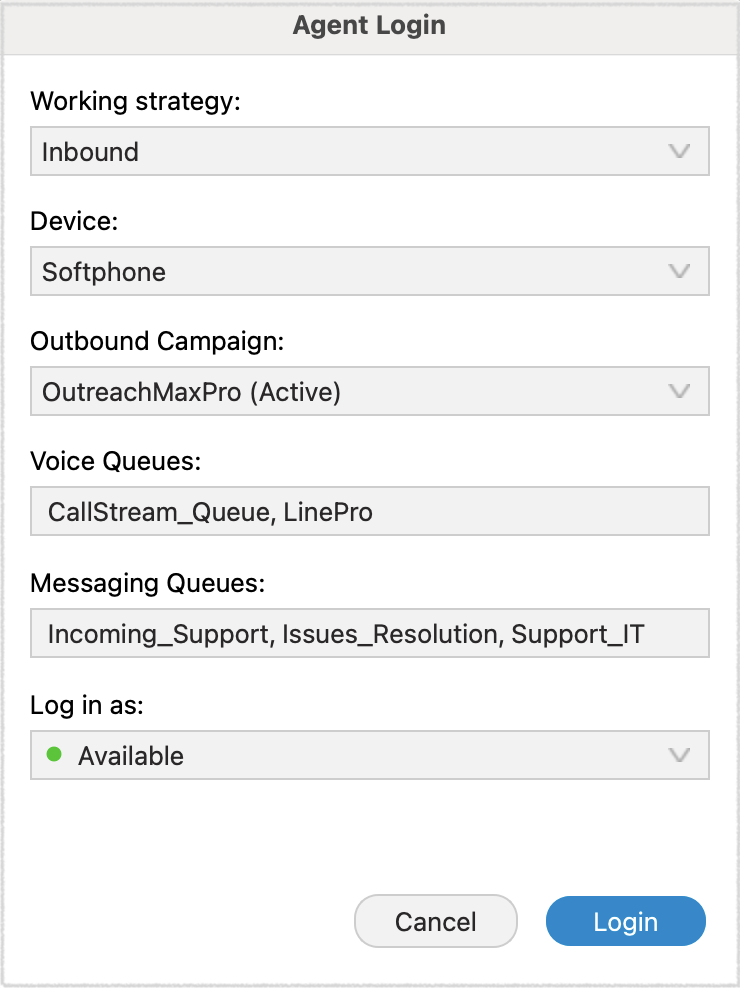
¶ Working Strategy
Agents have the flexibility to choose between three different agent strategies: outbound, inbound, and blended mode. Each strategy serves a specific purpose and can be tailored to your business needs.
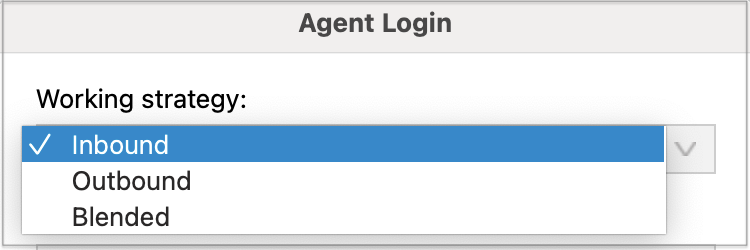
Inbound Mode
Inbound mode enables agents to handle customer interactions by working exclusively within queues. This strategy is ideal when your focus is on addressing incoming calls or other forms of customer communication. Agents in inbound mode are dedicated to addressing customer queries, resolving issues, and providing support.
Outbound Mode
Outbound mode is designed for proactive customer outreach. Agents working in this mode focus solely on outbound campaigns, making calls to customers to initiate contact, provide information, conduct surveys, or offer promotions. Outbound mode allows your team to engage with customers in a targeted manner, ensuring your message reaches the intended audience.
Blended Mode
Blended mode is a dynamic strategy that automatically adjusts agent assignments based on real-time call center conditions. In this mode, the system intelligently moves agents between inbound and outbound strategies to optimize their productivity. If the inbound queues are not busy, agents are switched to outbound mode to maximize their utilization. Conversely, when there are customers waiting in the queue, agents are moved from outbound to inbound strategy to ensure prompt customer service. Blended mode strikes a balance between inbound and outbound activities, enhancing overall efficiency.
¶ Device
When it comes to choosing a device for dialing and receiving calls, agents have two options available:
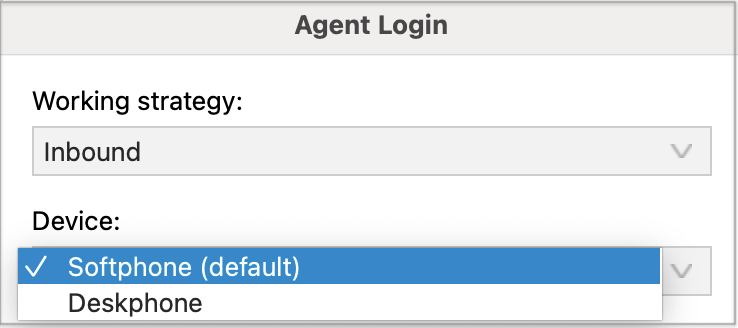
Deskphone
Deskphones are traditional devices designed specifically for voice communication. They typically offer a handset, a dial pad, and programmable buttons for various functions.
Softphone Softphones are software applications that enable you to make and receive calls using a computer or mobile device. They use Voice over Internet Protocol (VoIP) technology to transmit voice signals over the internet.
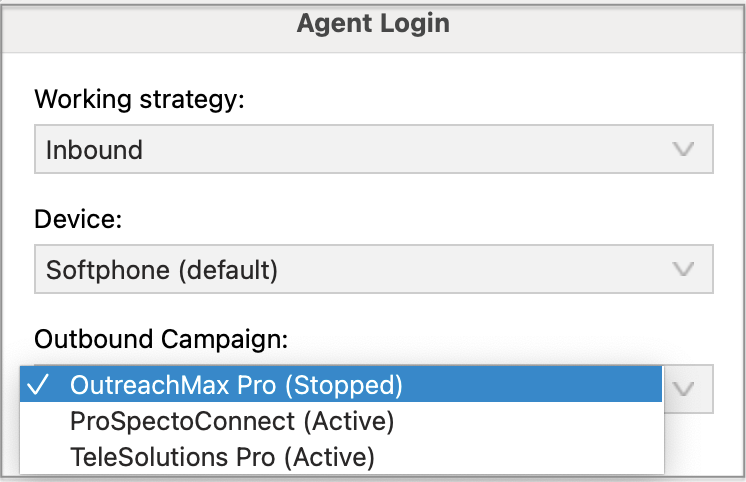
¶ Outbound Campaign
During an agent's login session, they are assigned to a specific campaign in which they will operate. While an agent can be associated with multiple campaigns, they can only work within a single campaign during a login session.
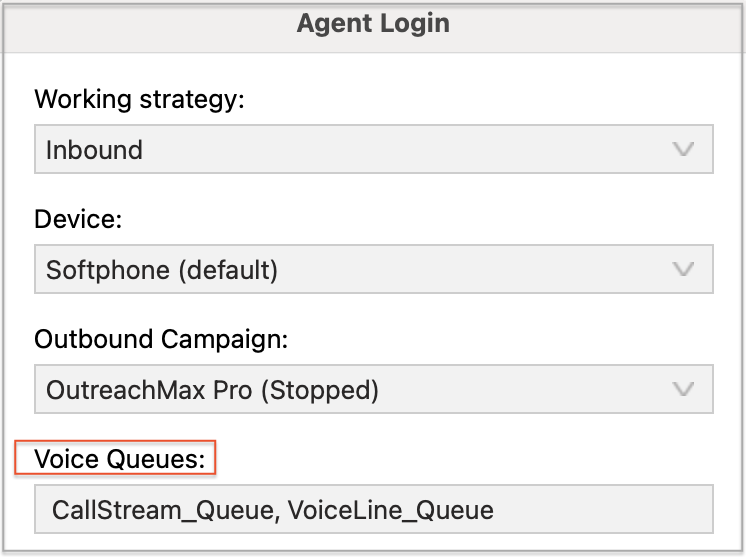
¶ Voice Queues
In this specific section, agents have the capability to view the voice queues to which they are presently assigned.
¶ Messaging Queues
Within this section, agents have visibility into the messaging queues they are presently allocated.

¶ Log In As
During an agent's login session, they have the flexibility to choose their login state as either Available or Paused. These states define the agent's availability to receive and handle incoming calls. Here's a brief explanation of each state:
- Available State
When an agent sets their login state to "Available," it means they are ready and willing to receive incoming calls. In this state, the agent is actively logged in and prepared to engage with customers or handle assigned tasks. - Paused State:
The "Paused" state allows agents to temporarily suspend call activities while remaining logged in. When an agent selects the "Paused" state, it indicates that they need a temporary break or interruption from taking calls.
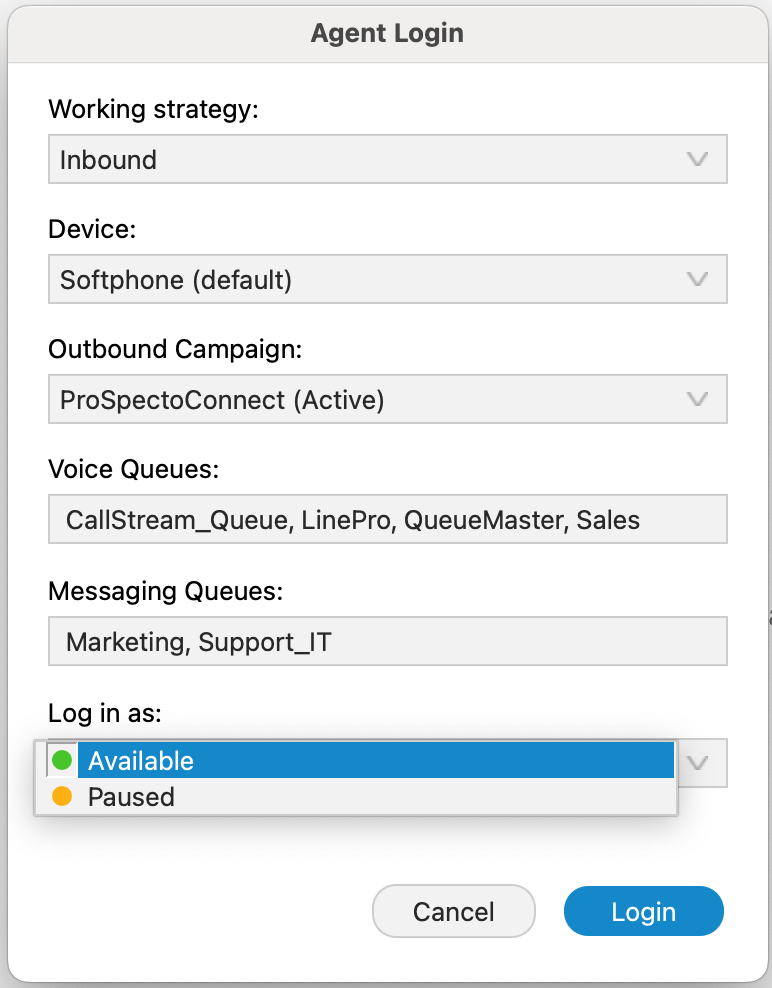
When the desired options have been selected, the agent should click on the Login button in order to log in.
If an agent is not part of any voice or messaging queues and has no assigned campaigns, they cannot log into the app.
¶ Agent Panel
The Agent Panel is a valuable tool built to enhance customer service agents' efficiency by combining all essential features into a single, user-friendly window. It enables agents to handle multiple calls, feedback forms, CRM popups, and callbacks, collaborate with other agents, and manage queues effortlessly. This documentation provides a comprehensive overview of the Agent Panel's features and demonstrates how it simplifies multitasking for agents.
The Agent Panel offers a convenient solution by directly integrating the phone dialer, phone-related settings, and Omni-channel capabilities within its window. This design eliminates the need for agents to switch between multiple windows while placing calls or handling various communication channels. By having all the necessary tools in one centralized location, agents can experience a more streamlined and efficient workflow.
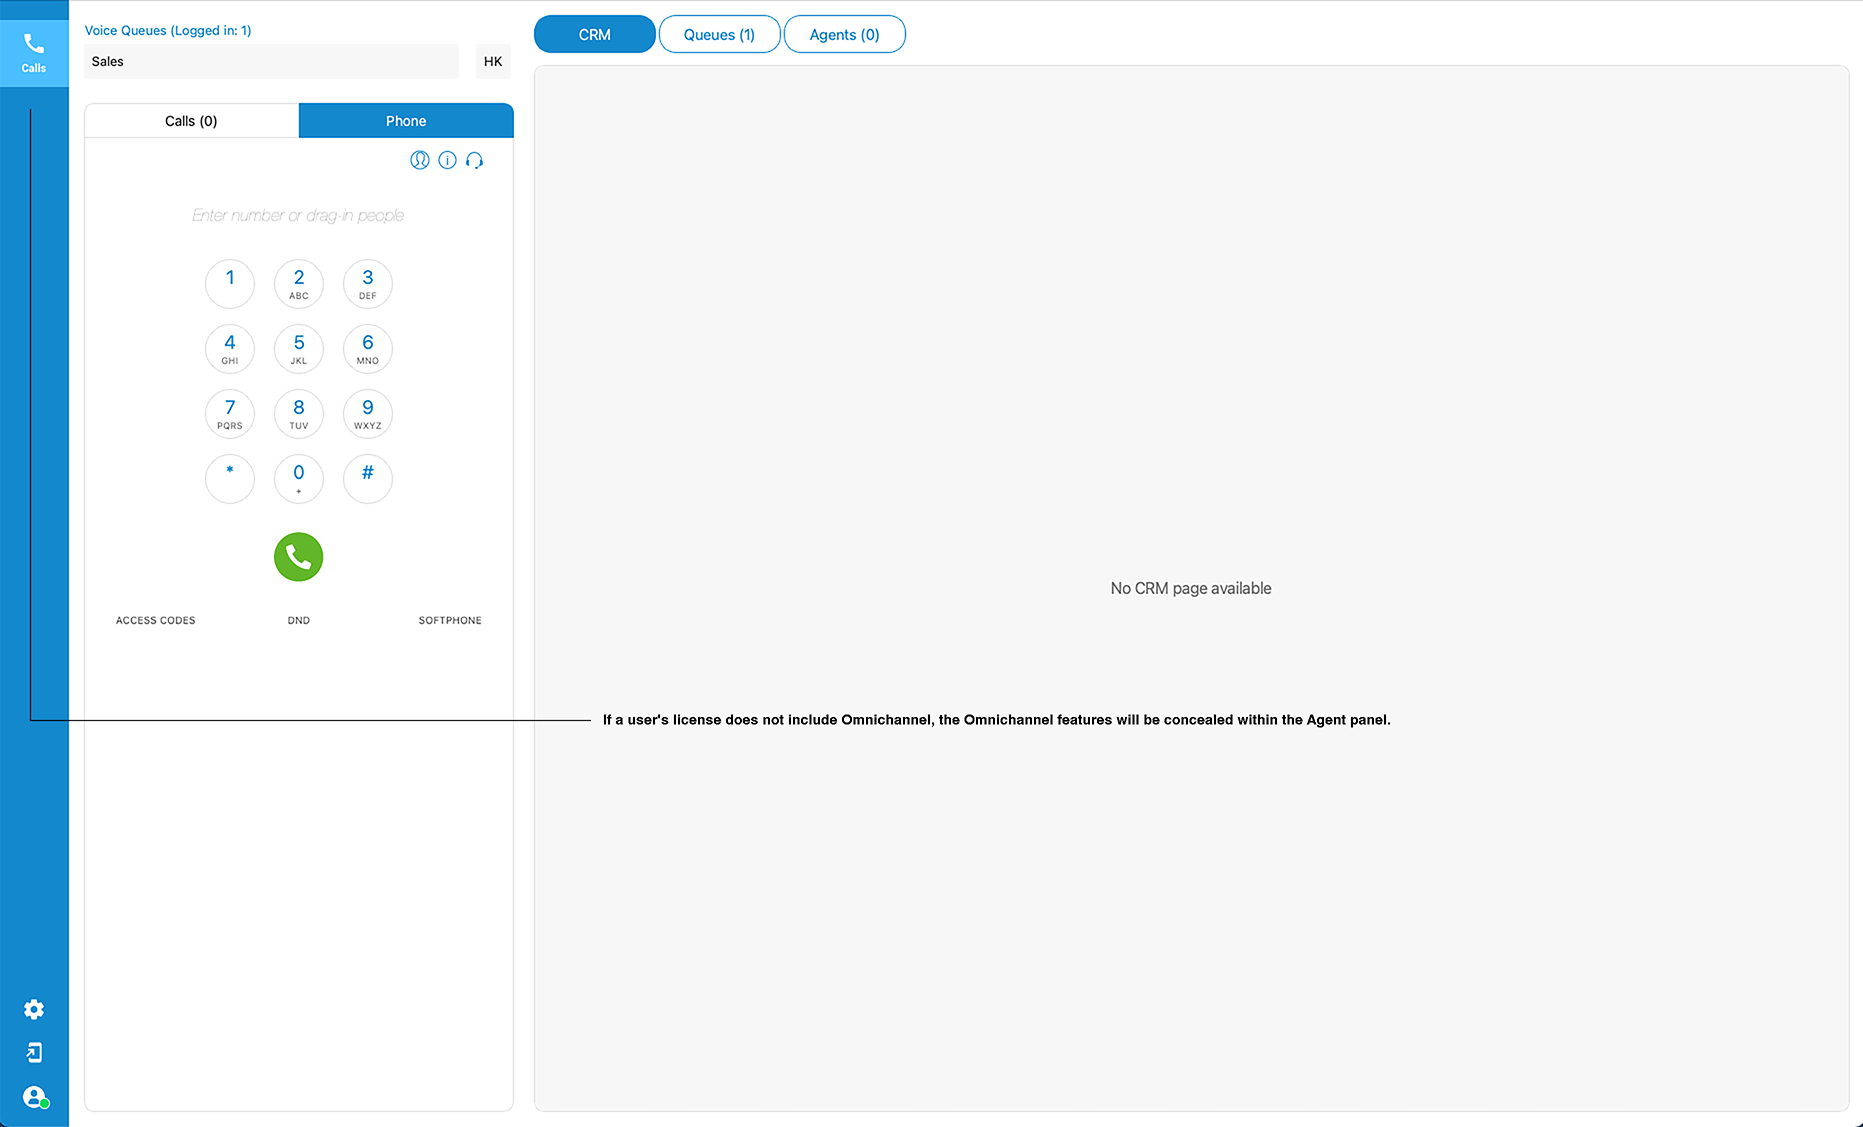
¶ Agent panel - Navbar
The navigation bar of the Agent panel is divided into three main sections, each serving a different purpose.
![]() The first section of the navigation bar is dedicated to the Contact Center aspect related to Voice calls. It provides functionality and tools specifically designed for voice call management.
The first section of the navigation bar is dedicated to the Contact Center aspect related to Voice calls. It provides functionality and tools specifically designed for voice call management.
The second section of the navigation bar focuses on the messaging part of the Contact Center, known as OmniChannel. The elements within this section enable Agents to handle chats, emails, and other forms of messaging interactions. The following components are included:
![]() This feature allows Agents to engage in real-time conversations with customers through chat channels.
This feature allows Agents to engage in real-time conversations with customers through chat channels.
![]() It provides a reliable interface to handle email inquiries, compose responses, and manage email-based customer interactions.
It provides a reliable interface to handle email inquiries, compose responses, and manage email-based customer interactions.
![]() The dashboard component offers Agents an overview of their ongoing messaging activities. It provides key metrics, performance indicators, and real-time data related to chat and email interactions.
The dashboard component offers Agents an overview of their ongoing messaging activities. It provides key metrics, performance indicators, and real-time data related to chat and email interactions.
![]() This feature enables Agents to view and manage ongoing conversations, as well as closed conversations across multiple messaging channels.
This feature enables Agents to view and manage ongoing conversations, as well as closed conversations across multiple messaging channels.
![]() This feature serves as a central hub for managing contact information. Agents can add, edit, merge, and delete contacts, as well as access a customer's conversation history across multiple channels for improved customer service.
This feature serves as a central hub for managing contact information. Agents can add, edit, merge, and delete contacts, as well as access a customer's conversation history across multiple channels for improved customer service.
![]() The third section of the navigation bar empowers Agents to customize settings related to voice calls, application preferences, voice alerts, and personal profile configurations.
The third section of the navigation bar empowers Agents to customize settings related to voice calls, application preferences, voice alerts, and personal profile configurations.
Full utilization of Omnichannel and its features requires additional activation through a valid license.
¶ Voice Calls
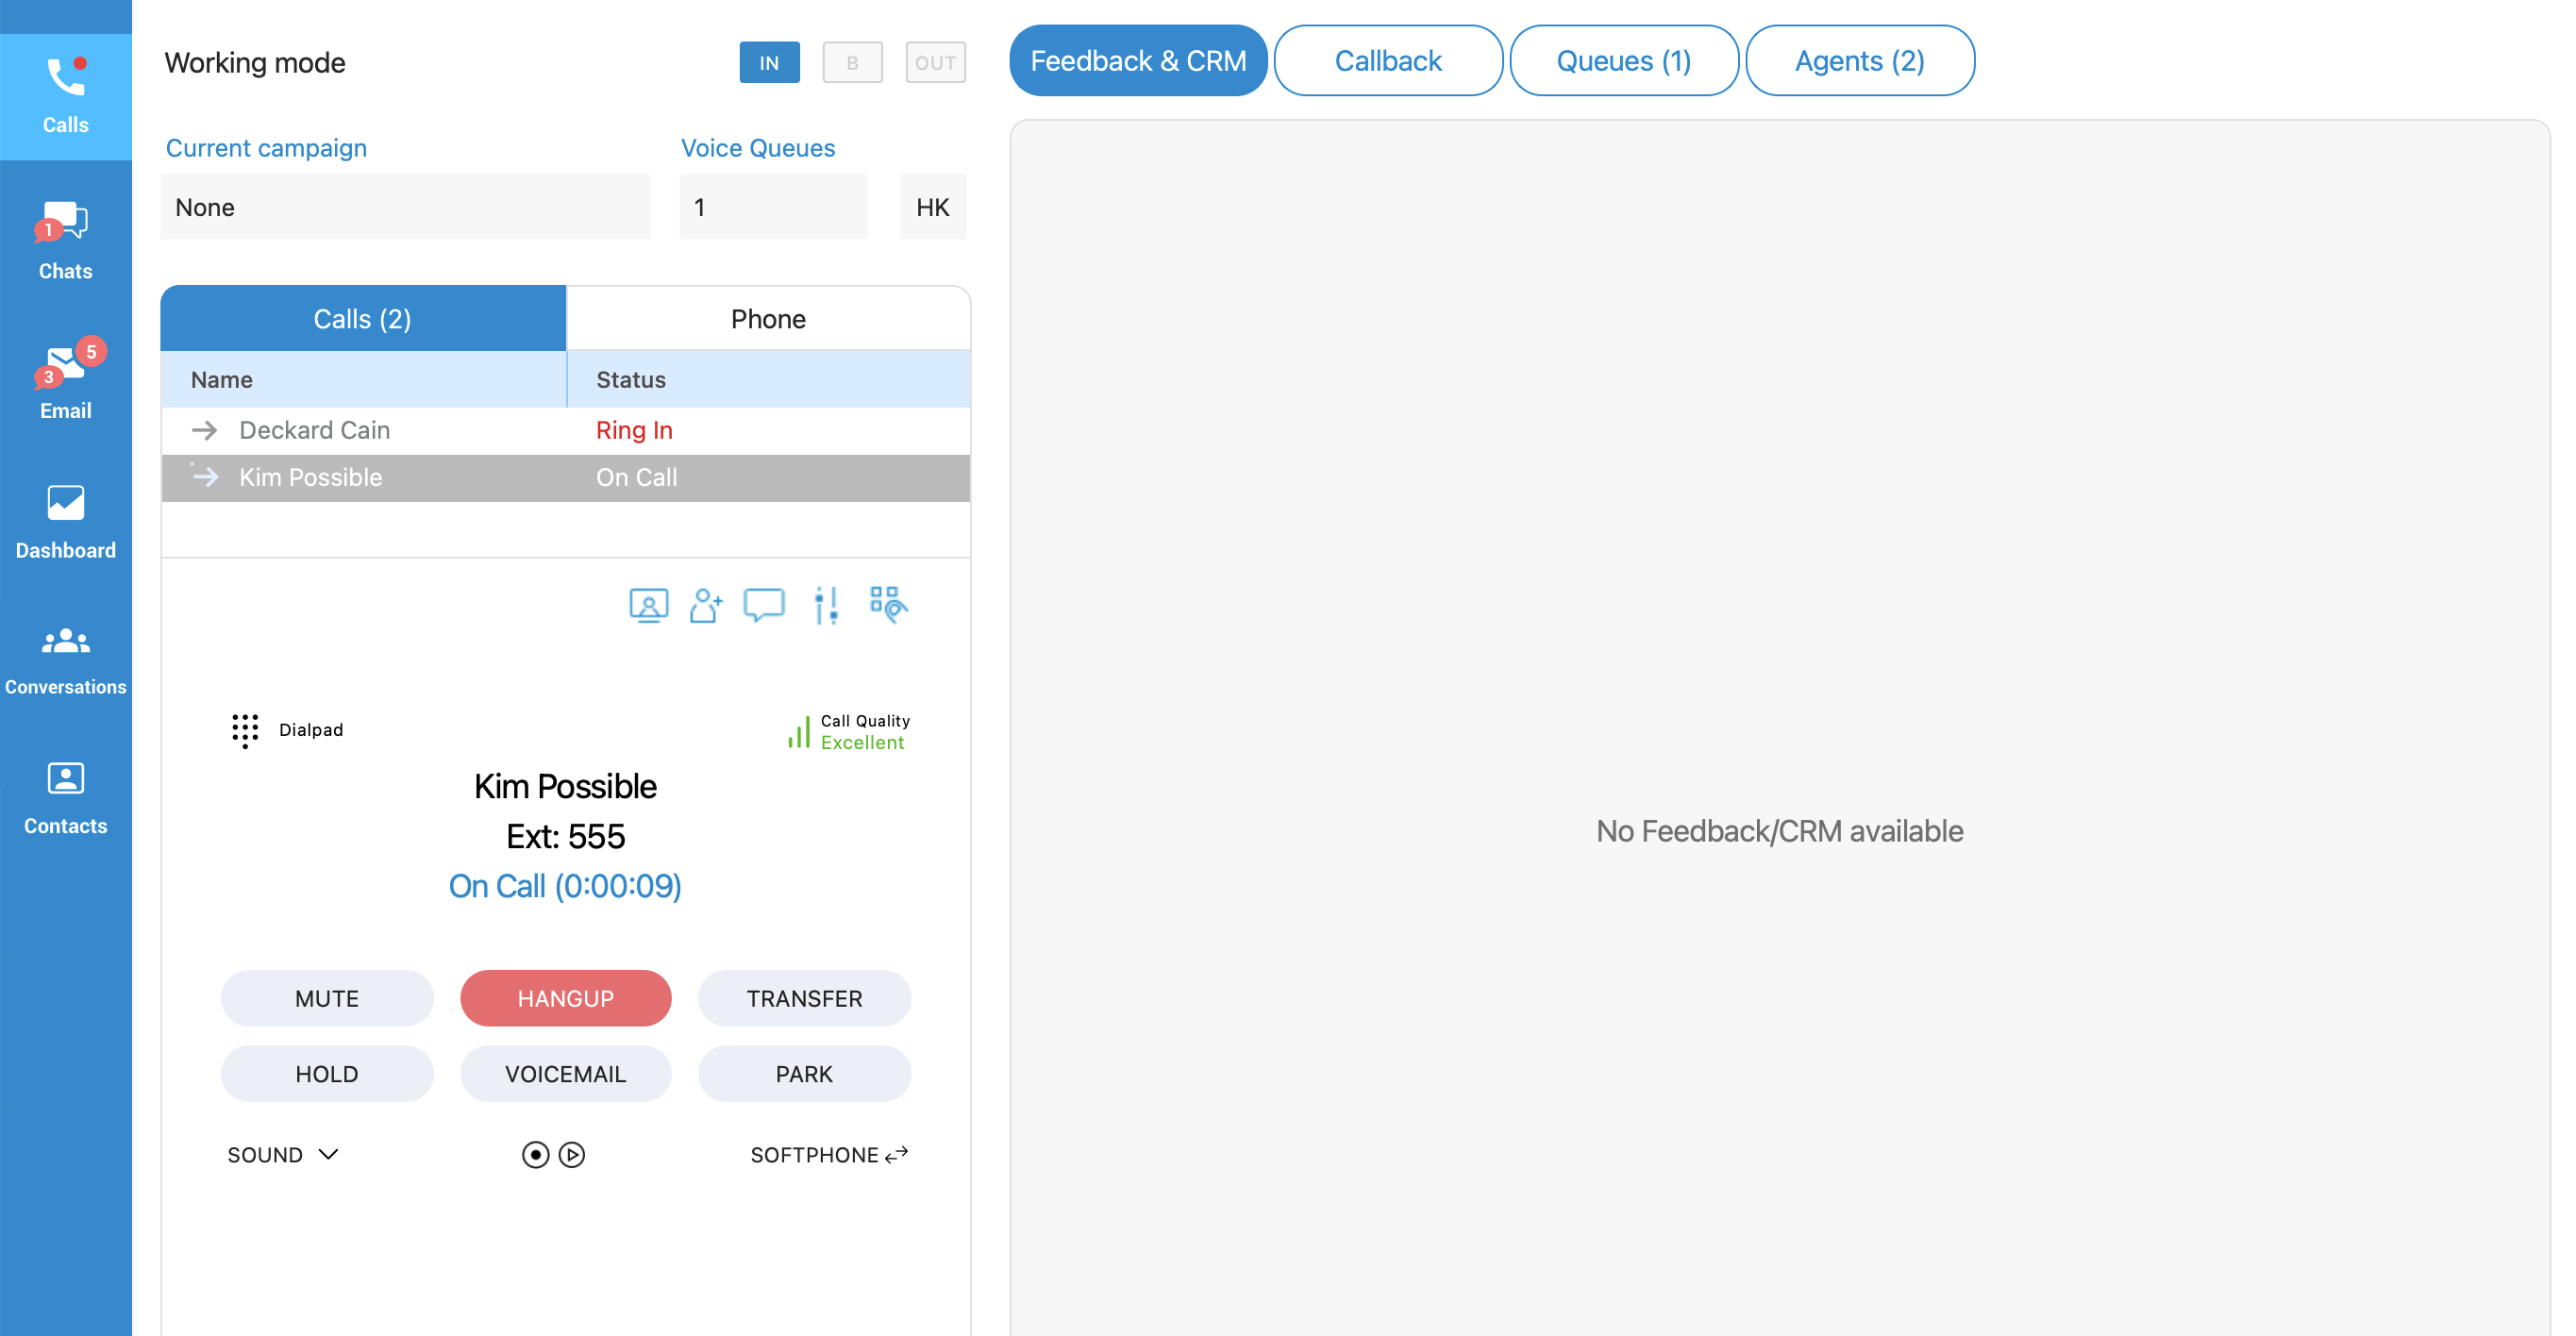
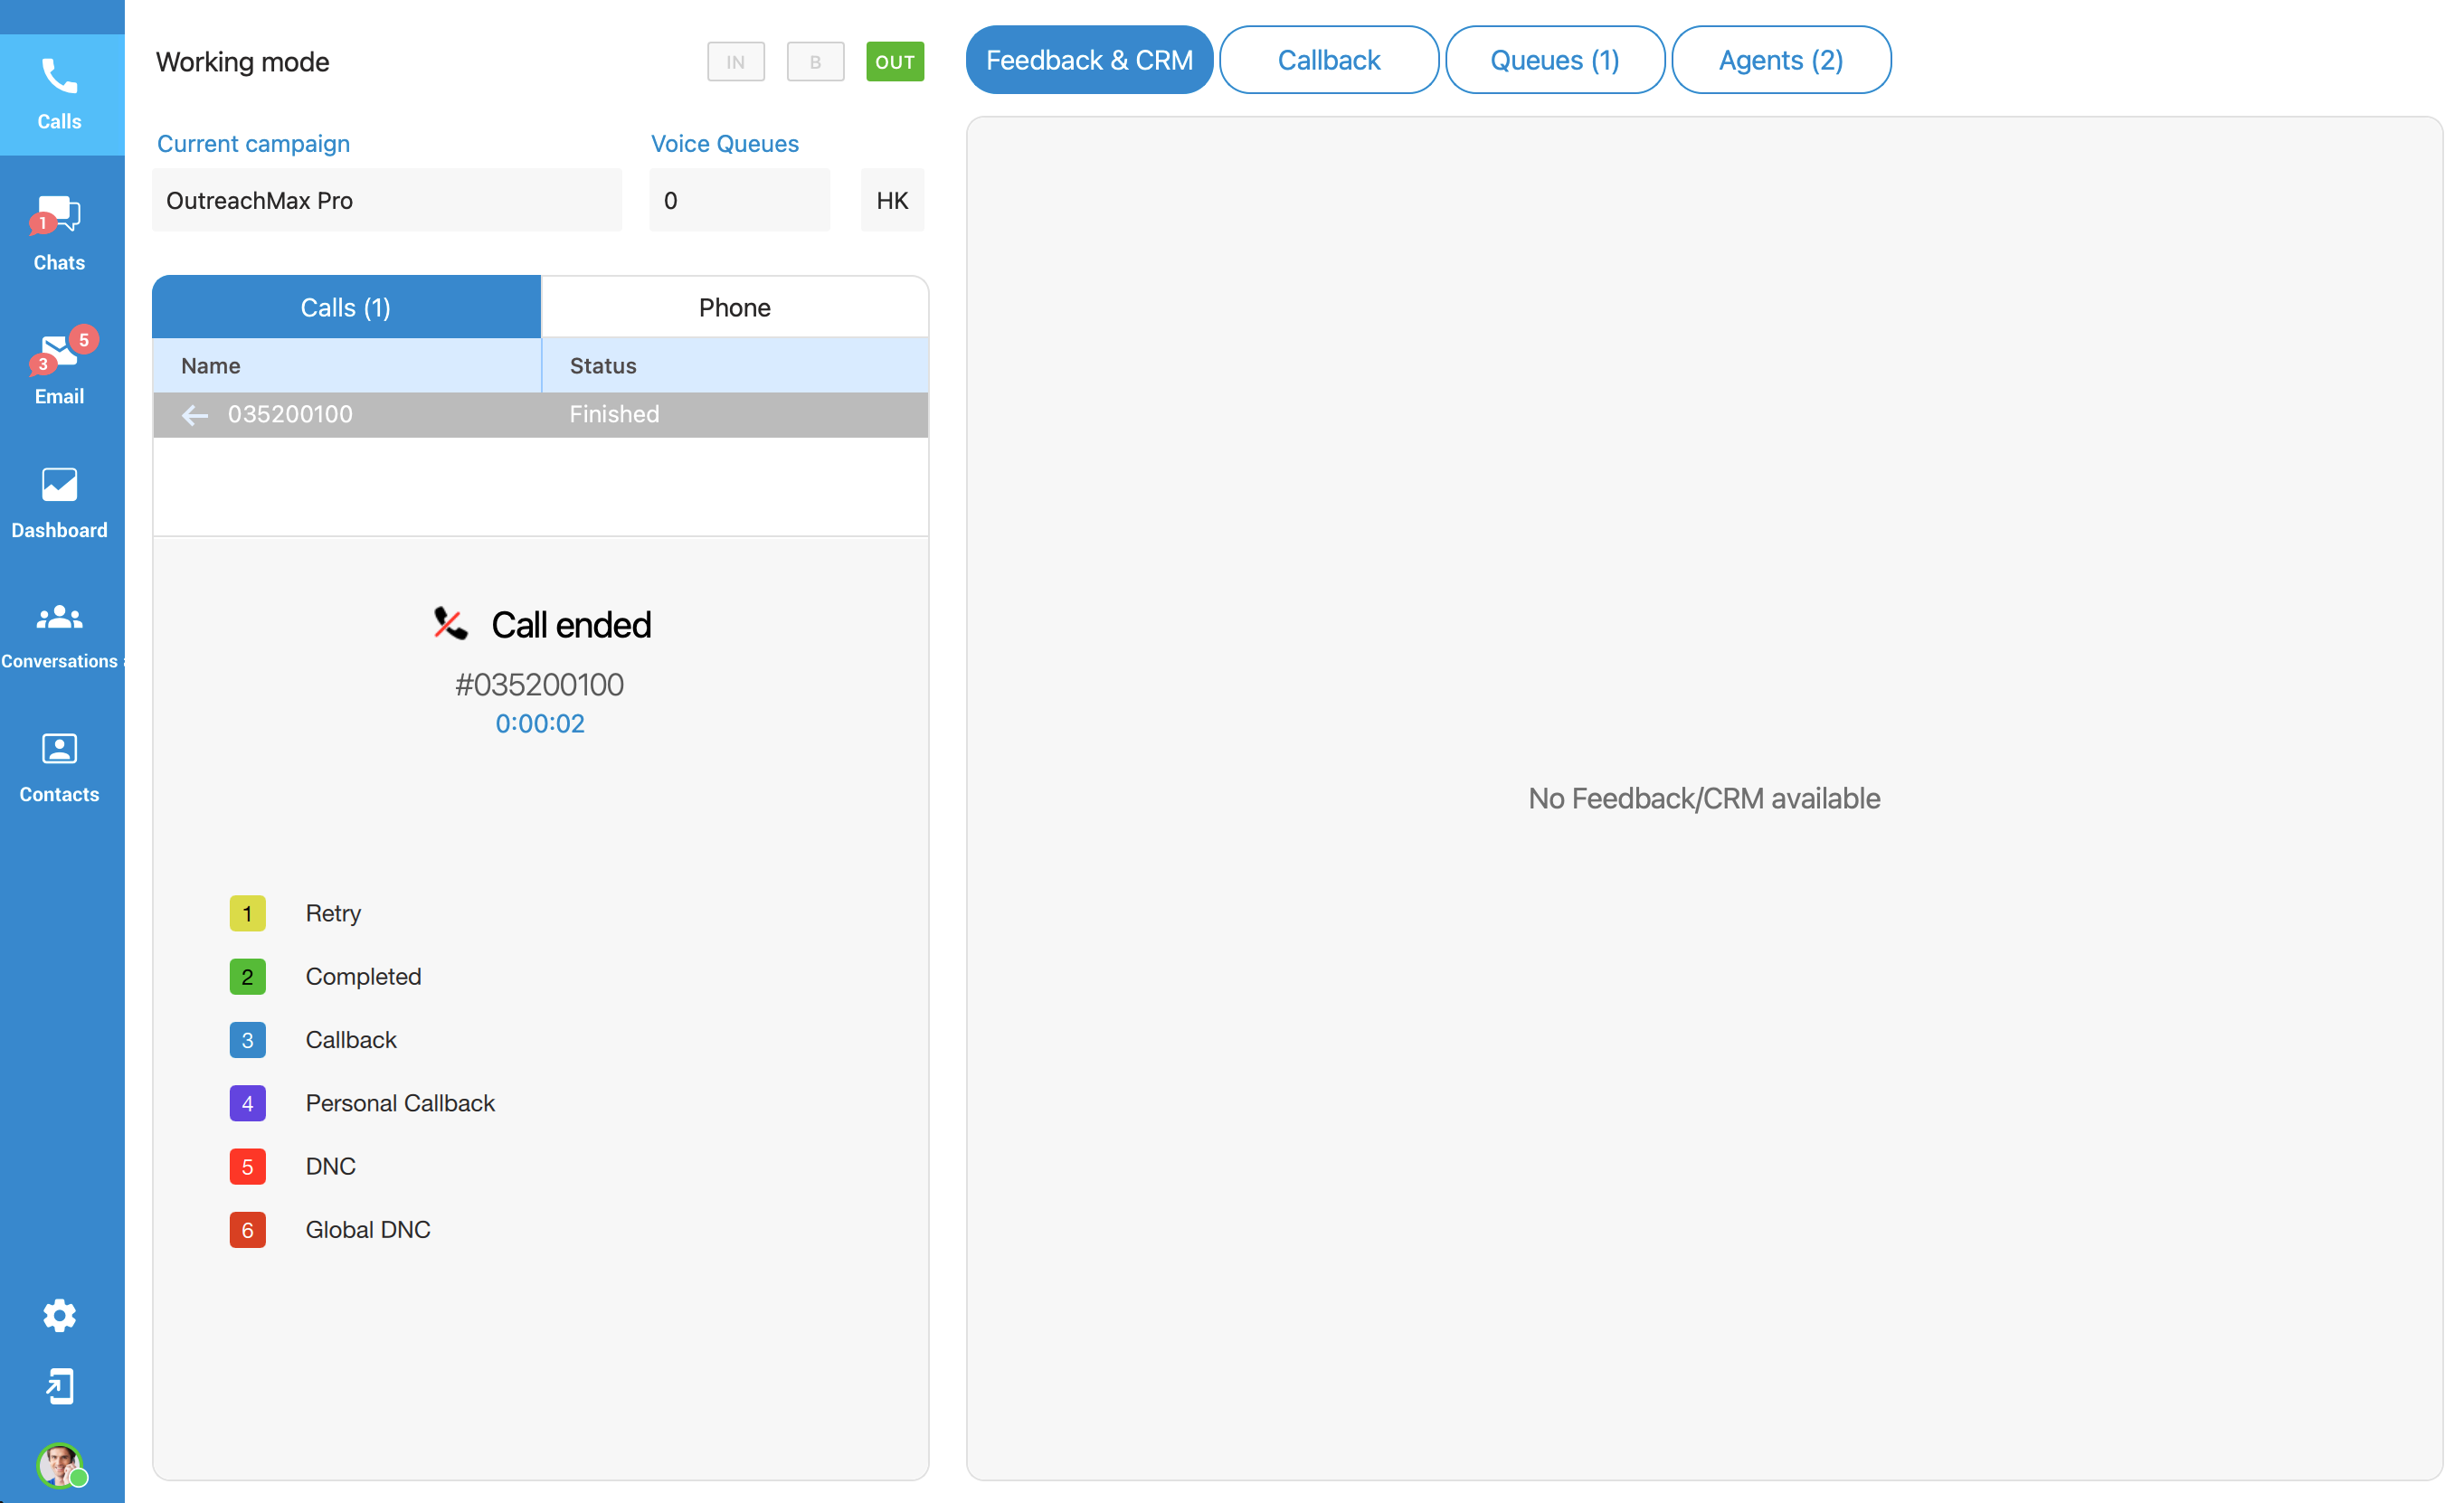
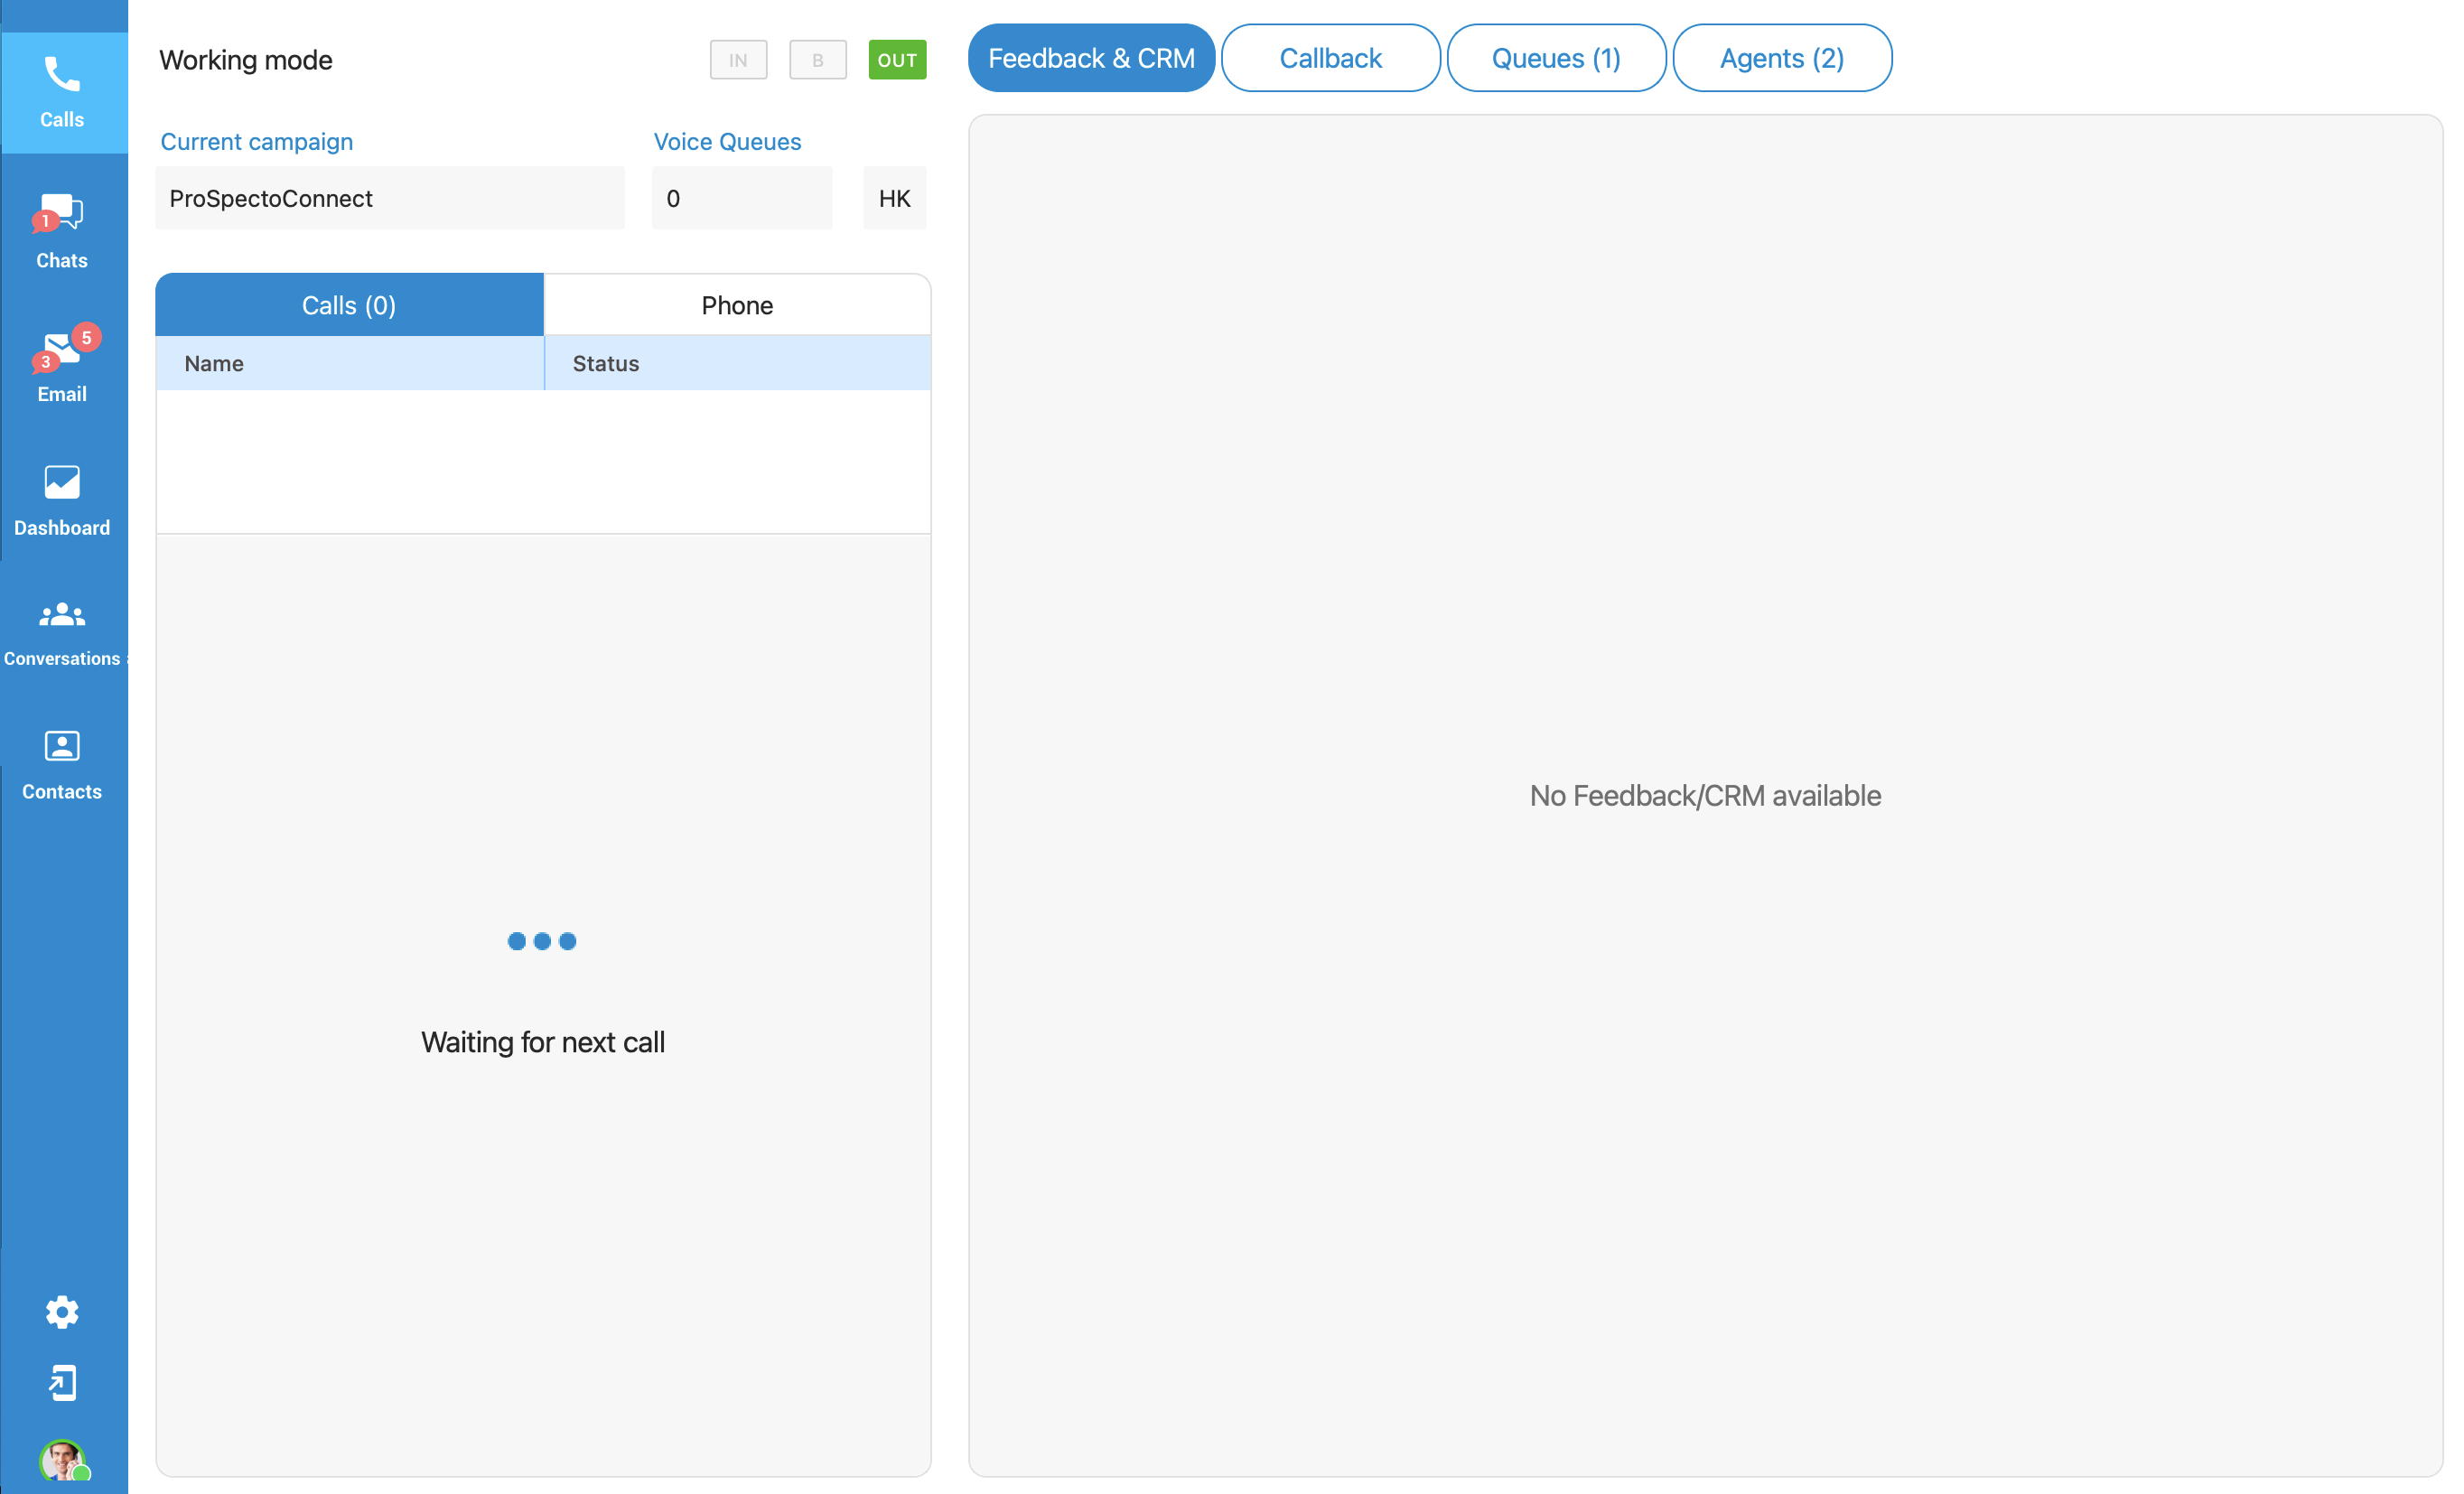
¶ Calls
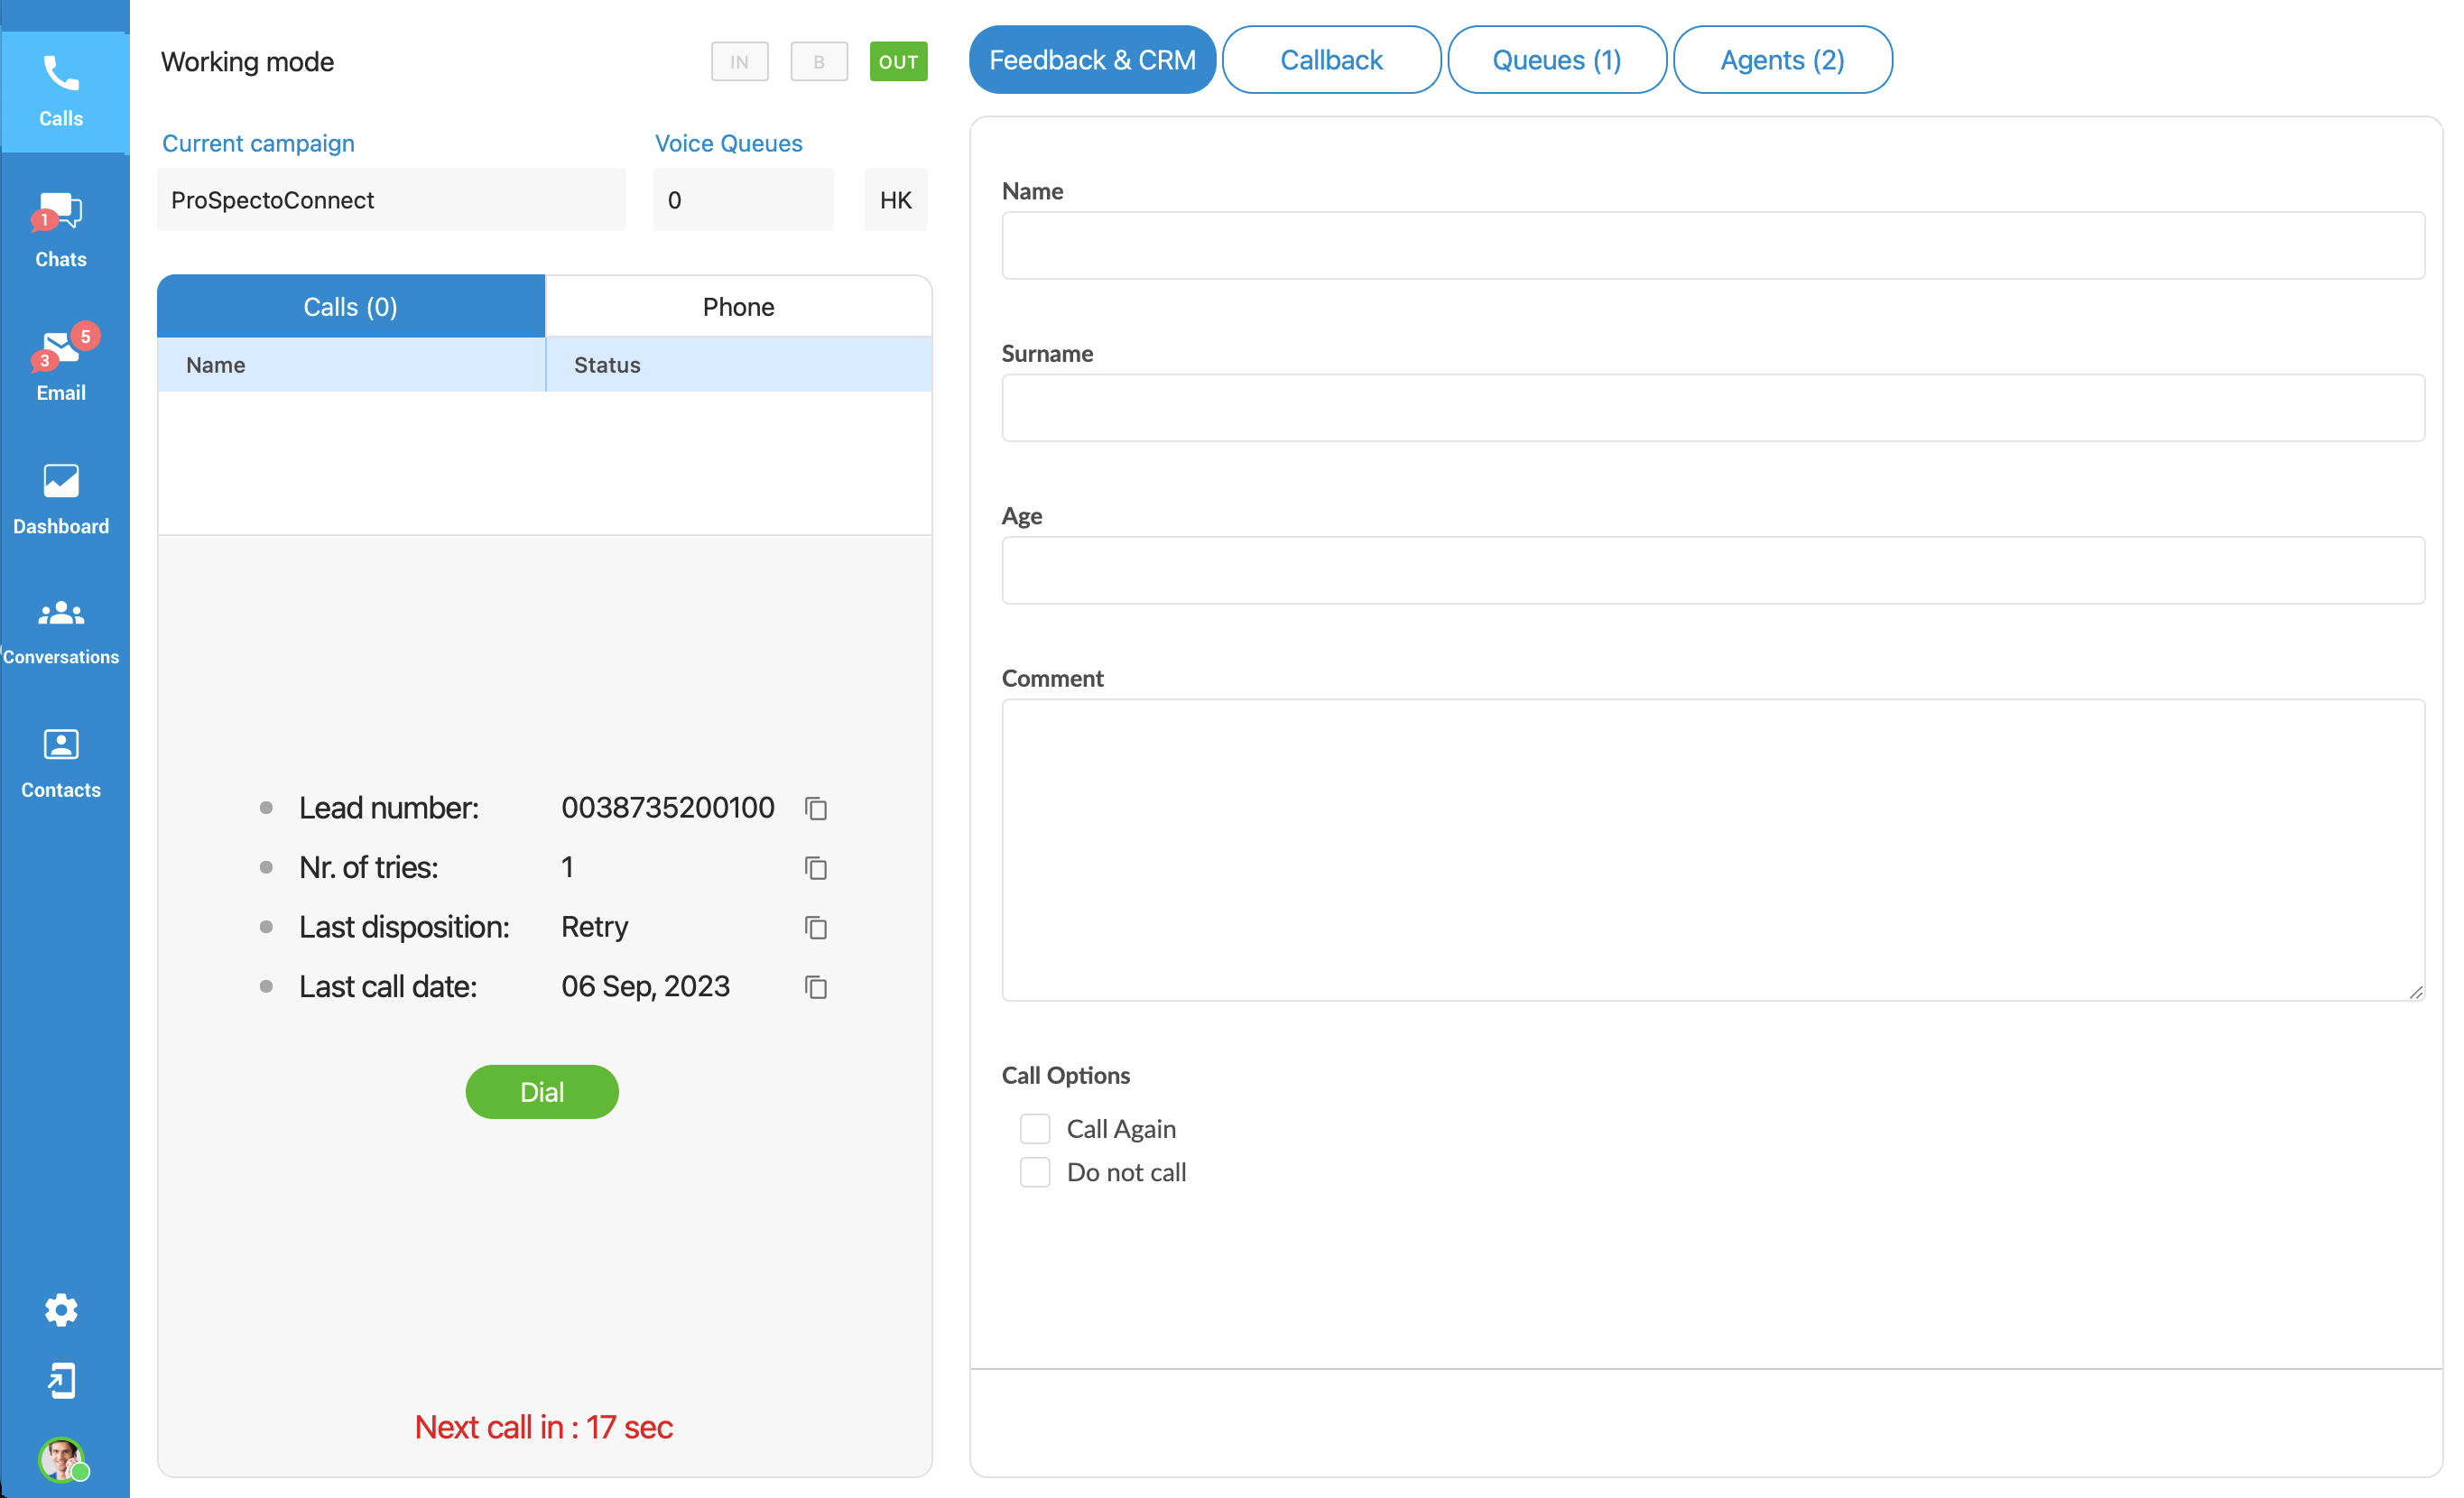
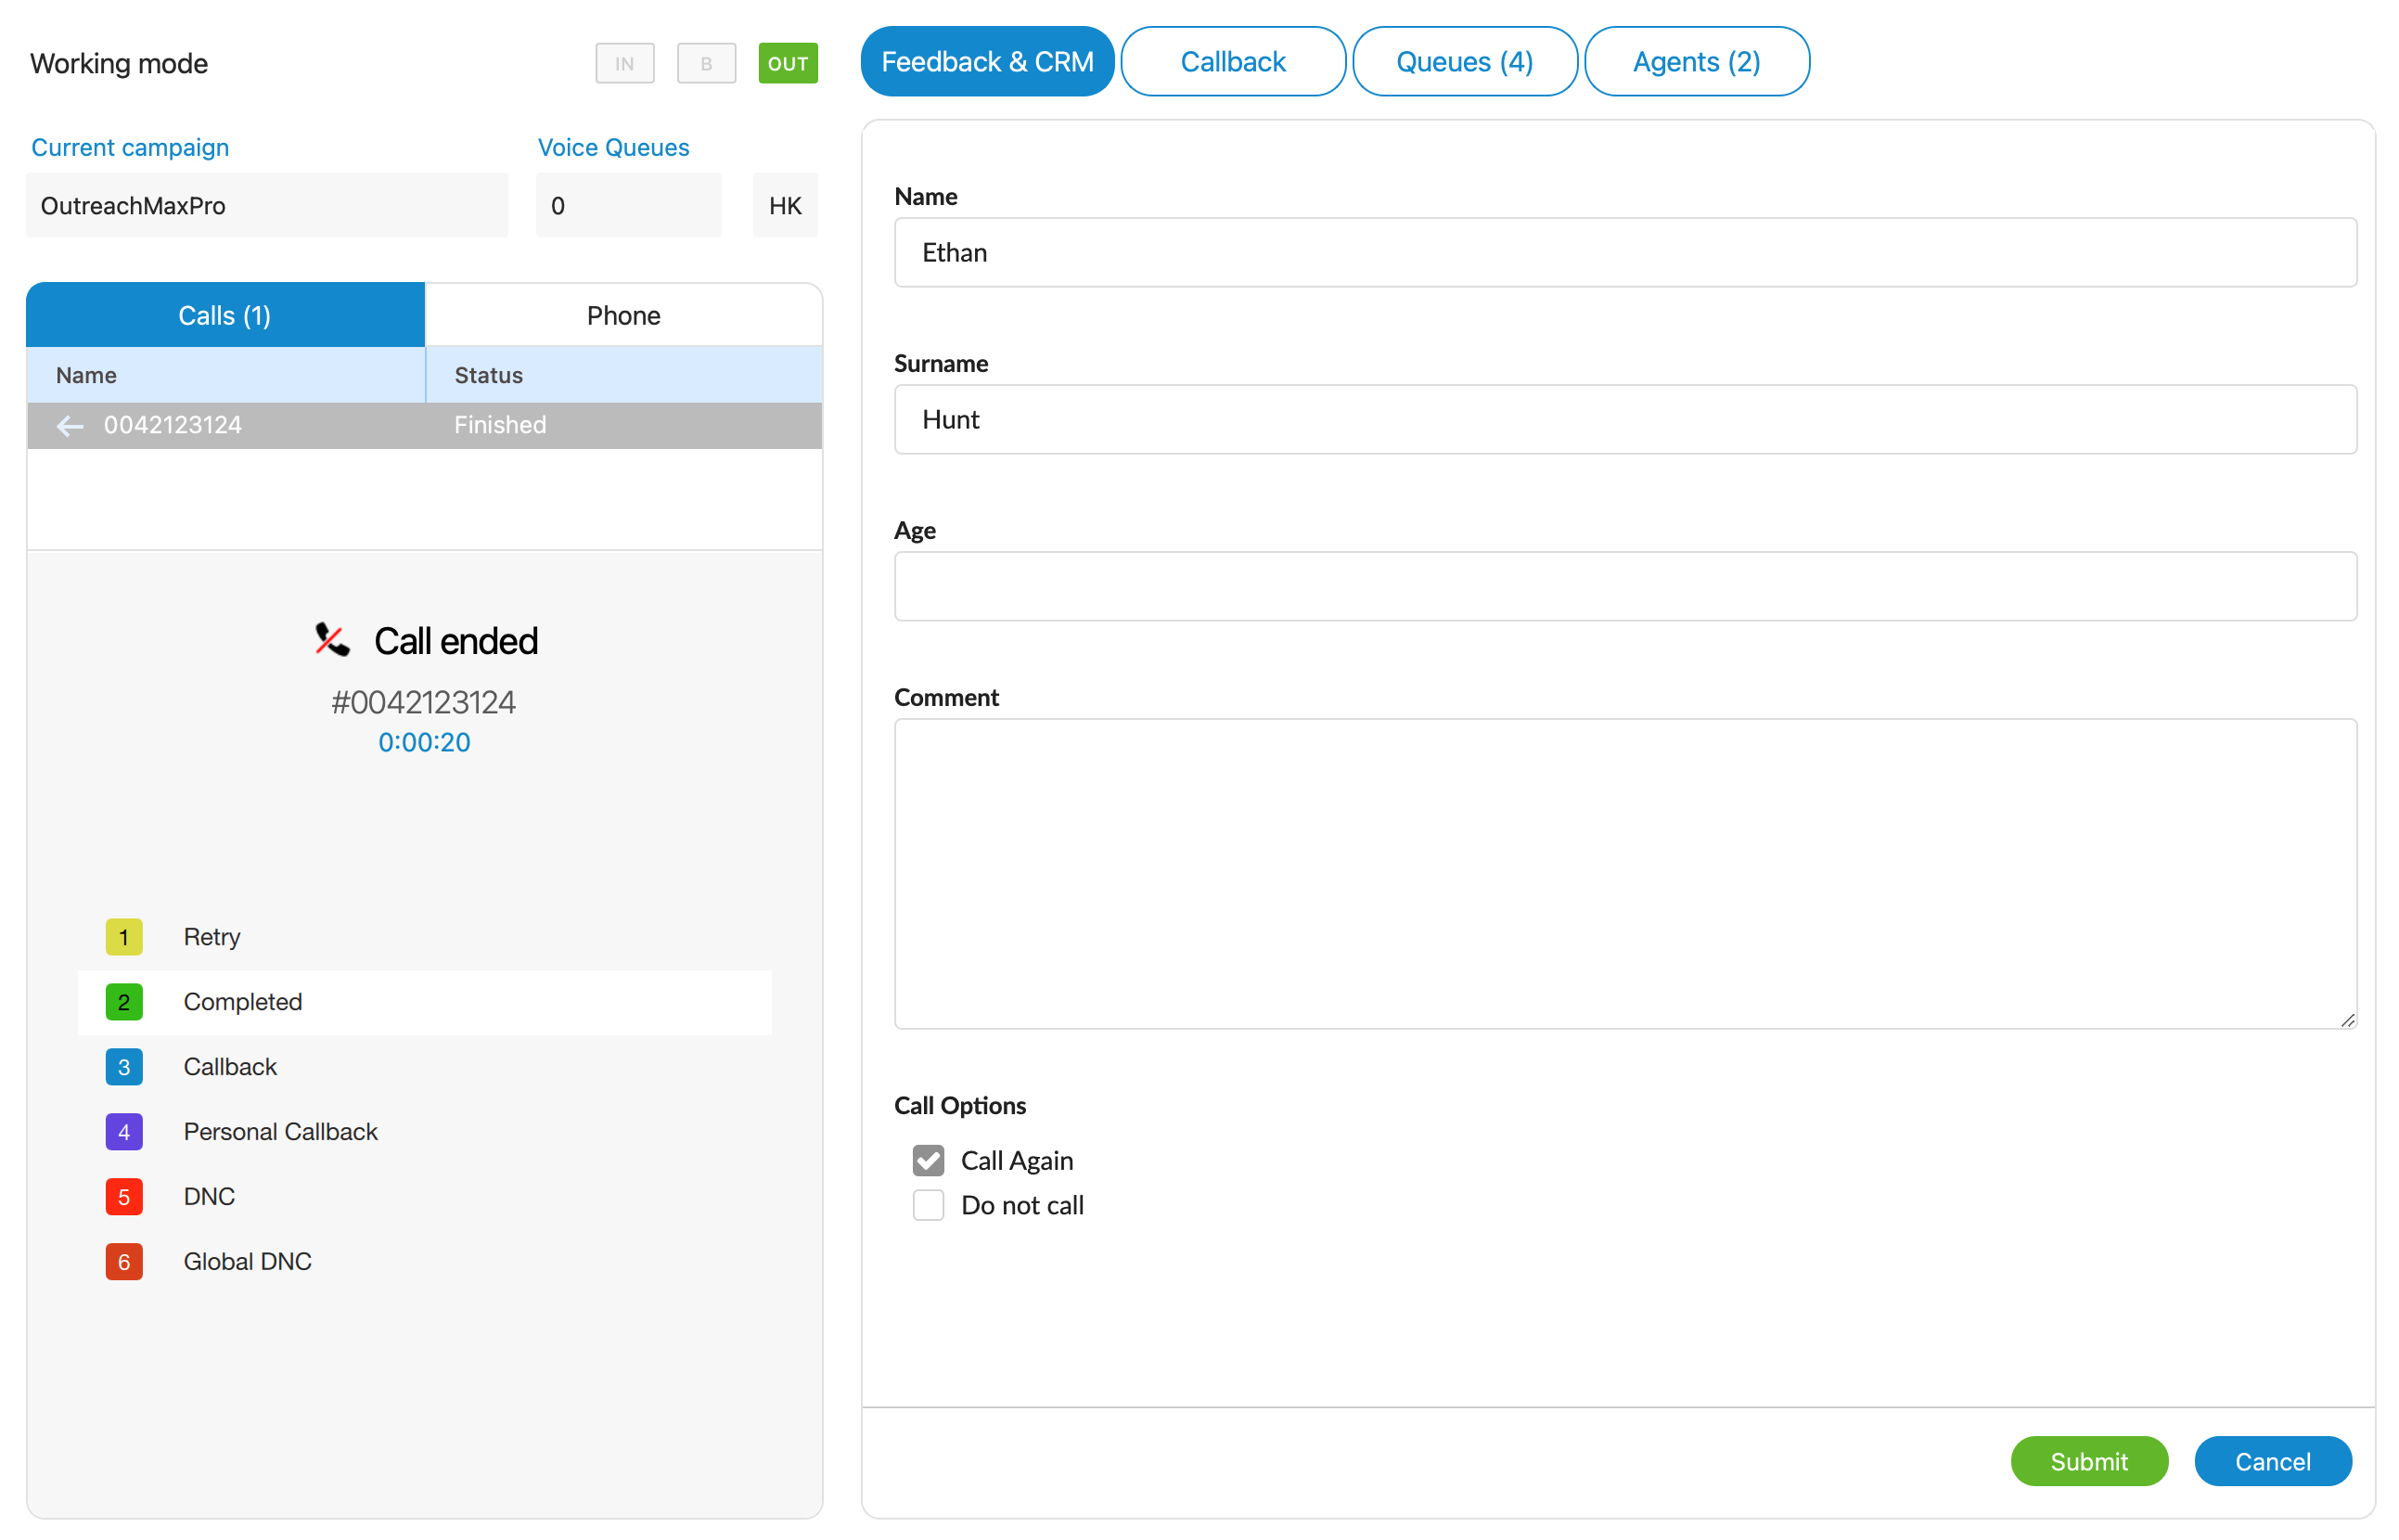
The Calls section of the navigation bar provides Agents with information and tools related to inbound and outbound calls in the Contact Center. It offers several functionalities that enable Agents to handle calls efficiently. Here's an overview of what users will find in this section:
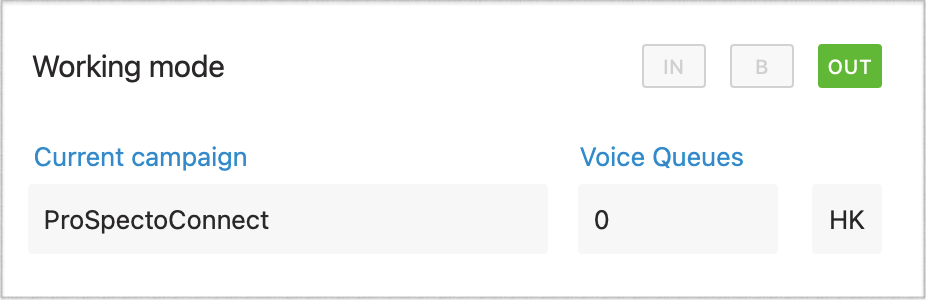
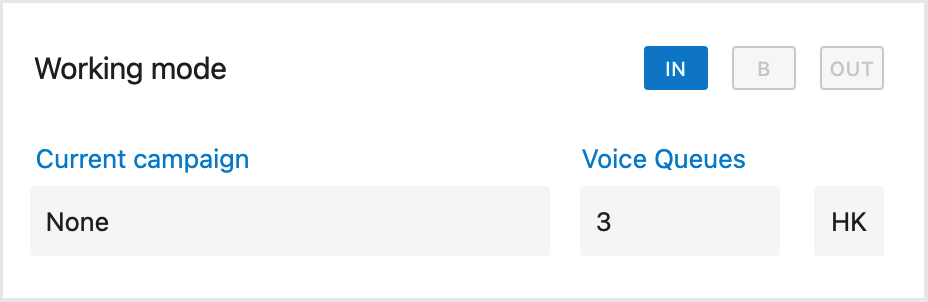
¶ Working Mode
In a call center environment, agents have the flexibility to work using different strategies: inbound, outbound, or blended mode. To indicate the current strategy, direction buttons have been introduced. There are three types of direction buttons, each representing a specific strategy.

Here's a breakdown of the buttons and their corresponding strategies:
When the  option is selected, it signifies that the agent is currently working in an inbound strategy. Inbound strategy involves handling incoming customer calls.
When the  option is selected, it indicates that the agent is working in an outbound strategy. Outbound strategy involves proactive customer outreach, where agents make outbound calls as part of campaigns.
When the  option is selected, it signifies that the agent is working in blended mode. Blended mode is a dynamic strategy that automatically transitions agents between inbound and outbound activities based on call center conditions.
The Blended mode is based on the 'Minimum idle Agents per Queue" parameter, which can be found and updated on the PBX systems. The blended mode can be automatic or manual:
- Automatic mode - The system automatically switches between Inbound and Outbound modes.
- Manual mode - The Agent can select a working strategy manually between the Inbound, Outbound, and Blended mode by clicking on a specific button.
On every change, direction buttons are updated, so that agent has an overview of operation mode in real-time.
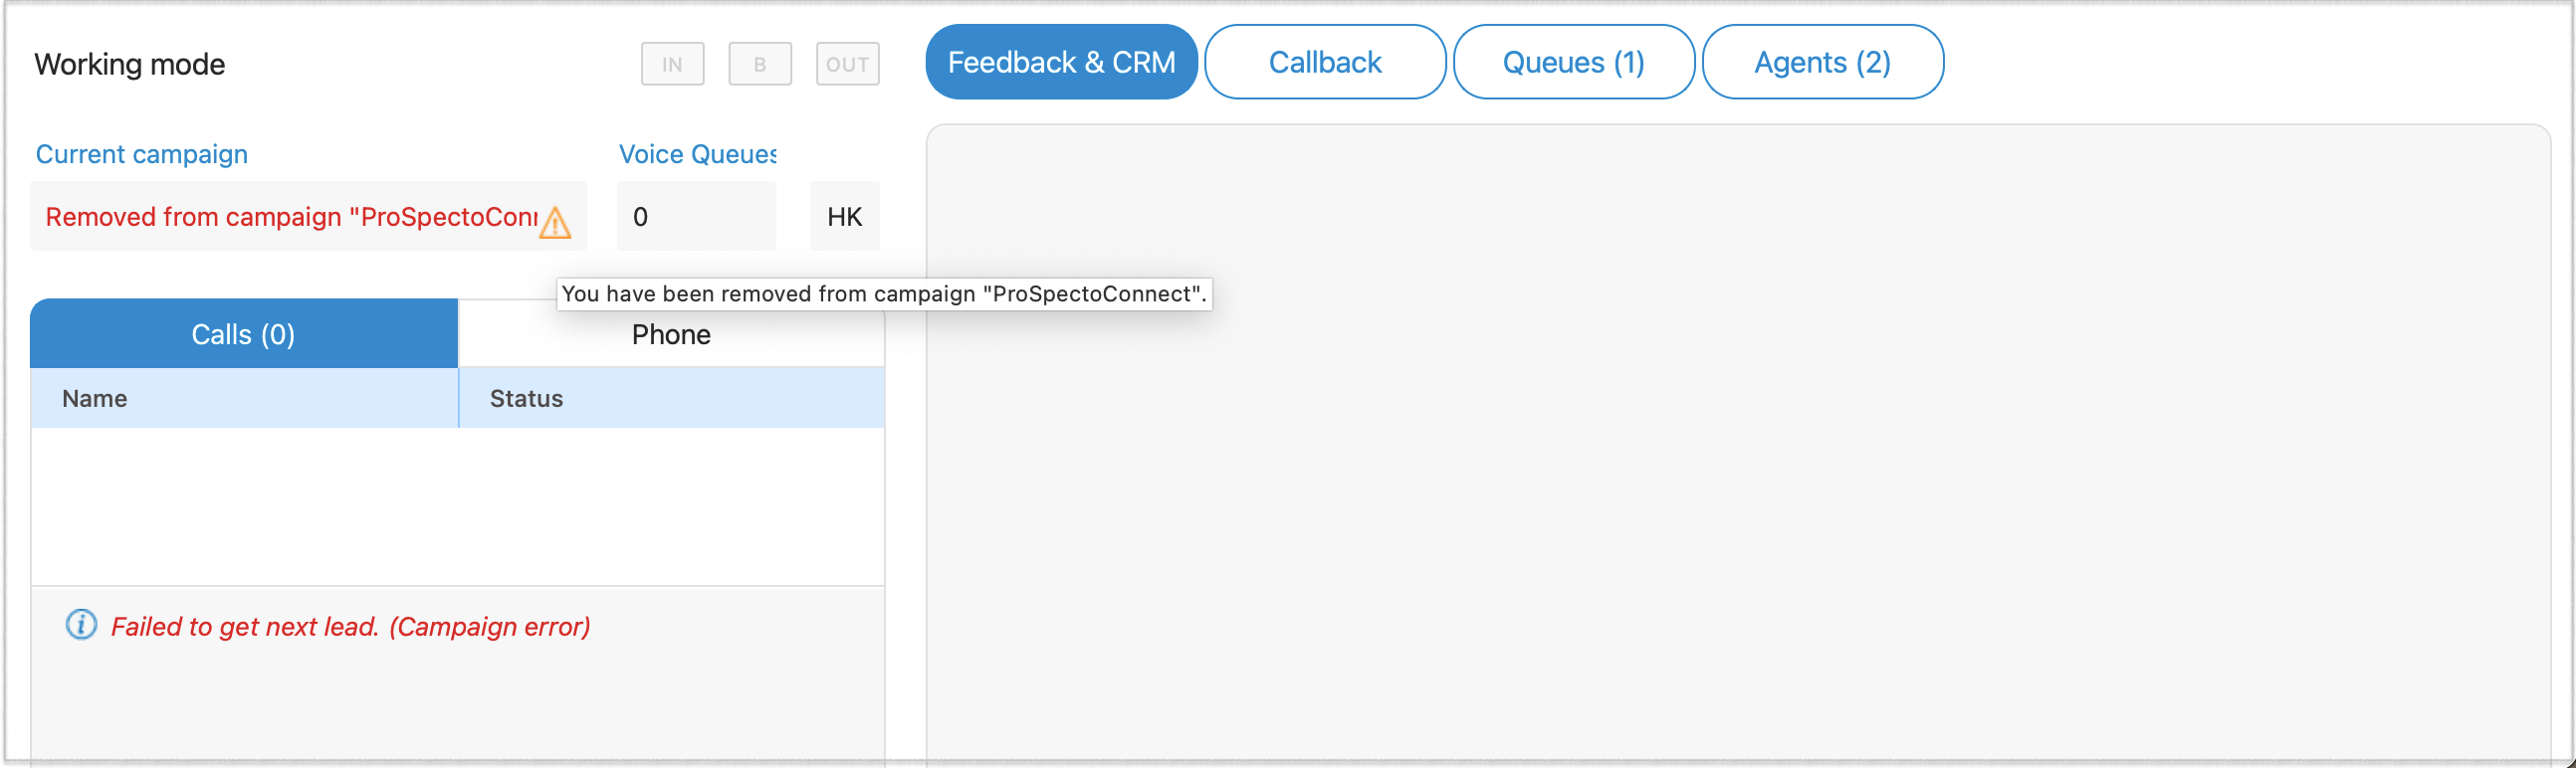
Below the Working mode section, there are ''Current campaign'' and ''Queues'' labels:
The Current Campaign label - displays the name of the campaign in which the agent is currently working during the login session. This information helps identify the specific campaign or project to which the agent is dedicated. In the outbound strategy scenario, where agents primarily engage in proactive customer outreach, the "Queues" label will display "0" since the focus is on campaign-driven activities rather than queue-based interactions.
The Voice Queues label - indicates the number of queues in which the agent is actively working during the login session. In the case of an agent working in the inbound strategy, the "Current campaign" label will display "None" since inbound operations typically do not revolve around specific campaigns.
If an agent is removed from the campaign while they are actively online, a warning message will promptly appear within their interface under this label.
An Agent can not work in a Campaign and a Queue at the same time.
¶ HotKeys
This option refers to Keyboard shortcuts that Agents use to select a particular Disposition faster. This feature can significantly improve Agent's performance. When using Hot Keys, Agents do not have to use the interface.

Hovering over the HK button, the Agent gets the list of dispositions and their keyboard shortcuts for the current Campaign/Queue.
Dispositions can be configured on the system and displayed within the App in the area next to the HK button.
Hotkeys are used only if users have active Dialer/Queue calls that are answered or completed. In all other cases, nothing happens.
¶ Agent Session State
If an error occurs during the Agent login session, the following message will be displayed within the Agent Panel window:
The user may click on the label above to get more detailed information about the error.
![]()
The error message can be displayed in several cases:
- Your agent needs to log back in because their session is broken. You are not logged into any queue nor campaign. This may happen because the service was restarted.
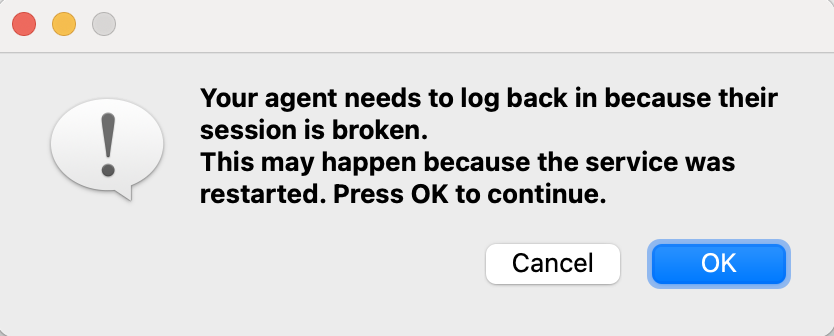
- Your agent needs to log back in because their session is broken. This may happen because the service was restarted.
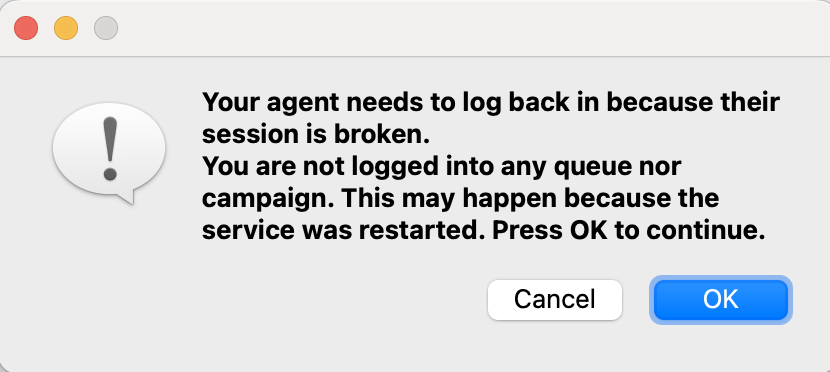
To solve this error, the user must re-login or click the 'OK' button. (The app restarts automatically).
¶ Call Centre Status
If an error occurs with the Call Centre connection status, the error message will be displayed within the ''Agent Panel'' window:
The message changes depending on the type of error. An error can occur if modules are not connected (the Agentpool or Dialer module). By clicking the error message, gloCOM will log out and hang up all active calls.
Also, the user will be notified if the license limit for the Dialer module is reached:
¶ Call handling
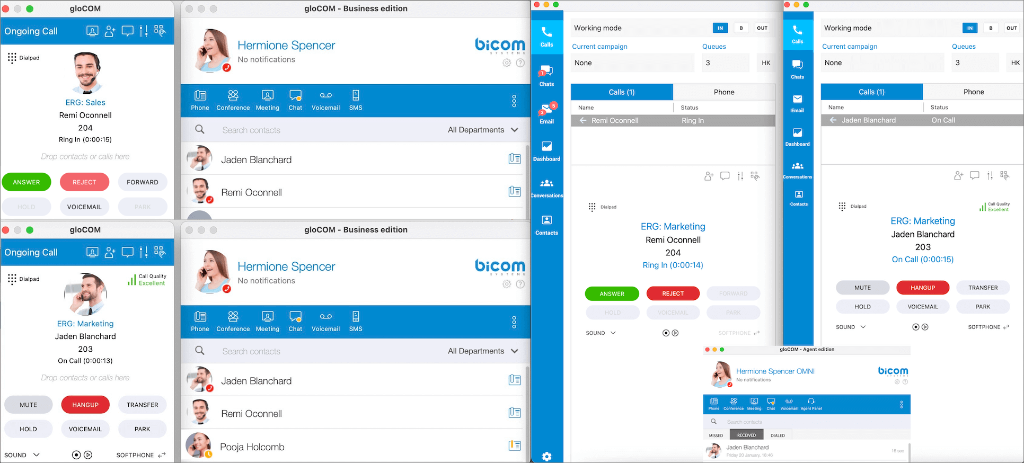
The Calls section displays current calls and allows Agents to handle multiple calls easily.
The list shows the call direction (inbound![]() or outbound
or outbound ![]() ), the name or number of the contact, and the call status (''Ring In, On-call, On Hold''). Switching between calls is possible by selecting the desired call.
), the name or number of the contact, and the call status (''Ring In, On-call, On Hold''). Switching between calls is possible by selecting the desired call.
¶ Post-Call Survey Indicator for Agents
This feature informs agents when a post-call survey is enabled for a call originating from a queue. It ensures that agents are aware when customers will be asked to complete a survey after the call, allowing agents to handle such calls accordingly.
Post-Call Survey Label
When an agent receives a call from a queue that has a survey assigned, a label titled "Post Call Survey" will be displayed in the top-left corner of the call window within the agent panel.
![]()
Tooltip Information
Hovering over the "Post Call Survey" label will display a tooltip with a brief explanation, informing the agent that the customer will be prompted to fill out a survey at the end of the call.

NOTE: If the call does not originate from a queue or the queue does not have a survey assigned, the "Post Call Survey" label will not appear in the call window.
Below Calls, the ''Call widget'' section displays information about calls, and Agents can use it to handle calls.
¶ Advanced Call Handling
¶ Dialer Calls (Outbound Call Center)
Handling dialer calls are slightly different from regular calls, where each call may belong to a specific campaign.
The campaign has four different strategies:
- Power strategy
- Preview strategy
- Progressive strategy
- Voice Messaging
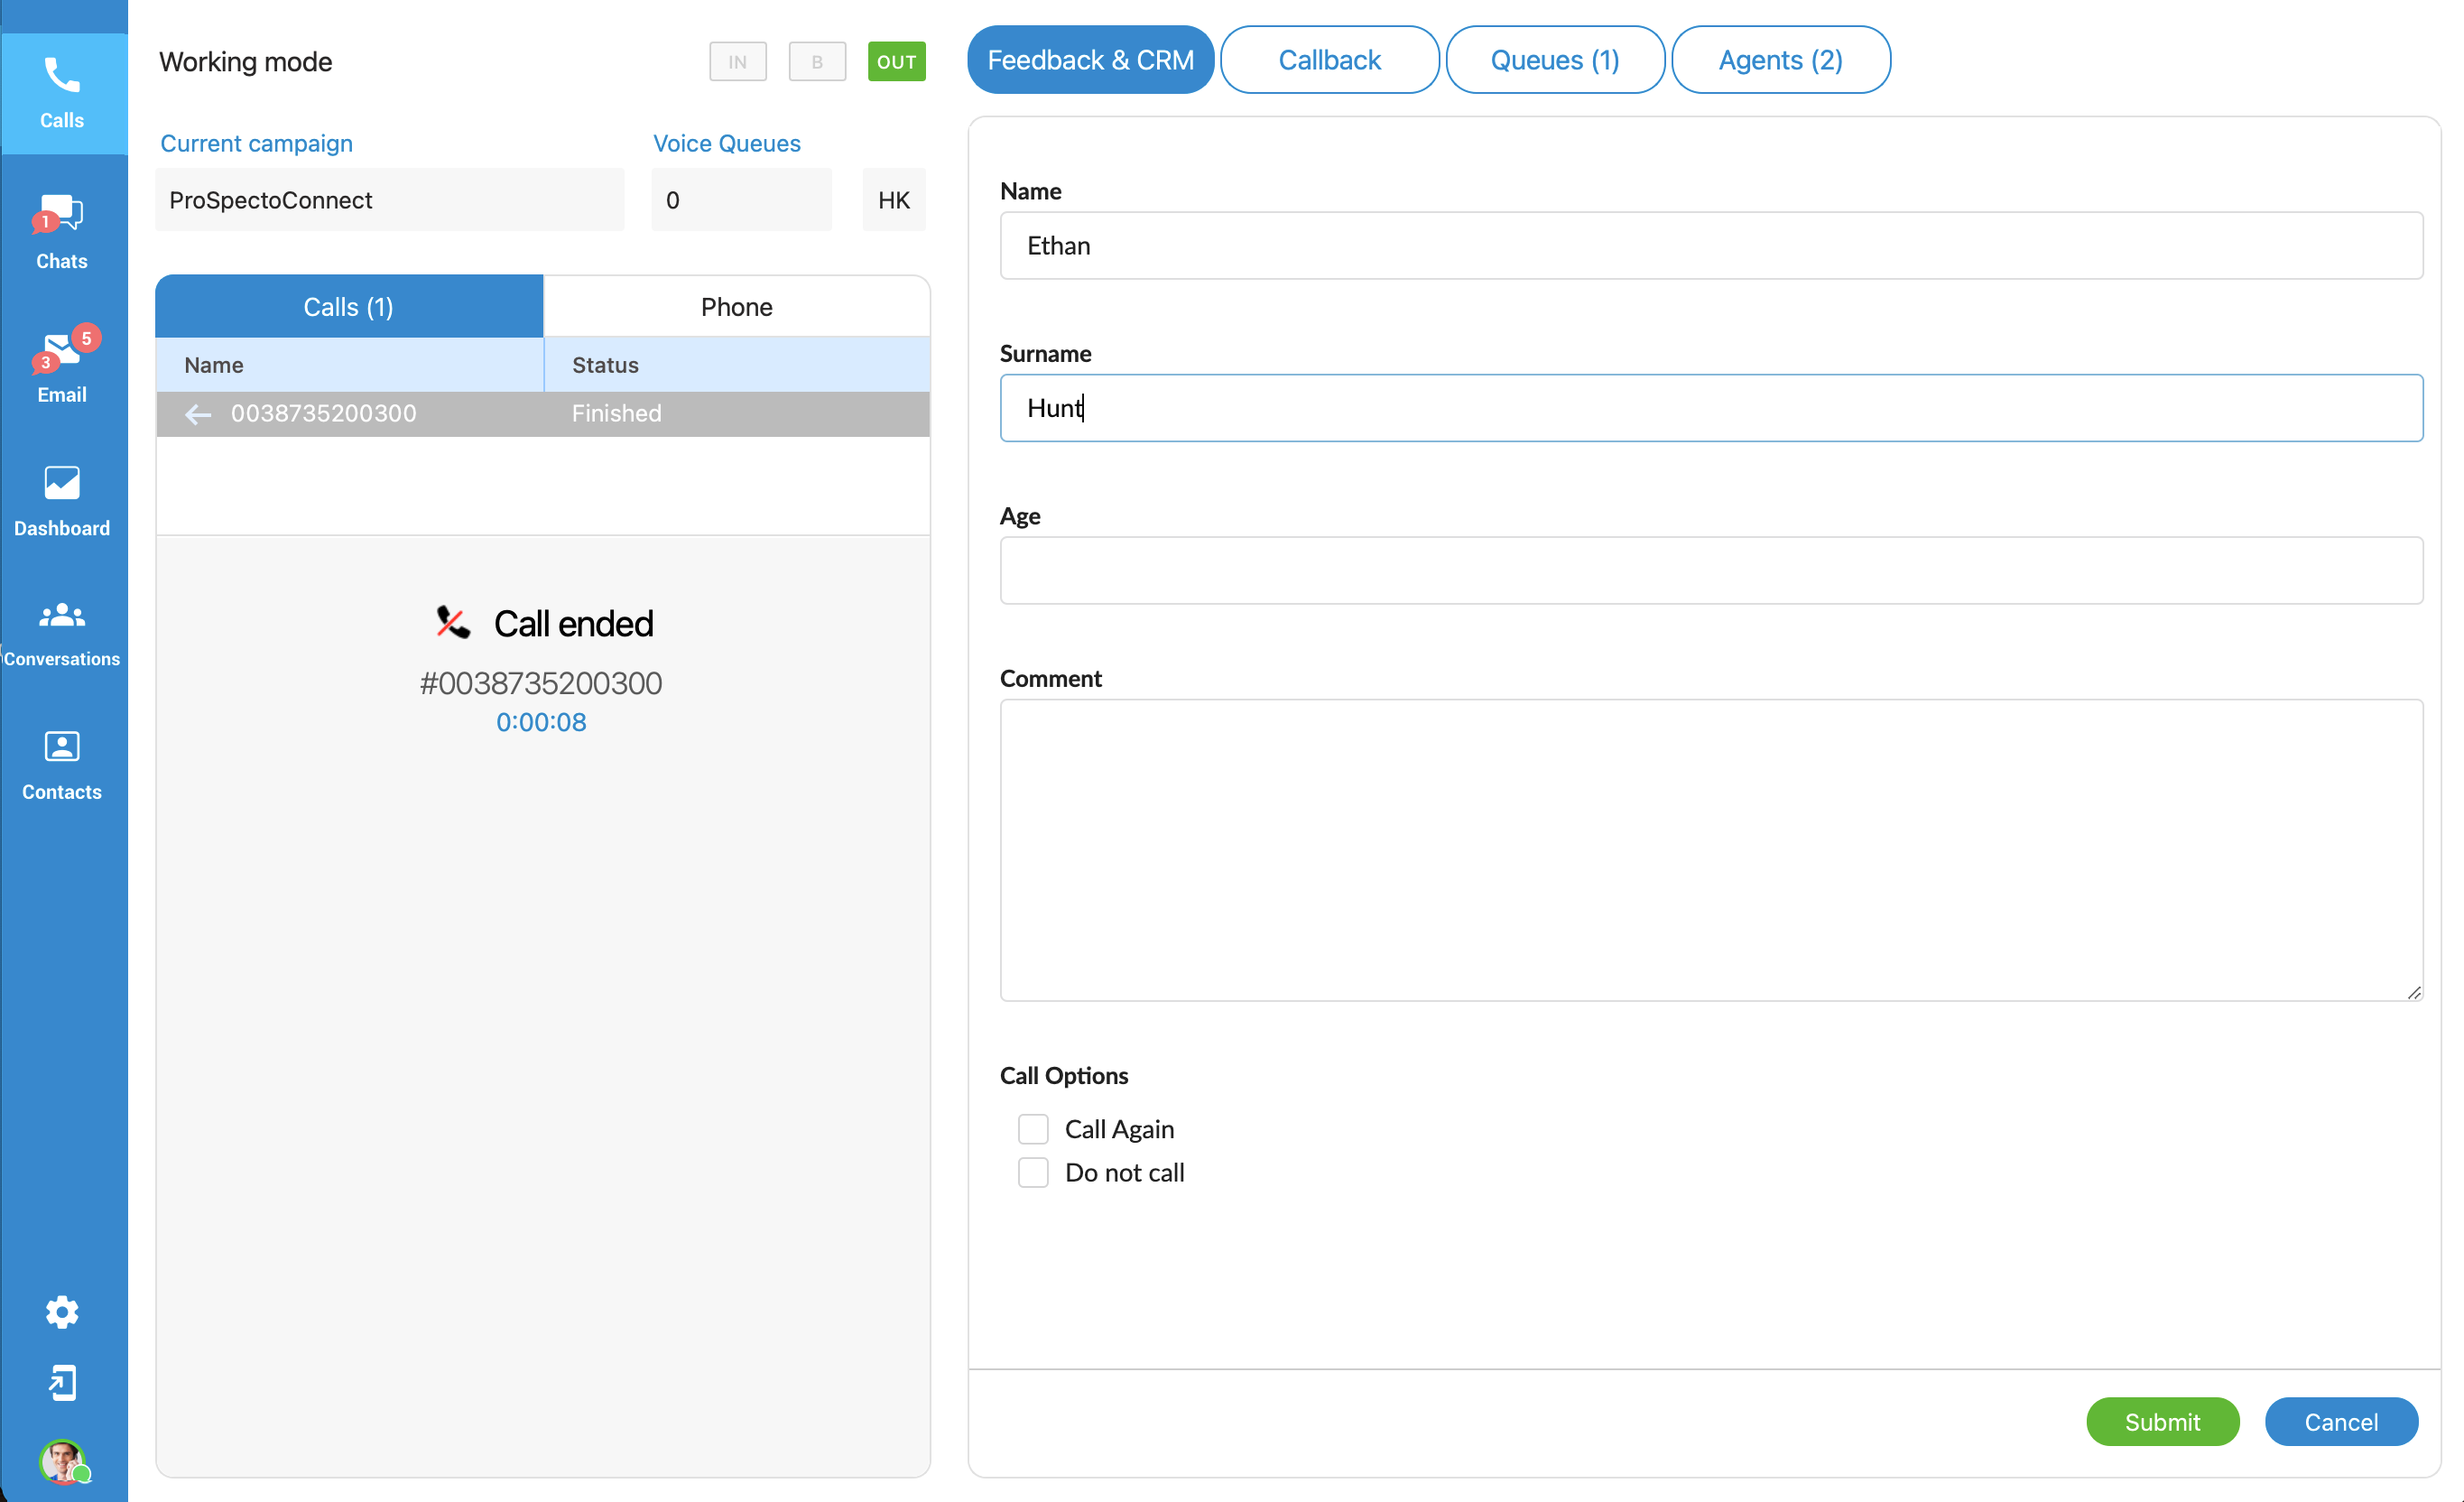
Each campaign has the capability to define specific options that agents should submit after a call. These options, known as dispositions, allow agents to categorize and provide information about the outcome or status of each call. Additionally, PBXware enables the configuration of feedback forms that are associated with individual campaigns. To configure and manage dispositions and feedback forms, adjustments need to be made within PBXware system.
Please note that the application interface changes depending on the strategy. Also, each campaign has various options (Dispositions, Feedback Forms) that Agents could submit.
Unlike regular calls, the dialer call is considered completed when both dispositions and feedback form have been submitted (if enabled), and only then the call is removed from the calls list. If enabled, dispositions are displayed when the audio call is finished and remain visible until the user submits a disposition. On the other hand, if enabled, the feedback form is always visible, until it is submitted.
If the disposition list is too large, a search field will be displayed above the list, allowing agents to search for the desired disposition by entering the disposition's code or name.
Agents can easily copy lead numbers or other information from the agent panel. They can do so by left-clicking on the field name to copy to the clipboard or by clicking the button next to the label for the same clipboard functionality.

¶ Power strategy
The Power strategy is a dialing method where multiple calls are automatically initiated for each available agent. It aims to maximize agent productivity by reducing idle time between calls.
When using the Power strategy, the campaign dials leads based on Idle Agents multiplied by the power number.
It works as follows:
• The campaign fetches leads based on power.
• The campaign dials leads for each Agent times number of power. (Number of power can be set on PBX system.)
• The Agents are placed in the pool.
• The Lead who answers first will be connected to one of the Agents, and others (leads) will be dropped.
¶ Preview strategy
This strategy allows an Agent to have a preview of lead details so they can decide whether to dial the lead or not.
The Agent can fetch the next lead from the Campaigns list by clicking the ![]() button. If the Agent decides to call the lead, then they need to press the
button. If the Agent decides to call the lead, then they need to press the ![]() button.
button.
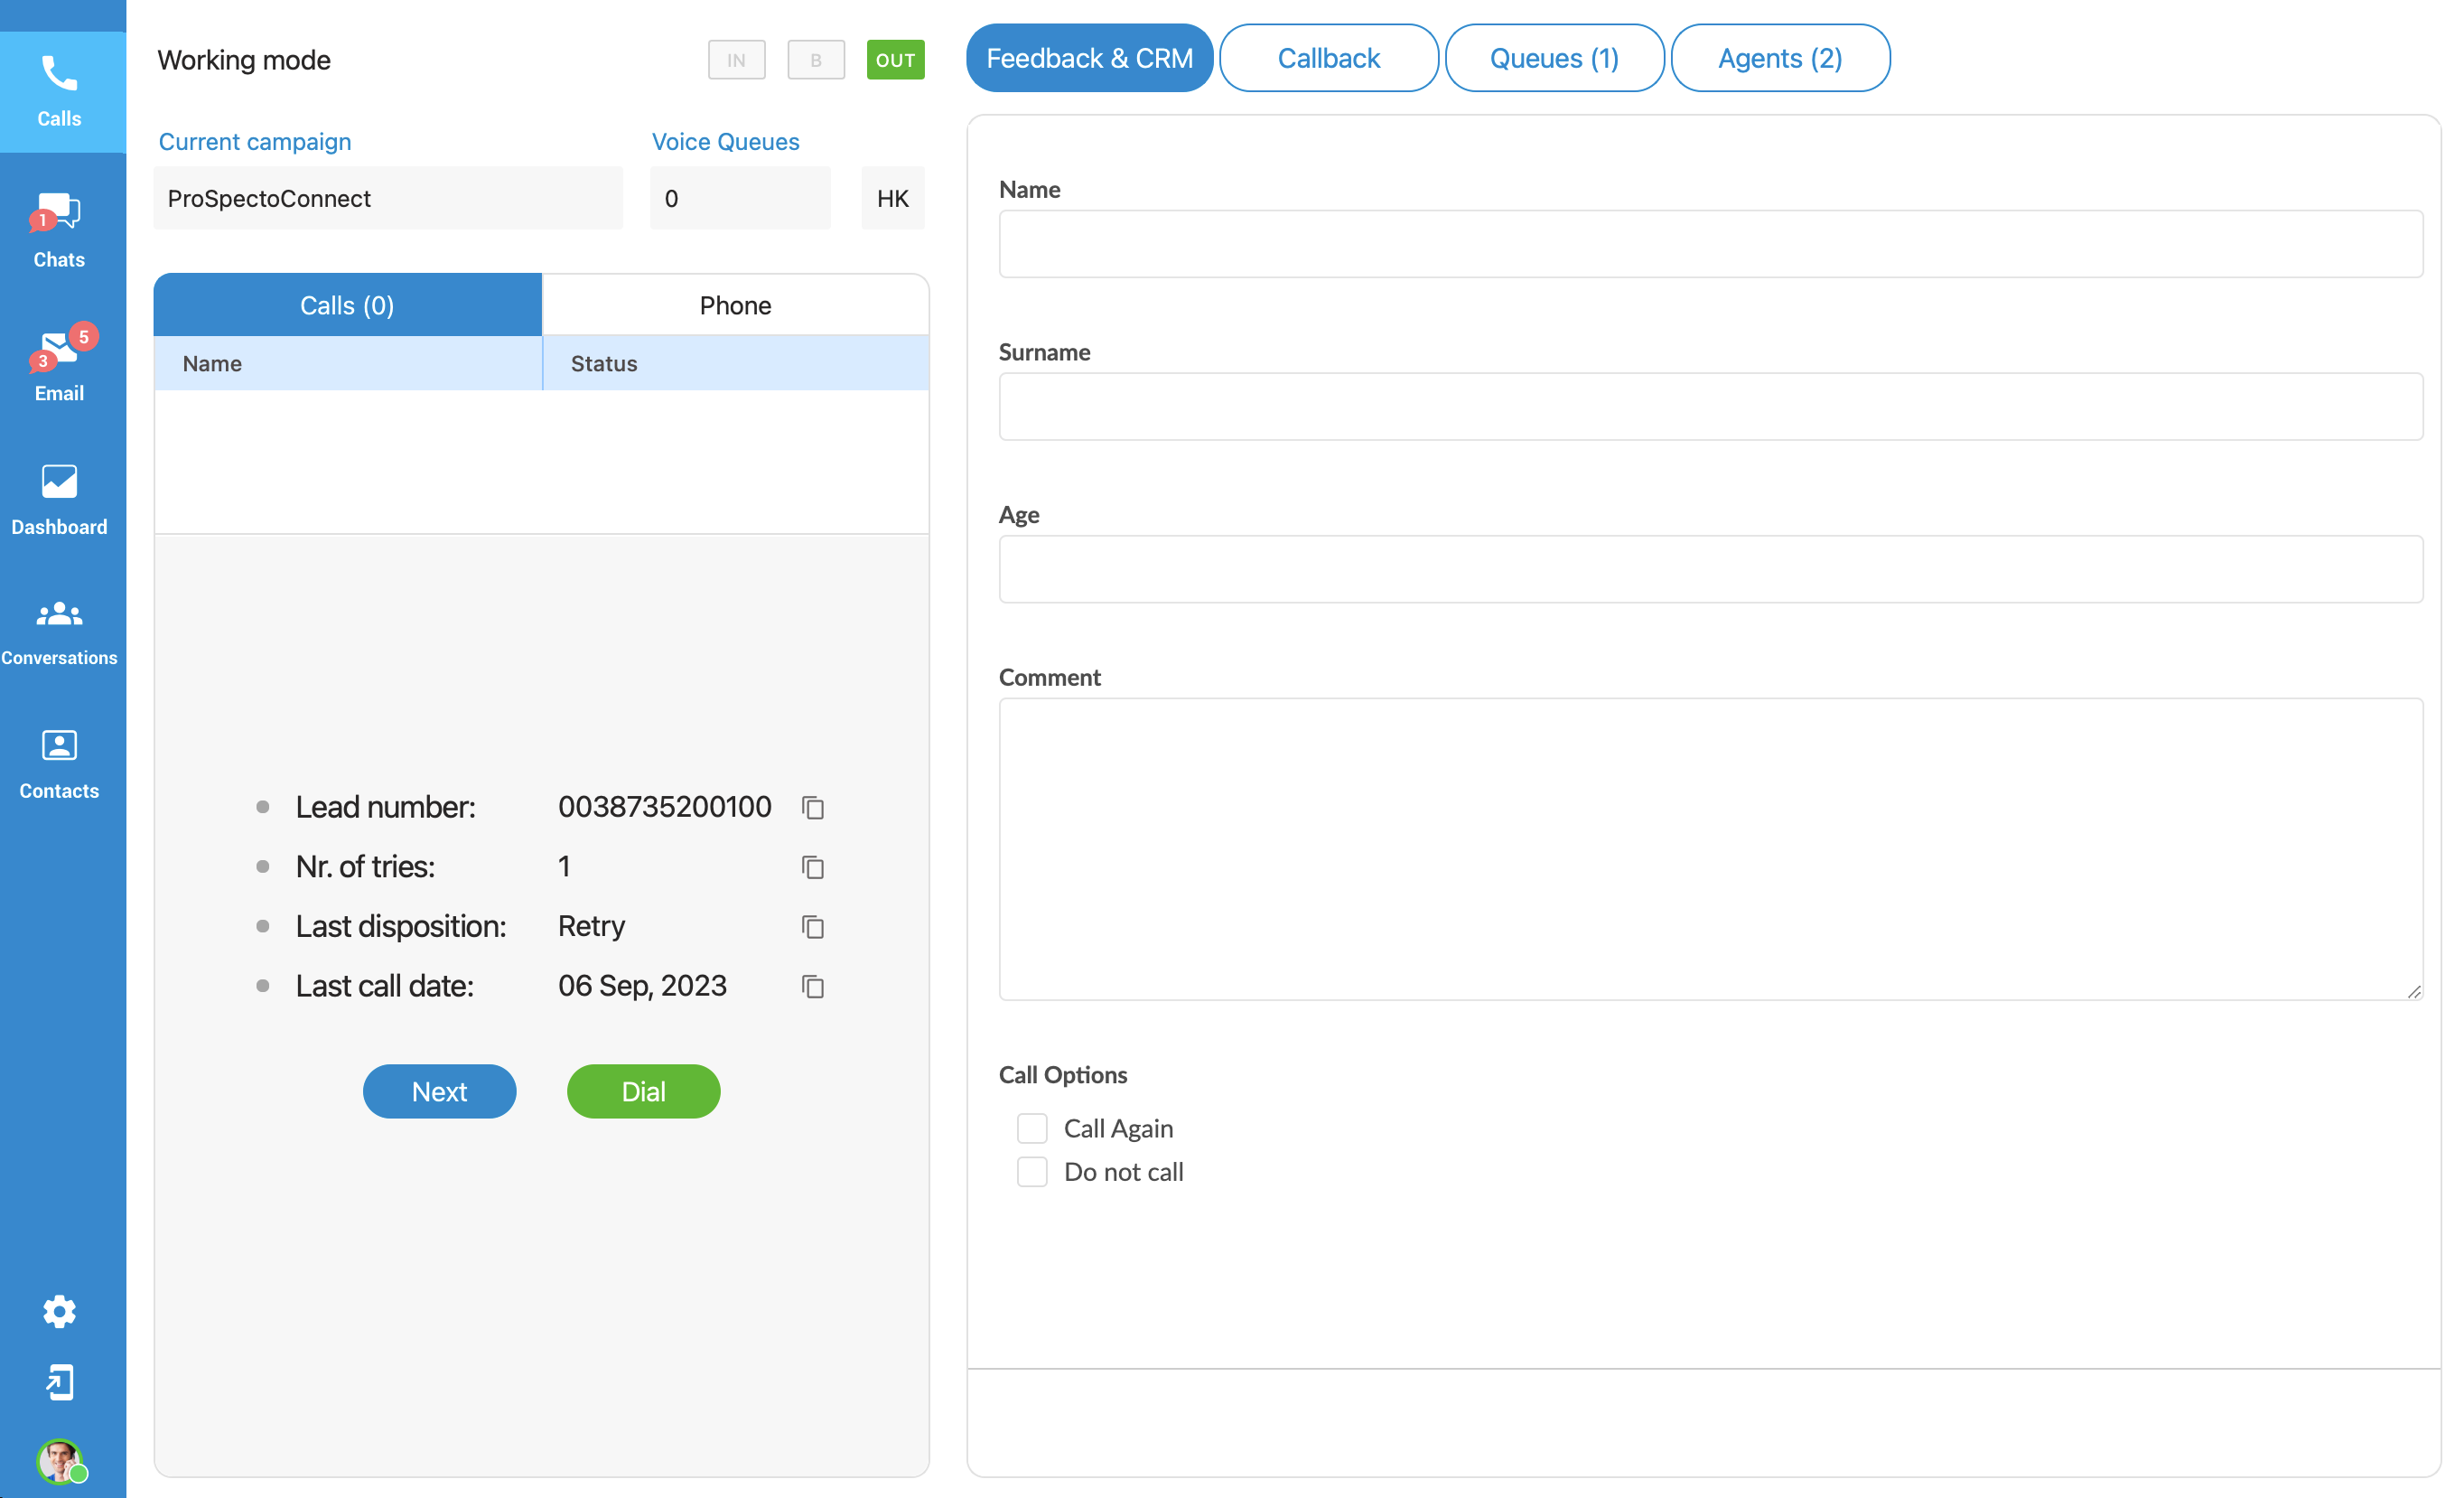
Feedback Form is displayed but cannot be edited until the call starts.
¶ Progressive strategy
The Progressive strategy works the same as a preview. The only difference is the Agent has a timeout in which they must perform a dial, and there is no possibility to manually fetch the next lead. If the Agent does not perform dial inside the desired time frame, the system will automatically dial the next lead.
There is an option in PBXware called ''Preview Timeout'' that indicates how long it will take before the system dials lead automatically. This information is shown below the ![]() button.
button.
¶ Enhanced Ring Groups Calls
Calls from Enhanced Ring Groups are supported for the Business, Office, Agent, & Supervisor edition.
The user can see the name of the ERG that has been calling for all incoming calls.
¶ Feedback Forms
Agents can use Feedback forms to obtain customer feedback. The main goal is to understand better the overall customer experience, which can help improve products or services and even the fundamental understanding of the business users.
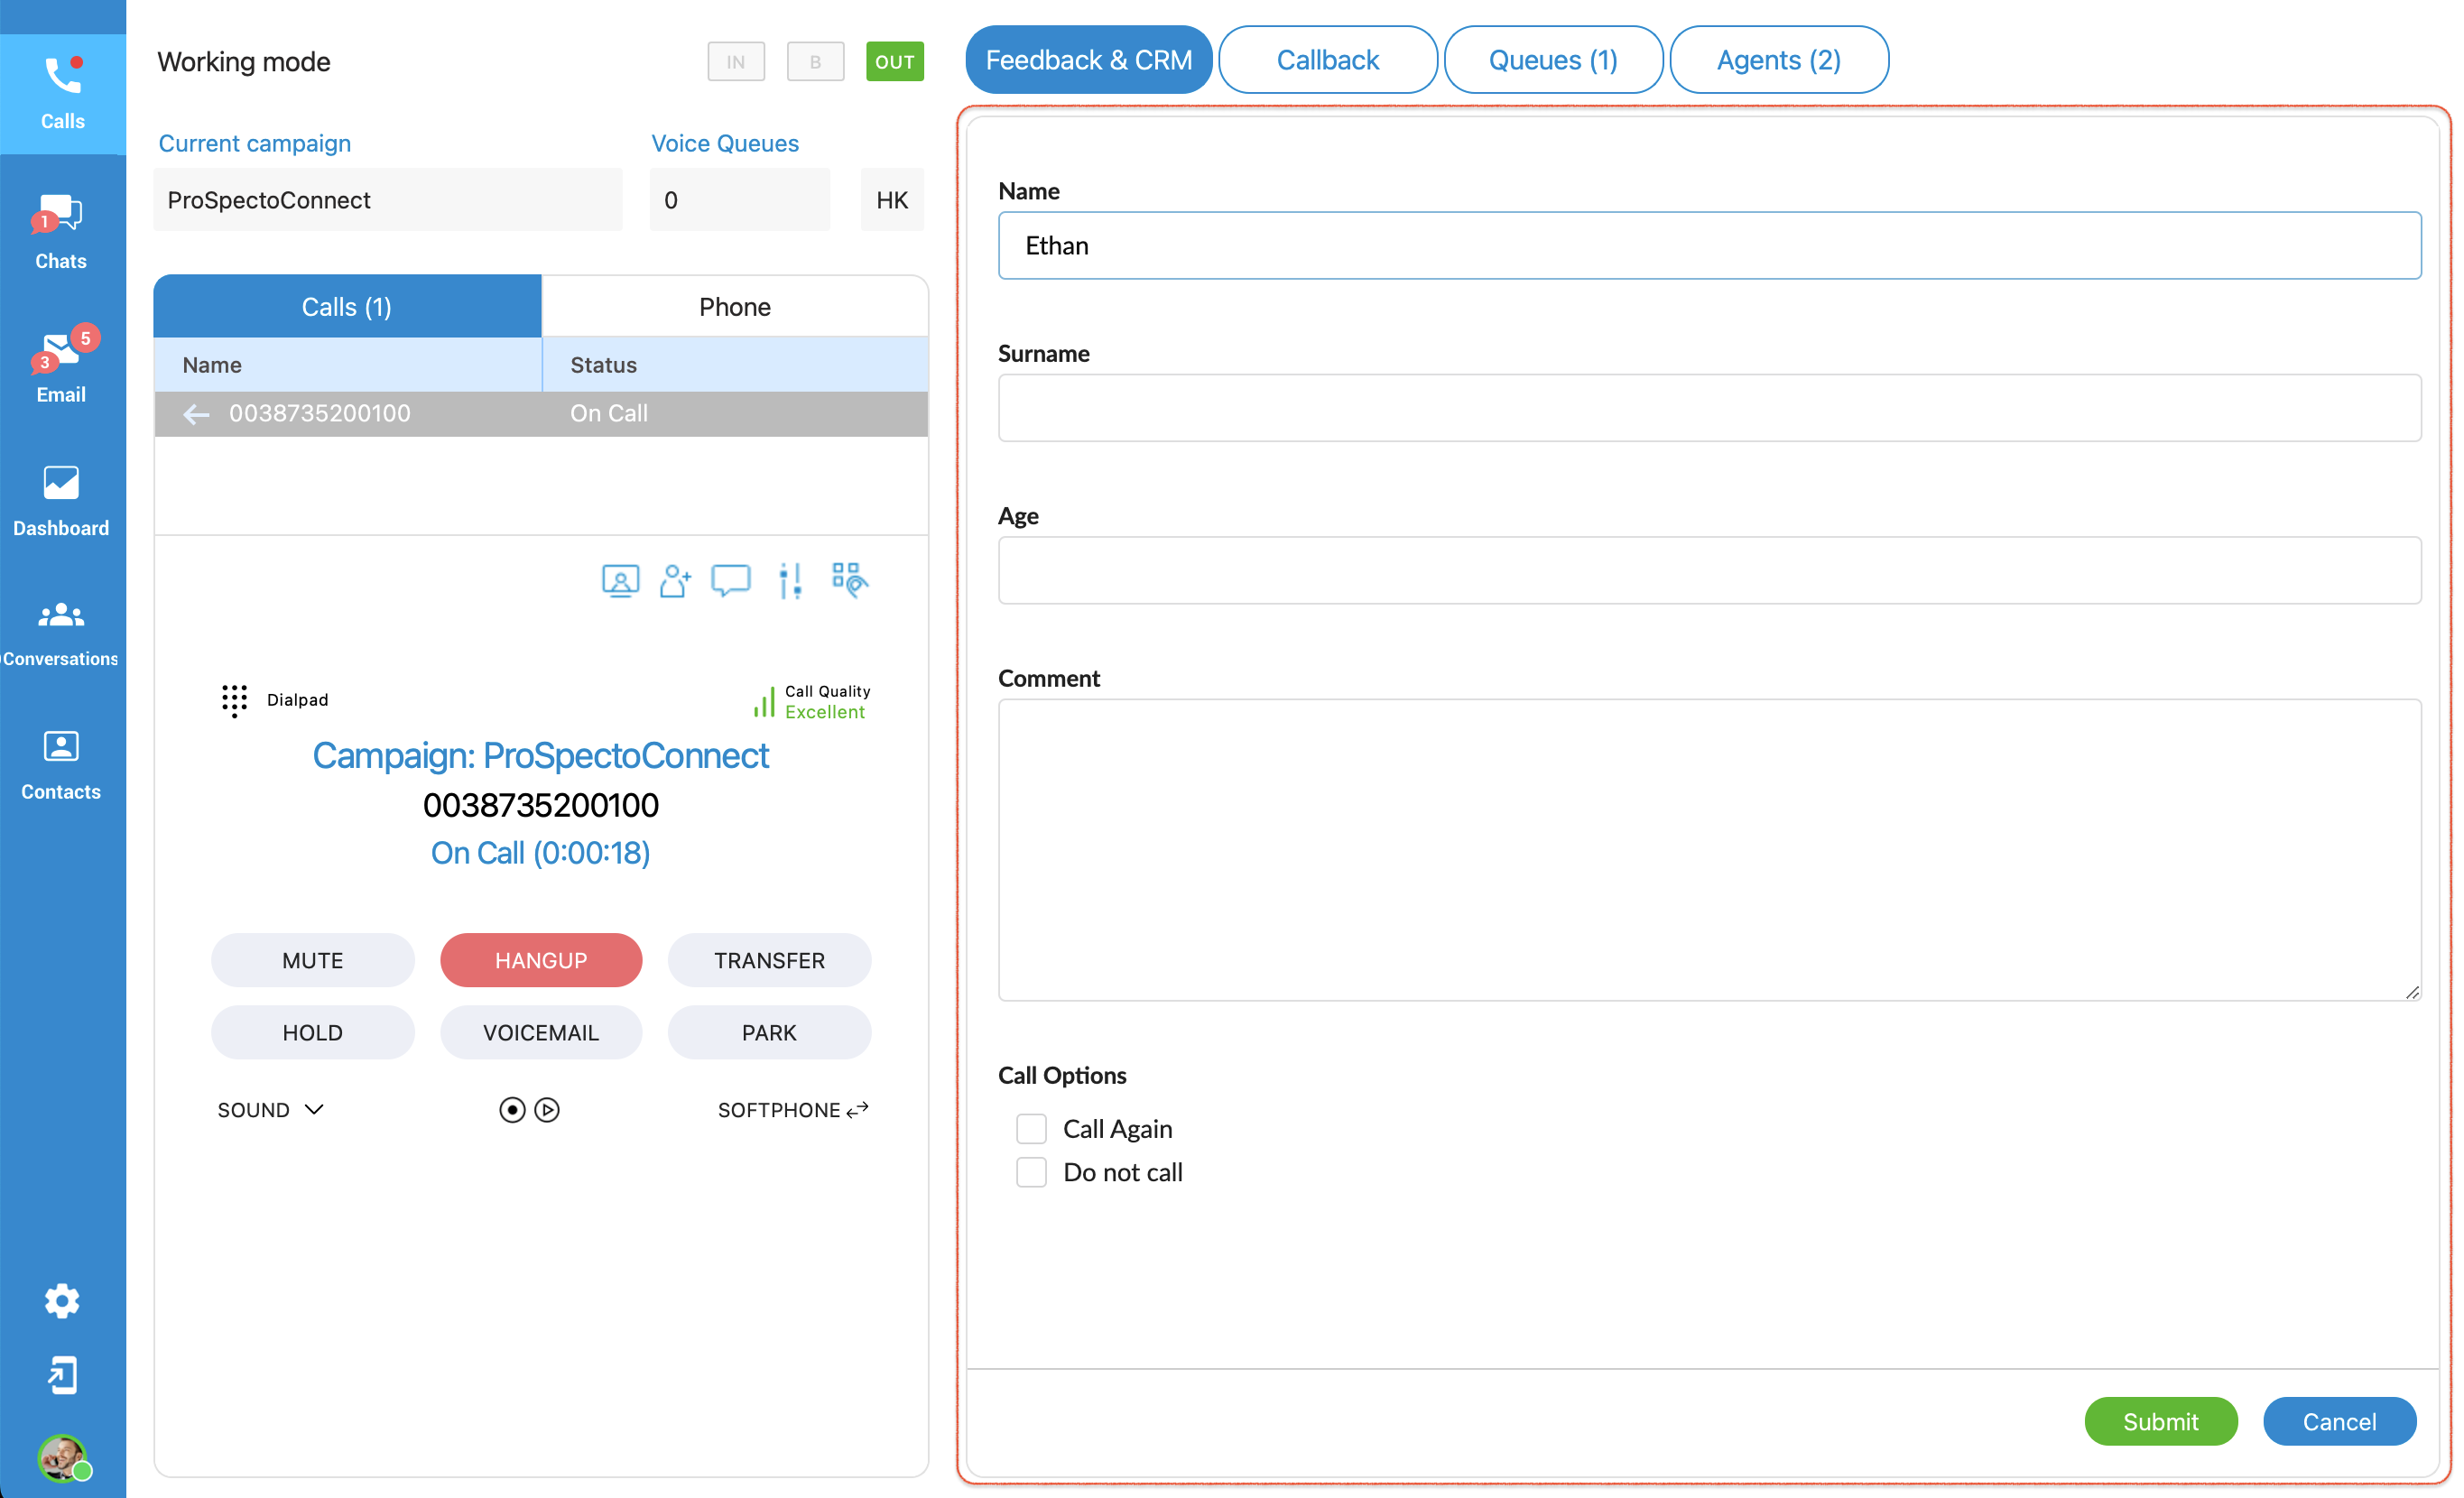
Feedback forms are used for Queues and Campaigns. They are displayed whenever there is a new call into the Queue or a new call from the Campaign. In order to show the Feedback form within the App, it has to be loaded on PBXware, and the option 'Send Feedback Forms' must be set to 'Yes'. Otherwise, a Feedback form is not available.
To edit the Feedback form, the user may click the  button that is placed on the bottom right side of ''Feedback widget''.
When editing is done, clicking the  button to send all data to the server.
If the user clicks the  button, all entered information will be lost, and the Feedback form will be closed.
In the Preview/Progressive strategy, a Feedback form is visible before the call is started, but in that case is possible only to read information, not to edit it. That helps an Agent to decide if they want to call that contact or go to the next one. The Feedback form stays visible even after the call is finished until the user submits or closes it.
If the call is rejected, the Feedback form will not be displayed.
¶ Screen Pop
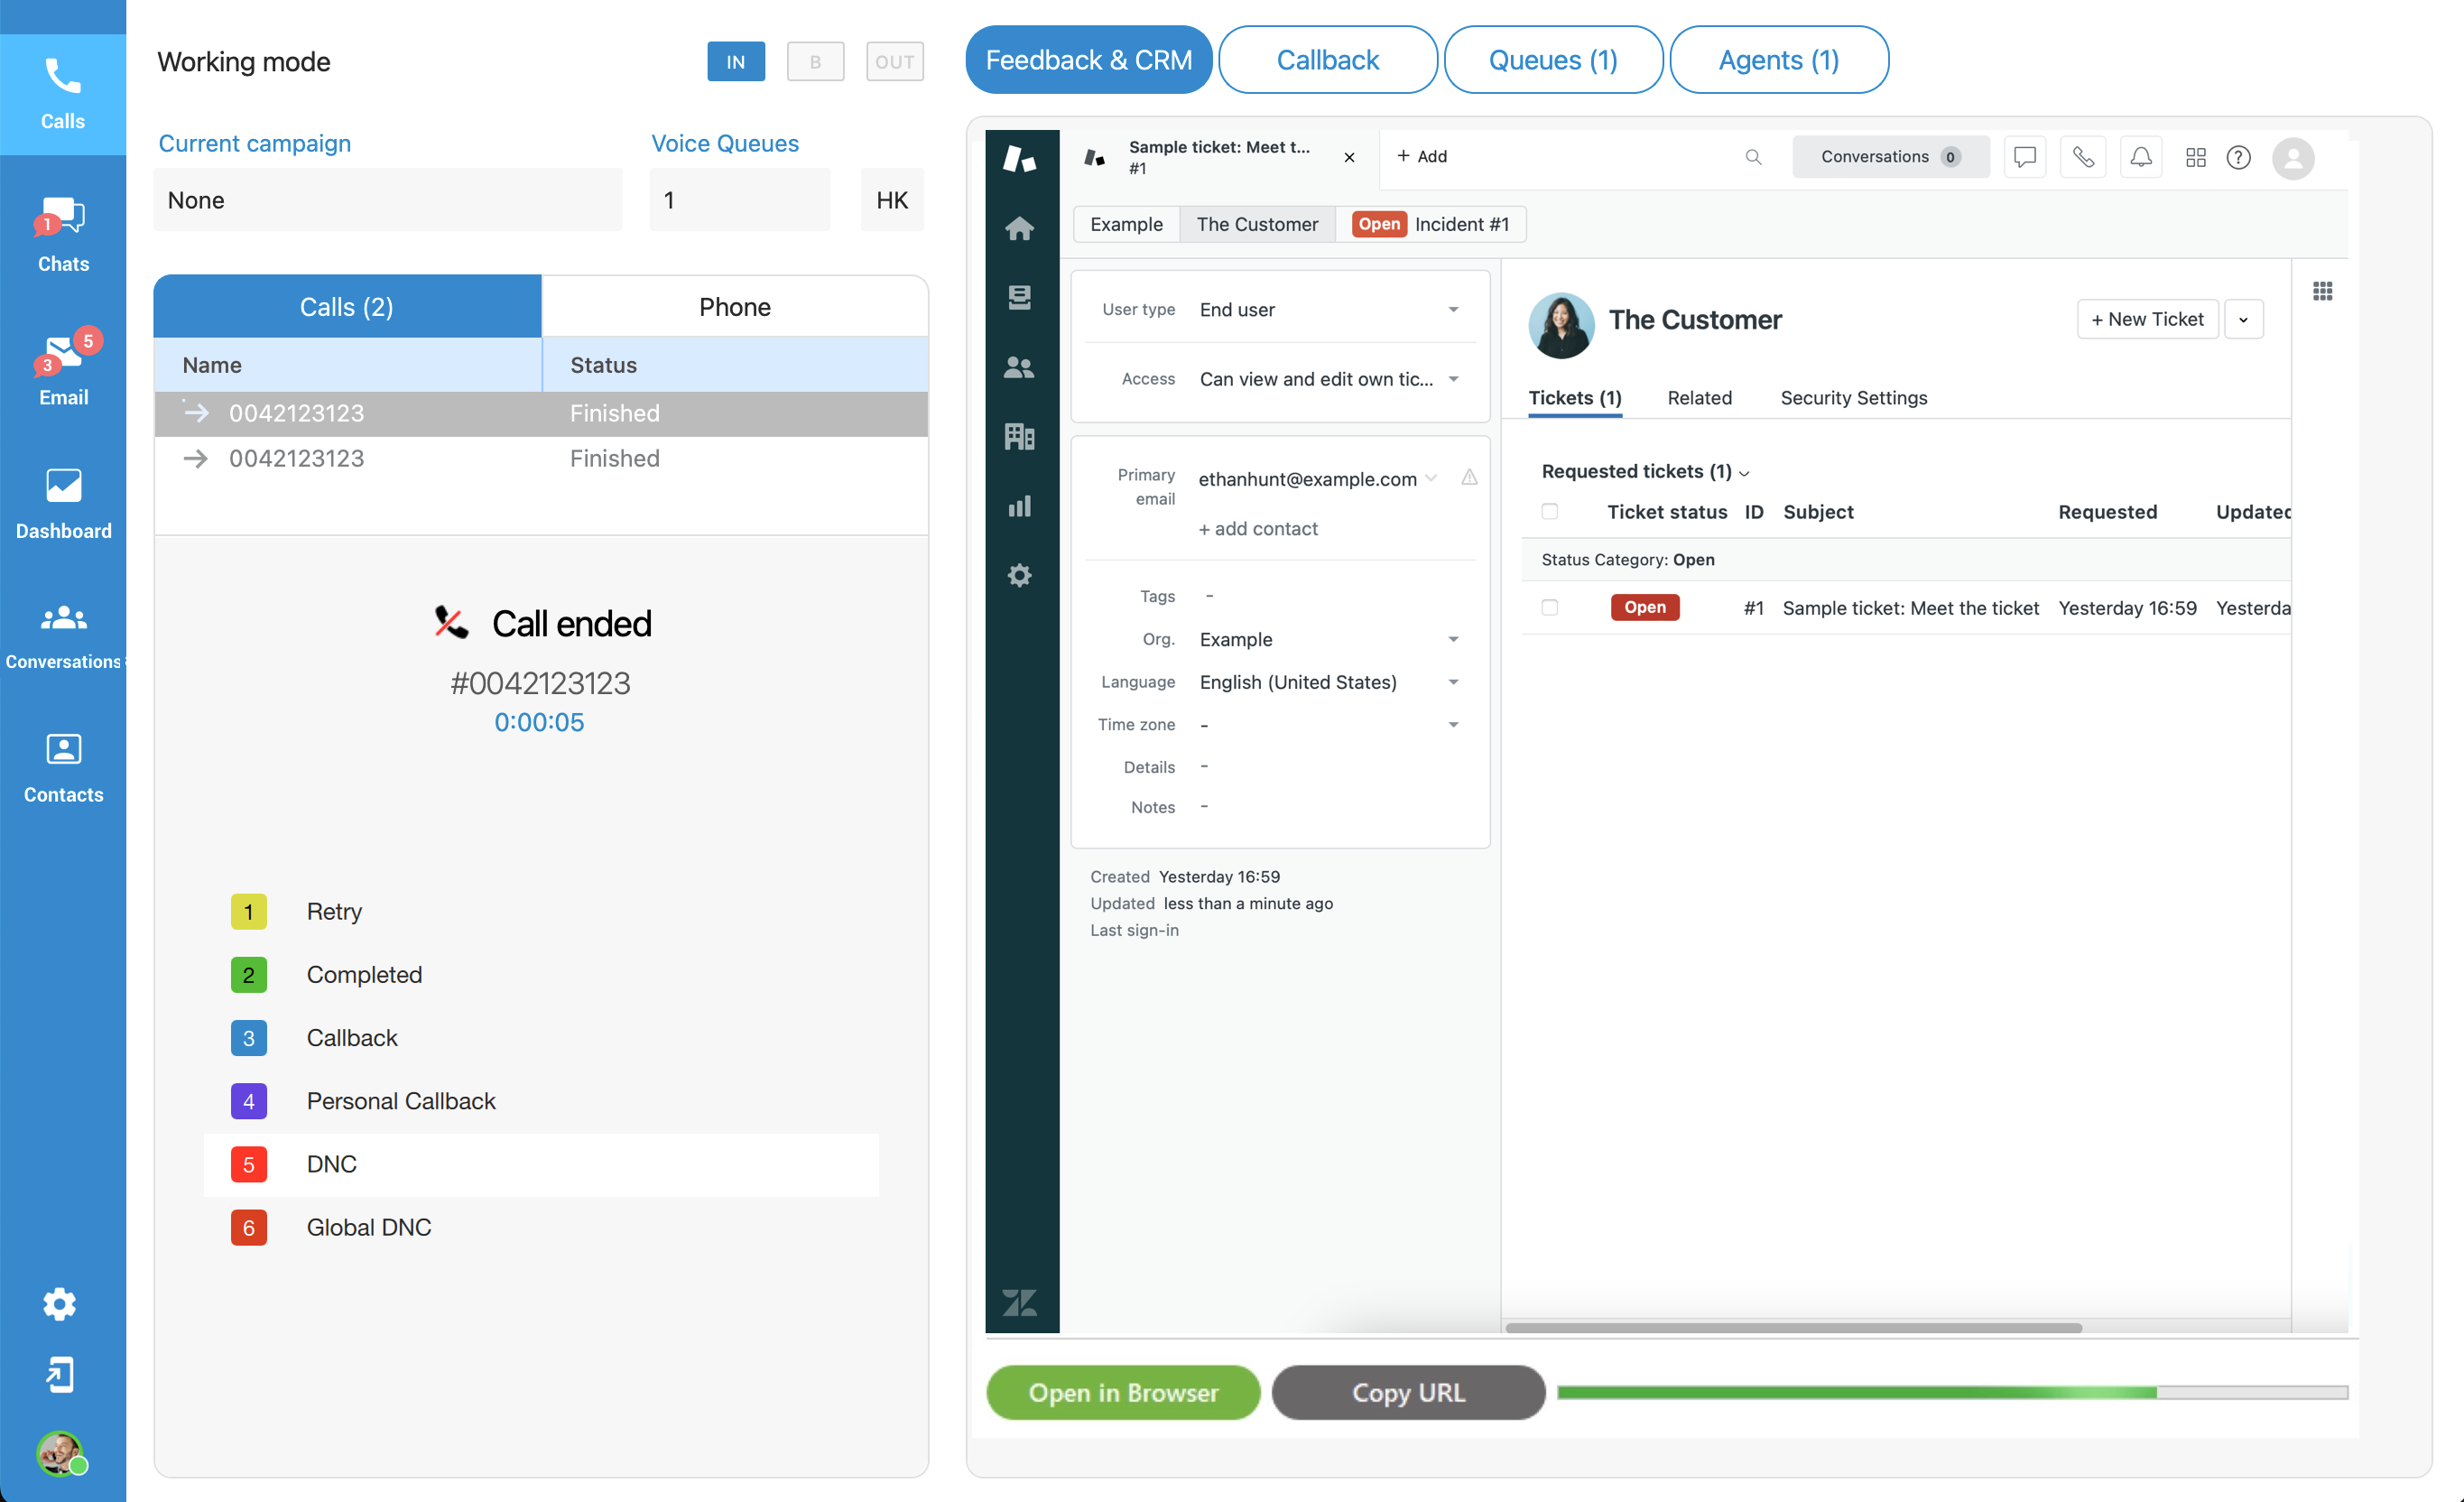
In order to use the CRM feature, the CallPopup module needs to be enabled.
Within settings (Preferences->Modules->Settings), the user must check the option ''Screen Pop within the Agent panel inside the application instead of Default Browser''.
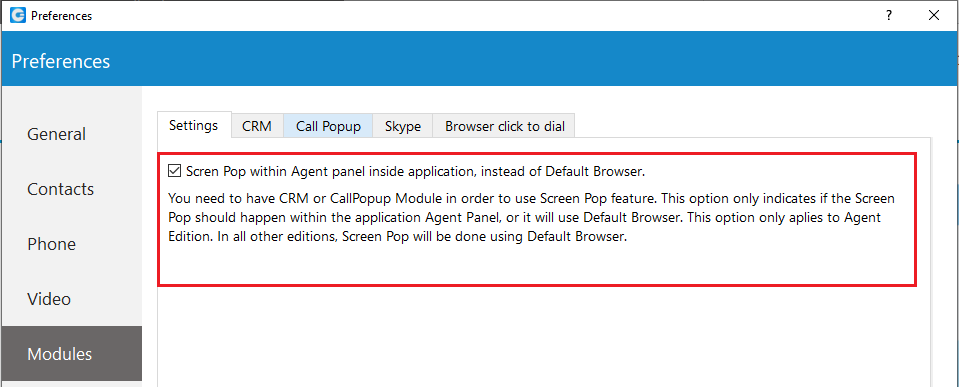
If this feature is enabled, the Screen Pop will appear within the application inside the ''Agent Panel'' window; otherwise, it will use ''Default Browser''.
The system offers the capability to trigger a screen pop based on the URL configured for each specific Queue. This means that when an interaction, such as a call, is received within a particular Queue, the system can automatically open a designated web page or URL associated with that Queue.
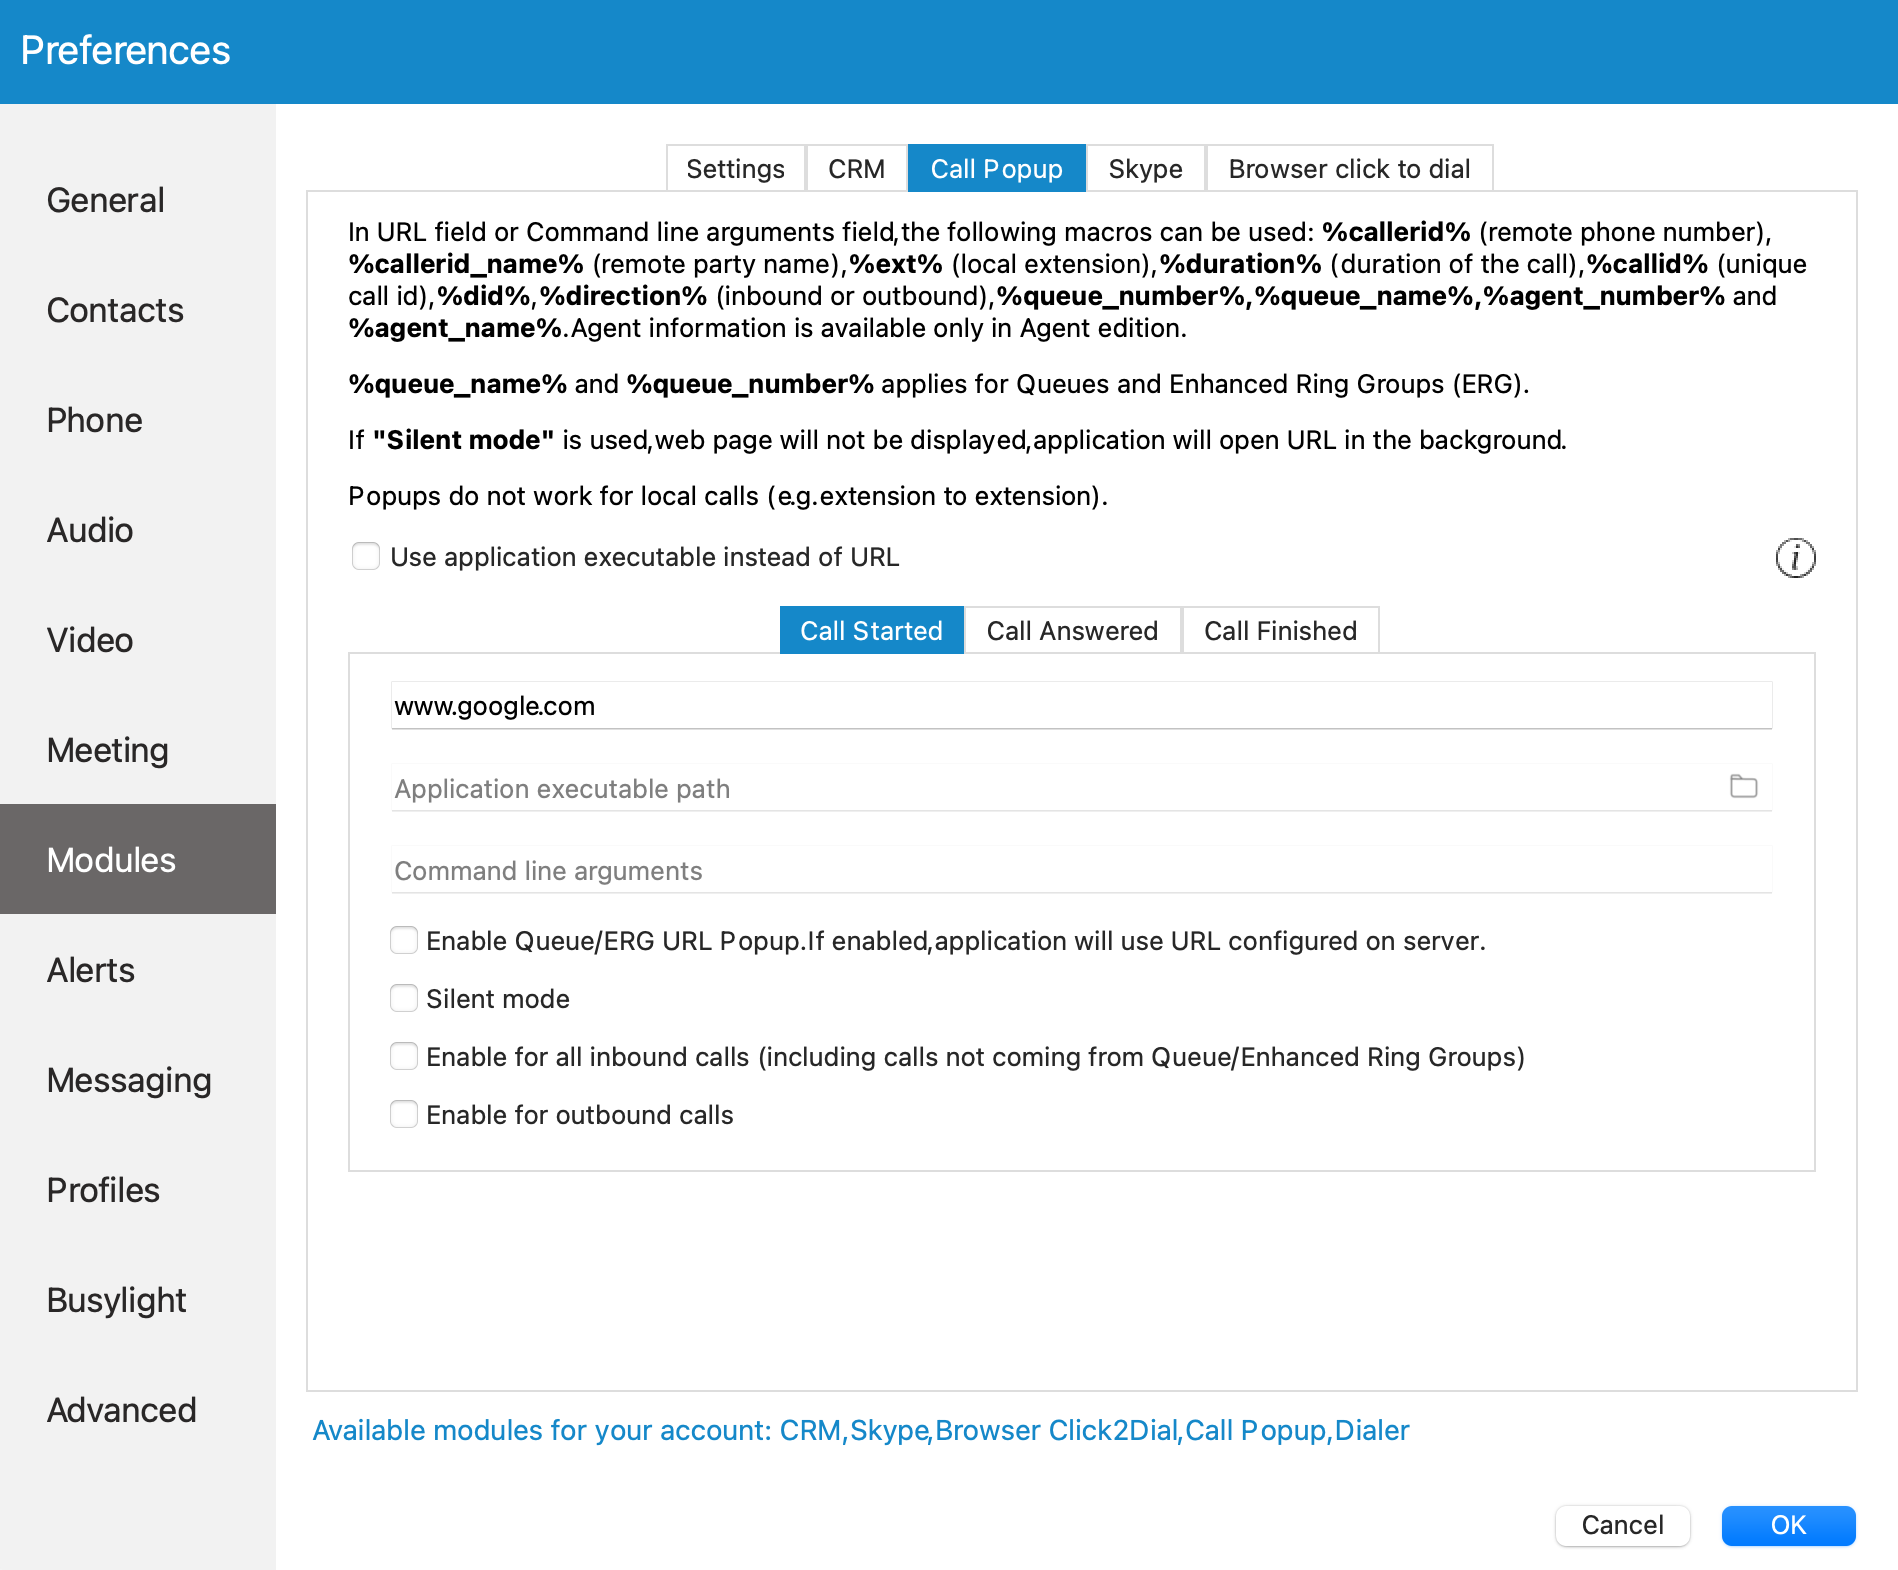
However, it's important to note that this functionality is conditional upon a specific system setting. To enable this feature, you need to ensure that the option labeled ''Enable Queue/ERG URL Popup'' is selected. This setting can be found in the app preferences under the ''Modules'' section and specifically within the ''Call Popup'' tab.
When this option is checked or enabled, it signifies that the application will utilize the URL previously configured on the server to facilitate the screen pop behavior. In practical terms, this means that the designated web page or URL will open automatically when an interaction is initiated within the specified Queue.
While loading the page, there is a progress bar that indicates that the page has not been fully loaded yet.
To stop the page loading click on the Stop button.
If the page fails to load, an icon Reload will appear, making it possible to reload the web page.
To the left of the reload icon, a warning icon Warning is placed, so the user can get more information about page status by hovering over the icon.
Also, two actions are possible:
 Opens the page in ''Default Browser''
 Copies the URL of the page that is loading/loaded
¶ CRM Pop
The CRM module offers seamless integration with a range of CRM systems, including Salesforce, SugarCRM, Zoho, Microsoft Dynamics, Bullhorn, Zendesk, Pipedrive and Hubspot. It provides a host of valuable features, such as call popups and logging, automated contact synchronization, one-click dialing, robust search functionality, CDR (Call Detail Record) upload capabilities, and more.
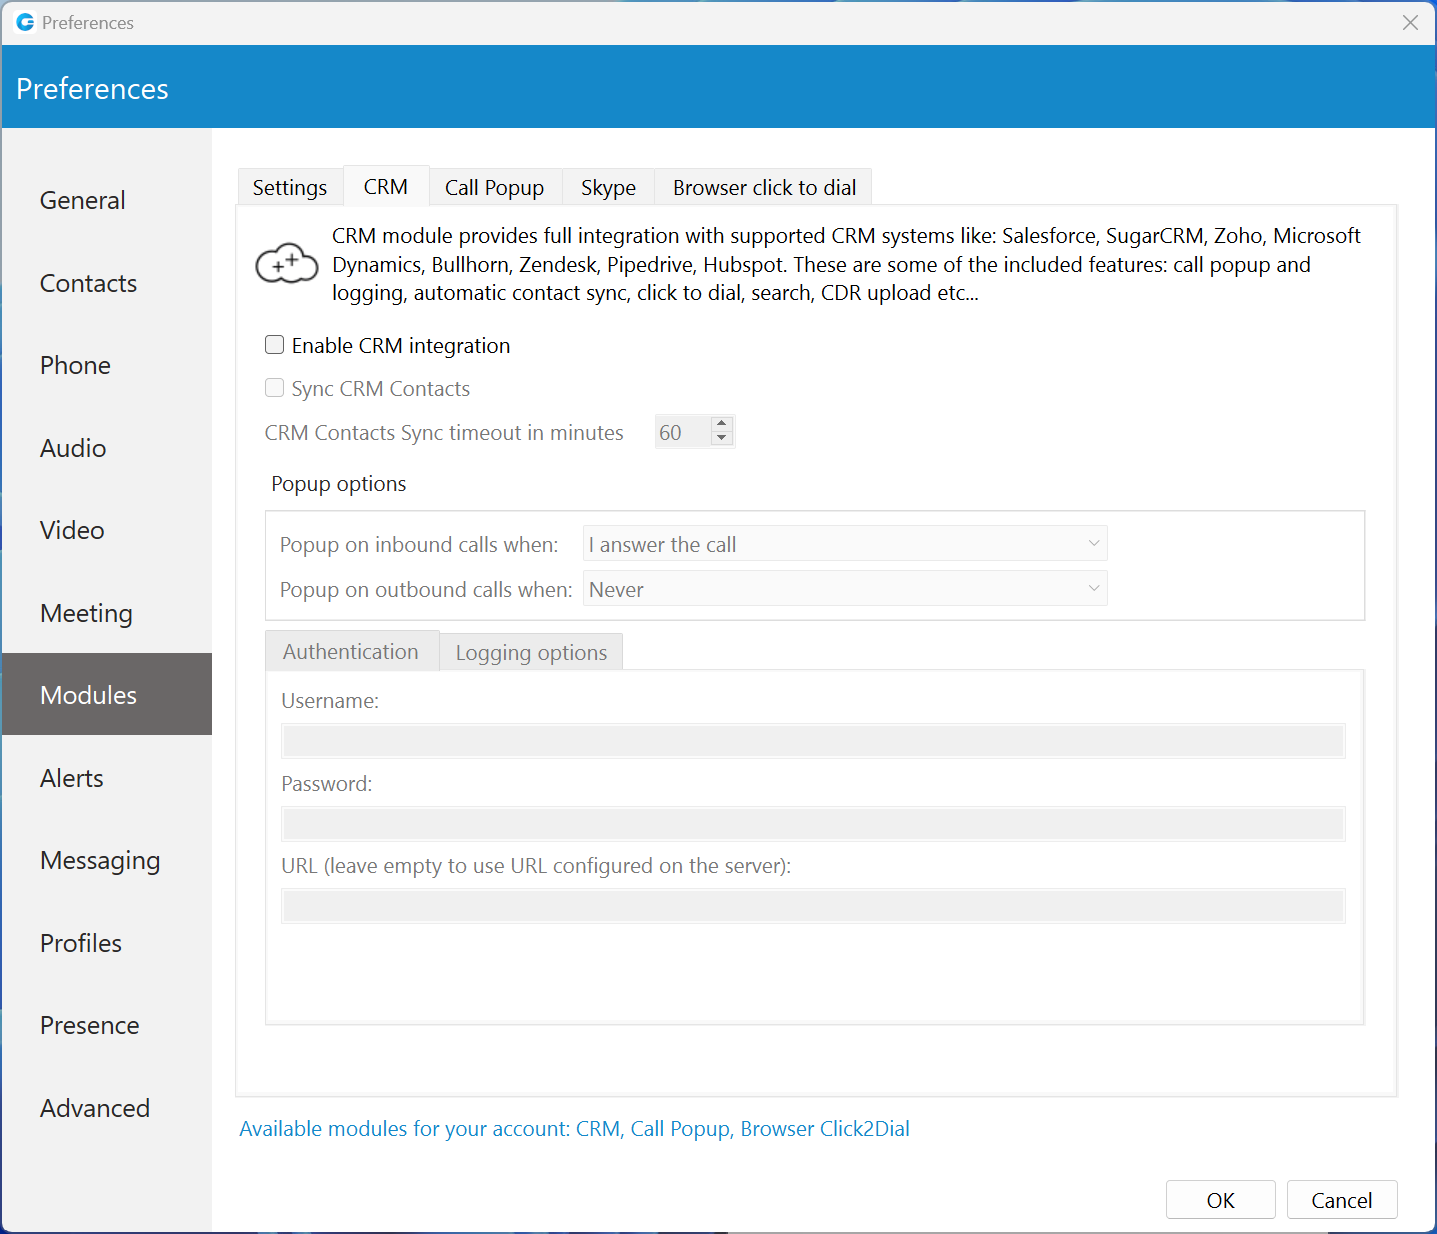
Underneath the CRM tab, there’s an option that enables the CRM Integration.
¶ Personal Callback
When Agents select the disposition of the Personal Callback type, the system will automatically create a list of all upcoming personal callbacks and place the list inside the Callback tab within the Agent panel.
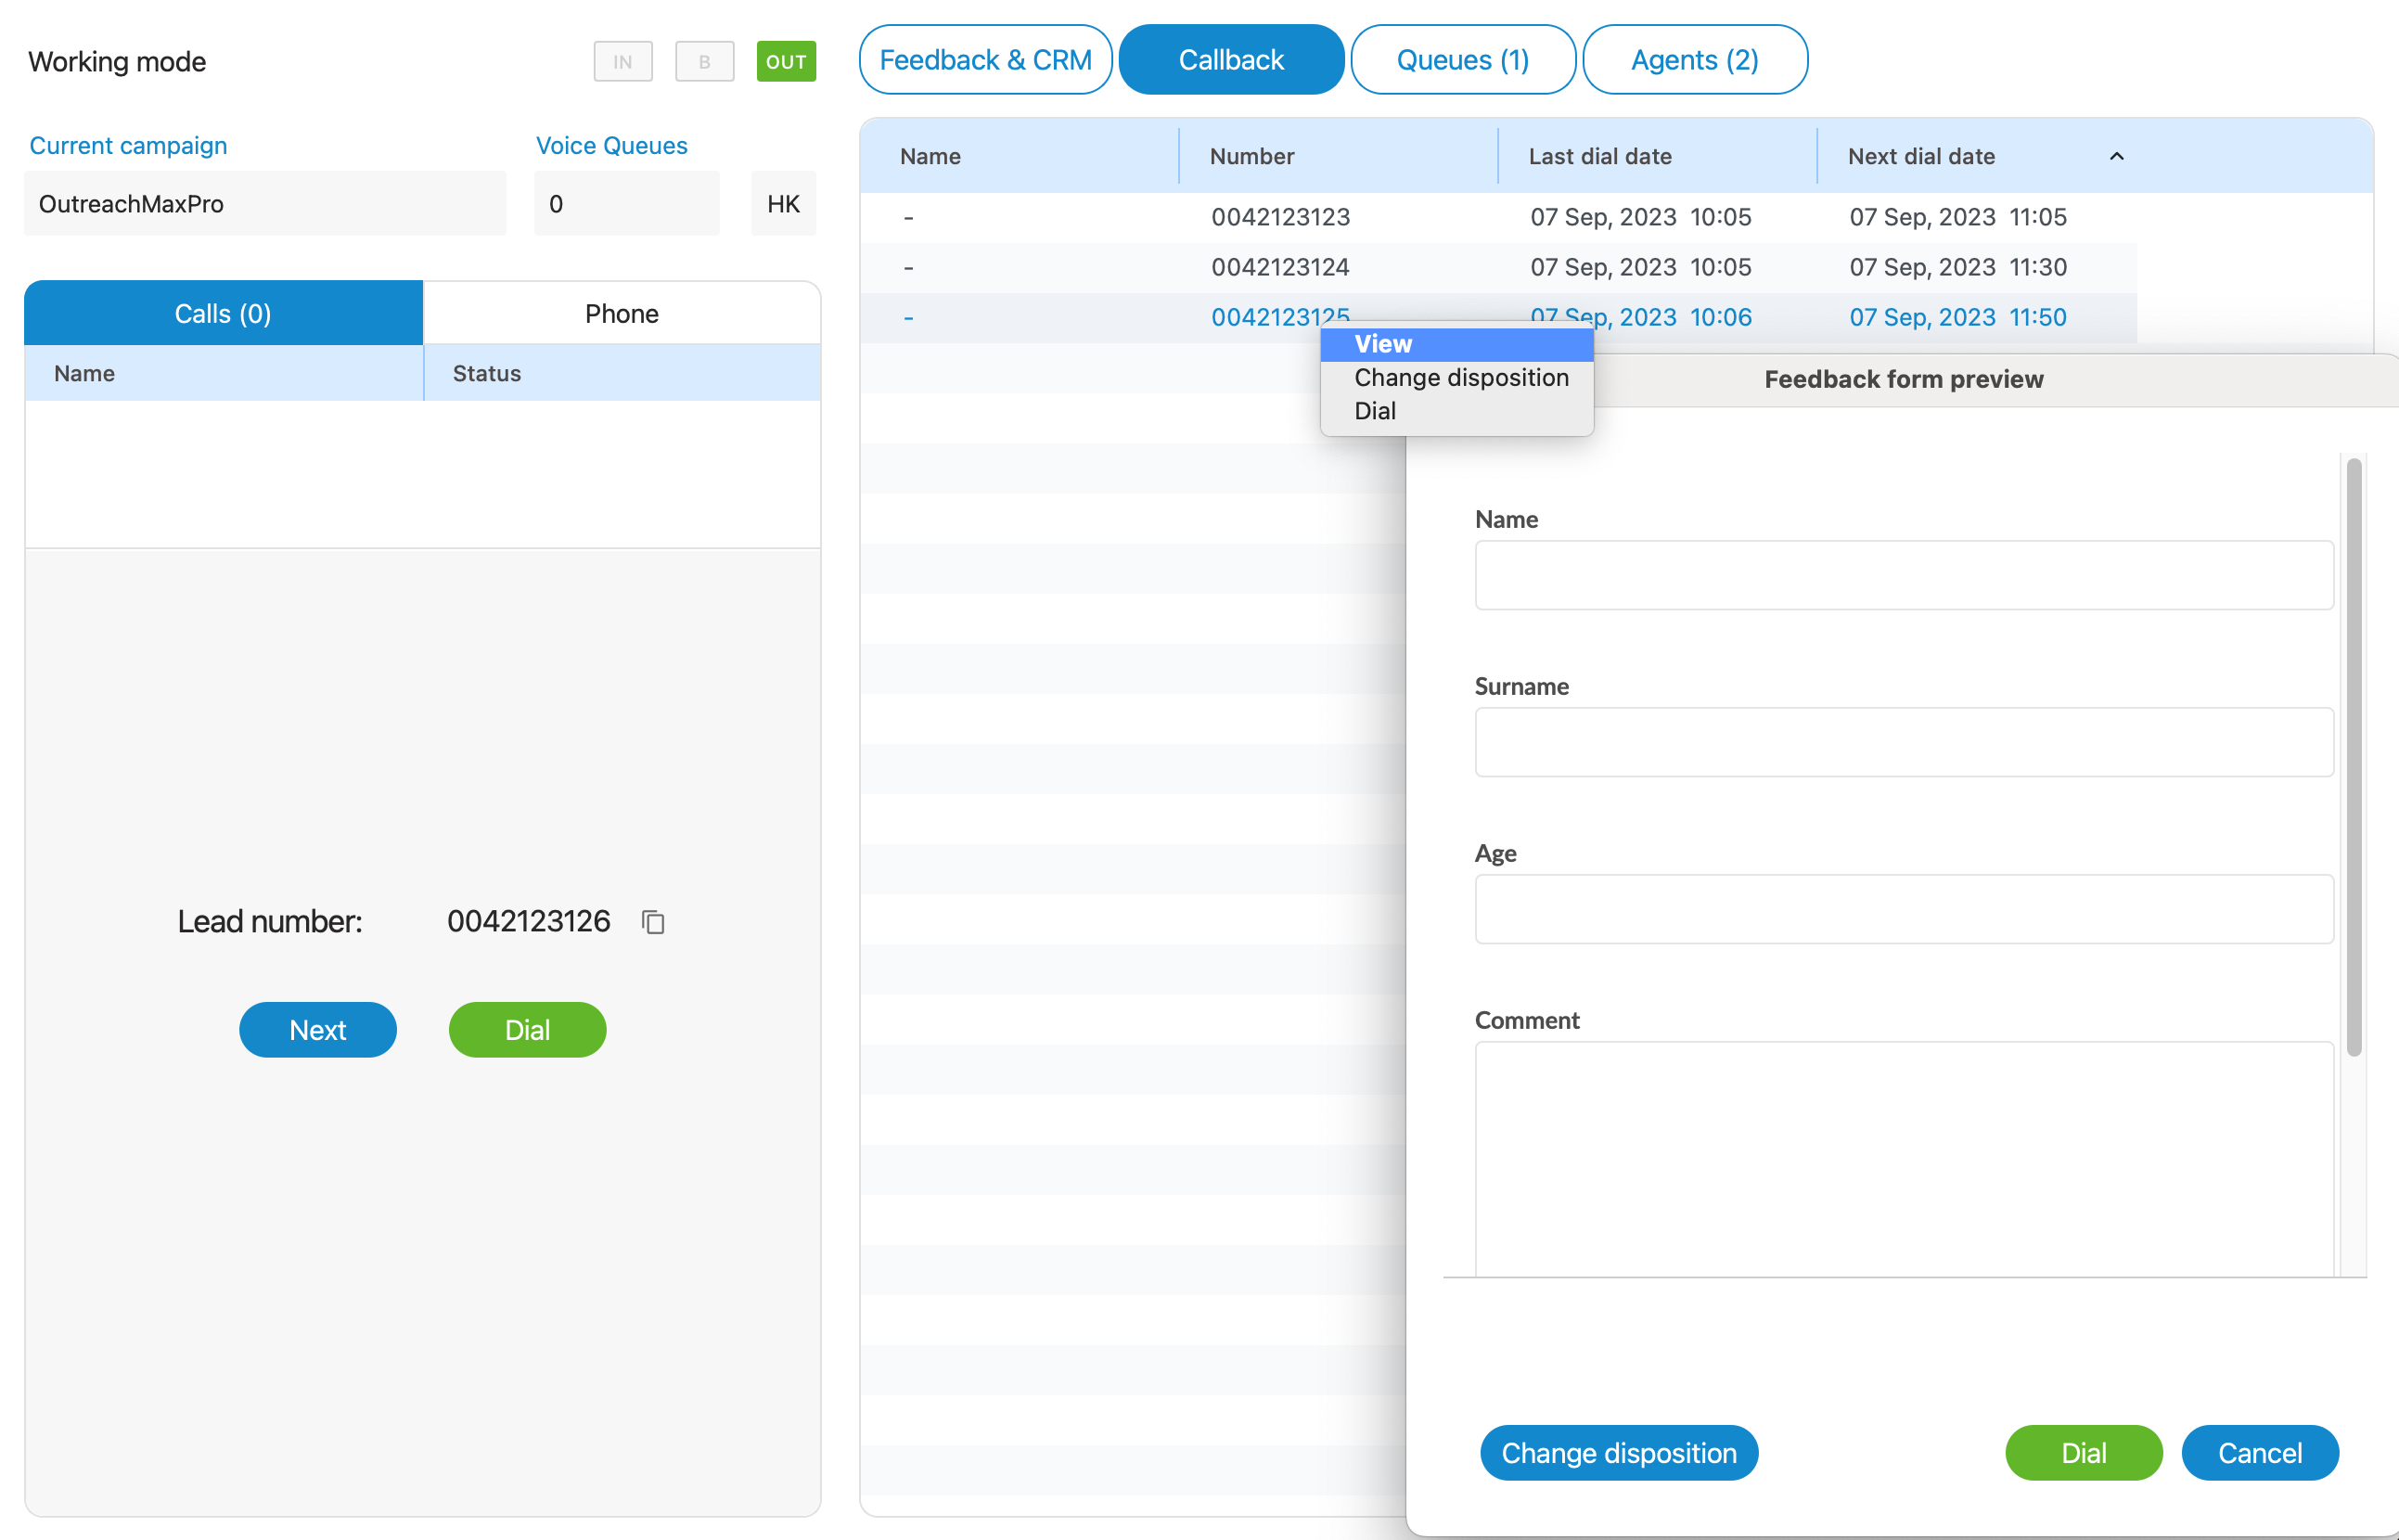
A name, number, last dial date, and next dial date represent every personal callback. The Agent may edit the personal callback list by simply right-clicking on it.
The additional options will be presented:
View - opens a new dialog with detailed information about the lead (Feedback form). From this dialog, it is also possible to dial callback and change the disposition of the callback.
This is a default option available with a double mouse click.
Change disposition - opens a new dialog where it is possible to change callback disposition
If the disposition list is too large, a search field will be displayed above the list, allowing agents to search for the desired disposition by entering the disposition's code or name.
Dial - Dial callback
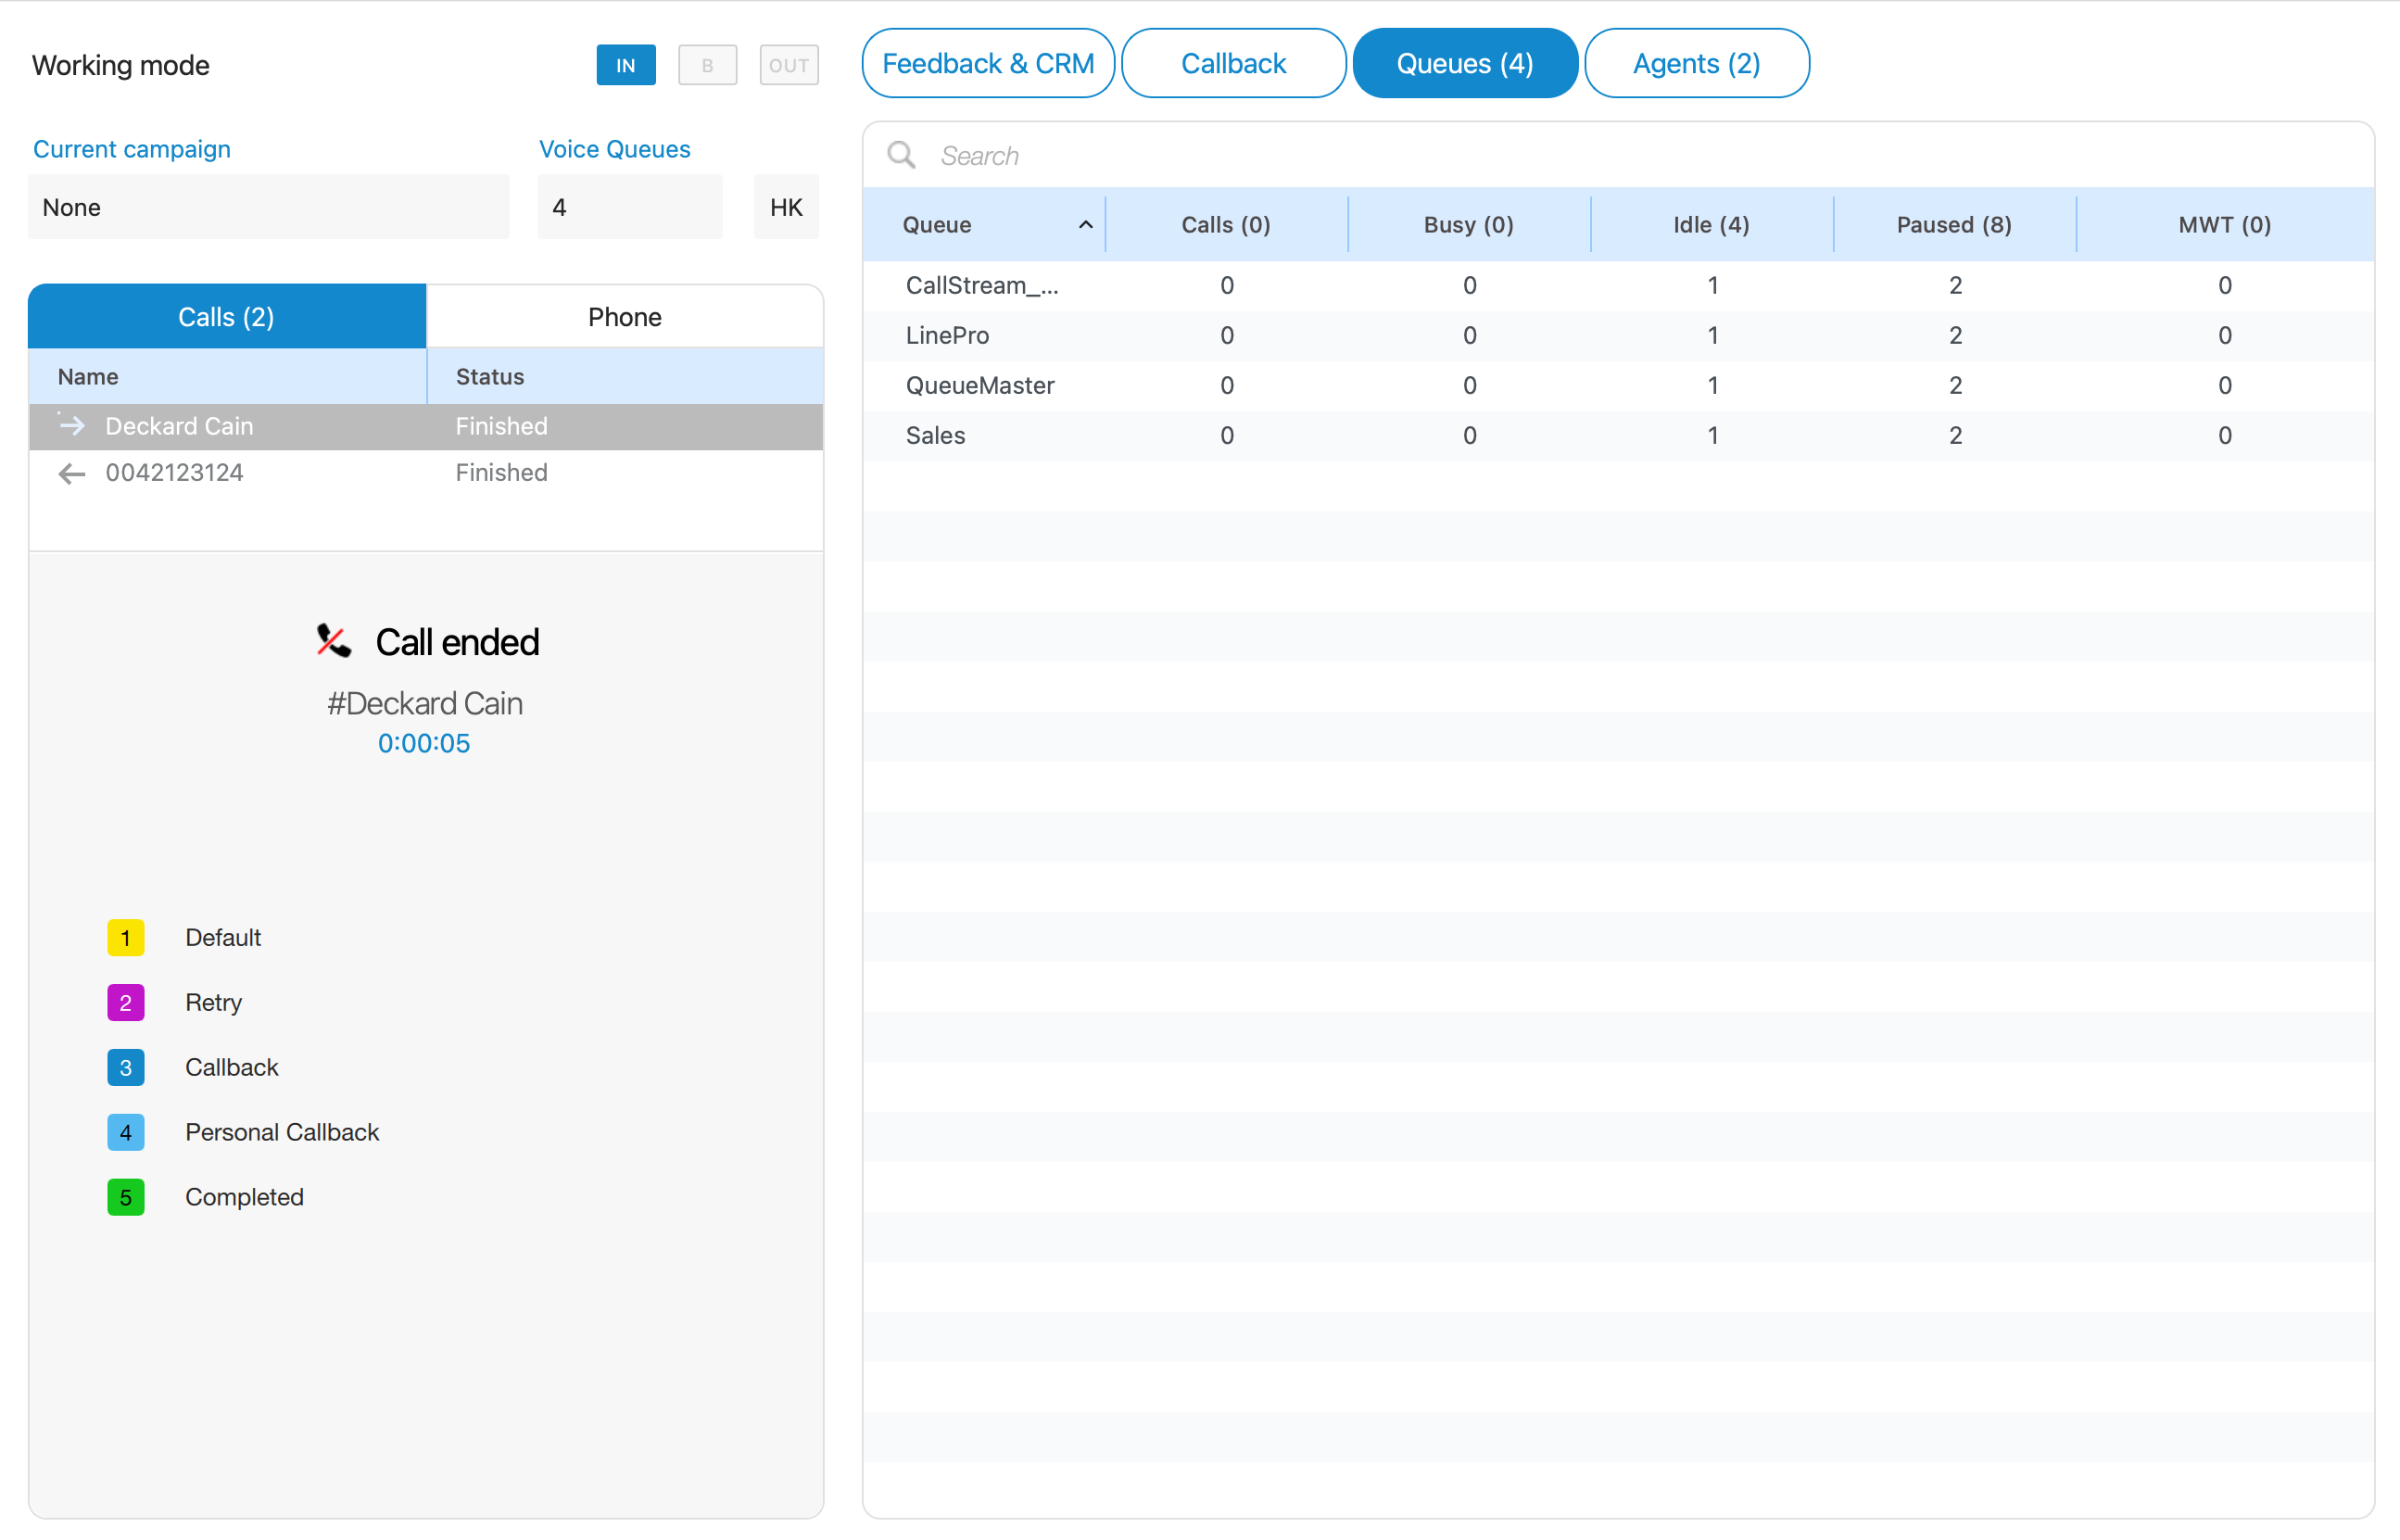
¶ Queues tab
The Queues tab section allows Agents to search through all queues on the system by queue name or queue number.
The total number of queues and which Queue will be displayed within the Agent panel can be managed through Queues Settings (Agent Panel Settings->Voice Settings)
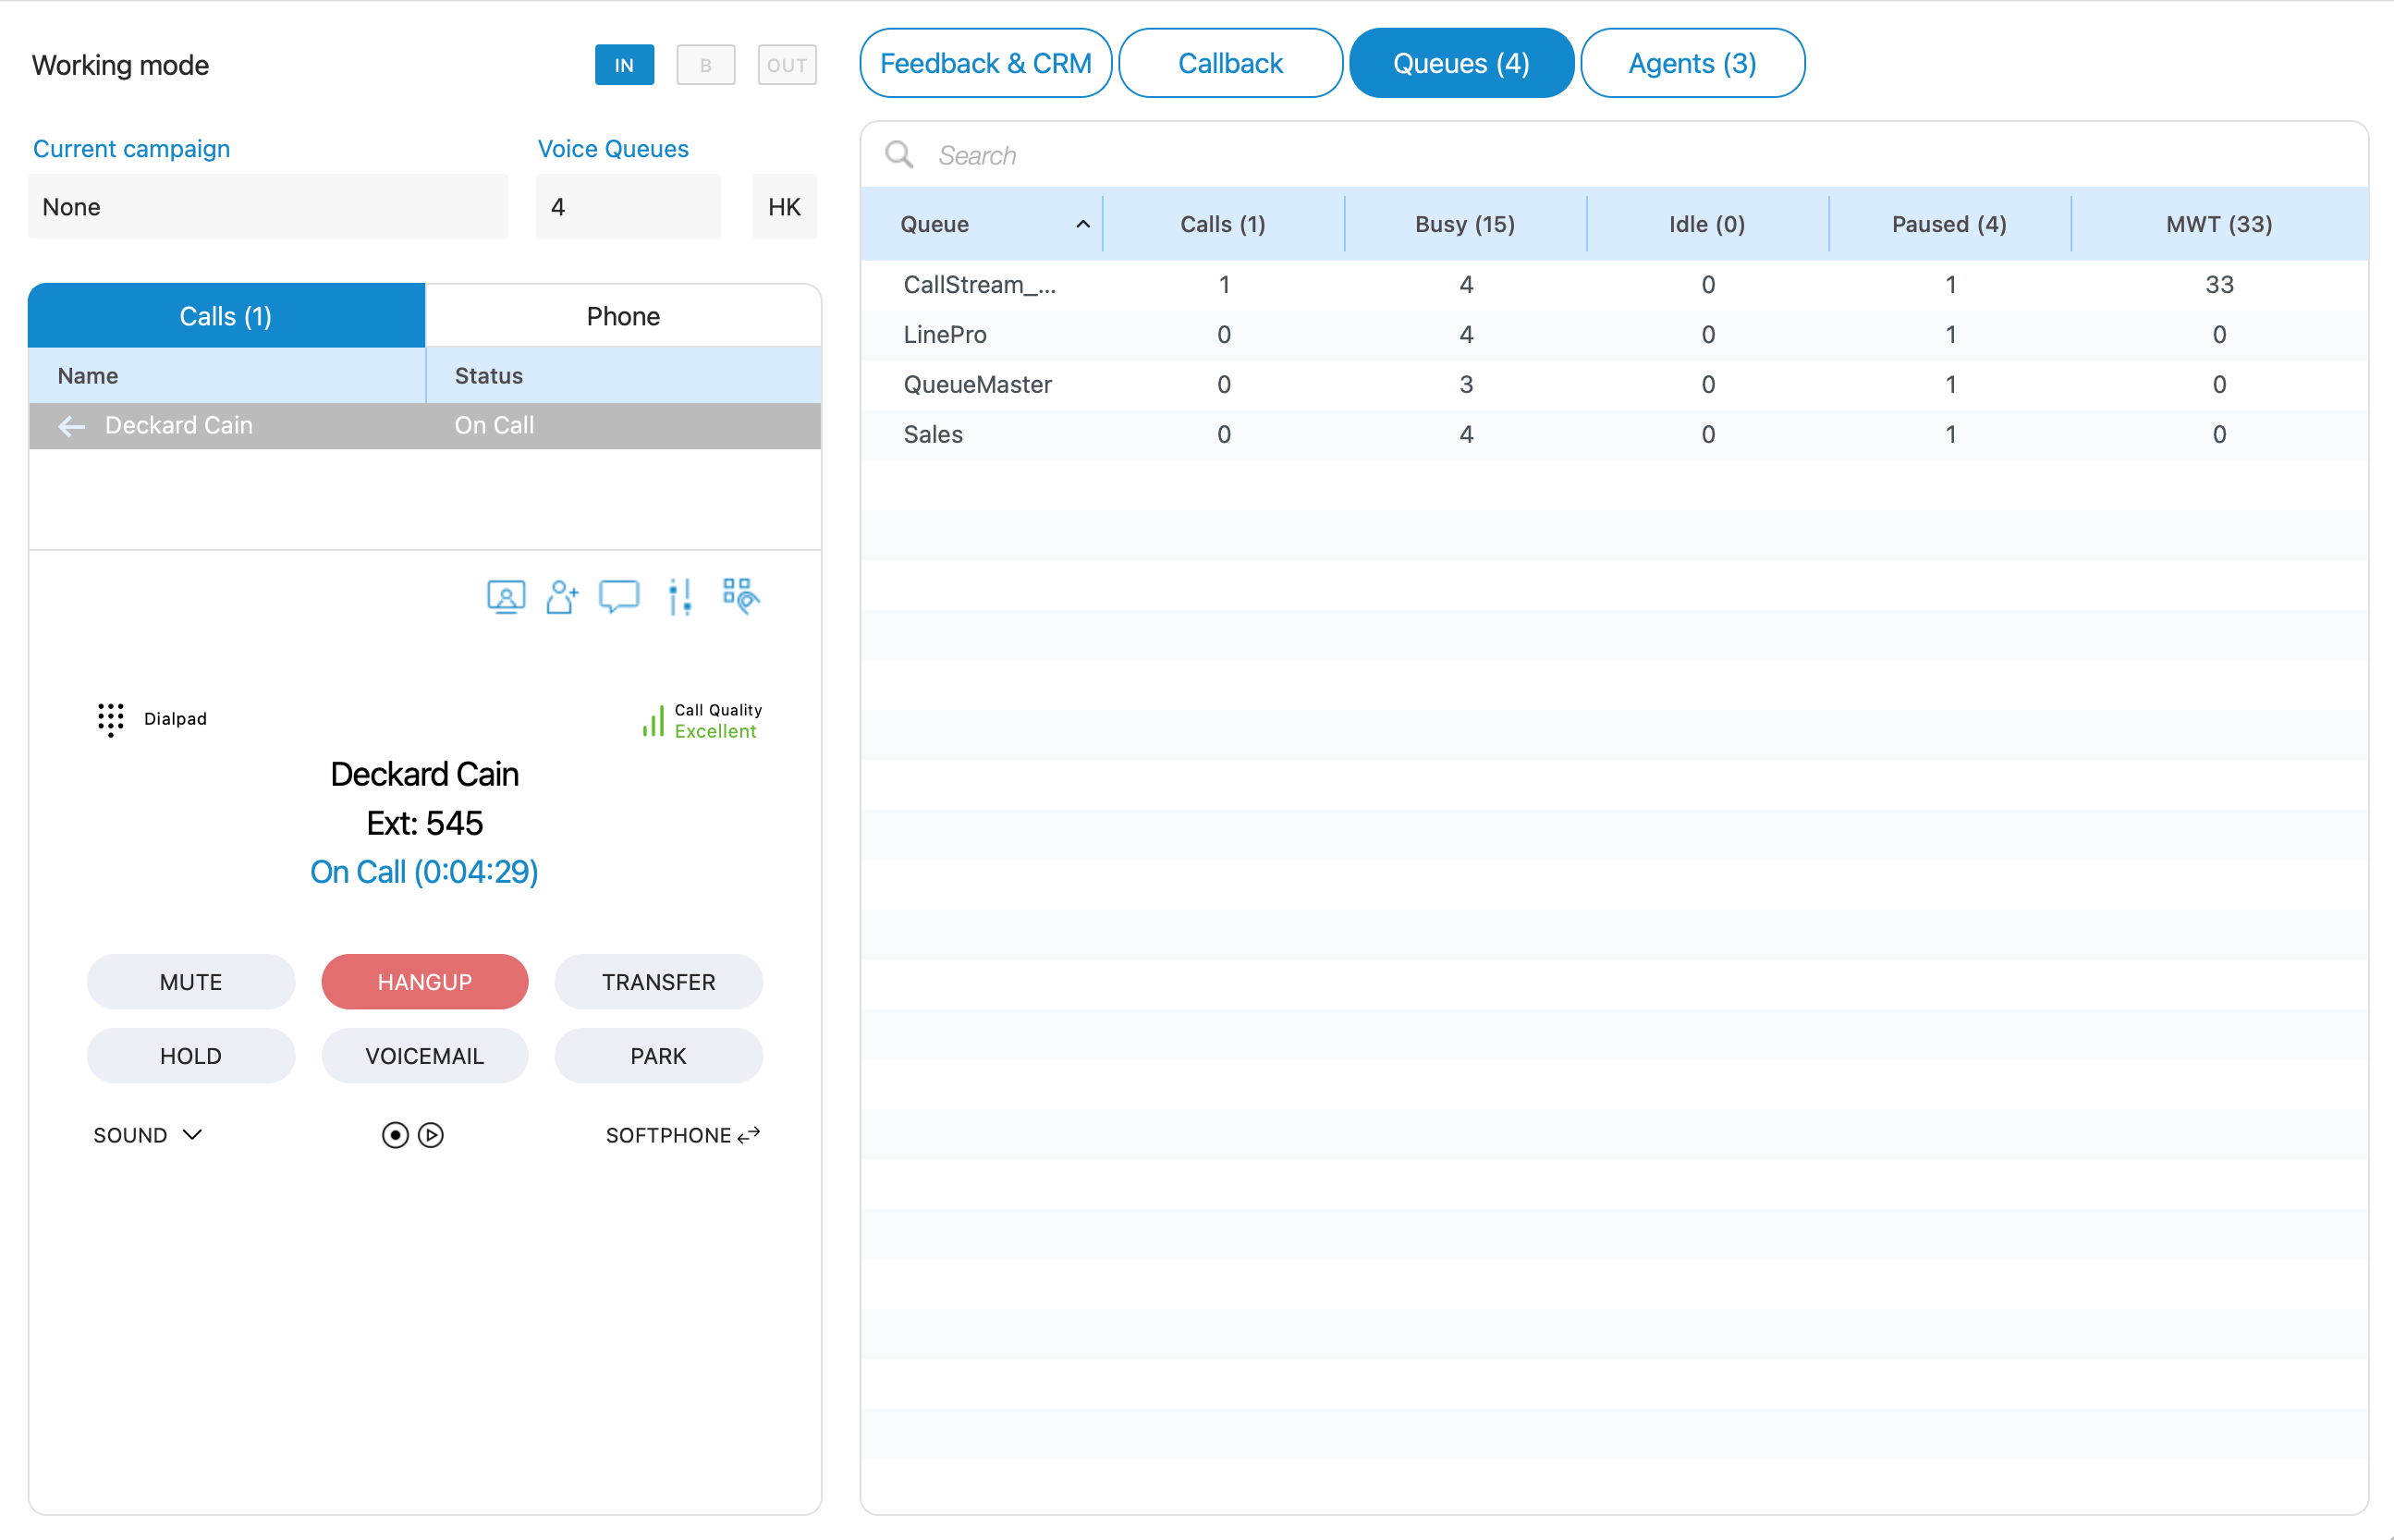
For each Queue, the following information is shown:
- Queue name
- Calls
- Busy
- Idle
- Paused
- MWT(MaxWaitTime)
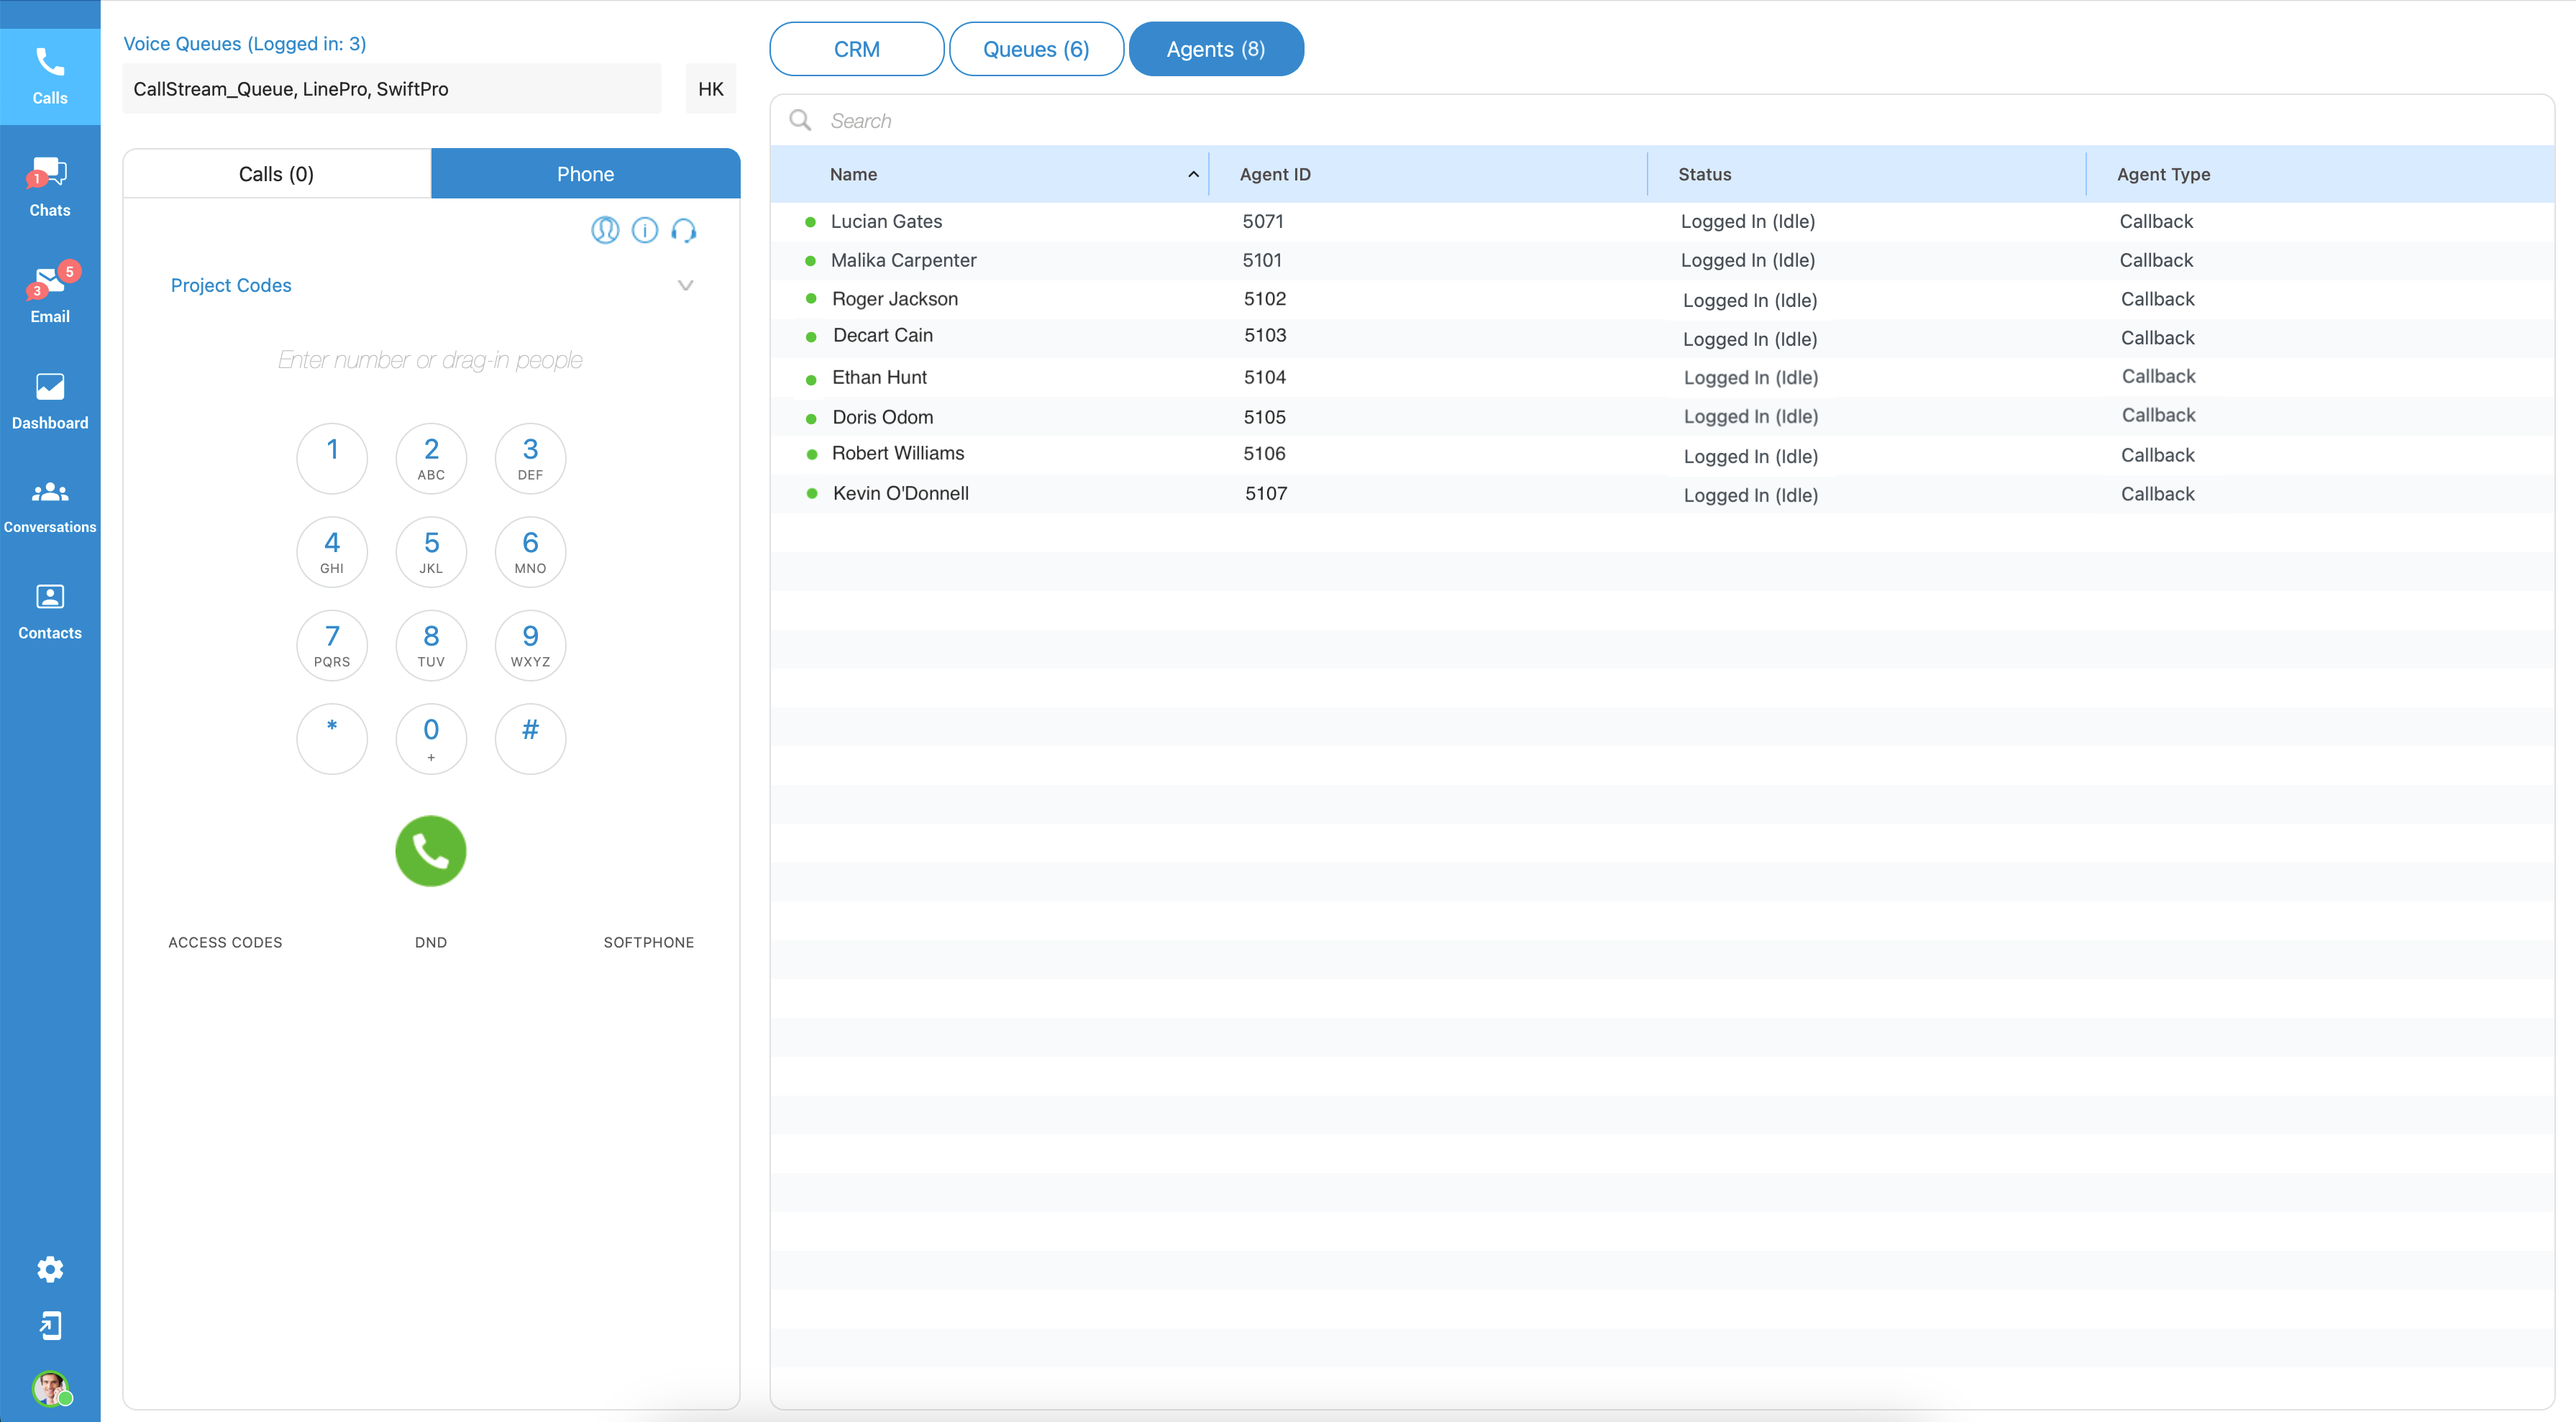
¶ Agents tab
The Agents tab section allows Agents to search through all agents on the system(by name or agent number), call specific agents, or chat with them. Currently, the Agents tab shows logged-in agents, but users can manage this via the Agent Settings(Agent Panel Settings->Voice Settings) and choose which Agents will be displayed within this tab.
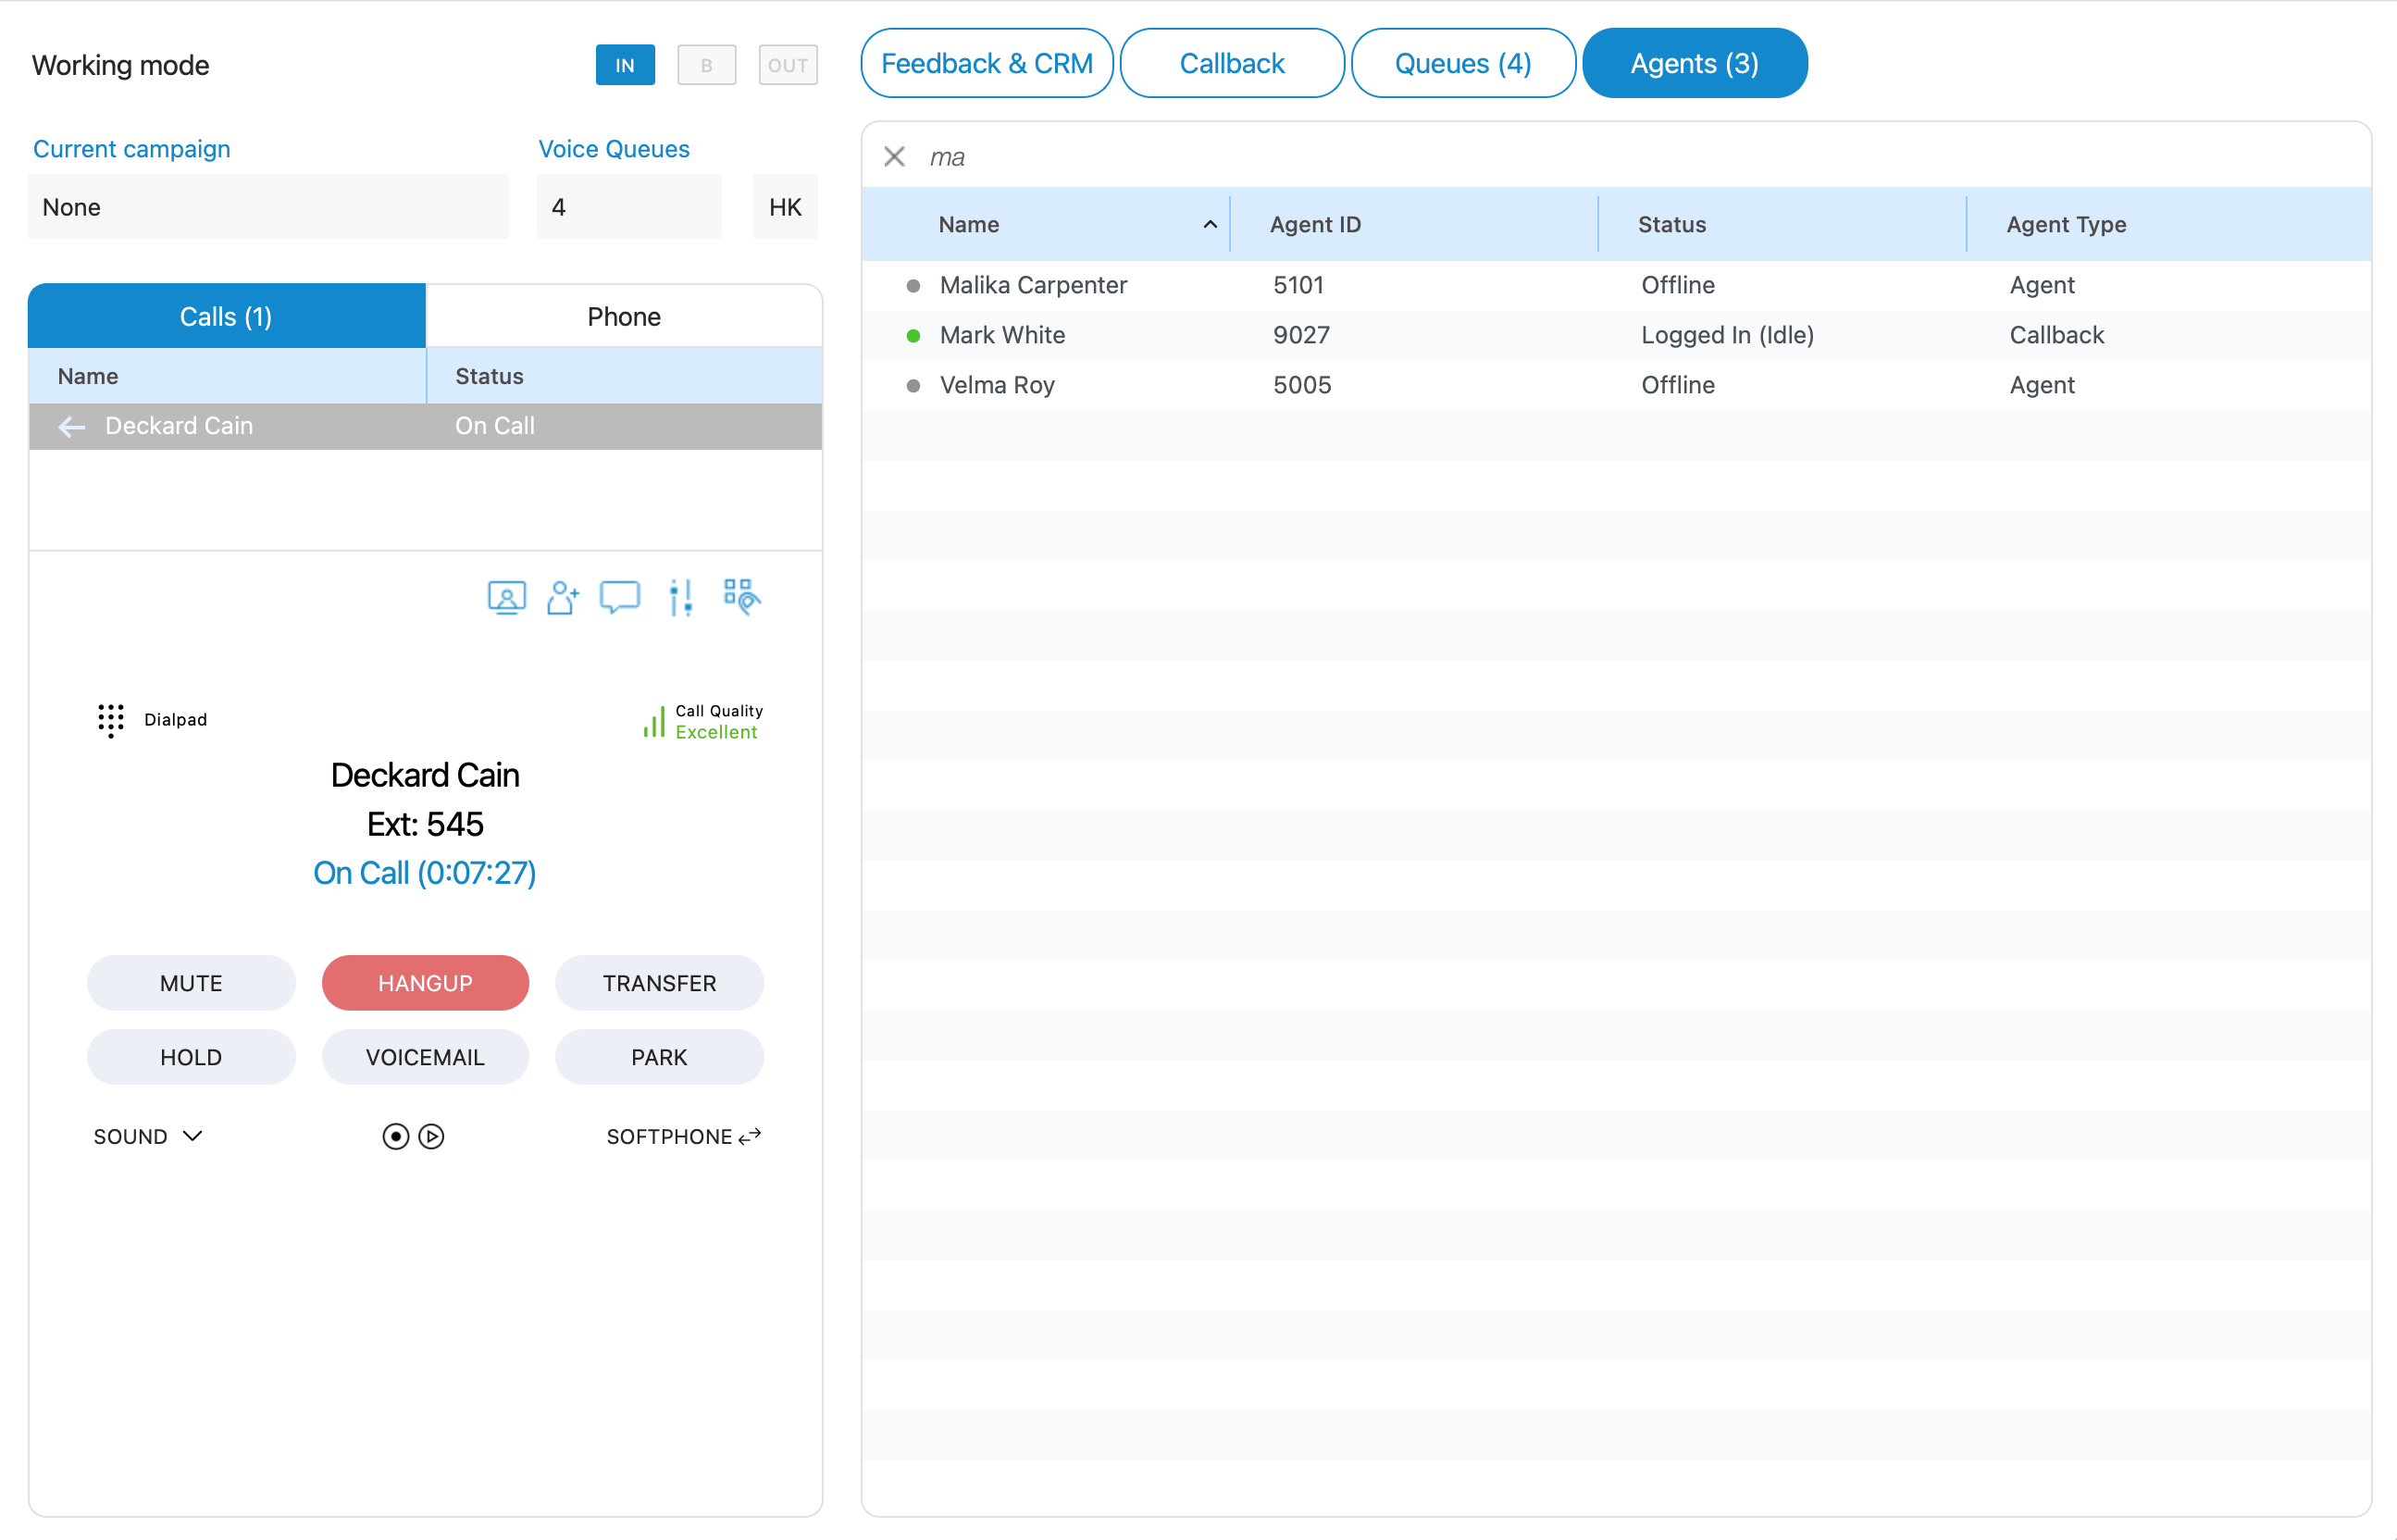
The following information is displayed for each Agent: ''Name'', ''Agent ID'', ''Status'', and ''Agent Type''.
- Name - Displays the Agent's Name(E.g., Issac Bains)
- Agent ID - Displays the Agent's Number(E.g., 1001)
- Status - Displays the Agent's status(E.g.,Idle, Paused)
- Agent Type - Displays the Agent's type(E.g., Callback)
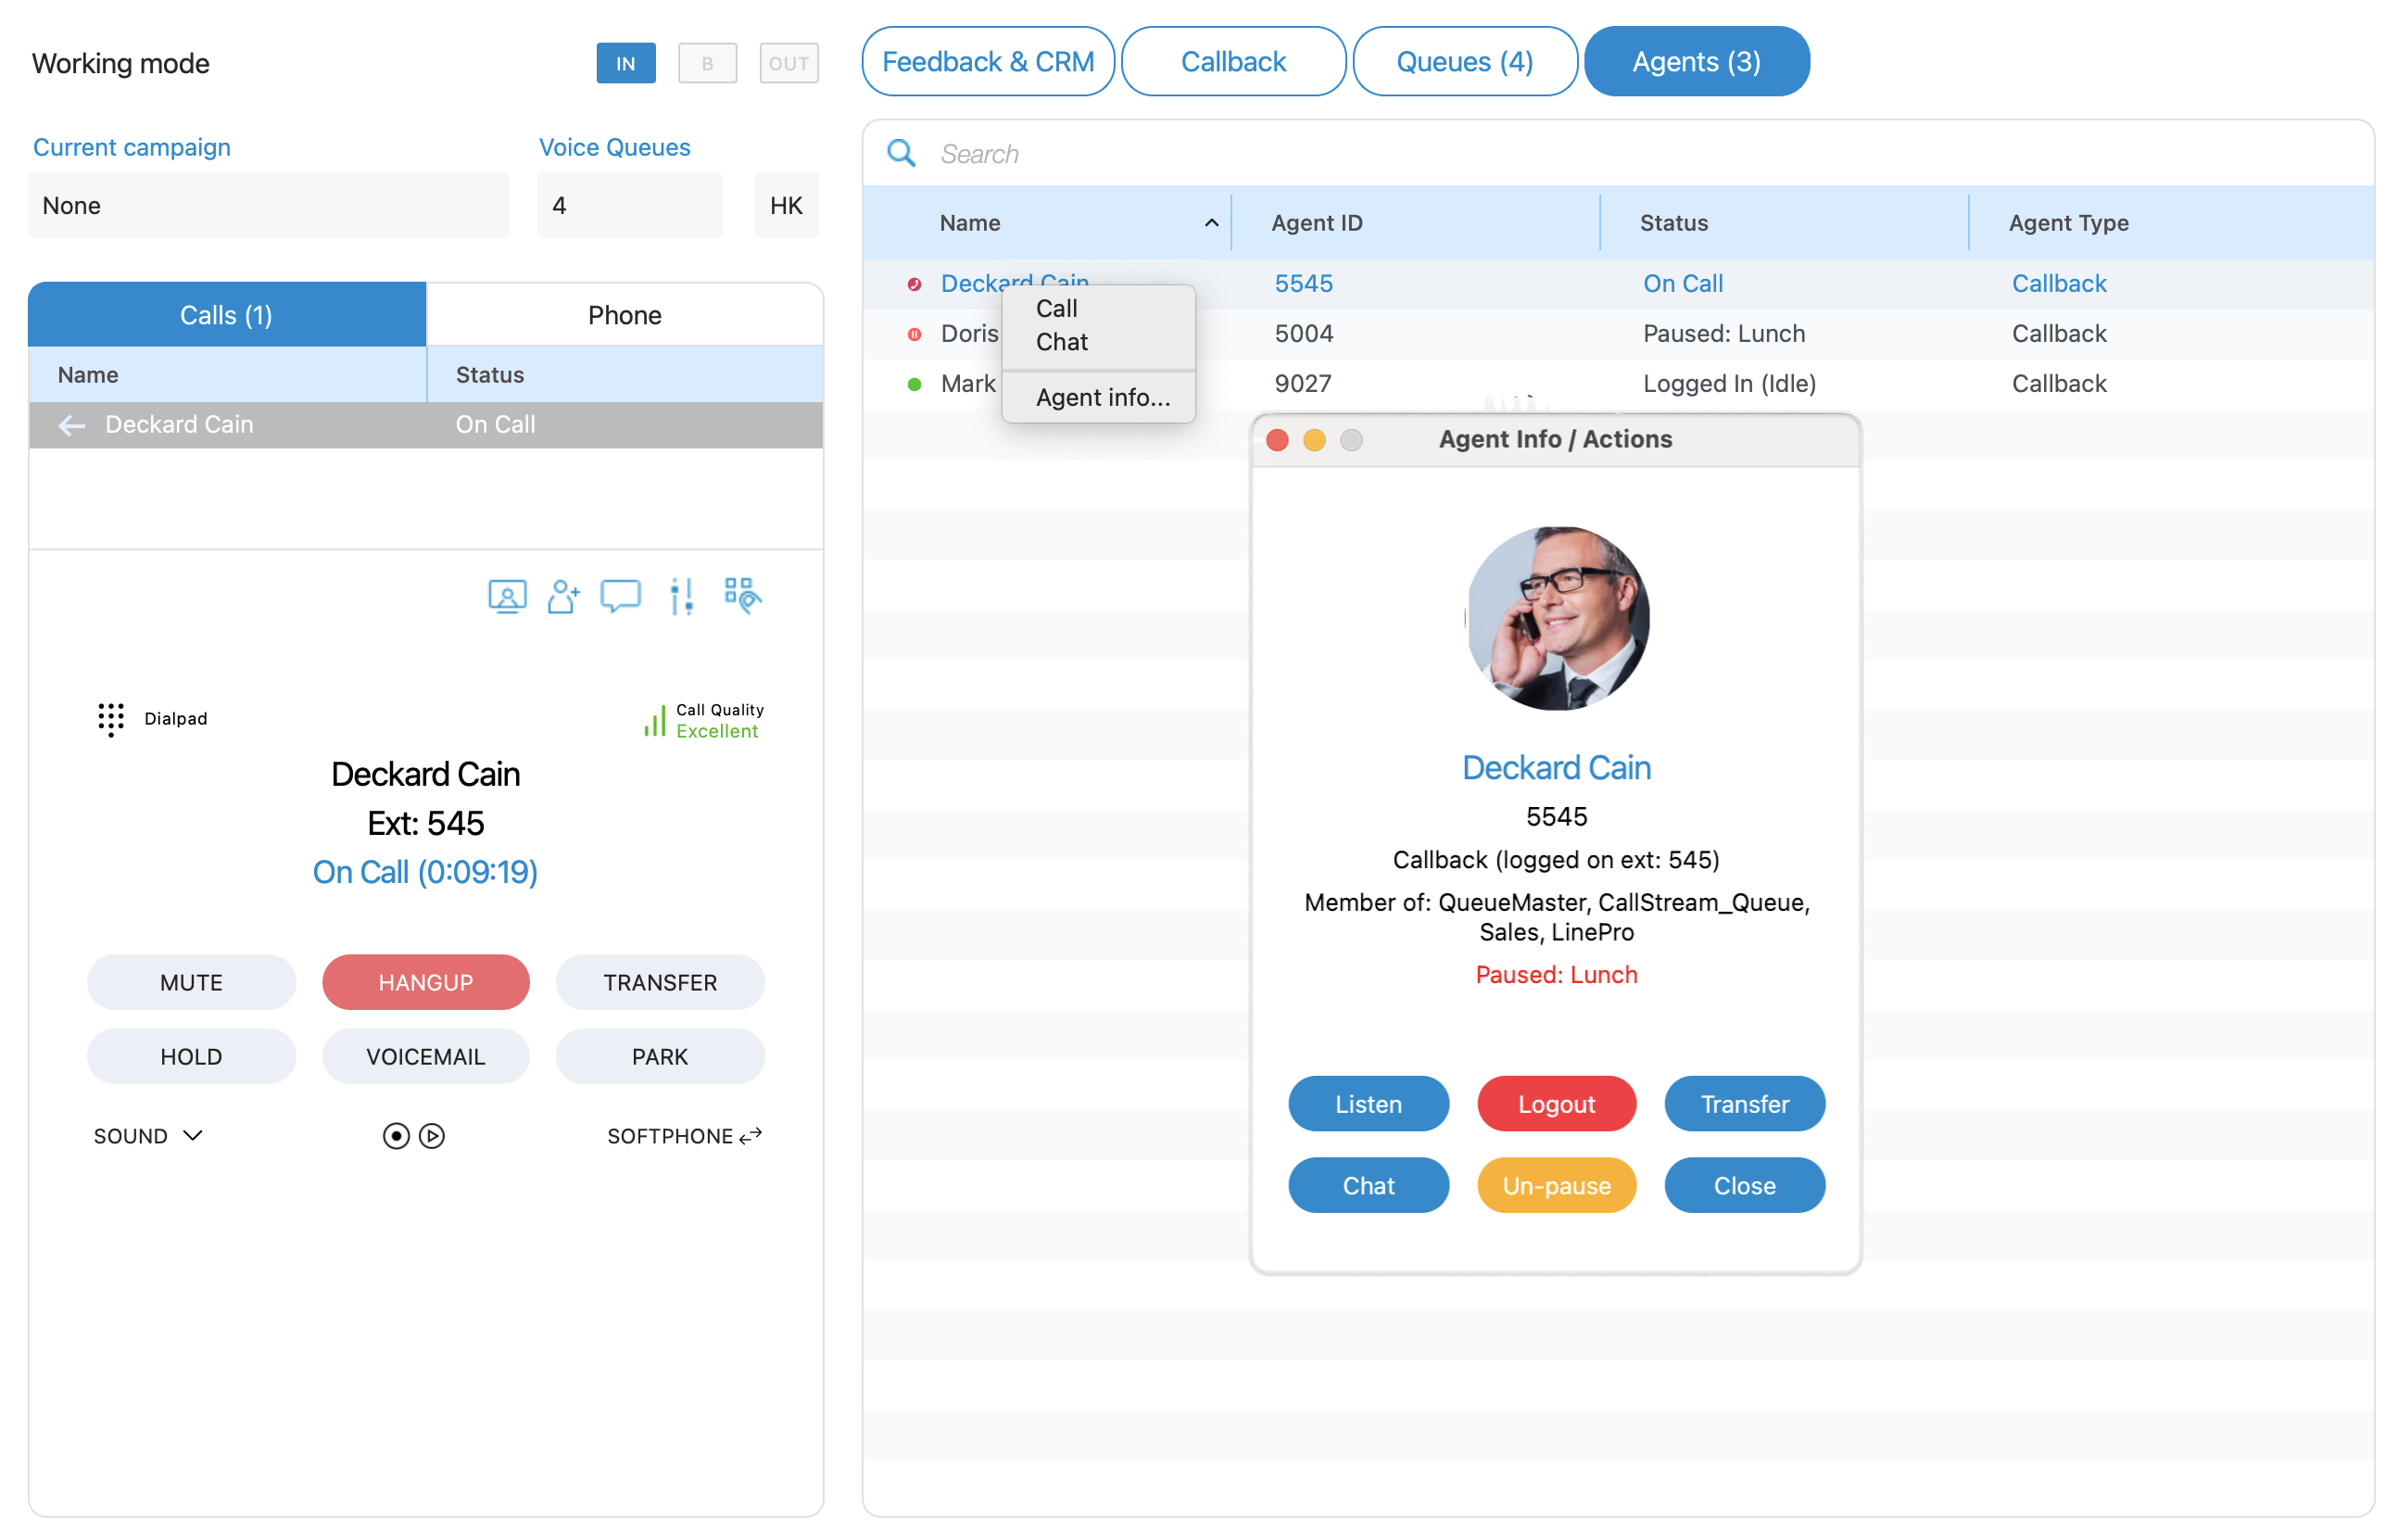
The Agent may right-click on a specific agent and bring up the following options:
i. Call - with this option, the user can make a call to the selected Agent.
ii. Chat - the user can start a chat with the selected Agent.
iii. Agent info - Opens a dialog containing all information about the Agent, like Agent name, Agent number, Agent login type, and Queues of which an Agent is a member.
¶ Queues and Campaigns Dispositions
Within the system, it is entirely possible to configure Dispositions on a per-Queue or per-Campaign basis. Dispositions represent predefined categories or outcomes that are used to categorize and document the results of calls made within a specific Queue or Campaign.
When a call within a Queue or Campaign concludes, the system facilitates an organized and user-friendly process for Agents. A list of previously established Dispositions becomes readily available within the Agent panel. This list is designed to assist Agents in efficiently documenting the outcome of the call. Agents can conveniently choose a Disposition from this list that best aligns with the specific outcome or result of the call they just handled.
If the disposition list is too large, a search field will be displayed above the list, allowing agents to search for the desired disposition by entering the disposition's code or name.
Each Disposition has the following information:
Name - describes Disposition name, so Agents know what will happen if they press a specified disposition button (i.e., Retry, Callback, Personal Callback, DNC)
Hotkey - refers to a keyboard shortcut that Agents use to improve their performance(i.e., If the hotkey of a disposition is ‘1’, to submit this disposition an Agent can press the number '1’ on their keyboard. After pressing '1’ if the Disposition is submitted, the message “Disposition submitted successfully” will appear)
Color - each Disposition can have its color, which helps Agents to find and select Dispositions accurately
¶ Show Main Window
The feature brings the application's main window to the forefront, making it the active and visible.

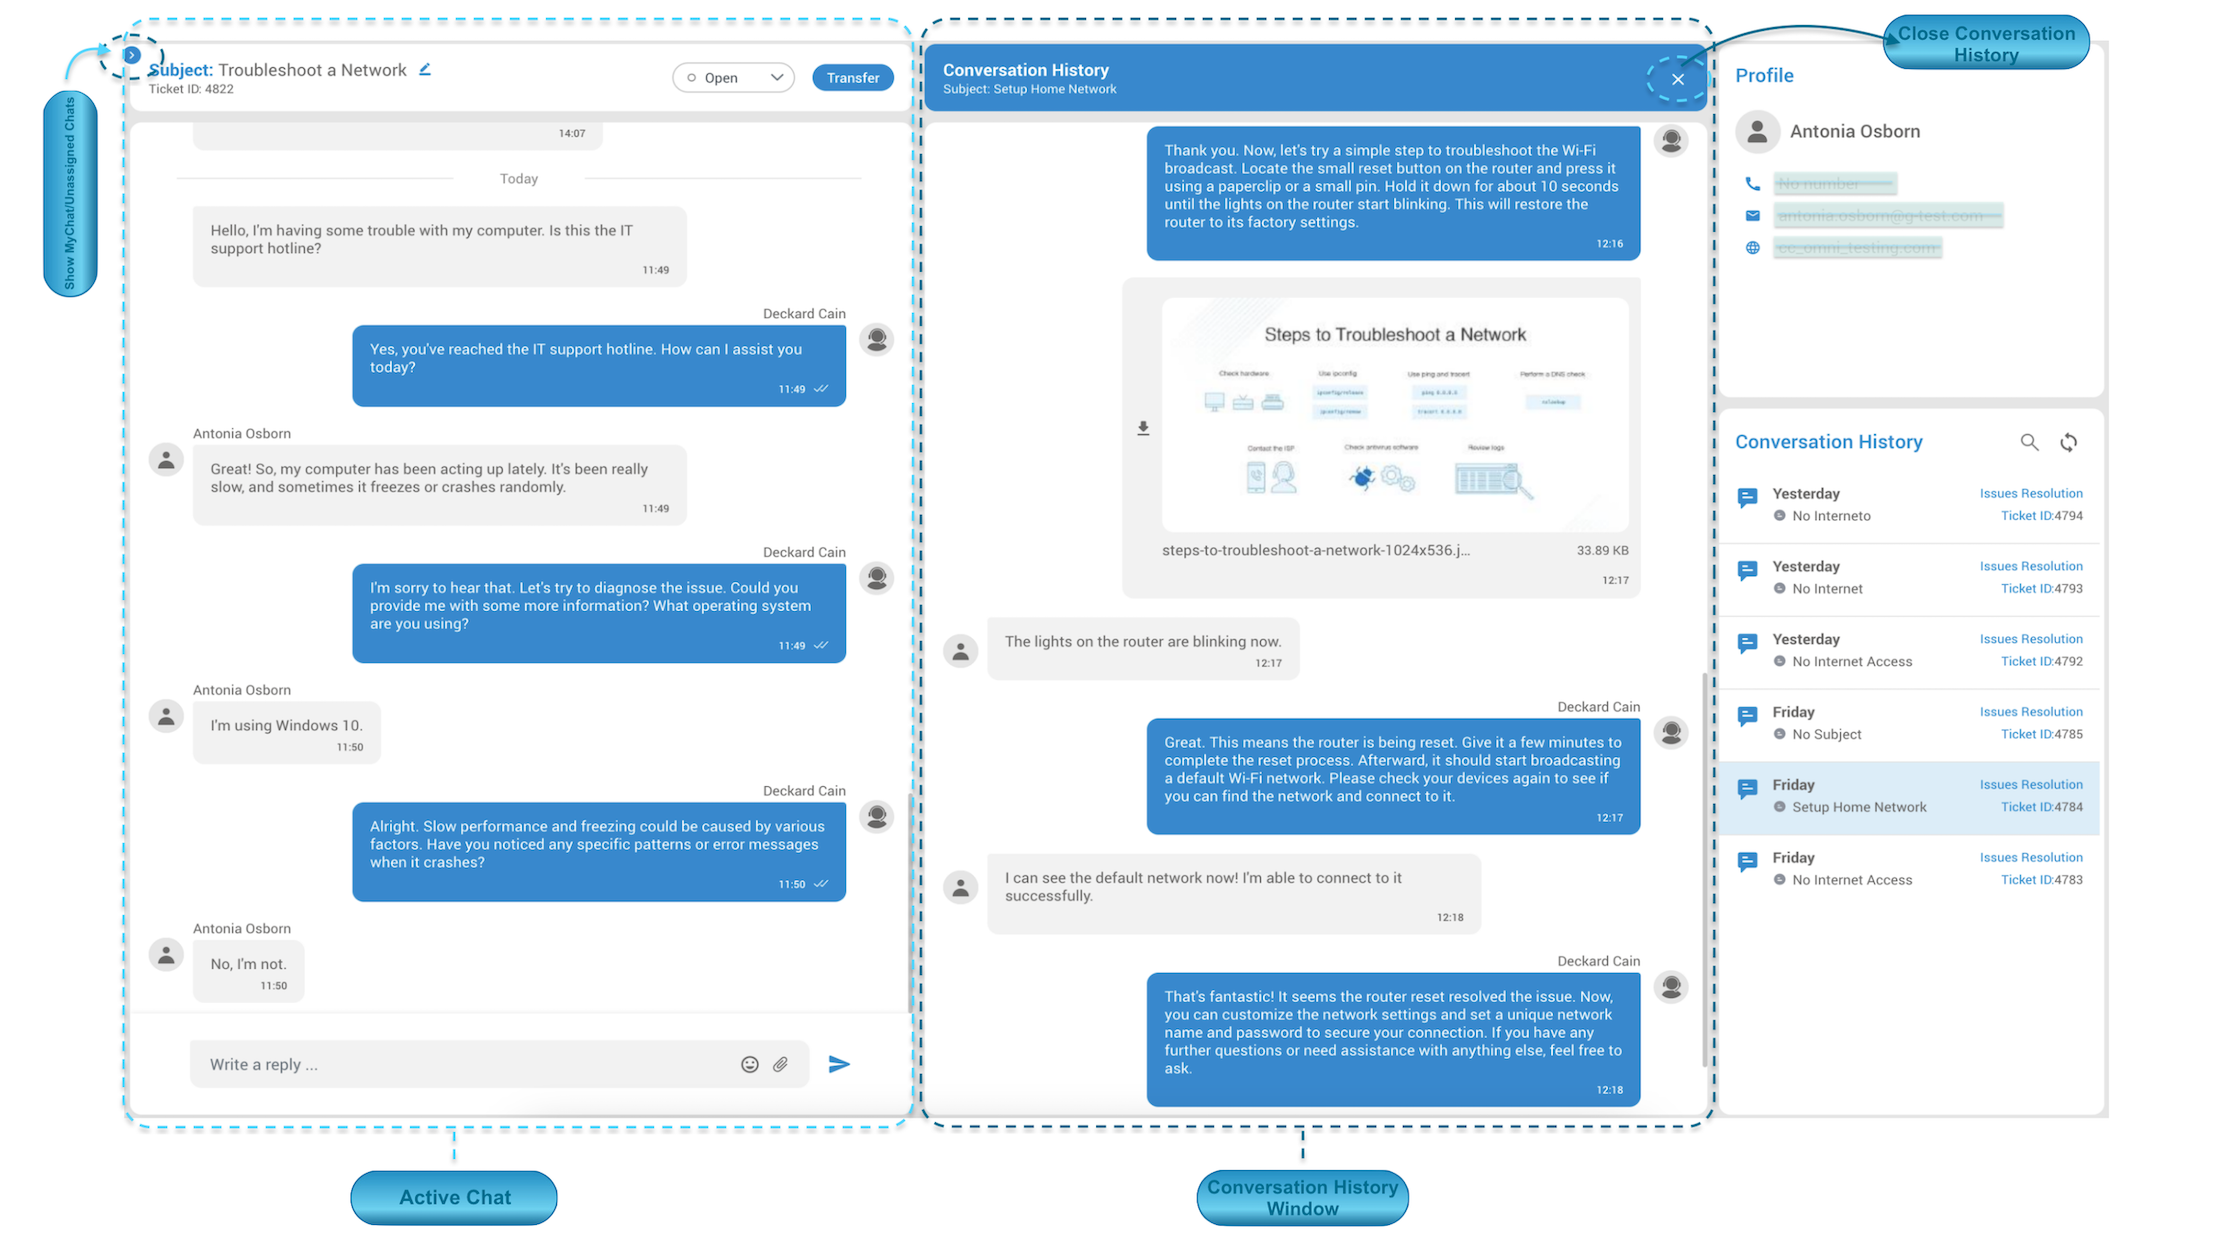
¶ Profile
The Profile section provides comprehensive details about the agent, including their name, state, agent number, involvement in voice and messaging queues, assigned campaigns, and the agent's current workload.
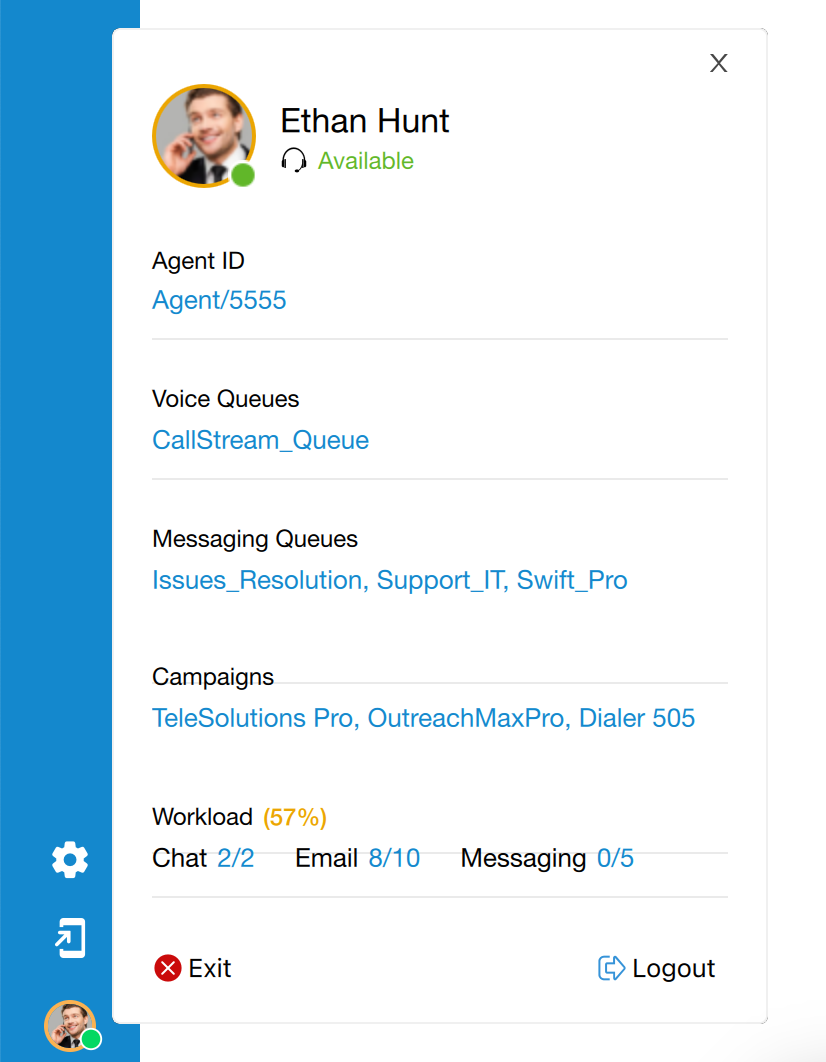
Within this section, agents have the ability to transition their status from 'Available' to 'Pause.' Through the dropdown menu, they can specify the reason for their pause.

A colored banner will display across the agent panel, indicating the duration of the pause state, allowing agents to easily track the paused time.
Towards the bottom of this section, the agent has two options.

They can either select "Exit" to close the application entirely or opt for "Logout" to log out from the agent's app.
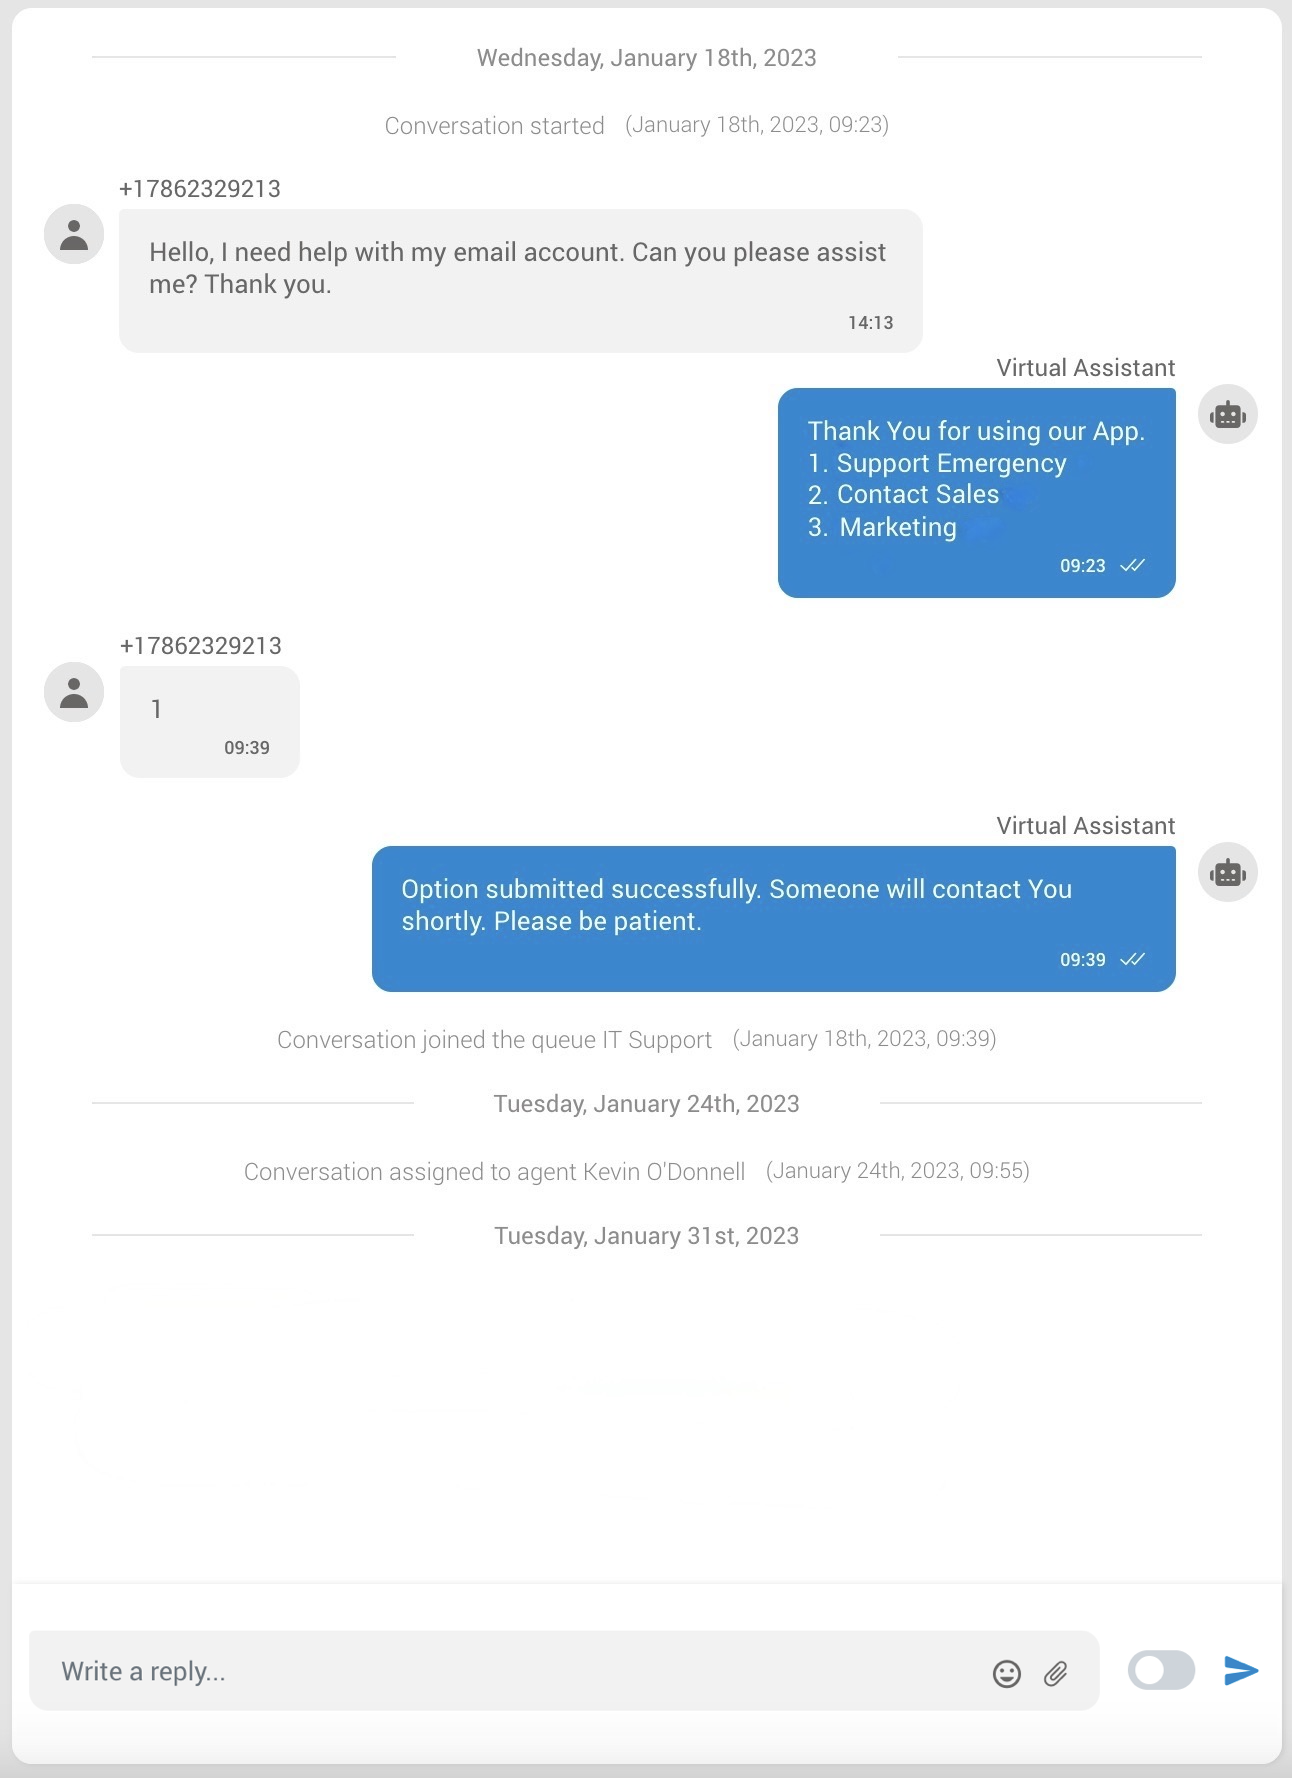
¶ OmniChannel
Omnichannel is a robust application that extends the power of Contact Center features, allowing your customers to interact with your business across multiple communication channels like voice calling, emailing, live chat messaging, socials and SMS texting.
An Omnichannel Contact Center combines all your communication channels into a single, easy-to-use interface. Every channel will be able to integrate and relate with one another so the customer can switch effortlessly between channels.
The main focus is creating a consistent customer experience, engaging with the people already interacting with your brand/company to ensure they get a seamless and improved customer experience, regardless of what channel they are using.
Note: For users whose license does not encompass Omnichannel capabilities, or those operating on a version of PBXware devoid of Omnichannel support, all Omnichannel features will be veiled and unattainable within the Agent panel. This arrangement ensures users engage solely with functionalities permitted by their specific license or software edition.
Several sections are related to the OmniChannel (or Messaging) part of the Contact Center Edition:
¶ Chats
The "Chats" feature within the application provides agents with live updates on ongoing customer interactions across various channels, including the Visitor app (Live Chat), Socials, and SMS. Agents can leverage this feature to effectively handle their assigned conversations by performing actions such as assigning, transferring, closing, or banning customers and accessing conversation histories conveniently.
Adding live chat to an omnichannel plan is like having a super tool for talking with customers in many different ways. It helps everything work together smoothly, so when customers want to ask questions or talk, they can use different methods like chat, SMS, or email. This super tool also lets helpers reply fast, talk to many people simultaneously, and give great help!
The Chat landing page is divided into six sections, each representing the following:
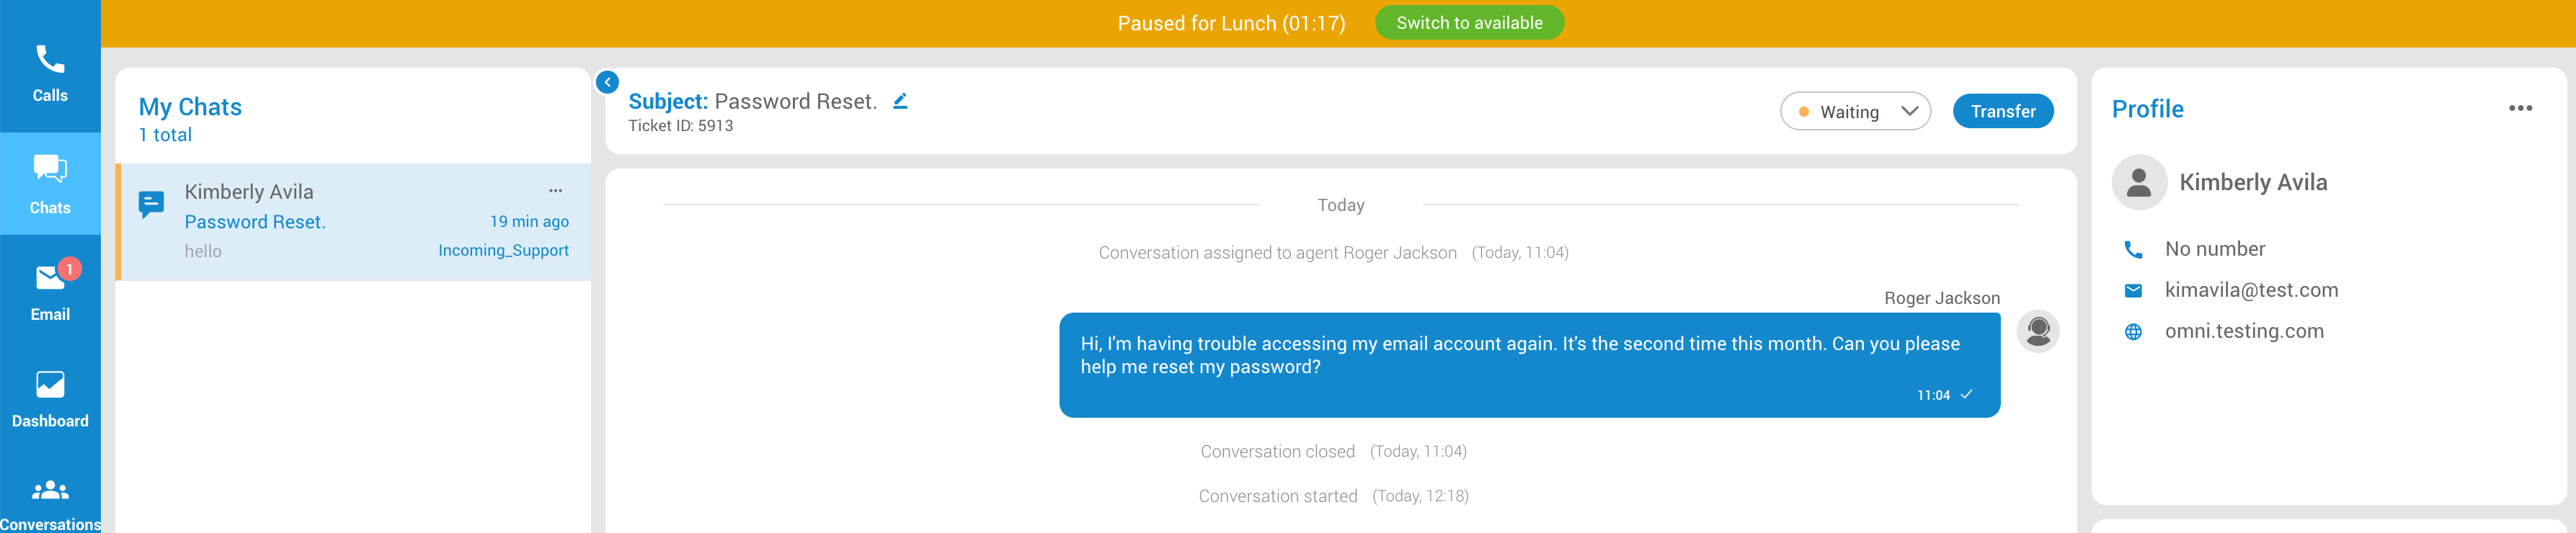
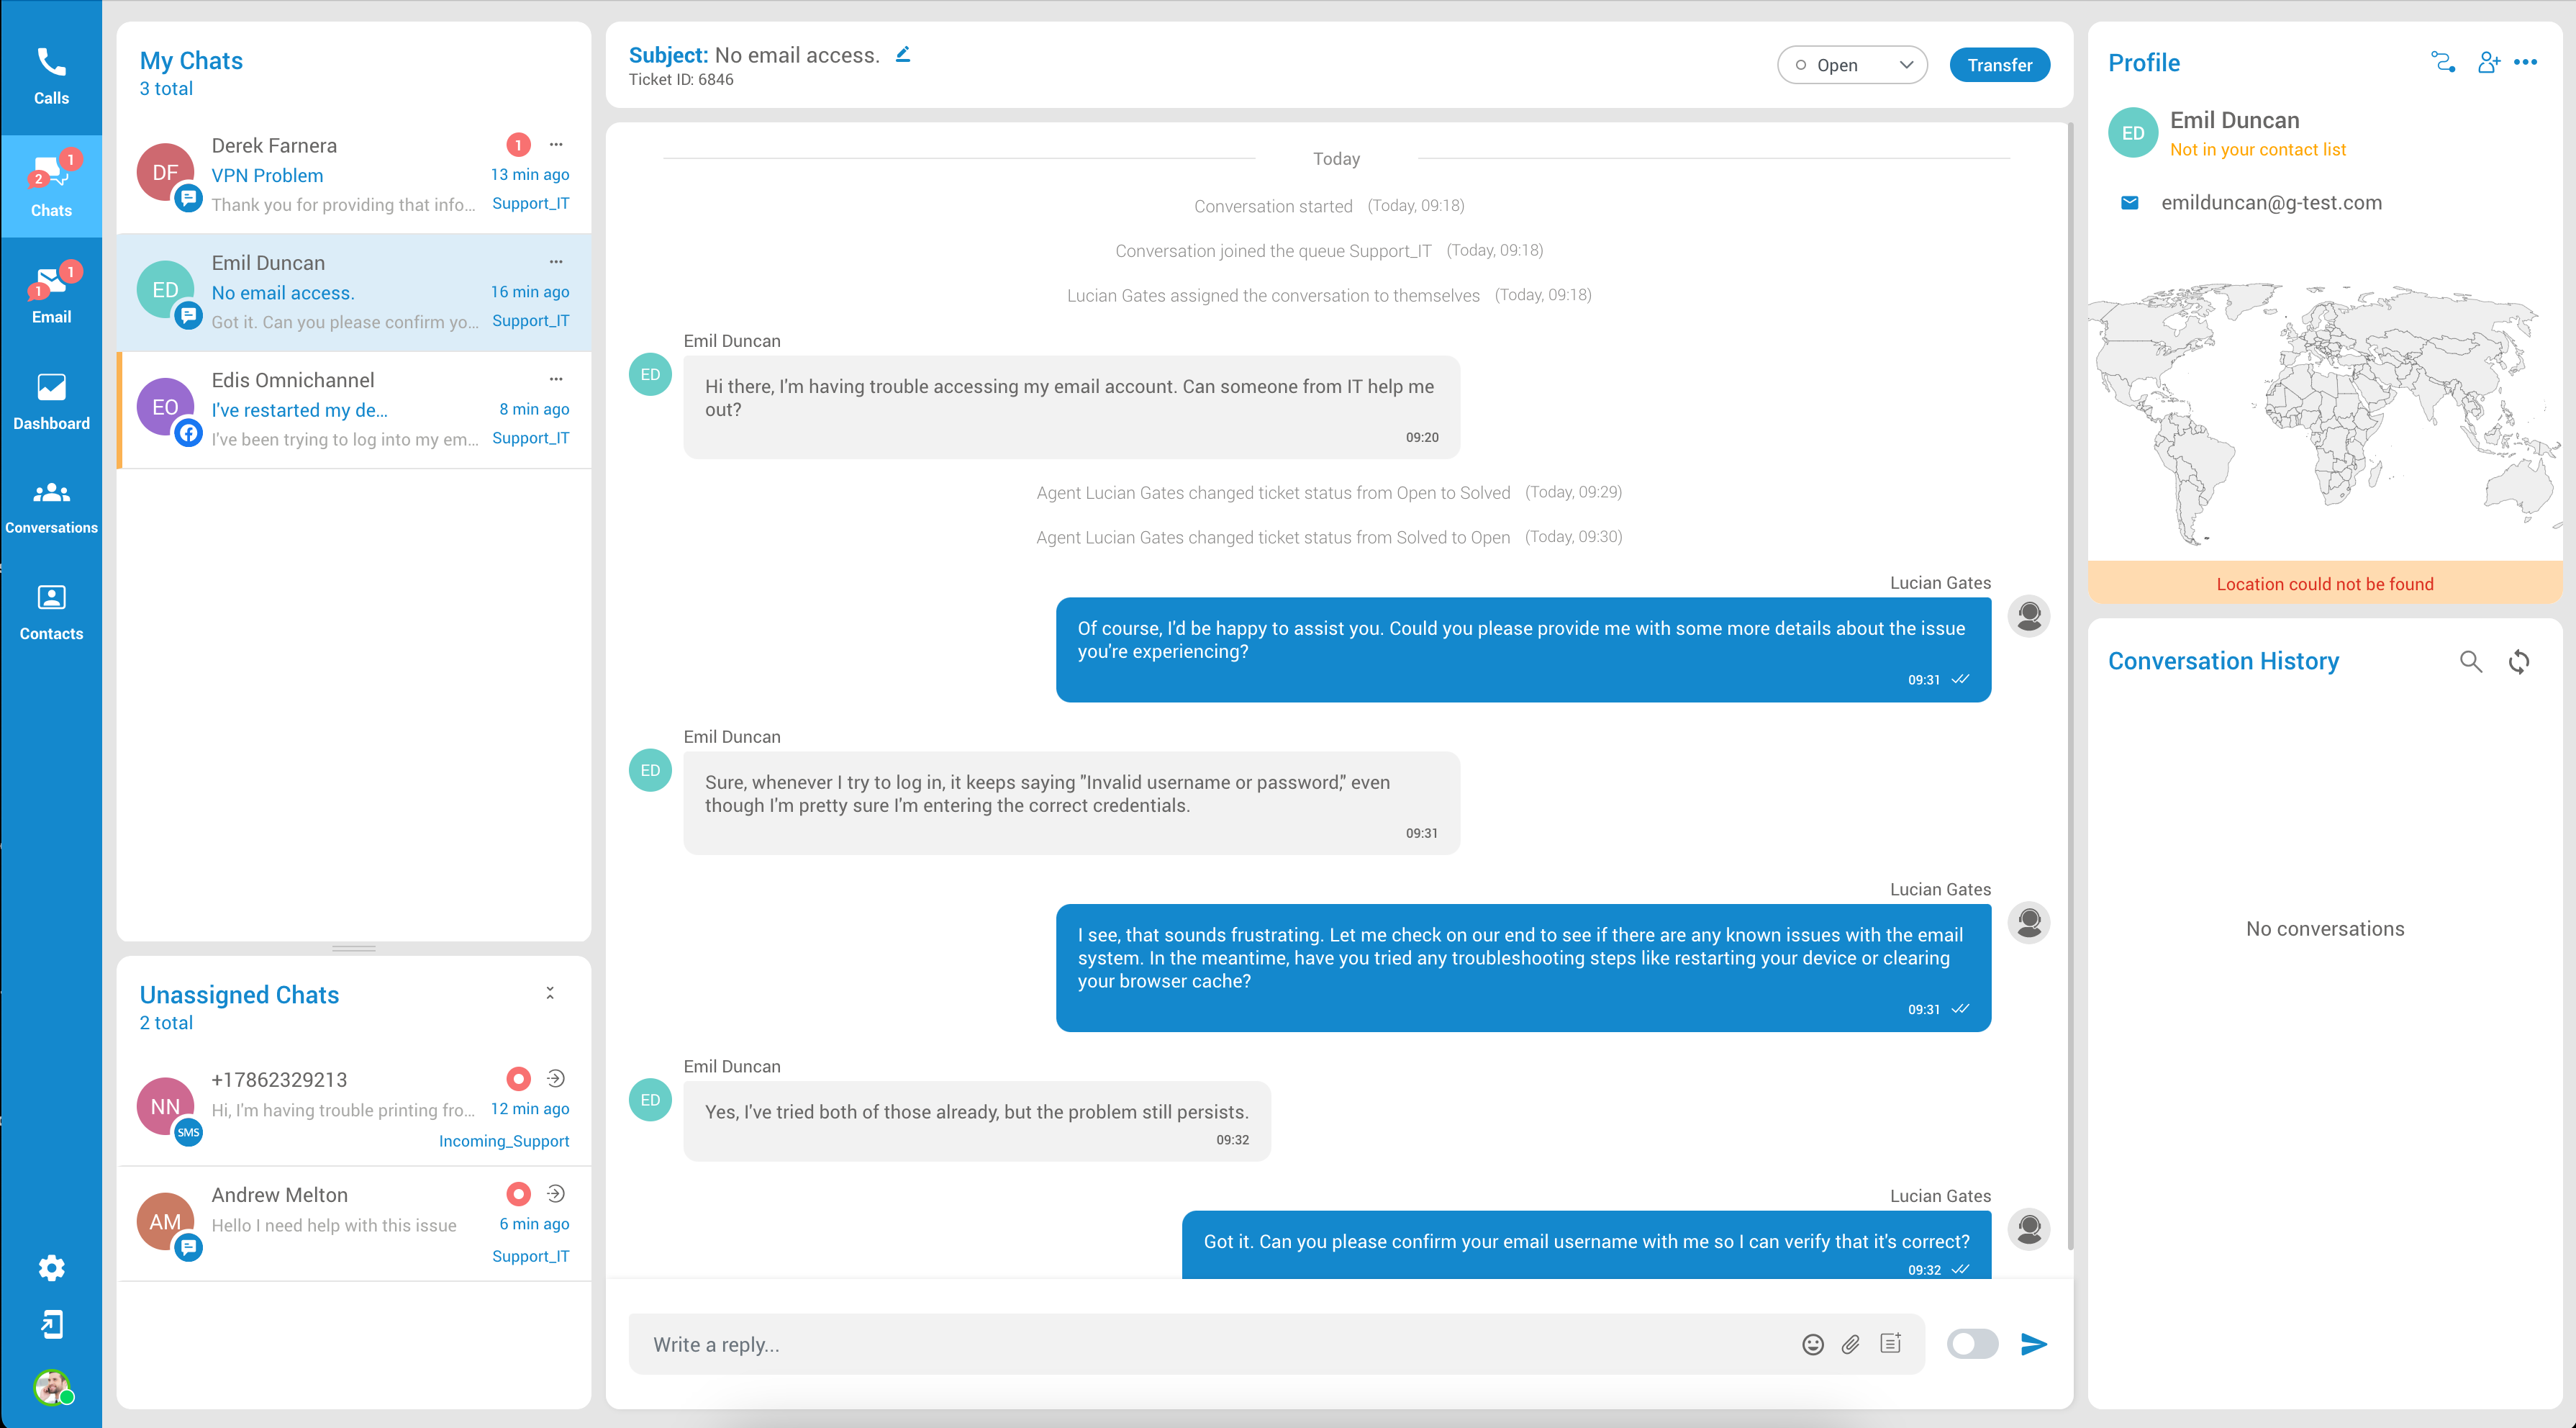
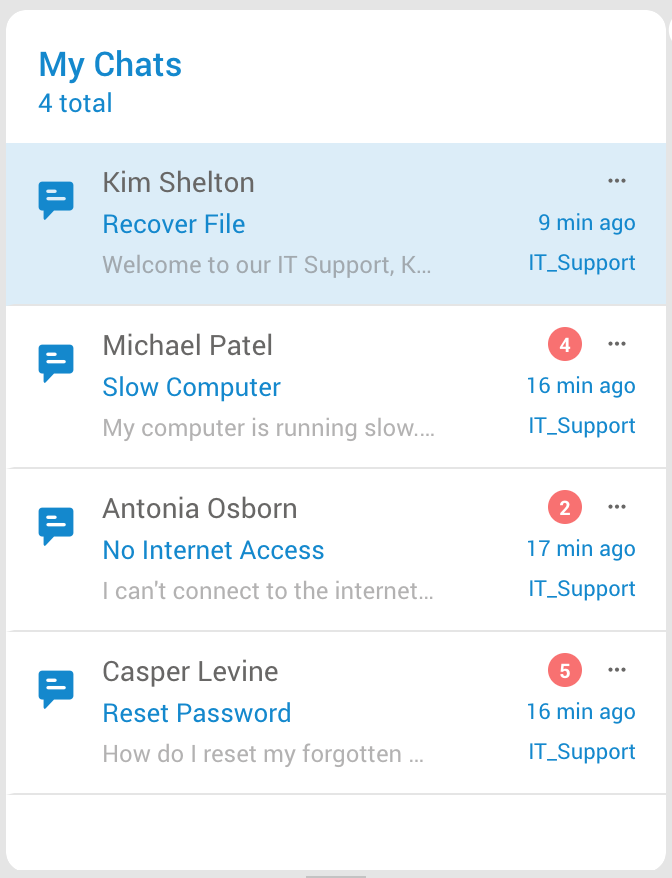
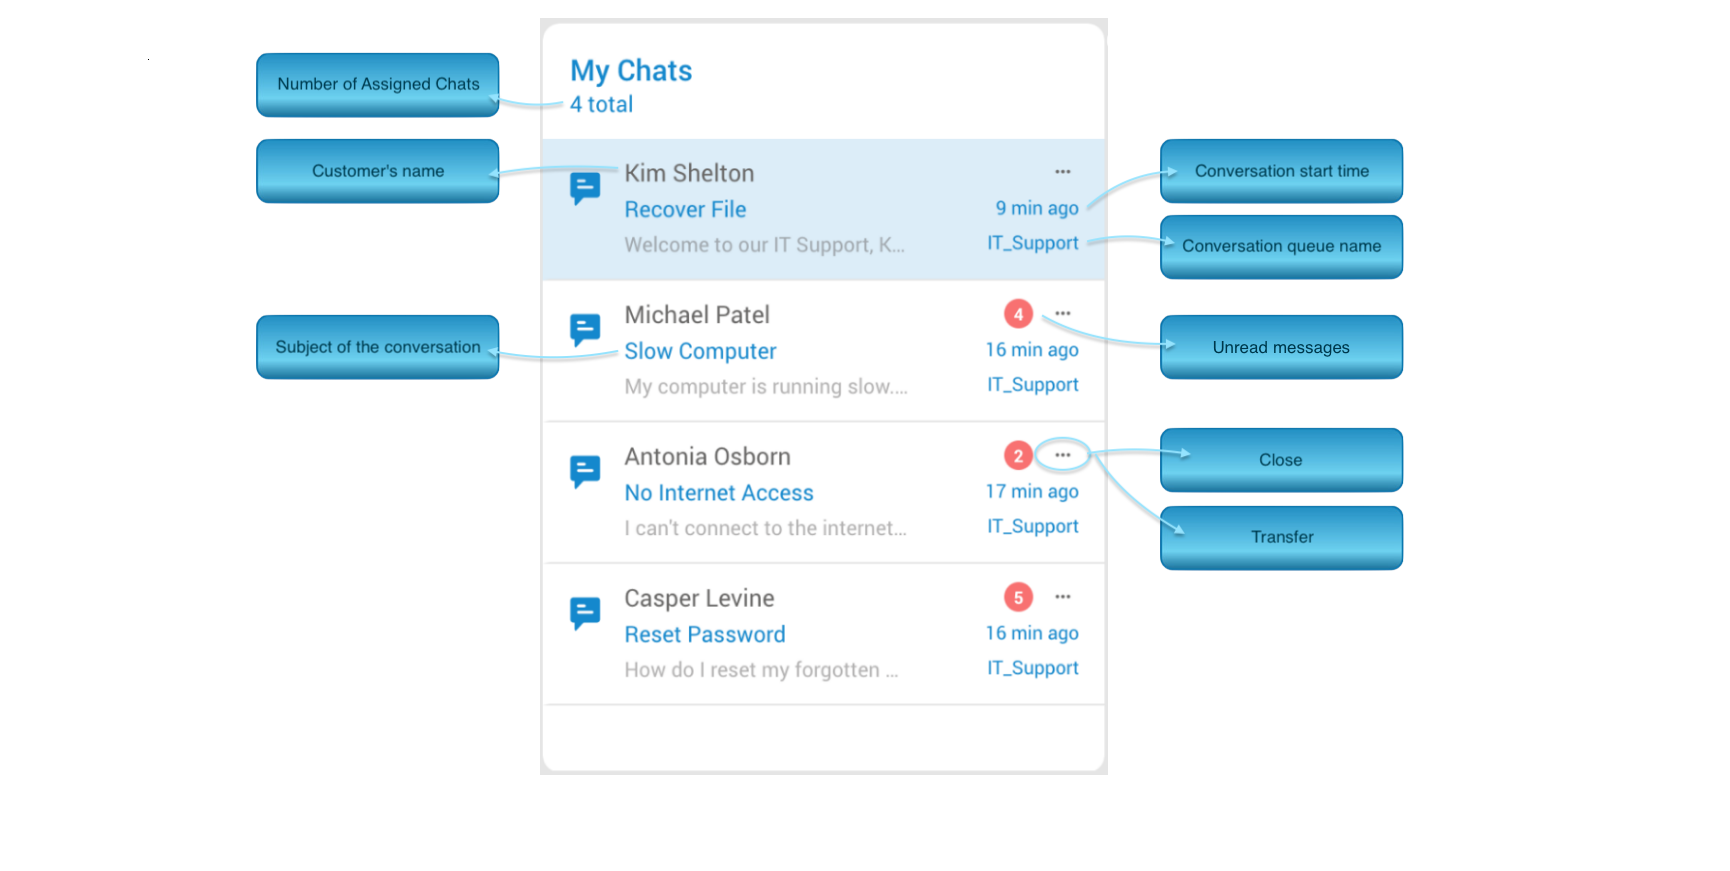
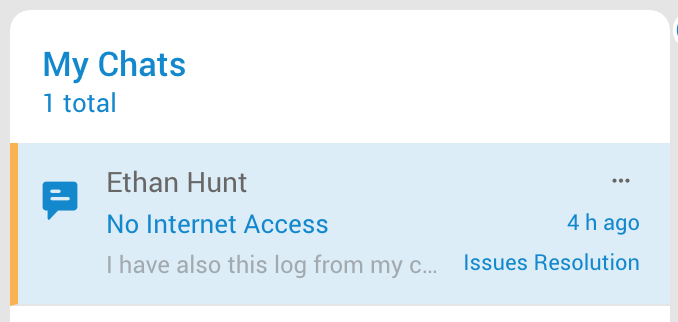
¶ My Chats
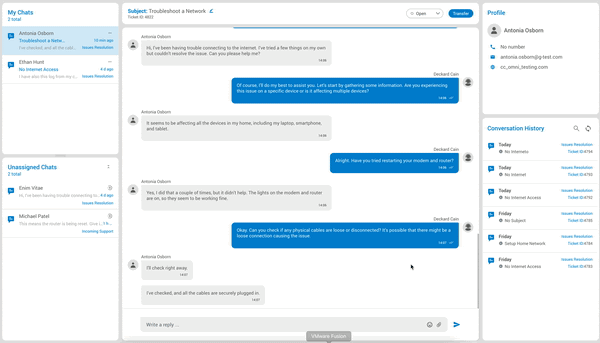
The 'MyChats' section of the application displays information about the conversations assigned to the agent. This section provides agents with a quick overview of their workload and helps them manage their time efficiently.
Agents can take various actions on each conversation in the 'MyChats' section. They can open the conversation to view the full conversation history, respond to the conversation, transfer the conversation to another agent, or close the conversation once it is resolved.
In addition to the number of conversations, the section also displays the following information for each conversation:
-
The number of Assigned Chats - This represents the number of assigned chats/conversations to the agent, which will change accordingly as the agent is assigned more conversations or when conversations are closed.
-
The Customer's name or the Customer's number - This helps agents identify the customer they are talking to and personalize their interactions.
-
Subject of the conversation - Brief description of the problem or request.
-
Conversation start time - Time when the conversation was started. This gives agents a reference point for the conversation and helps them manage their time efficiently.
-
Conversation queue name - Name of the queue where the conversation was opened. This helps agents identify the source of the conversation and enables them to provide appropriate support.
-
Unread messages - This notification represents the count of unread messages and will appear whenever there are new unread messages within the conversation.
As previously stated, agents have the ability to transfer or close conversations within this section. Upon clicking the three-dot button, two additional options will be displayed.
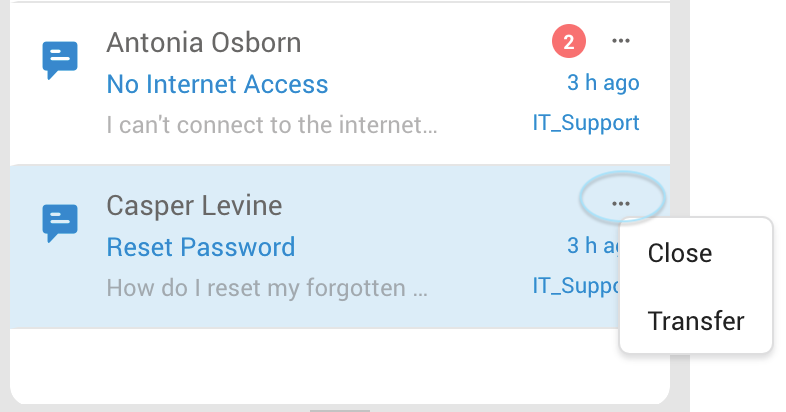
Close Conversation
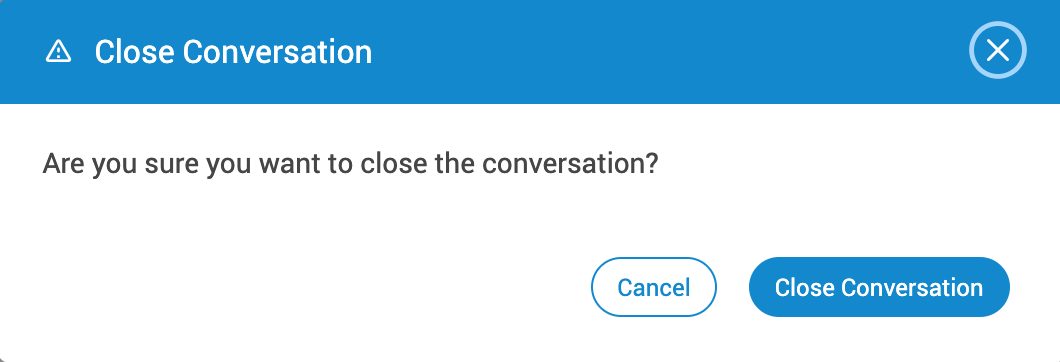
When an agent tries to close a conversation, a confirmation dialog box will pop up. It asks, "Are you sure you want to close the conversation?" This safeguard prevents accidental chat closures, ensuring the user truly means to end the conversation. The selected conversation will be permanently closed by choosing the Close Conversation option. Furthermore, it will be removed from the "MyChats" section and archived in the "Conversation History."
After successfully closing a conversation, the corresponding notification will appear within the agent panel.
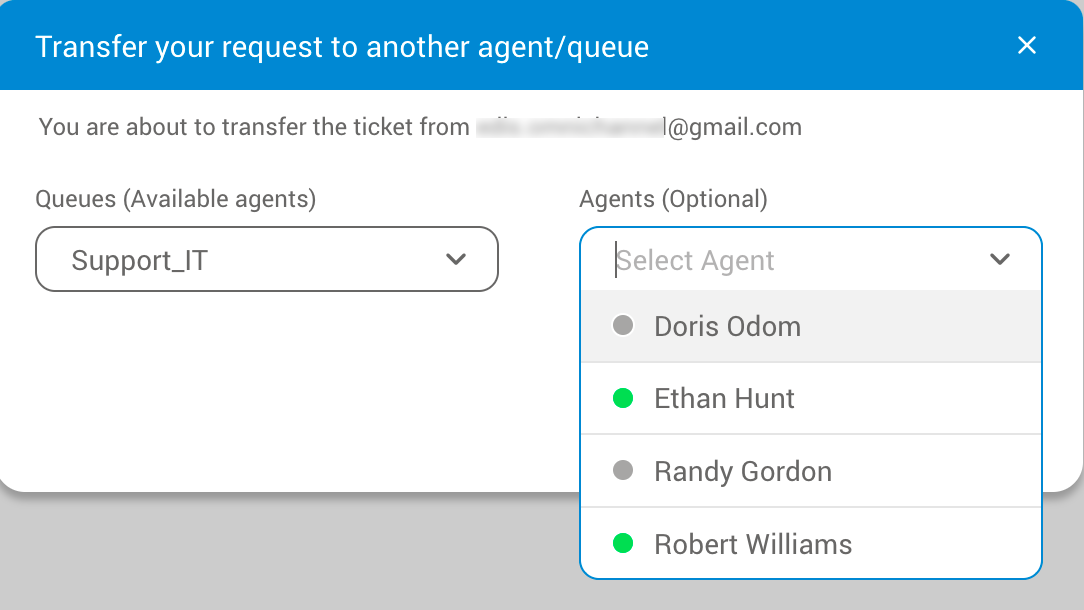
Transfer Conversation
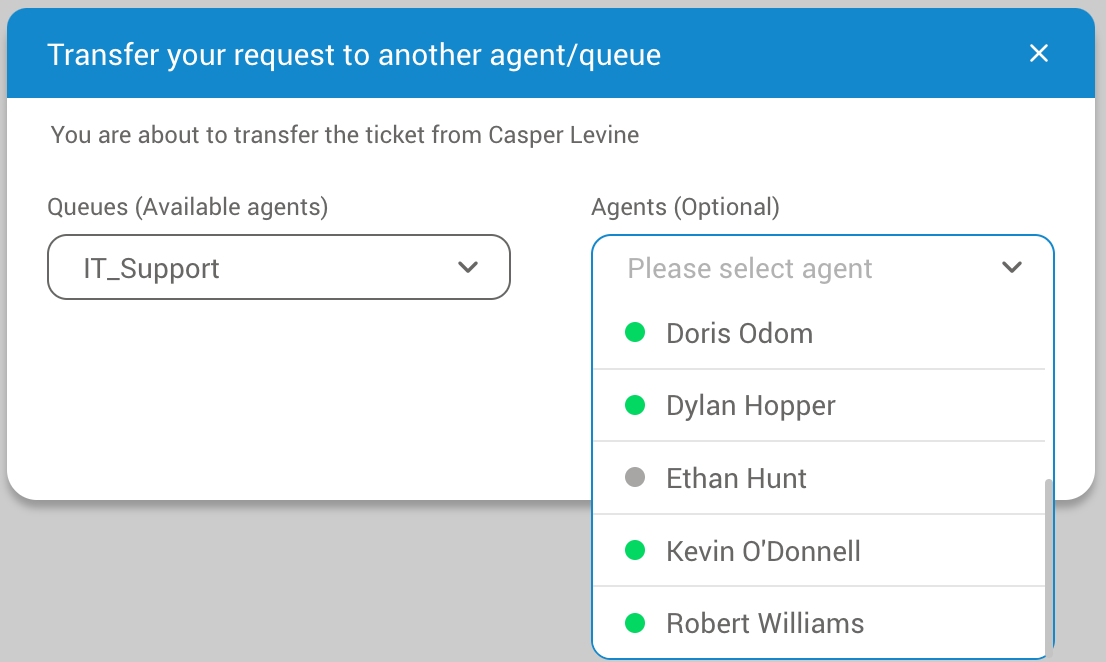
A new window will appear when the agent selects a conversation and clicks the Transfer option. From there, the agent can choose the queue to which the selected conversation will be transferred or select the specific agent to whom the conversation will be assigned.
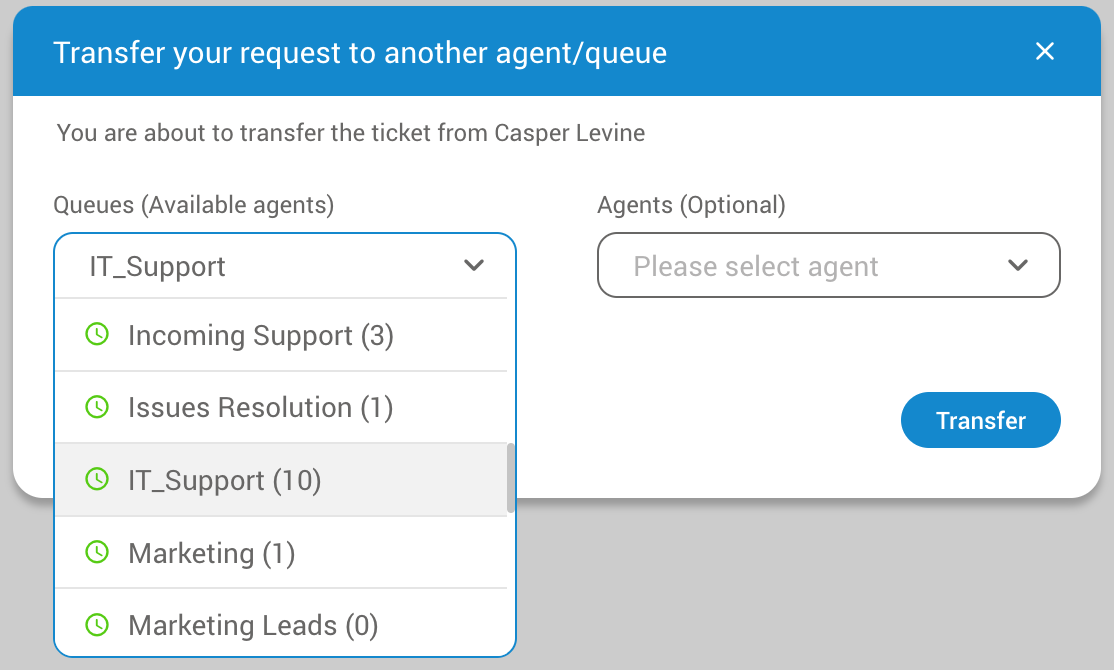
When a conversation is transferred directly to an agent, it will be automatically assigned to that specific agent regardless of which queue the agent belongs to. This means that the agent will be solely responsible for managing the conversation and responding to the customer's queries.
Conversely, if a conversation is transferred to a queue where no agents were selected, it will be sent to the unassigned conversations section for the selected queue. This allows agents who are available and logged in to the queue to take ownership of the conversation and provide support to the customer.
After successfully transfering the conversation, a corresponding notification will appear within the agent panel.
During transfers, agents may access valuable information regarding queues or the availability of other agents.
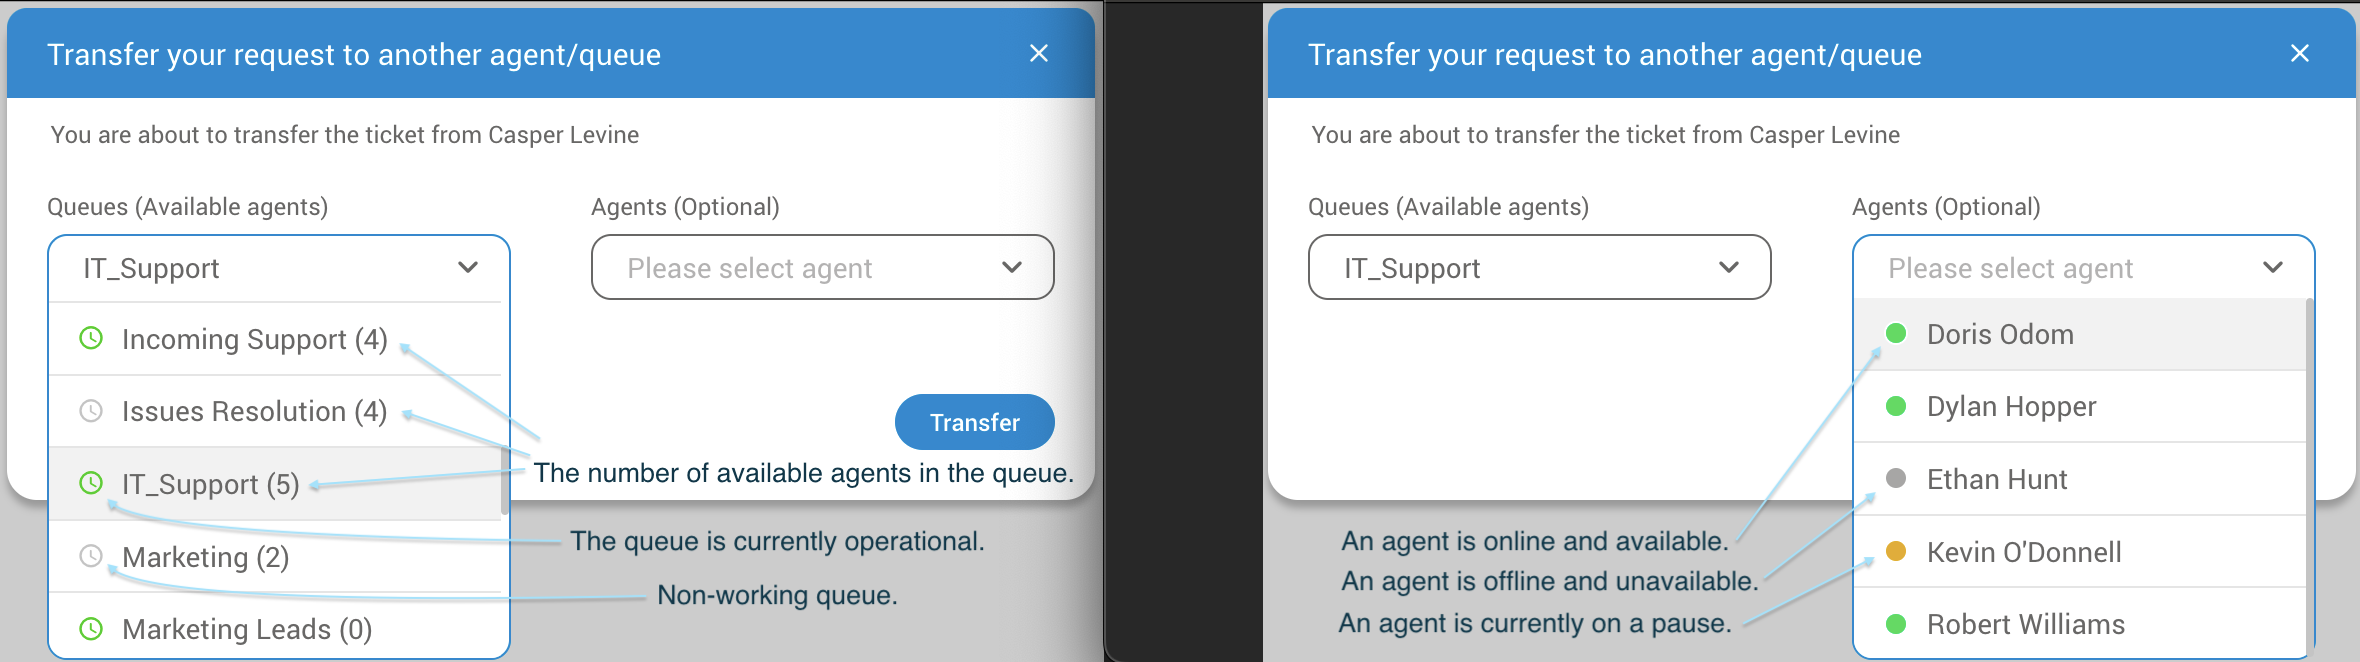
Transferring conversations to queues without agents, which are empty, is not permitted. However, transferring to a queue during non-working hours is still an option. In both instances, the transfer window will generate relevant warning messages.

¶ Unassigned Chats
The 'Unassigned Chats' section of the application displays information about all unassigned conversations for each queue that the agent is part of. This section helps agents identify conversations waiting for a response and allows them to take ownership of the conversation.
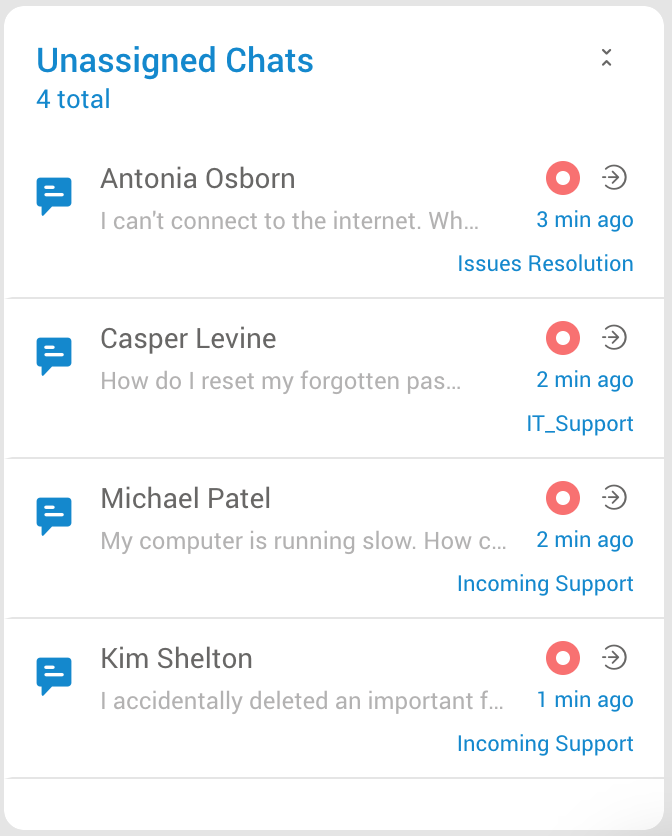
For each unassigned conversation, the section displays the following information:
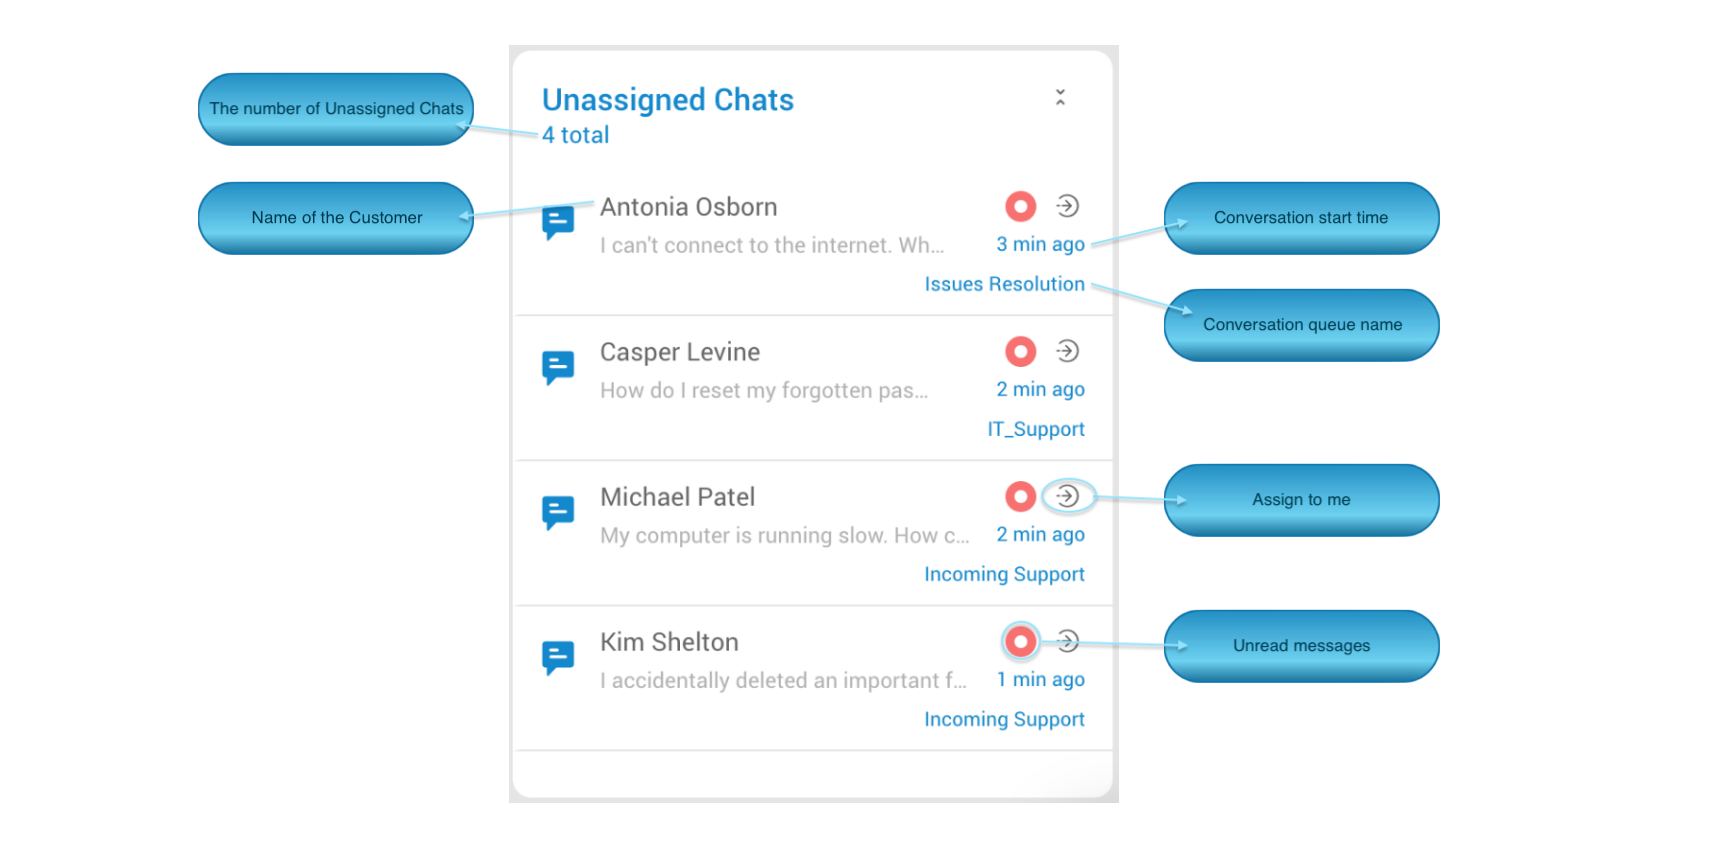
- The Customer's name or the Customer's number - This helps agents identify the customer they are talking to and personalize their interactions.
- The number of Unassigned Chats - This represents the number of unassigned chats and will change as new conversations are created.
- Conversation start time - The time when the customer started the conversation. This gives agents a reference point for the conversation and helps them manage their time efficiently.
- Conversation queue name - Name of the queue where the conversation was opened. This helps agents identify the source of the conversation and enables them to provide appropriate support.
- Unread messages - Notification for unread messages will appear whenever there are new unread messages within the unassigned conversation. These notifications differ slightly from the "MyChats" section notifications since they do not display the number of new messages.
- Assign to me button: This button allows the Agent to manually assign conversations to themselves, indicating they are willing and able to take on the conversation. This is especially useful when the queue is busy and automatic routing is delayed or when the conversation requires specific expertise that only the Agent possesses.
When an agent clicks on an unassigned conversation in the 'Unassigned Chats' section, the app provides a preview of the conversation. This preview includes important information about the conversation, allowing the agent to quickly assess the nature of the query and determine whether they are best suited to handle it. From this window, agents may assign selected conversations to them by clicking the 'Assign to me' button.
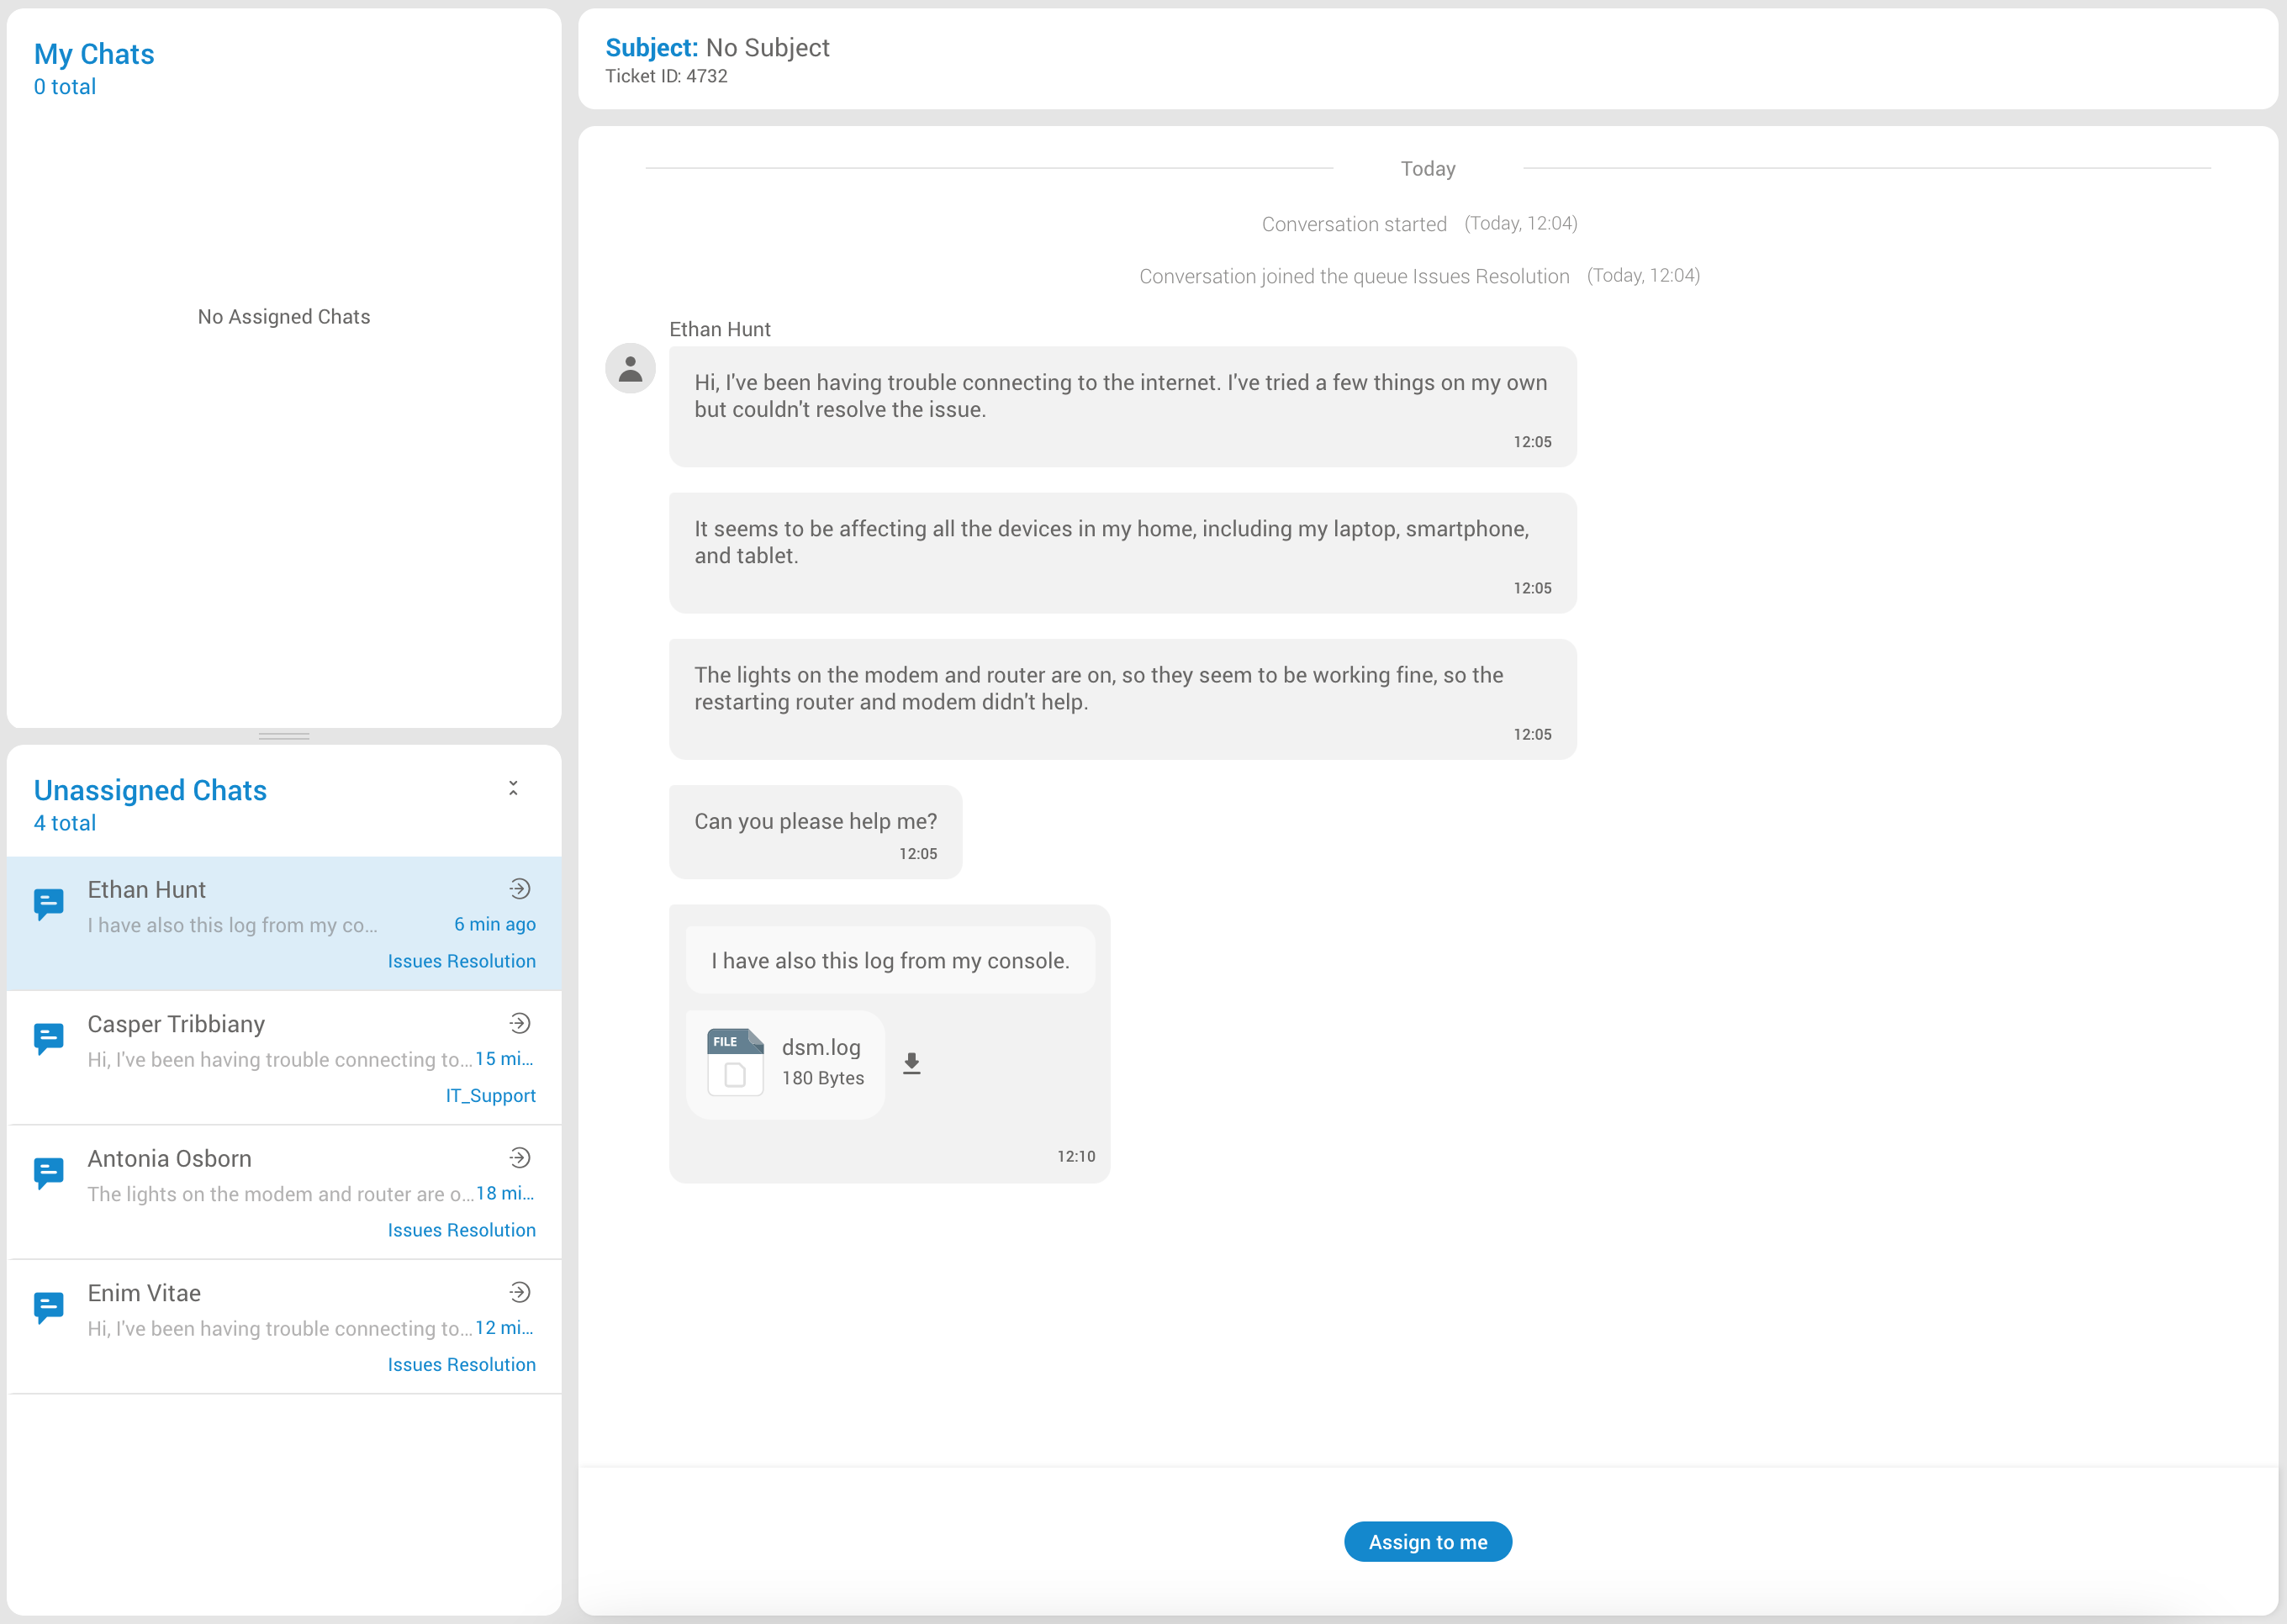
Also, by clicking on the conversation, agents can scroll up the previous conversations with that specific customer (if there are any), which includes any attachments associated with the conversation. This allows agents to see through any documents, images, or other files that the customer has shared, providing them with valuable context to resolve the customer's query effectively.
¶ Omni Conversations Assigment
When it comes to the assigning methods, the app provides two options for assigning conversations to agents: automatic assignment and manual assignment.
In cases where automatic assignment is enabled within the PBX system, conversations will be automatically assigned to agents based on a set of predefined rules or criteria.
If the automatic assignment isn't turned on, the agent has the option to manually assign the conversation to themselves by choosing the 'Assign to me' selection.
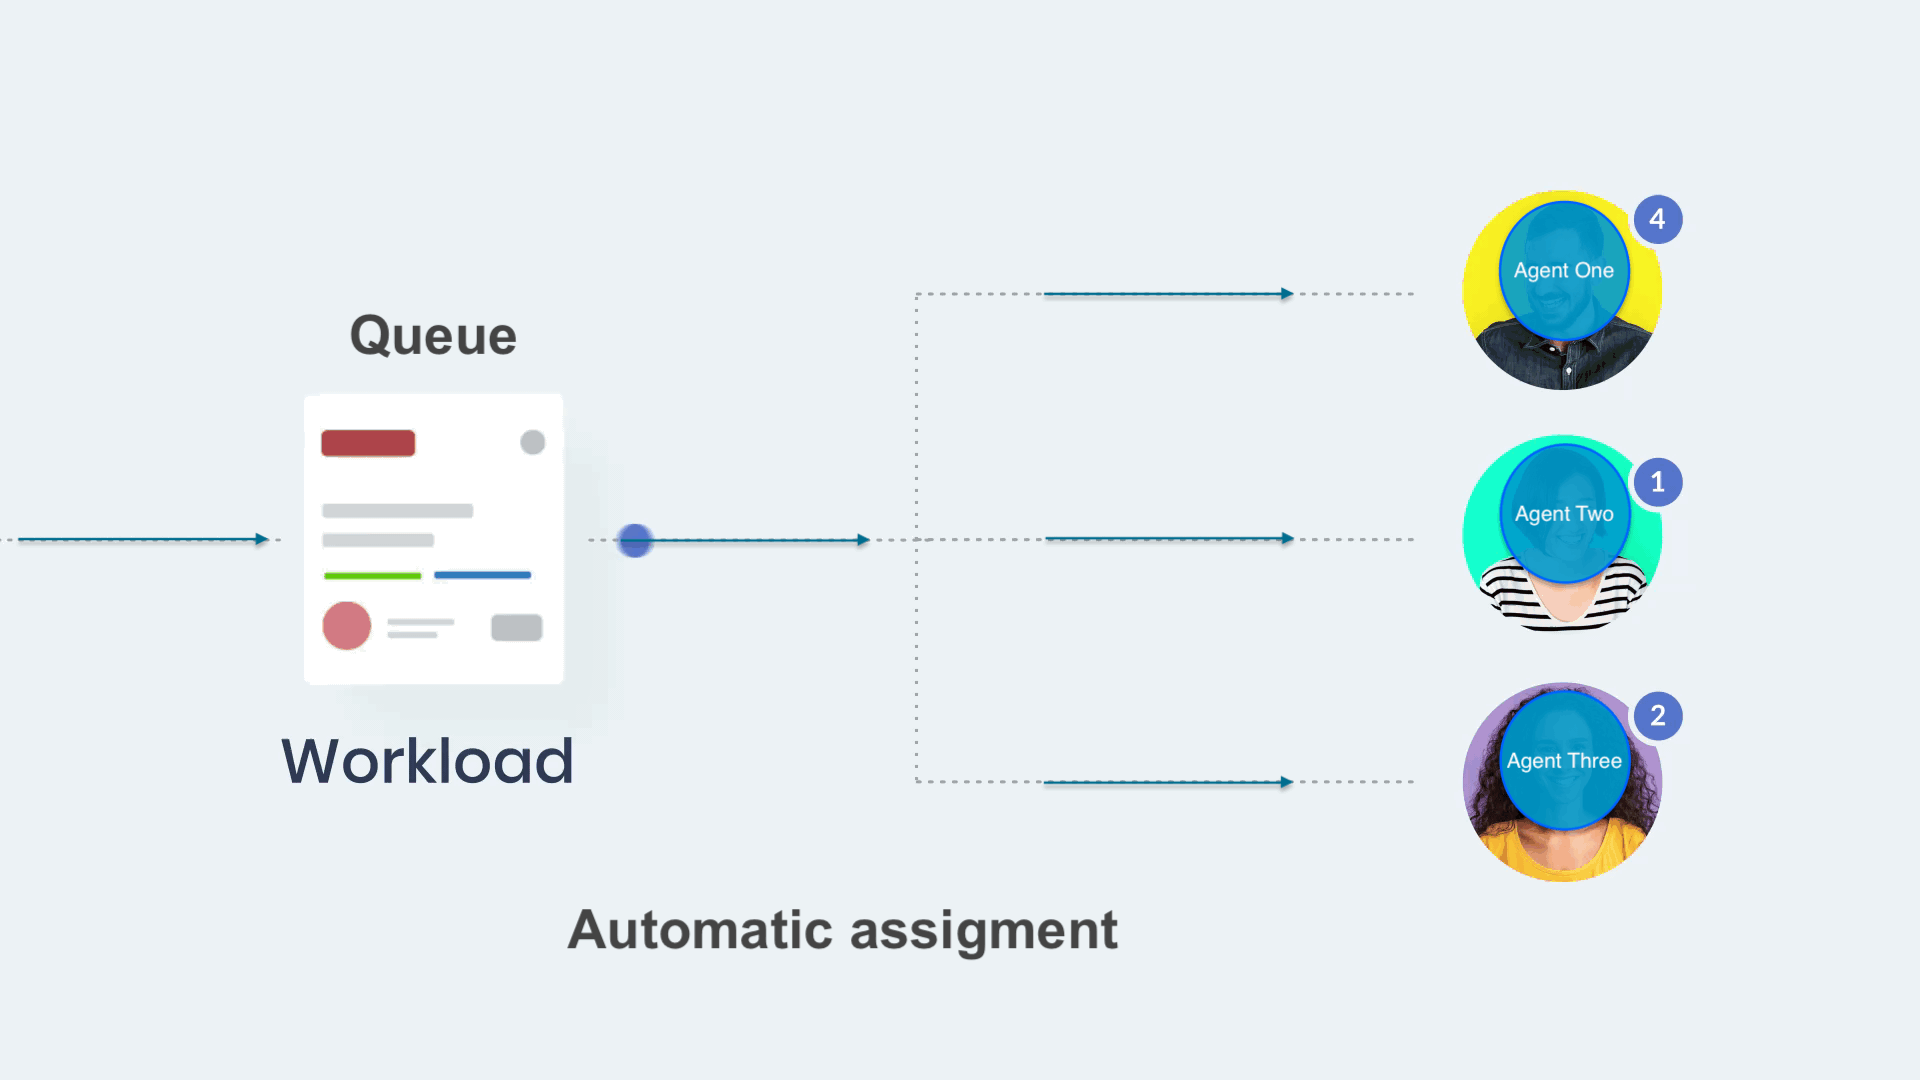
¶ Automatic Assigment
Automatic or AA assigment is triggered by next events:
- Conversation Creation
If a conversation is created outside of operation hours for a particular queue, it triggers the algorithm to auto-assign the conversation.
(This means a conversation is started when the queue is not open.)
- Conversation Transfer
If a conversation is transferred outside of operation hours for a queue, the algorithm auto-assigns the conversation.
(The conversation is transferred during non-working hours of the queue.)
- Conversation Closure
When an agent closes a conversation, the algorithm assigns a new conversation based on the current workload and capacity.
(This means after the agent initiates close conversation option, the system will automatically assign a new conversation to that particular agent, depending on the agent's workload and capacity.)
- Beginning of Operation Times
The algorithm auto-assigns conversations at the beginning of operation times for the queue.
(The queue started working.)
- Adding New Agents
When new agents are added to a queue from the PBXware GUI, the algorithm auto-assigns conversations.
(This occurs because the number of agents available for the queue has been increased, and the system distributes the workload accordingly among these agents.)
- Agent Login
When an agent logs into the system, the algorithm auto-assigns conversations based on the predefined rules.
(Similar to the event of adding a new agent to the queue, workload is distributed among available agents.)
- Unpausing an Agent
When an agent is unpaused, the algorithm auto-assigns conversations according to the agent's current capacity and workload.
(When an agent returns from pause break, the system will auto-assign conversations according to the agent's current capacity and workload.)
- Change of Agent's Status
When an agent switches their status from "active" to "inactive," the algorithm automatically reassigns conversationss to ensure a balanced workload.
¶ Manual Assigment
If the automatic assignment is not enabled, the agent can assign the conversation manually by selecting the  option. This allows the agent to take ownership of the conversation and handle the query themselves.
The manual assignment option is particularly useful for situations where the agent has specialized knowledge or expertise in a particular area and is better equipped to handle the query. By manually assigning the conversation, the agent can ensure that the customer receives the best possible support and that their query is resolved as efficiently as possible.
The Agent can assign conversations manually even if the system is set to assign conversations automatically.
¶ Chat - Subject Section
Within this section, agents have the ability to modify a conversation's status, indicating its progress or current state. Additionally, agents can transfer conversation or edit the subject of the conversation and easily track the ID of the current conversation.

¶ Subject of the Conversation
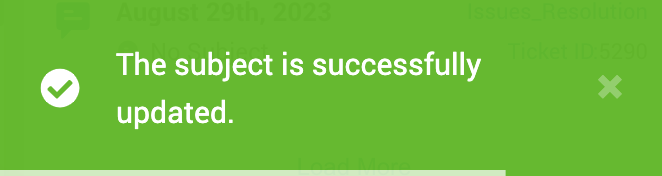
Agents can edit the subject of the conversation in this section. This can be particularly useful for ensuring that completed conversations are easy to find and review, especially if the conversation involves a complex or nuanced issue.
Any updates on the subject will trigger a corresponding notification.
¶ Status of a Conversation
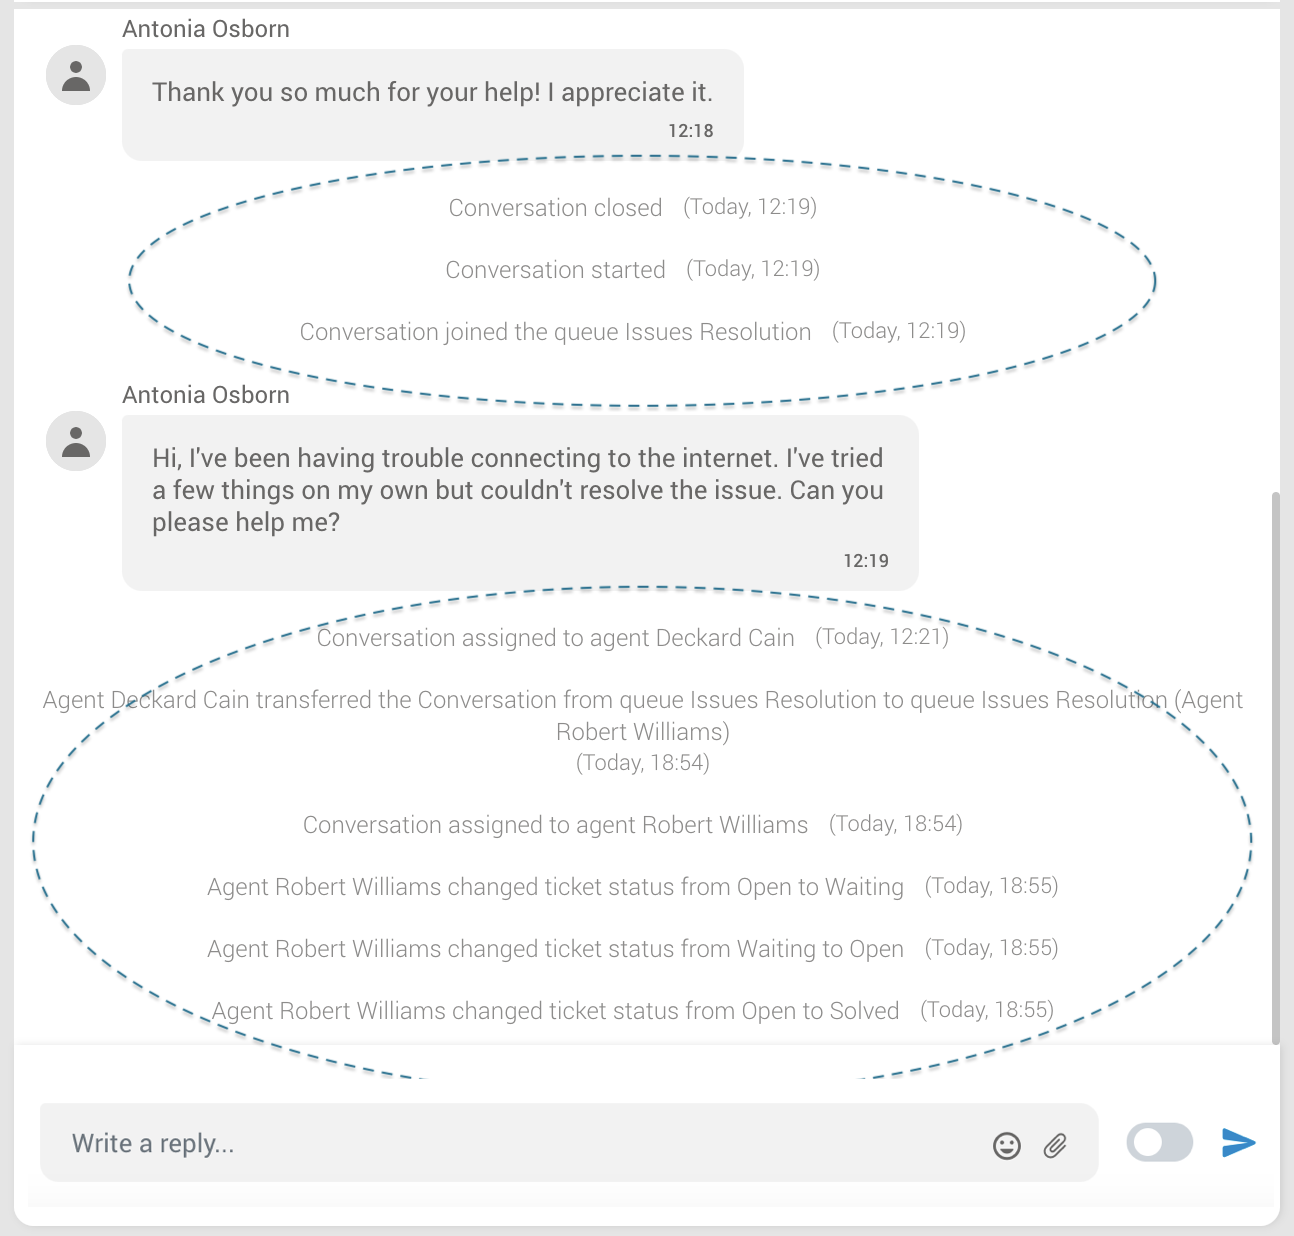
Conversations within the system can have four different statuses that indicate the current stage or state of the conversation:
Open Status
This status is set by default when a conversation is assigned to an agent, either through manual or automatic assignment.
Waiting Status
The "Waiting" status indicates that the agent is awaiting additional information from the customer. This could be specific details such as ID numbers, operating system details, or any other relevant information required to proceed with assisting the customer.
Solved Status
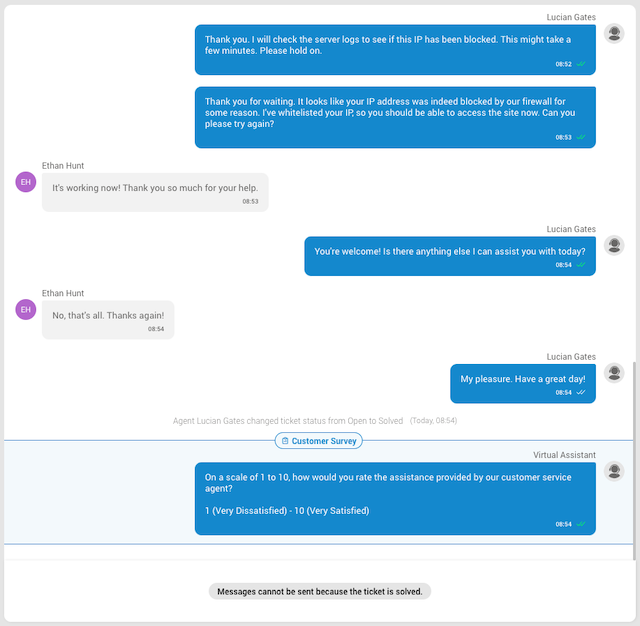
When a conversation reaches the "Solved" status, it signifies that the agent has completed their assistance and resolution process. However, the conversation is still awaiting confirmation from the customer regarding the resolution. The agent may have successfully solved the customer's problem or provided a solution, but it is necessary to check with the customer if everything is working as expected. Once the customer confirms their satisfaction or provides any further feedback, the conversation can be closed.
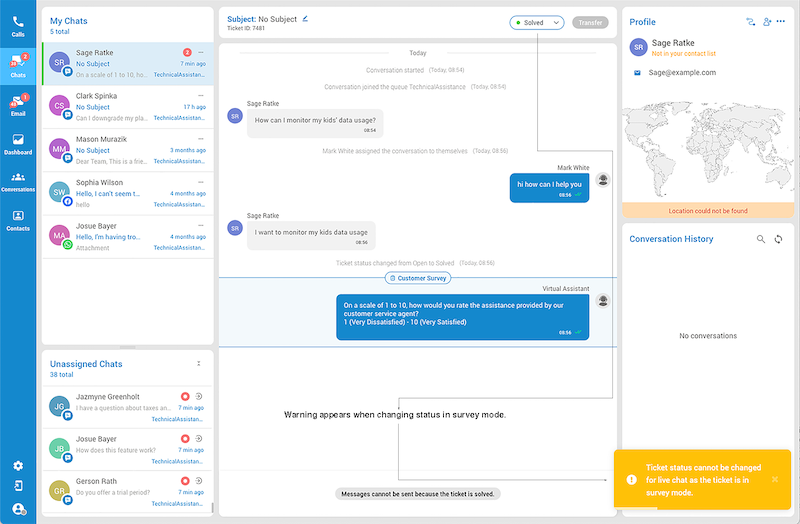
When an agent changes the status of a conversation to "Solved," it will trigger a customer satisfaction survey. The survey will appear within the Conversations card, allowing customers to rate the agent's performance and leave additional comments. This survey is optional and must be enabled in your system for customers to access it.

Once the conversation is marked as "Solved," it can no longer be edited or have its status changed.
When an agent sets the ticket status to Solved, or when a customer closes the ticket causing it to enter the Solved state, messages can no longer be sent.

Changing the ticket status to Open or Waiting is disabled for tickets which are in Solved status. Additionally, a warning message is displayed for messaging channels when the system is in survey mode and an agent attempts to change the ticket status. The message states: "Ticket status cannot be changed for live chat as the ticket is in survey mode."
Ticket transfers are not allowed when the ticket's status is set to Solved."

The system automatically closes the conversation once the customer completes the survey. The closed conversation will remain in the agent's assigned conversations but will be greyed out and uneditable. The only option for closed conversations is the "Hide" button, which removes them from the agent's assigned section.
¶ Ticket Closure and Visibility
¶ Customer or Supervisor Closure
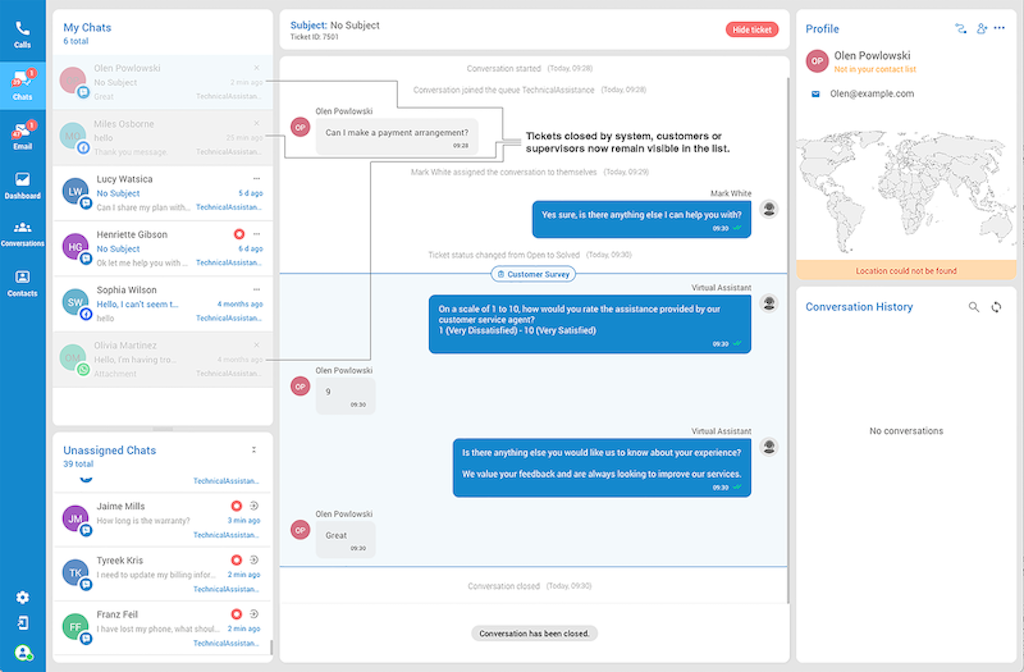
When a customer or supervisor closes a ticket:
- The ticket remains visible in the "My Chats" section.
- This allows for better tracking, enabling agents to still view the ticket.
- The ticket appears grayed out in the list.
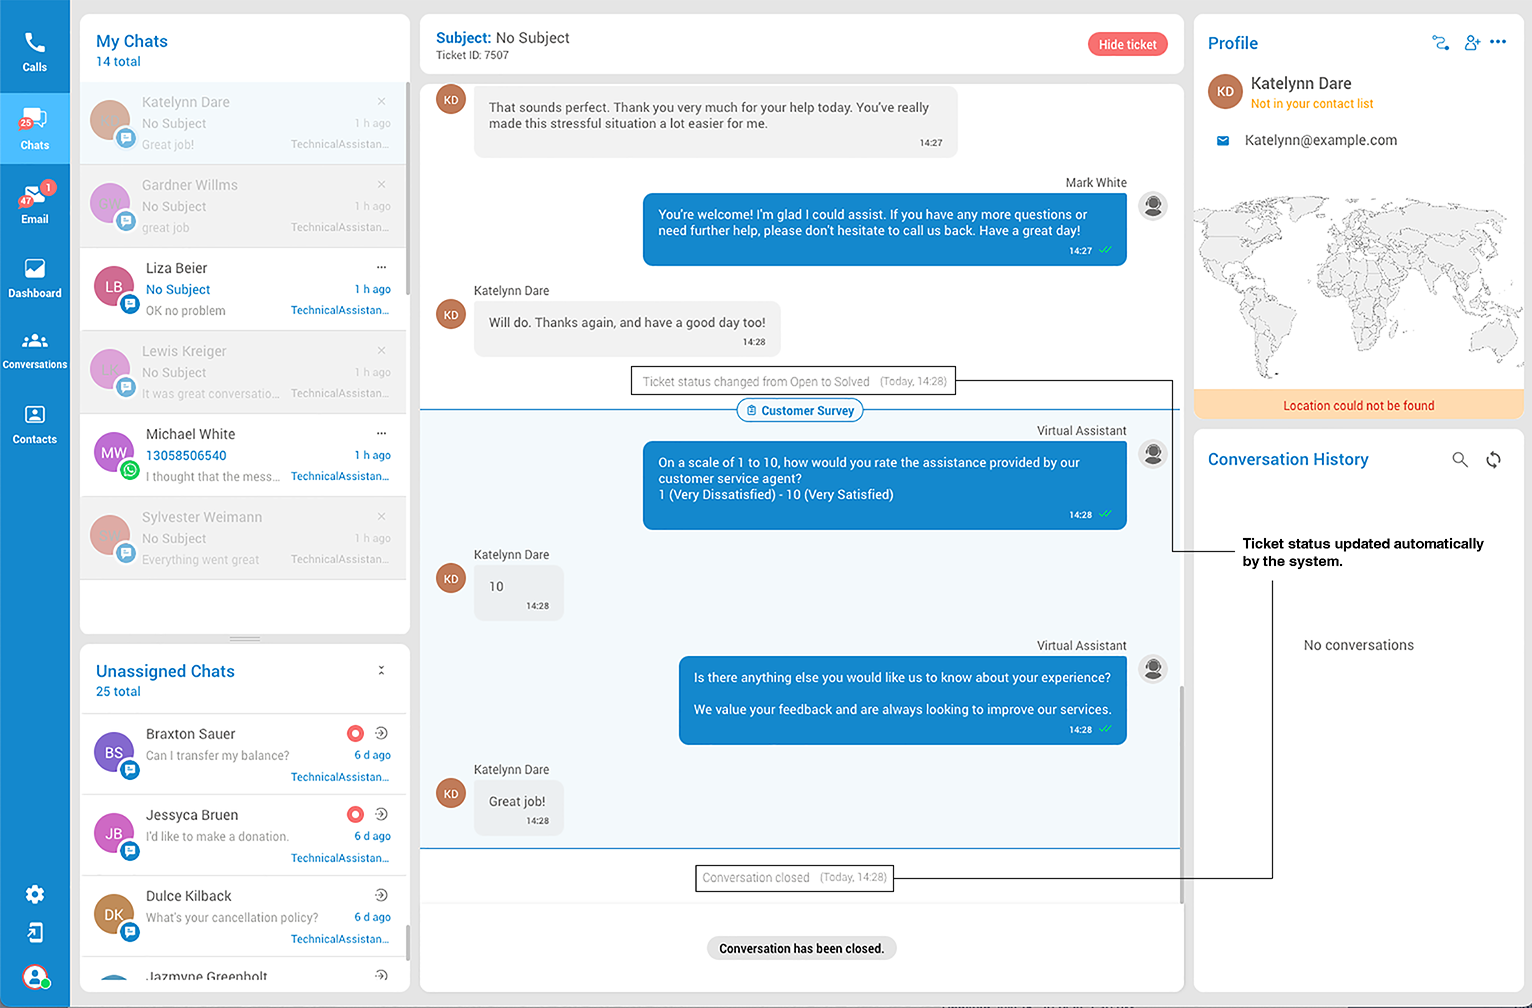
When a customer ends the Live Chat session, the system automatically updates the ticket's status from 'Open' to 'Solved.' This change triggers an event message stating, 'Ticket status updated from Open to Solved.' Following the completion of the survey by the customer, another event message is displayed: 'Conversation closed.'
¶ Agent Closure
When an agent closes a ticket:
- The ticket is removed from the "My Chats" list.
- The ticket is moved to the Closed conversation list.
- Agents can access the ticket history in the Closed conversation list if needed.
¶ Survey Completion Closure
After a customer completes the survey:
- The system automatically closes the ticket.
- The ticket remains visible in the "My Chats" list.
- It appears grayed out, similar to customer or supervisor closed tickets.
¶ Hiding Closed Tickets
Agents can remove tickets closed by customers, supervisors, or after survey completion from their view:
- Select the grayed-out ticket in the "My Chats" list.
- Locate the red "Hide Ticket" button above the conversation window.
- Note: This button only appears for tickets not closed by agents.
- Click the "Hide Ticket" button to remove the ticket from your list.
This ticket management system is designed to balance efficiency, accountability, and user experience. By keeping customer or supervisor-closed tickets visible, agents stay informed of recent interactions. Agent-closed tickets are removed to declutter the active list, while survey-closed tickets remain visible for feedback review. The hide option for non-agent closed tickets gives agents control over their workspace. All closed tickets are accessible in the Closed conversation list, ensuring a comprehensive history for reference and quality assurance. This approach effectively balances immediate agent needs with long-term tracking and accountability requirements.
¶ Transfer Conversation
The 'Transfer' button allows agents to transfer a selected chat or conversation to another agent or queue. When transferring a chat to another agent, the chat will be automatically assigned to the selected agent, regardless of which queue they belong to. If the chat is transferred to a queue, it will be sent to the unassigned conversations section of that queue.
¶ Conversation Card
A text-based communication feature that allows customers and agents to chat in real-time. This means that conversations happen in the same way as any other chat, with messages being sent and received almost instantly.
When chatting with a customer, the agent can scroll through the conversation history to review what has been discussed previously. The app enables agents to enhance their messages by incorporating emojis, canned responses, and WhatsApp templates. This feature enhances context, accelerates response times, and improves conversation management efficiency.
Additionally, the app provides support for file attachments, allowing agents to send and receive different types of files during the conversation. However, there is a size limit of 20MB for each file that can be uploaded.
The conversation card provides agents with a snapshot of essential information related to a conversation. When agents select a conversation, they are directed to a screen displaying the conversation card. The card includes the conversation's start time and queue assignment, information about the assigned agent, the transfer history, if applicable, and the conversation's status and closure details.
Please note that if the chatbot (Virtual Assistant) has been configured in the system for 'Live Chat' and 'SMS Chat', any conversations between the chatbot and the customer will also be displayed inside the Conversation card. This ensures that the agent has visibility into any automated interactions that have taken place with the customer before they start the conversation.
If enabled, the customer survey will be displayed as a virtual assistant message, visually separating it from the regular conversations. Brief messages within the survey will inform the customer about the survey, and these messages can be created/edited within the user's system.
¶ Seen Feature
The Seen feature in gloCOM enhances communication by providing clear indicators that a message has been read. This feature is available for Live Chat, Facebook Messenger, and WhatsApp, helping both agents and customers know when their messages have been seen.
¶ Overview
The Seen feature includes:
- Agent Panel: Agents can see when a customer has read their message.
- Customer Interface: Customers can see when an agent has read their message.
¶ Using the Seen Feature
¶ For Agents
-
Viewing the Seen Indicator:
- Live Chat: When a customer reads your message, a "Seen" indicator (double green marks) will appear next to the message in your Agent Panel.
- Facebook Messenger and WhatsApp: Similar to Live Chat, when a customer reads your message, a "Seen" indicator (double green marks) will appear in your Agent Panel.
-
Steps to Use:
- Log in to gloCOM as an Agent or Supervisor.
- Engage in a Live Chat, Facebook Messenger, or WhatsApp session with a customer.
- Send a message to the customer.
- When the customer reads the message, you will see the "Seen" indicator next to the message in your panel.
¶ For Customers
-
Viewing the Seen Indicator:
- Live Chat: When an agent reads your message, a "Seen" indicator (double green marks) will appear next to your message in the Live Chat window.
-
Steps to Use:
- Engage in a Live Chat session with an agent.
- Send a message to the agent.
- When the agent reads your message, you will see the "Seen" indicator next to your message in the chat window.
¶ Benefits
- Enhanced Communication Transparency: Both parties can see when their messages have been read, reducing uncertainty and improving communication efficiency.
- Improved Customer Experience: Customers know when their messages have been seen, which helps manage expectations for responses.
- Efficient Follow-ups: Agents can see if customers have read their messages, allowing them to follow up more effectively.
The Seen feature in gloCOM ensures that both agents and customers are always informed about the status of their messages, enhancing overall communication and service quality.
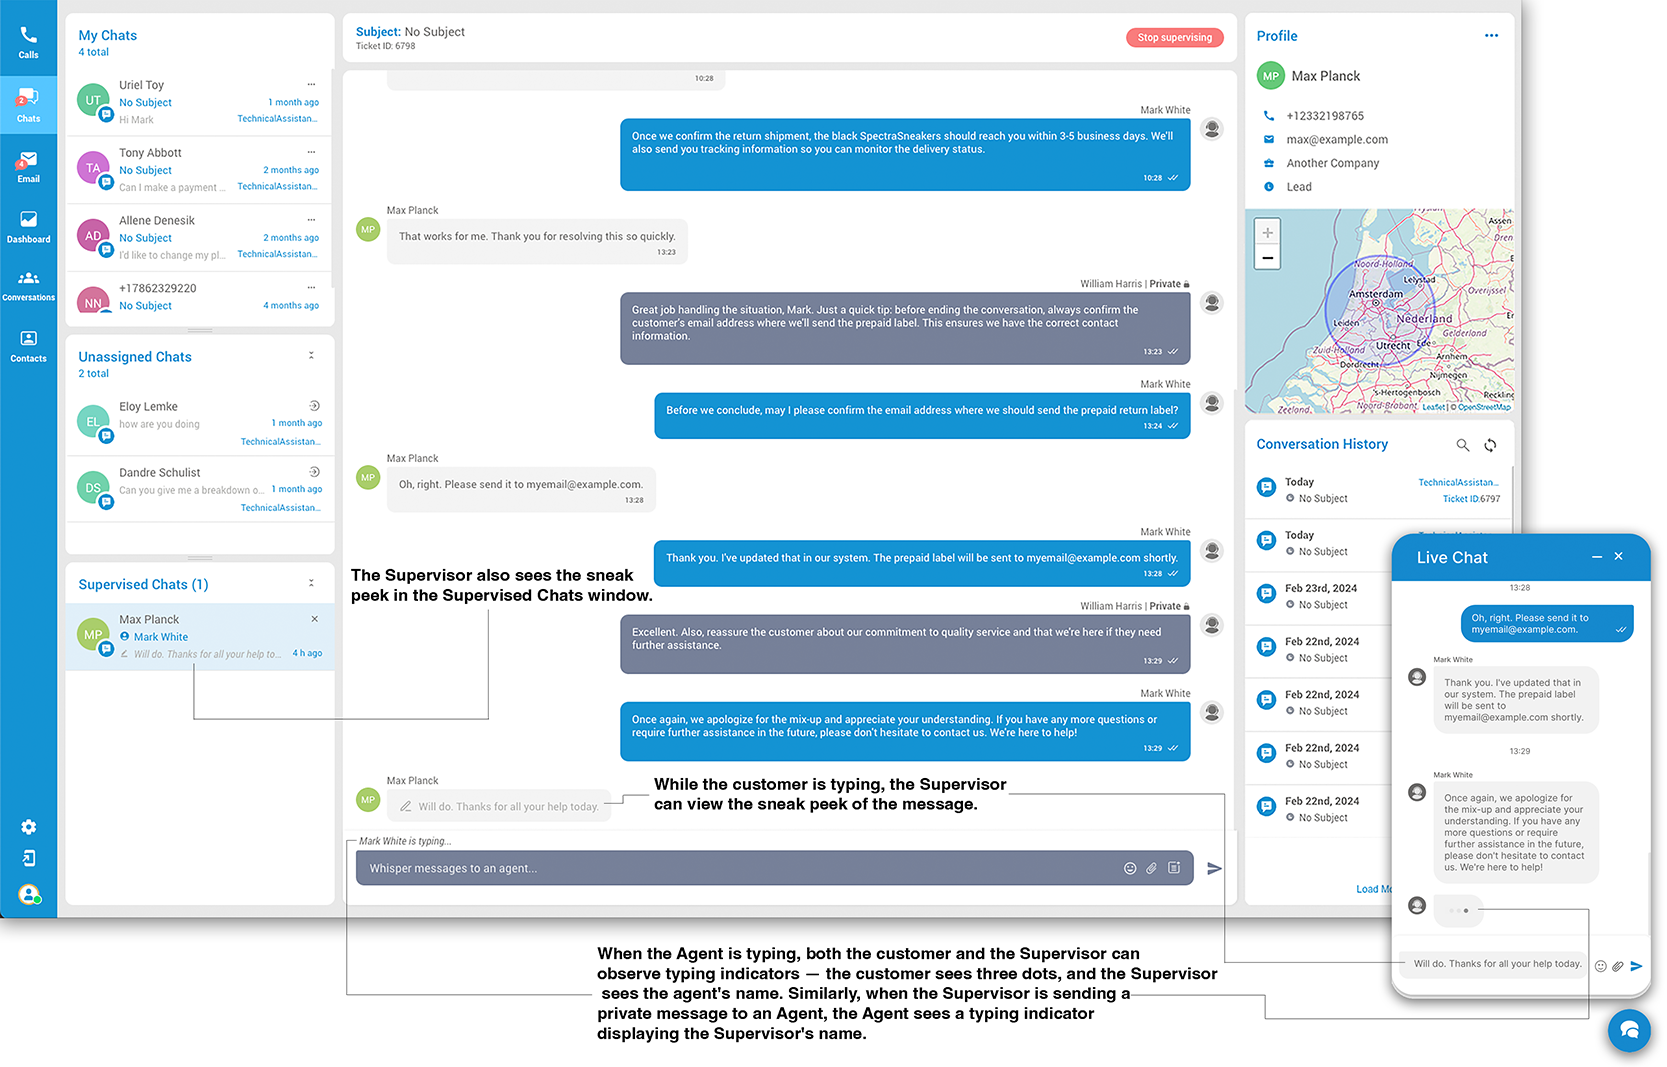
¶ Typing Notification and Sneak Peek Preview for Agents
¶ Overview
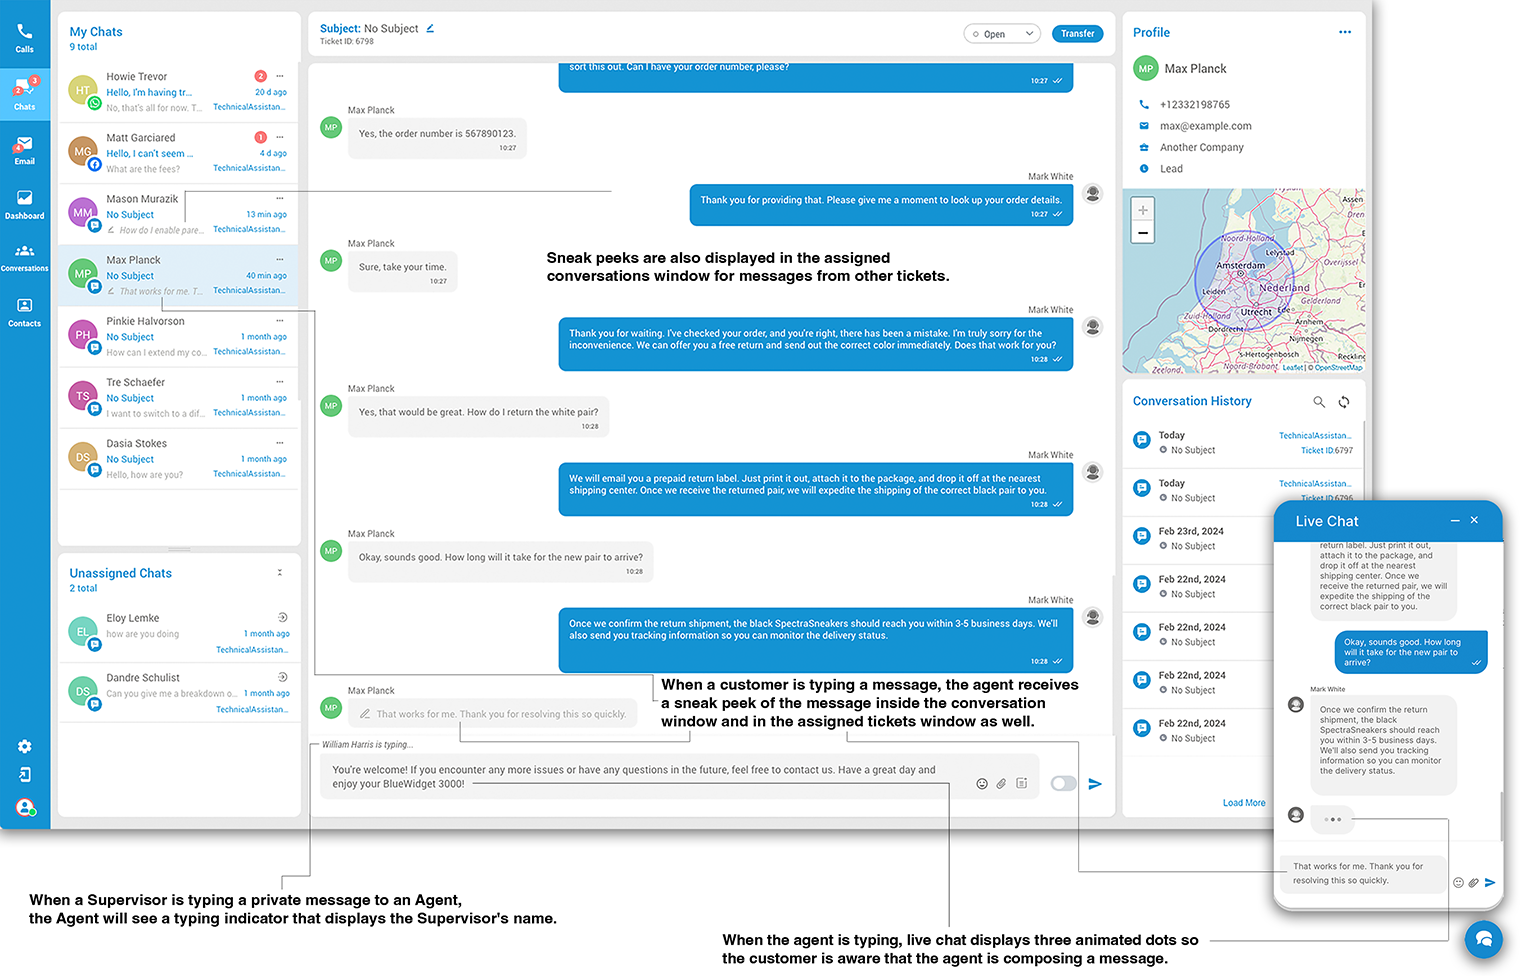
The Typing Notification and Sneak Peek Preview features are designed to enhance communication between agents and users in the Live Chat environment. These features provide agents with real-time insights into user messages as they are being composed, as well as notifications when other participants are typing.
¶ Typing Notification
The Typing Notification feature signals to chat participants that the other party is currently composing a message. This is visually represented by three animated dots, indicating an active typing status.
¶ Sneak Peek Preview
The Sneak Peek Preview feature enables agents to view what a user is typing in real-time, even before the message is sent. This proactive feature is aimed at improving response times and preparing agents for incoming queries or concerns.
¶ Feature Details
¶ For User-Agent Interaction
¶ User Typing Preview for Agents:
- When a user begins to type a message in a live chat, the assigned agent will be able to see a live preview of the message being composed, updating in real-time.
- This preview is displayed directly in the conversation window and updates as the user types.
- The sneak peek preview will also appear in the associated ticket within the "My Chats" window.
¶ Agent Typing Notification for Users:
- When an agent starts composing a response to a user in a live chat, the user will be notified through the display of three animated dots. This visual cue indicates that the agent is actively typing a message.
¶ For Multiple Users
- In scenarios where multiple users from the live chat are typing simultaneously, sneak peek previews will be accessible for each individual's message in their respective tickets within the "My Chats" window. This feature facilitates efficient management of multiple conversations by the agent.
¶ For Agent-Supervisor Interaction
¶ Supervisor Typing Notification for Agents:
- If a supervisor is sending a private message to an agent, the agent will receive a typing notification that includes the supervisor's name. This ensures that agents are aware when supervisors are actively composing messages to them.
¶ Use Cases
- Improved Response Time: Agents can better anticipate user queries and begin formulating responses in advance, leading to reduced wait times.
- Enhanced Communication: The introduction of real-time previews and typing notifications contributes to a more dynamic and engaging conversation experience.
- Efficient Conversation Management: Agents can navigate and manage multiple conversations more effectively by being informed of users' active typing status.
¶ Conclusion
The Typing Notification and Sneak Peek Preview features play a pivotal role in fostering a seamless and efficient communication experience within our live chat application. By providing agents with real-time insights into the conversation dynamics, these features not only enhance responsiveness but also elevate the overall user engagement and satisfaction.
¶ Messaging Guidelines for WhatsApp and Facebook
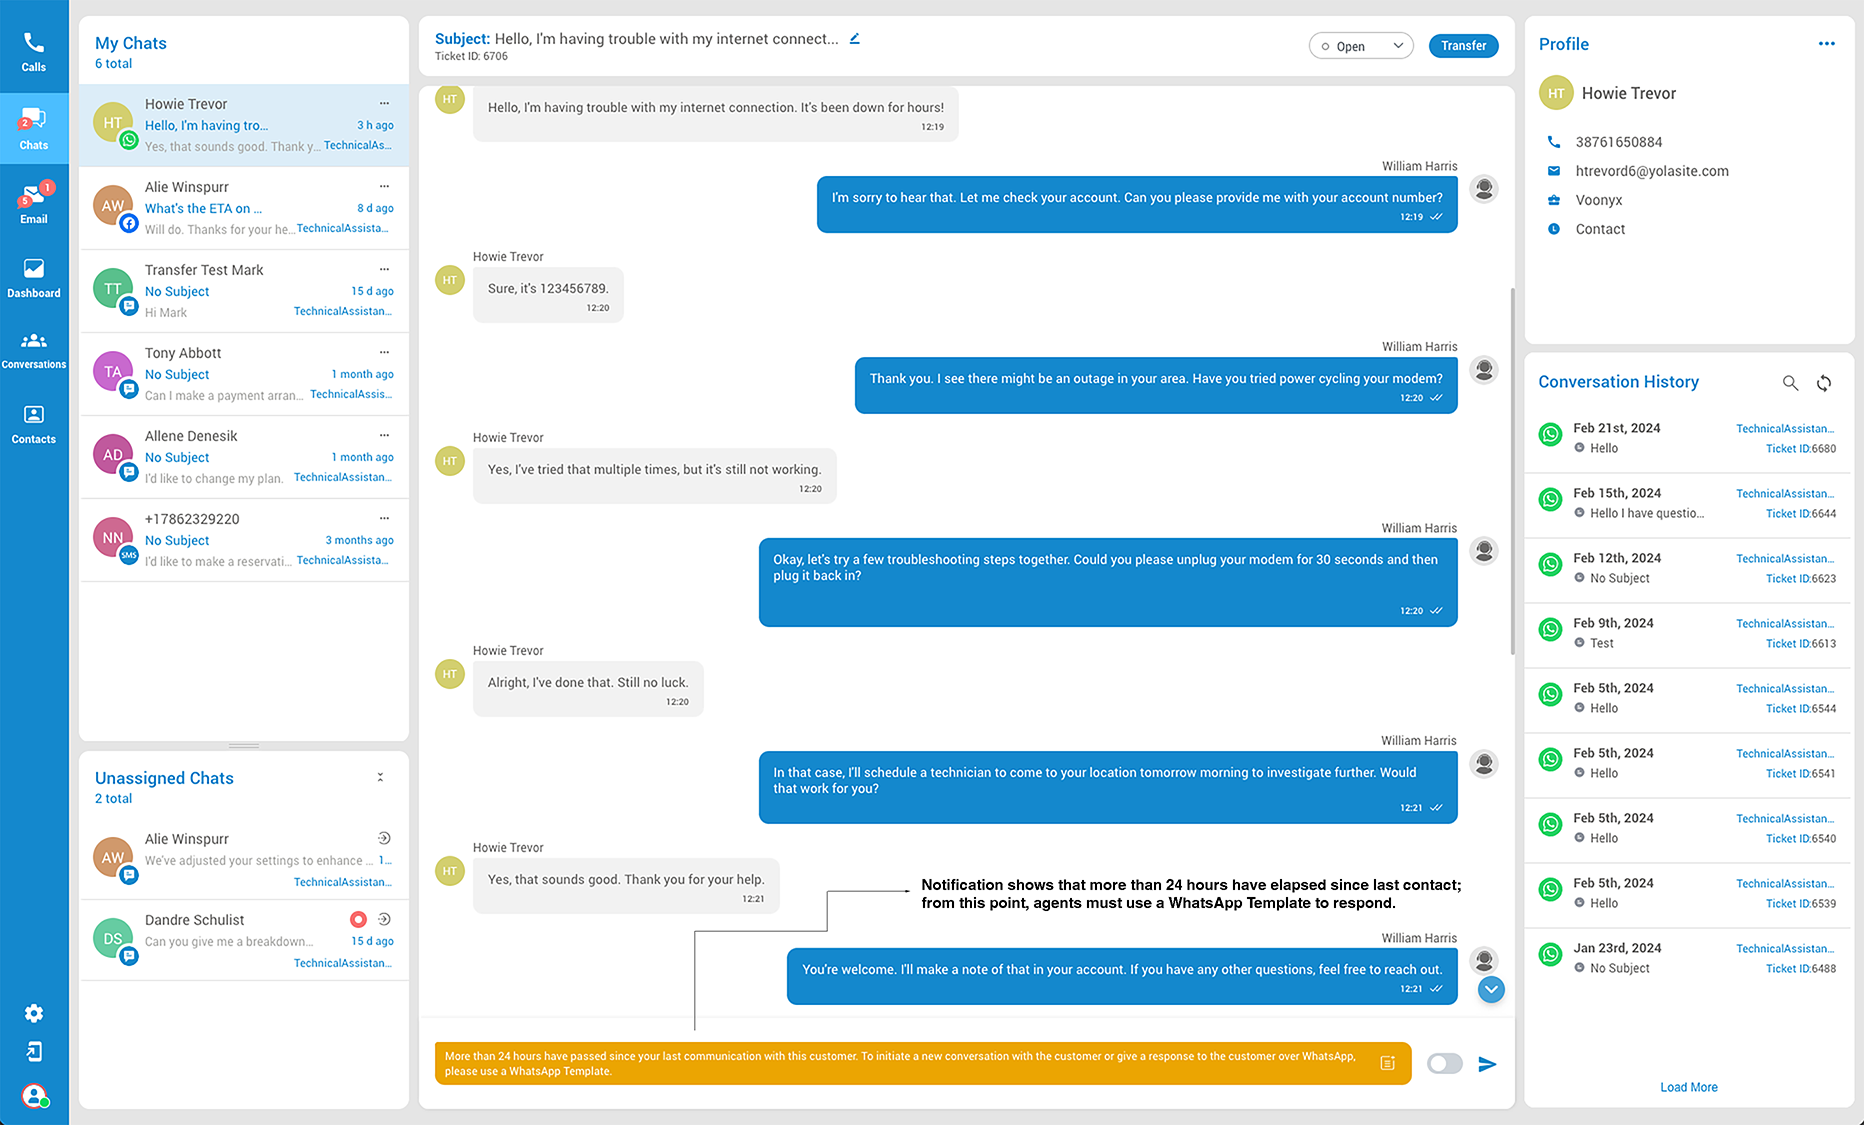
¶ WhatsApp Messaging Rules
When communicating with customers via WhatsApp, adhere to specific constraints:
- 24-Hour Rule: If more than 24 hours have passed since the last message from a customer, agents can only respond using pre-approved WhatsApp Templates. Direct new messages are not allowed without customer initiation.
- Customer Initiation: Agents cannot send new messages until the customer initiates the conversation again.
- Template Usage: Agents are restricted to responding with WhatsApp Templates after the 24-hour window to ensure compliance with WhatsApp's policies.
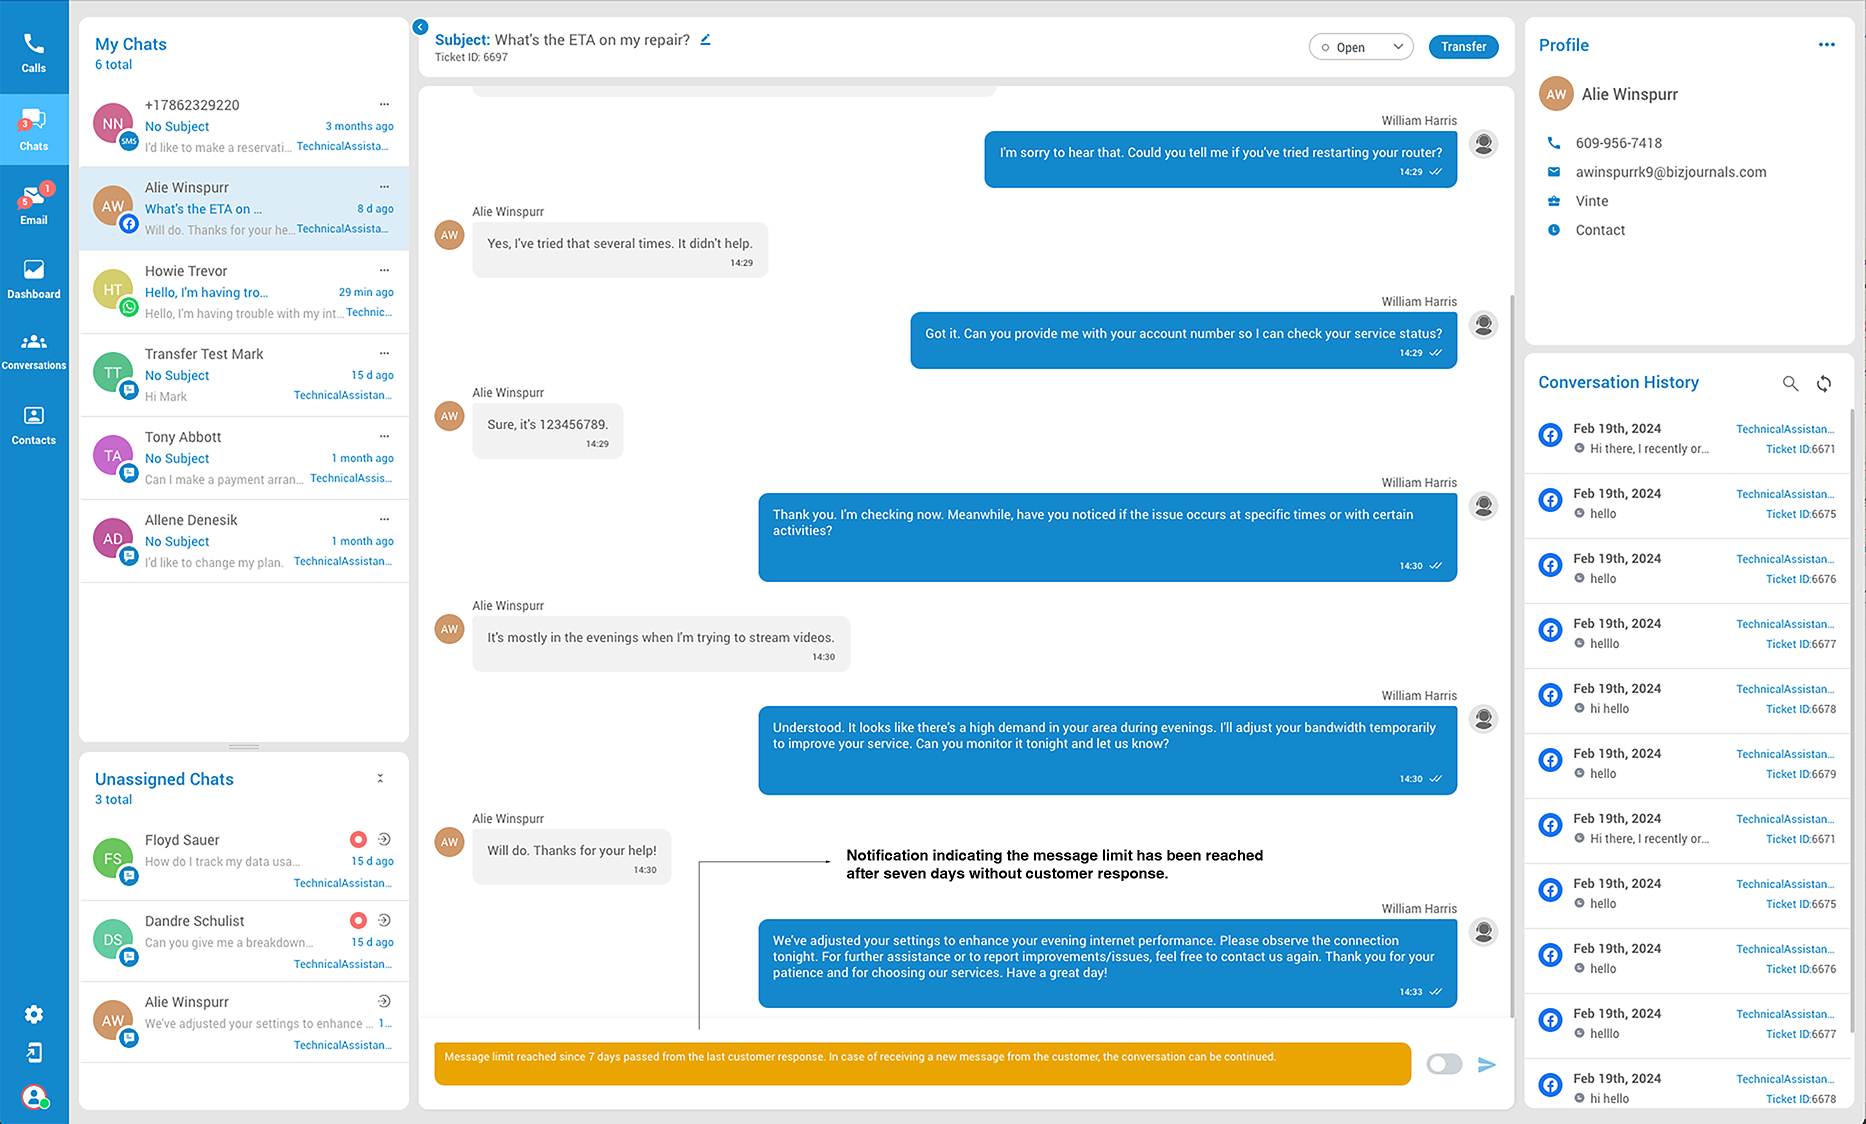
¶ Facebook Messaging Rules
For Facebook, different rules apply:
- 7-Day Limit: If 7 days have passed since the last customer response, the agent cannot reach out proactively. The conversation can continue once the customer sends a new message.
¶ Best Practices
- Timely Responses: Respond within allowed time frames to maintain engagement and comply with platform rules.
- Use Templates Wisely: On WhatsApp, prepare for common scenarios with templates to ensure compliant responses post-24-hour window. On Facebook, monitor interactions to avoid surpassing the 7-day limit.
- Monitor Conversations: Regularly check for new customer messages on both platforms to provide timely and appropriate responses.
Adhering to these guidelines ensures effective communication with customers while complying with platform-specific messaging rules.
¶ Echo Messages
When replying to customer messages through the Agent panel, there are distinctions based on the origin of the message:

-
Answering from Facebook Business Manager: If a user responds to a conversation in the Agent panel that originated through Omnichannel but was answered from Facebook Business Manager, the Agent panel will display "Sent from Facebook" to indicate the source of the response.
-
Continuing Conversation from Agent Panel: If an agent continues responding to an ongoing conversation directly from the Agent panel, their name will be displayed with the message.
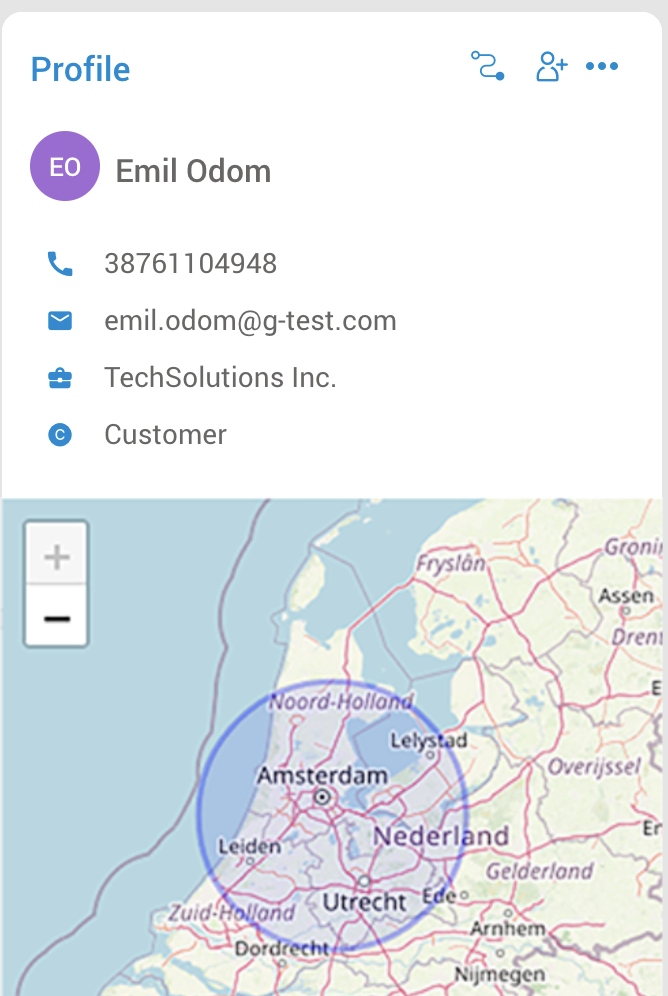
¶ LiveChat Profile
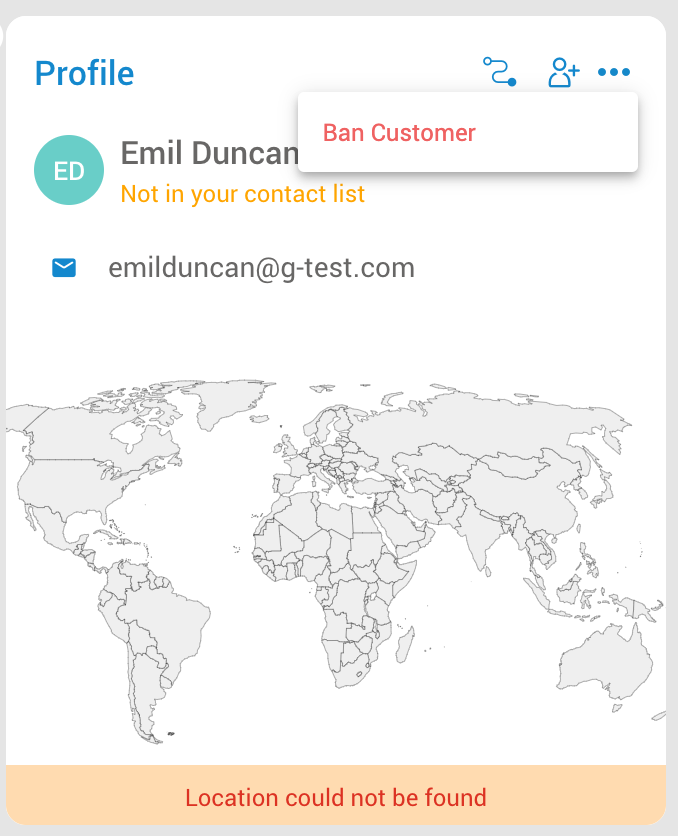
The Profile section displays customer used. Information may include:
- Name - The customer’s name.
- Email - The customer’s email address.
- Phone number - The customer’s phone number.
- Facebook Page (if available) - This identifies the customer’s Facebook page.
- Geo Location of the Customer - Knowing the customer’s geographical location provides valuable context for tailoring support services based on regional preferences or specific needs. It can also help identify trends or issues that might be localized to certain areas.
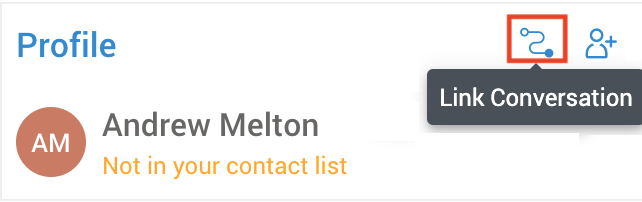
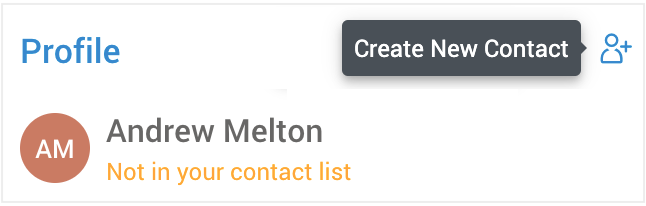
From the Profile section (top-right) agents have the ability to:
-
Link/unlink a conversation to existing Contact - Opens a view listing suggested contacts and a search field for finding additional contacts.
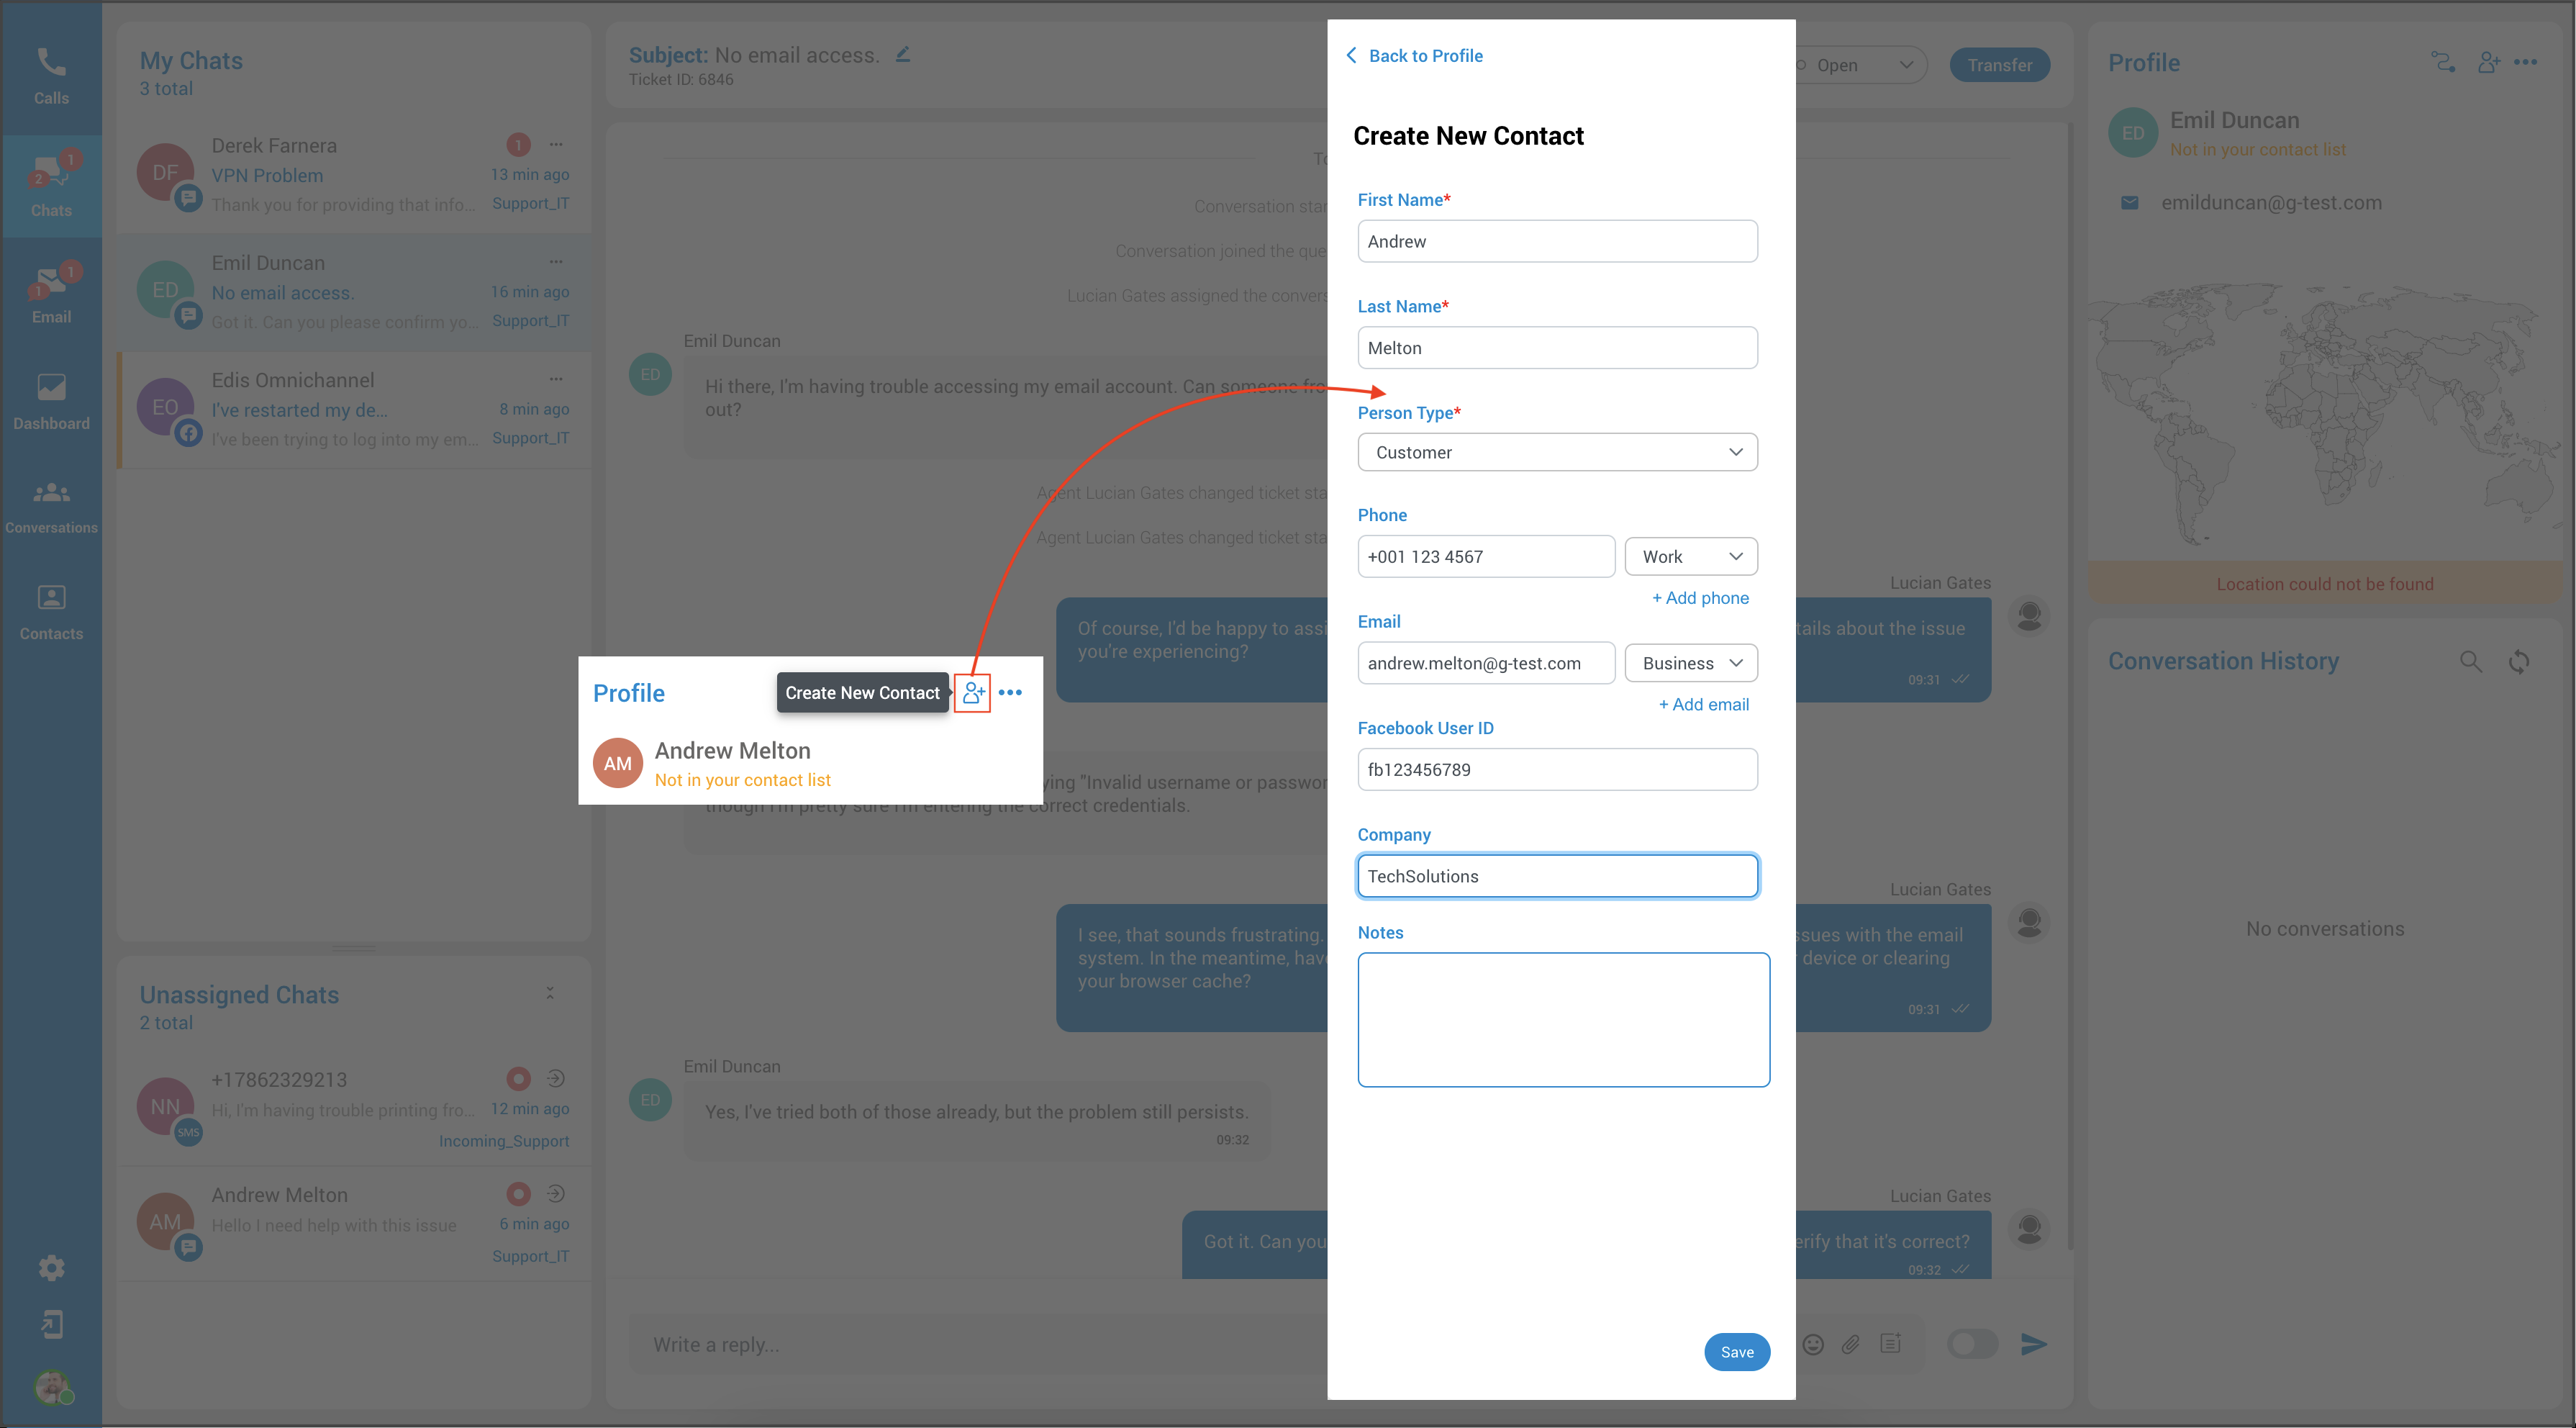
-
Create a new contact and link the conversation to it - Opens a form to input new contact information; upon saving, this new contact is automatically linked to the conversation.
-
Ban Customer - Restrict interactions with specific customers.
Linked conversations differ from unlinked conversations in that when an agent links a conversation to an existing contact or adds a new contact and links the conversation to it, that conversation appears within the History section.
This section displays all linked conversations to that contact across all channels. So, if a customer contacts agents over time via voice calls, SMS, email, Facebook, etc., all conversations will be visible within the History section. (This info will be provided if agents have linked conversations to that particular customer)
This helps agents provide better service by allowing them to refer back to past conversations for context. Overall, it simplifies support, enabling agents to offer personalized assistance more effectively.
How to Link Conversation
To link unlinked tickets, you can opt to connect them to an existing contact or create a new one. If you choose to link to an existing contact, you can browse or search for them from a dropdown menu displaying suggested contacts.
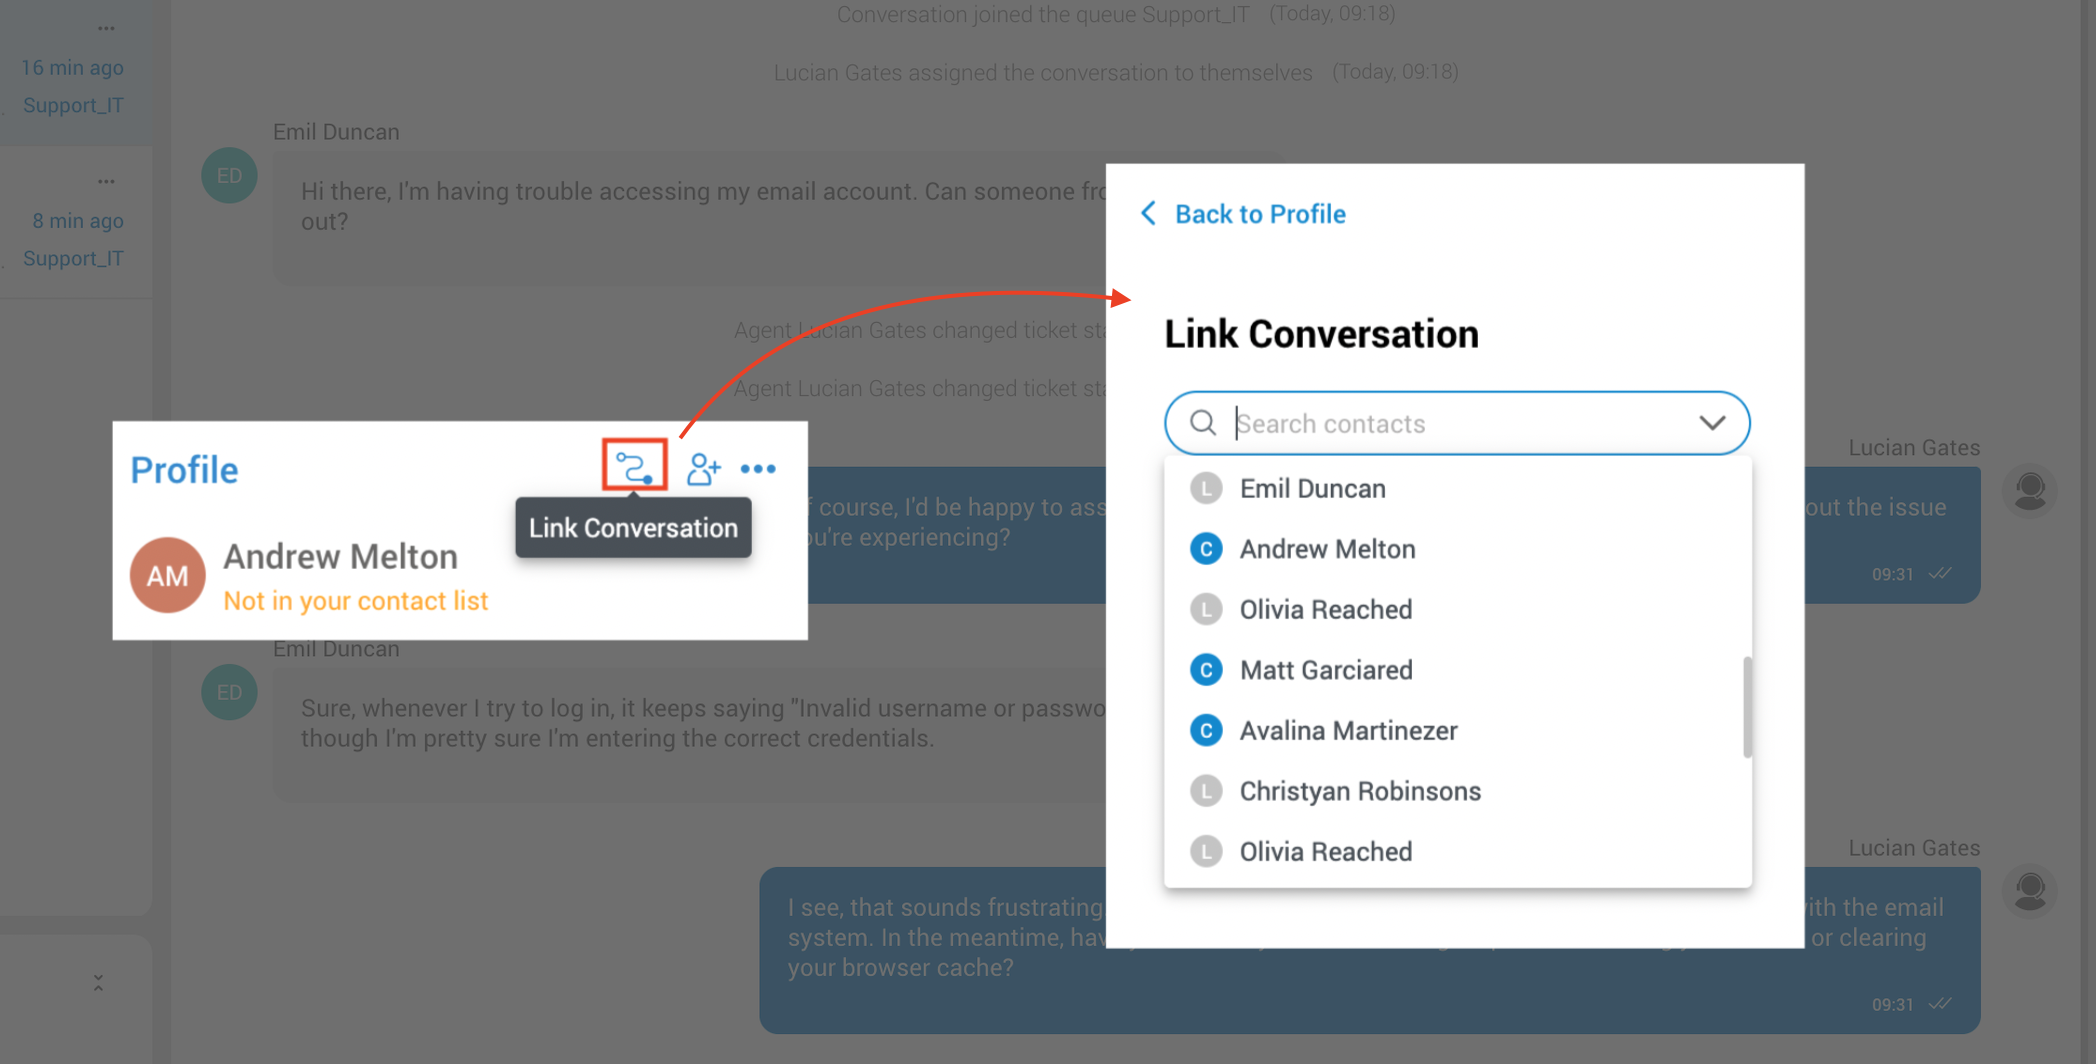
Once you find the right one, select it and confirm the link.
Alternatively, if you’re creating a new contact, simply fill out the information form and save it to automatically link the conversation.
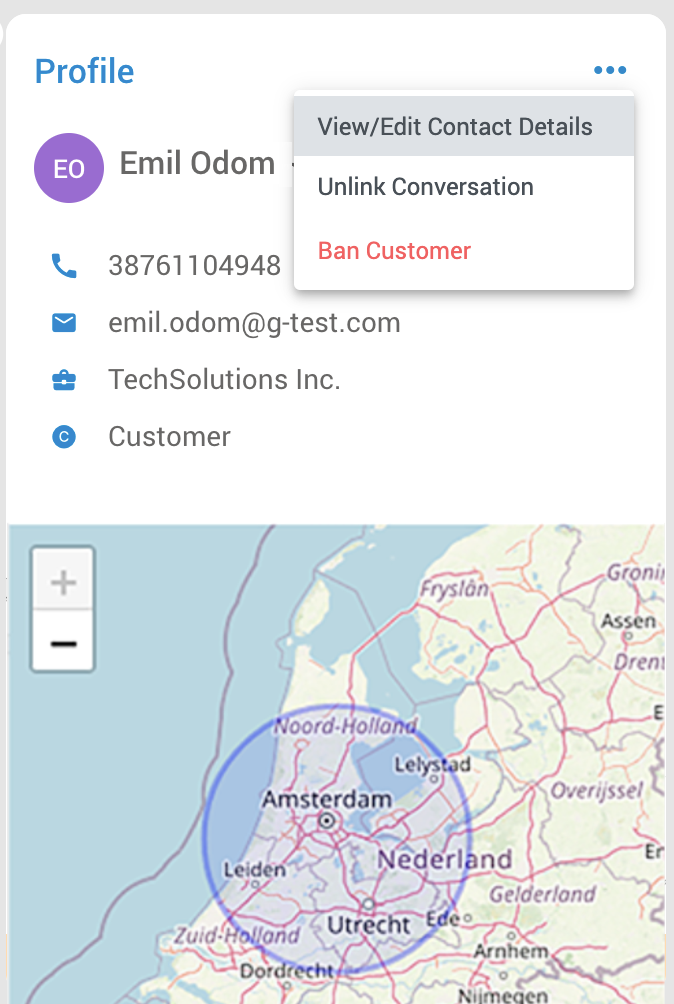
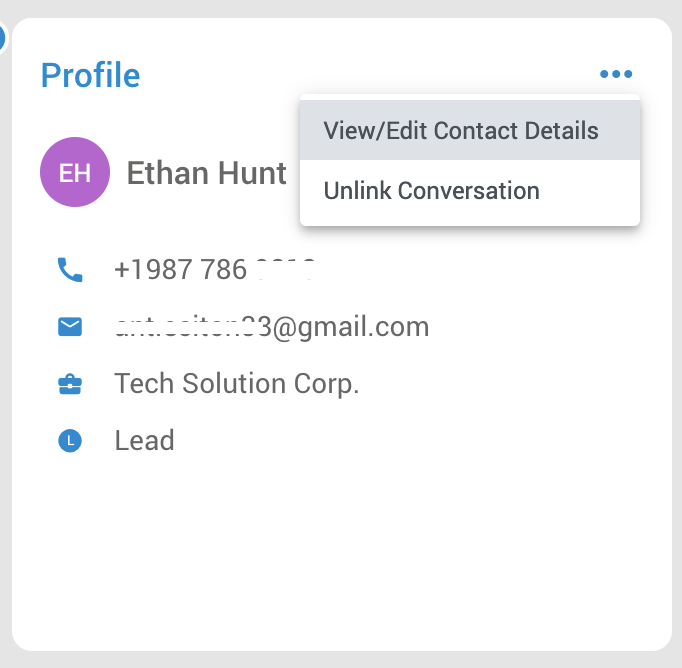
For tickets already linked to a contact, the Profile Card provides all available contact information. In the three dots menu, agents will find additional options:
- View/Edit Contact Details - Allows access to and modification of the contact’s information.
- Unlink Contact - Detaches the current conversation from the linked contact.
- Ban Customer - Restrict interactions with specific customers.
¶ Ban Customer (LiveChat only)
Another valuable feature within this section is the Ban Customer option. This functionality empowers agents to restrict interactions with specific customers with whom they are presently engaged, preventing those banned customers from either continuing ongoing conversations or initiating new ones.
To initiate the ban, agents simply need to click the three-dot button within the interface and then select the 'Ban Customer' option.
Hereafter, a new window will open within the agent panel. In this window, agents are provided with the capability to specify the duration for which the ban will remain in effect.
Furthermore, they are required to provide a clear and valid reason for the customer's ban, ensuring that the cause behind the action is well-documented.
Common reasons for banning customers include harassment of call center agents, use of offensive language, making false claims, repeated violations of terms of service, or engaging in fraudulent activities.
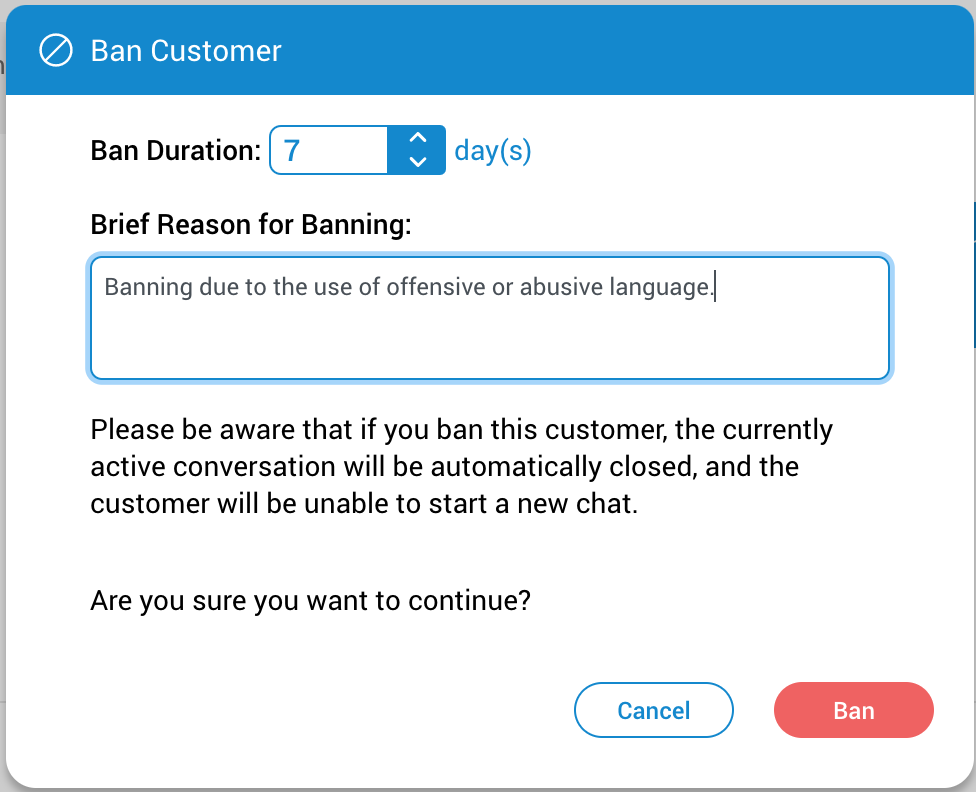
By selecting the 'Ban' button, the agent initiates a ban on the current customer. As a result, a short notification will appear, and the ongoing conversation with that customer is automatically terminated.

The list of banned customers can be found in the Security section within Settings.
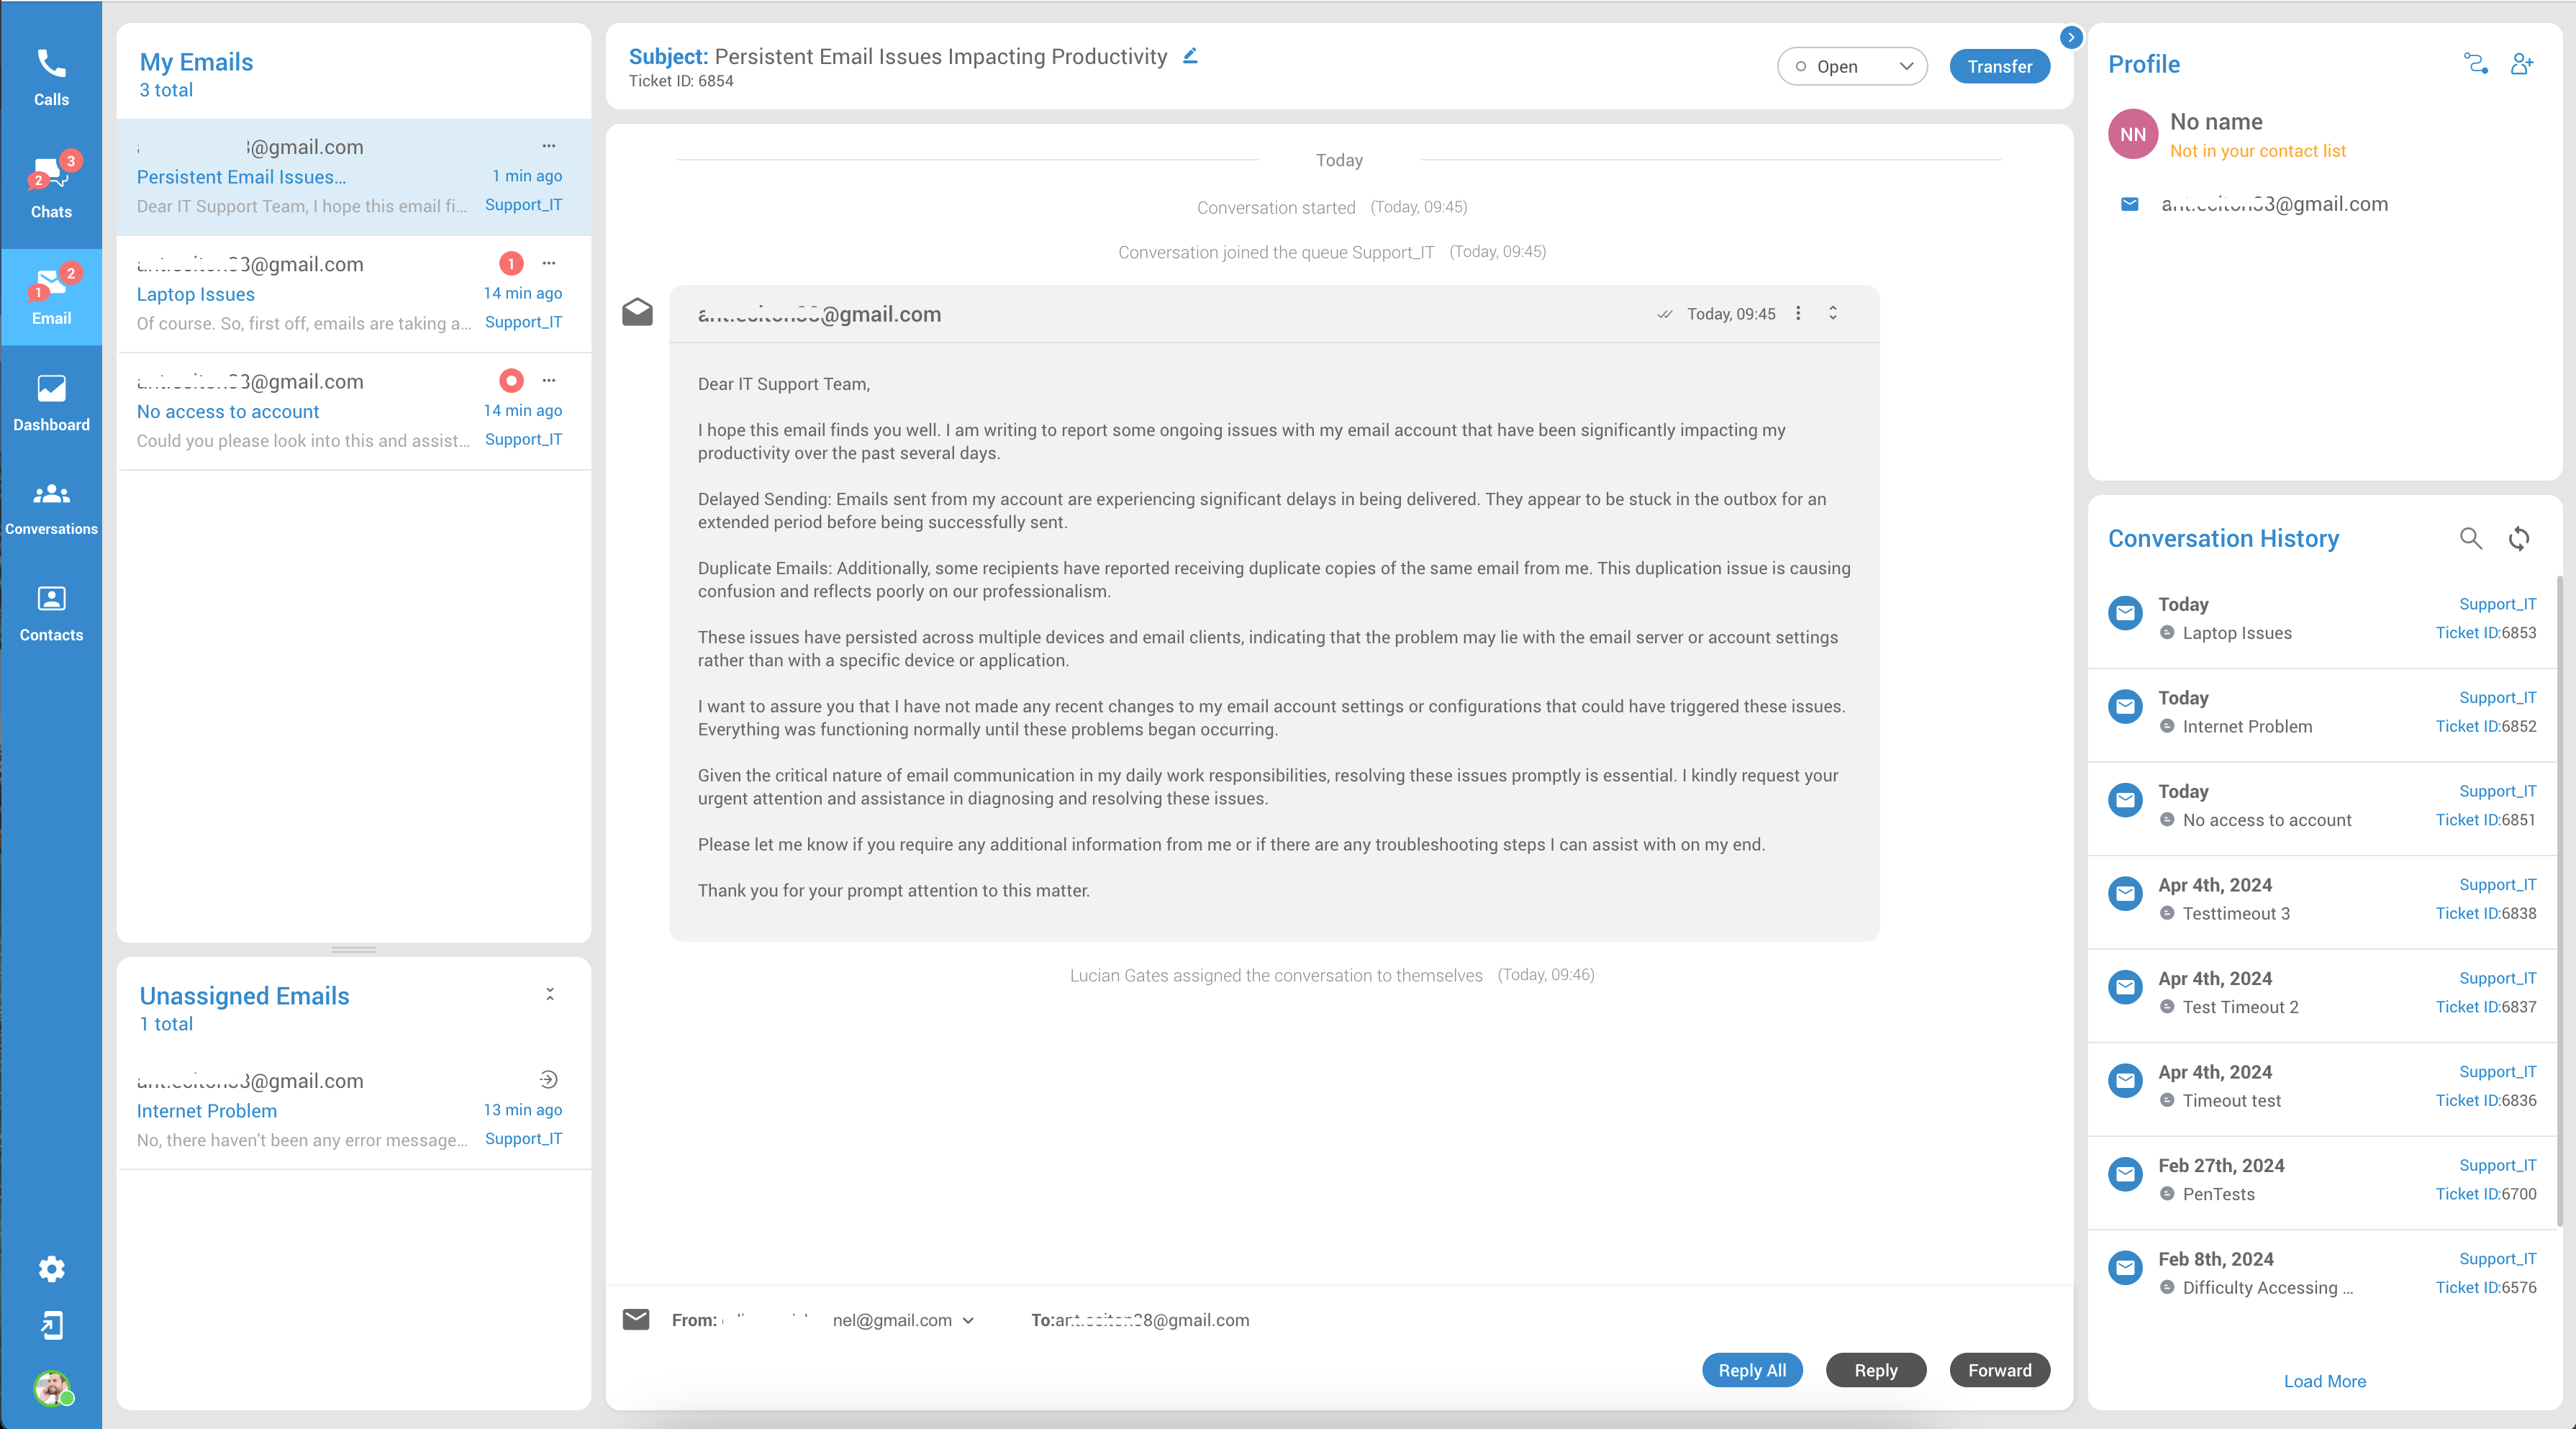
¶ Conversation History
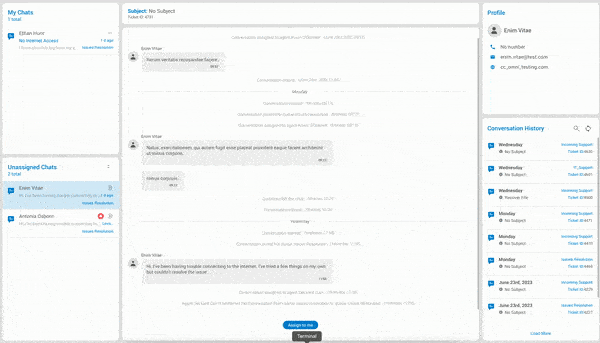
The Conversation History feature allows agents to access the full history of past conversations with a particular customer. This list is automatically updated every five minutes, or agents can manually refresh it at any time.
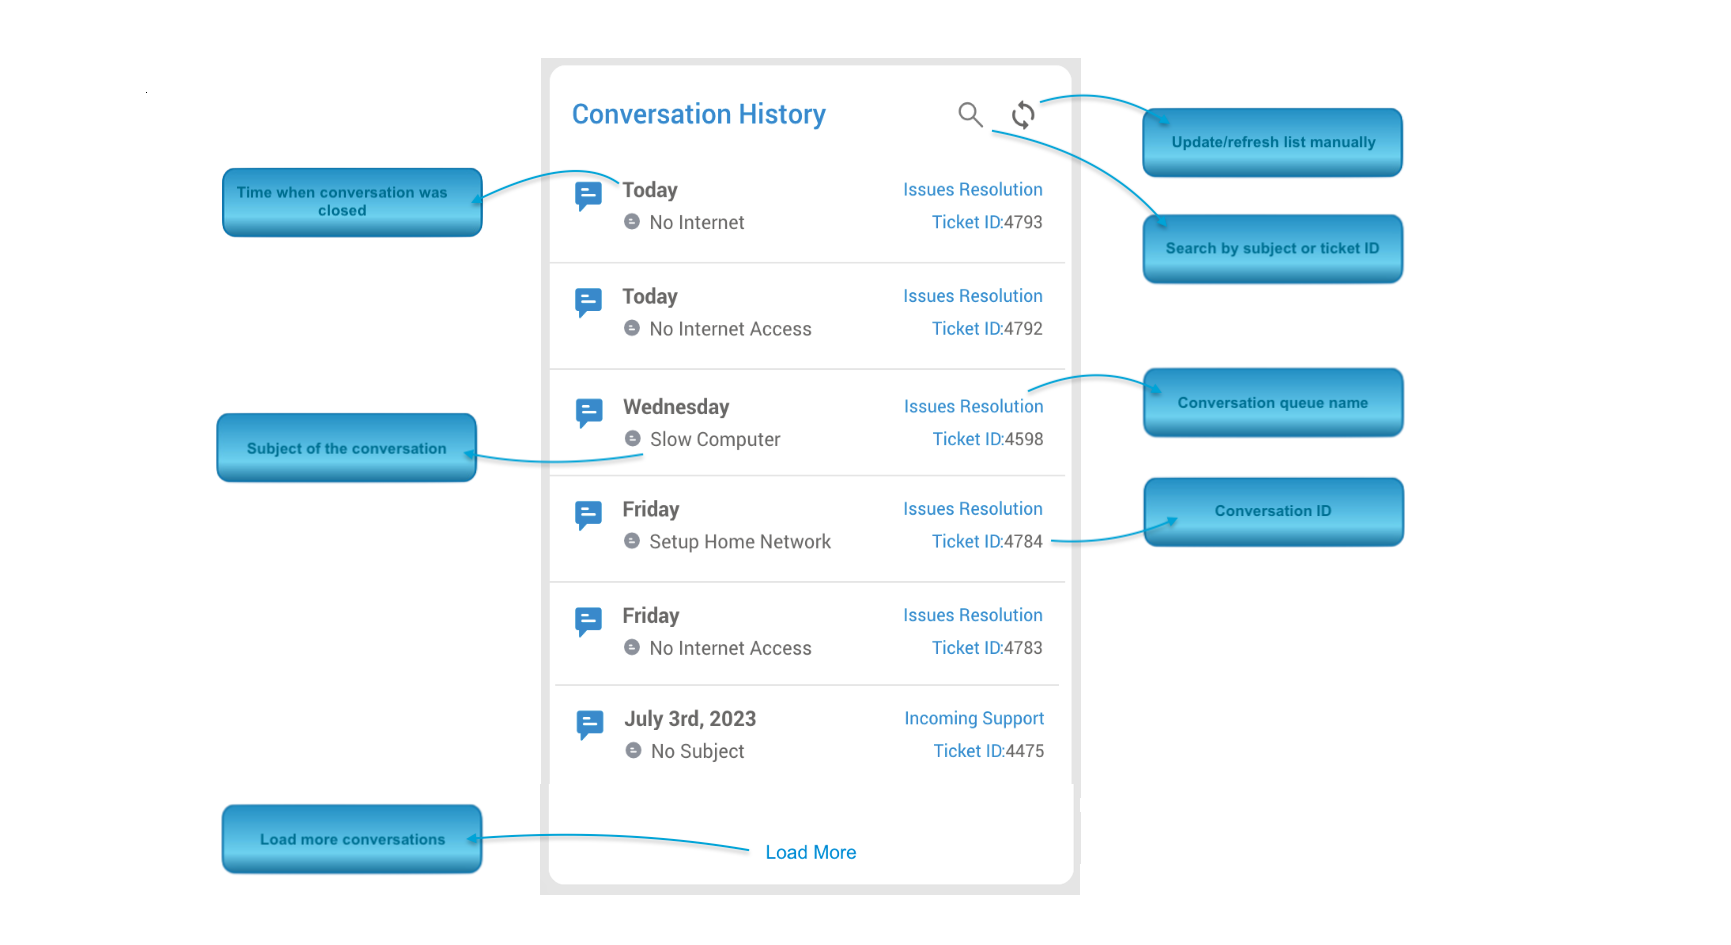
By default, the Conversation History section displays up to eight closed conversations at a time. Agents can load more conversations by clicking the 'Load More' button at the bottom of the list.
By clicking on a specific conversation, agents can view the entire chat log, as well as any attachments or notes associated with the conversation. The chat log is displayed in chronological order, with the most recent message displayed at the top.
This feature is especially useful for agents who need to quickly access information from previous conversations, such as customer preferences or previous issues. With access to this historical data, agents can provide more personalized and effective support to customers.
To expand desired chat, the Agent can simply select/click on the closed conversation within this window.
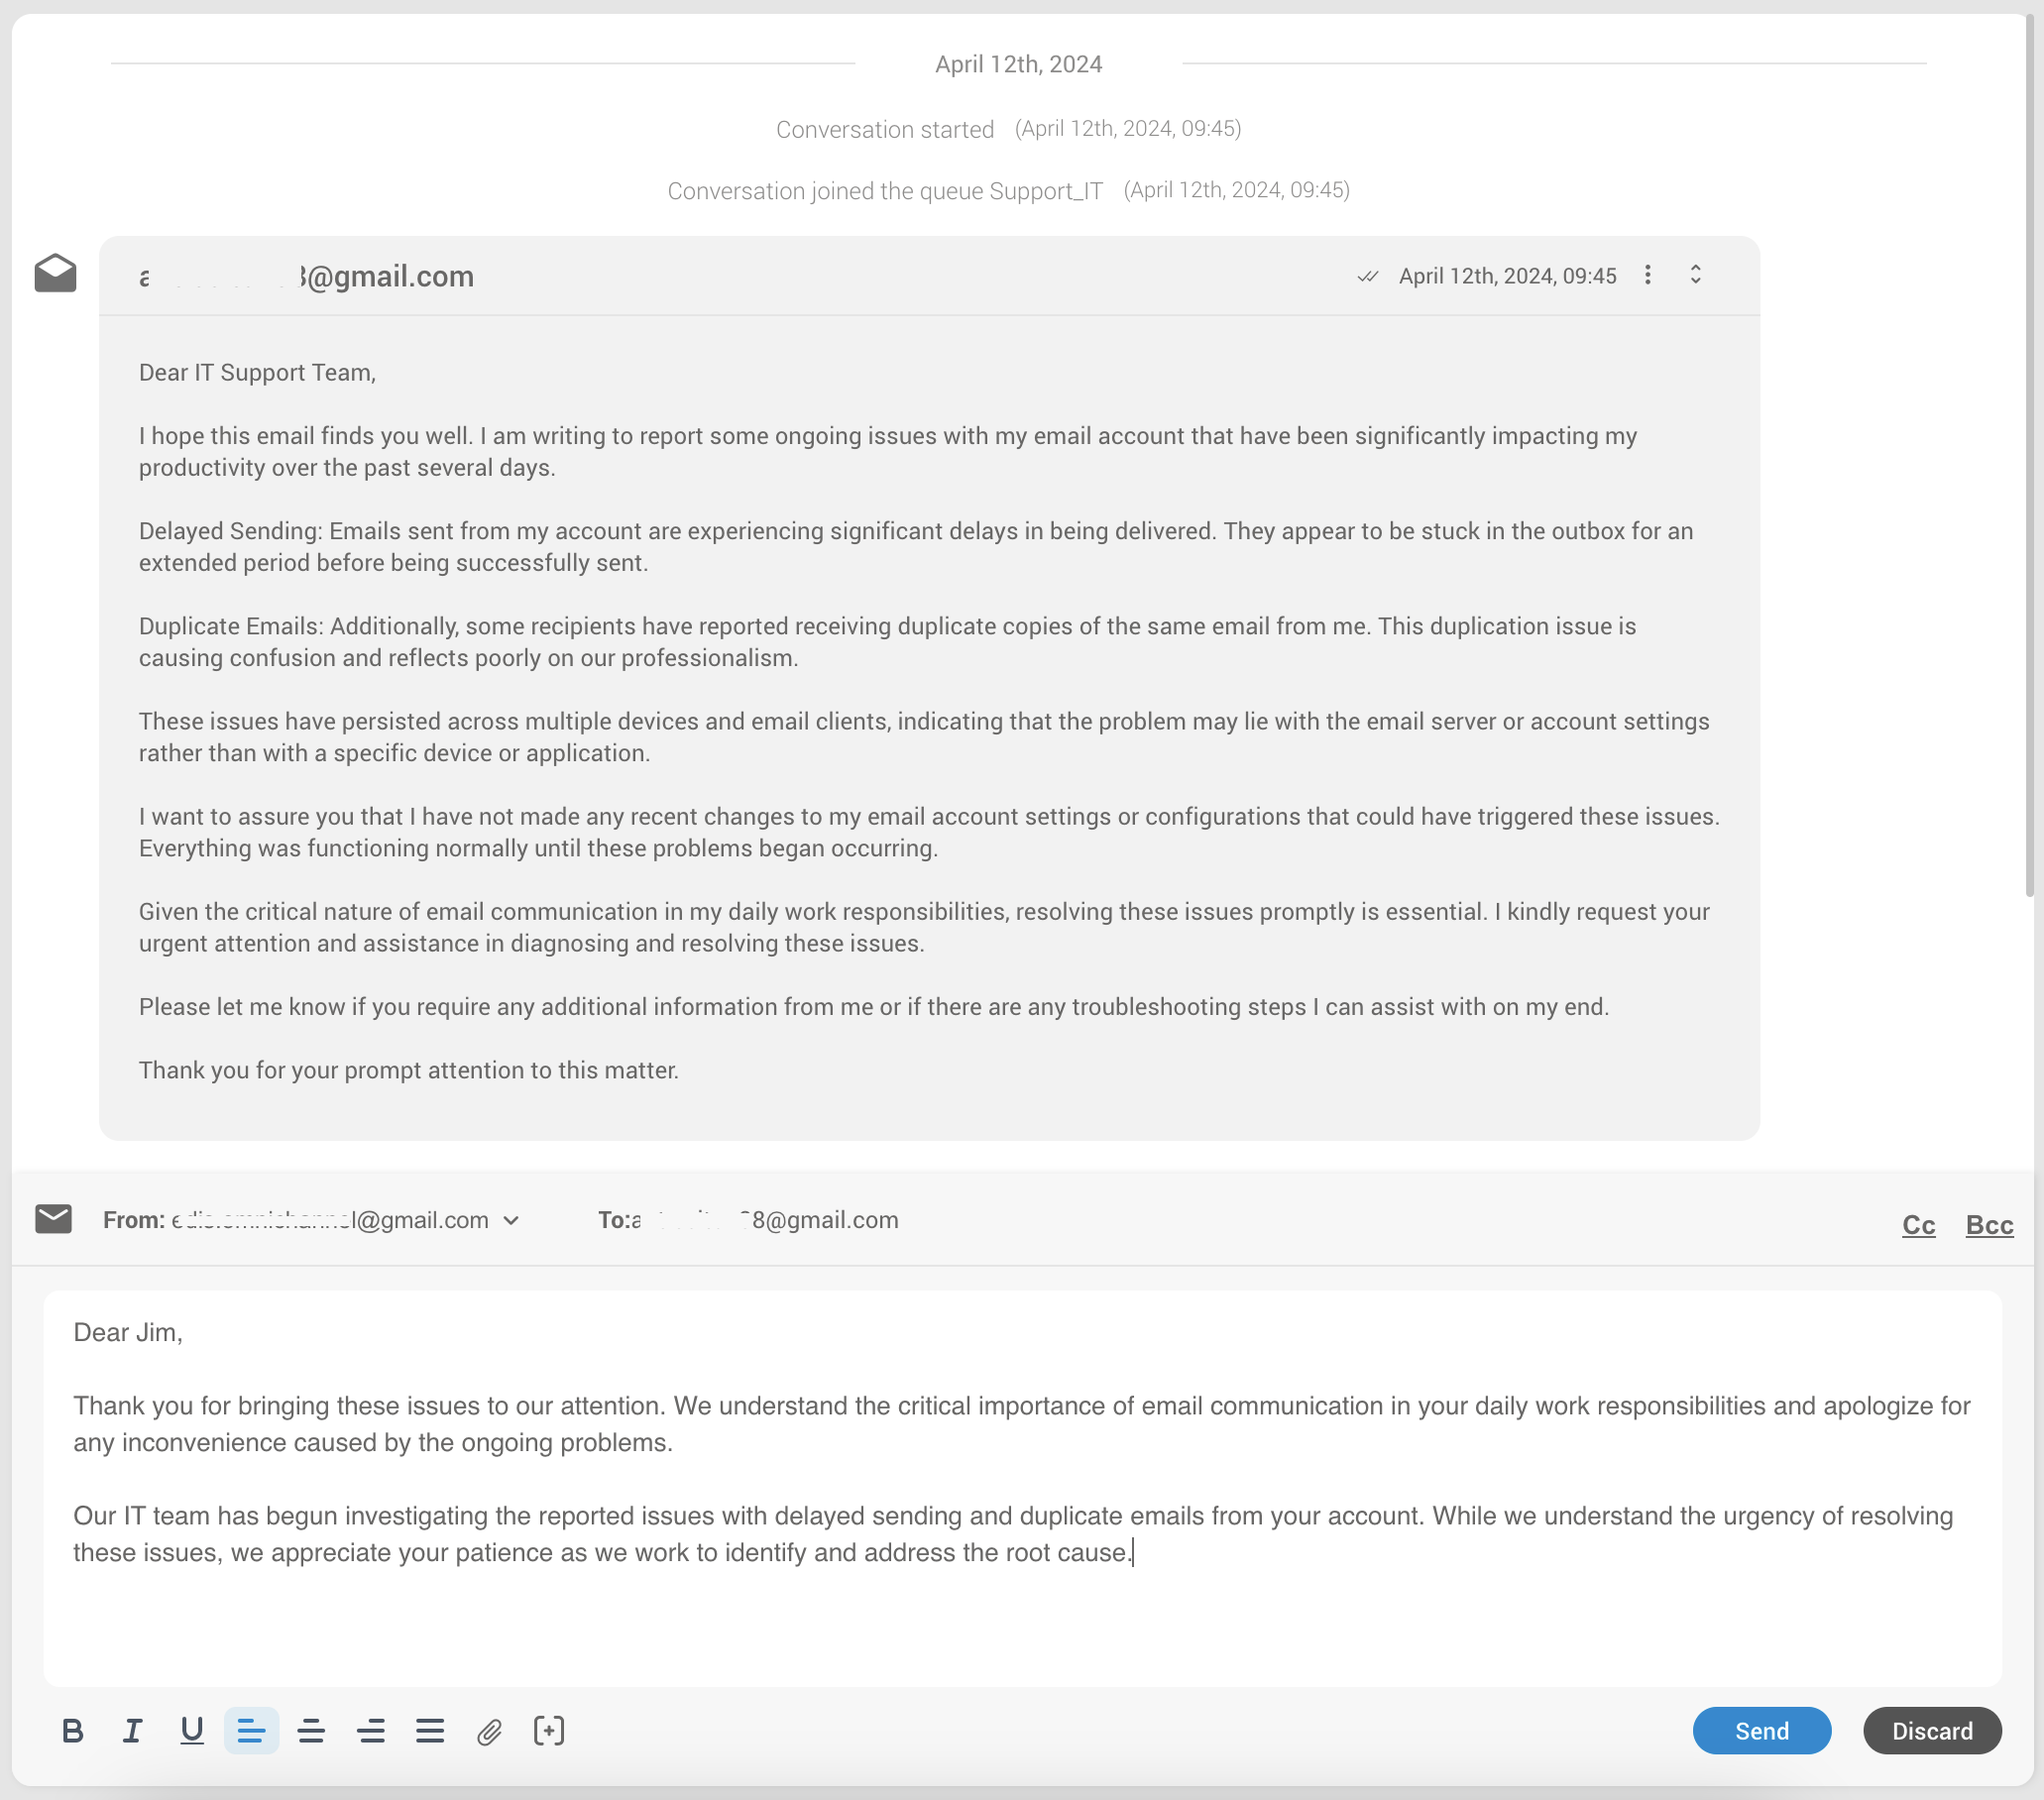
The 'Email' section within the gloCOM Agent Edition holds significant importance by offering agents comprehensive insights into ongoing and resolved email conversations.
This component plays a vital role in the omnichannel setup as it easily enables a seamless transition between ways of talking to customers.
With email added, agents can explain things well, share files, and give organized responses. They can also follow up on past talks, which keeps customers happy and stops them from repeating things.
The Email landing page is divided into six sections, each representing the following:
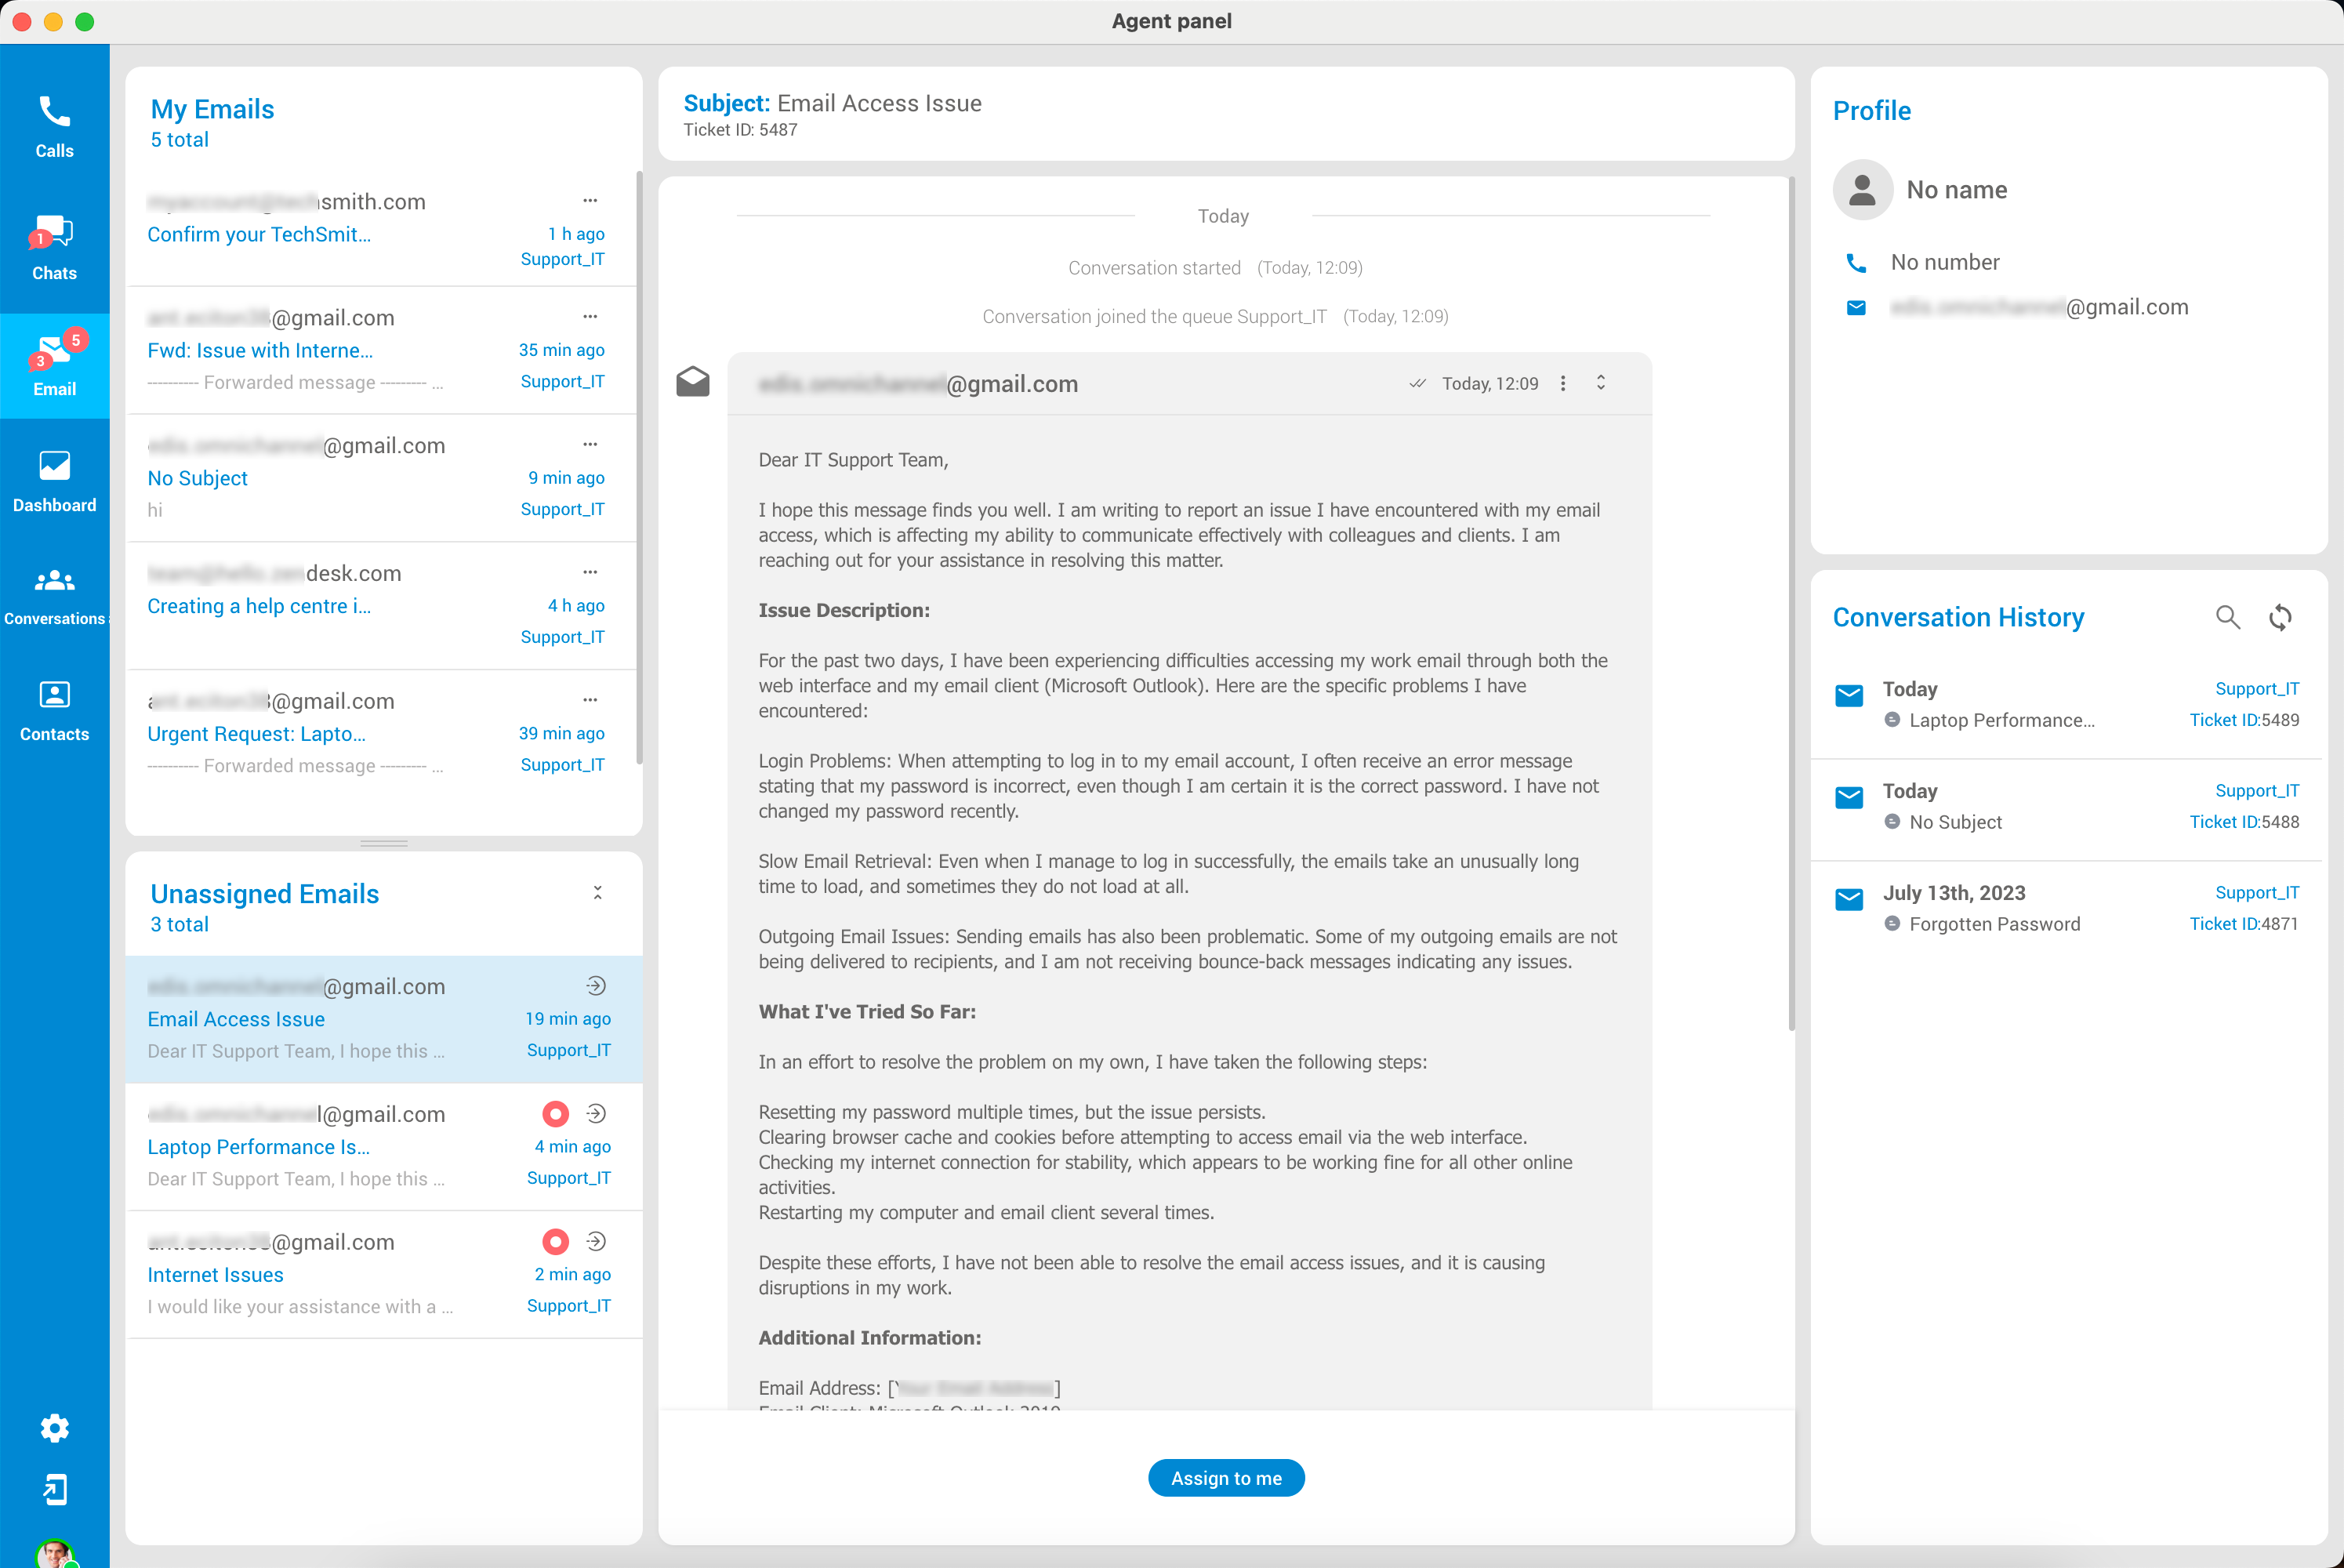
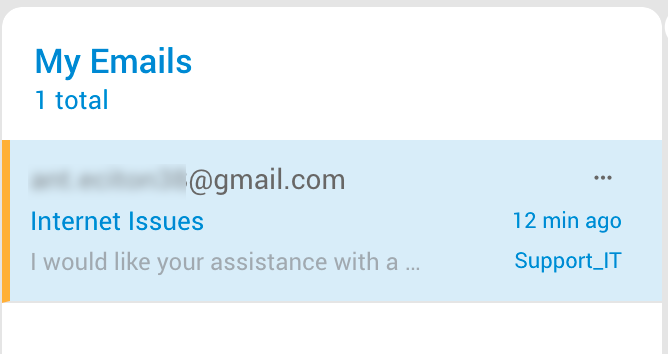
¶ My Emails
The MyEmail feature simplifies handling email conversations assigned to agents. In this application section, agents can access details about their email tasks. This section includes the overall count of email conversations assigned to them, as well as the number of conversations requiring replies.
Additionally, MyEmail provides other relevant information:
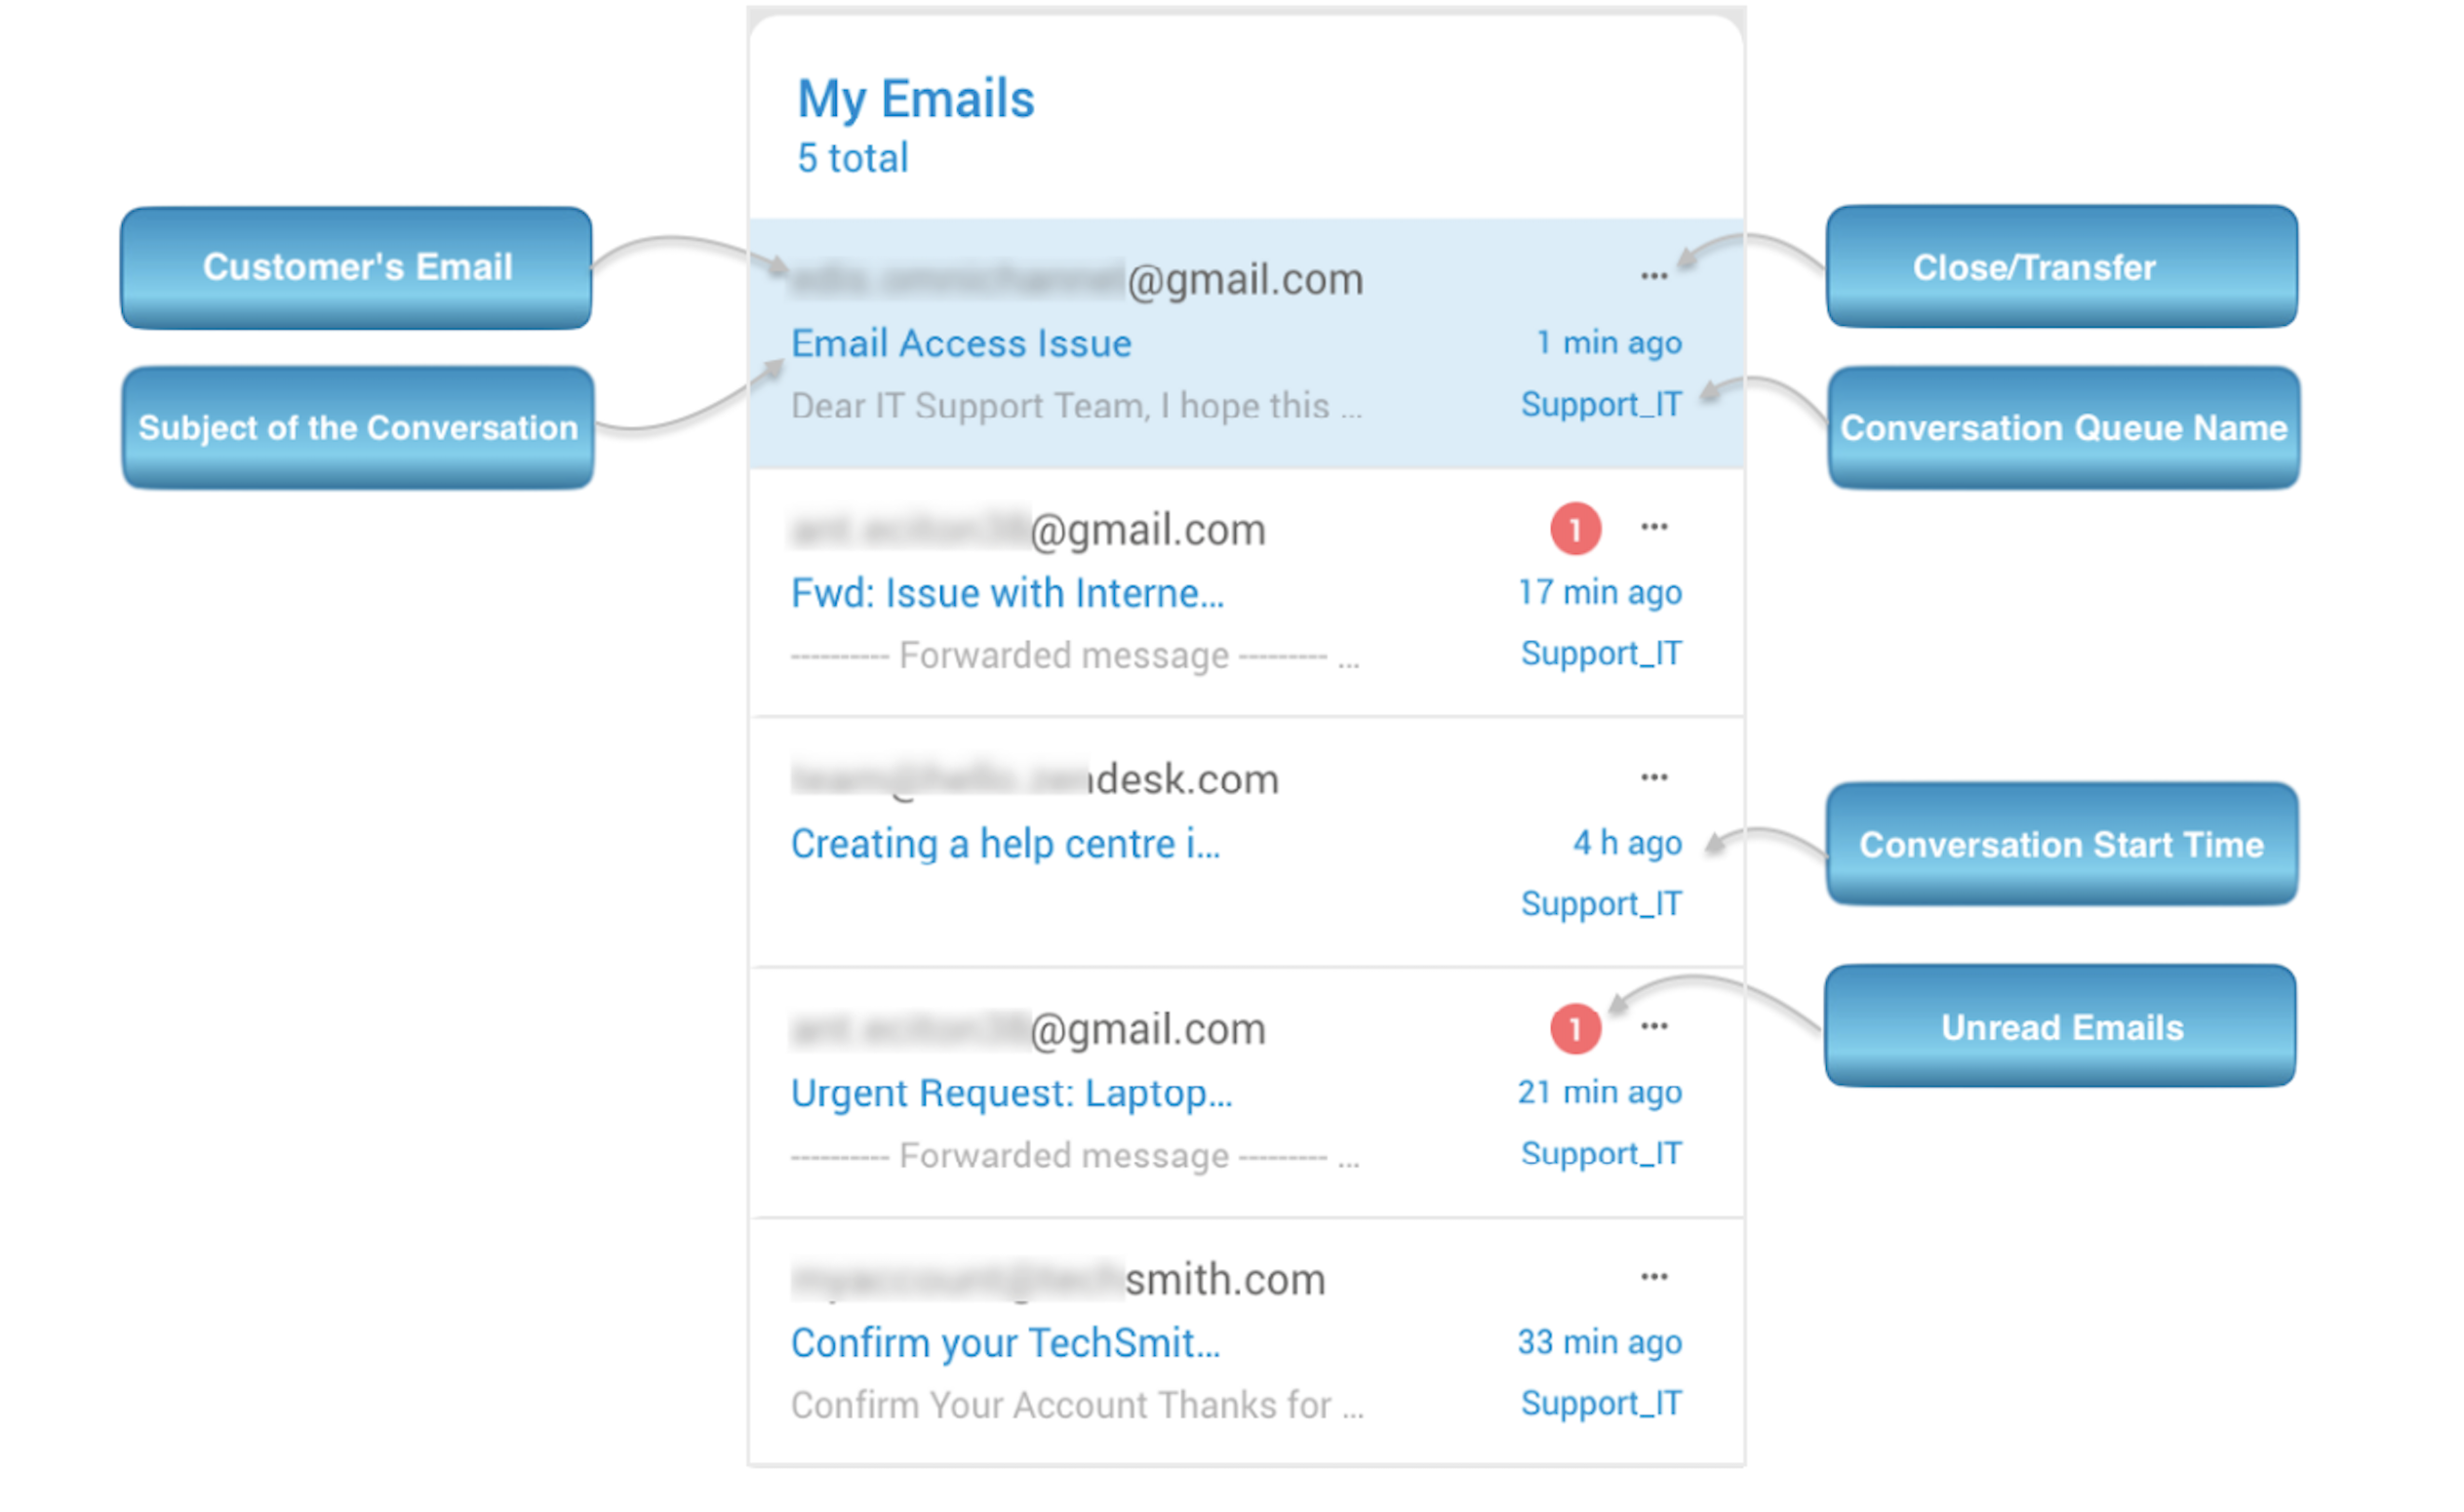
- Customer's Email: This is the email of the customer who initiated the conversation.
- Subject of the Conversation: Brief description of the problem or request.
- Close/Transfer: Additional options for close and transfer emails.
- Conversation Queue Name: This reveals the queue where the conversation originated, assisting agents in understanding its source and offering relevant support.
- Conversation Start Time: Time when the conversation was started. This gives agents a reference point for the conversation and helps them manage their time efficiently.
- Unread Emails: Represents the number of unread emails.
Within this section, agents can pick a particular conversation to continue helping the customer. Agents have the option to transfer chosen conversations to other agents or queues, or they can decide to close the conversation after it's done.
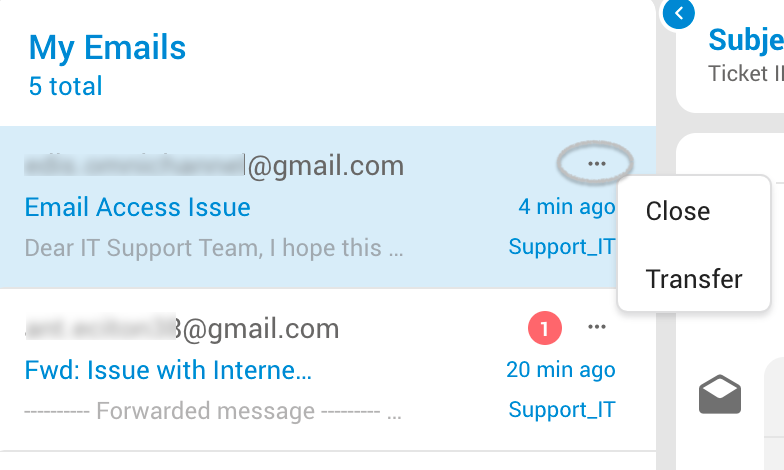
Close Conversation
When agents choose a conversation and click the "Close" option, the selected conversation will be permanently closed. As a result, it will be removed from the "MyEmails" section and archived in the "Conversation History."
Transfer Conversation
A new window will pop up when the agent selects a conversation and clicks on the "Transfer" option. From there, the agent can choose the queue to which the selected conversation will be transferred or select the specific agent to whom the conversation will be assigned.
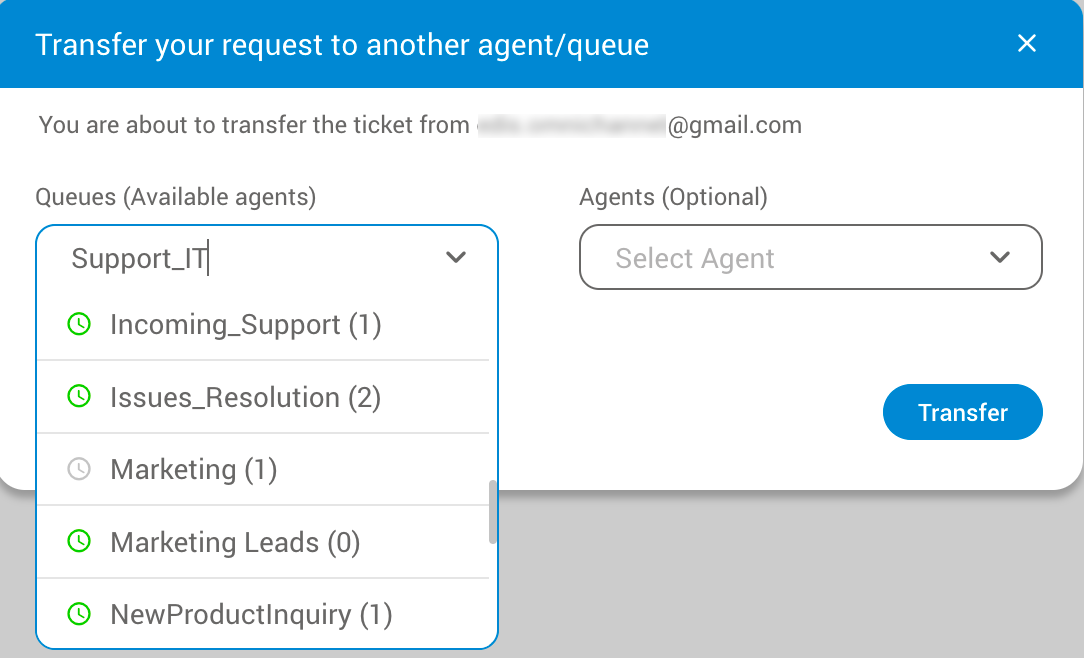
If chat is transferred directly to the Agent, it will be automatically assigned to that specific Agent (no matter which queue the Agent belongs to). Otherwise, if the conversation was transferred to the Queue where no Agents were selected, it will be sent to unassigned conversations for the selected Queue.
¶ Unassigned Emails
The Unassigned Emails part of the application shows details about conversations that haven't been assigned to any specific agent yet. It lets agents see which conversations are waiting for a reply and gives them the option to take responsibility for these conversations.
For each unassigned conversation, the section displays the following information:
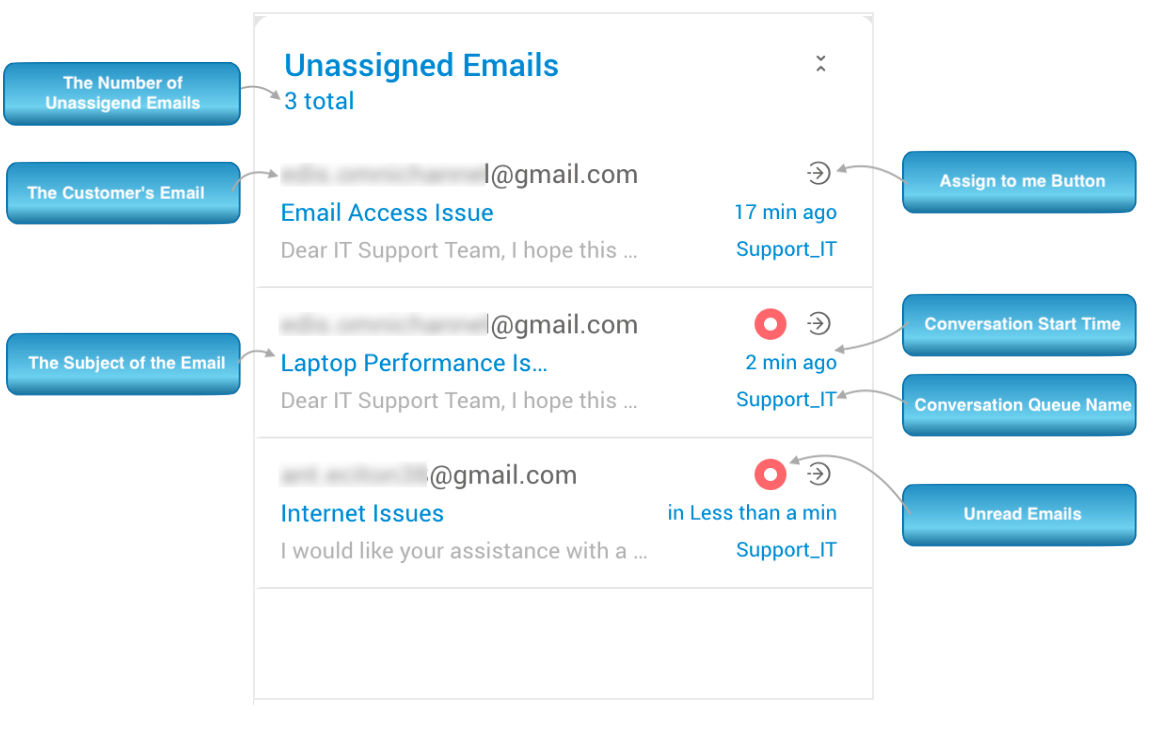
- The Number of Unassigned Emails - This represents the number of unassigned emails.
- The Customer's Email - This helps agents identify the customer they are talking to and personalize their interactions.
- Subject of the Conversation: Brief description of the problem or request.
- Assign to me Button: This button allows the Agent to manually assign emails to themselves, indicating they are willing and able to take on the conversation. This is especially useful when the queue is busy and automatic routing is delayed, or when the conversation requires specific expertise that only the Agent possesses.
- Conversation Start Time - Time when the customer started the conversation. This gives agents a reference point for the conversation and helps them manage their time efficiently.
- Conversation Queue Name - Name of the queue where the conversation was opened. This helps agents identify the source of the conversation and enables them to provide appropriate support.
- Unread Emails - Notification for unread Emails.
When agents click on an unassigned emails in the 'Unassigned Emails' section, they get a quick look at it. This preview gives them key details about the conversation so they can decide if it's something they can handle well.
Agents can also see the conversation's history by clicking on the conversation. This includes any files that were shared, like documents or images. This background info helps agents better understand the customer's situation and find effective solutions. The rules for assigning conversations to agents are the same as those applied in the Chat section.
¶ Email Subject Section
Within this section, agents have the ability to modify an email conversation's status, indicating its progress or current state. Additionally, agents can edit the subject of the email conversation and easily track the conversation's unique ID.
¶ Subject of the Conversation
Agents can edit the subject of the conversation in this section. This can be particularly useful for ensuring that completed conversations are easy to find and review, especially if the conversation involves a complex or nuanced issue.
¶ Email Conversation Statuses
Email conversations in the system can have four different statuses that reflect their current stage or state:
Open Status
This status is assigned automatically when an email conversation is given to an agent, either through manual or automatic assignment.
Waiting Status
The "Waiting" status shows that the agent is waiting for more information from the customer. This could be specific details like ID numbers or operating system info needed to assist the customer.
Solved Status
When an email conversation is marked as "Solved," it means the agent has finished helping and resolving the issue. However, customer confirmation is still needed. The agent might have fixed the problem or provided a solution, but it's important to make sure everything is working for the customer. After the customer confirms they're satisfied or gives more feedback, the email can be closed.

Closed Status
The "Closed" status lets agents mark an email as done. Once closed, the conversation moves from the agent's active list to the conversation history for reference.
¶ Transfer Conversation
The Transfer button enables agents to move a chosen chat or conversation to another agent or queue. When transferring to another agent, the selected agent becomes the new owner, regardless of their queue. If transferred to a queue, the chat goes to that queue's unassigned conversations section.
¶ Email Conversation Card
The application includes an email-based communication feature that enables agents to send and receive emails. During a conversation with a customer, agents have the ability to scroll through the conversation history, facilitating a quick review of previous discussions.
Similarly to MyChats, when agents select a conversation/email, the conversation card on their screen provides a quick overview of all the important details. This card includes information about when the conversation started, its associated queue, and details about the assigned agent. If the conversation was transferred, it also displays who initiated the transfer and when.
¶ Email Profile
The Profile Card displays customer information which varies based on the communication channel used.
From the Profile section agents have the ability to:
- Link/unlink a conversation to existing Contacts - Opens a view listing suggested contacts and a search field for finding additional contacts.
- Create a new contact and link the conversation to it - Opens a form to input new contact information; upon saving, this new contact is automatically linked to the conversation.
Linked conversations differ from unlinked conversations in that when an agent links a conversation to an existing contact or adds a new contact and links the conversation to it, that conversation appears within the History section. This section displays all linked conversations to that contact across all channels. So, if a customer contacts agents over time via voice calls, SMS, email, Facebook, etc., all conversations will be visible within the History section. (This info will be provided if agents have linked conversations to that particular customer)
This helps agents provide better service by allowing them to refer back to past conversations for context. Overall, it simplifies support, enabling agents to offer personalized assistance more effectively.
How to Link Conversation
To link unlinked tickets, you can opt to connect them to an existing contact or create a new one. If you choose to link to an existing contact, you can browse or search for them from a dropdown menu displaying suggested contacts.
Once you find the right one, select it and confirm the link.

Alternatively, if you’re creating a new contact, simply fill out the information form and save it to automatically link the conversation.
For tickets already linked to a contact, the Profile Card provides all available contact information. In the three dots menu, agents will find additional options:
- View/Edit Contact Details - Allows access to and modification of the contact’s information.
- Unlink Contact - Detaches the current conversation from the linked contact.
¶ Email Conversation History
The Conversation History feature empowers agents to access the complete record of past conversations with a specific customer. This list is automatically updated every five minutes, or agents can manually refresh it whenever needed.
By selecting a specific conversation, agents can review the entire chat log, along with any attachments or notes associated with that conversation. The chat log is presented in chronological order, with the most recent messages displayed at the top.
The Agent can select/click on the closed discussion within this window to expand desired conversation.
By default, the Conversation History section shows up to eight closed conversations at a time. Agents can load more conversations by simply clicking the 'Load More' button at the bottom of the list.
¶ Dashboard
The Dashboard serves as the agent's control center, offering a holistic view of their activities and performance. It's a centralized hub that provides a comprehensive overview of their interactions across voice and messaging channels.
Additionally, the Dashboard includes a dedicated section for queue monitoring, enabling agents and supervisors to track the activity and workload of their assigned queues efficiently. The 'My Performance' tab offers valuable insights into their daily activities. Three main sections are:
¶ Agents
The Agent Dashboard displays important information about the agent's activities on different channels and conversations. When agents open this section, they will be prompted with the info about all other agents they are working with across the system. This information proves valuable when agents require assistance from their peers or supervisors.
The dashboard has three sections:
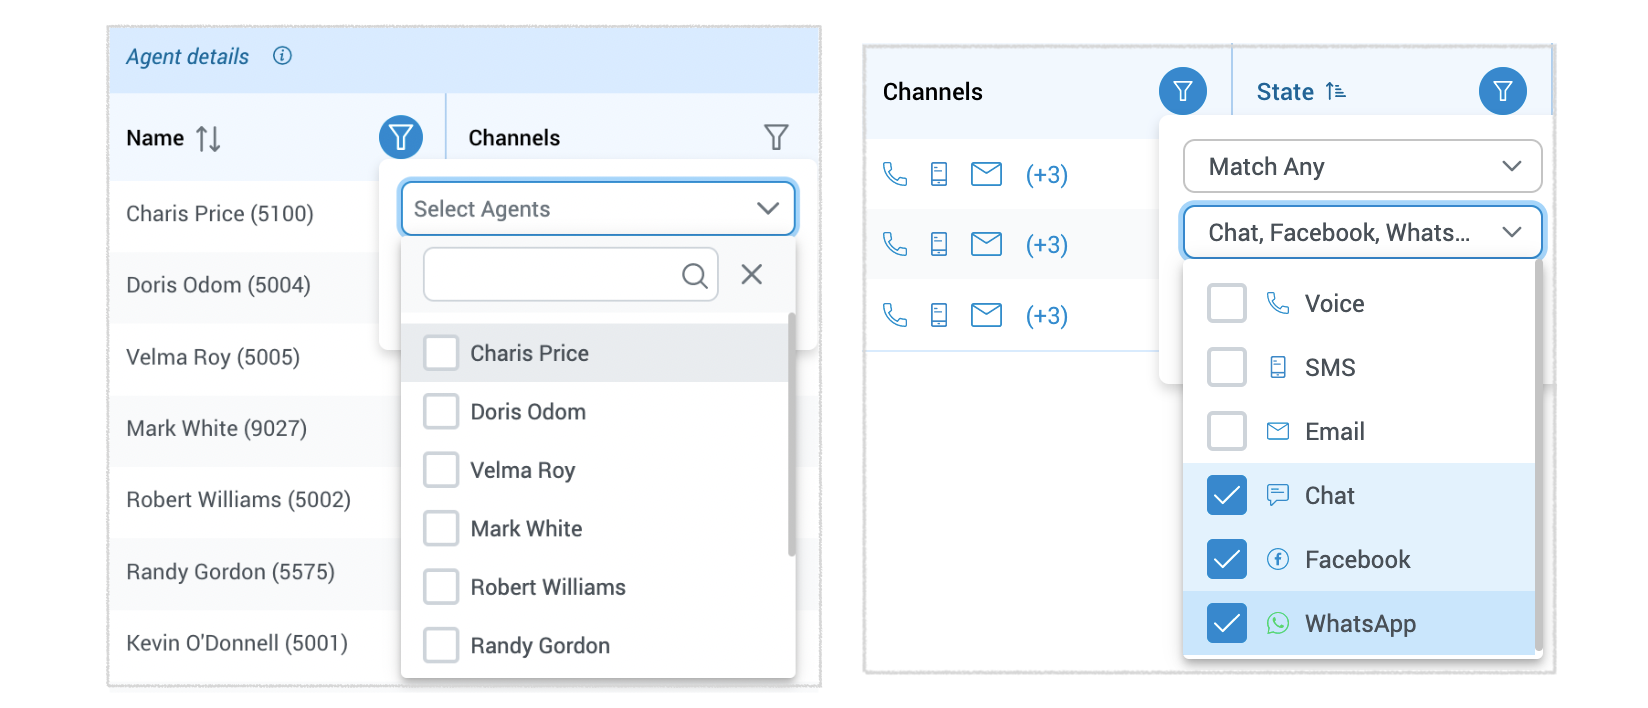
- Agent Details
Within this section, users will find details about each agent, including their Name and the Channels for which they provide support.
To access more information about a specific agent, hover over their name and click the adjacent ![]() button. This action will provide users with insights into the agent's current state and all the queues they are associated with.
button. This action will provide users with insights into the agent's current state and all the queues they are associated with.
For a comprehensive understanding of the columns labeled 'Name' and 'Channels,' click on the icon next to the "Agent Details" label. This will provide users with detailed descriptions of these columns.

Users also have the option to filter agents based on their name or the channels they are actively working with.
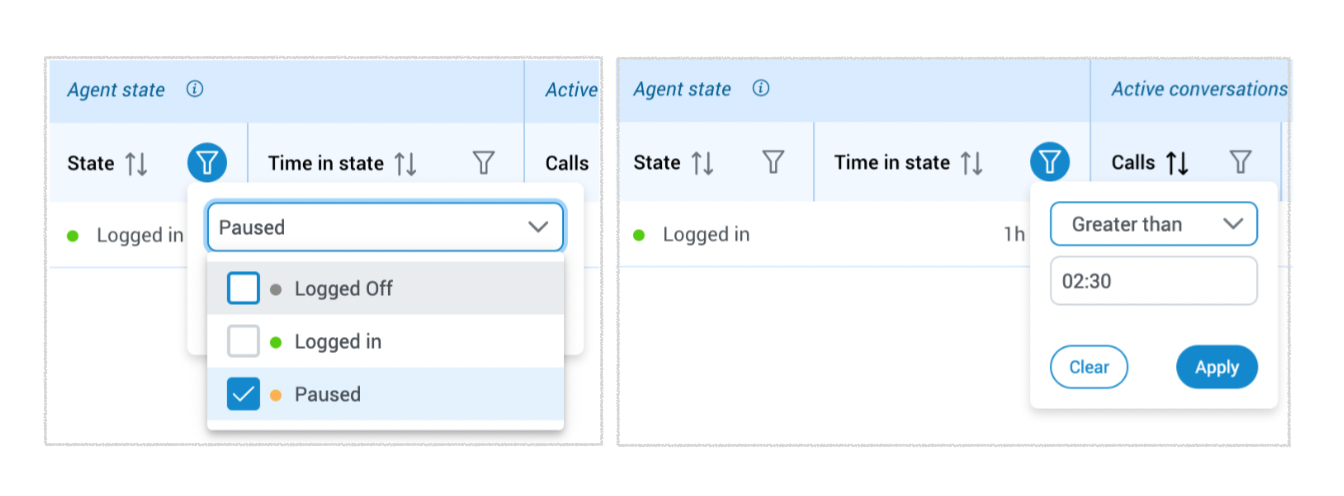
- Agent State
This section represents the agent's login state and how long they have been in that state. The following states are possible:
- Logged off - The agent is not currently available to handle any queue, possibly because they are not scheduled to work or are facing technical issues.
- Logged In - The agent is actively available to handle customer requests.
- Paused - The agent is momentarily unavailable for customer requests, which might be due to breaks, lunch, meetings, or other reasons.
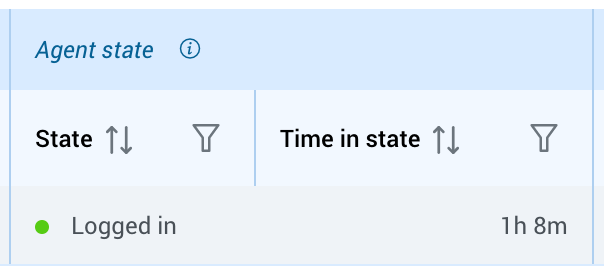
To gain a thorough grasp of the "State" and "Time in State" columns, click on the icon adjacent to the "Agent State" label.
Users are also empowered to filter agents by their login state or the time in that state.
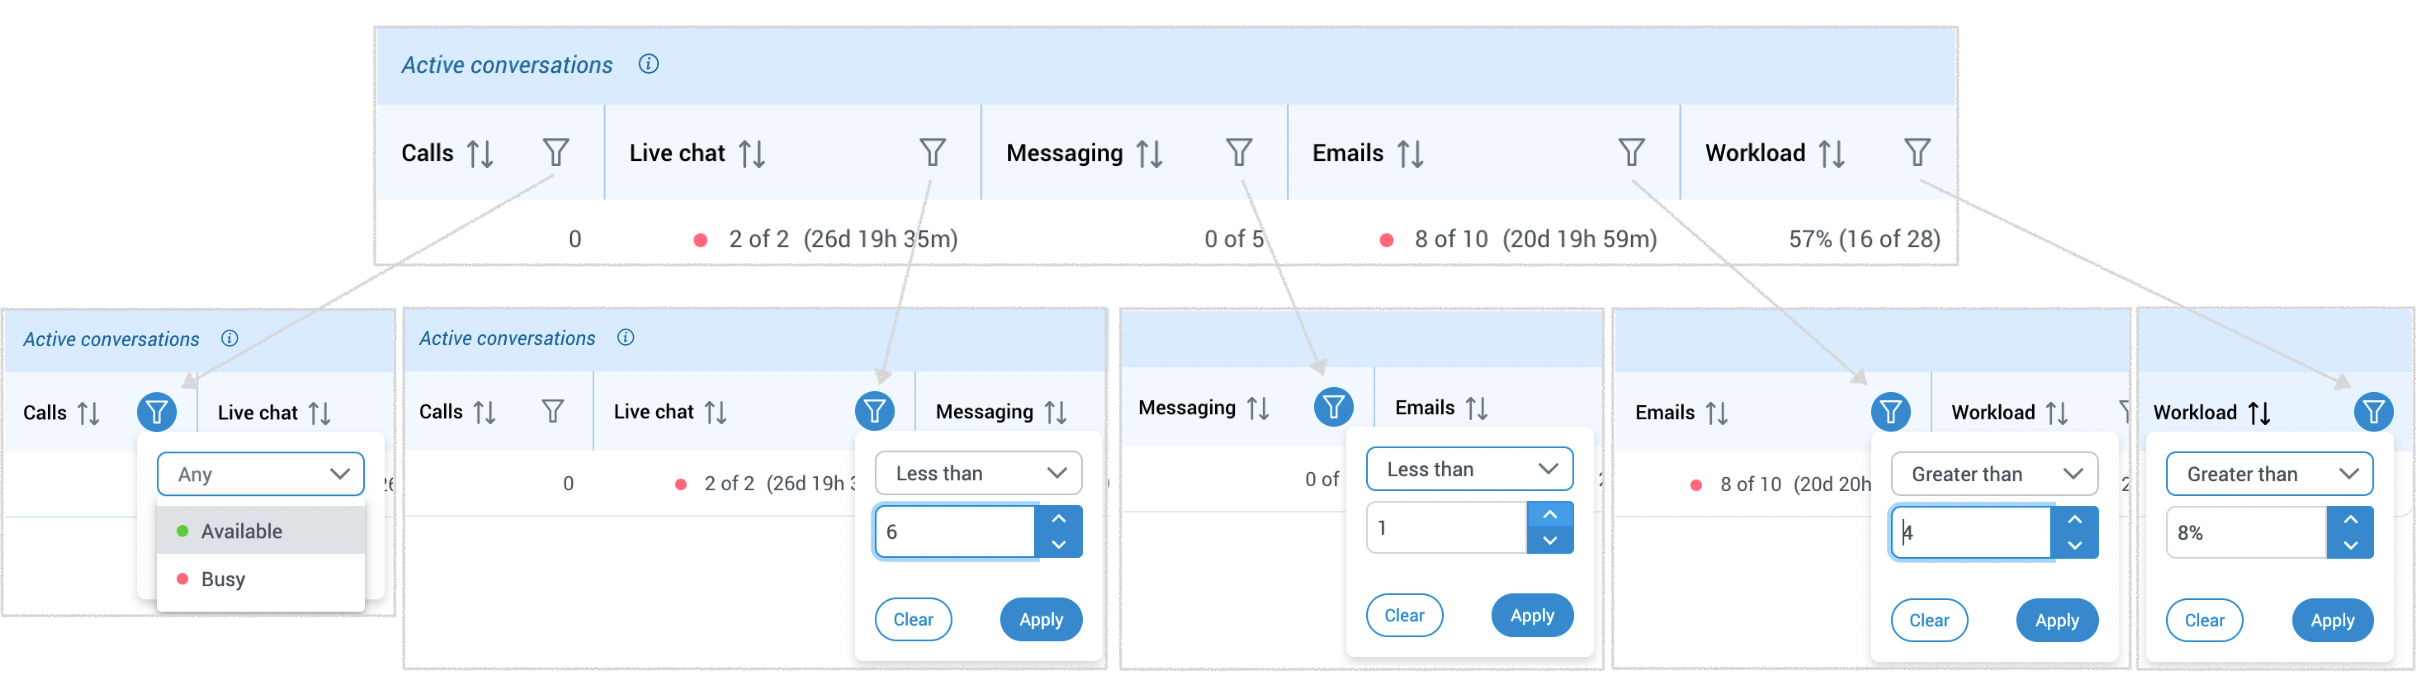
- Active Conversations
This section displays the number of active conversations on each communication channel and their duration. It also shows the workload capacity of the agent. Also, the following information is displayed:
- Calls - Represents the number of active conversations for voice communication channel.
- Live Chat - Represents the number of active conversations for live chat communication channel.
- Messaging - Represents the number of active conversations for social and SMS communication channel.
- Email - Represents the number of active conversations for email communication channel.
- Workload - This number, calculated using specific formulas and adjustable on the PBX system, represents the percentage of the agents' workload within all queues they are a part of. It provides information about how many conversations agents currently have compared to their maximum workload capacity.
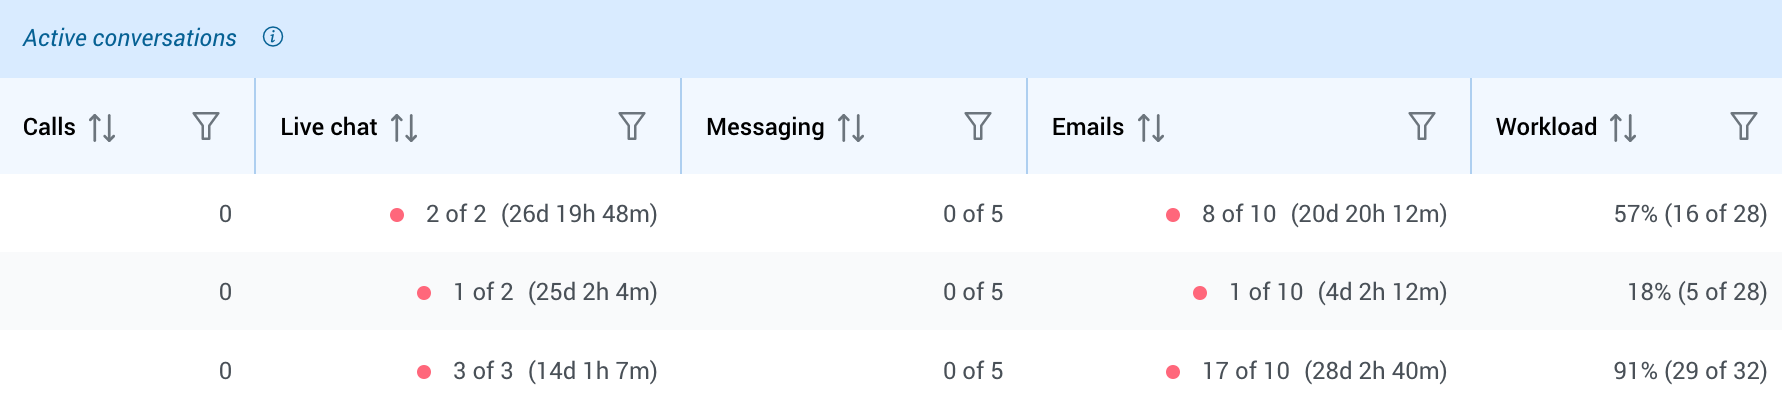
For a comprehensive understanding of each columns regarding this section, click on the icon next to the "Active Conversation" label.

Users also have the option to filter active conversations based on 'Calls', 'Live Chat', 'Messaging', 'Emails', and 'Workload'.
Overall, the Agent Dashboard provides a comprehensive view of the agent's current state and activities on different channels and conversations.
To remove all applied filters, users can click the
button in the agent panel's top right corner.
¶ Queues
The Queue section page provides agents with a quick and easy way to understand the activity and workload of their Queue, allowing them to respond to customer inquiries more effectively. Within this section, agents can access information regarding the queues they are actively engaged with.
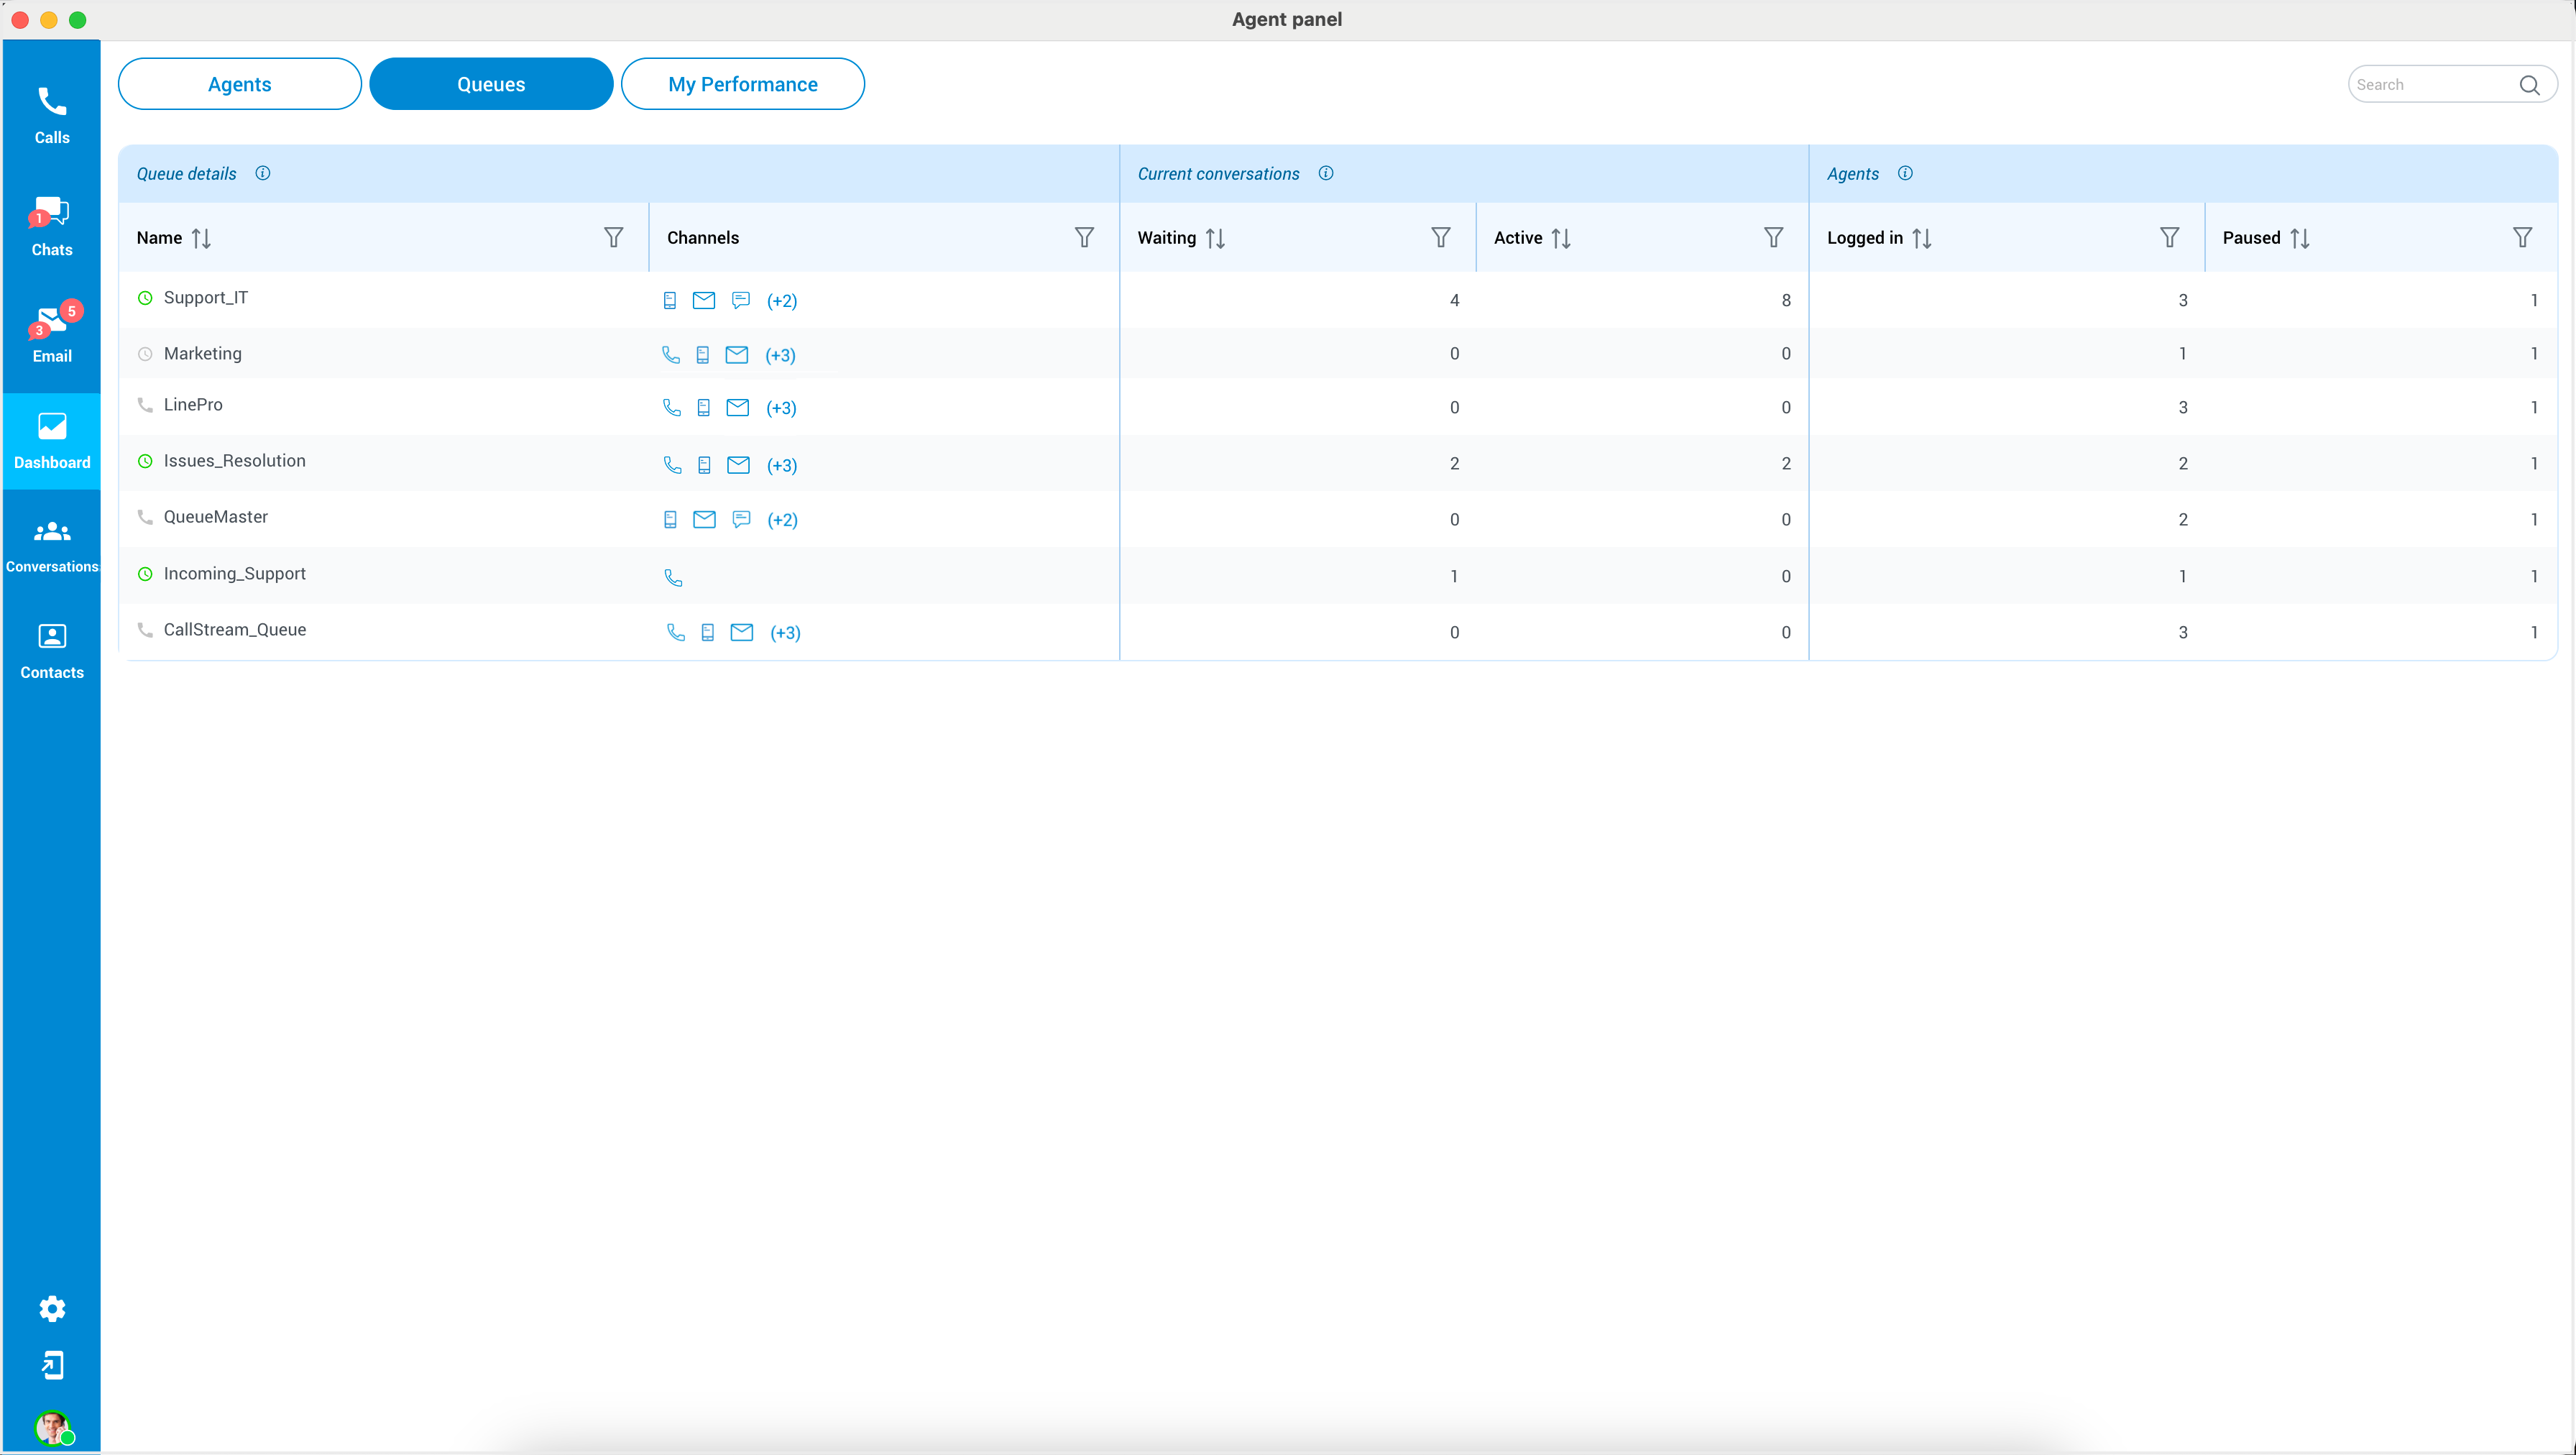
The page consists of three sections:
- The Queue Details section provides agents with important information about each queue. It displays the name of the queue and the communication channels in which the queue is utilized.
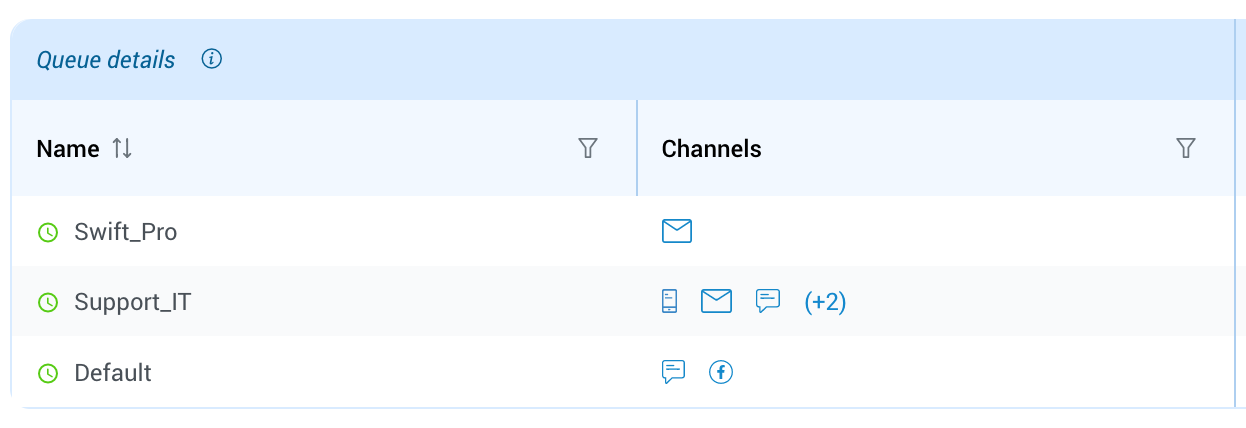
Furthermore, on the left side of each queue's name, there are icons that indicate the queue's operation times (OT). A green icon signifies that the queue is operational during working hours, while a gray icon indicates that the queue is not operational during non-working hours. For voice queues, a phone icon is displayed.
To access information about which agents are assigned to a specific queue, hover over the queue name and click the adjacent ![]() button.
button.
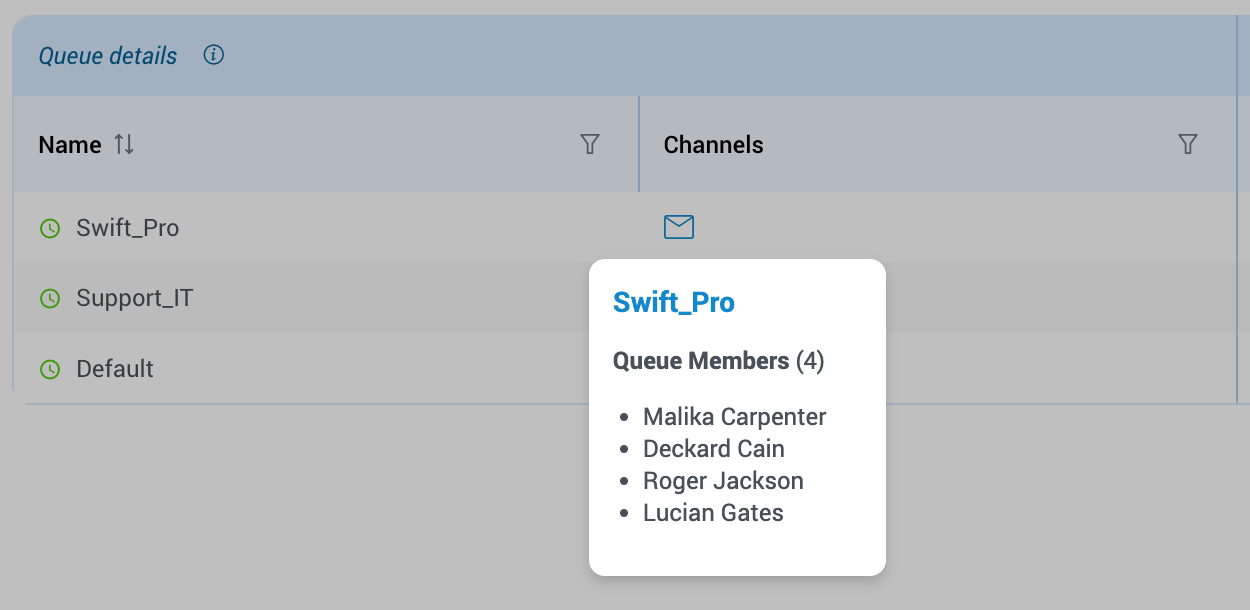
The descriptions beside the labels are consistent with the previous documentation, and filters are also provided for this section.

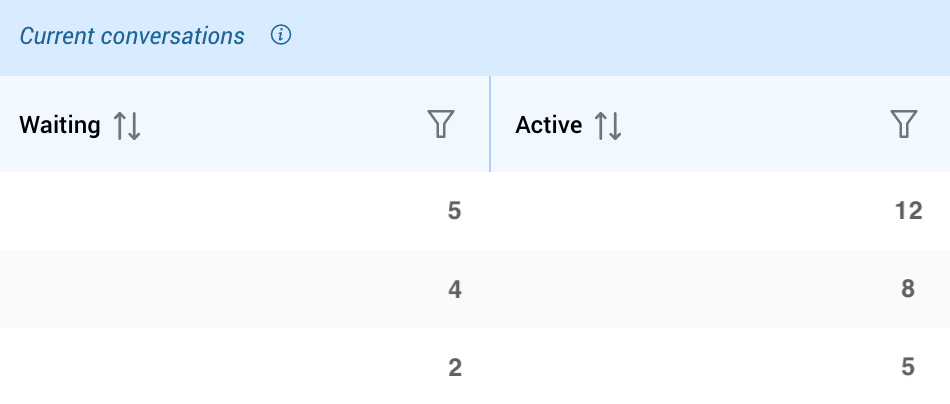
- The Current Conversations section shows the number of waiting and active conversations in the Queue. Agents can quickly determine how many conversations are currently waiting for a response and how many are actively being worked on.
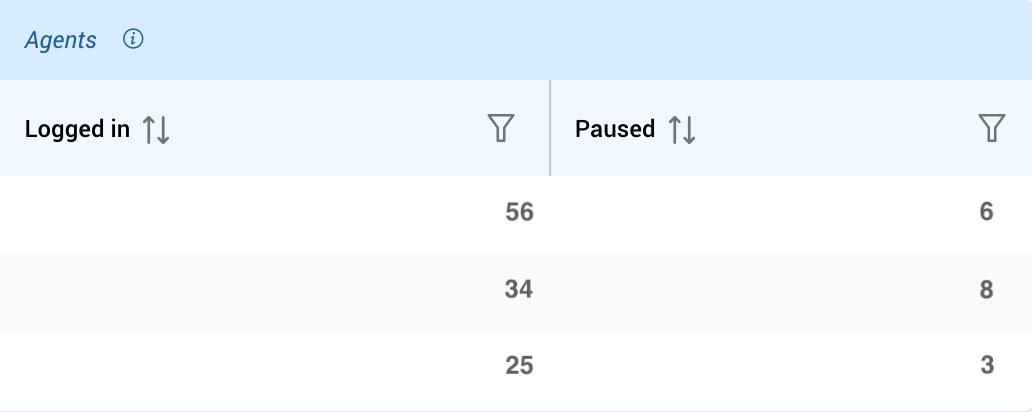
- The Agents' States section displays the number of currently logged-in and paused agents in the Queue. This information helps agents understand the current availability of their team members, allowing them to coordinate their efforts more effectively.
¶ My Performance
This page illustrates the agent's capacity to manage multiple tickets simultaneously, offers insights into their workload and daily activity, and provides valuable metrics such as the number of completed conversations, speed of answer, handling time, etc.
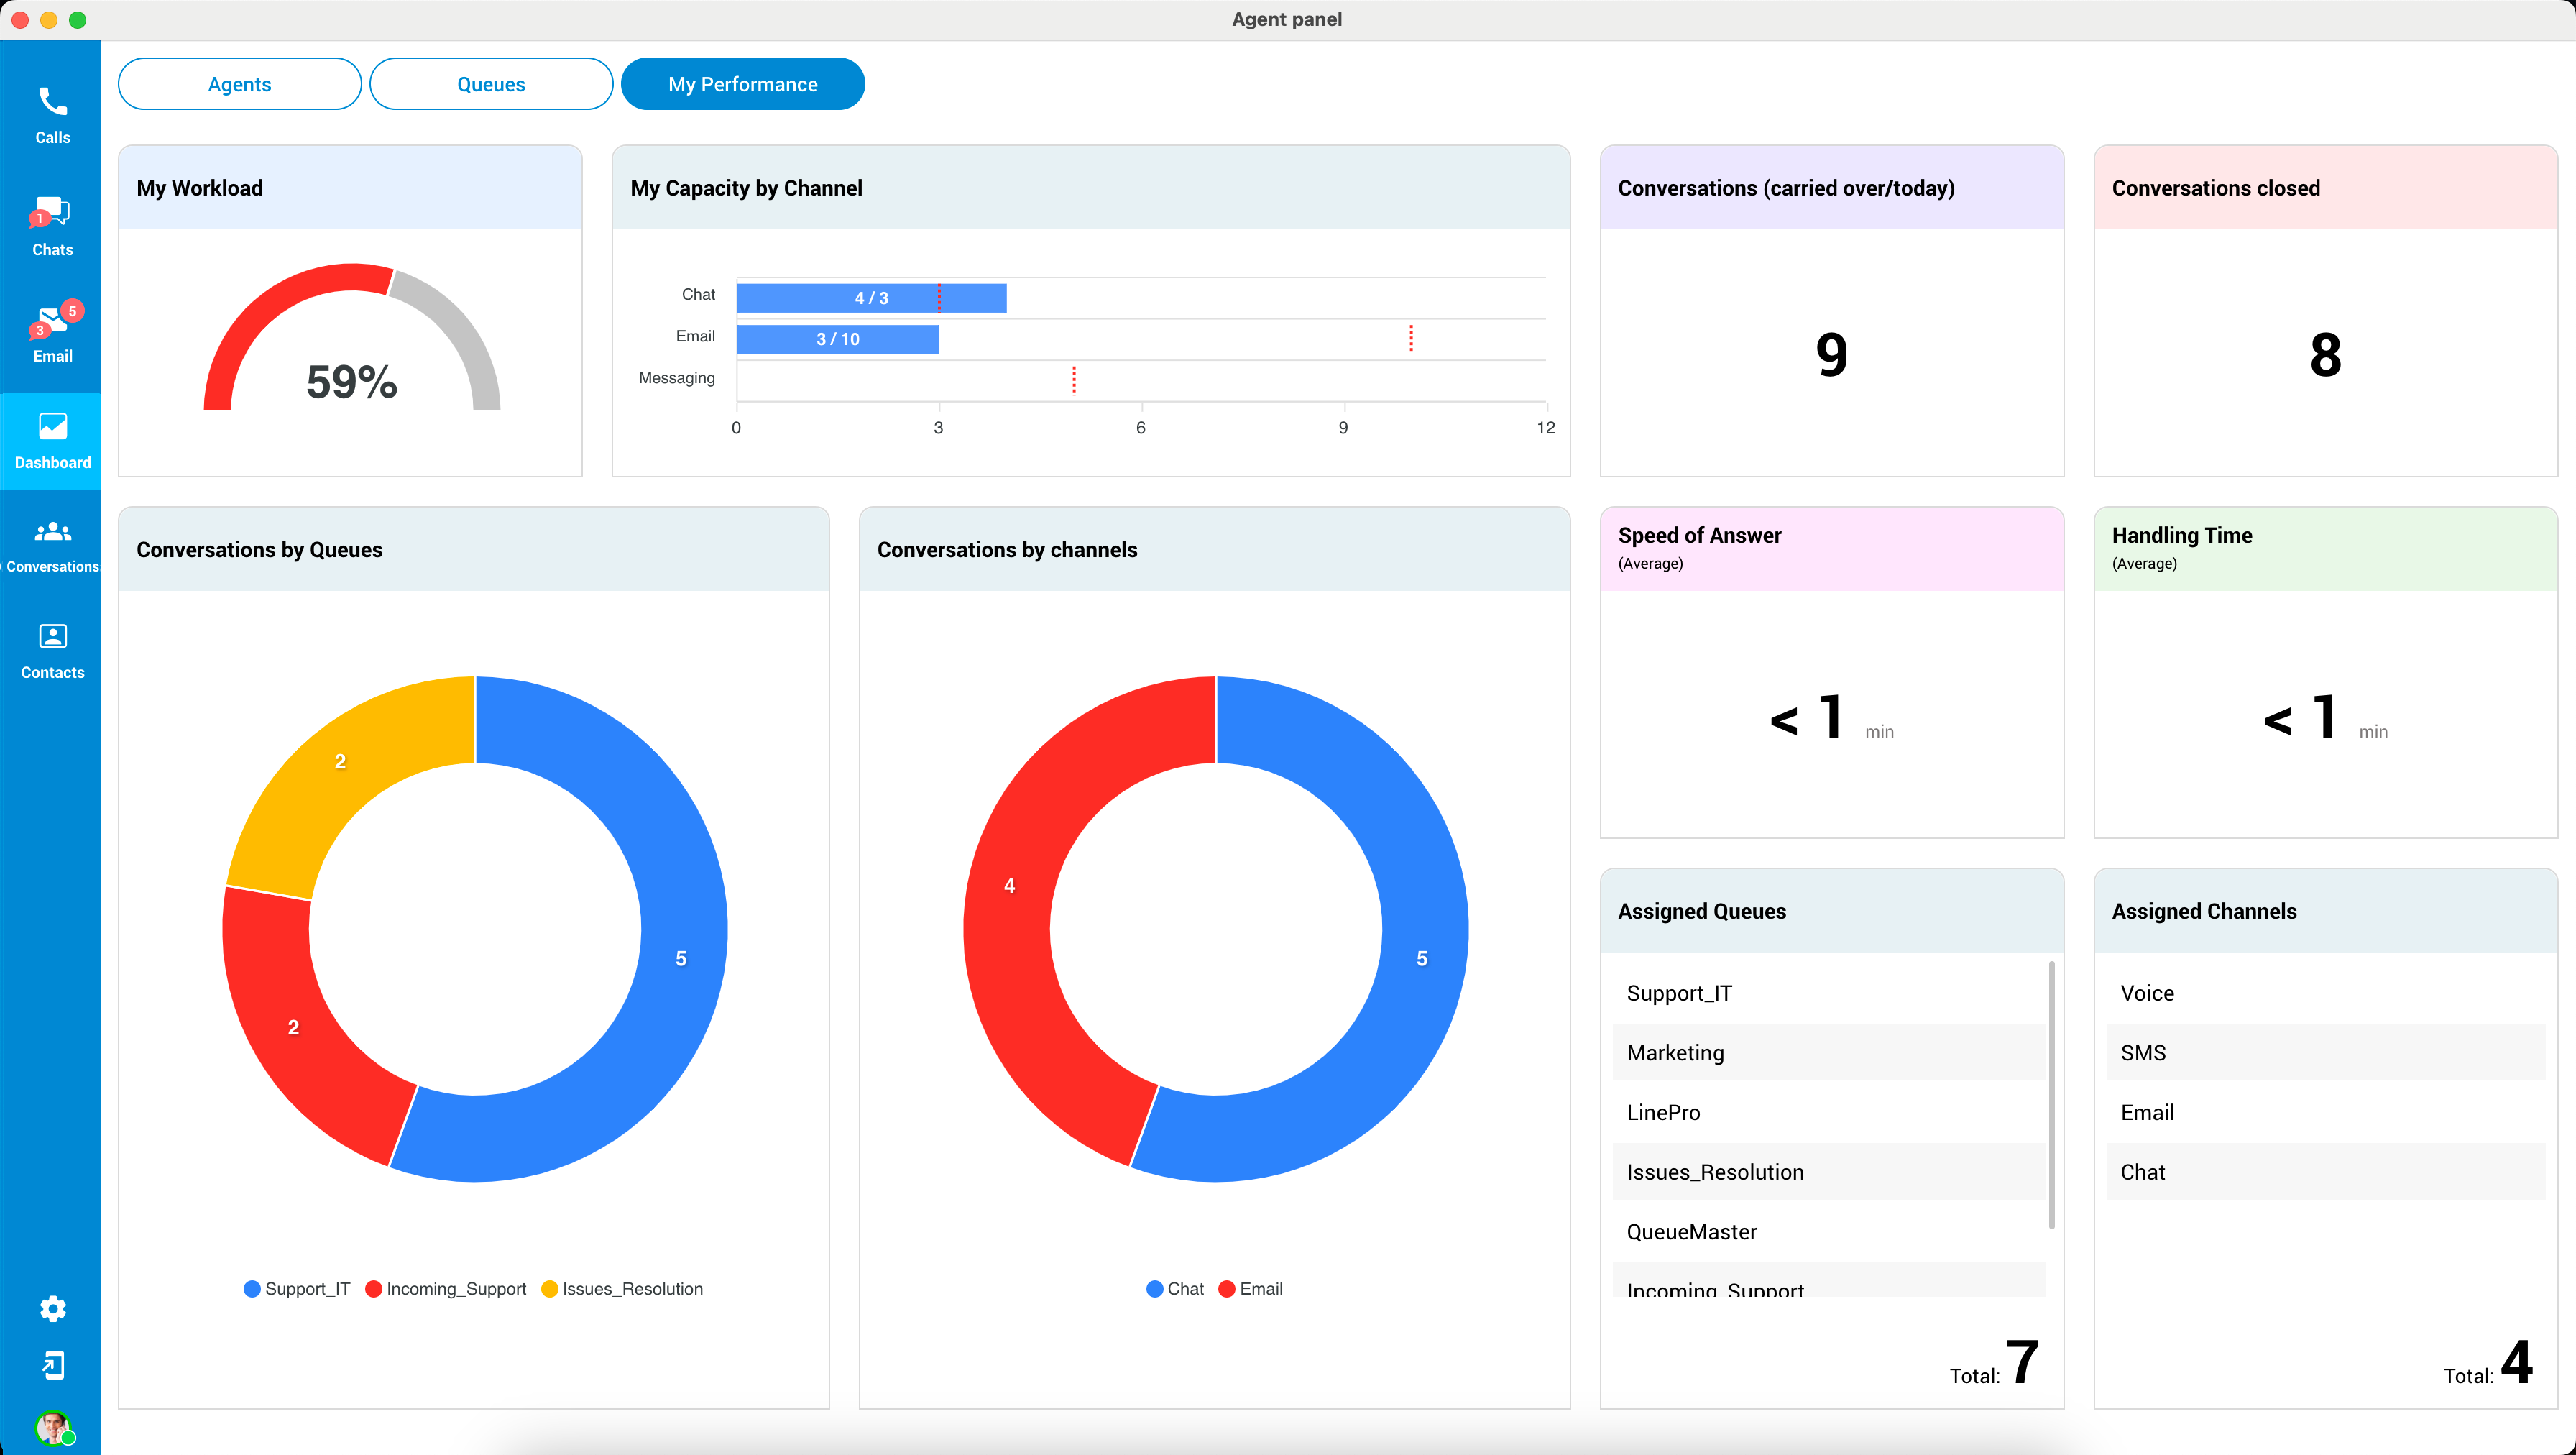
Here is a breakdown of the information displayed on this page:
-
My Workload: This section visually represents the user's workload as a percentage, calculated by considering the number of ongoing conversations across different channels like chat, SMS, or email. The meter is divided into two sections: red and grey. The red section represents the utilized(used) working units, while the grey section indicates the remaining working units.
-
My Capacity by Channel: This area displays a graph that helps agents monitor the number of active conversations and their maximum capacity for handling conversations.
-
Conversations(carried over/today): This metric showcases the sum of conversations agents have carried over from prior days combined with the count of new conversations received today.
-
Conversations Closed: This provides an overview of how many conversations an agent has on the current day.
-
Conversations by Queues: This section provides information on the number of conversations an agent has handled for each queue.
-
Conversations per Channels: This displays the number of conversations an agent has handled for each communication channel, such as live chat, SMS, email, etc.
-
Speed of Answer: This metric shows the average time an agent takes to respond to a conversation.
-
Handling Time: This displays the average time an agent spends handling a conversation.
-
Assigned Queues: This shows the queues to which an agent is currently assigned.
-
Assigned Channels: This displays the communication channels to which an agent is currently assigned.
By providing these metrics, the My Performance tab helps agents track their progress and identify areas where they can improve their performance.
¶ Partial Service Availability
If there's a partial service availability issue, the Agent Panel will show a message stating, "Dashboard functionality may be affected due to partial service readiness." This means that the complete set of services may not be accessible, leading to potential disruptions in the display of messages within conversations.
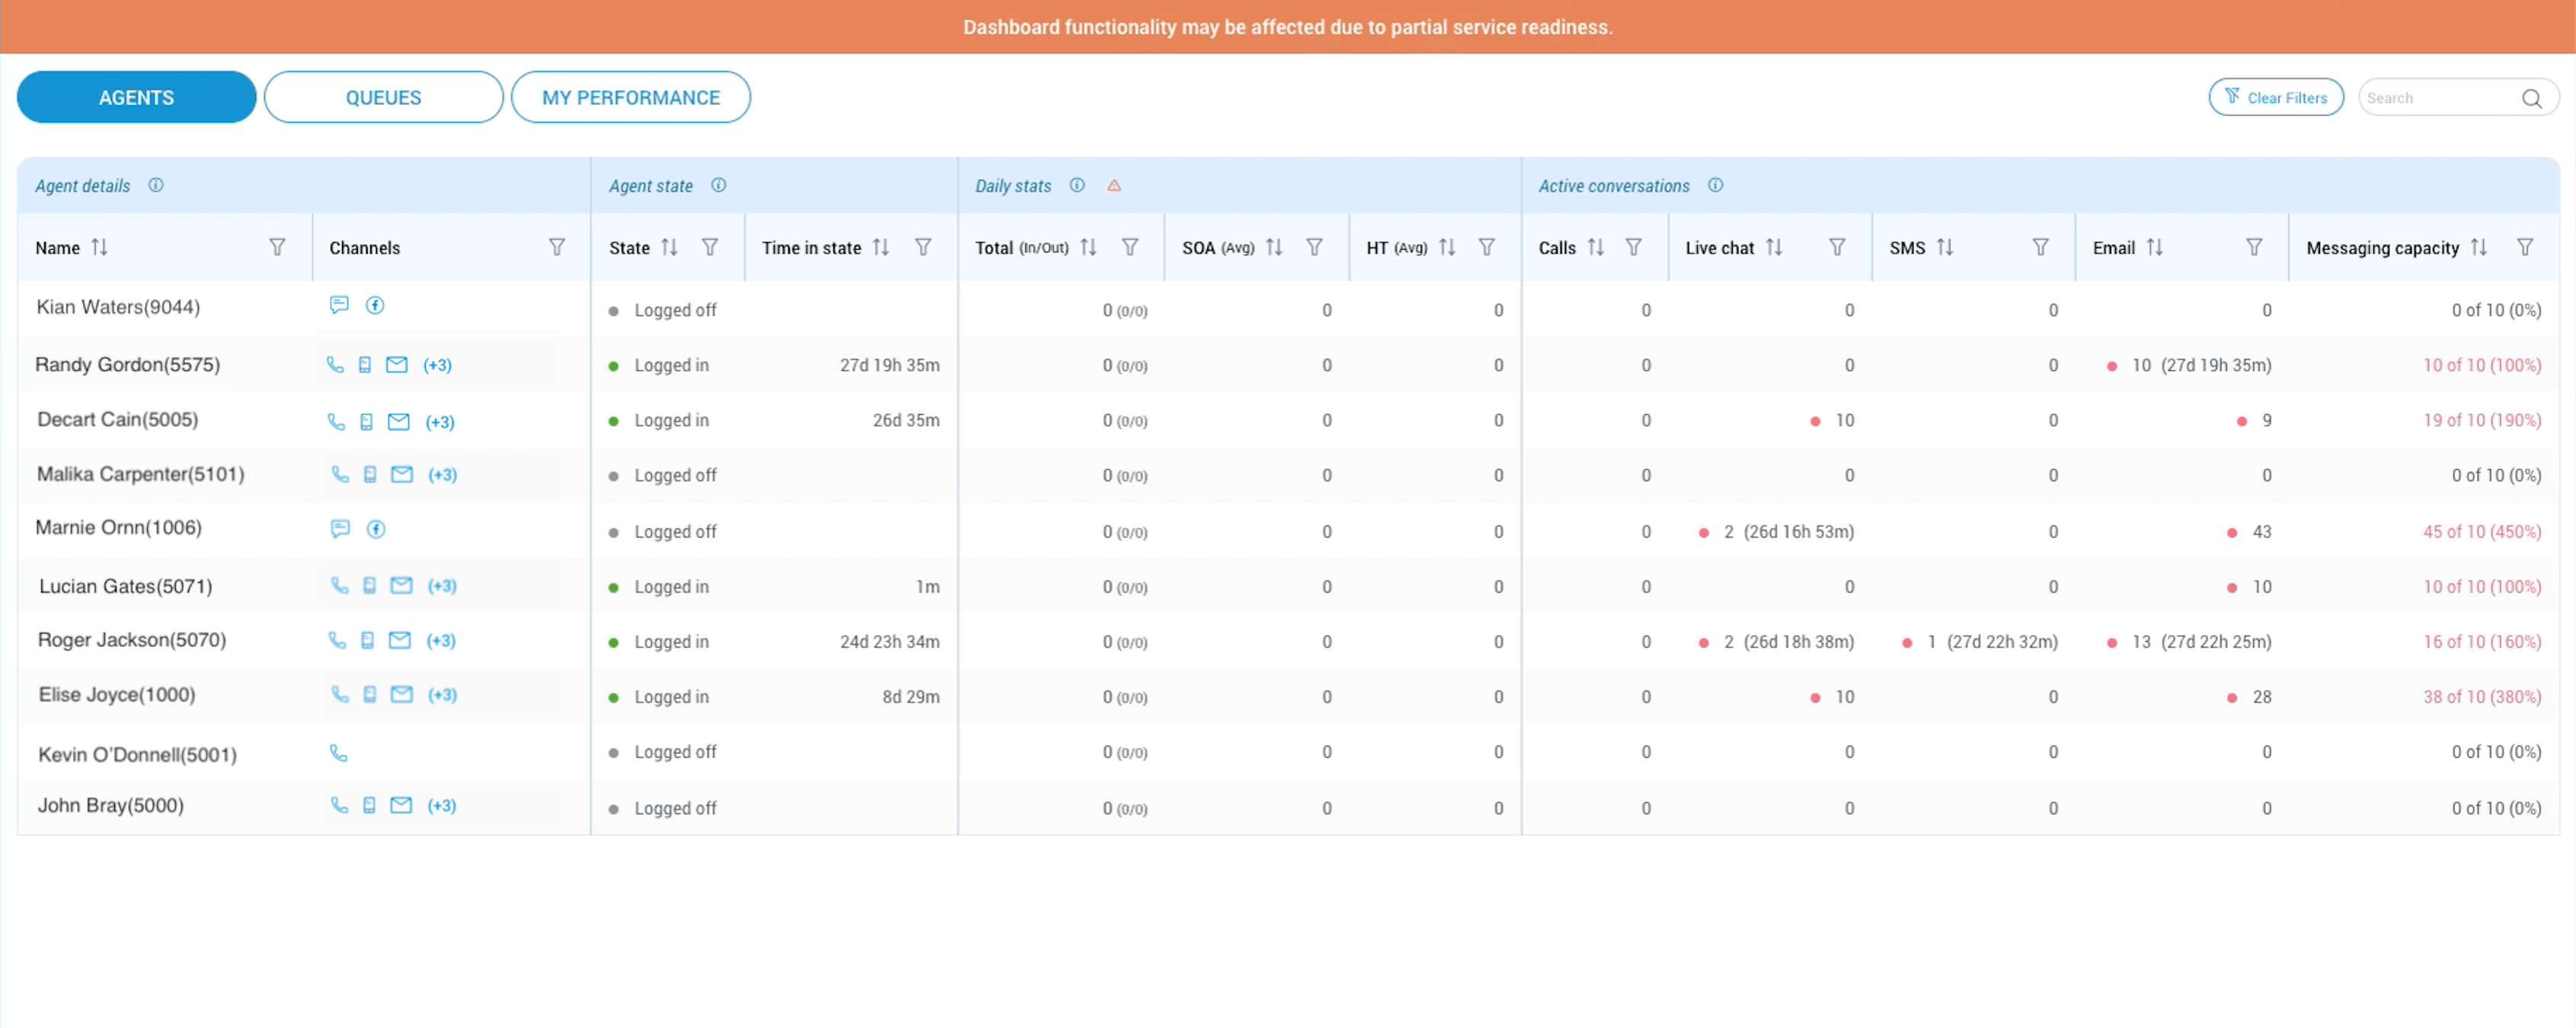
In specific instances, hovering over the service error will unveil a message like "Error while loading daily stats," accompanied by a warning sign. This example illustrates the error message that might appear in such situations.
¶ Conversations
The Conversations section allows agents and supervisors to quickly and easily view all active and waiting conversations in the system and promptly assign conversations to themselves or other agents as needed (only for supervisors). It is a critical tool for managing customer interactions and ensuring all customer inquiries are addressed promptly and effectively.
¶ Active Conversations
The Conversations section of the app displays information about active conversations and conversations that are currently waiting to be assigned to an agent.
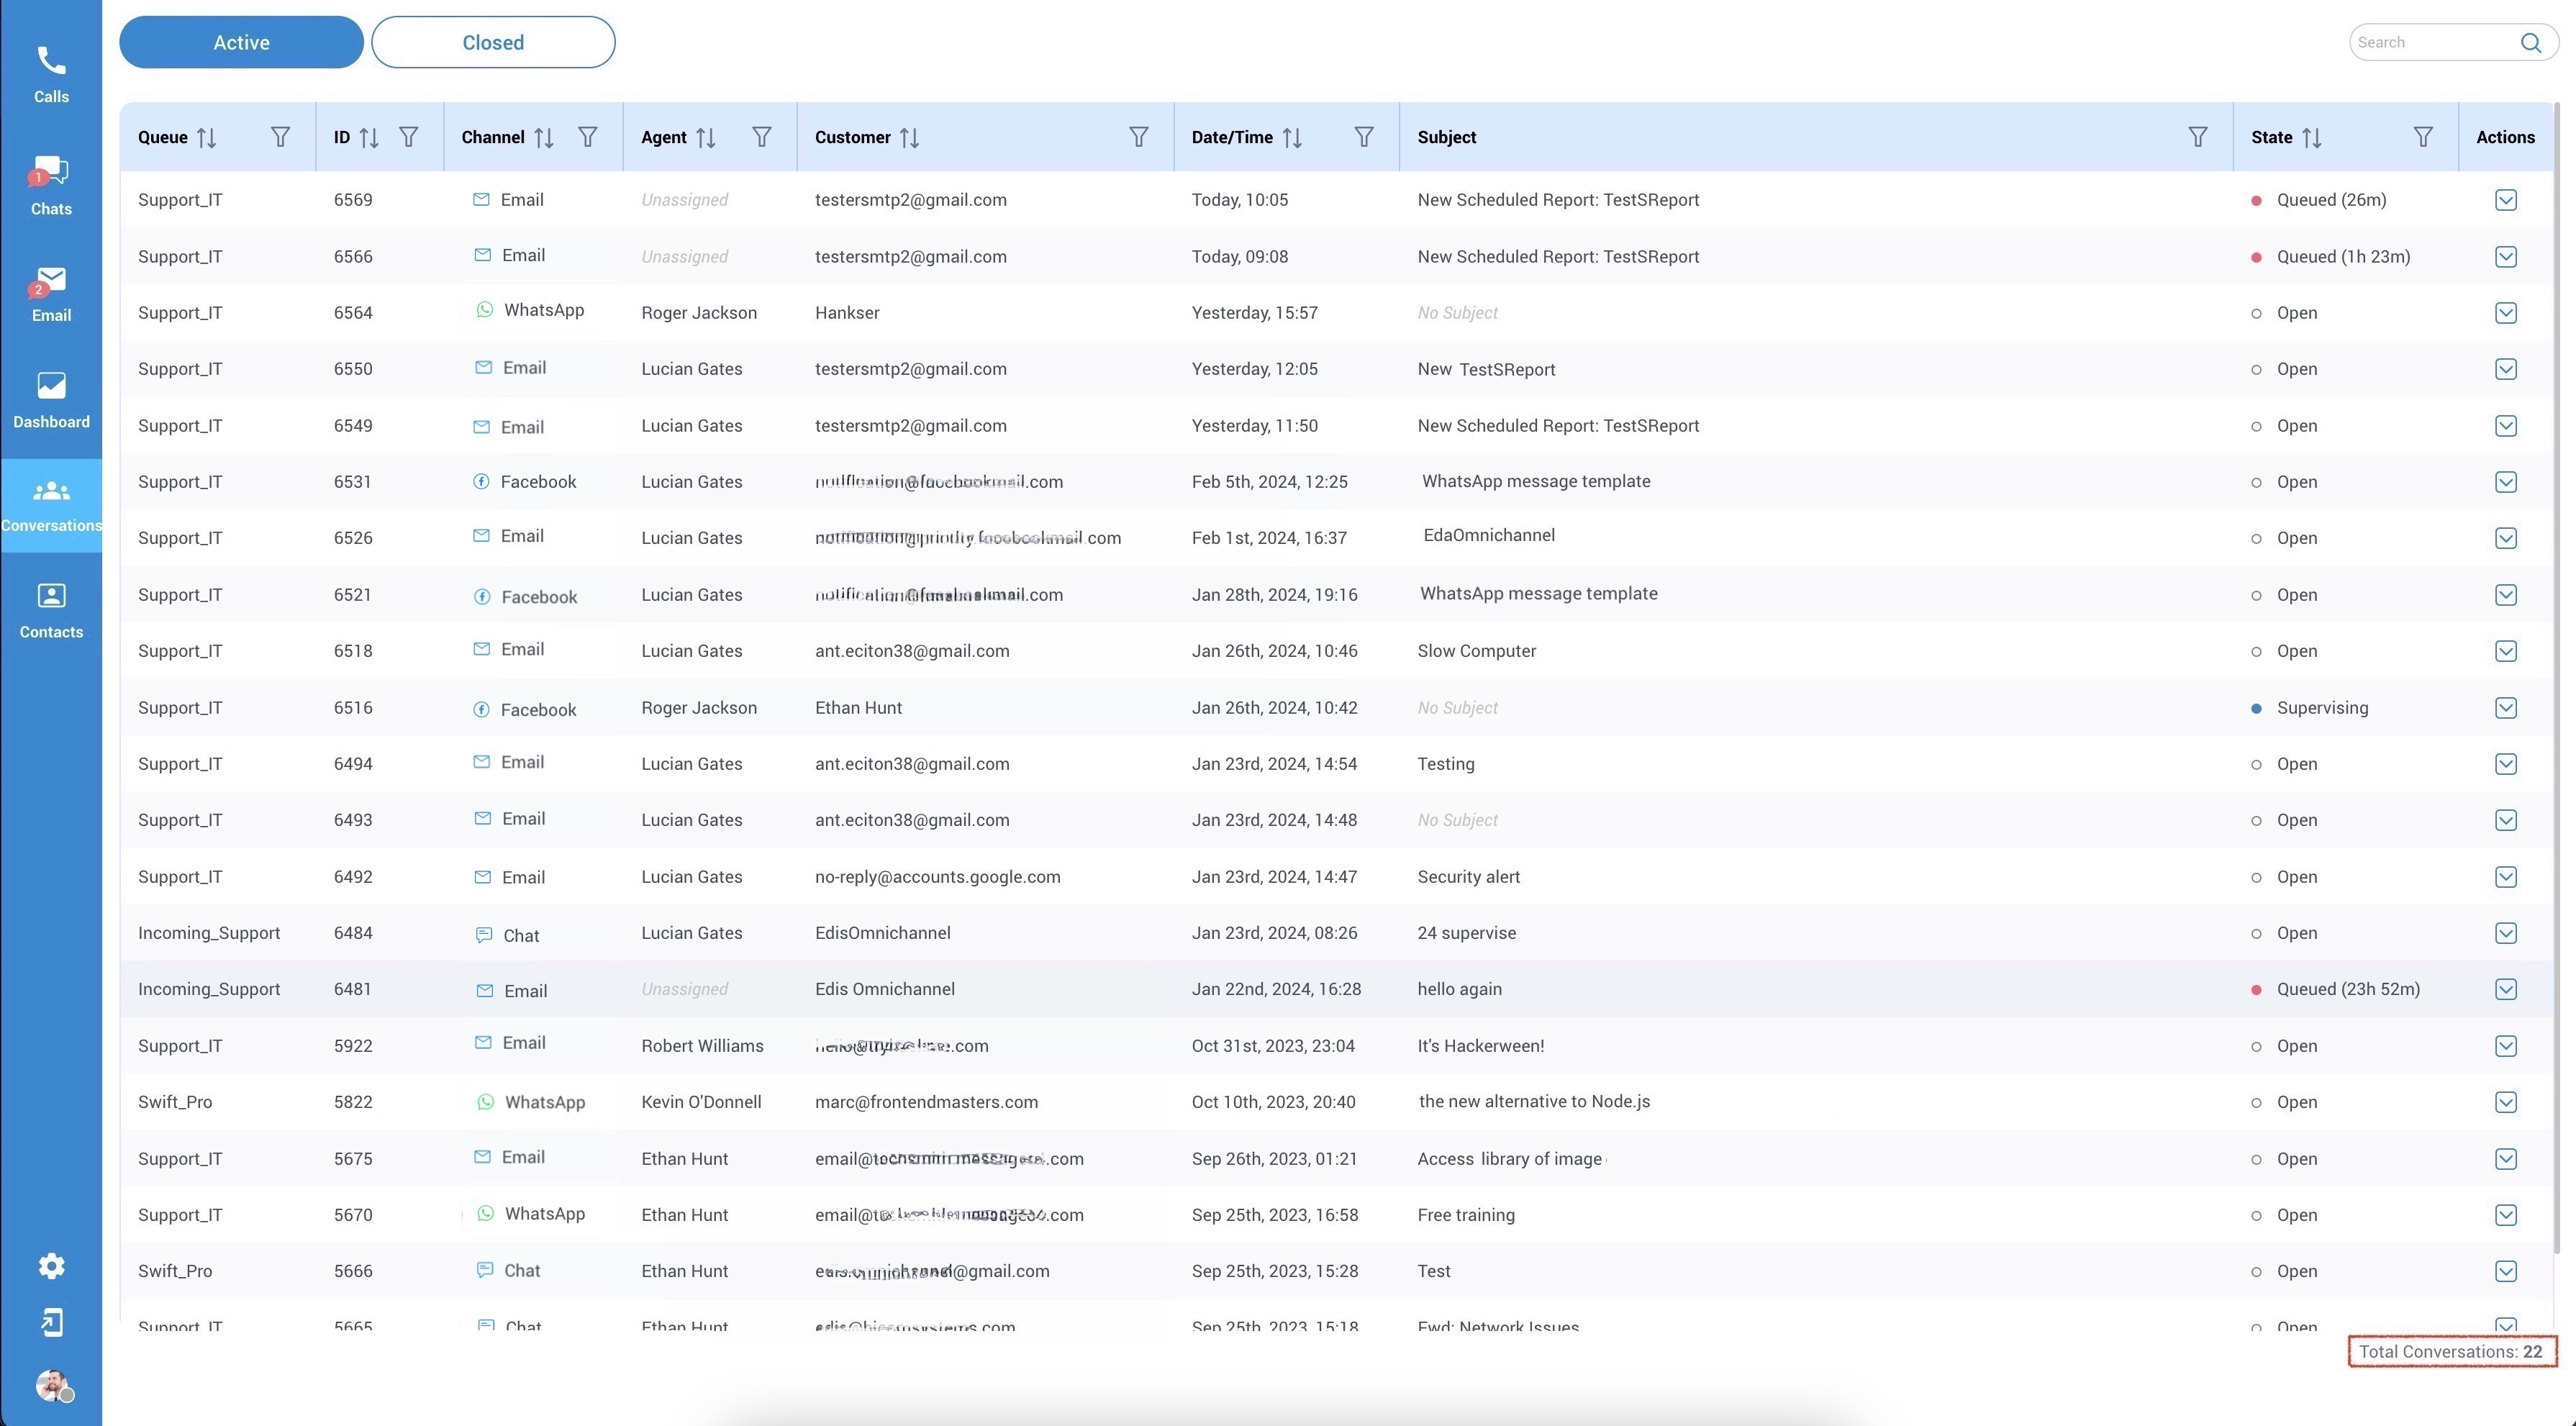
This section provides the following details about each conversation:
- Queue: This displays the name of the queue to which the conversation belongs.
- ID: This displays the conversation ID number, which uniquely identifies each conversation.
- Channel: This displays the channel through which the conversation was started (e.g. Live Chat, Email, SMS, etc.).
- Agent: This displays the name of the agent who is currently assigned to the conversation, if any.
- Customer: This displays the name of the customer who initiated the conversation, along with their email, SMS number or domain from which the conversation was started.
- Date/Time: This displays the date and time when the conversation was started.
- Subject: This displays the subject of the conversation, if any.
- State: This displays state of the conversation assigned by the agent.
- Total Conversations: This field represents the total number of active conversations.
Users can easily filter and organize active conversations based on various criteria (mentioned above), simplifying locating and handling them.
¶ Closed Conversations
This section conveniently presents all closed conversations containing chats, emails, and voice interactions for review and reference.
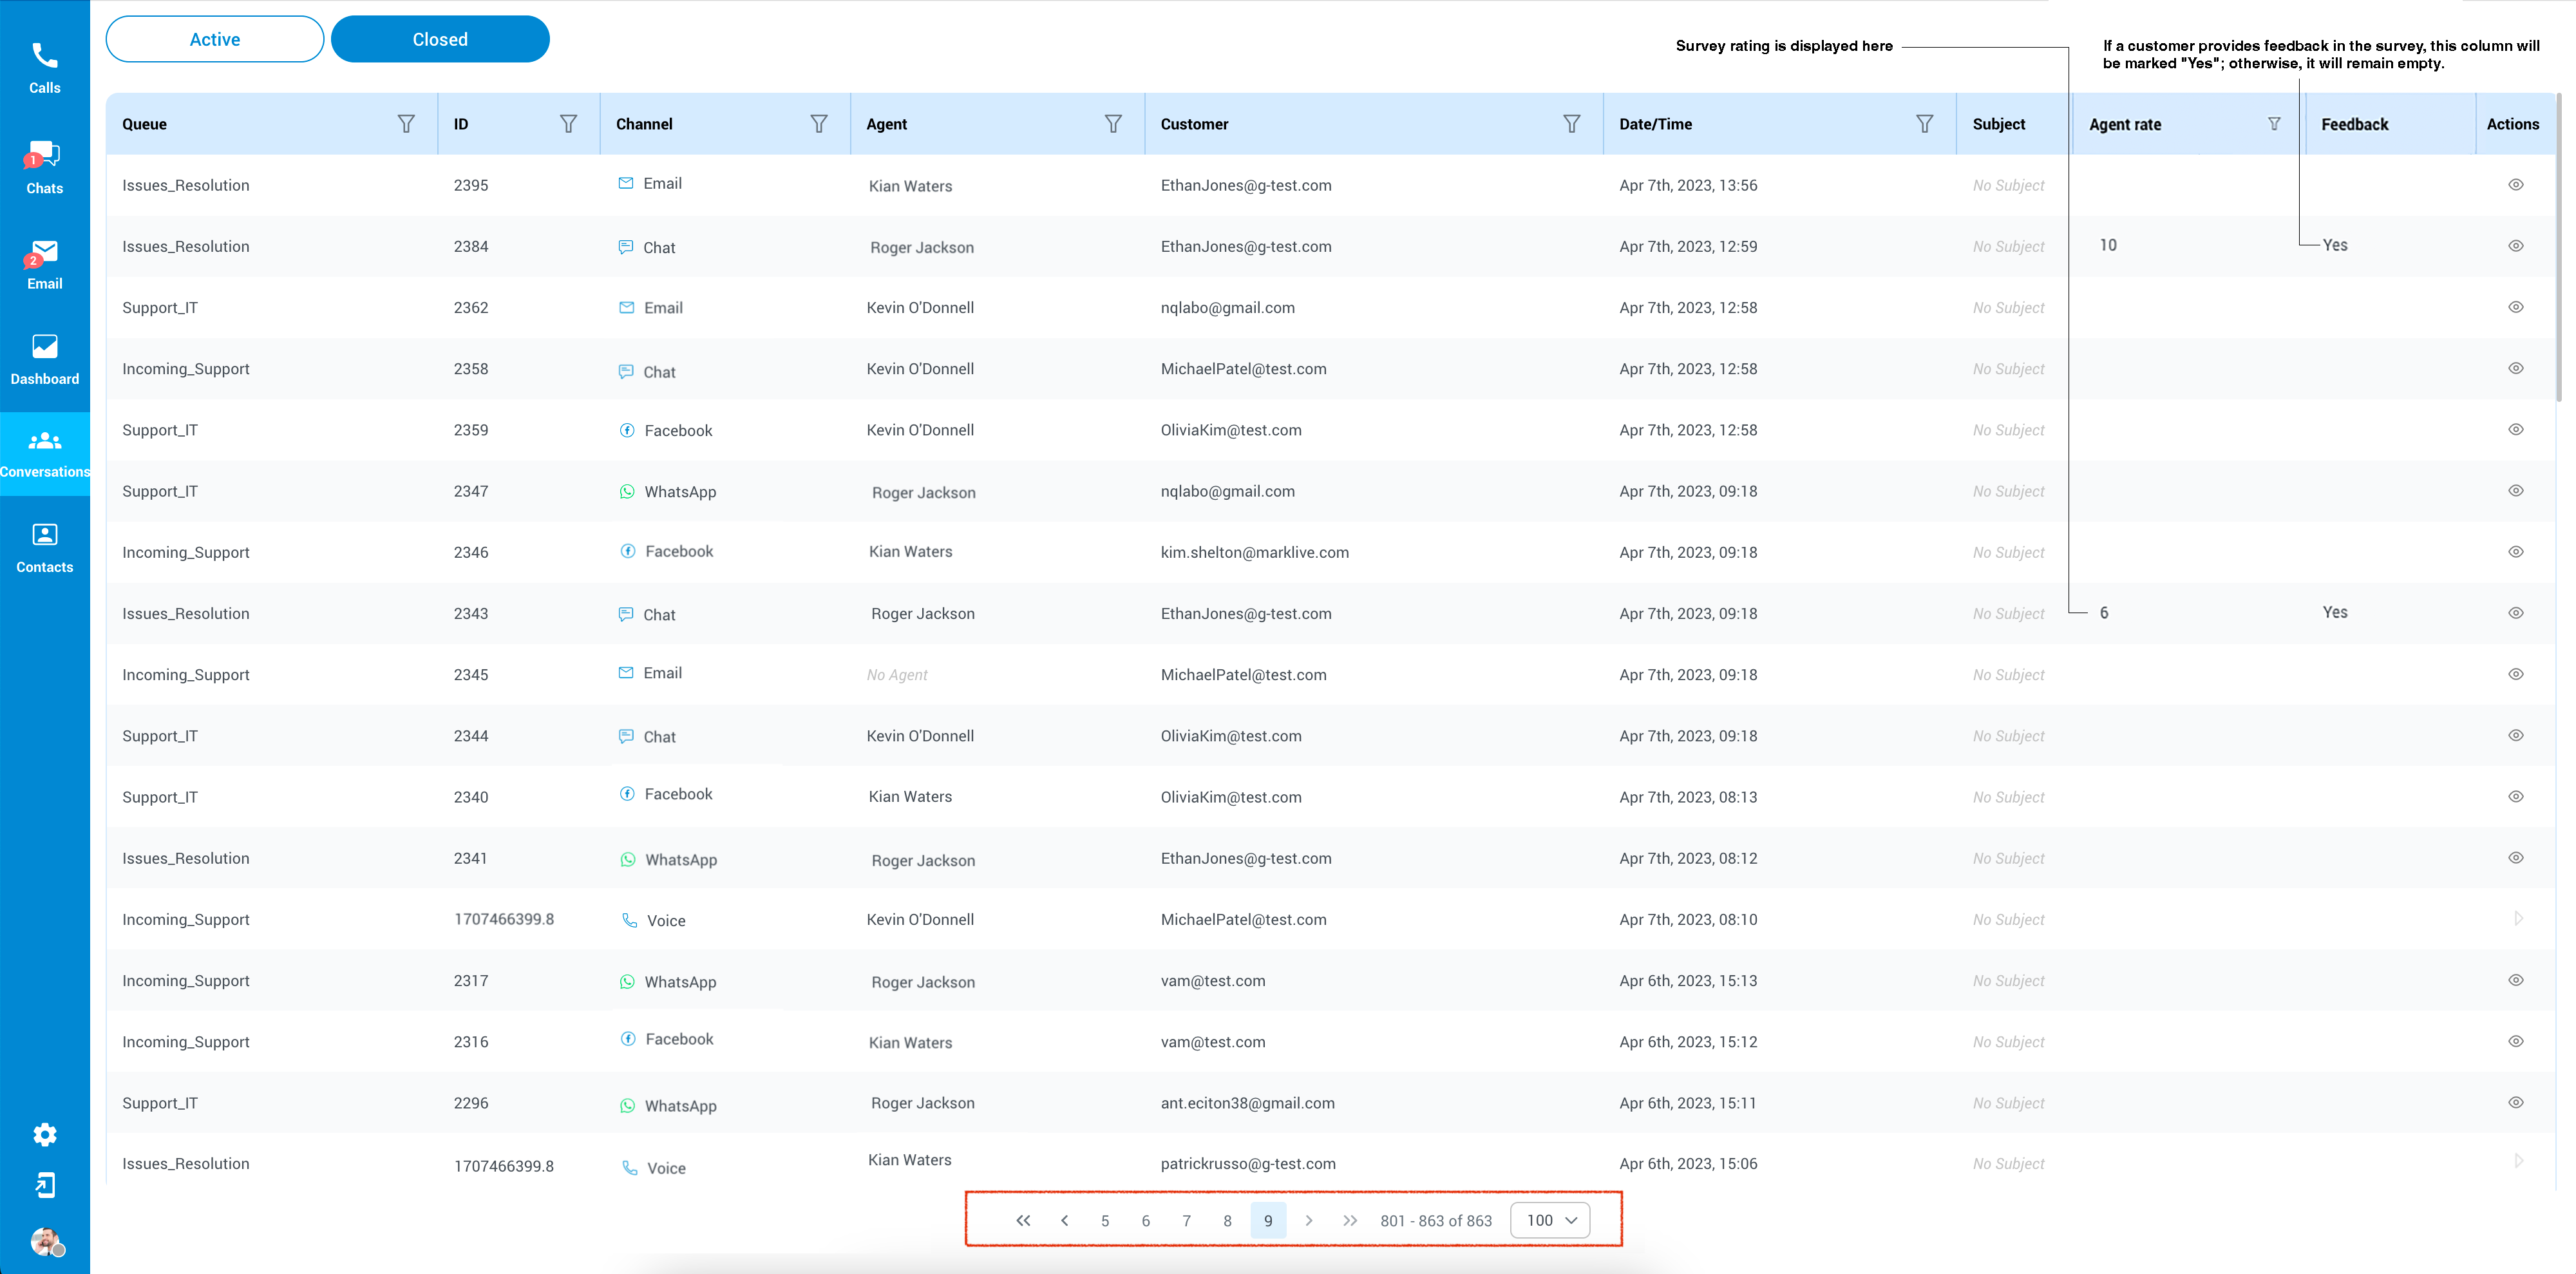
Users can conveniently refine and organize closed conversations according to different filters, making it easier to find and manage them. These filters include:
- Queue: To narrow down conversations by specific queues.
- ID: For locating conversations using unique identification numbers.
- Channel: To sort conversations by the communication method, such as Live Chat, Email, SMS, or Voice.
- Agent: For filtering based on the particular agent who handled the conversation.
- Customer: To search for conversations involving specific customers.
- Date/Time: For isolating conversations within a chosen date and time range.
- Subject: To find conversations based on their subject or topic.
- Agent Rate: The "Agent Rate" column displays the agent's rating from 1 to 10, based on customer evaluations. If a customer skips the survey, the column will be empty.
- Feedback: If a customer provides written feedback in addition to the rating in the survey, this column will display "Yes"; otherwise, it will remain empty.
- Action: Show conversation or Play recording.
¶ Show conversation or Play recording
The user's role determines the ability to view these conversations or play recordings. Supervisors can access complete details of all closed conversations within their assigned queues. Conversely, agents can only view conversations they were directly involved in.
![]() Show Conversation –This option, designed for chats and emails, allows agents to access and review the historical record of the closed conversation, providing valuable context and information.
Show Conversation –This option, designed for chats and emails, allows agents to access and review the historical record of the closed conversation, providing valuable context and information.
![]() Play Record - This feature is intended for closed voice conversations, enabling agents to playback and listen to the recorded content of past voice interactions, facilitating comprehensive analysis and assessment.
Play Record - This feature is intended for closed voice conversations, enabling agents to playback and listen to the recorded content of past voice interactions, facilitating comprehensive analysis and assessment.
The design of these viewing permissions is thoughtfully created to strike a balance between accessibility and confidentiality. This ensures that users are granted access levels aligning with their organization's responsibilities.
¶ Contacts
The Contacts module serves as a central hub for gathering contact information from various sources. Initially, it allows for contact management directly from the Agent & Supervisor app, including adding, editing, merging, and deleting contacts.
Users can add or edit new contacts through the Contact section. Supervisors have the ability to upload contacts via CSV files, while agents can only add contacts individually, one by one.
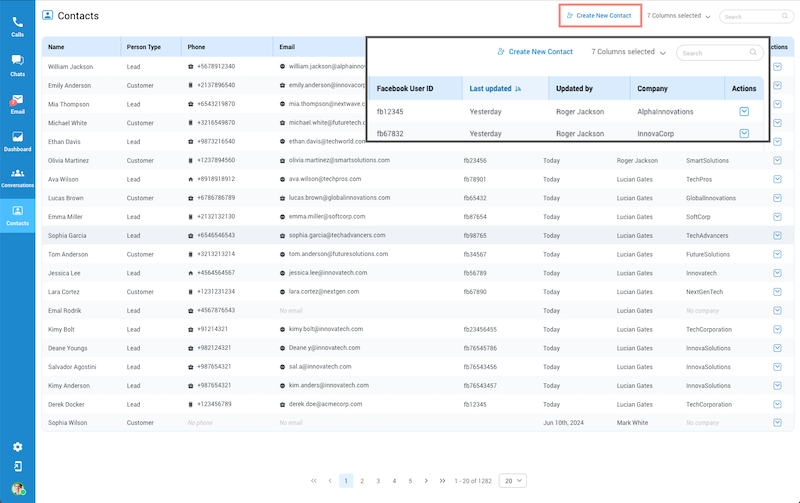
When users click on 'Create a New Contact,' a new window will appear, displaying a form for entering new contact information.
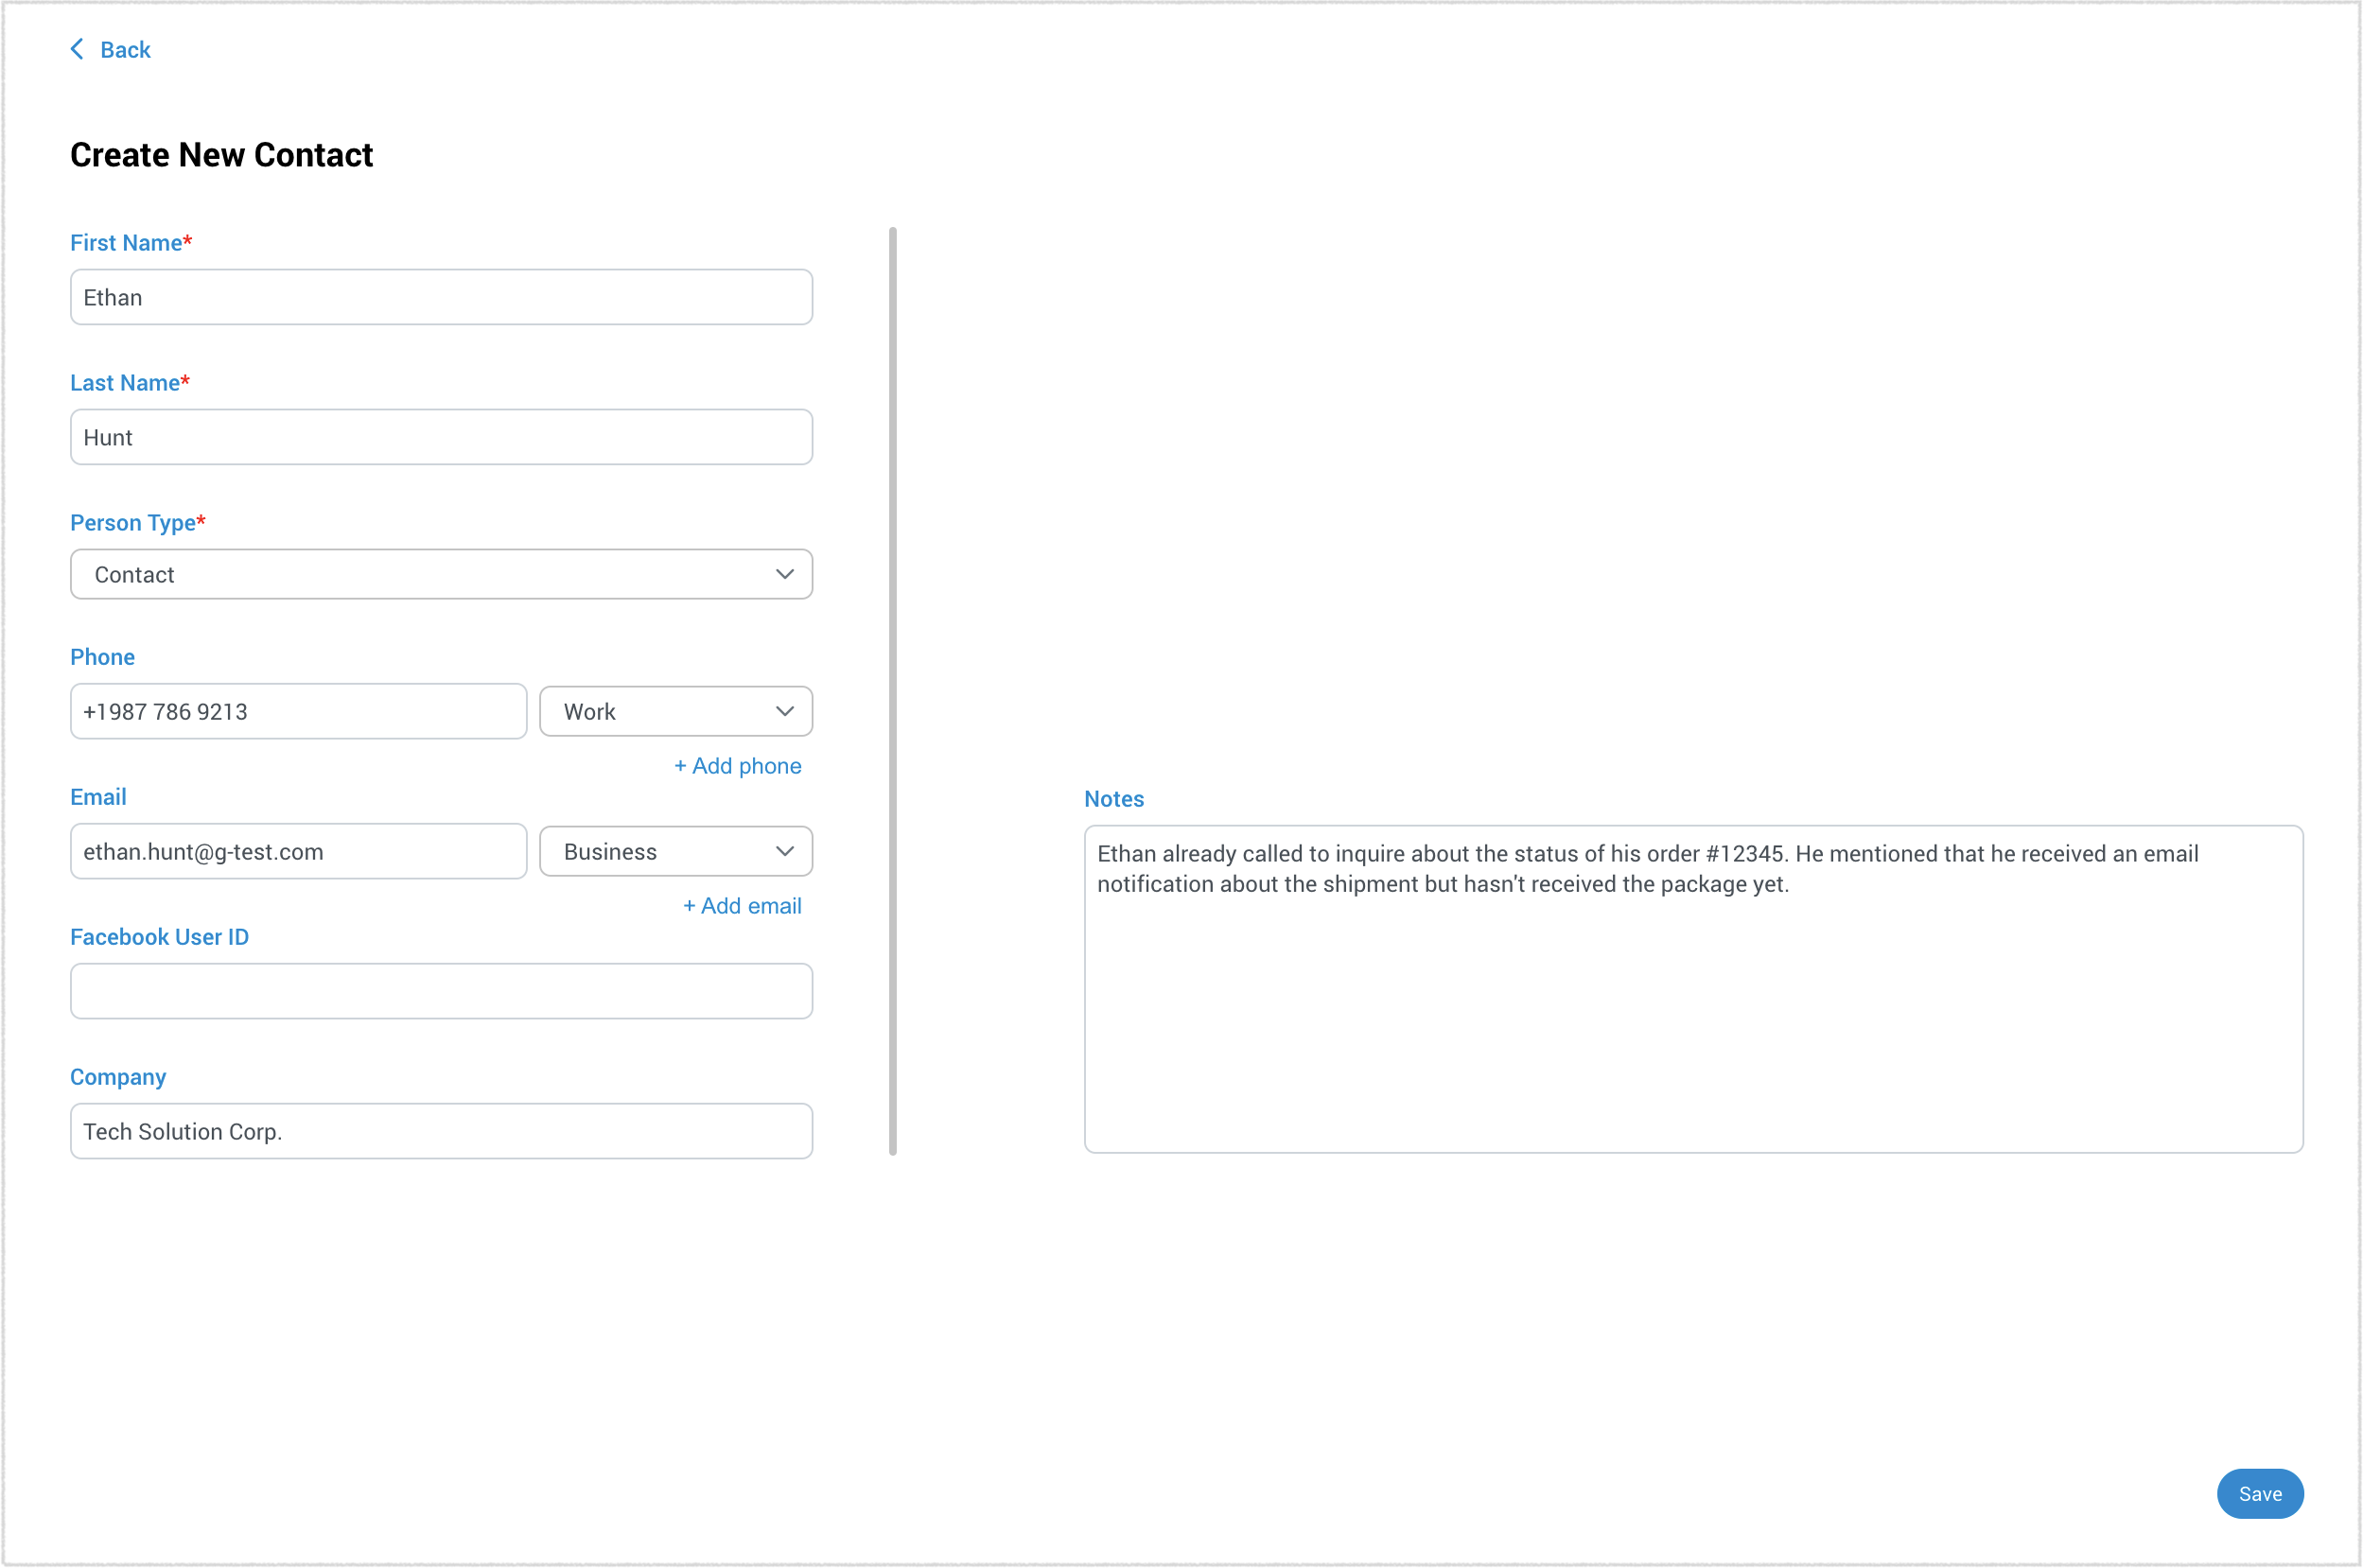
Plase be noted that first three fields are requirement to save the form. (First Name, Last Name and Person Type.)
Once the form is completed, users can click 'Save' to store the contact details.
Next to the "Create New Contact" option, there is a dropdown menu where you can choose which columns to display in the Contacts section. You can turn all columns on or off except for the Name column, which is mandatory.
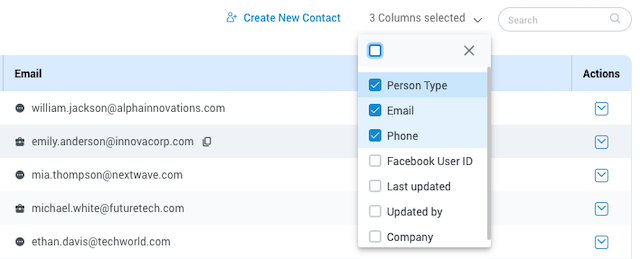
Aditional actions for the Contacts section are:
View/Edit
Selecting this action enables agents to view or edit an existing contact. Upon selection, a new window will open displaying a contact form that can be edited or reviewed.
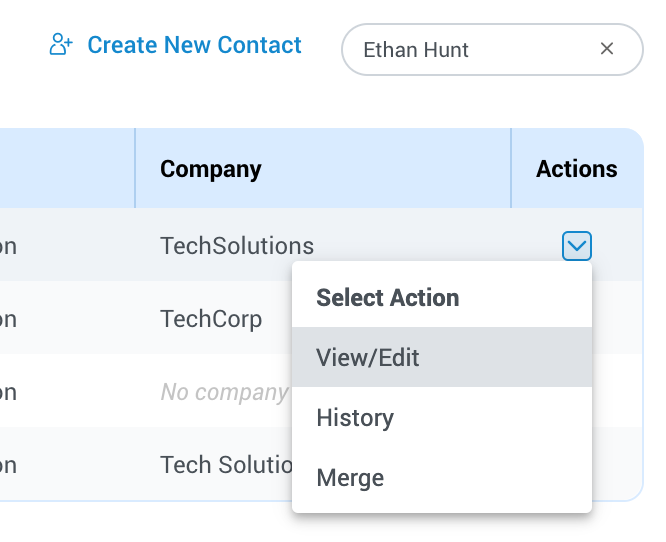
History
Agents can utilize this option to view the history of conversations for a particular customer across all channels. Upon selection, a new window will display all conversations from the selected customer, including voice, email, SMS, live chat, Facebook, and WhatsApp conversations.
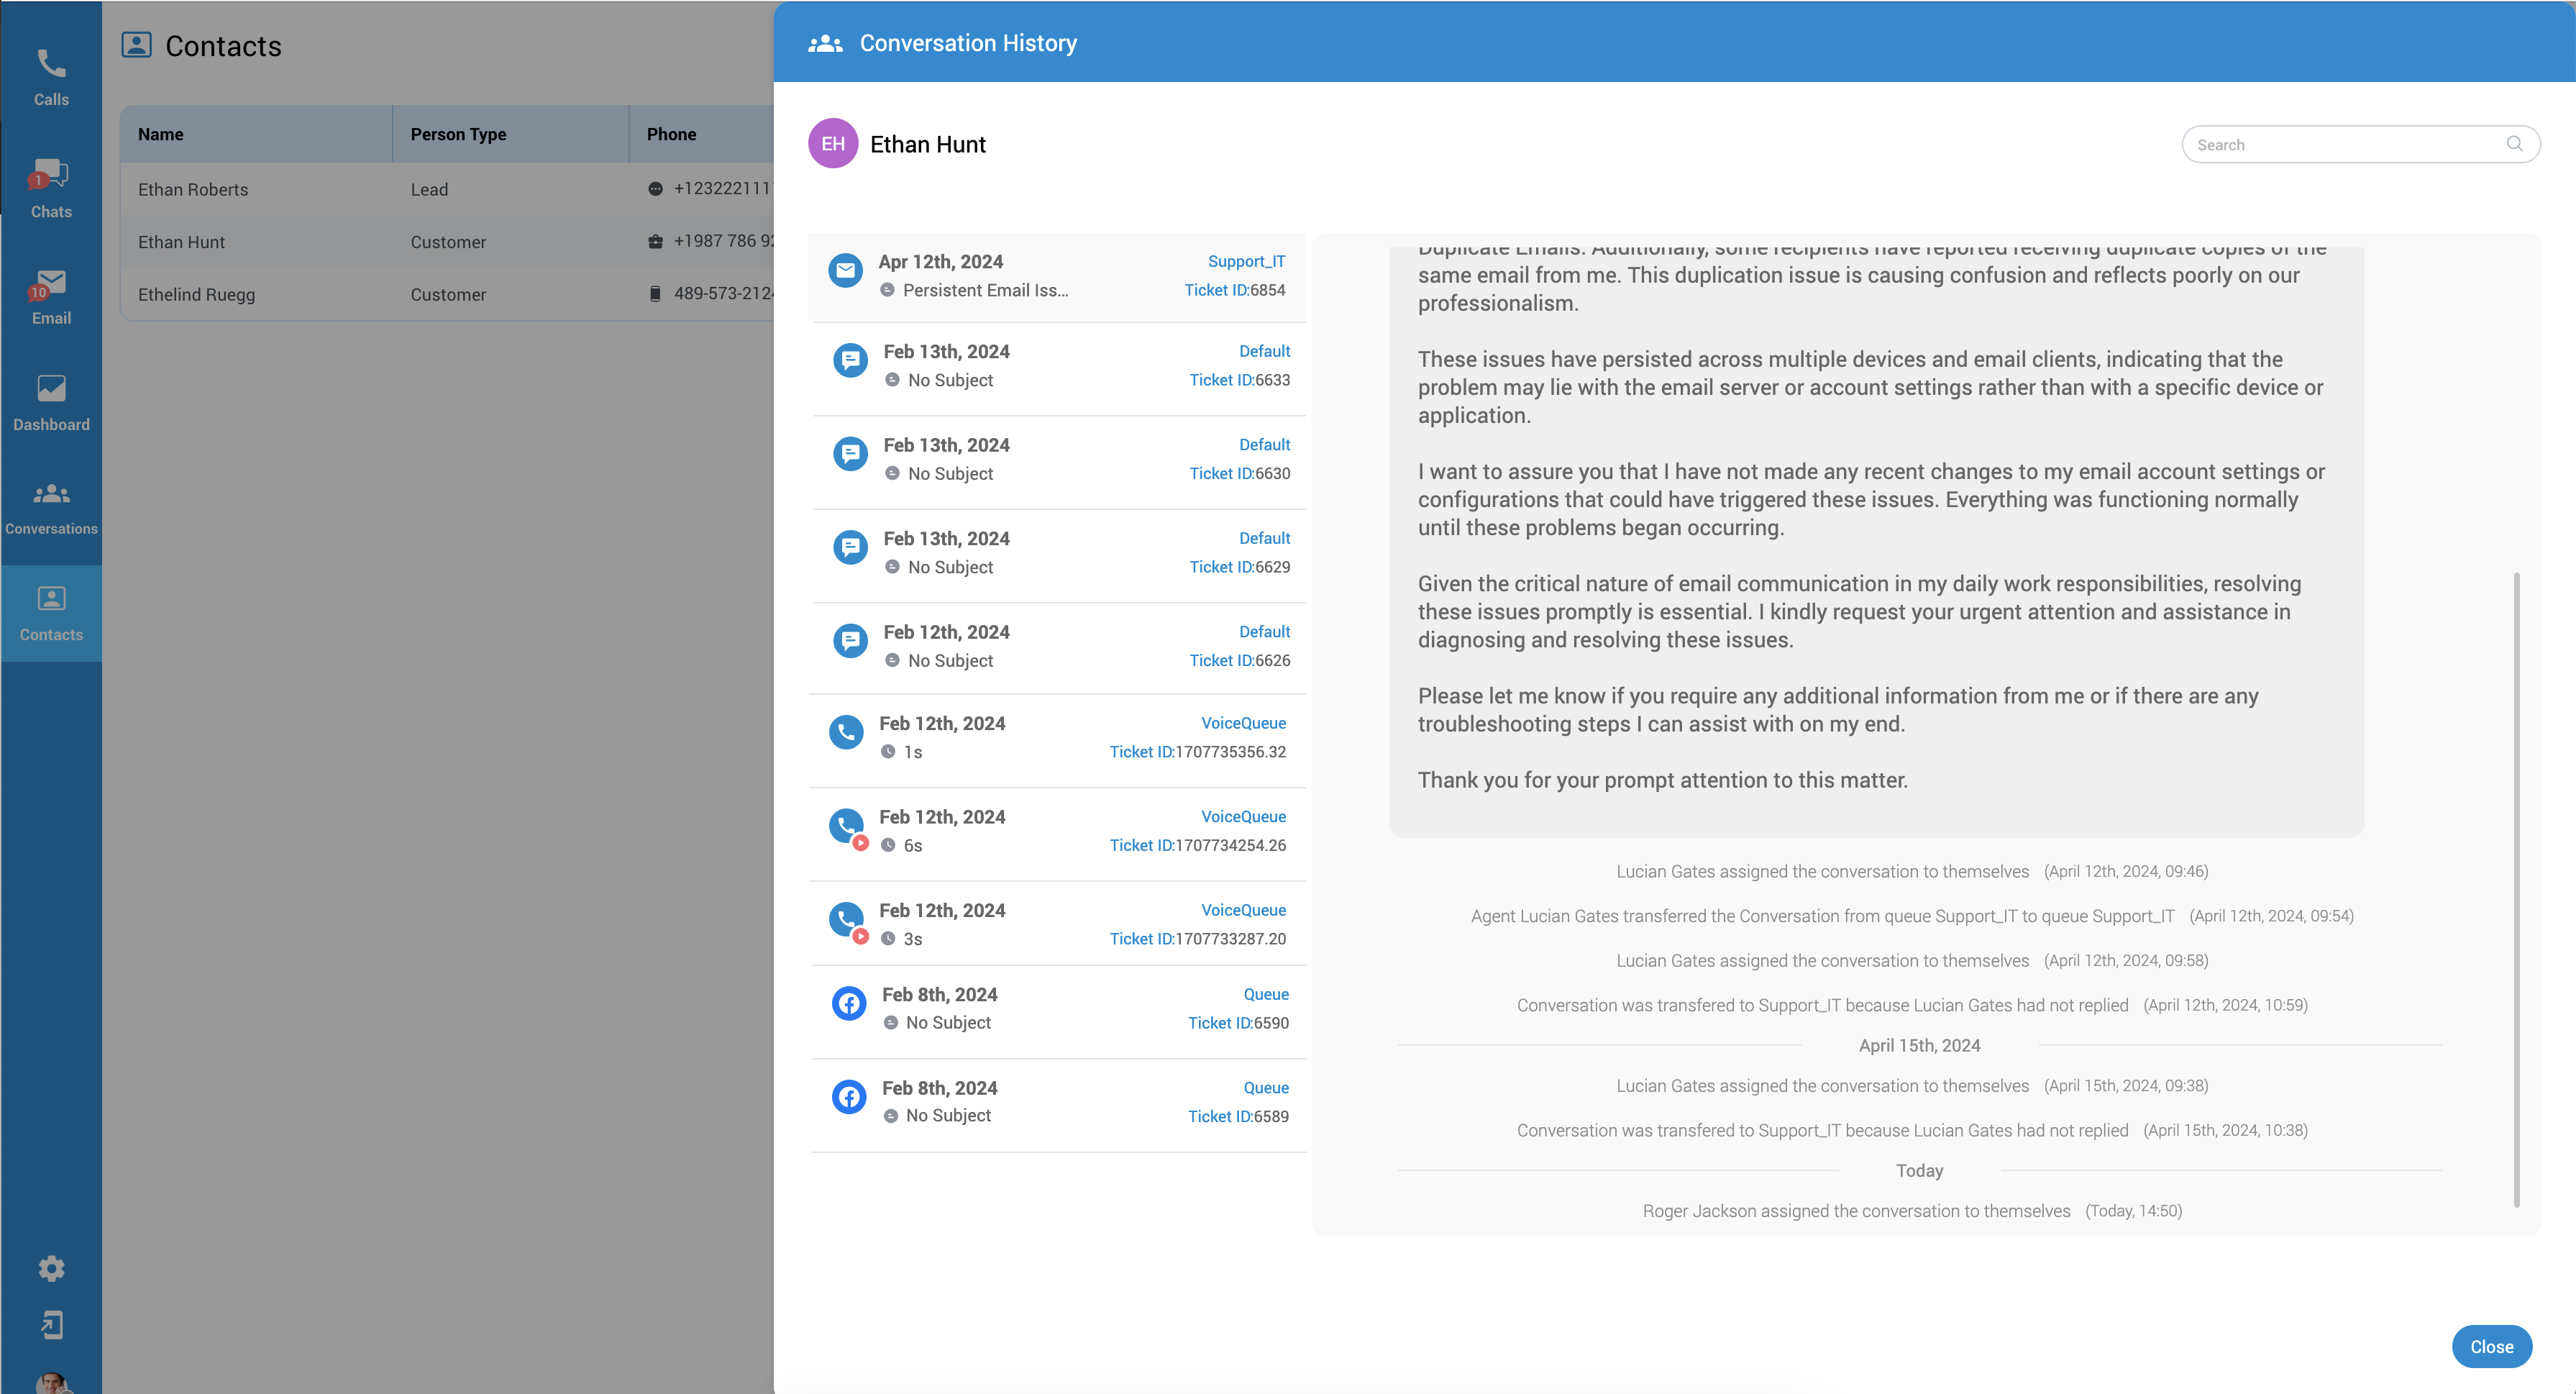
Merge
Contact merging is a feature that enables the consolidation of multiple contact records into a unified entity. This process streamlines and organizes contact information by merging redundant or duplicate entries, resulting in a single comprehensive record.
By merging contacts, users can avoid clutter and confusion in their contact lists, ensuring efficiency and accuracy in managing and accessing important contact details.
Here are the steps to efficiently merge your contacts:
- Navigate to your Contacts list.
- Find the contact you want to serve as the primary for the merge.
- In the Actions column next to your selected contact, click the dropdown menu, and choose the Merge option.
- Once you initiate the merge, you'll be directed to the Merge Contacts screen. Here, the page title will read: "Merge Contacts - Please choose the information you would like to keep, and the other contact's details will be replaced."
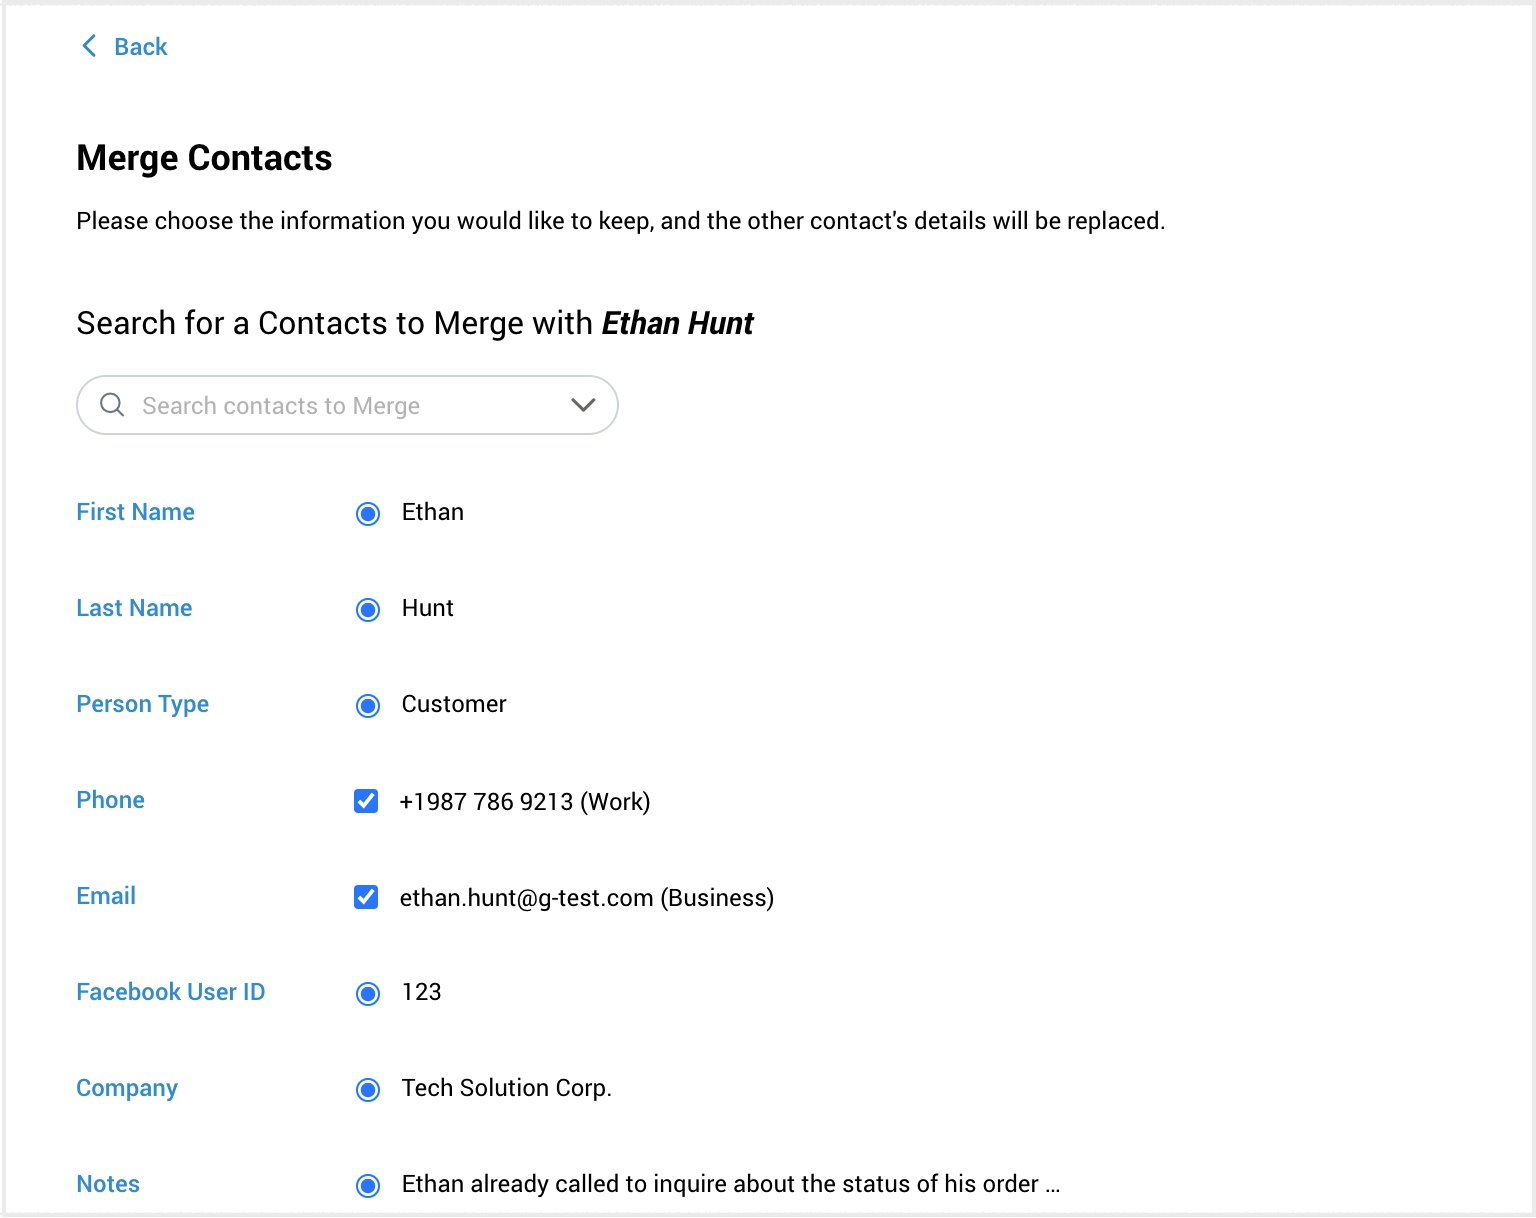
- To merge contacts, begin by searching for them using their names and surnames. Next, utilize the dropdown menu to choose another contact for merging with the initial one.
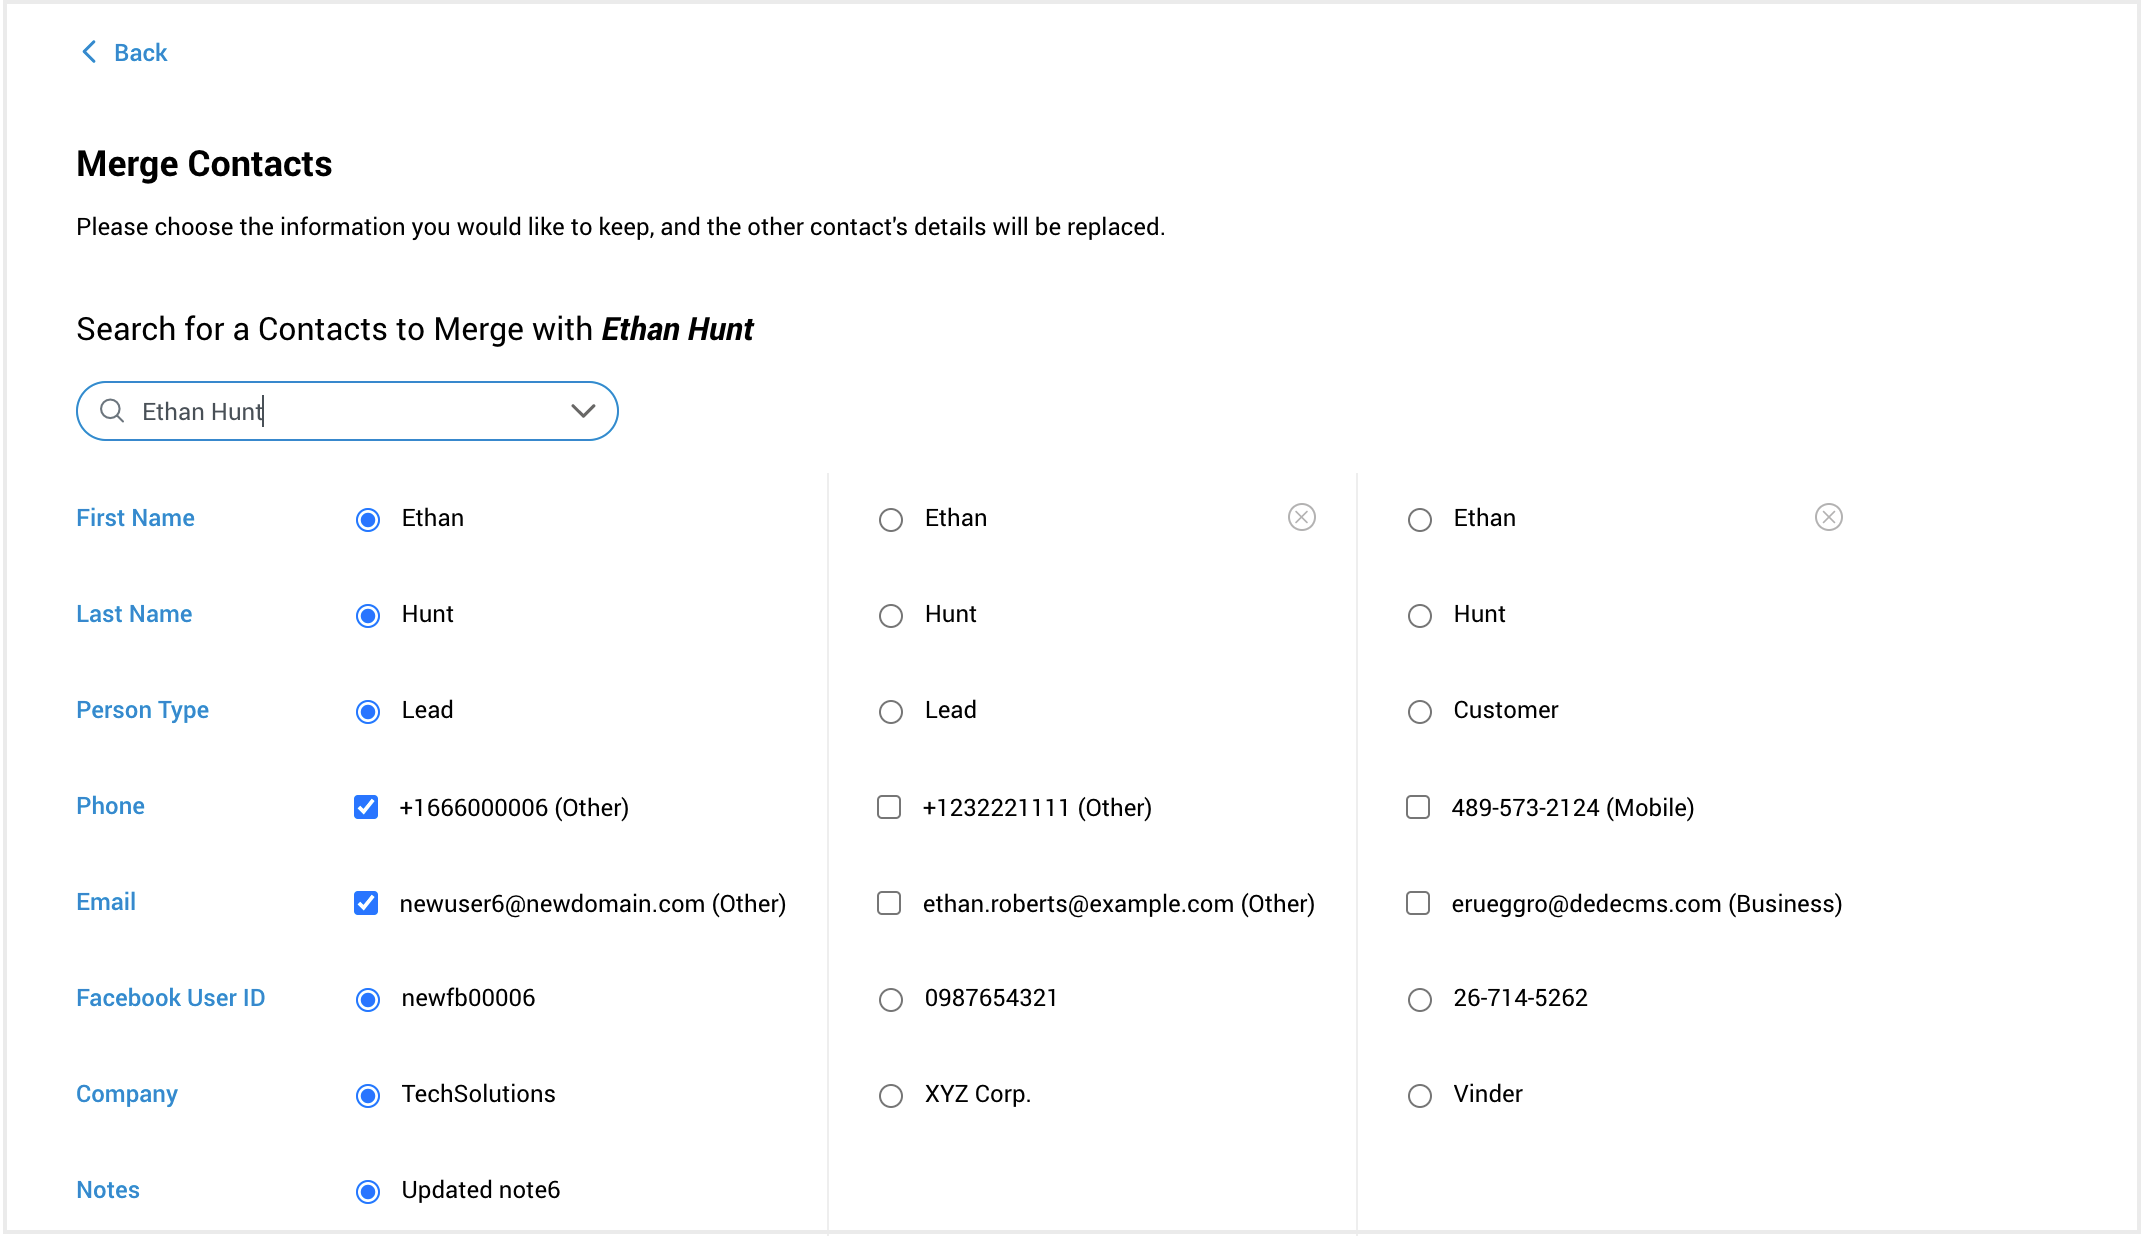
When merging contacts, you can select multiple phone numbers or emails (checkboxes), but only one option each for fields like name, last name, person type, ect. (radio buttons). Use radio buttons to indicate which information you want to retain. After merging, the selected information will be displayed in the Contacts directory.
Once you've made your selections, click Merge. A confirmation alert will appear: "Are you sure you want to merge these contacts? Merging is a one-time action and cannot be undone. Ensure you have selected the correct details to keep, as the original contacts will be permanently updated.
¶ OpenStreetMap for Omnichannel Live Chat
¶ Overview
Our Omnichannel Live Chat service now integrates OpenStreetMap to enhance the support experience. This feature enables agents to view the geographical location of customers initiating a chat, providing valuable context for personalized assistance.
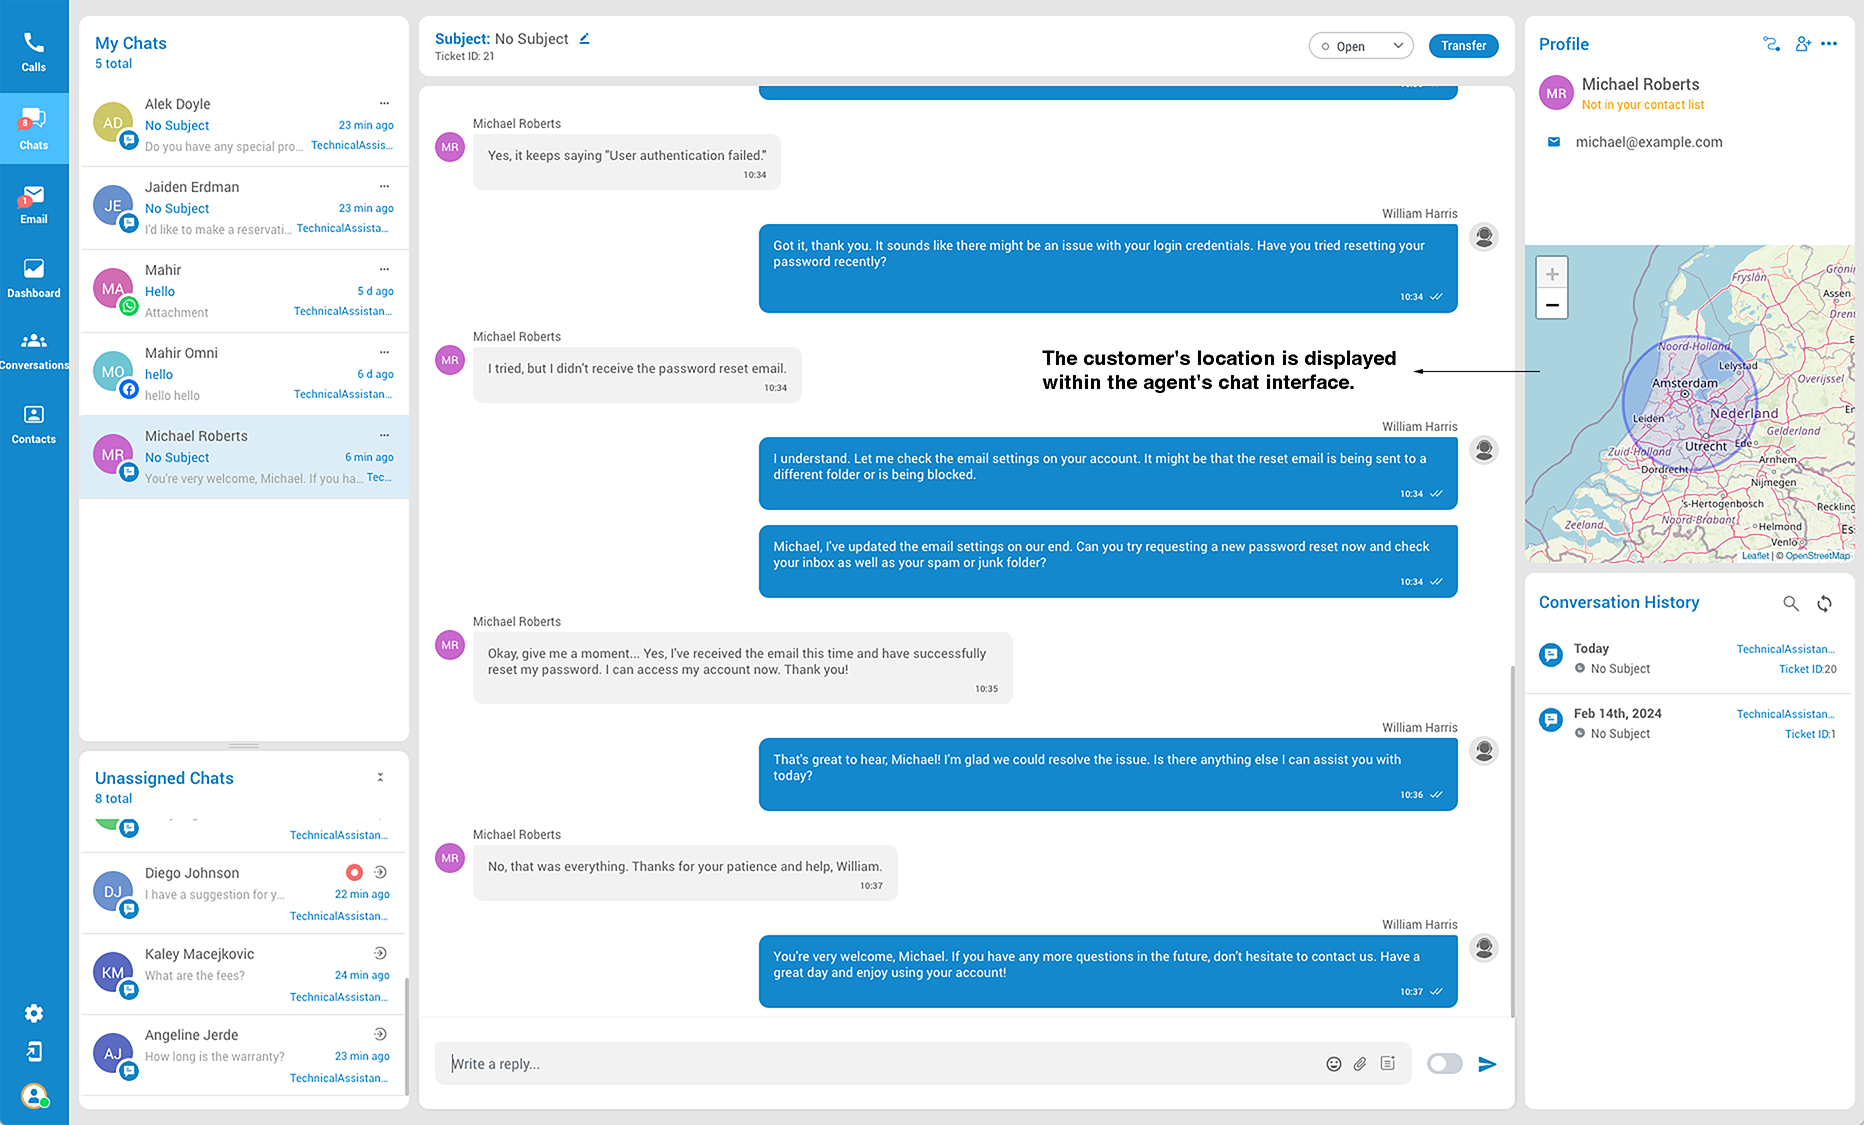
¶ How It Works
- Customer Location Display: When a customer starts a chat session through our Omnichannel service, the agent's interface will automatically display the customer's location on an OpenStreetMap map. This is done securely and in compliance with privacy regulations.
- Agent Usage: Agents can use this location information to offer more tailored support and services, enhancing the customer's experience.
¶ Benefits
- Provides agents with immediate context about the customer's location.
- Enables more personalized and efficient customer support.
¶ Accessing Customer Locations
- The customer's location is displayed within the agent's chat interface.
- No additional action is required from the agent to view this information.
¶ OmniChannel Licensing
Unlock the potential to elevate your customer service with the gloCOM Agent edition and OmniChannel module. Contact your provider to explore enabling the Contact Center edition with the Omnichannel module in your license and begin delivering exceptional service to your customers.
If your Contact Center edition lacks OmniChannel activation or you've reached the OmniChannel module limit, notifications will be displayed within the agent/supervisor panel.
Note: If the Omnichannel feature is not activated in the user's license, the sections associated with Omnichannel will not be presented or visible in the Agent Panel.

¶ OS Native Notifications for OMNI Messaging Events
Like gloCOM, which provides native OS notifications for various events (e.g., new messages, phone calls, missed calls), OMNI Agent app should also offer similar notifications for its messaging events. These notifications are crucial for agents who may be working in other applications, as they alert them to visually and audibly important events.
¶ Some of Key Events for Notifications:
- New Customer Message: Alert when a customer sends a new message.
- Customer in Queue: Notification when a new customer waits in the queue.
- Ticket Assignment: Important, especially for automatic assignment strategies, notifying agents when a ticket is assigned to them.
- Ticket Transfer: Alert when a ticket is transferred to the agent.
¶ Notifications and Indicators in gloCOM's Omni-Channel
¶ New Assignments and Transfers
- Chat Assignments: When a chat is automatically assigned or transferred to an agent, a notification will appear saying, "You have a new assigned chat."

- Email Assignments: Similarly, if an email is automatically assigned or transferred to an agent, the notification will state, "You have a new assigned email."

¶ Unread Messages and Emails
- Chat Messages: Unread messages, whether assigned or unassigned, will be marked with a bold red circle.

- Emails: Unread email tickets in the assigned or unassigned list will also be marked with a bold red circle. Clicking the circle will acknowledge the ticket and remove the indicator.
¶ Notifications for Ongoing Chats and Emails
- Chat Messages: If an agent is in another chat or the app is in the background, new messages in ongoing chats will trigger a "You have a new message" notification.

- Emails: If the agent is working on another task or chat, notifications for new emails in ongoing threads will be displayed similarly.

¶ Message and Email Counts
- Chat Messages: The number of new messages in ongoing chats will be displayed within each ticket in the list of assigned tickets.

- Emails: A red circle with a number will indicate the total count of new emails received by the agent.
¶ General Notifications
- Unassigned Emails: If a new email is in a queue but remains unassigned, or if an email is transferred to an agent, a notification will be triggered.

- Unassigned Messages: If a new message is in a queue but remains unassigned, or if an message is transferred to an agent, a notification will be triggered.

- gloCOM Summary: gloCOM will display the total number of unread messages and emails, as well as the count of assigned or unassigned chats and emails.
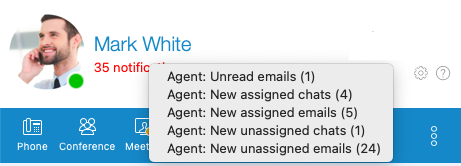
Note: For all the events described above, dock and sound notifications will be displayed, similar to those for calls and chat messages.
¶ Chat Event Notifications
Agents will receive notifications directly within the chat window whenever specific events related to conversation assignments take place. These notifications are designed to keep agents informed, ensuring they stay updated on relevant ticket assignment activities in real-time.
¶ Event Notifications
Start/Closed & Joined Conversation
When a conversation begins, a notification is displayed to inform agents about initiating the interaction.
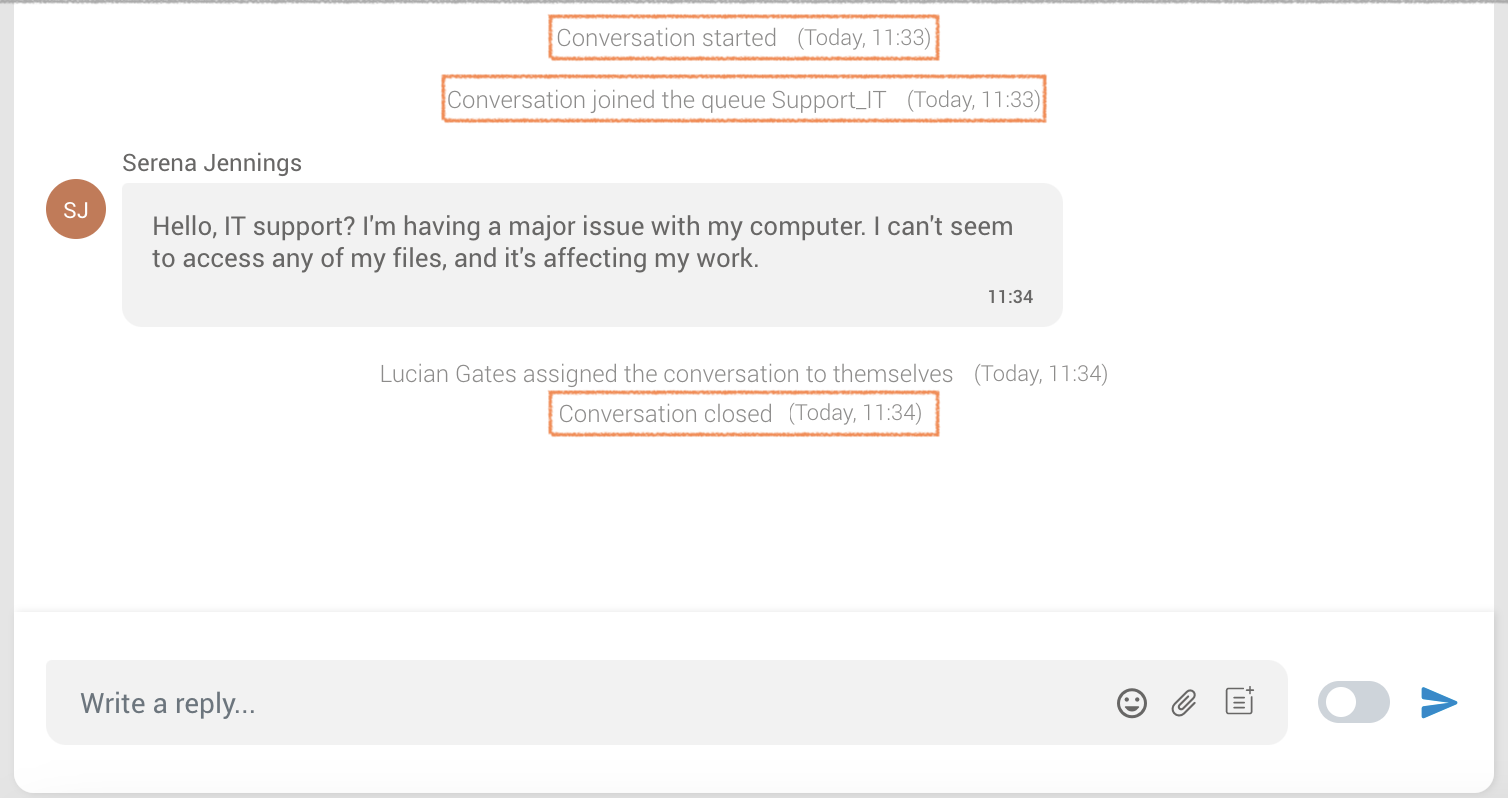
Upon the closure of the conversation, a corresponding notification is generated to signal the closing of the communication.
Additionally, the system reveals the queue name associated with the conversation, providing valuable context about the queue from which the customer initiated the conversation.
Auto-Assignment
In the event of an automatic conversation assignment, a notification message will be displayed: "Conversation assigned to [Agent Name] automatically."
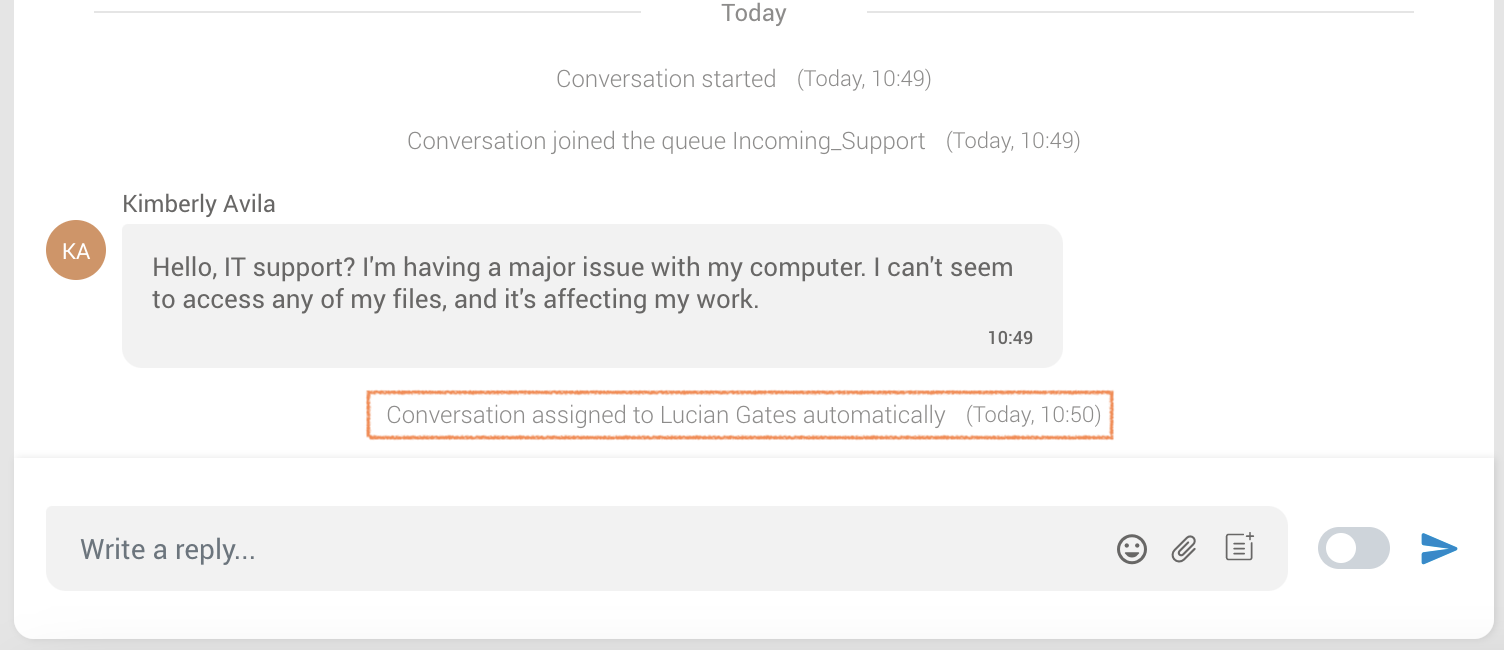
This ensures that agents are promptly informed when the system automatically assigns a conversation to a specific agent.
Manual Assignment
When an agent manually assigns a conversation, a notification message will appear: "[Agent Name] assigned the conversation to themselves.
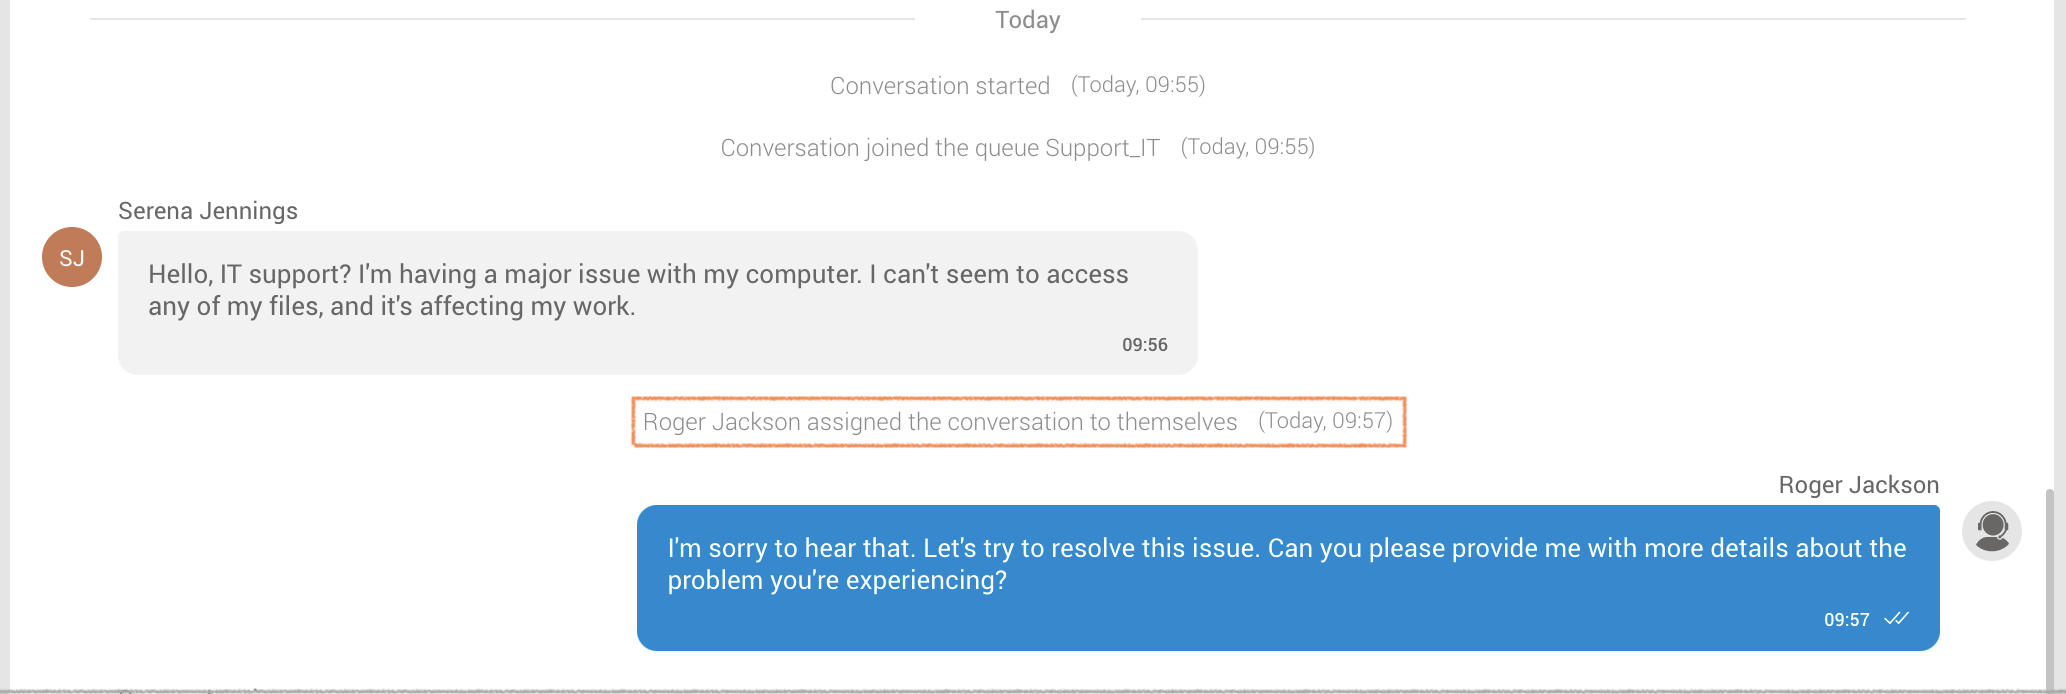
This alert provides clear communication within the system, letting others know when an agent takes direct ownership of a ticket assignment.
Returning Customer
In the case of a conversation involving a returning customer, a notification message will be conveyed: "Conversation assigned to [Agent Name] due to last interaction with returning customer."
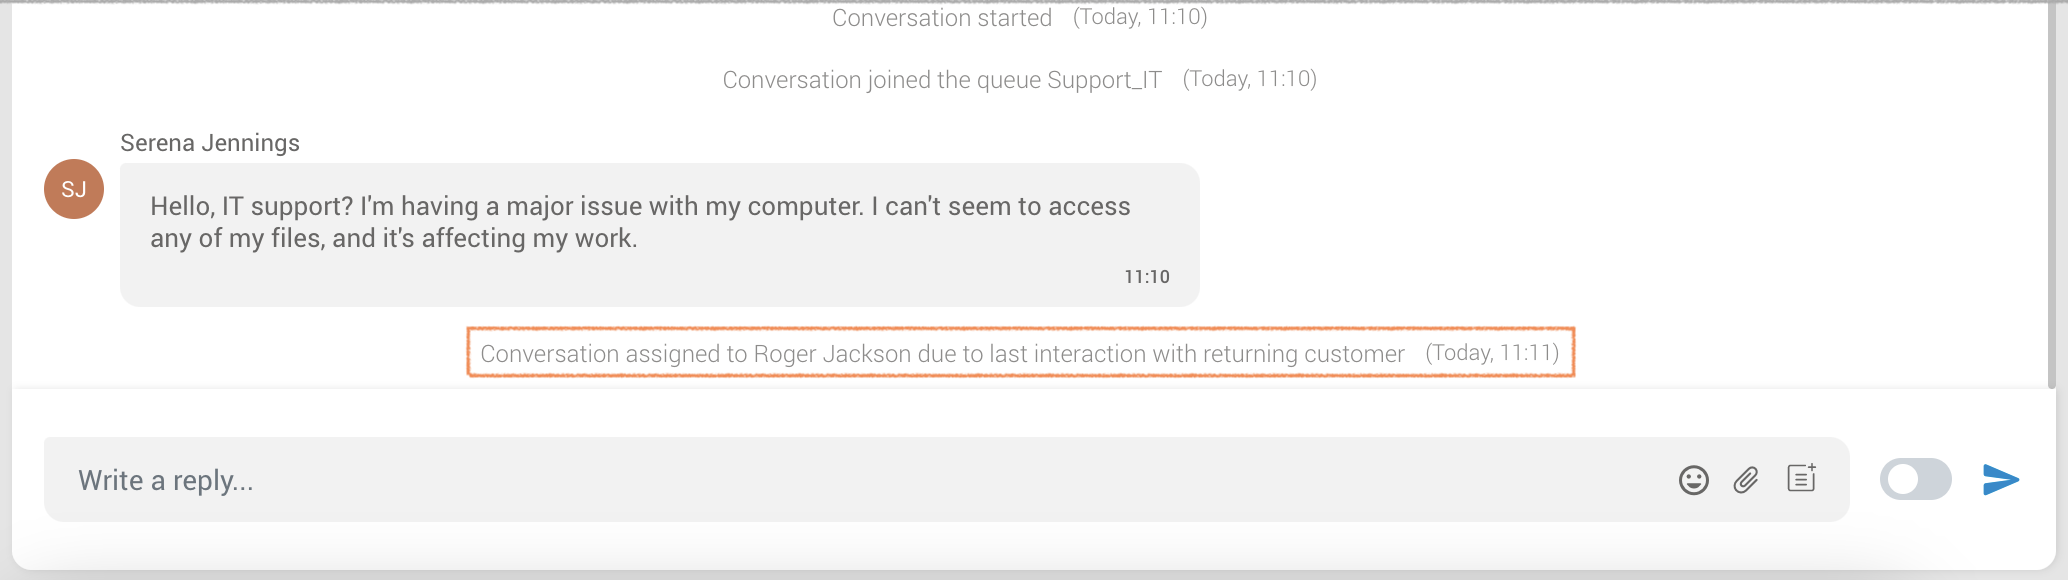
This notification ensures that agents know why the conversation is assigned, highlighting the importance of past interactions with returning customers for a more personalized and informed support experience.
Transfers
In the scenario where a conversation is transferred from another agent, a notification message will be displayed: "Conversation assigned to [Agent Name] due to direct transfer from another agent."
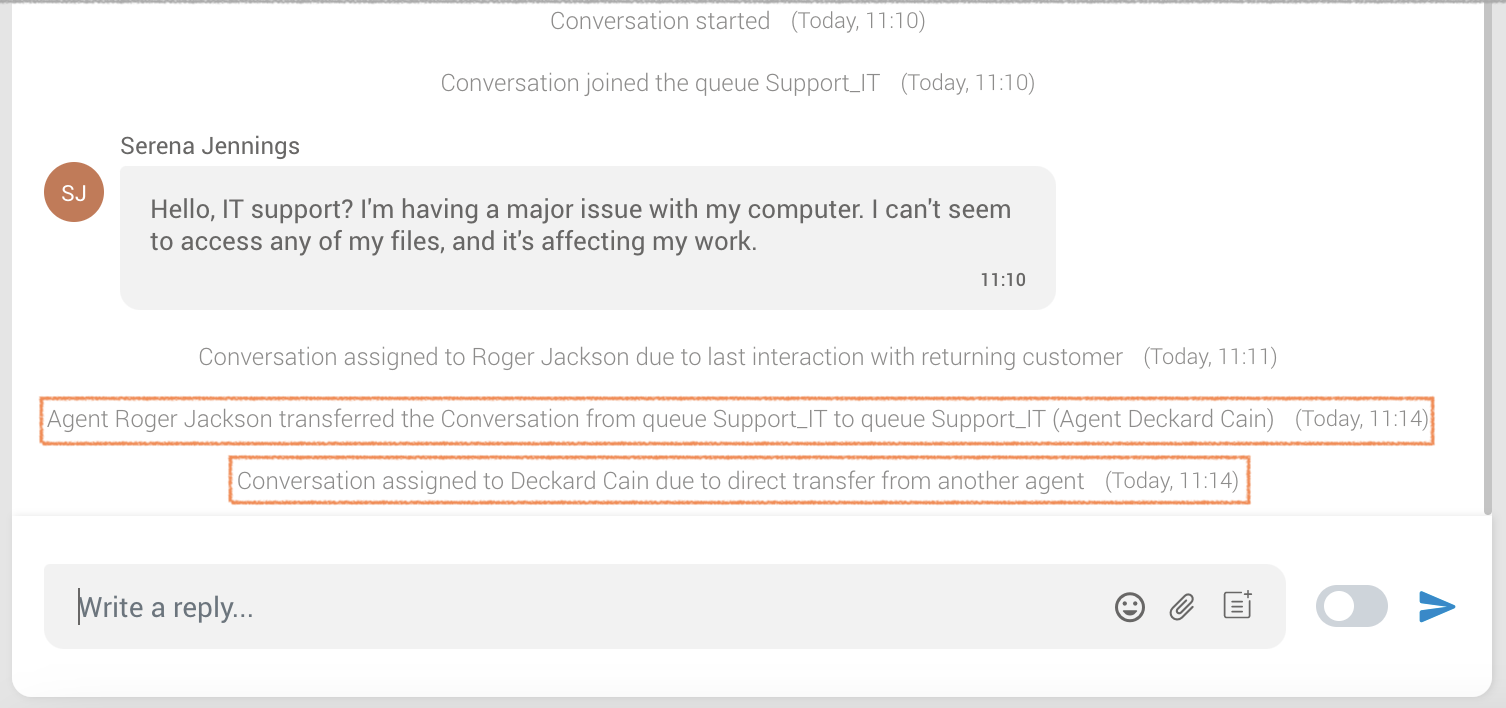
In the case where a conversation is transferred from the same queue, a notification message will be displayed: "[Agent Name] transferred the Conversation from queue [Queue Name_One] to queue [Queue Name_One]."
(e.g., "Agent Roger Jackson transferred the Conversation from queue Support_IT to queue Support_IT.")
In the case where a conversation is transferred from another queue, a notification message will be displayed: "[Agent Name] transferred the Conversation from queue [Queue Name_One] to queue [Queue Name_Two]."
(e.g., "Agent Roger Jackson transferred the Conversation from queue Support_IT to queue Swift_Pro.")
This notification informs agents about the source of the conversation assignment, promoting transparency and clarity in the workflow when conversations are handed over between team members.
¶ Settings
This section provides agents with comprehensive access to critical functionalities, enabling seamless management of security protocols, voice configurations, application settings, voice alerts, as well as pre-defined responses, WhatsApp templates and Email signatures.
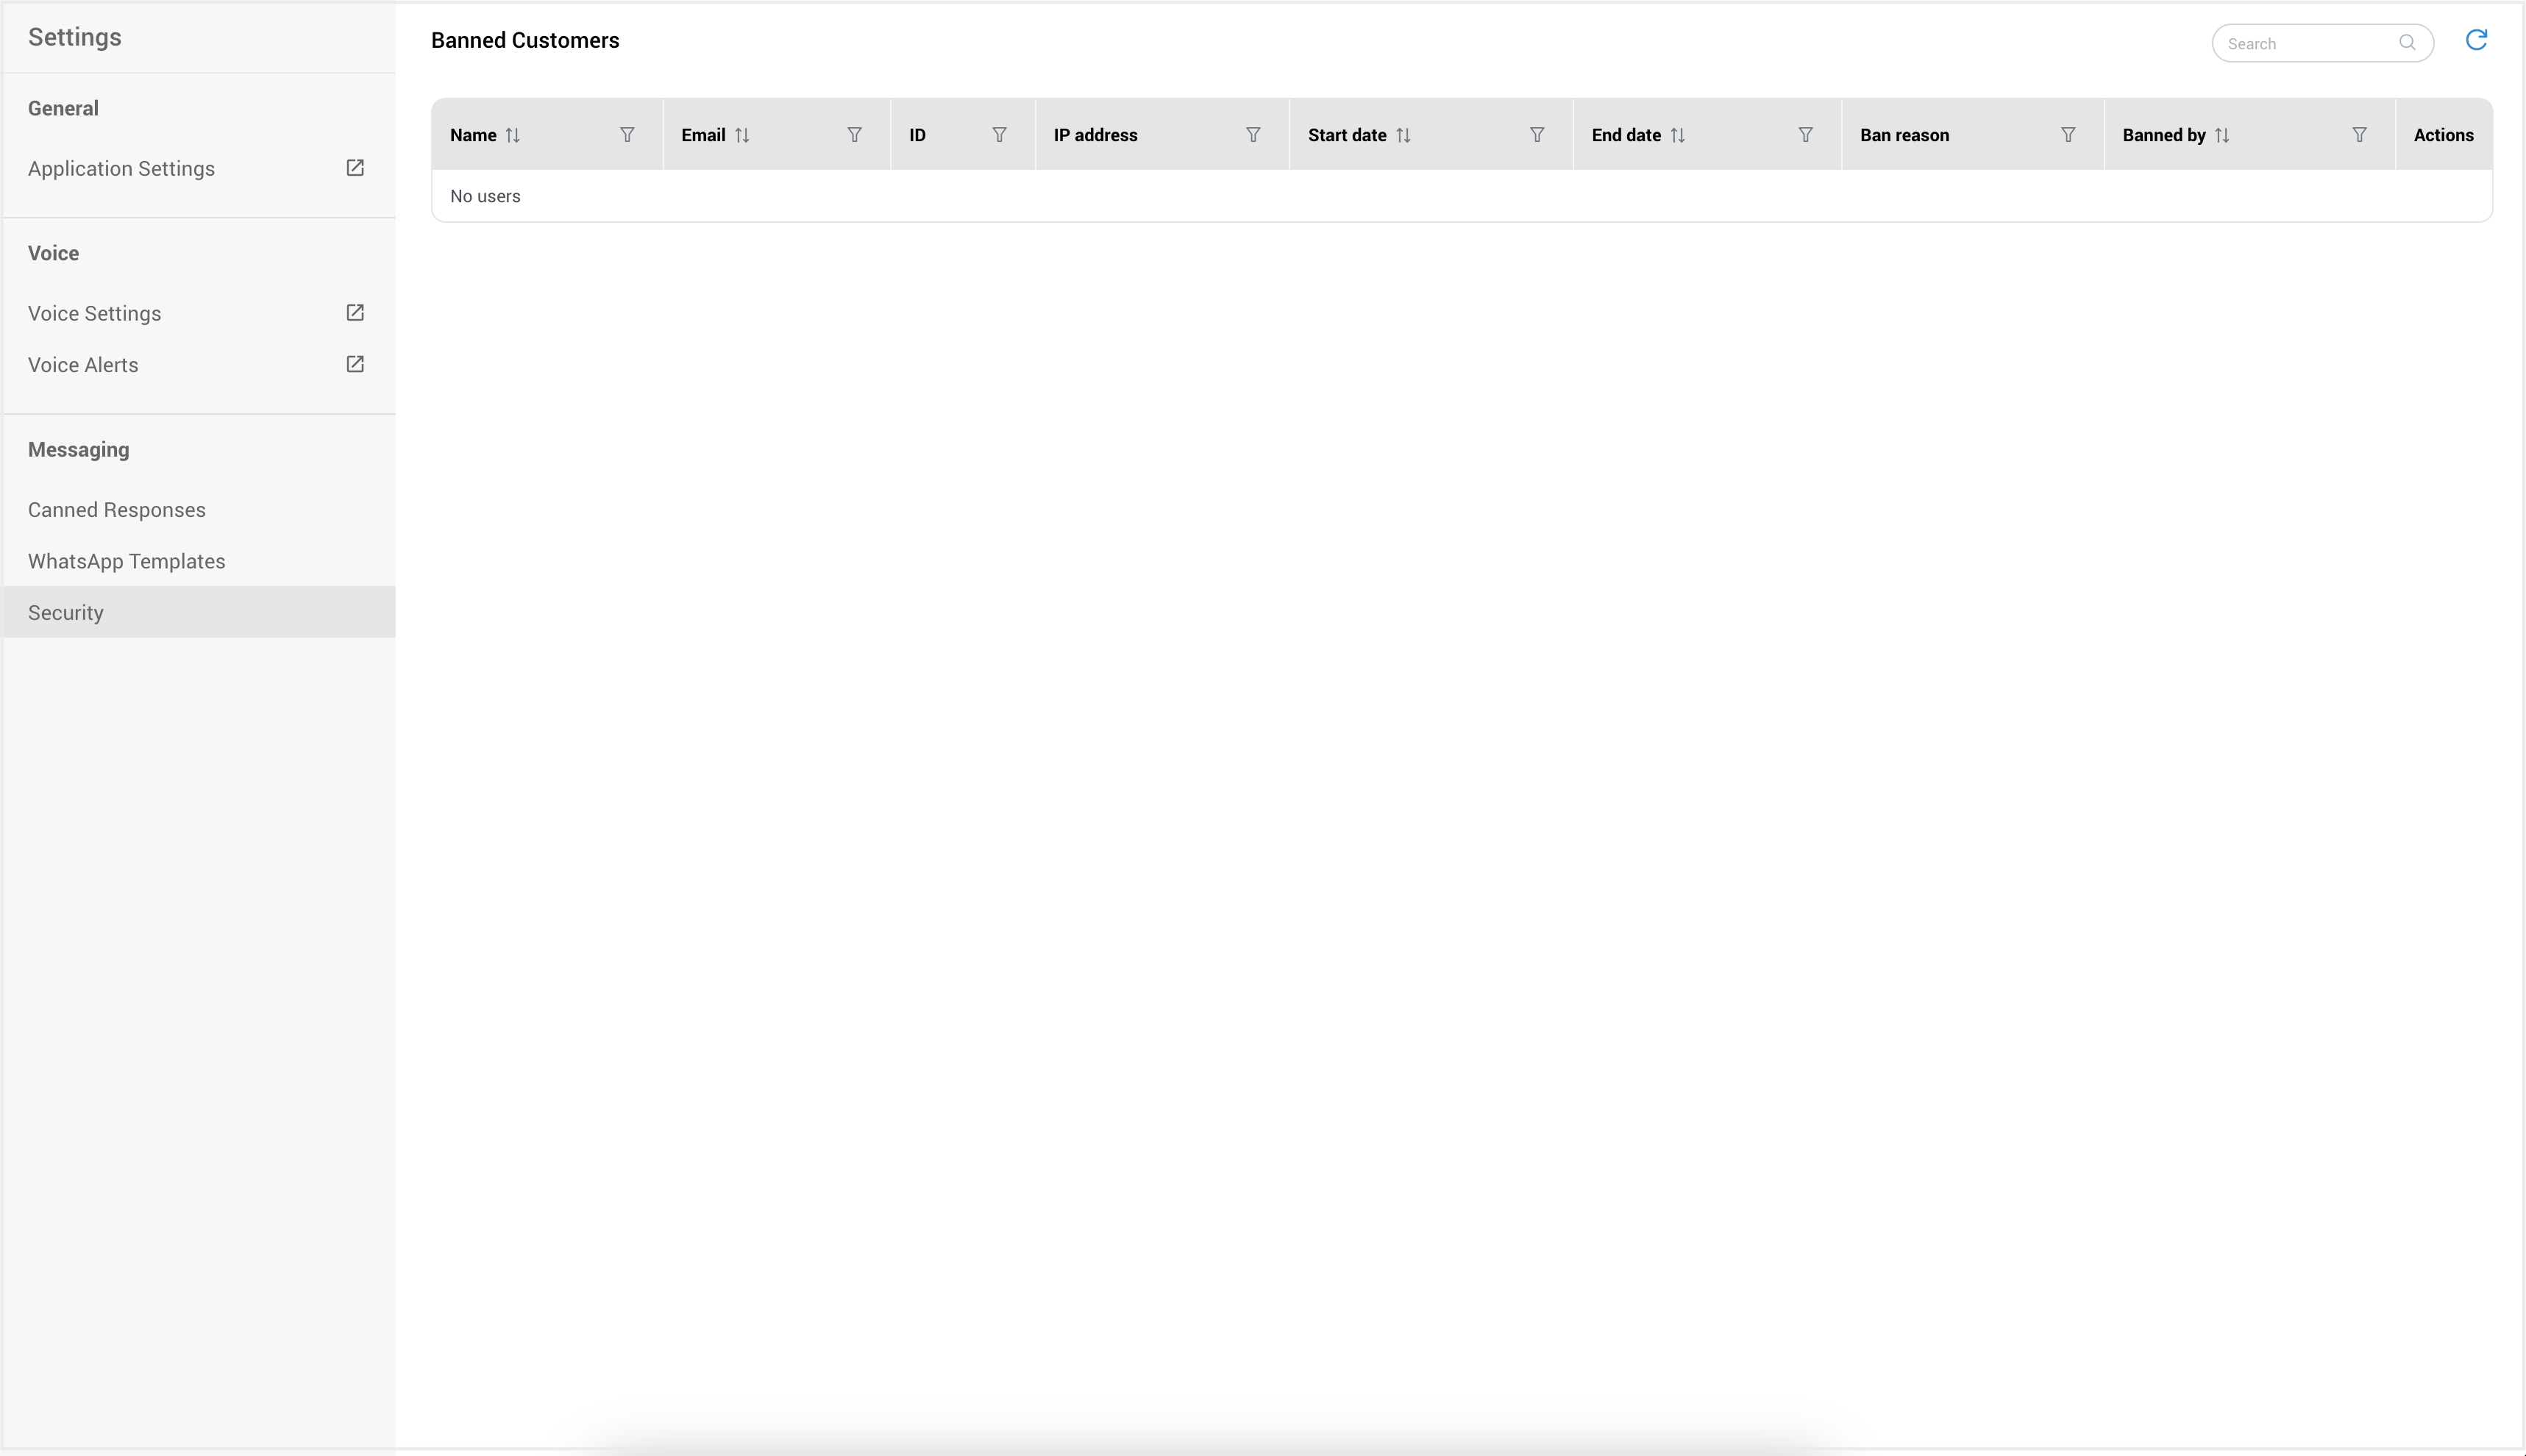
¶ Application Settings
Within the Application Settings section, users have the flexibility to configure a range of parameters to suit their preferences and streamline their experience. This includes options such as automatic launch and login, preferred language, configuration options related to phone functionality, audio and video settings, alerts, module settings, etc.
¶ Voice Settings
This panel contains settings for Agents, Queues and Alerts, so accordingly, there are 3 tabs with same names.
Agents
The drop-down list is used to select which agents will be visible in the Agent Panel window, inside Agents tab.
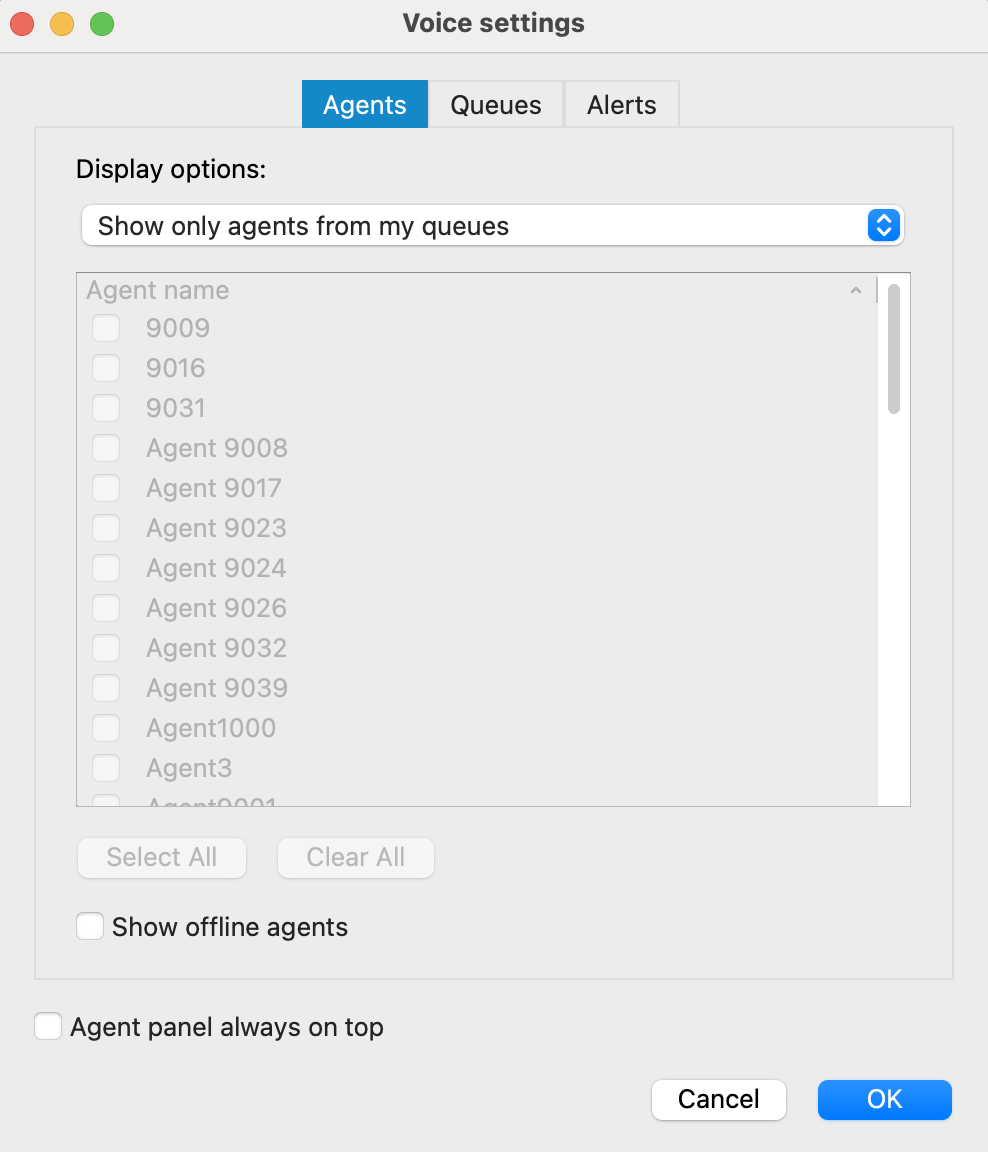
You can select the following options:
• Show only agents from my queues • Show all agents
• Show custom selected agents
Also, there is checkbox 'Show offline agents' that is used for showing offline agents inside the Agents tab.
Below, the checkbox 'Agent panel always on top' is used in case you want to set the Agent Panel always on top.
Queues
The drop-down list is used to select which queues will be visible in the Agent Panel window, inside Queues tab.
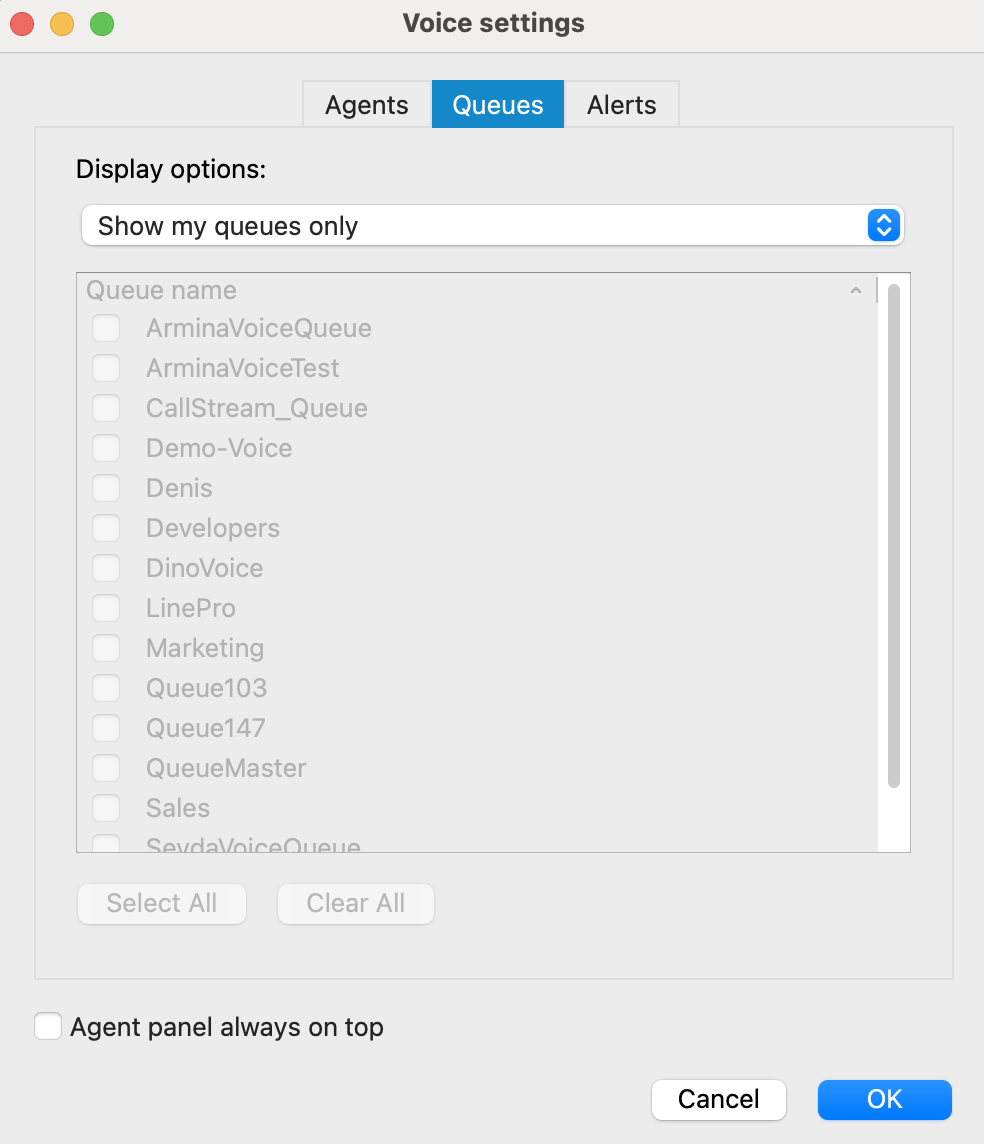
The following display options are offered:
• Show my queues only
• Show all queues
• Show custom selected queues
Below, there is a checkbox 'Agent panel always on top' that is used in case you want to set the Agent Panel always on top.
Alerts
Max wait time (MWT): MWT displays longest waiting caller in the Queue.
- Threshold (minutes): If you want to be alerted when a caller is waiting for more than X minutes in the Queue, set Threshold on that value. When the waiting time reaches the Threshold, it will be displayed in red color, and application will optionally display an alert to the user.
- Refresh time (seconds): Select or enter the number which will represent refresh interval in seconds.
Alert Options
- Alert interval (minutes): Alert interval is the amount of time in which application will alert agent for one specific type of event (alert). You can select or enter the number which will represent this interval in minutes.
- Show popup for alerts: If this option is checked, the application will show popup whenever an alert occurs.
- Alert me for my queues only: If this option is checked, you will receive alerts only for your queues.
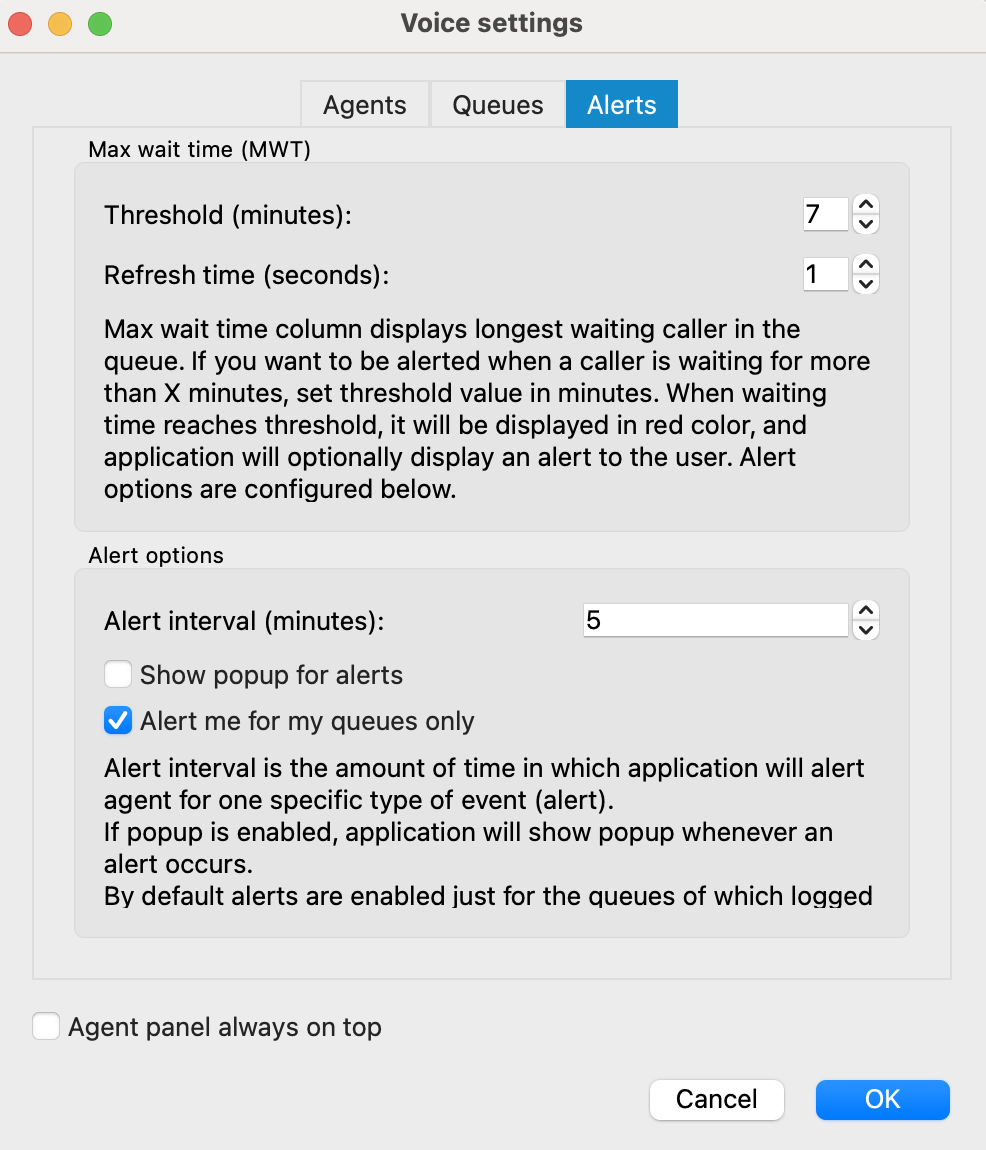
Below, there is a checkbox 'Agent panel always on top' that is used in case you want to set the Agent Panel always on top.
¶ Voice Alerts
The "Alerts" dialog presents a comprehensive list of alerts. Each alert in the list includes the following details: the timestamp and specific alert information.
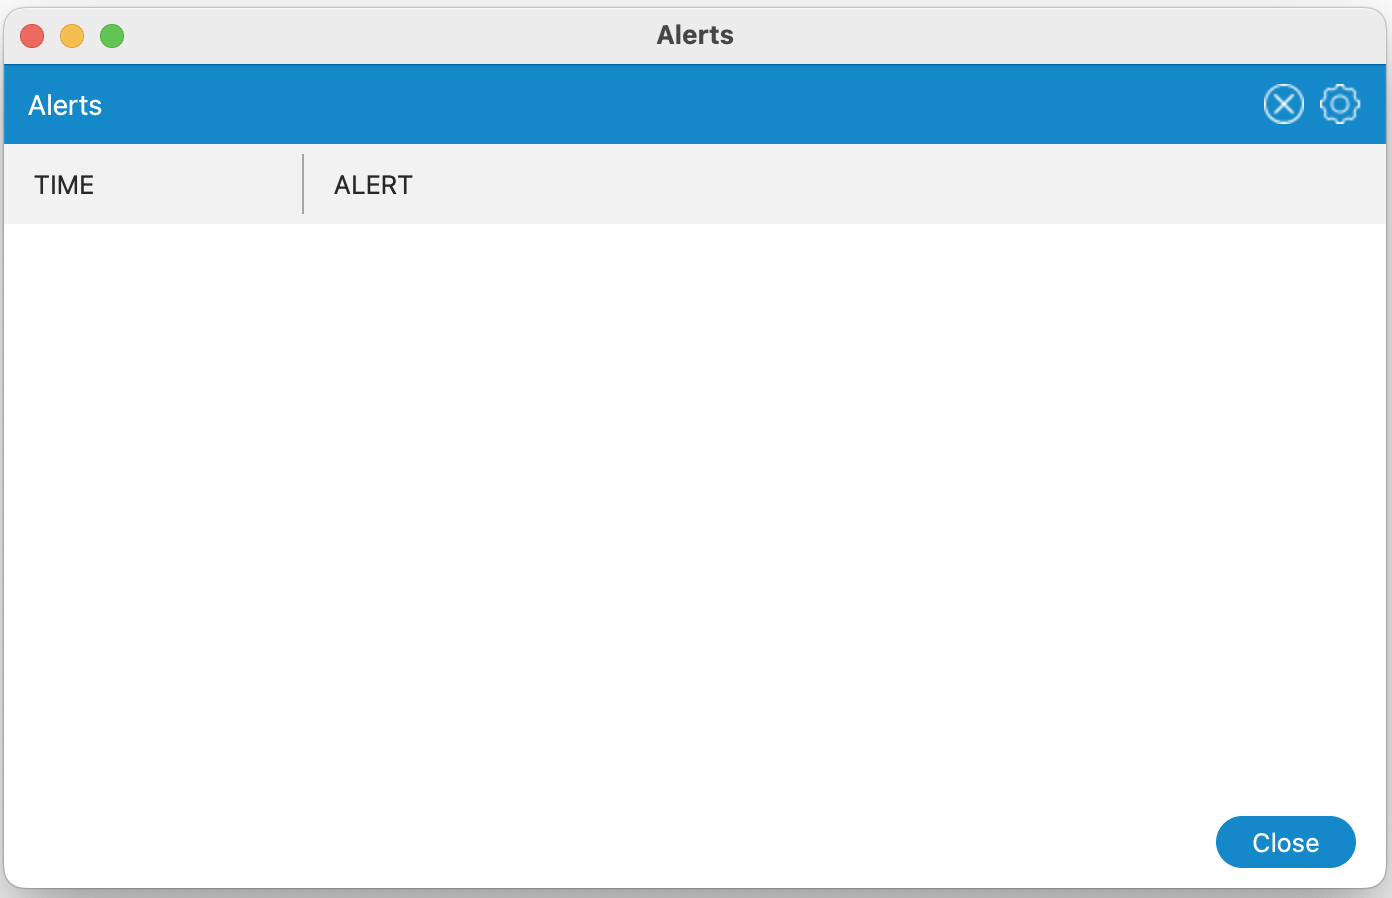
Located on the top right corner of the Alerts dialog, there is an option to delete all alerts from the list. Additionally, adjacent to the "Delete" button, you'll find a "Settings" button. Clicking on this button will open the "Agent Panel Settings" dialog, allowing you to modify previously configured alert options to suit your preferences.
¶ Canned Responses
Canned responses are pre-defined message templates used to quickly respond to customer inquiries. They ensure consistency and efficiency in communication across various channels, including SMS, Email, Chat, Facebook, and WhatsApp.
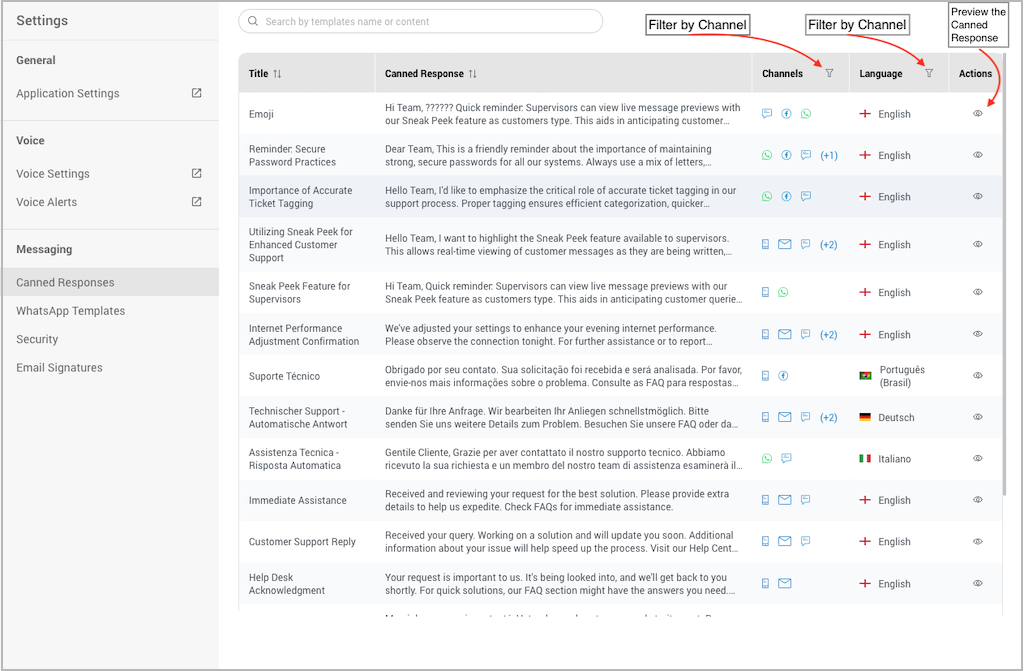
Canned responses are accessible under the Agent Panel Settings page, within the Messaging section. Upon accessing this page, agents are presented with a list of previously added canned responses. This list can be navigated using the search bar above, allowing users to search by name or content of the canned responses.
The list is organized into five columns:
- Title - Sort by name.
- Canned Response - Sort by content.
- Channels - Filter by the channel(s) assigned.
- Language - Sort by language. Available languages include English, Deutsch, Español, Français, Italiano, Português (Brasil).
- Actions - Options to View, Edit, and Delete a canned response.
Create a Canned Response
Creating a canned response is a feature exclusive to the Supervisor edition of the software. Instructions for creating a canned response in the Supervisor edition will be provided in the Supervisor section.
Using Canned Response
Responding to customers with a canned response is straightforward:
- During a chat, locate the Canned Response / WhatsApp Templates button next to the emoji and attach files buttons.
- Click the icon for Canned Responses/WhatsApp templates located on the right part of the text input field.
- This opens a dialog where you can choose the desired canned response.
- Select the canned response to have it displayed in the text input field.
- Send your message. For messages with placeholders, they will be automatically filled with the relevant values upon sending.
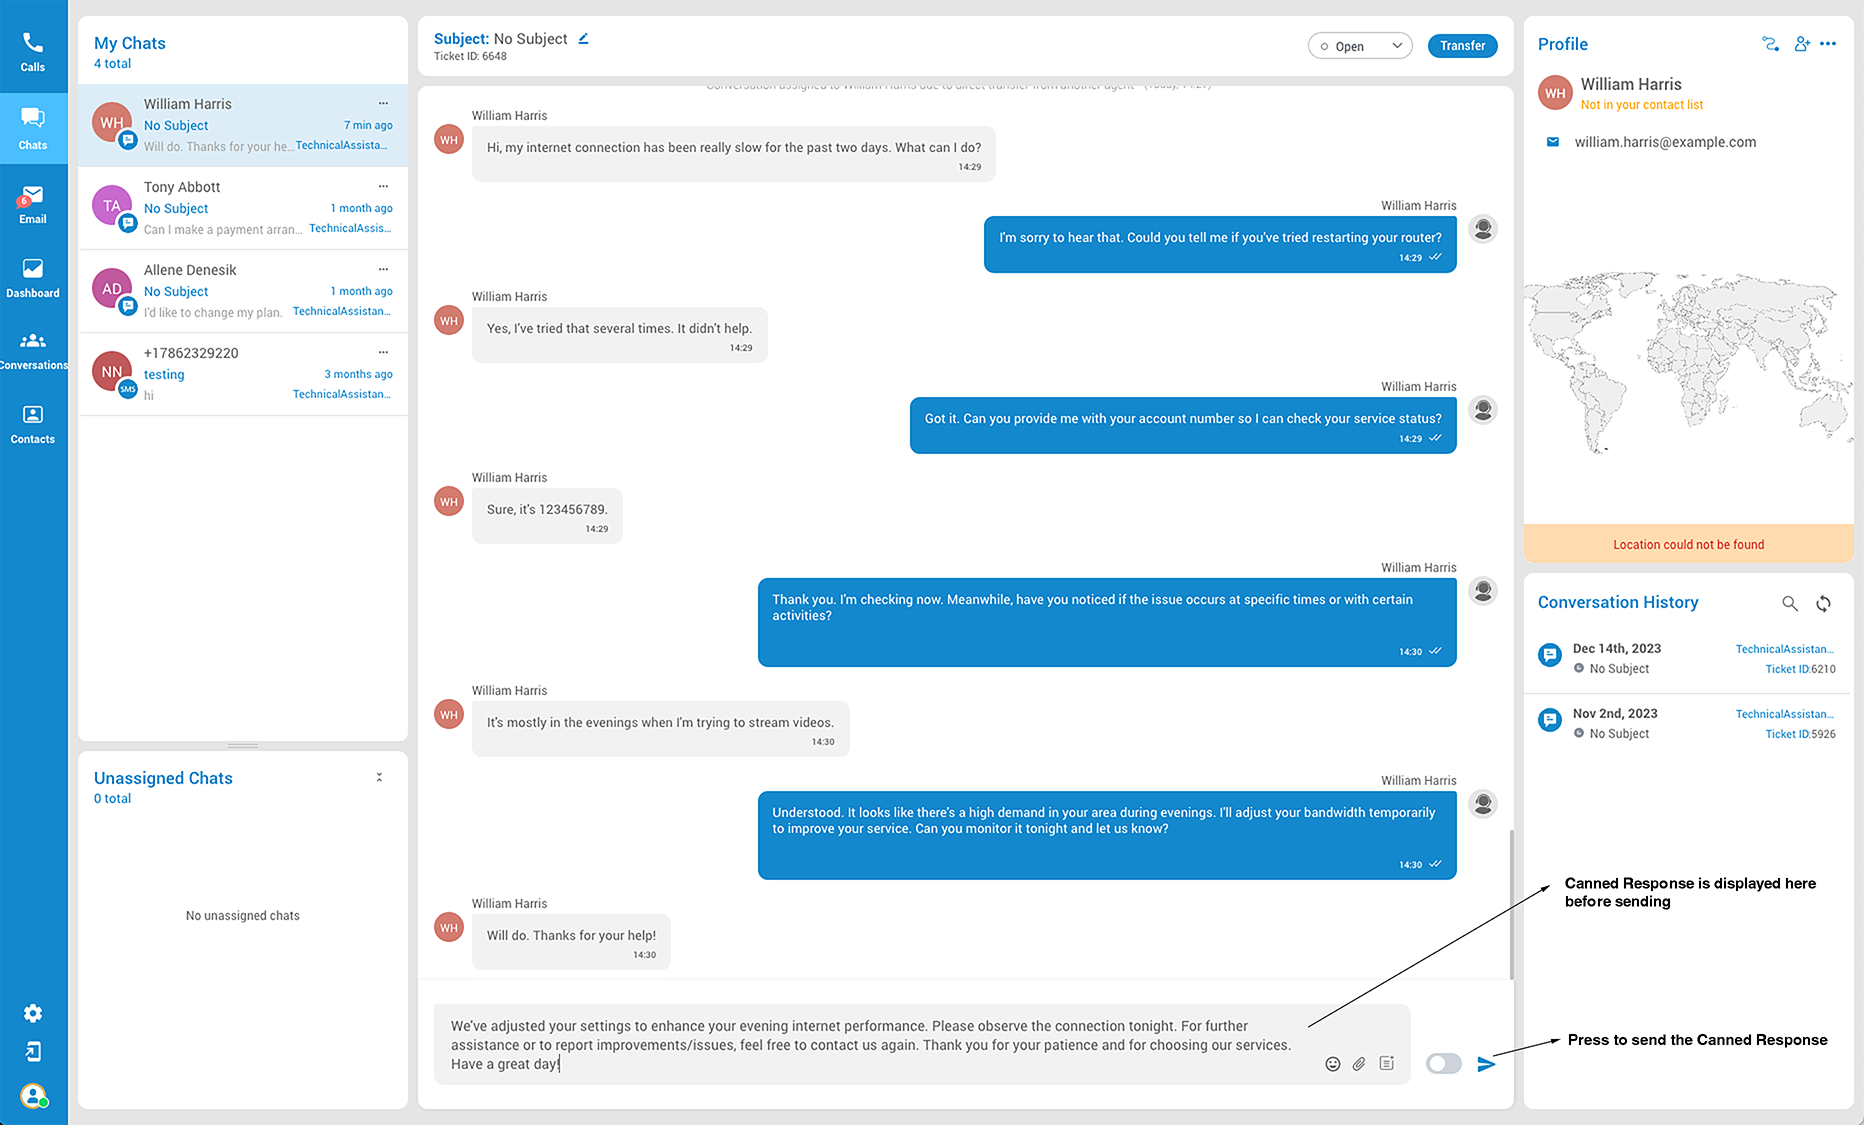
¶ Security
Specifically designed for LiveChat, this page empowers supervisors and agents to ban and unban customers and access a comprehensive list of banned customers, featuring details about the banned customer, restricted IP, the initiator of the ban, and reasons for the ban. This enhancement bolsters security and control for customer interactions.
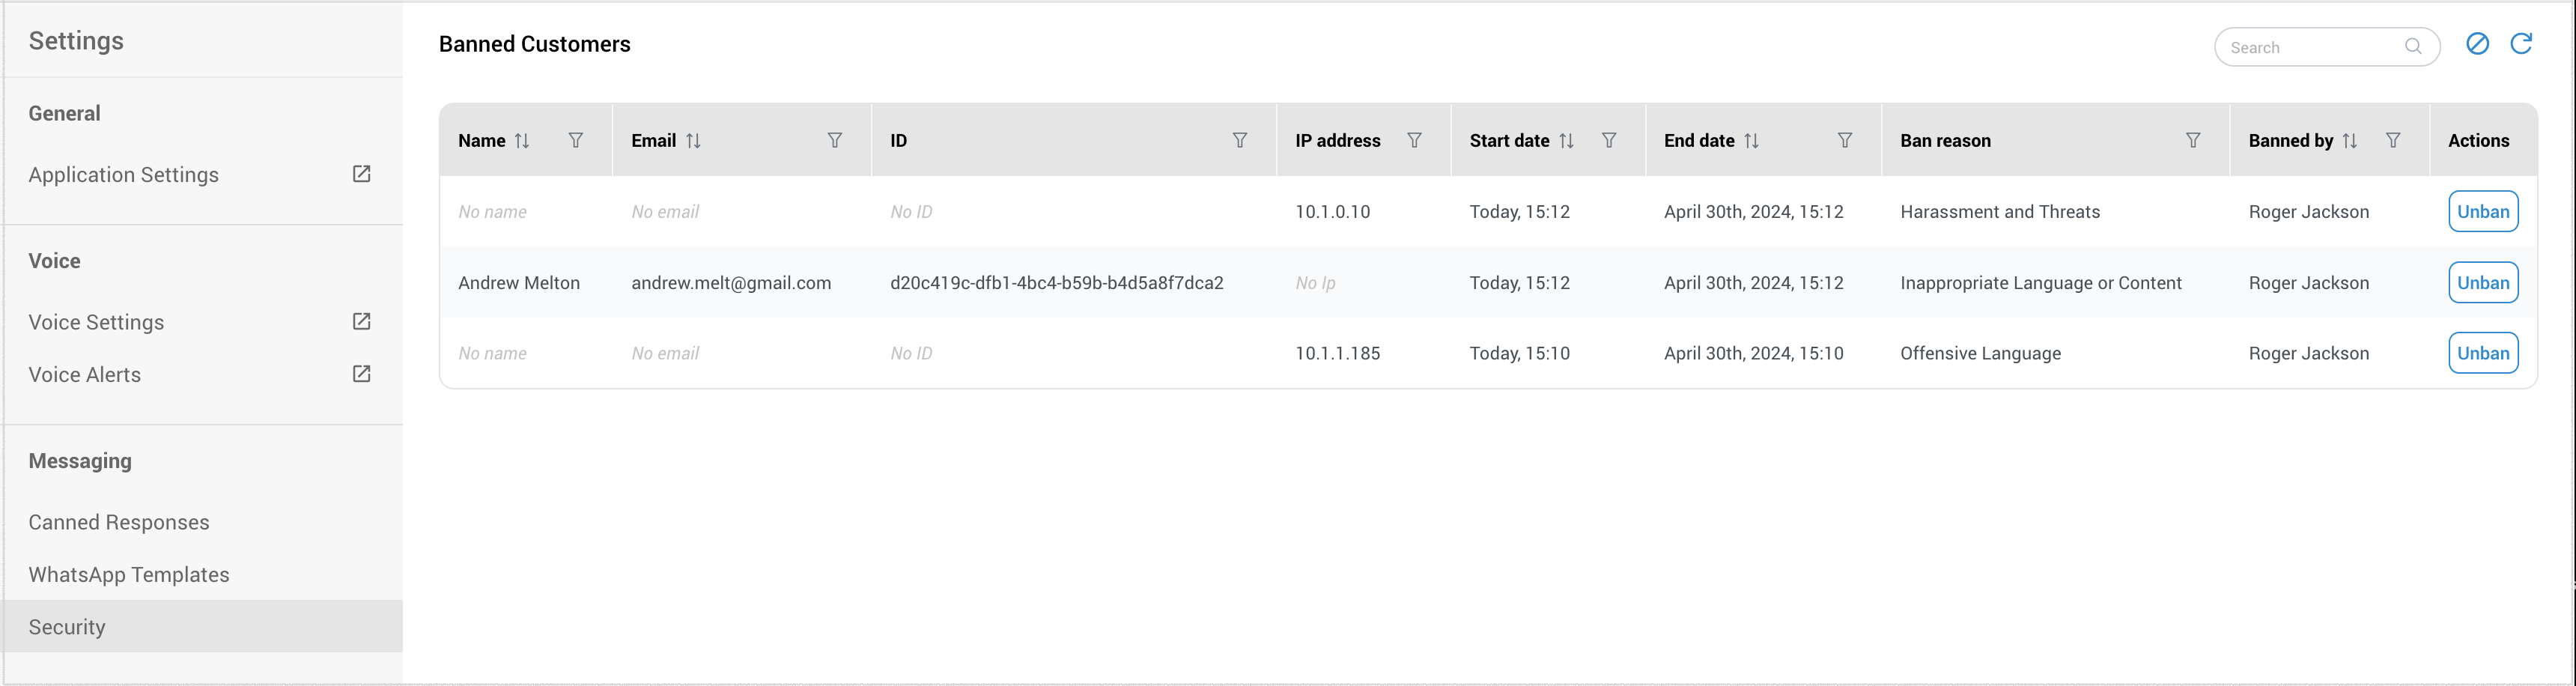
The "List of Banned Customers" can be accessed through the "Security" section. It provides the following information in its columns:
- Name: The full name of the banned customer.
- Email: The email address associated with the banned account.
- ID: A unique customer identifier, typically a token.
- IP Address: The last known IP address the banned customer used to access the service.
- Start Date: The date when the ban was initiated.
- End Date: The date when the ban is scheduled to expire.
- Ban Reason: The reason behind the customer's ban, either input by an agent or generated by the system.
- Banned By: Specifies whether the ban was executed by an agent or automatically by the system.
Actions Available
 Ban: Allows supervisors to impose a new ban on an IP address. Agent can not ban IP addresses.
 Unban: Permits the removal of a ban. Agents can unban customers they personally banned, while supervisors have the authority to unban any customer.
 Refresh - We highly recommend that users consistently utilize this button both before and after initiating the ban process. This practice ensures that the data in the table is displayed accurately and reliably.
In the event that two agents attempt to ban the same IP address, the IP address will not appear twice within the banned list. Instead, the system will consolidate the information. For example, if Agent A wishes to ban IP address 10.0.2.5 for seven days, the ban is approved and displayed in the banned table. Subsequently, when Agent B also wants to ban the same IP address (10.0.2.5) for 14 days, the data within the banned list will be updated with the information provided by the second agent. As a result, the IP address 10.0.2.5 will show a 14-day ban in the table, effectively overriding the initial 7-day ban set by Agent A.
Once a customer has been successfully banned or unbanned, a corresponding message will appear within the agent panel, providing confirmation and information about the action taken.
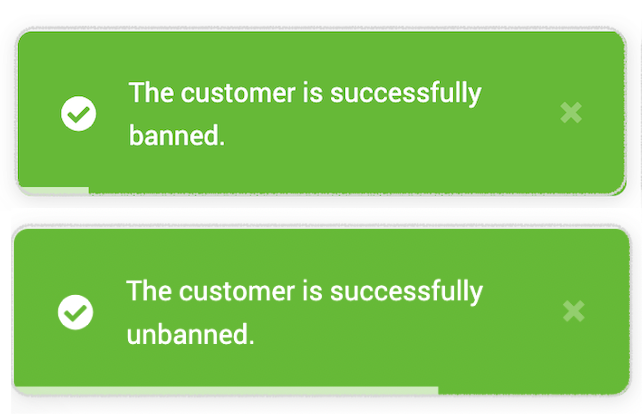
User Permissions
- Agent Permissions: Agents can view the complete list of banned customers and unban only those customers whom they have personally banned.
- Supervisor Permissions: Supervisors can view the list and unban any customer, irrespective of who initiated the ban.
The ban feature serves various purposes, including:
- Auditing and Tracking: It facilitates the monitoring of banned customers for security and compliance purposes.
- Efficient Management: It streamlines the management of banned users, making it easier to lift bans when required.
- Informed Decision-Making: It equips agents and supervisors with the essential information to make well-informed decisions regarding bans and unbans.
¶ Email Signatures
The Email Signatures feature in our app allows you to create and manage personalized signatures that are automatically appended to your outgoing emails. This feature is designed to help you maintain a professional appearance and ensure consistent branding in all your communications.
With Email Signatures, you can:
-
Create Professional Signatures: Design signatures that include your name, title, contact information, and any other details you choose.
-
Maintain Brand Consistency: Ensure that all emails from your organization reflect your brand’s identity, including logos, fonts, and colors.
-
Save Time: Your signature will be automatically included in every email, saving you the effort of manually adding it each time.
This feature is perfect for individuals who want to add a personal touch to their emails, as well as businesses aiming for a uniform corporate look in their communications.
¶ Accessing the Email Signatures Feature
You can access the Email Signatures feature within the main Agent app settings by navigating to the Messaging section.
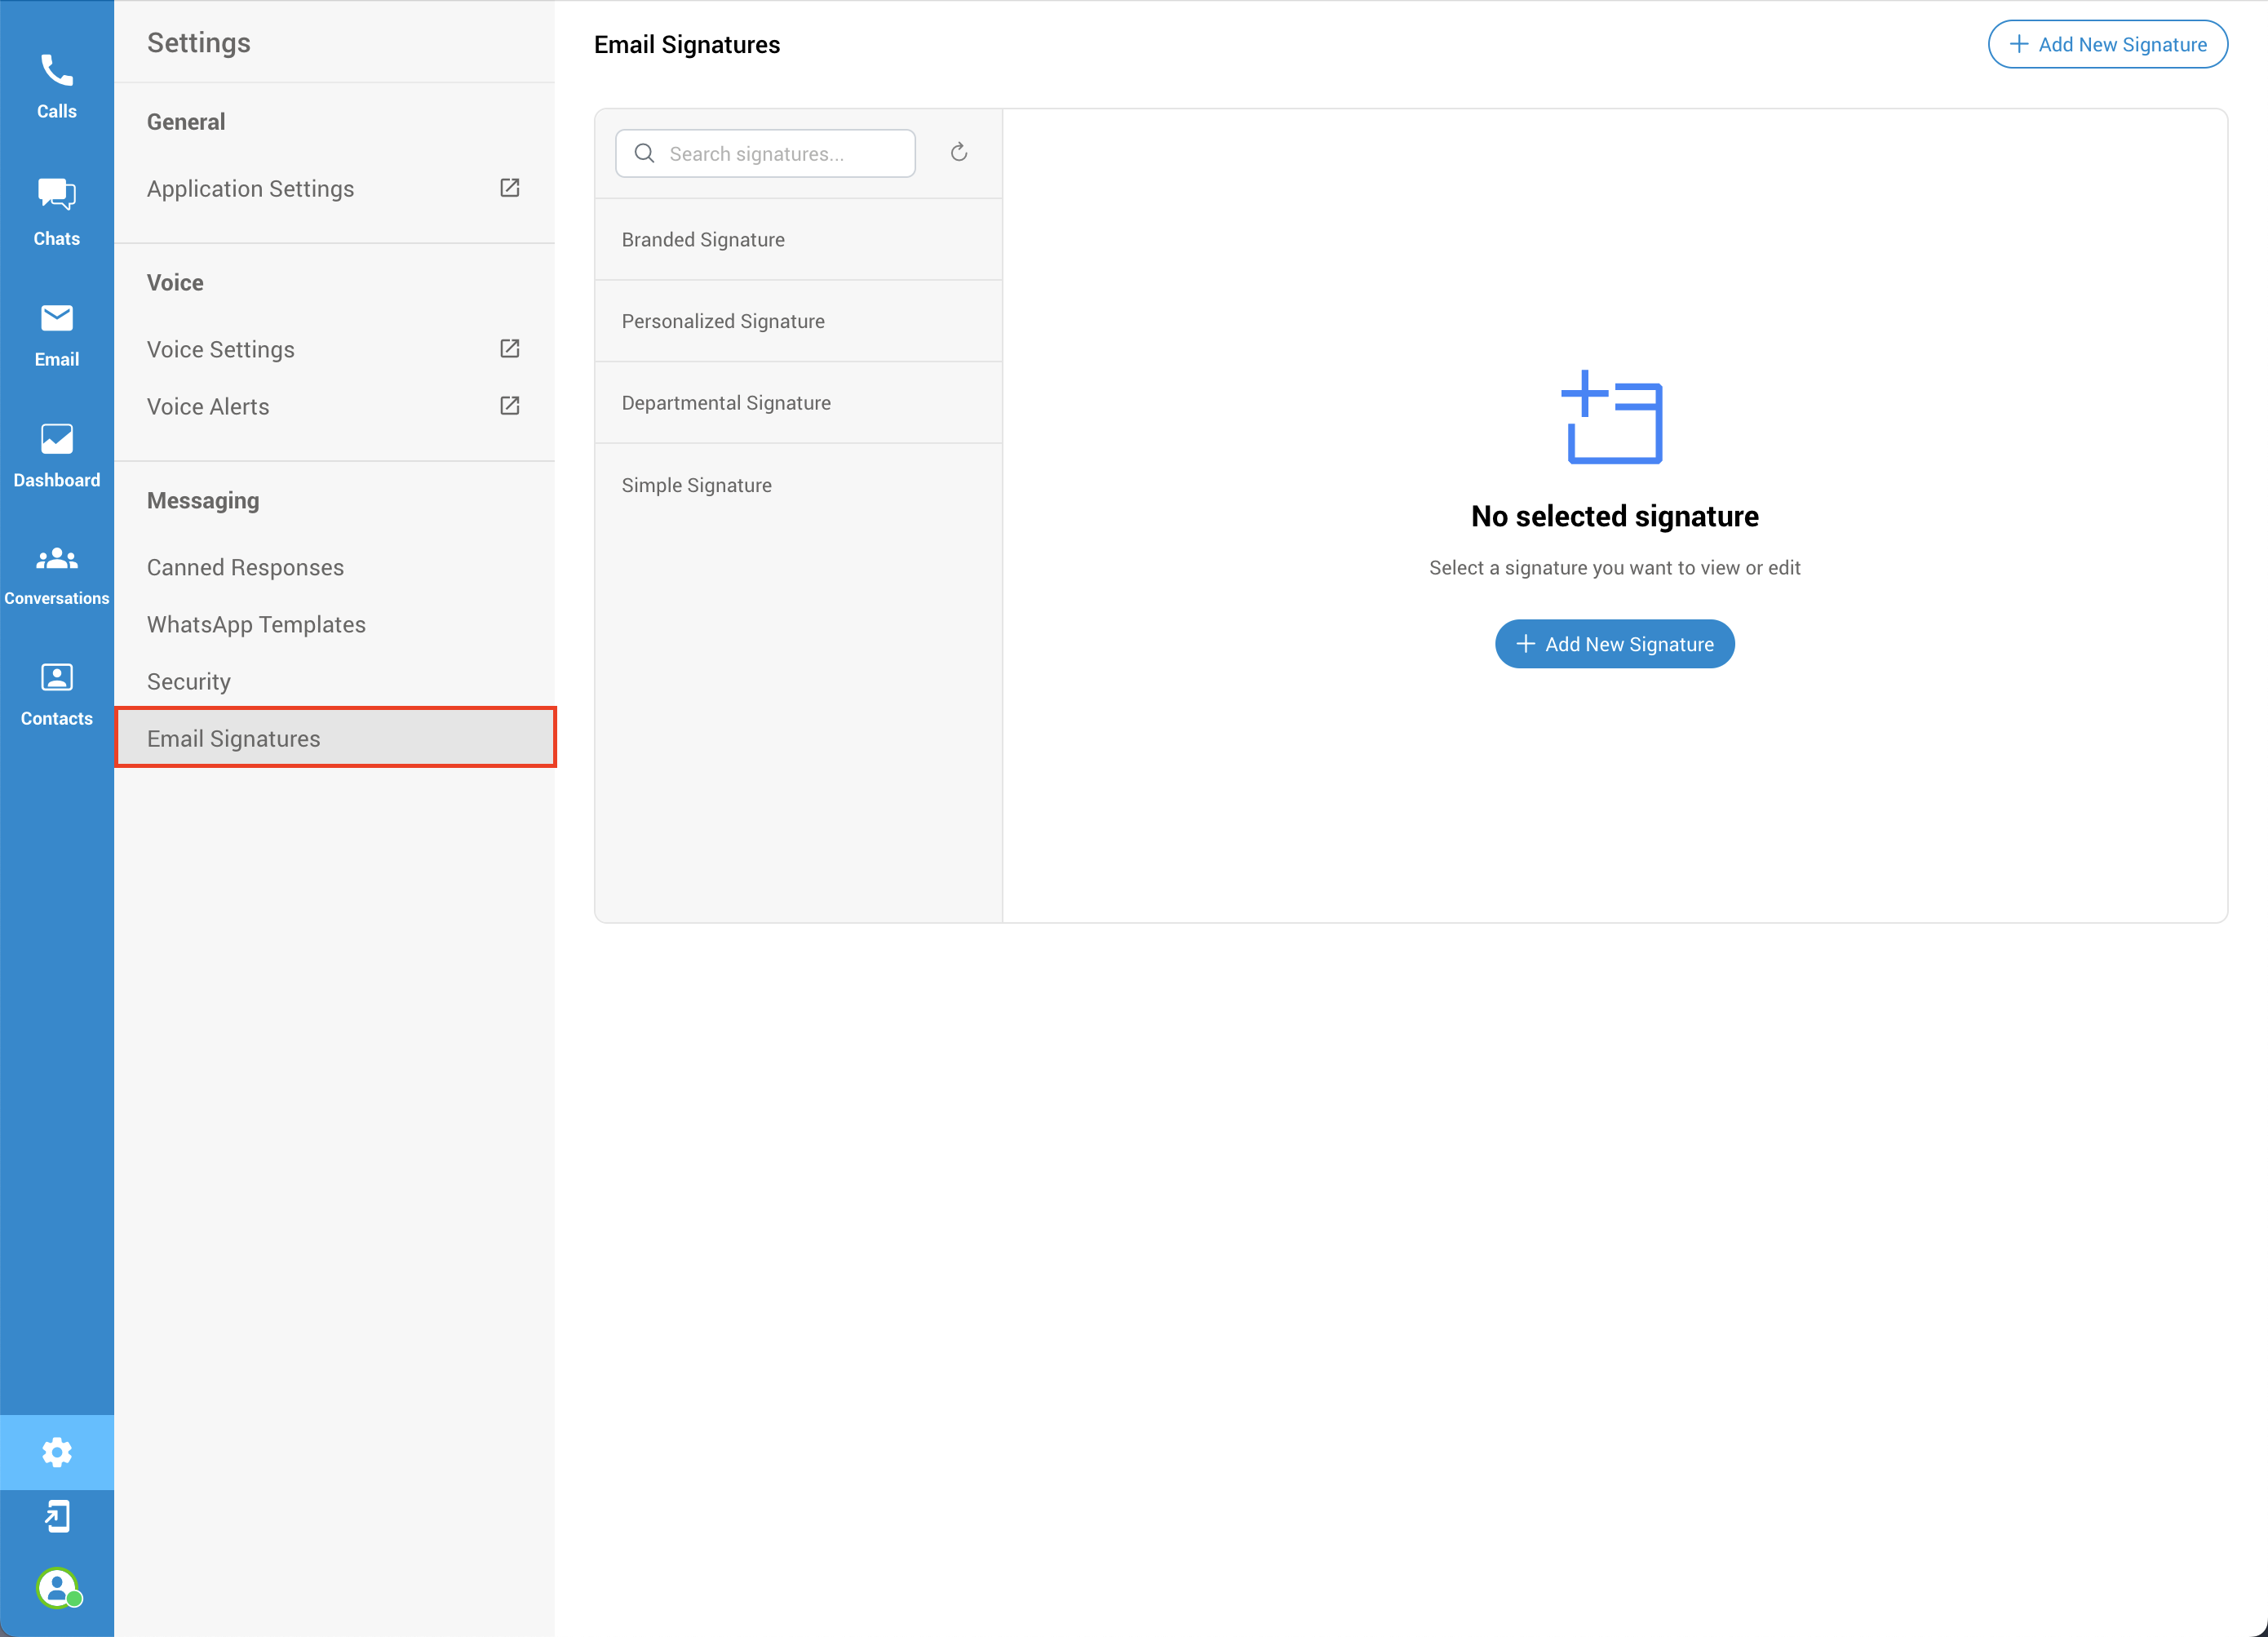
Once you navigate to the email signatures section, you can search through your email signatures, preview existing ones, edit them, and create new email signatures.
¶ Add New Signature
To create a new email signature, you can use either of the "Add New Signature" buttons. One button is blue and centrally located within the email signature section, while the other is white and positioned in the top-right corner of the section. Both buttons serve the same function and will initiate the process of creating a new email signature.
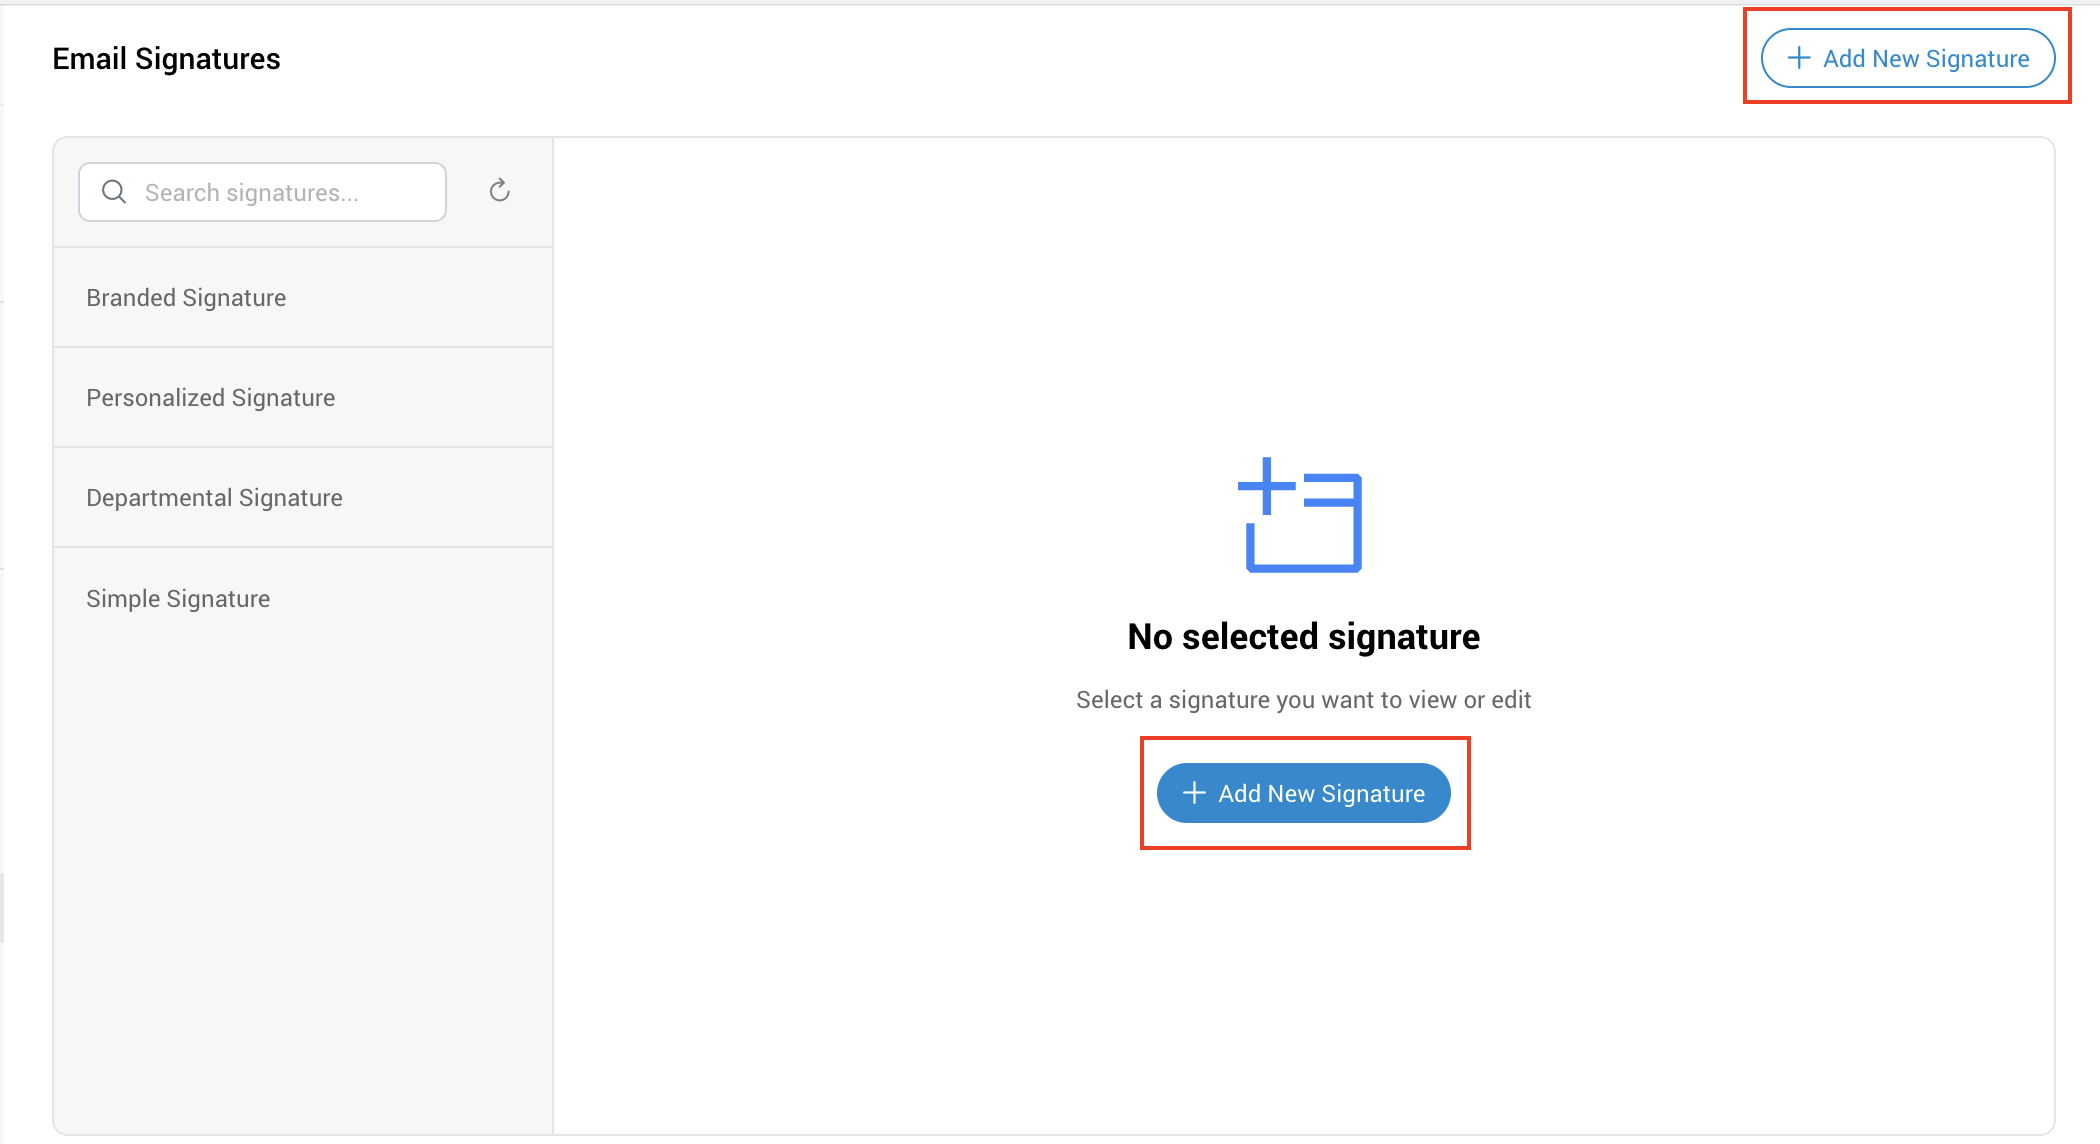
After clicking the "Add New Signature" button, a new pop-up window with a drop-down menu will appear. From there, we can select one of the templates created through the GUI and modify it, or we can click the "Create Signature" button without selecting a template and creating a new one from scratch.
If we select one of the templates, we will get a preview of that signature in the same window. Clicking on the "Create Signature" button will open a new form where we can modify this template.
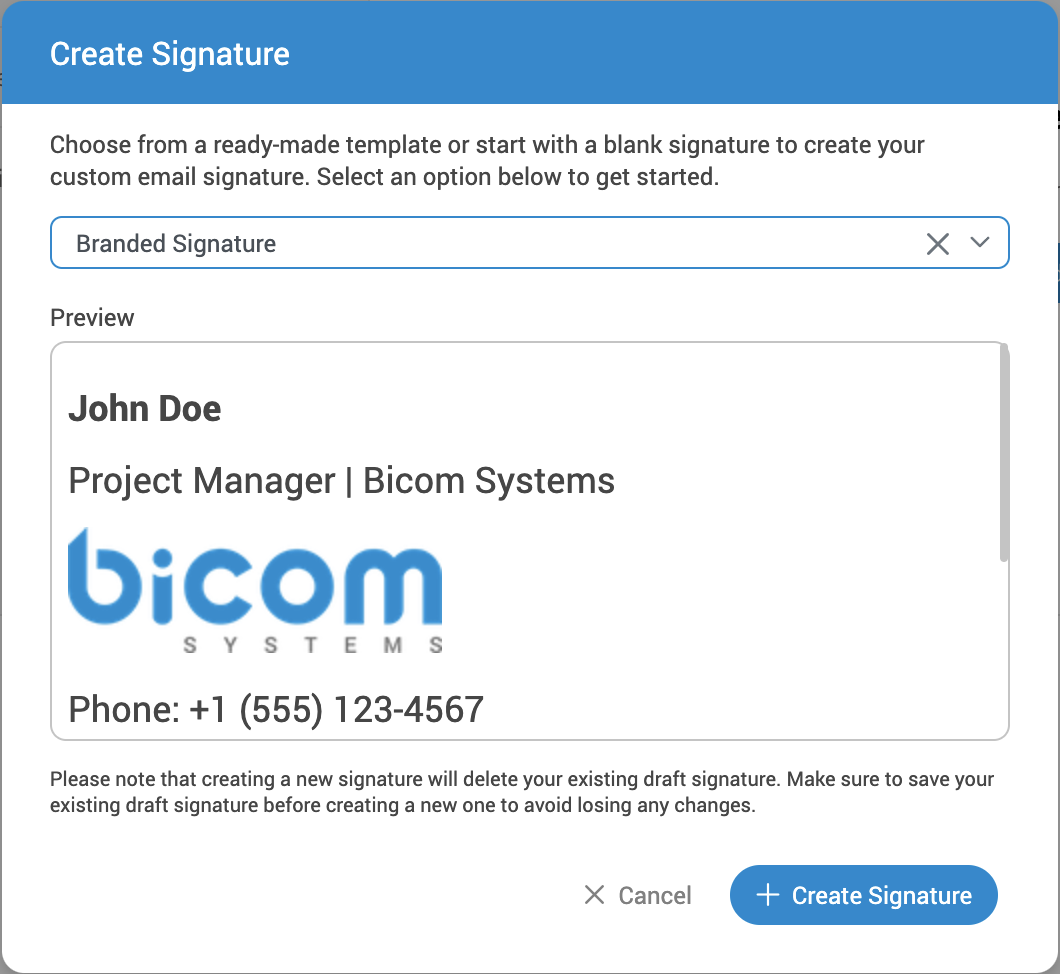
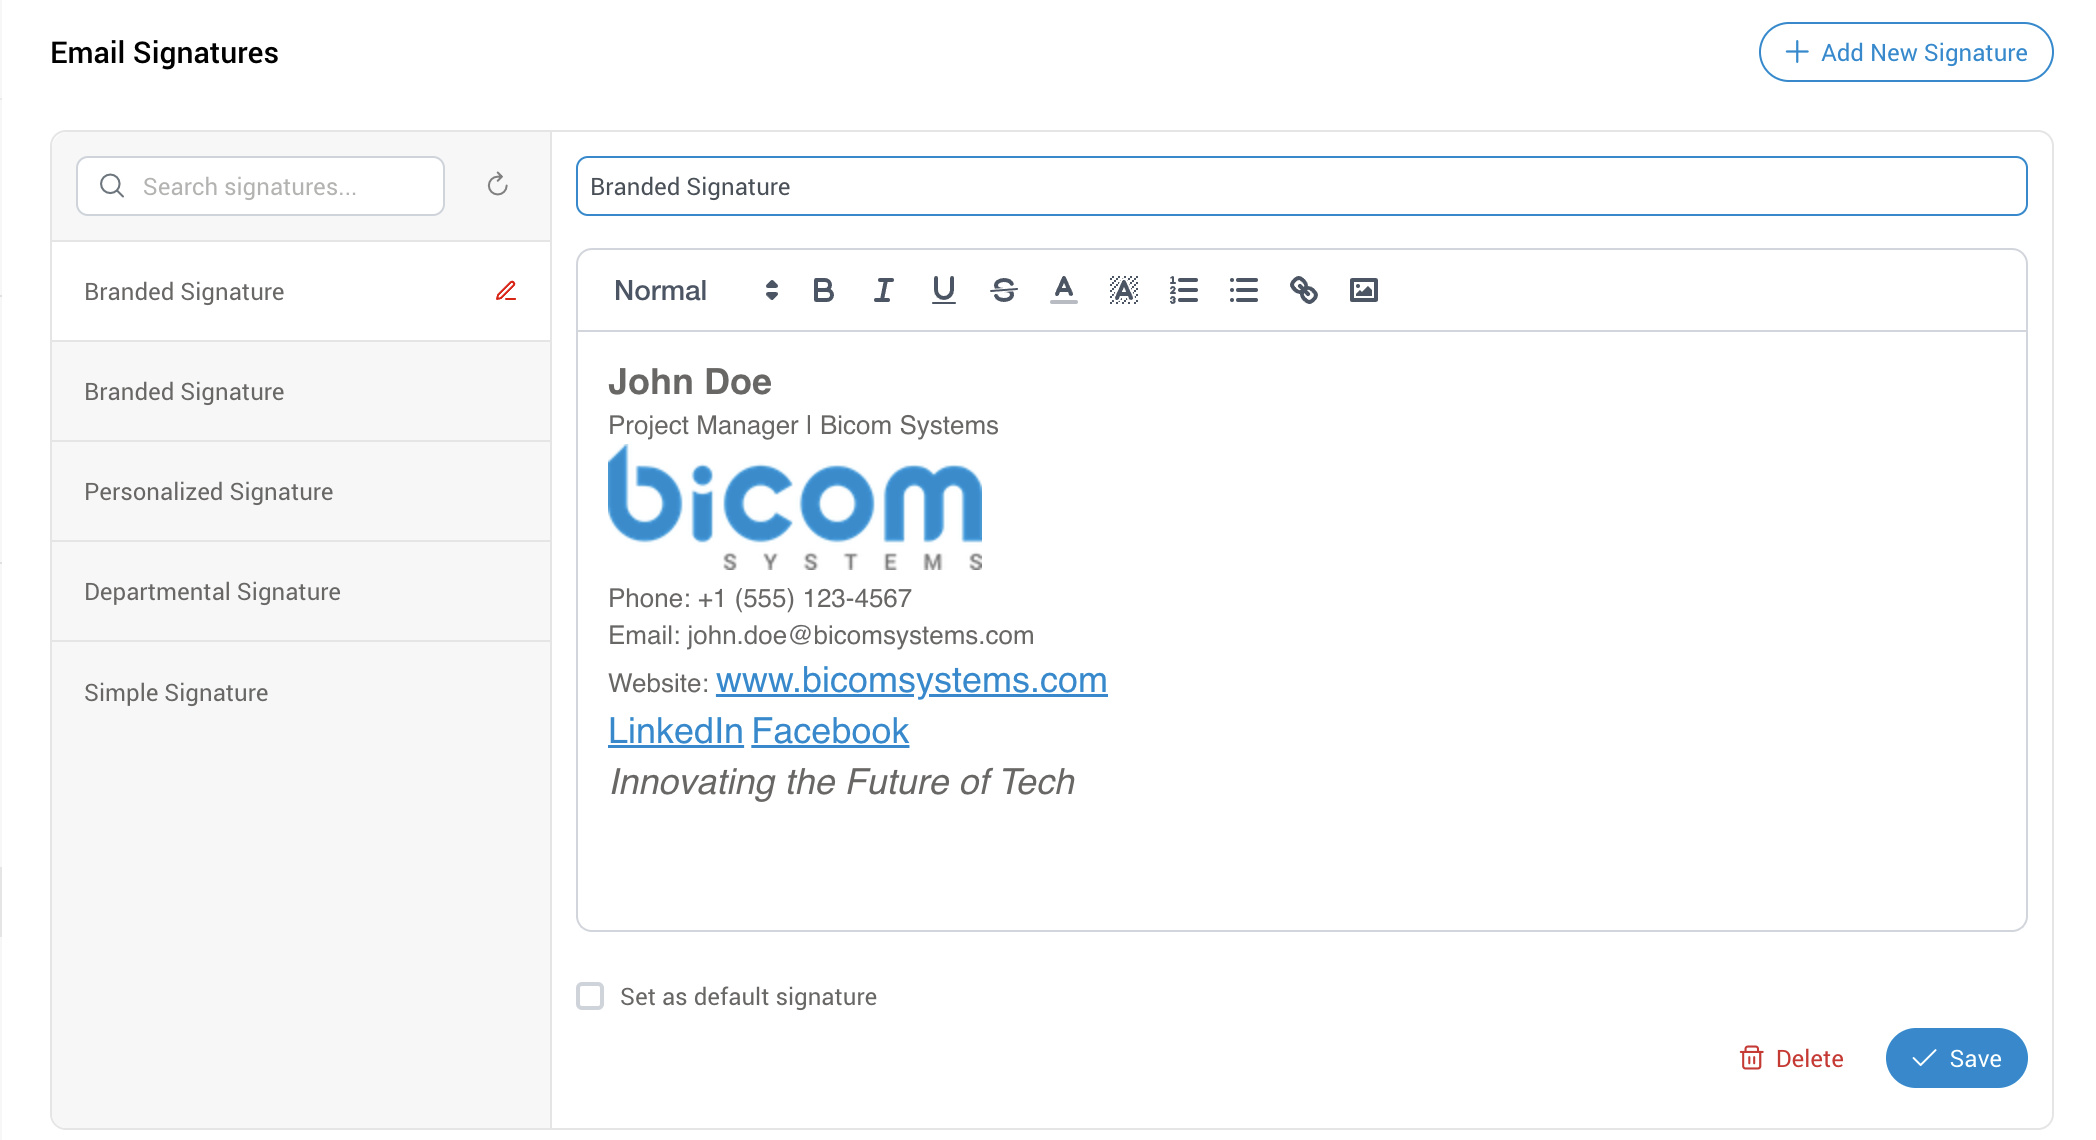
If we want to create a signature from scratch without selecting the template, click the "Create Signature" button, and a new form will open.
At the top of the form, enter the signature name. Below that, enter the body of your email signature. At the bottom of the form, you have the following options:
-
Set as Default Signature: Set this email signature as the default for all your emails.
-
Delete: Remove the email signature.
-
Save: Save the new email signature.
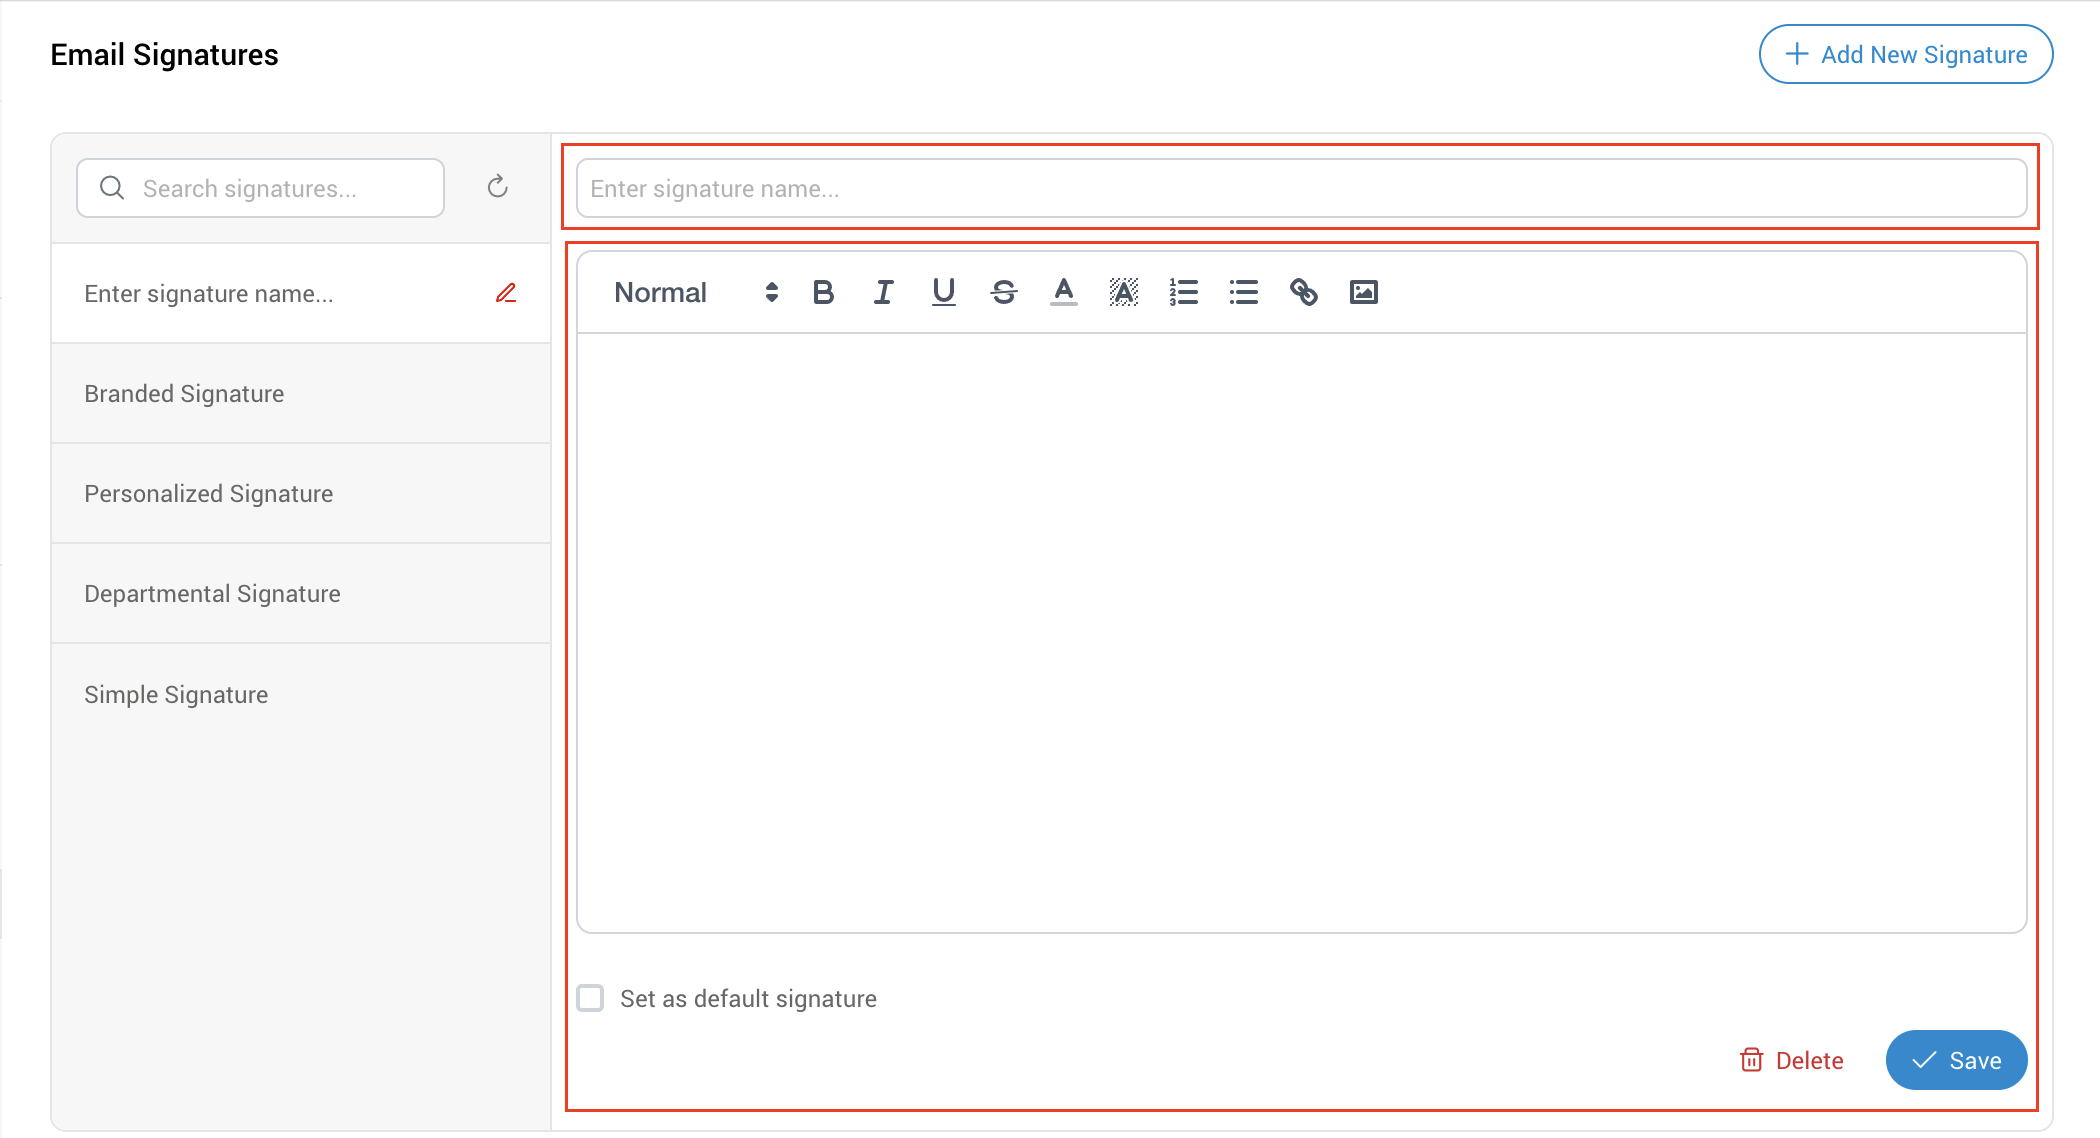
Once you are satisfied with your email signature, click the "Save" button to save it.
¶ Edit/Preview Signature
To preview an existing email signature, simply find it in the list and click on it. From this window, you can also edit the email signature. Please remember, when you finish editing, click "Save" to save your changes.
¶ Delete Signature
To delete an existing email signature, select the desired signature from the list and click the "Delete" button located next to the "Save" button.