¶ Supervisor (available in gloCOM Supervisor edition)
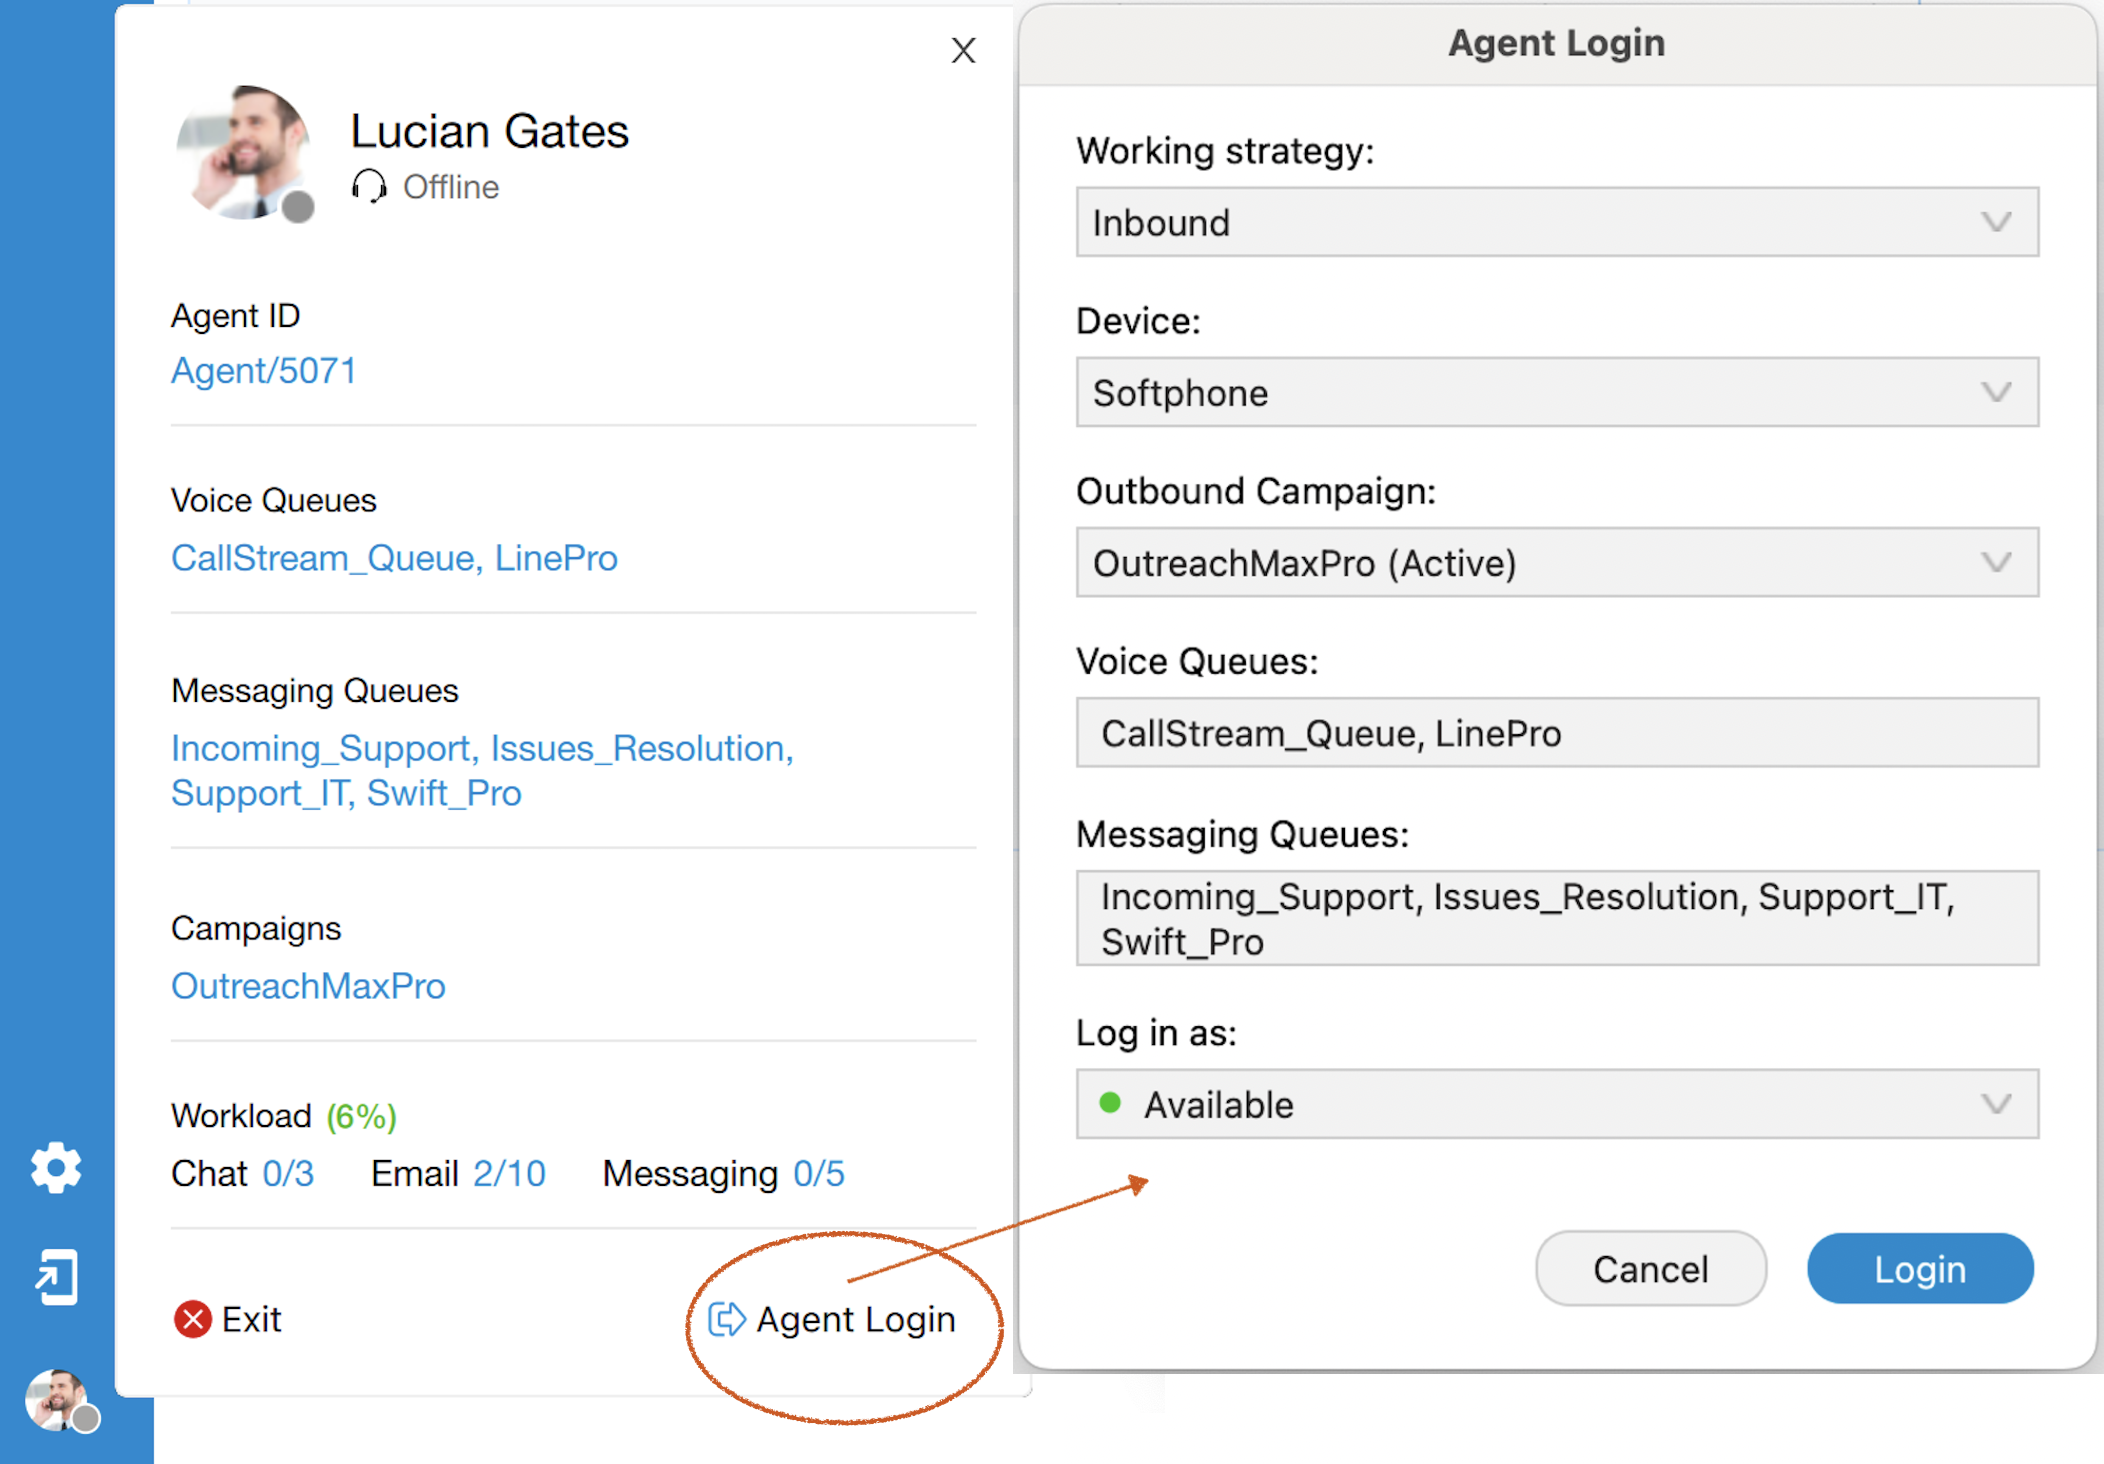
¶ Supervisor Login With Agent Number
Refinements to the supervisor login window prioritize security measures and simplify data management, contributing to an enhanced user experience tailored for the Supervisor edition.

Supervisors will log in as agents using specific credentials:
- Agent number assigned to the Supervisor (required)
- Agent PIN (optional)
These changes address privacy concerns by allowing supervisors to monitor only the queues and agents they are responsible for. Also, Supervisors must be added as members of specific queues to enable monitoring.
¶ Voice Page on Initial Login
Users who have provided an agent number for login and do not have the omnichannel module enabled in their license will be directed automatically to the 'Voice' page upon opening the agent panel. All other supervisor options will remain unchanged within the supervisor panel.
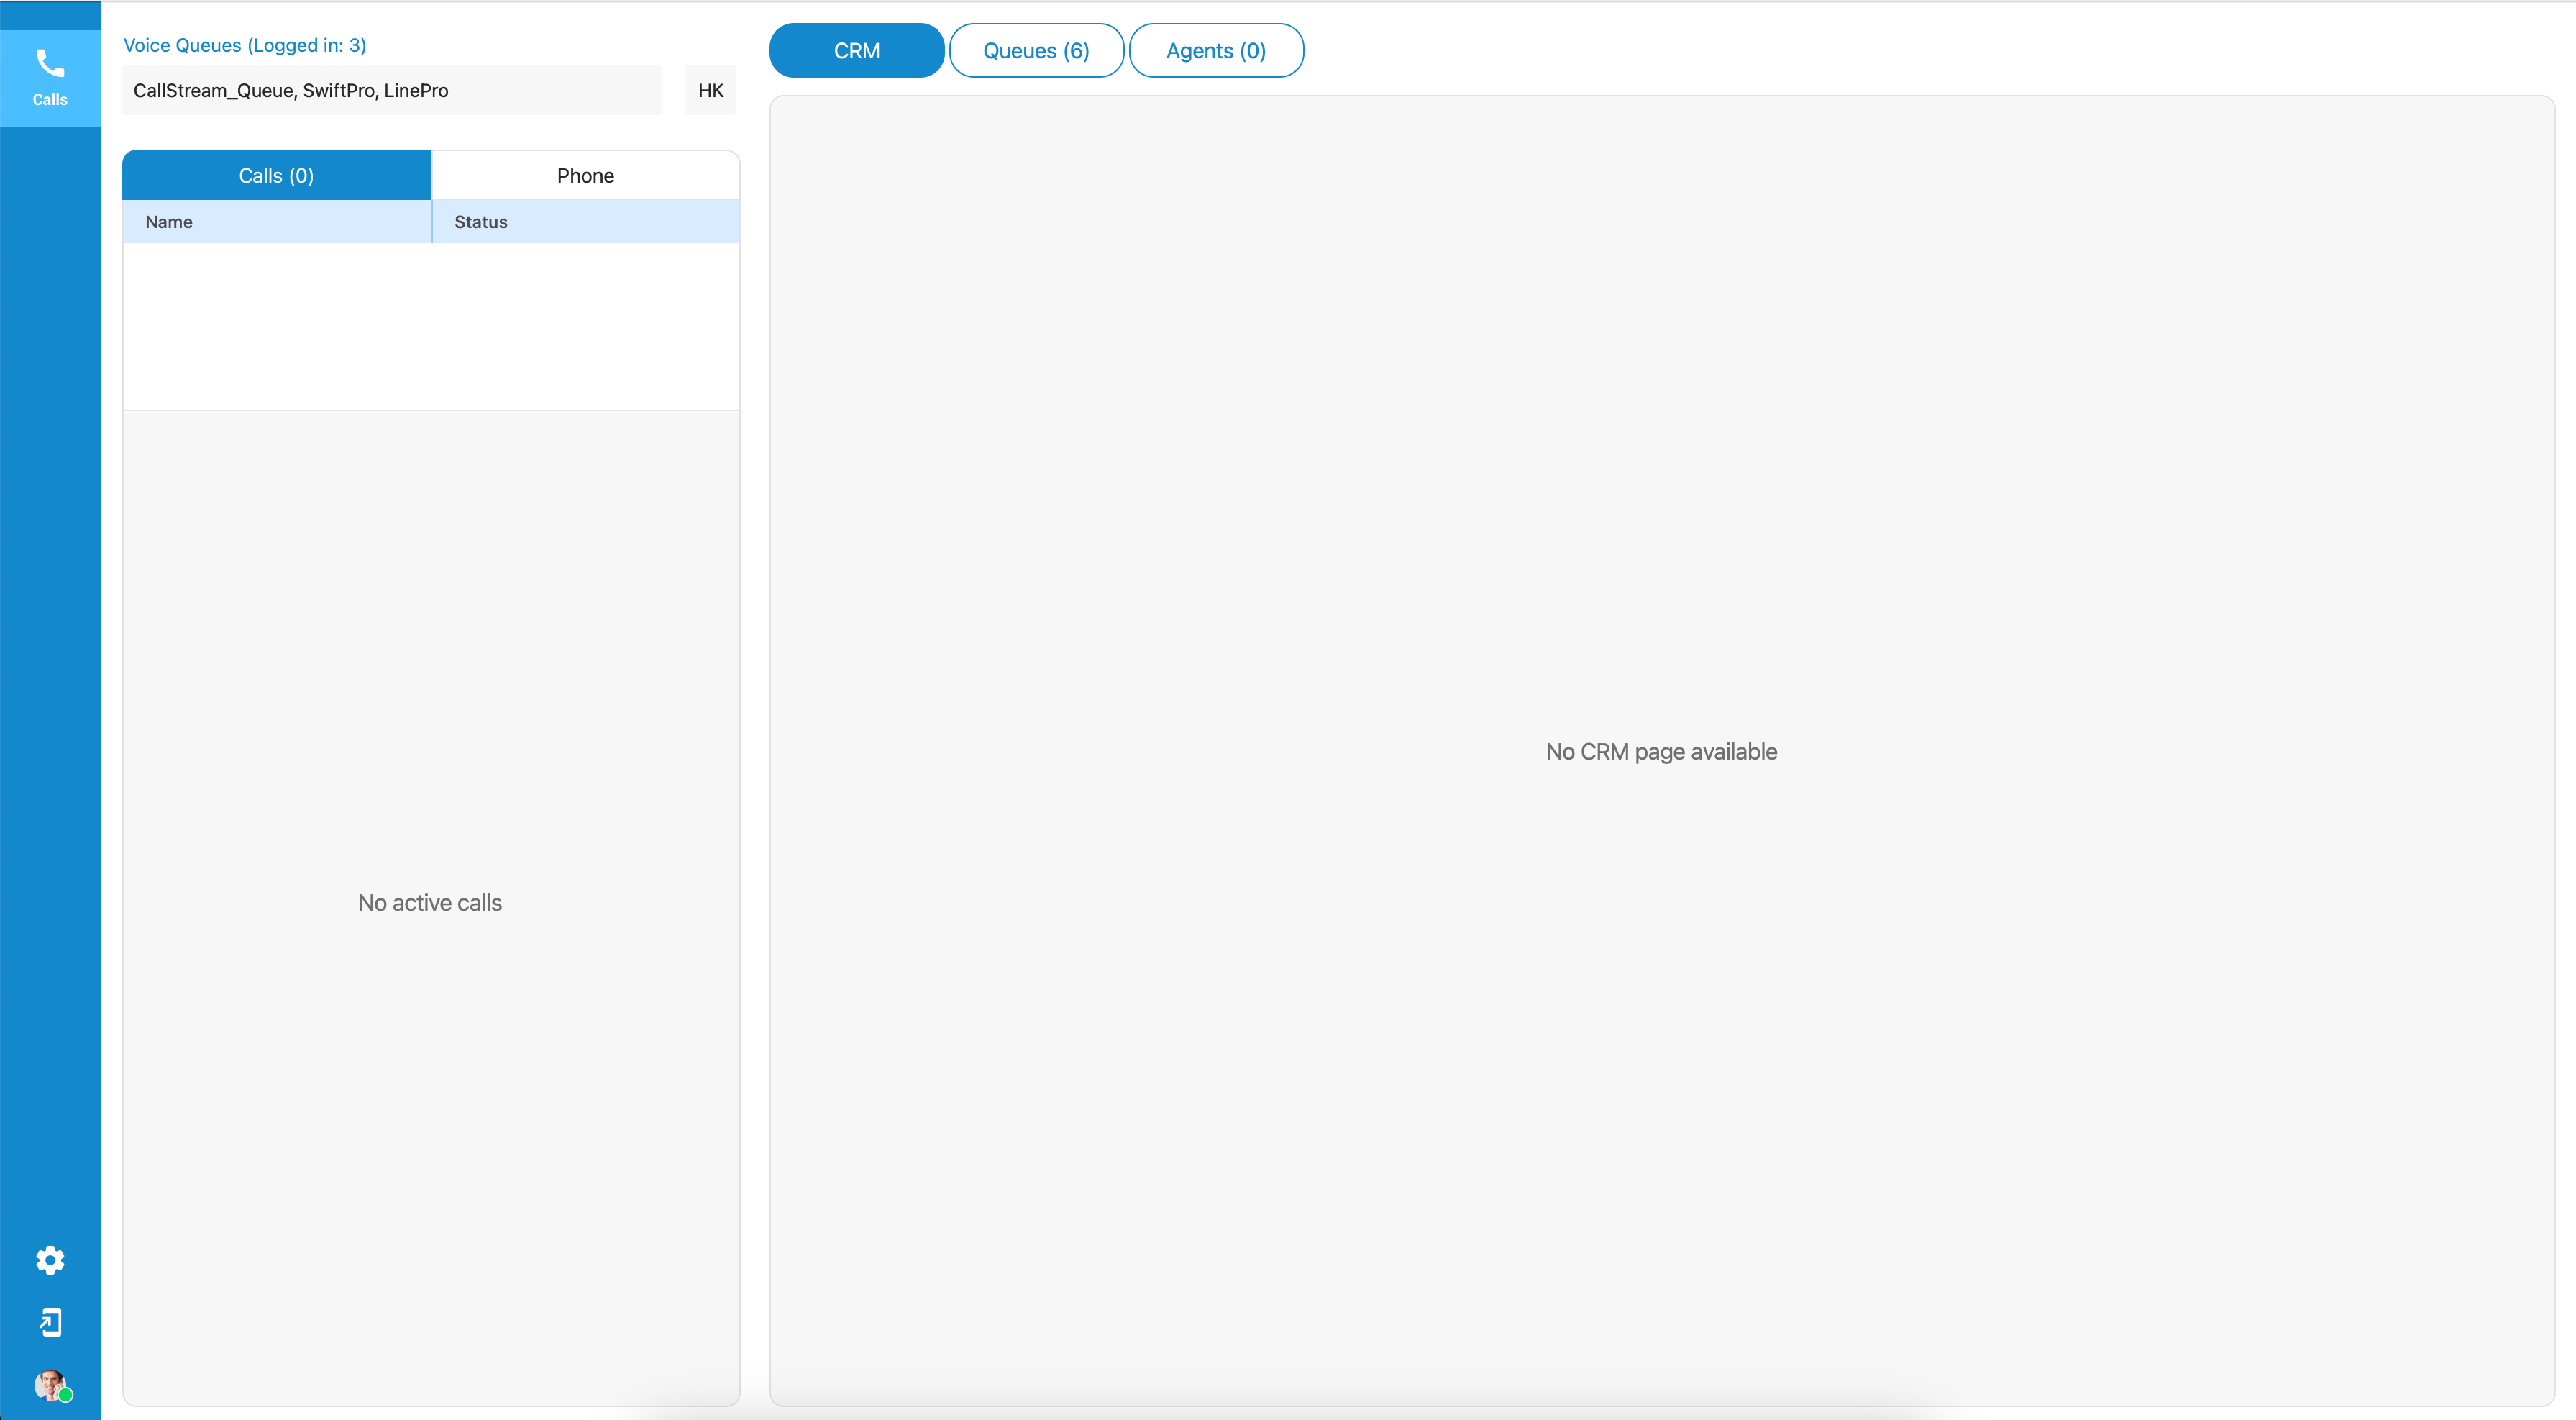
This specific behavior only occurs during the initial login.
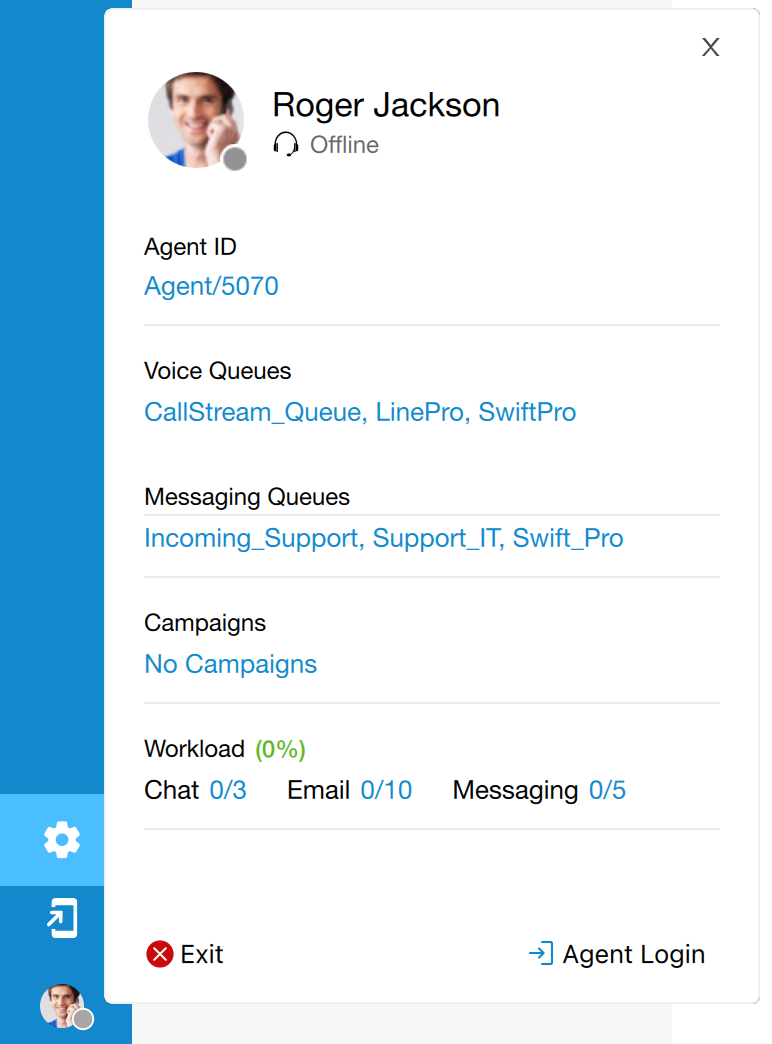
¶ Logged Off State by Default
Supervisors logging in will now find themselves automatically set to an 'Offline' state. This change aims to enhance user focus by restricting the receipt of voice conversations.
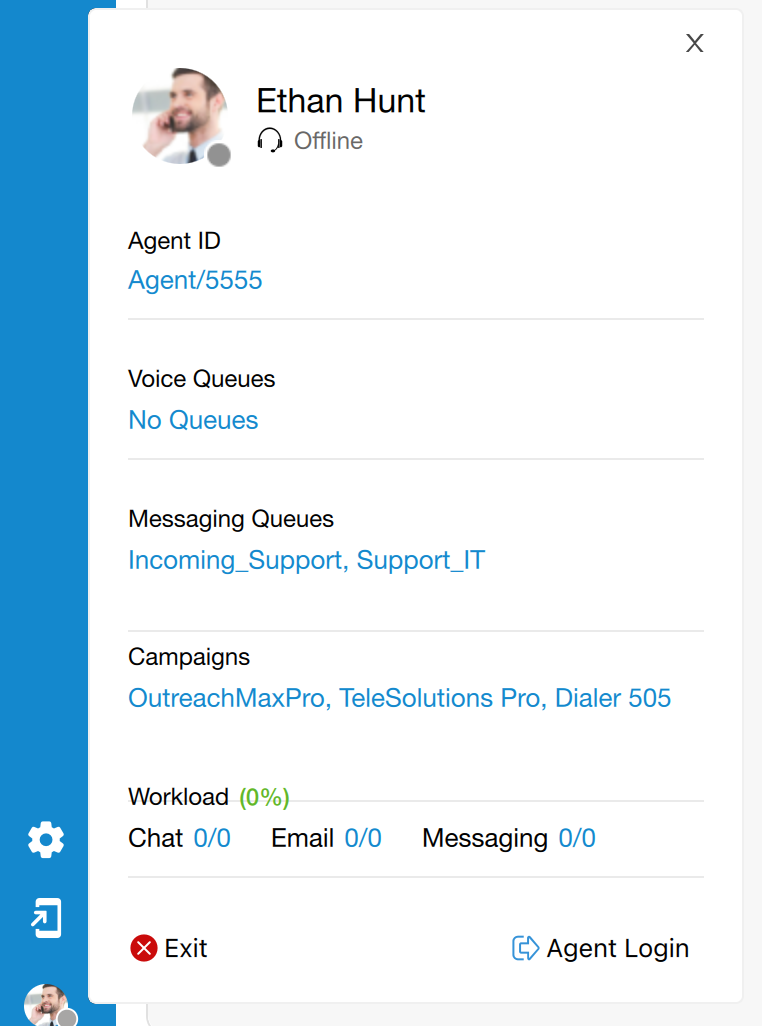
Even in the 'Offline' state, supervisors maintain the ability to receive direct incoming calls, make outgoing calls, and view the online status of agents and active queues.
While in the 'Offline' state, supervisors will still have unrestricted access to all functions, including monitoring conversations and utilizing the dashboard within the Supervisor panel.
¶ Back to Online State
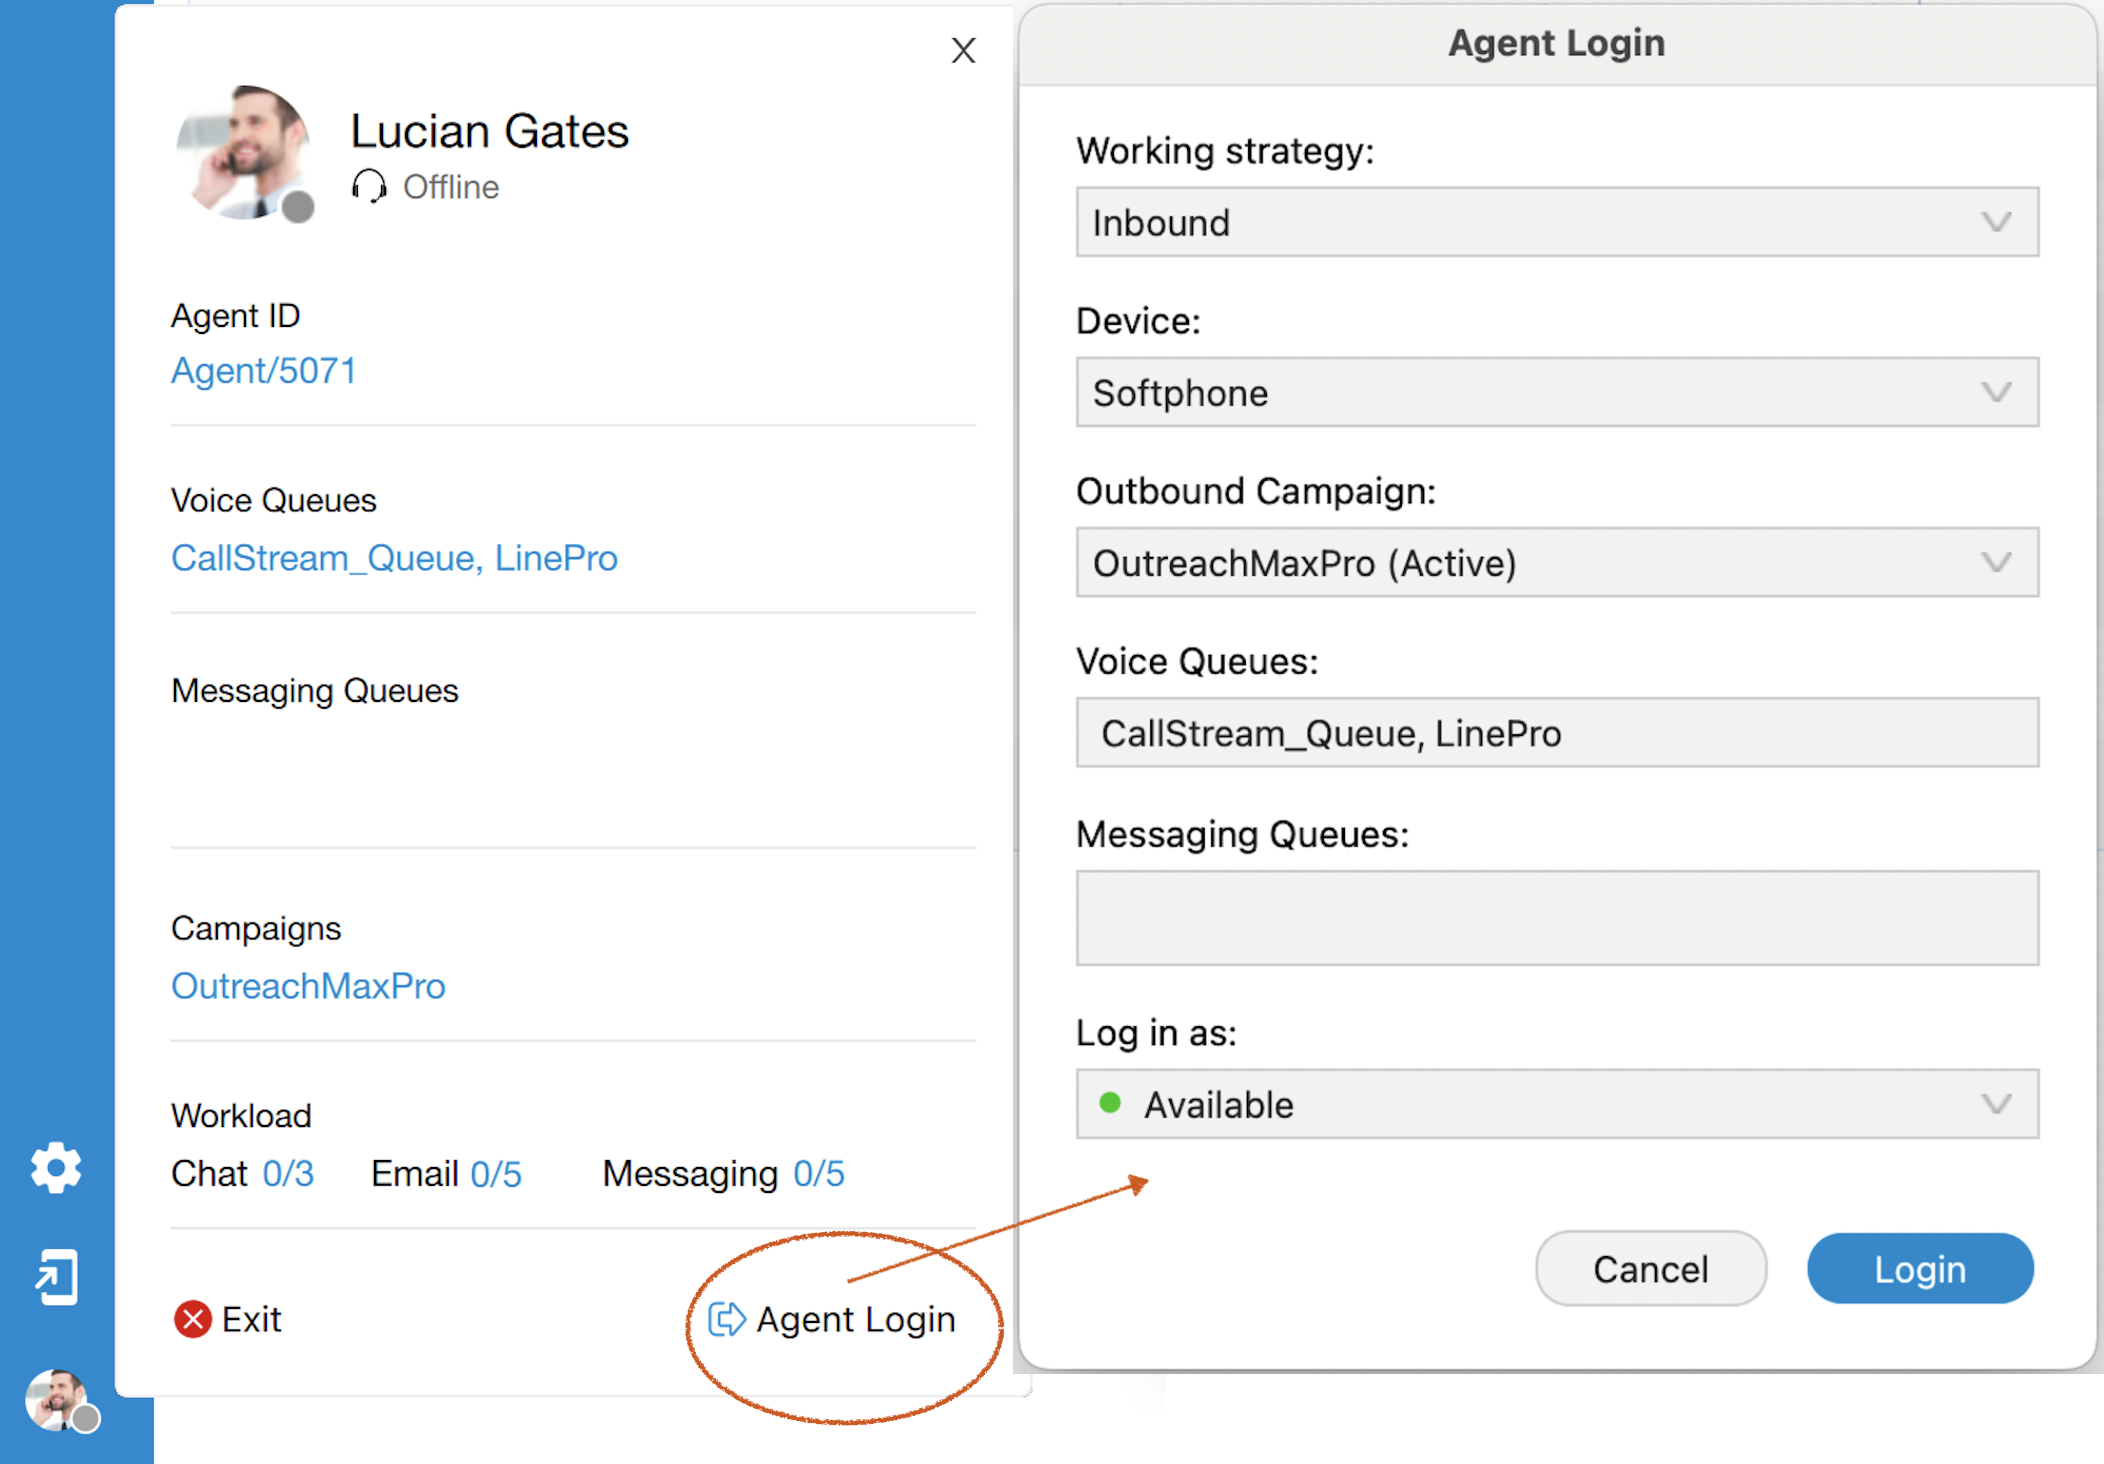
Users must click the 'Agent Login' button in the agent profile section to begin receiving voice calls. A confirmation window will prompt them to confirm their login.
¶ Supervisor Login Without Agent Number
If users attempt to log in without entering an agent number, they’ll successfully access the app’s main page, but they won’t be able to use or activate the Agent panel. However, the Supervisor panel will remain accessible for use.
¶ Supervisor Panel
The Supervisor Panel in the application provides a robust suite of tools for managing and monitoring customer interactions and agent activities in real-time. Supervisors can easily search for and access information on agents, queues, and campaigns, enabling them to oversee performance metrics and identify areas for improvement.
The panel allows for efficient management of voice calls, including answering, transferring, and monitoring calls as they happen. In addition to these core functionalities, the Supervisor Panel is highly customizable, offering various configuration options. Supervisors can adjust font size and appearance, set the panel to open upon login, and configure notification preferences to stay informed about important events. Settings specific to agents and queue calls are also available, giving supervisors control over how agent activities and queue statuses are displayed and managed.
¶ Search Field
A Search field has been added inside the Supervisor Panel. It is possible to search for Agents, Queues, or Campaigns.

When the user clicks on the Search field, the view with all Agents/Queues/Campaigns should be displayed. This view is visible only if the Search field is focused. If the user clicks anywhere outside the Search field or that view, it will close.
Agents are searched by a name or number. Queues and Campaigns are searched by name.
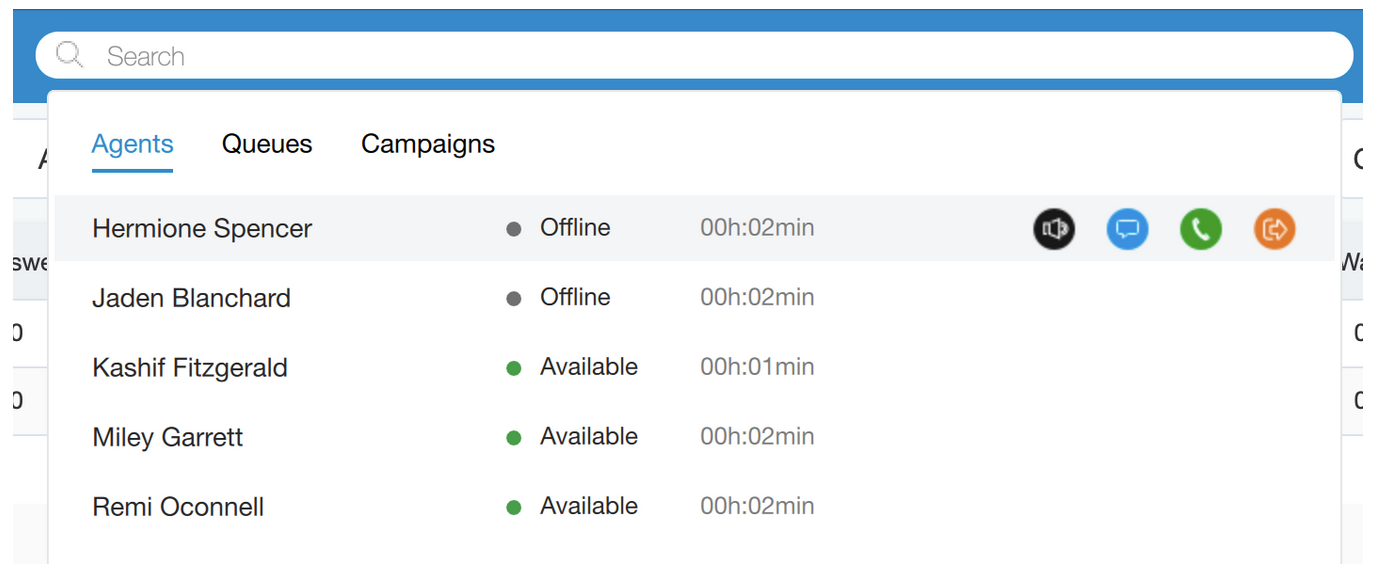
There are some additional actions provided when the user mouseover searched Agents:
- Listen: The Supervisor is authorized to Listen calls.
- Chat: The Supervisor can Chat with Agents.
- Call: The Supervisor can Take a call.
- Logout: The Supervisor may Logout specific Agent.
To exit Search mode press the ESC key or simply click anywhere outside the Search field.
If the user’s license does not support the Dialer option, the search option for Campaigns will not be available.
¶ Supervisor Toolbar
On the right side of the toolbar, there are icons that provide the following things:
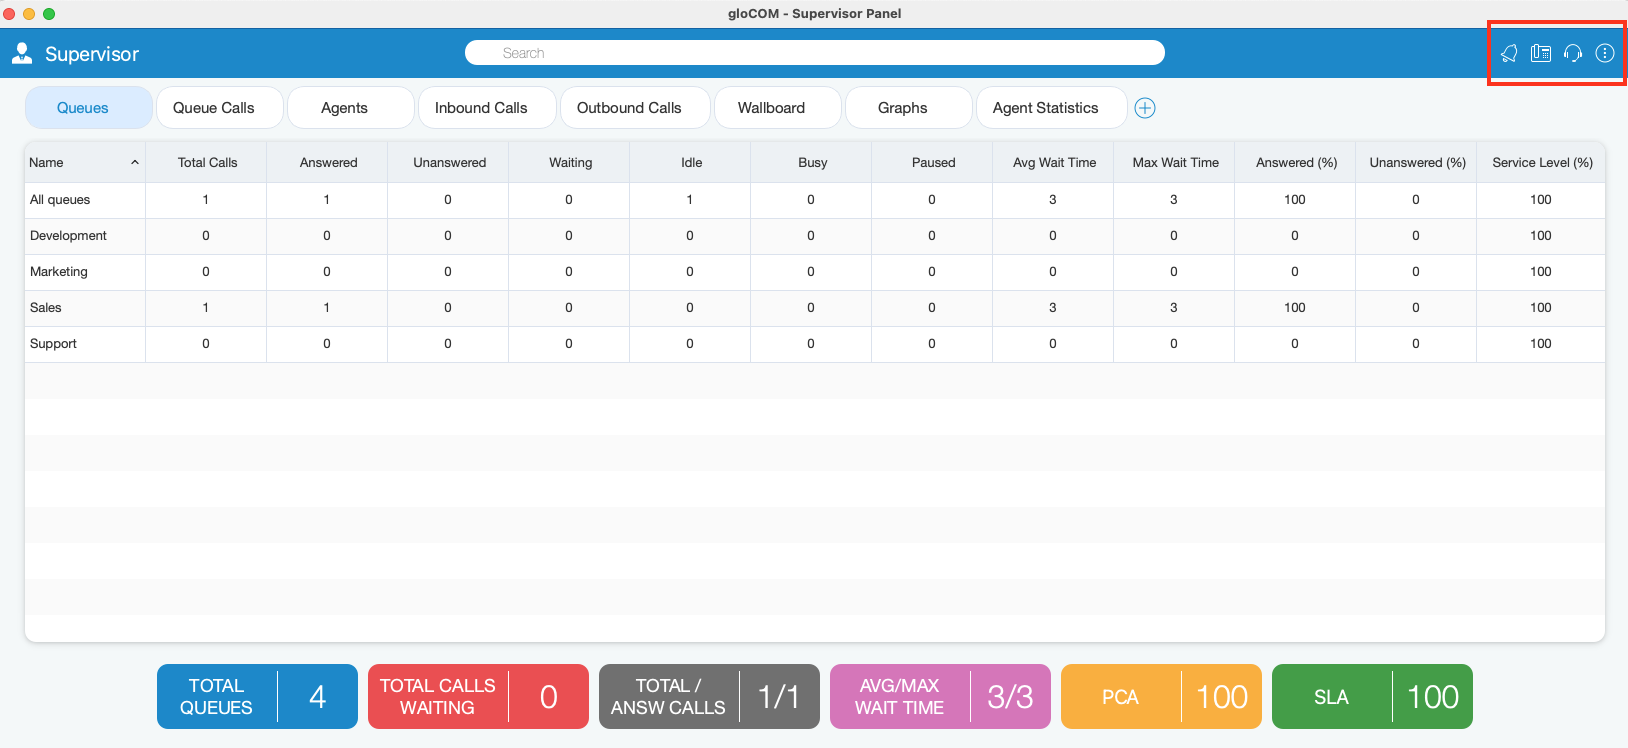
 Notification Bell: Clicking the Bell icon displays a list of all alerts.
 Phone Dialog: Shows Phone Dialog.
 Agent Panel: Shows Agent Panel.
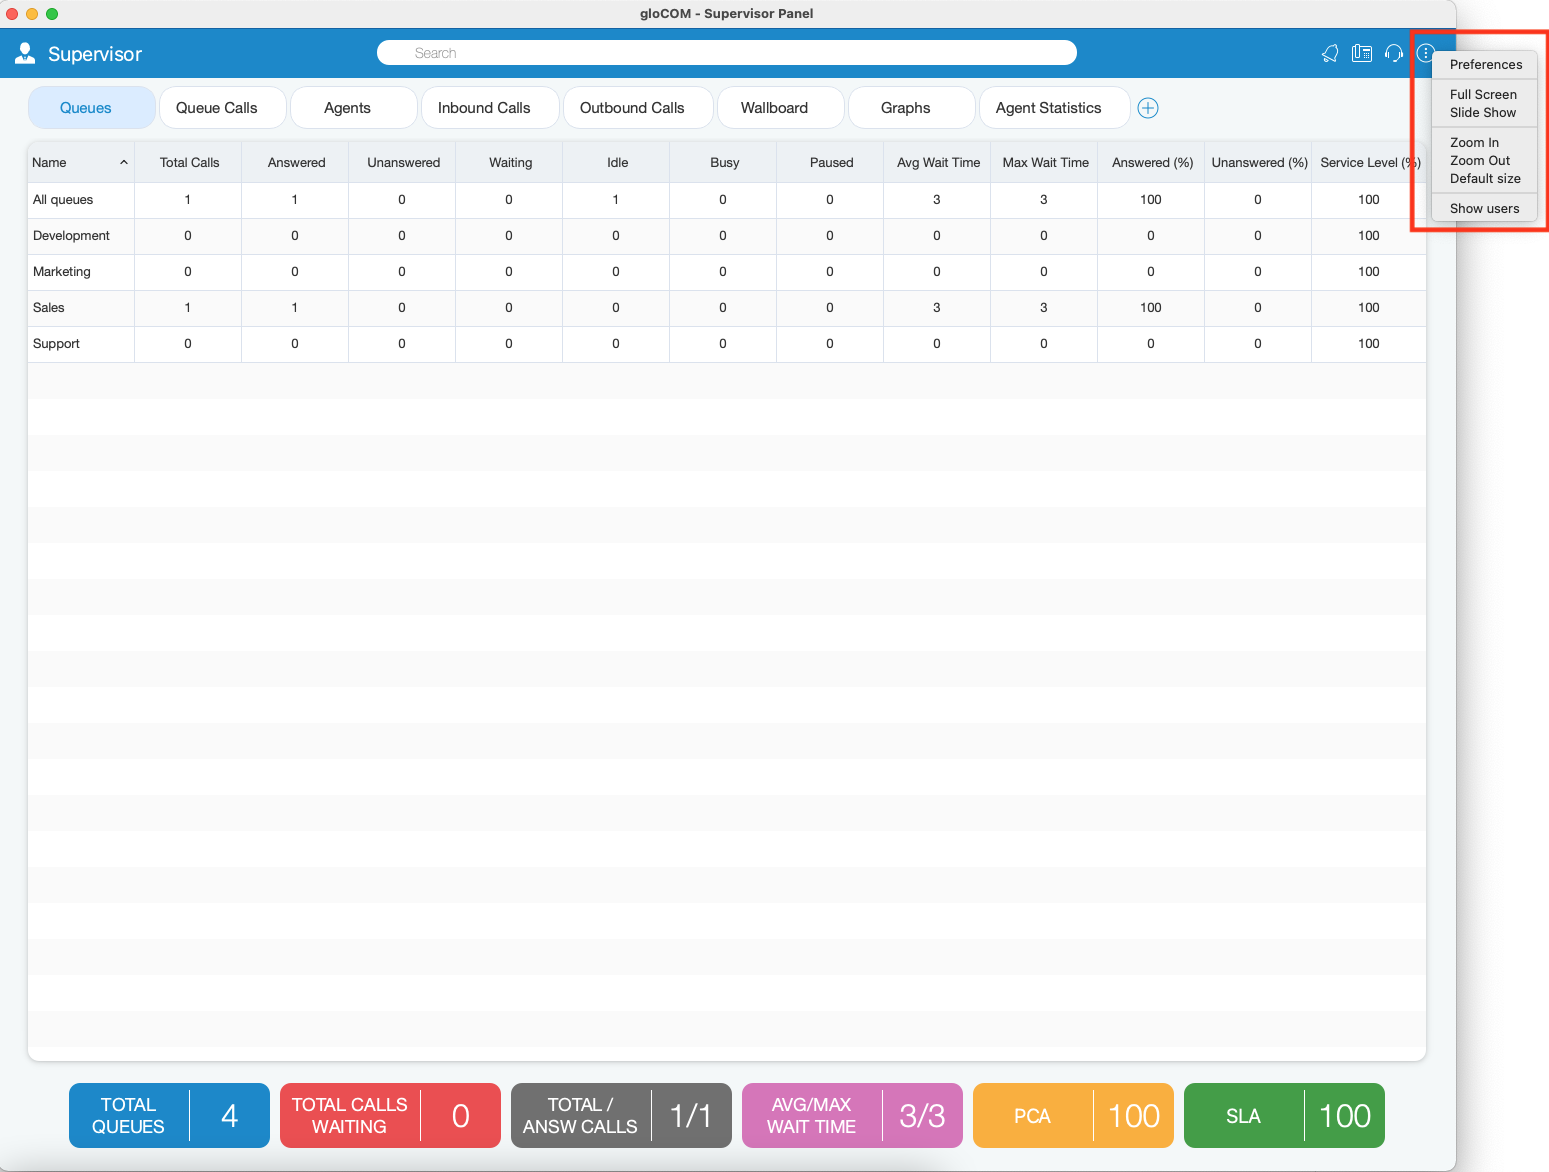
 Preferences: When the user clicks this action, an additional menu with the options appears.
Additional information about icons is shown below.
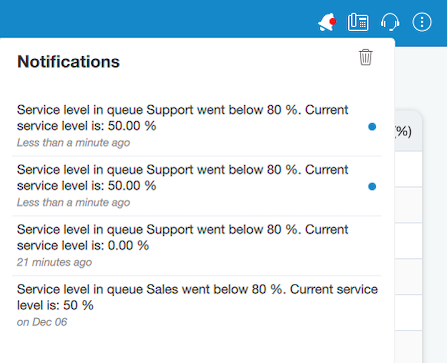
¶ Notification Bell
If there are new alerts, the Notification bell icon changes.
- Each item of the notification list consists of the message, the time when the alert occurred, and the state of the alert (read, unread).
- The unread message contains a blue circle on the right.
- To mark an alert as read it is necessary to hover over the alert item.
- To close the notification list click outside of the notification area, or simply by clicking on the notification bell icon again.
- To delete all notifications click the icon on the top right side (recycle bin).
¶ Phone Dialog
Clicking the Show Phone Dialog icon opens the Phone module area:
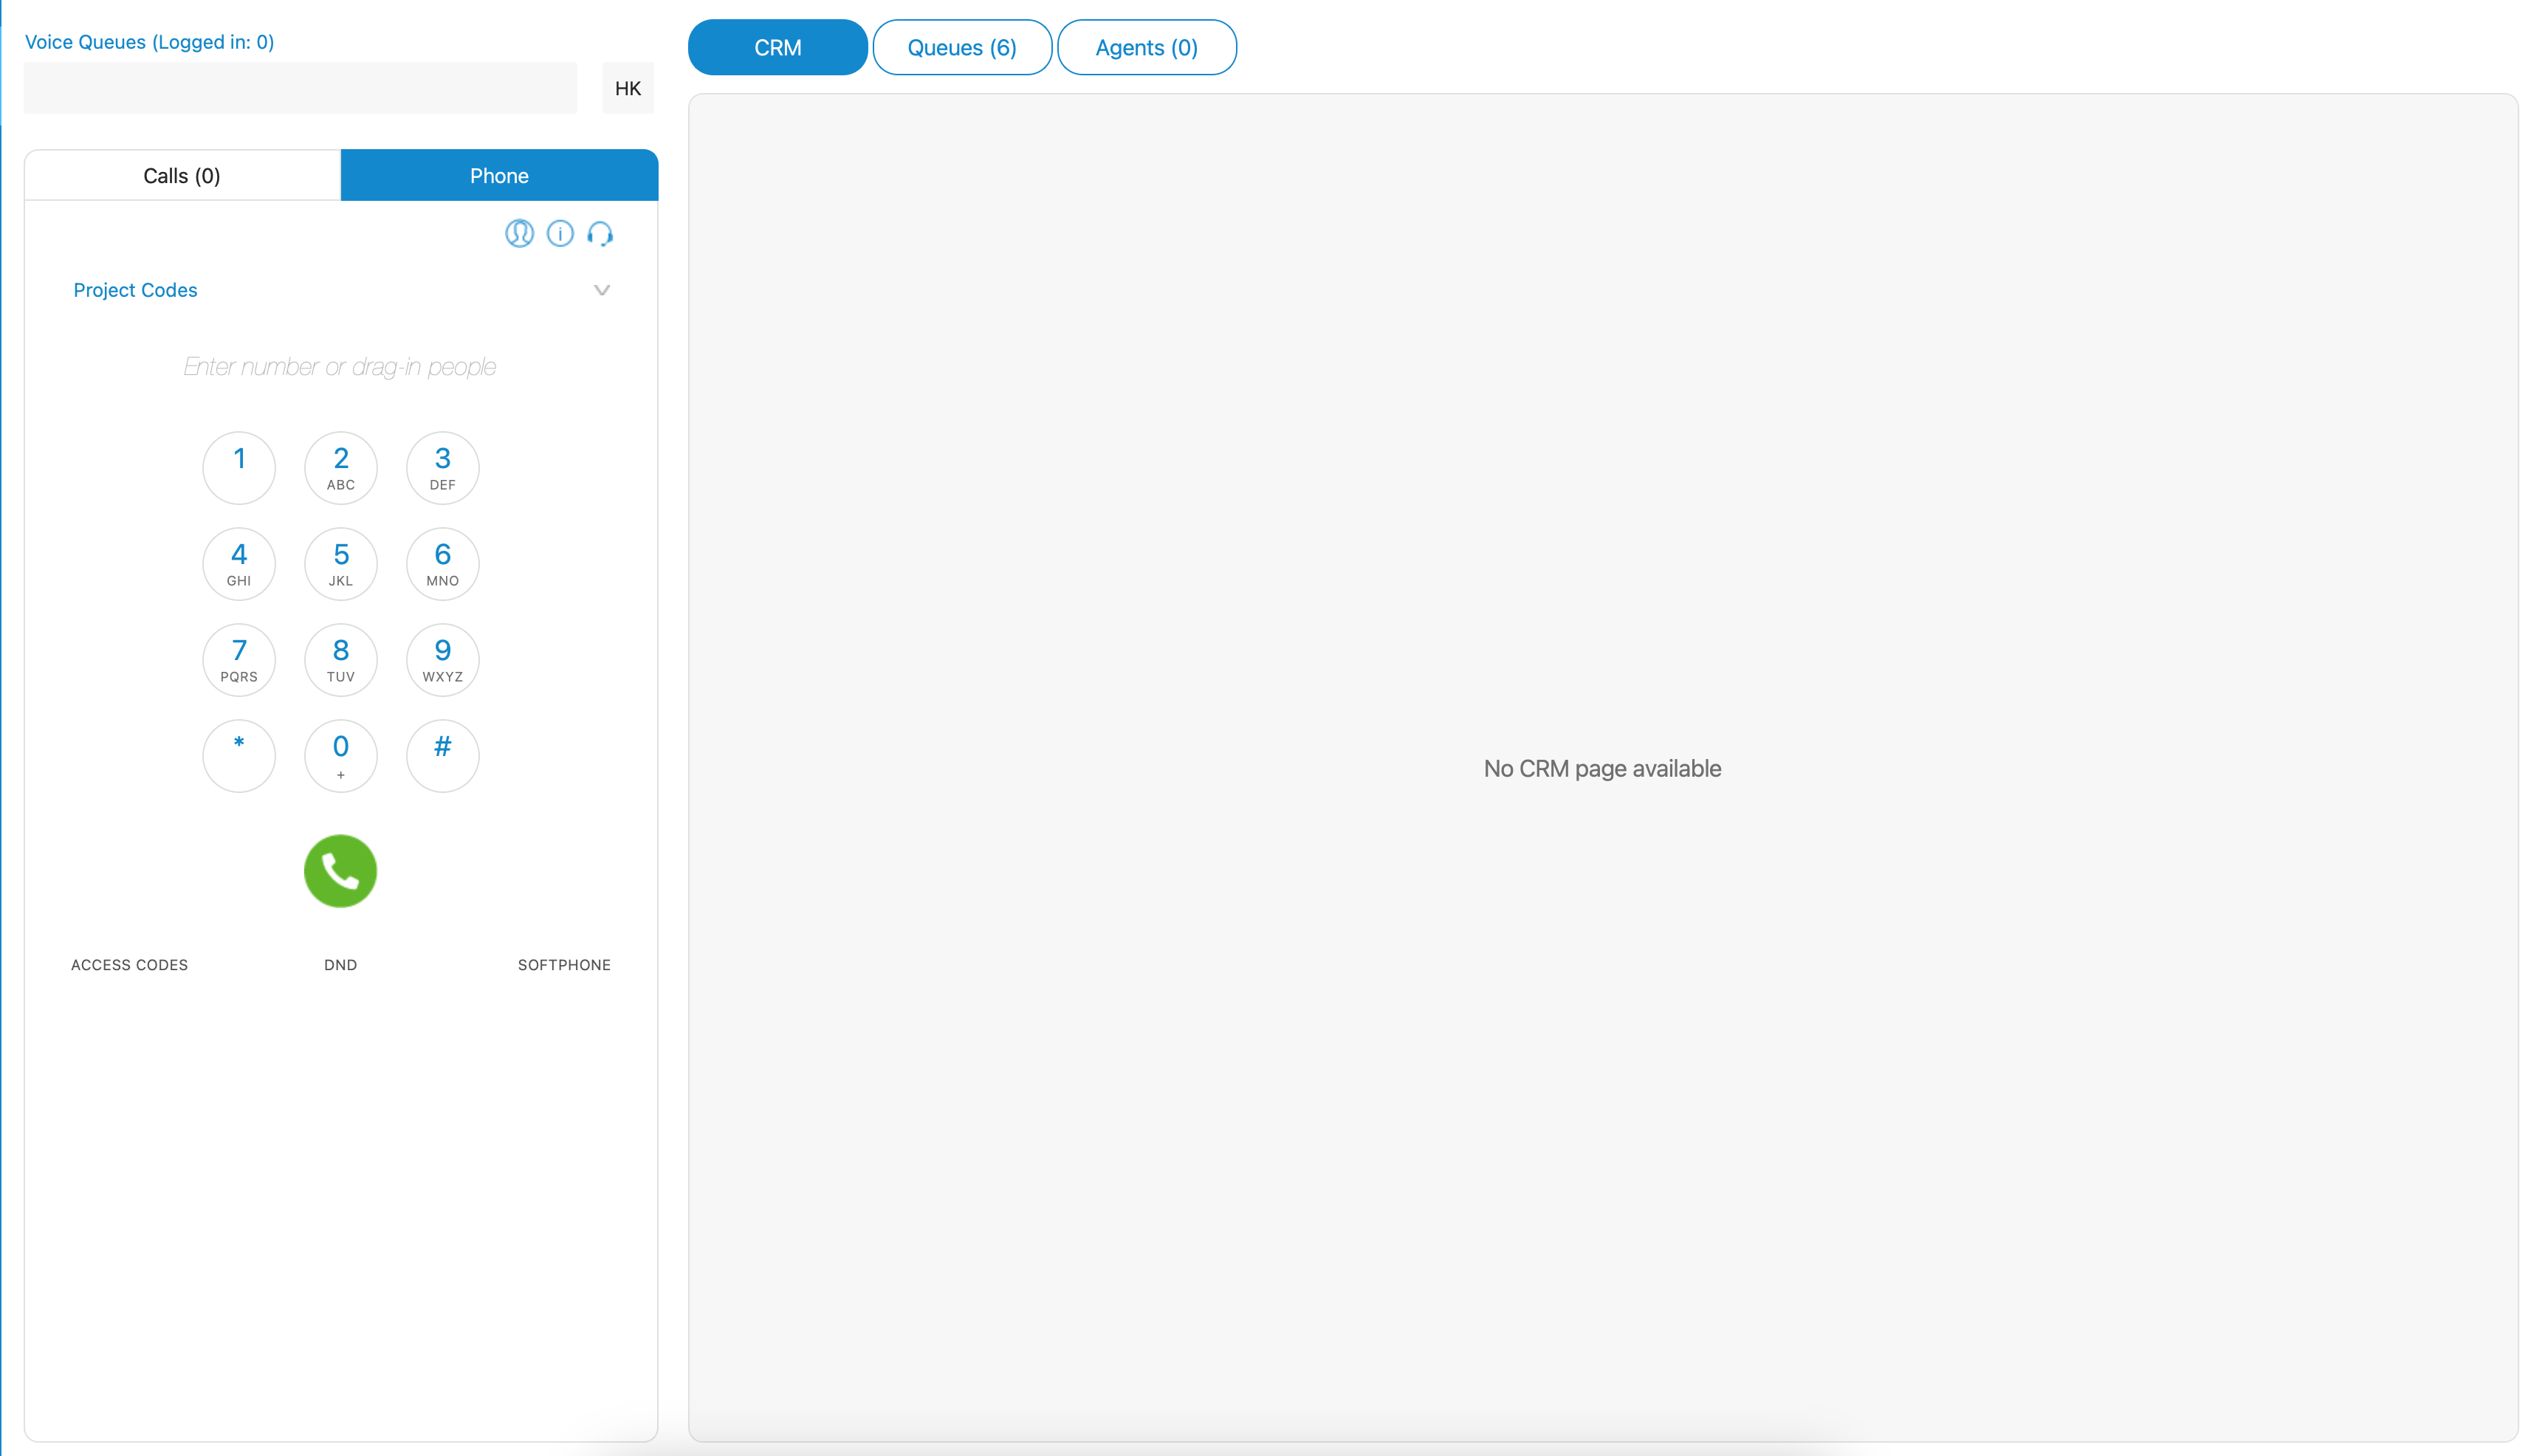
The phone module area provides information on missed calls and offers users the flexibility to choose their input/output and ringtone devices. It features a drag-and-drop function and enables users to adjust microphone and speaker volumes. Additionally, it displays dialed contact phone numbers and includes a dial keypad for entering numbers efficiently.
¶ Agent Panel
Agent Panel window can be opened by clicking the module icon from the Supervisor panel.
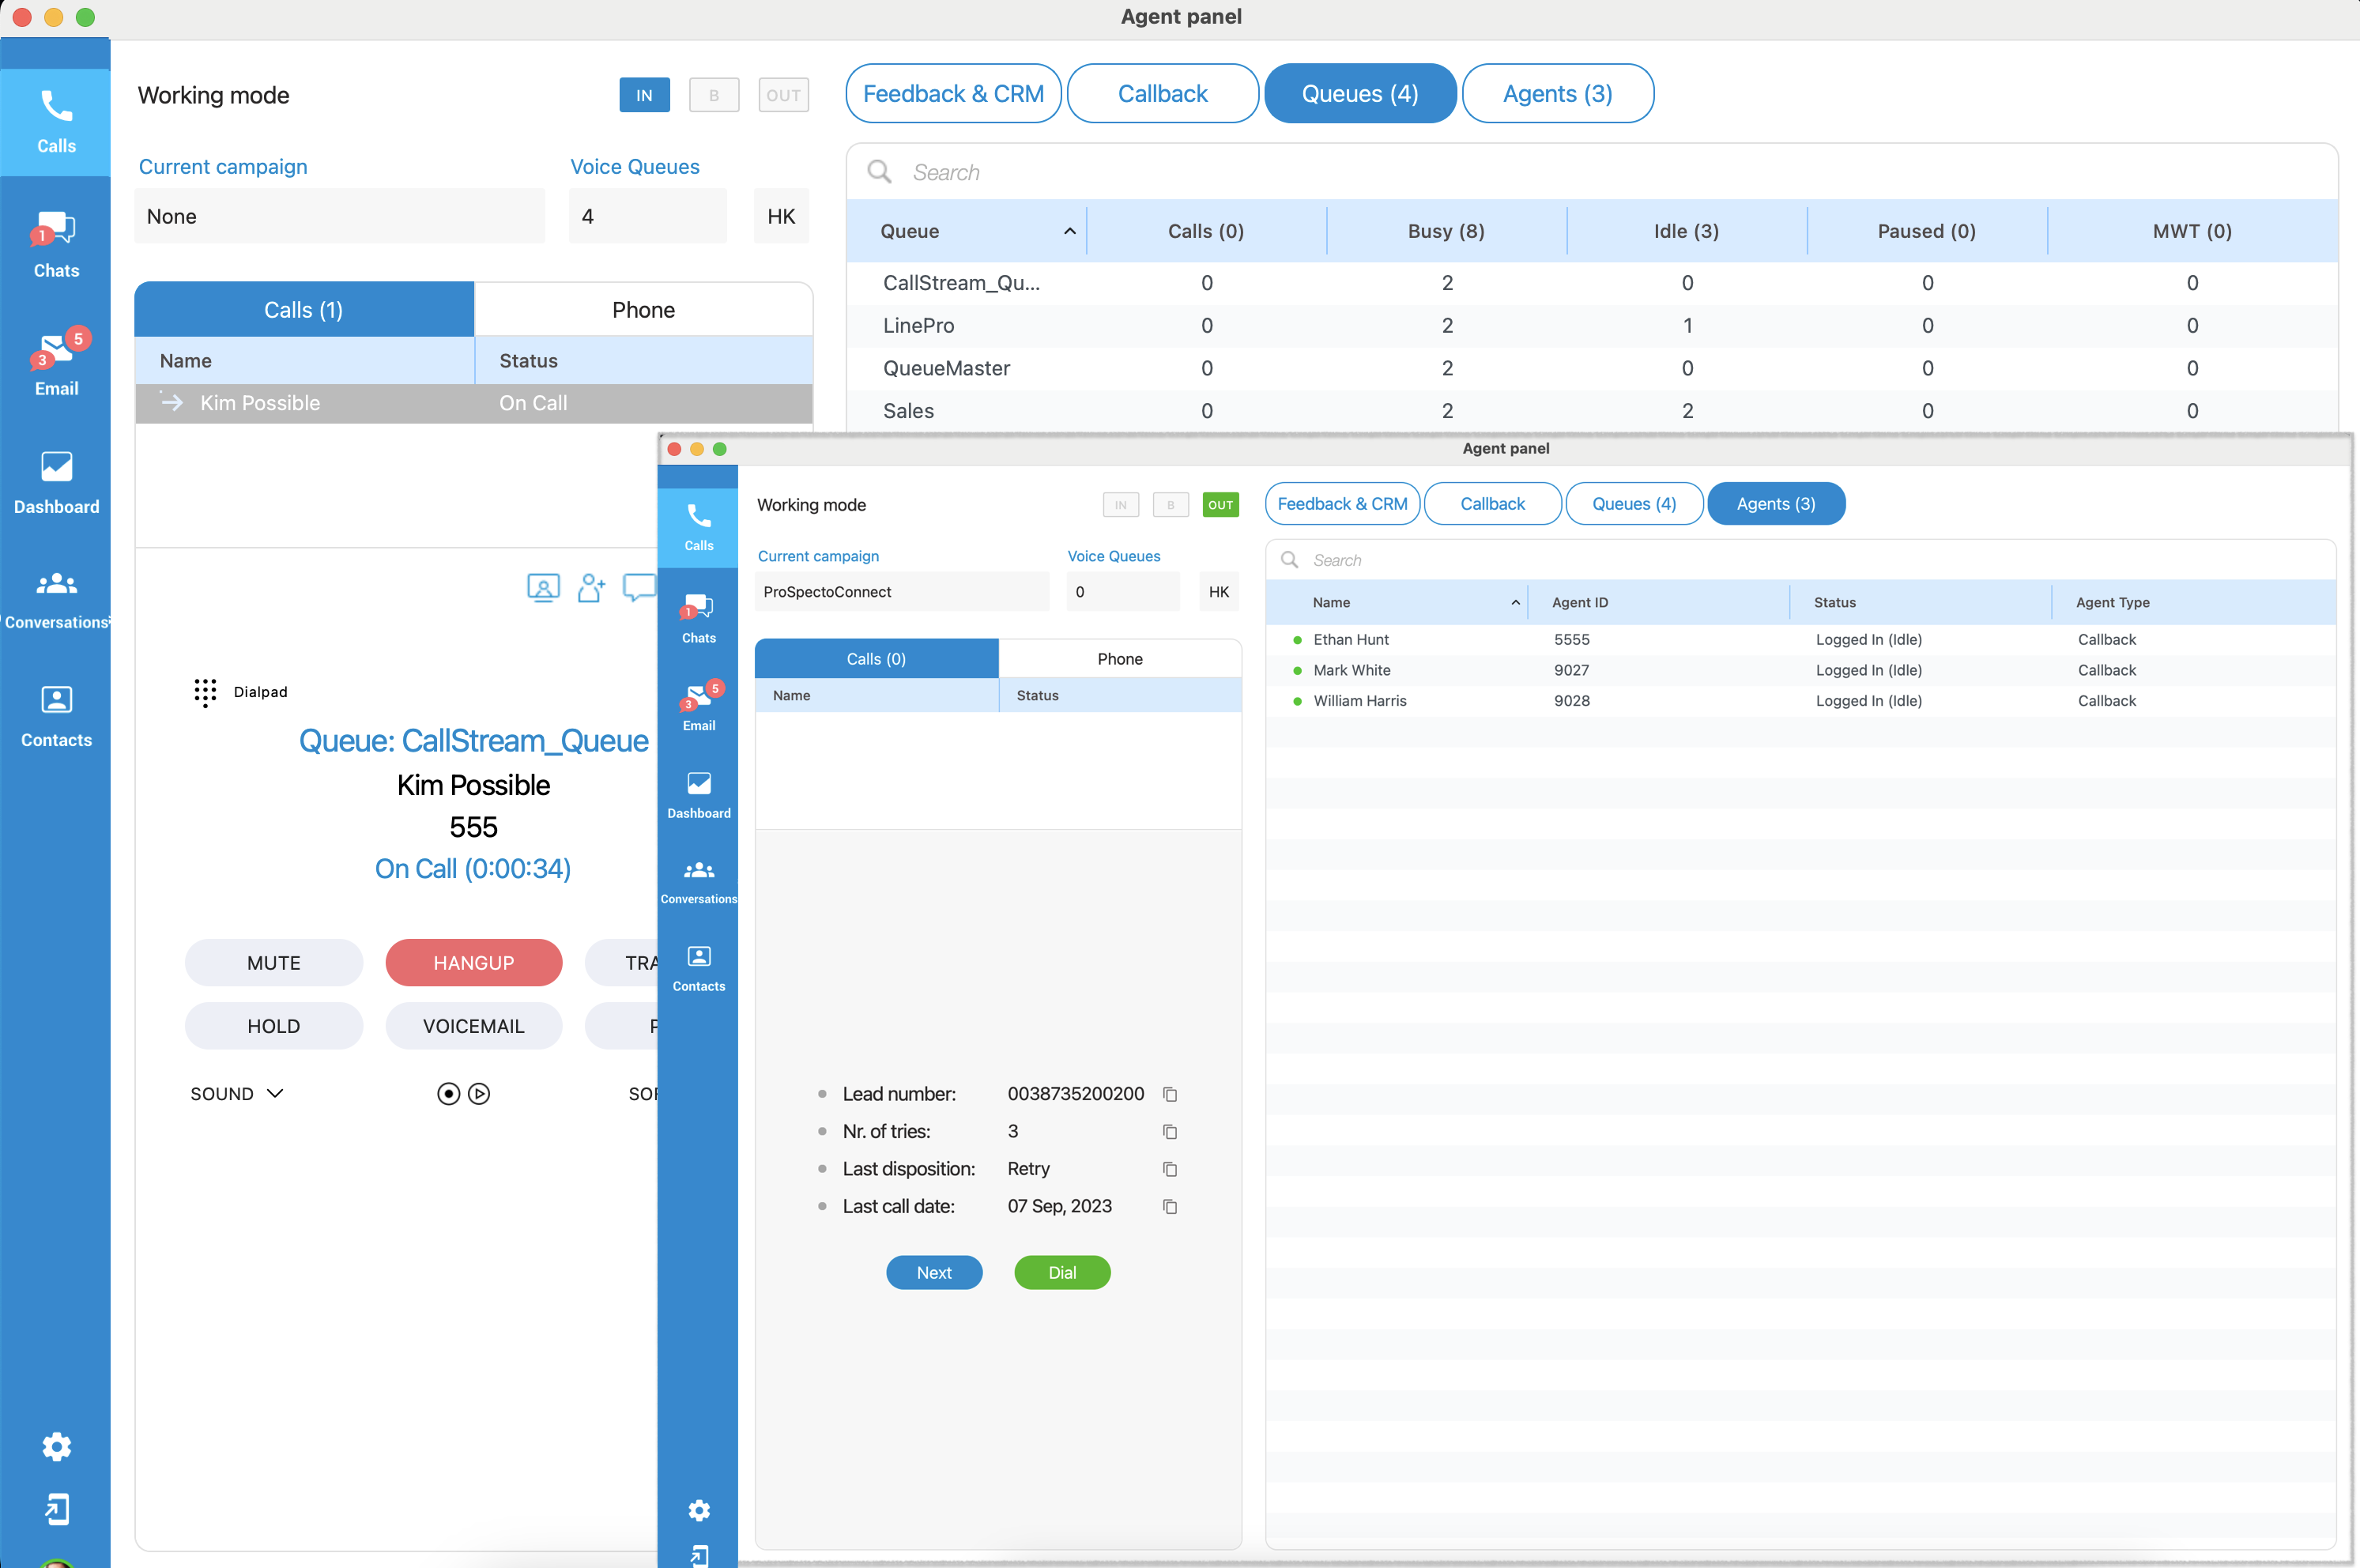
All agent-related features are located in this window (Agent Panel), and makes it easier for an agent to handle multiple calls, feedback forms, CRM popup, callbacks, other agents, and queues.
Also, the phone dialer and all phone-related settings will be displayed within the Agent Panel window.
¶ Preferences
By clicking Preferences, users have additional options for:
- Preferences: Open Preferences dialog in which users have configuration options for Alerts, Queues, Agents, and Threshold. More information about Preferences Options is displayed below.
- Full Screen: This option is used to enter fullscreen mode (Supervisor window occupies the whole computer screen). If the window is already in fullscreen mode, clicking this option restore window size to the previous size.
- Slide Show: This option is used to start/stop slide show of Wallboard module content.
- Zoom In/Out: This option is used to increase/decrease the font size for the content of all modules except Wallboard module.
- Default size: This option restores font size to default size.
- Show users: Open gloCOM main window.
¶ Preferences Options
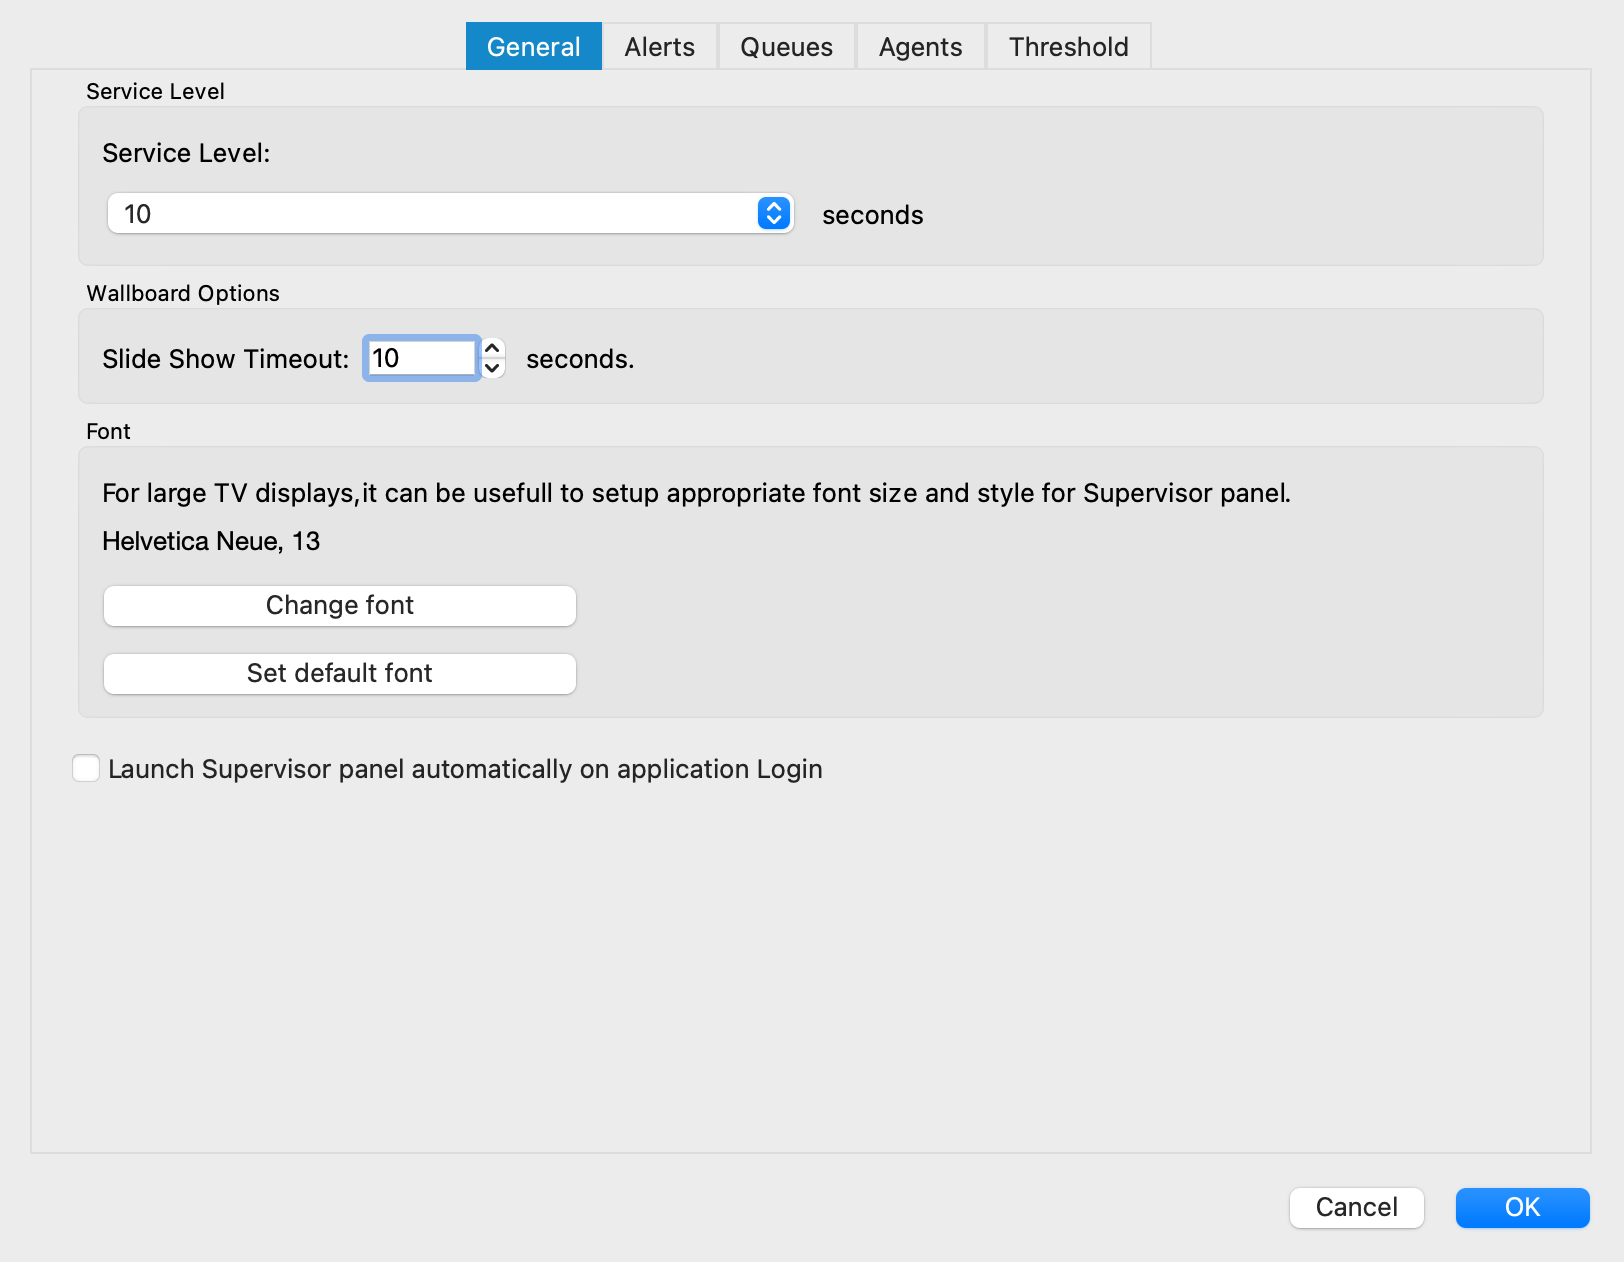
General tab
- Service level: Select time in seconds. This is used for calculating statistics inside Supervisor Panel.
- Slide Show Timeout: Select timeout for the slide show (in seconds).
- Change font: Change font and style of content inside Supervisor Panel. It can be useful for large TV screens to set up an appropriate font size.
- Set default font: Reset to the default font and style of Supervisor Panel.
- Launch Supervisor panel automatically on application Login: If this option is checked, after the Supervisor logs in, the Supervisor Panel will be automatically shown.
Alerts tab
- Flash Agent in Not Ready state after: Choose time in seconds when an alert will flash if the Agent is not ready.
- Flash Agent that has been in Talking state for more than: Choose time in seconds when an alert will flash if the Agent is in Talking state.
- Alert me when more than specified number of Agents are Not Ready: Choose the number of Not Ready Agents after which the alert will popup.
- Alert me when Service Level is below: Choose percent of service level after the Alert will popup.
- Alert me when a new message is received: Click on the checkbox to enable this option.
- Alert me when a new assistance request is received: Click on the checkbox to enable this option.
- In case of an alert play system sound beep: Click on the checkbox to enable this option.
- In case of an alert bring the application: Click on the checkbox to enable this option.

Queues tab
1. Queues/Calls
Inside the Queues/Calls tab you can select which Queues or fields will be visible in the Supervisor Panel, inside the Queues module.
- Select all: Select all Queues/Fields from the list of visible Queues/Fields.
- Clear all: Clear selection of all Queues/Fields from the list of visible Queues/Fields.
Also, there are options Show all Queues and Show all Fields if you want all Queues/Fields to be displayed inside the Queues module.
- Show calls from all Queues: If this option is selected, the application will display calls from all Queues regardless of the selected Queues in the above list. Otherwise, you will see only calls for the selected Queues. This option applies to the calls displayed in the Queue Calls tab.
2. Wallboard
Inside the Wallboard tab you can select which Queues or Fields will be visible in the Supervisor Panel, inside Wallboard module.
- Select all: Select all Queues/Fields from the list of visible Queues/Fields.
- Clear all: Clear selection of all Queues/Fields from the list of visible Queues/Fields.
Also, there are options Show all Queues and Show all Fields if you want all Queues/Fields to be displayed inside the Wallboard module.
Agents tab
Inside the Agents tab you can select which Agents or Static Members will be visible in the Supervisor Panel, inside Agents module.
- Select all: Select all Agents/Static Members from the list of visible Agents/Static Members.
- Clear all: Clear selection of all Agents/Static Members from the list of visible Agents/Static Members.
Also, there is option Show all Agents and Members if you want all Agents/Members to be displayed inside Agents module.
Threshold
- Field: Various field are displayed, such as Answered, Busy, Idle, Paused, Unanswered, Waiting, Service Level (%), etc...
- Threshold value: Defines the value for a particular event.
- Color: Defines the color that will be used for a particular event if the threshold value is set.
¶ Supervisor Panel Modules
Users can decide which tabs they want to see inside the Supervisor Panel. All tabs are displayed by default, the same as before.
All tabs are stored on the server, so the user does not have to customize tabs every time he/she logs in. Tabs are saved per account, and if the server does not support saving tabs, they will be saved locally. After updating the server, when the user logs in for the first time, tabs saved locally will be saved on the server so the user does not have to customize tabs again. Local storage is used only when the server does not support storing tabs.
 Add a new tab: A new, + option has been added. It is used to add a new tab. When the user clicks the + button, a new window with the following information is displayed:
- Type: Dashboard by default.
- Subtype: User can choose one of the subtypes from the dropdown menu.
- Tab name: The user can name the tab as he/she wishes, and if the user does not enter anything, the tab will be named automatically by default. (For custom Tab name, the maximum length is 100 characters)
The user will not be able to add a new tab if the max number of tabs (9) is reached.
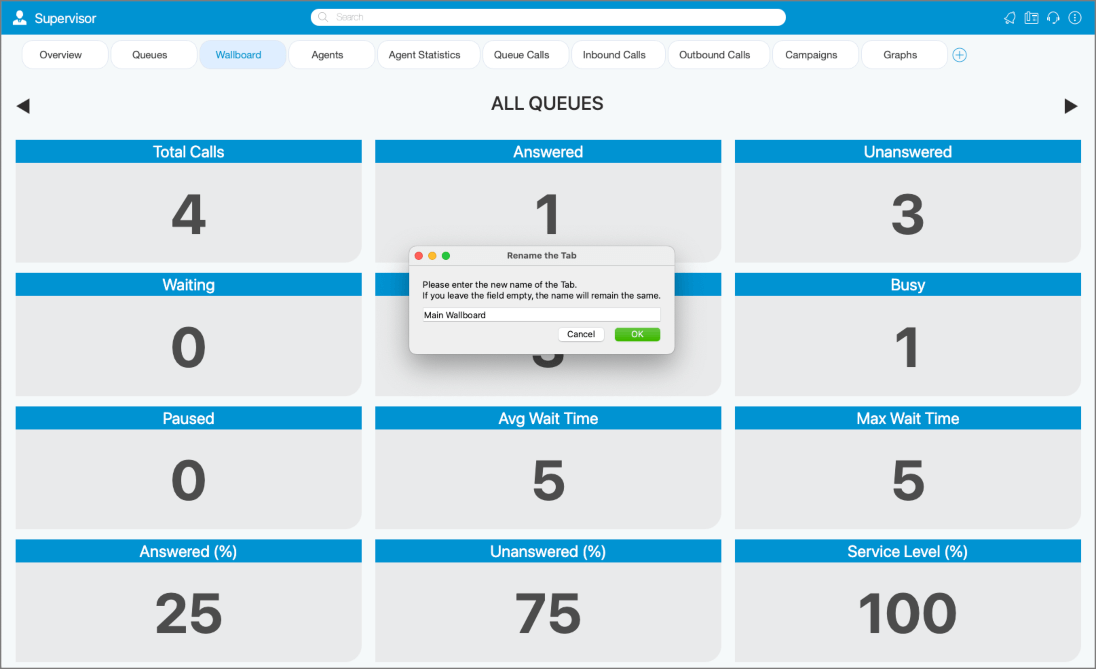
- Rename tab: The user can rename the existing tab by right-clicking on the tab.
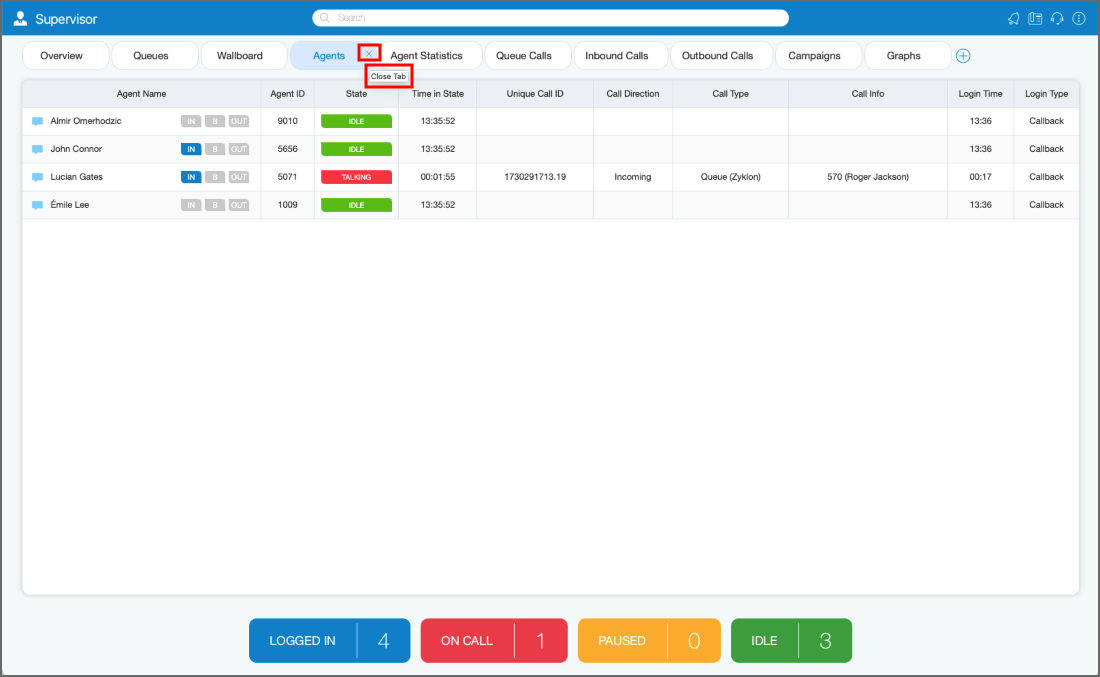
- Remove existing tab: Each tab can also be easily removed by clicking the X button.
- Reorder tabs: It is also possible to change the order of the tabs, simply by grabbing the tab and dragging it to a different location.
If the user’s license does not support the Dialer option, the user will not be able to add Campaigns tab.
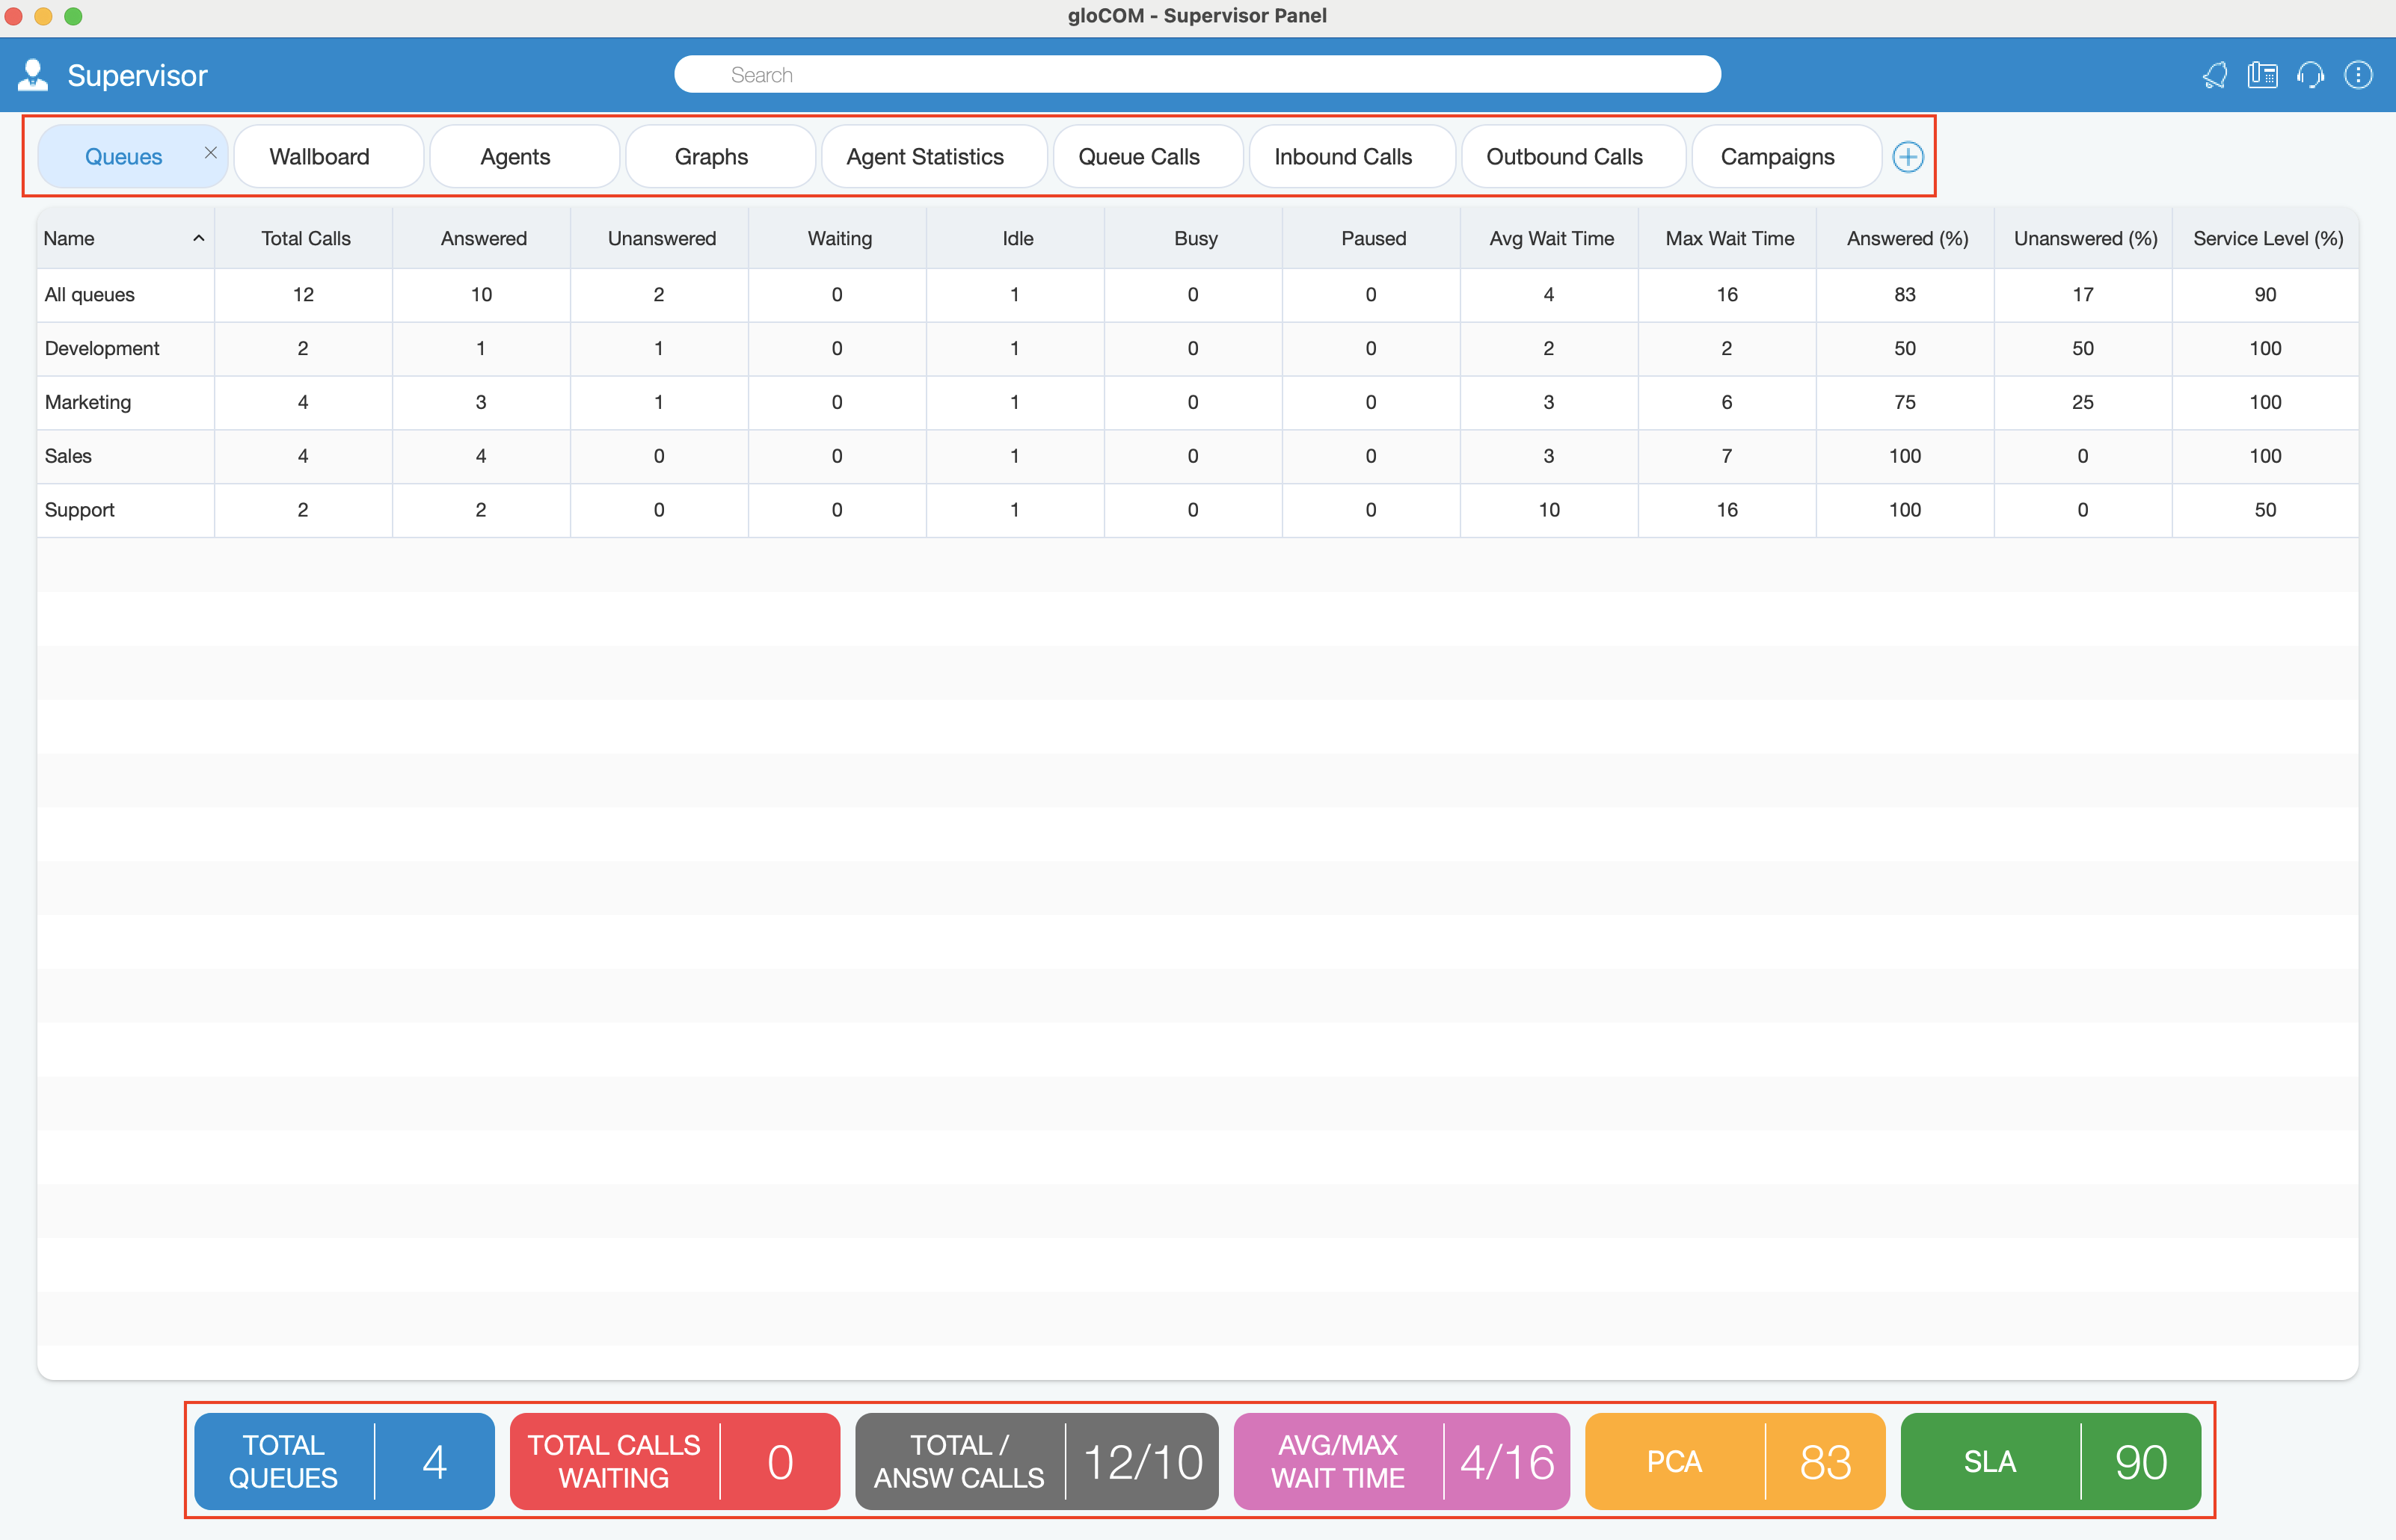
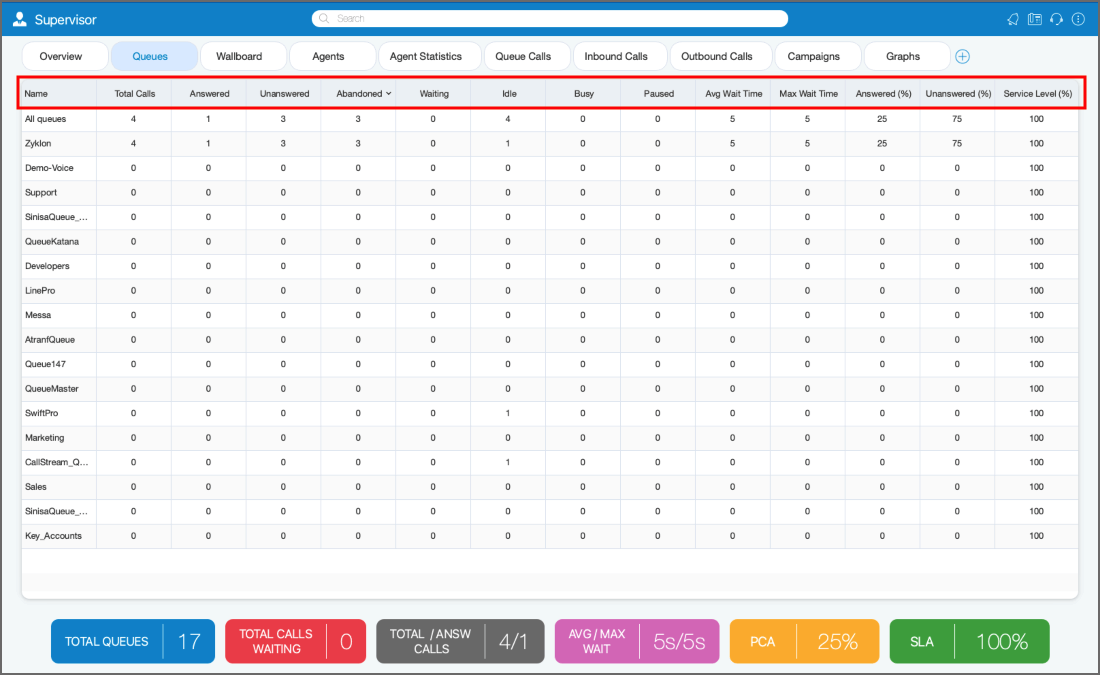
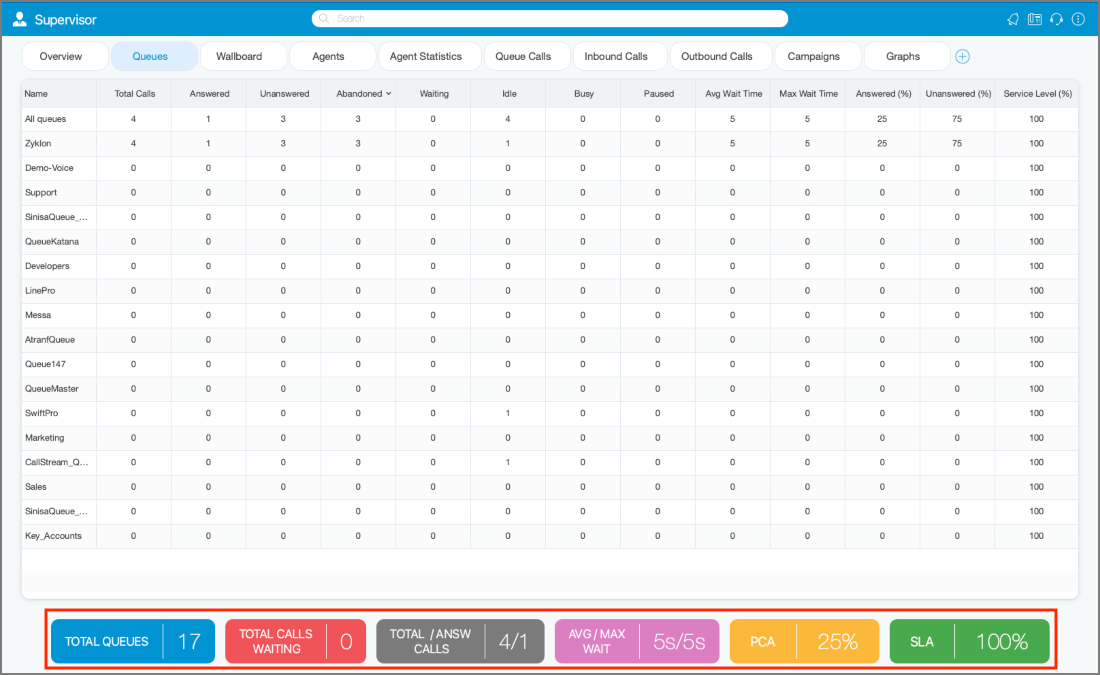
¶ Queues Module
Inside of the Queues Module the Supervisor can monitor Real-time information for all Queues selected through Preferences dialog.
- Total calls: Represents the total number of calls during the day (answered + unanswered).
- Calls answered: Represents the total number of answered calls during the day.
- Calls unanswered: Represents the total number of unanswered calls during the day.
- Abandoned: Represents disconnected or abandoned calls by the caller before being answered.
- Calls waiting: Represents the total number of calls waiting in the Queue to be answered by a free Agent.
- Members idle: Represents the total number of idle Agents.
- Members busy: Represents the total number of busy Agents.
- Members paused: Represents the total number of paused Agents.
- Average Wait Time (AWT) (in seconds): Represents the average amount of time callers must wait to reach an Agent.
- Maximum Wait Time (MWT) (in seconds): Represents the maximum amount of time callers must wait to reach an Agent.
- Calls Answered (%): Represents the percentage of answered calls during the day.
- Calls Unanswered (%): Represents the percentage of unanswered calls during the day.
- Service Level (%): Represents the percentage of calls that have been answered within a specified period of time. Service Level can be configured in the Preferences window.
Abandoned
The "Abandoned" column in the Queues tab of the Supervisor panel enables supervisors to track the number of calls that were disconnected or abandoned by the caller before being answered, with updates occurring every minute.
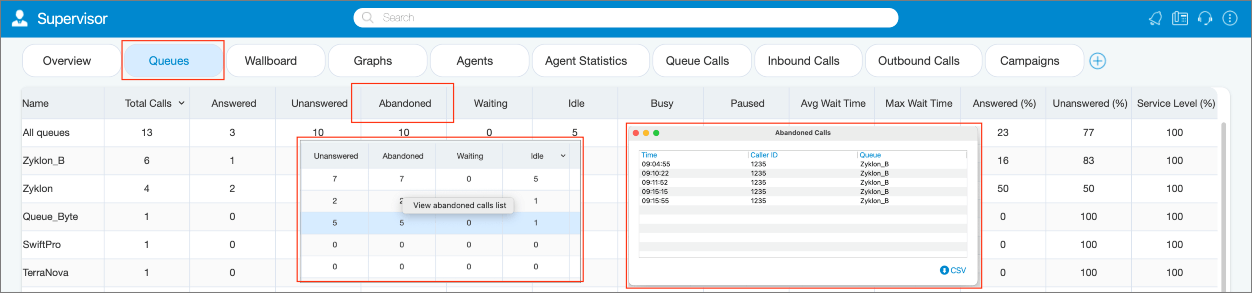
By right-clicking a count, supervisors can access a “View abandoned calls list” option, which opens a dialog showing each call's Time, Caller ID, and Queue Name. The dialog also includes an option to export this list as a CSV file, formatted for compatibility with My Dialer.
NOTE The Queues module displays queue statistics for the current day.
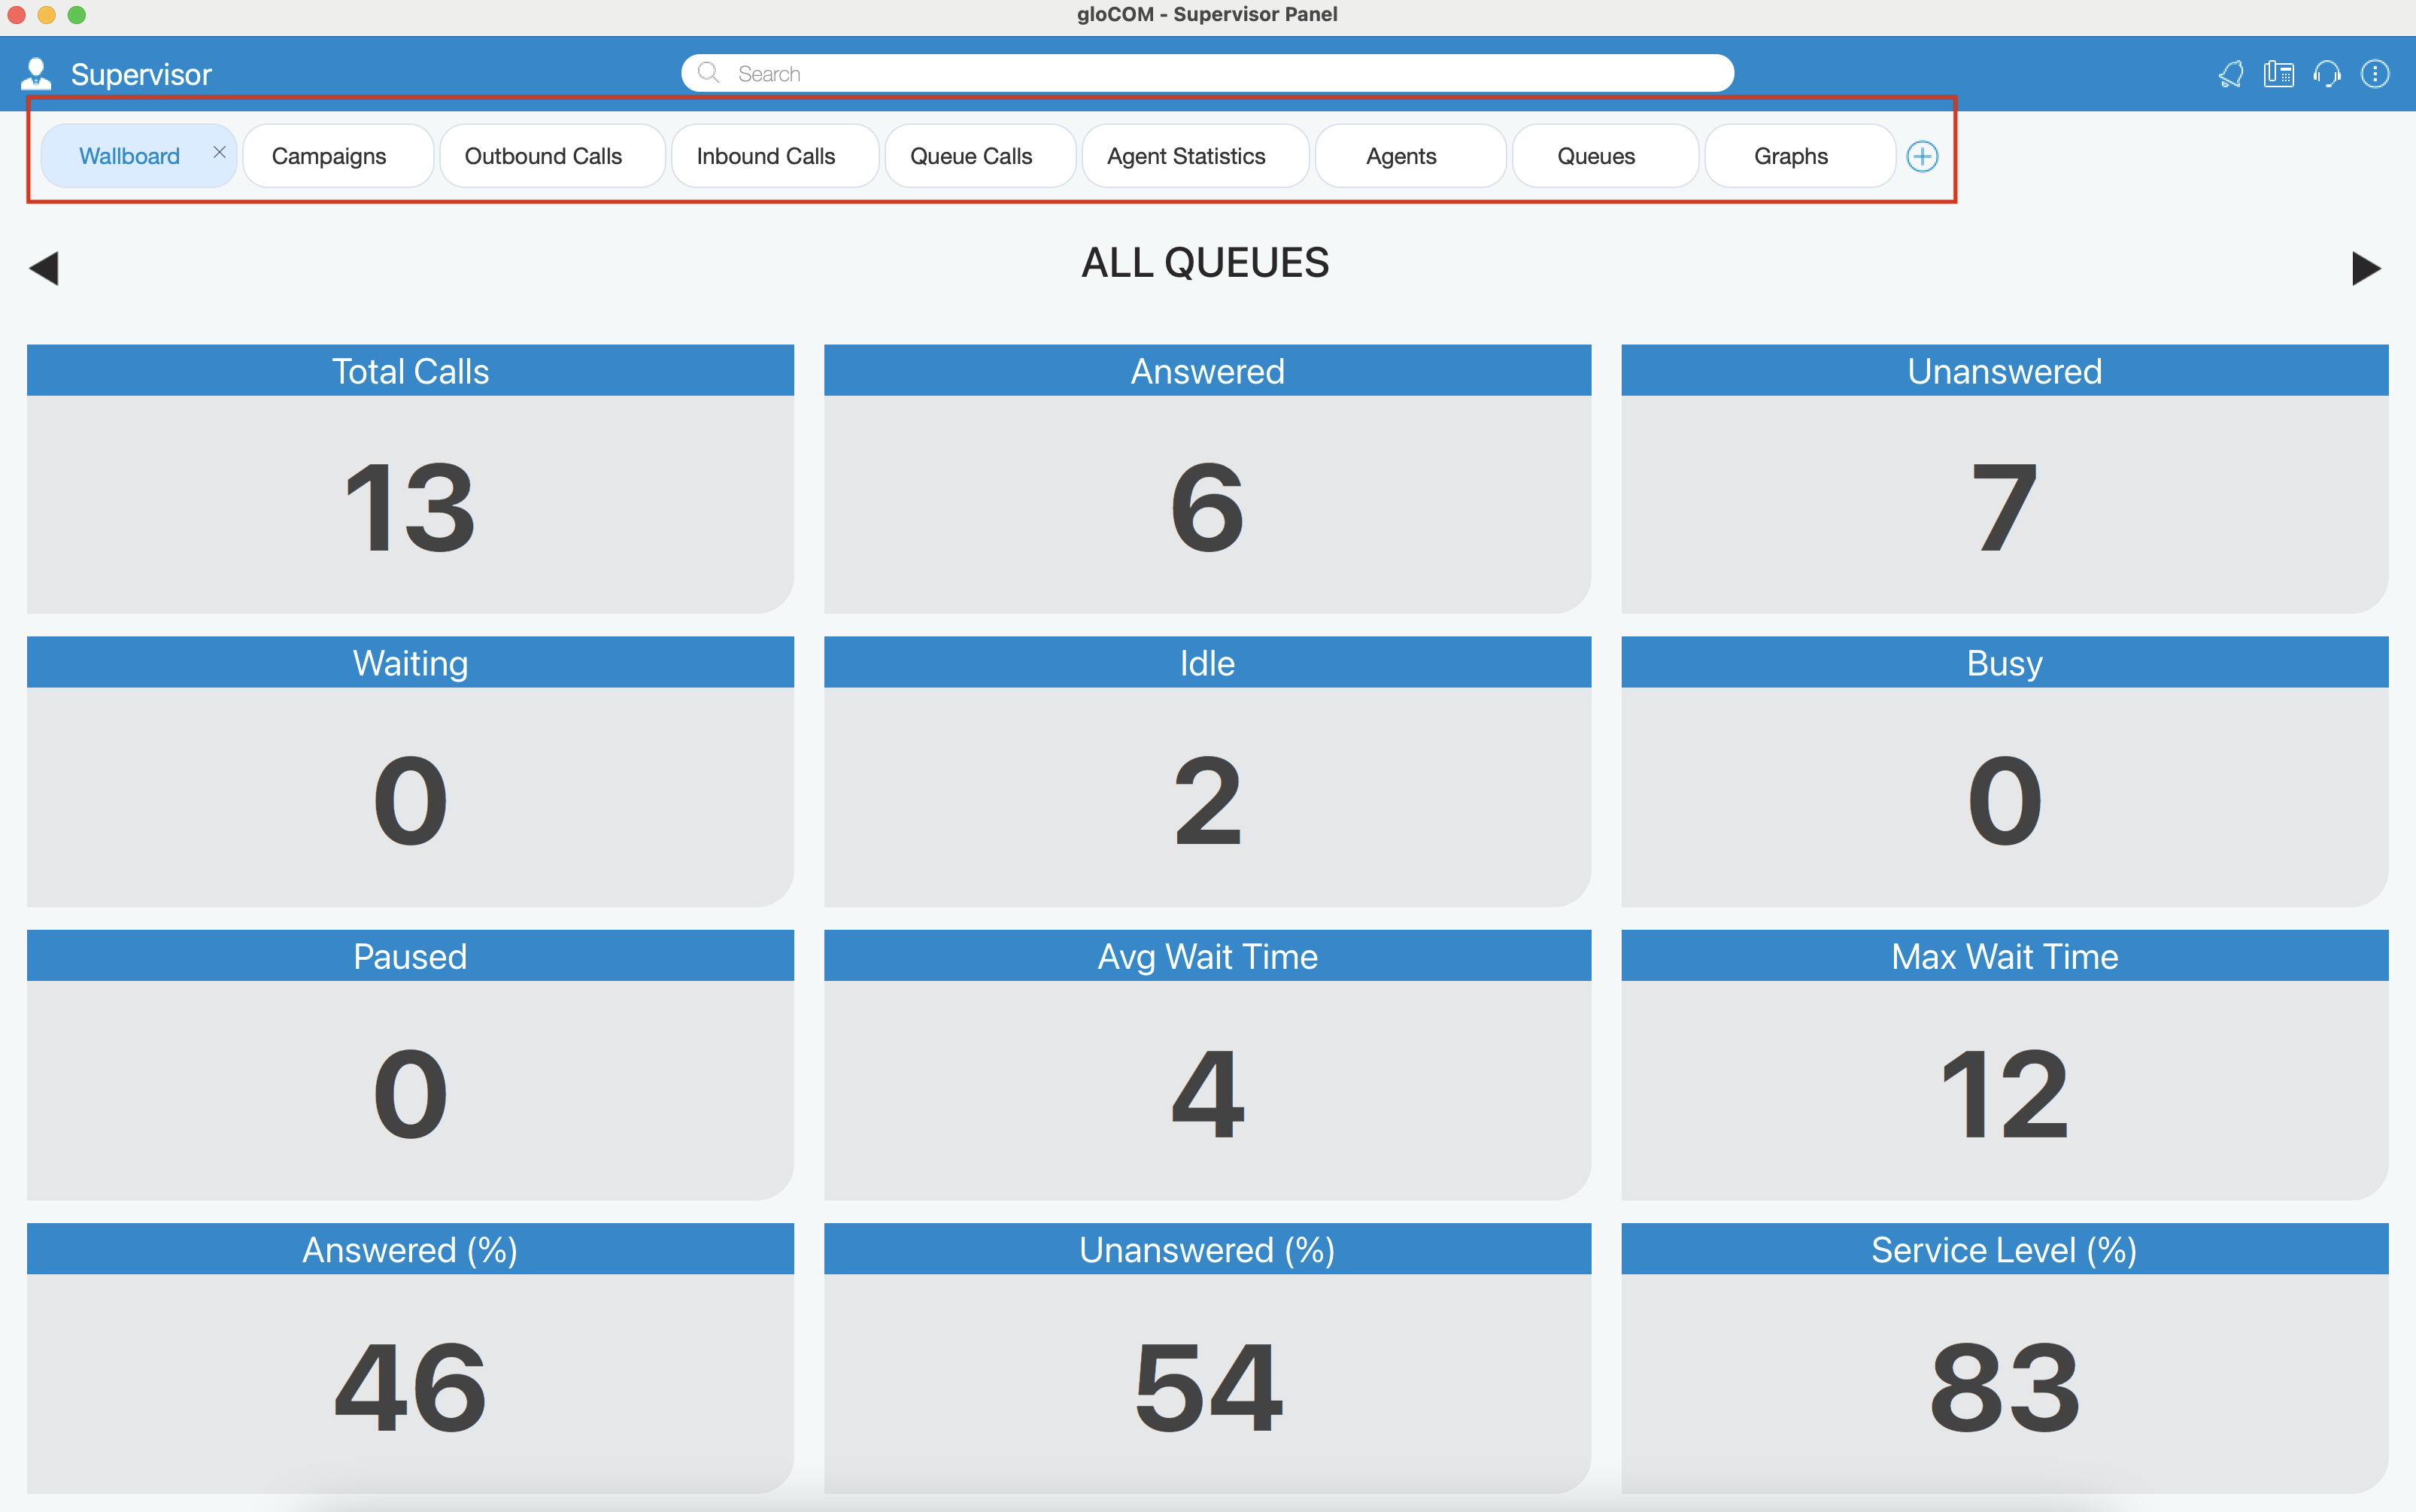
¶ Wallboard Module
Inside the Wallboard Module the Supervisor can monitor real-time information for all Queues selected through the Preferences dialog. The Wallboard is displayed in a large format intended for use with televisions or other large screens.
For each Queue the following information is shown:
- Total calls: Represents the total number of calls during the day (answered + unanswered).
- Calls answered: Represents the total number of answered calls during the day.
- Calls unanswered: Represents the total number of unanswered calls during the day.
- Calls waiting: Represents the total number of calls waiting in the Queue to be answered by a free Agent.
- Agents idle: Represents the total number of idle Agents.
- Agents busy: Represents the total number of busy Agents.
- Agents paused: Represents the total number of paused Agents.
- Average Wait Time (AWT) (in seconds): Represents the average amount of time callers must wait to reach an Agent.
- Maximum Wait Time (MWT) (in seconds): Represents the maximum amount of time callers must wait to reach an Agent.
- Calls Answered (%): Represents the percentage of answered calls during the day.
- Calls Unanswered (%): Represents the percentage of unanswered calls during the day.
- Service Level (%): Represents the percentage of calls that have been answered within a specified period of time. Service Level can be configured in the Preferences window.
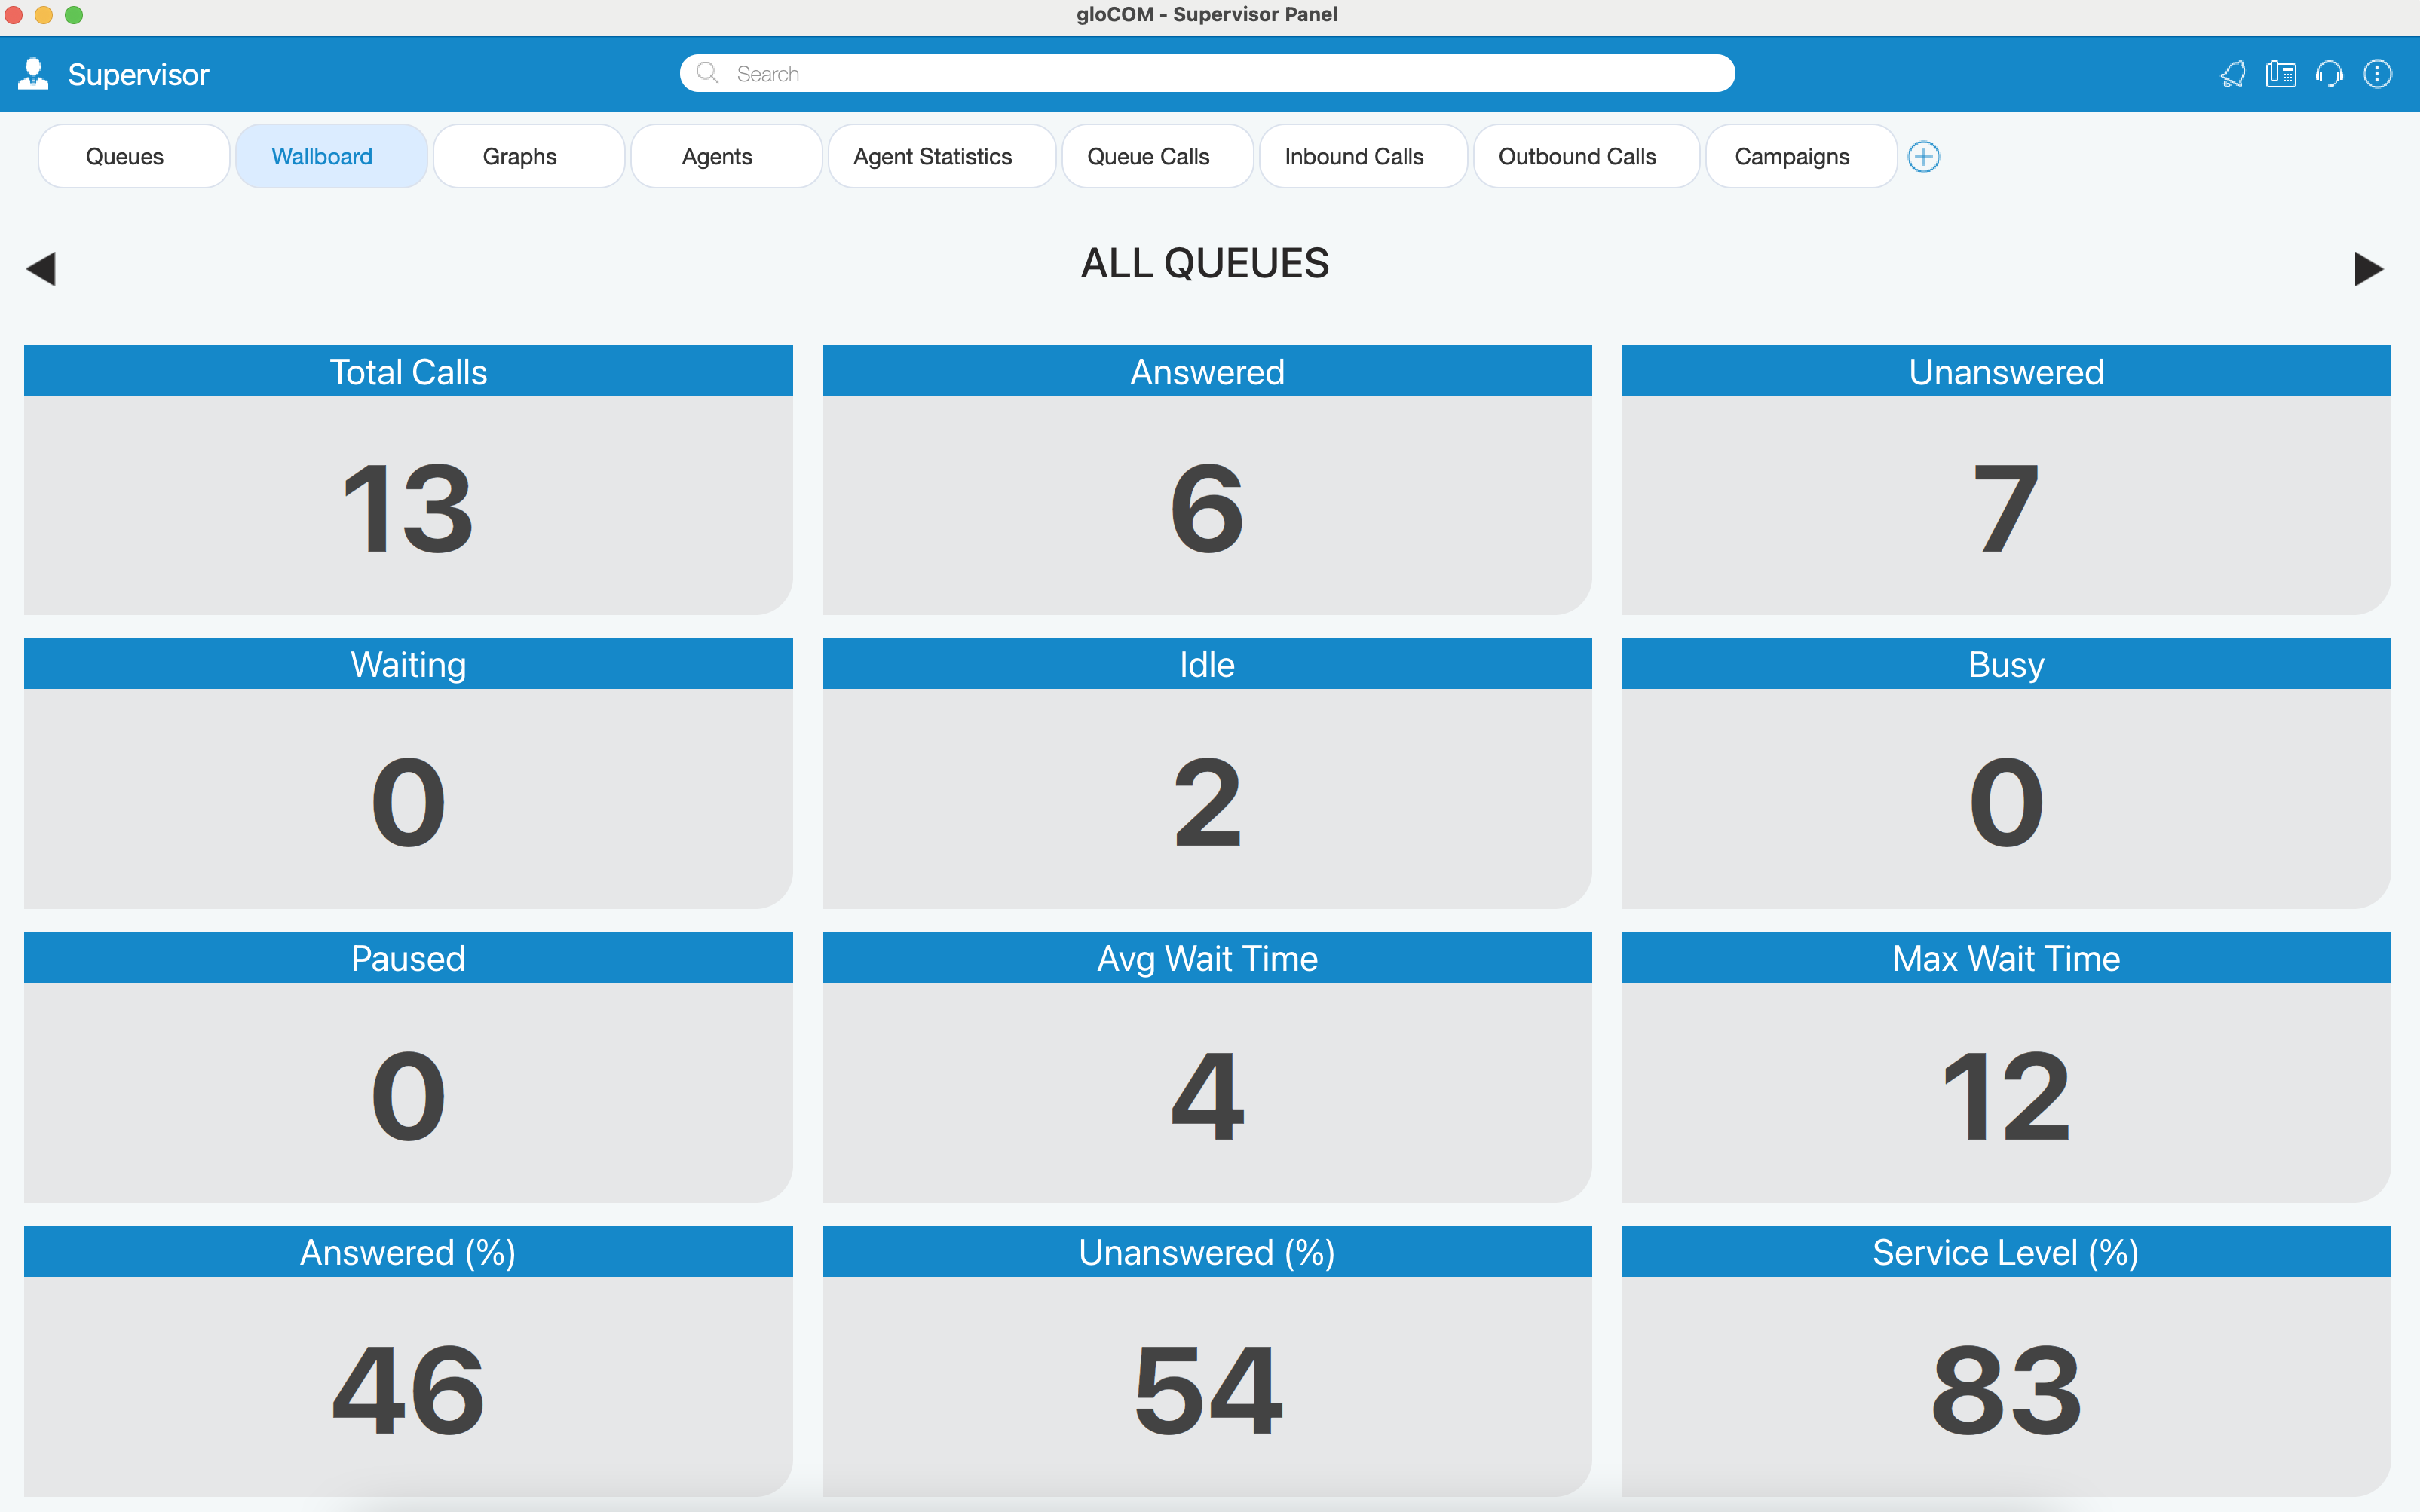
The Wallboard module displays Queue statistics for the current day.
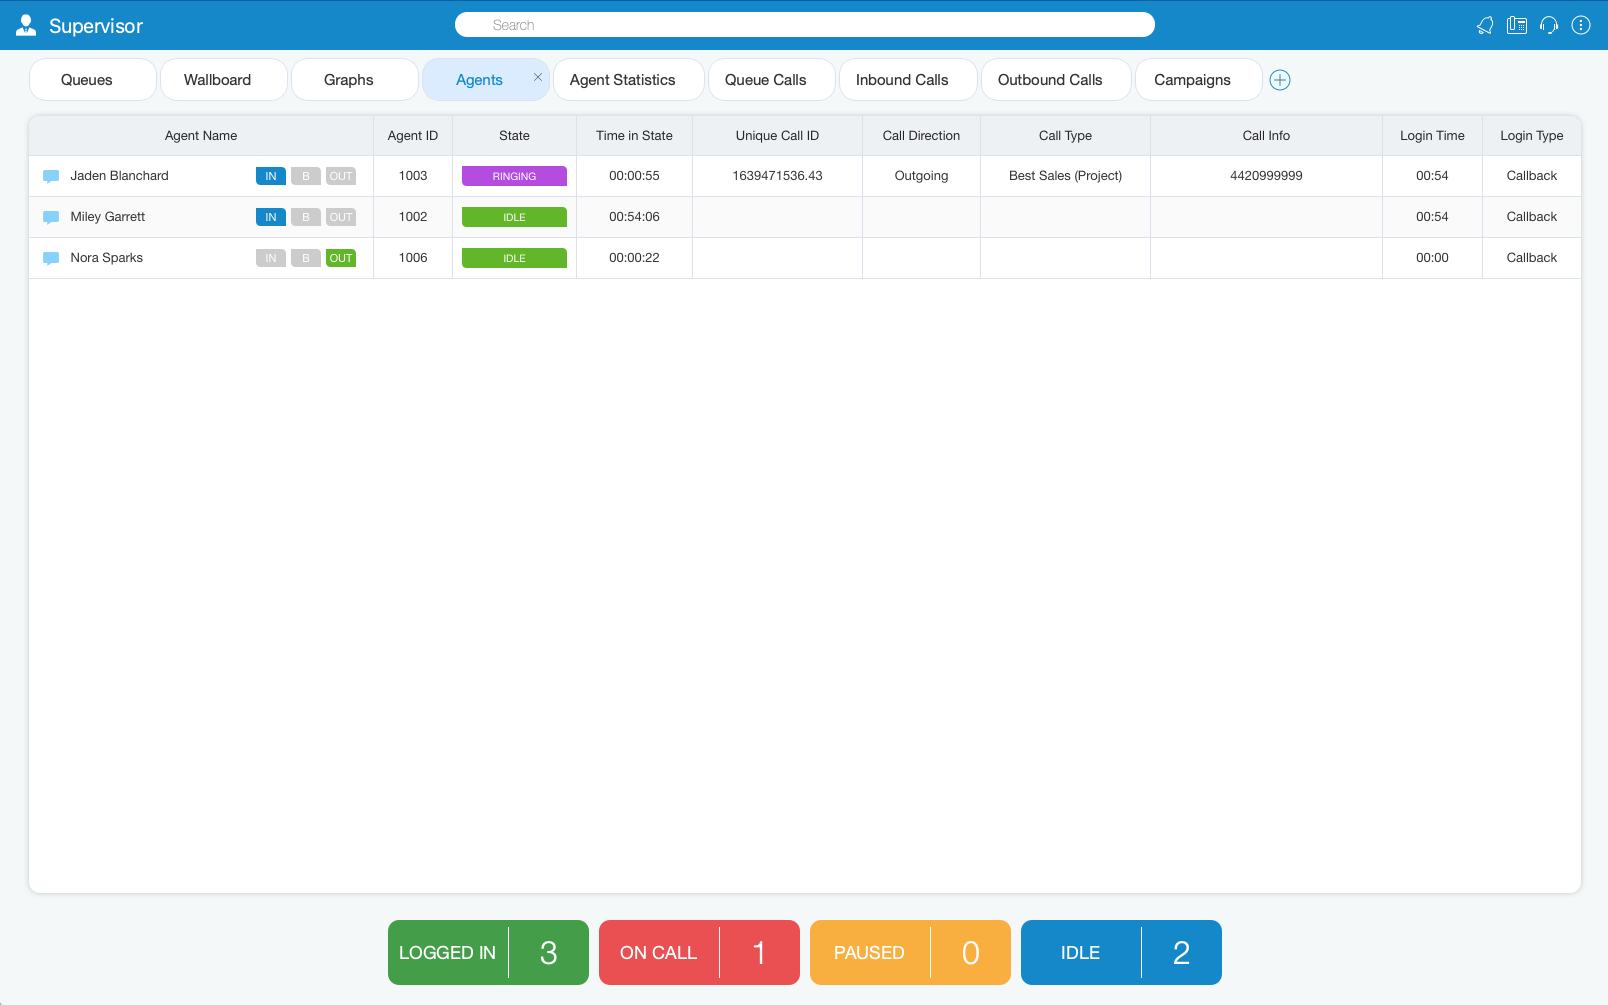
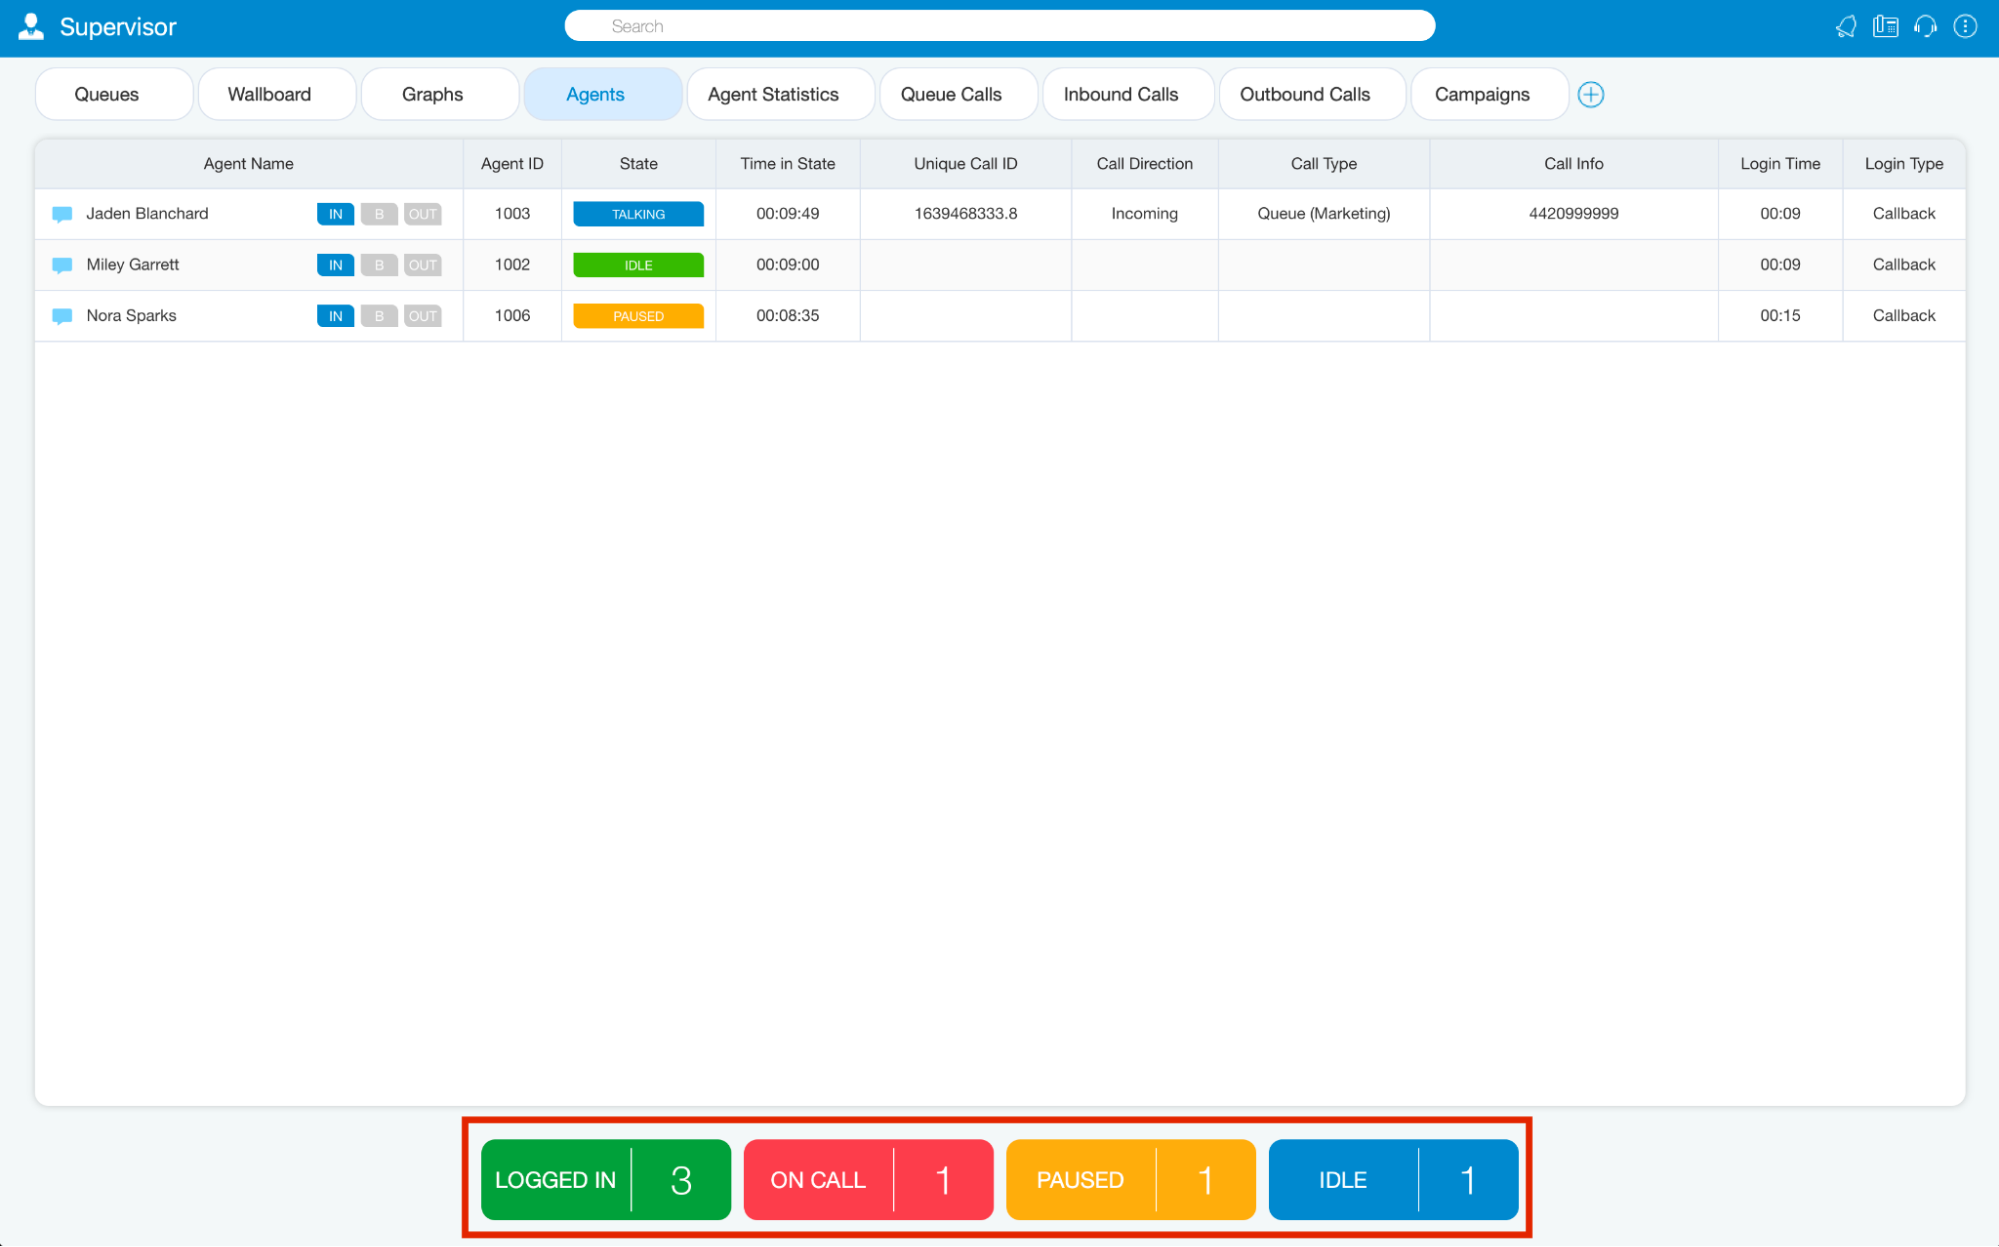
¶ Agents Module
Inside the Agents module, the Supervisor can monitor information for all logged-in Agents selected through Preferences dialog.
For each Agent the following information is shown:
- Agent Name: Represents Agent's name. If the Supervisor clicks on the Agent's name the Agent Info dialog will be displayed.
- Agent ID: Represents Agent's number.
- Agent State: Represents current state of an Agent (idle, paused, busy...).
- Time In State: Represents the amount of time the Agent is in the current state.
- Unique Call ID: Represents unique ID number of a Call.
- Call Direction: Outgoing, Incoming.
- Call Type: Regular Call, Queue Call, Campaign Call.
- Call Info: Represents the information about the call (call number, project code...).
- Login Time: Represents the amount of time the Agent is logged in.
- Login Type: The login type of the Agent.
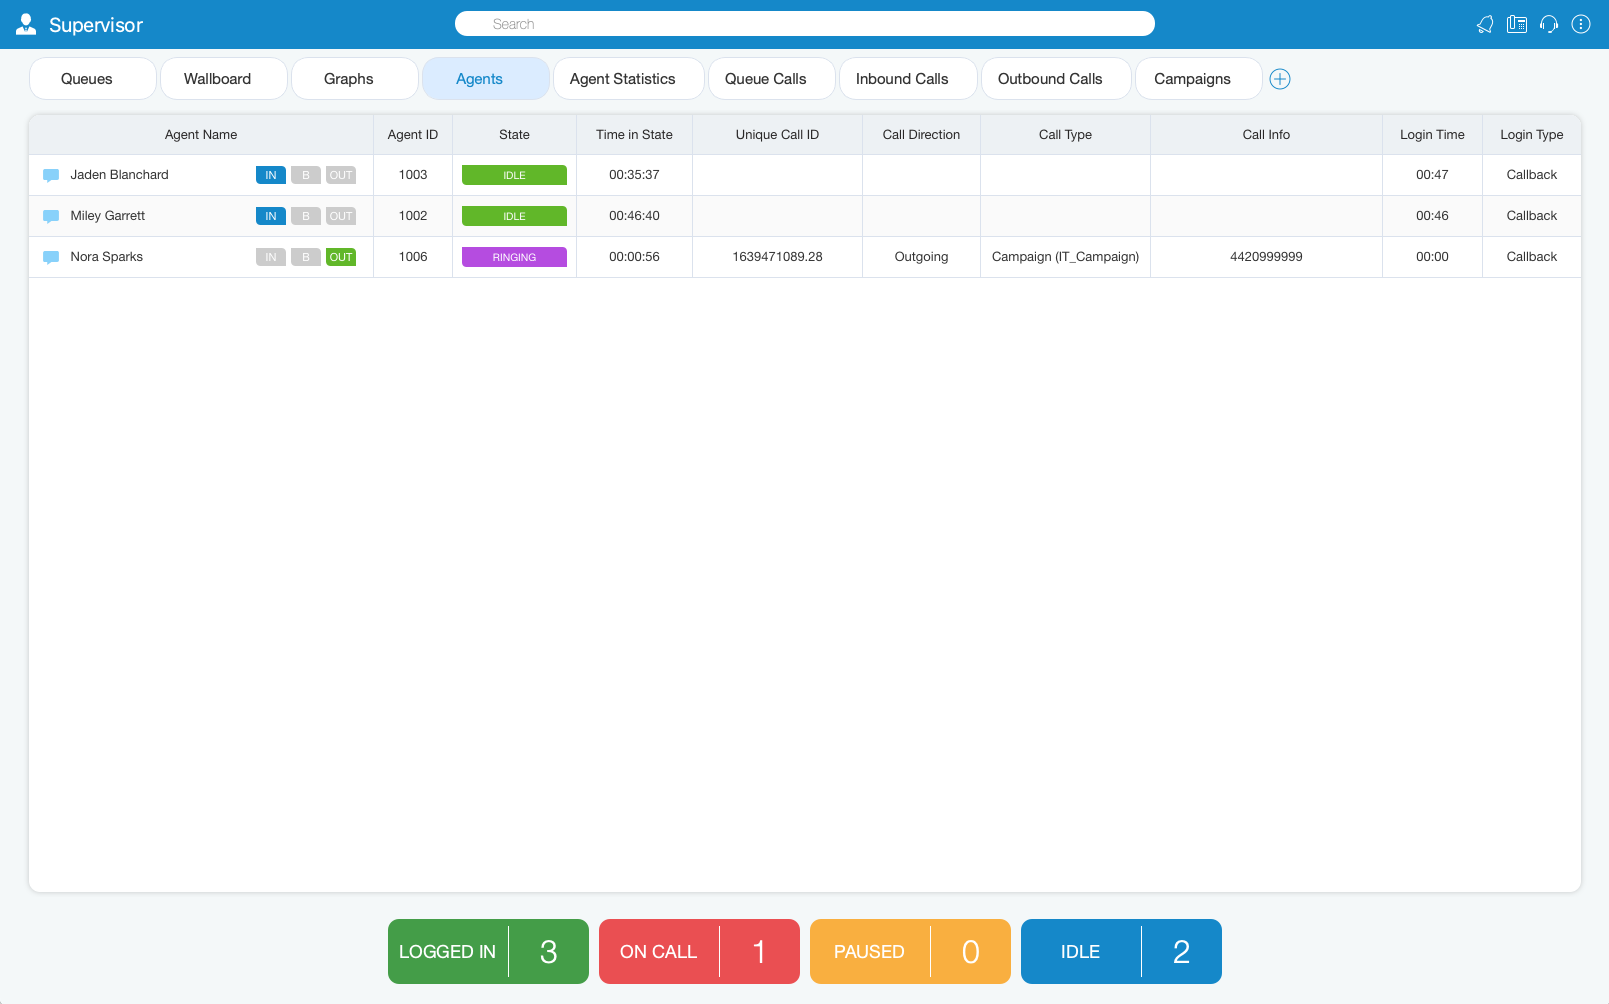
It is possible to see the Agent direction and blending option in real-time. The Supervisor can change the direction of any Agent by clicking on the direction buttons. Also, the Supervisor can see which project code each Agent is using for their current calls, and it is possible to monitor Dialer calls and Campaigns from the Agents module.
¶ Graphs Module
The Graphs module shows Real-time call statistics in the form of Graphs.
The following information is shown:
- Total Calls: Represents the total number of calls during the day.
- Answered Calls: Represents the total number of answered calls during the day.
- Unanswered Calls: Represents the total number of unanswered calls during the day.
- Maximum / Average Wait Time (in seconds): Represents the maximum/average amount of time callers must wait to reach an Agent.
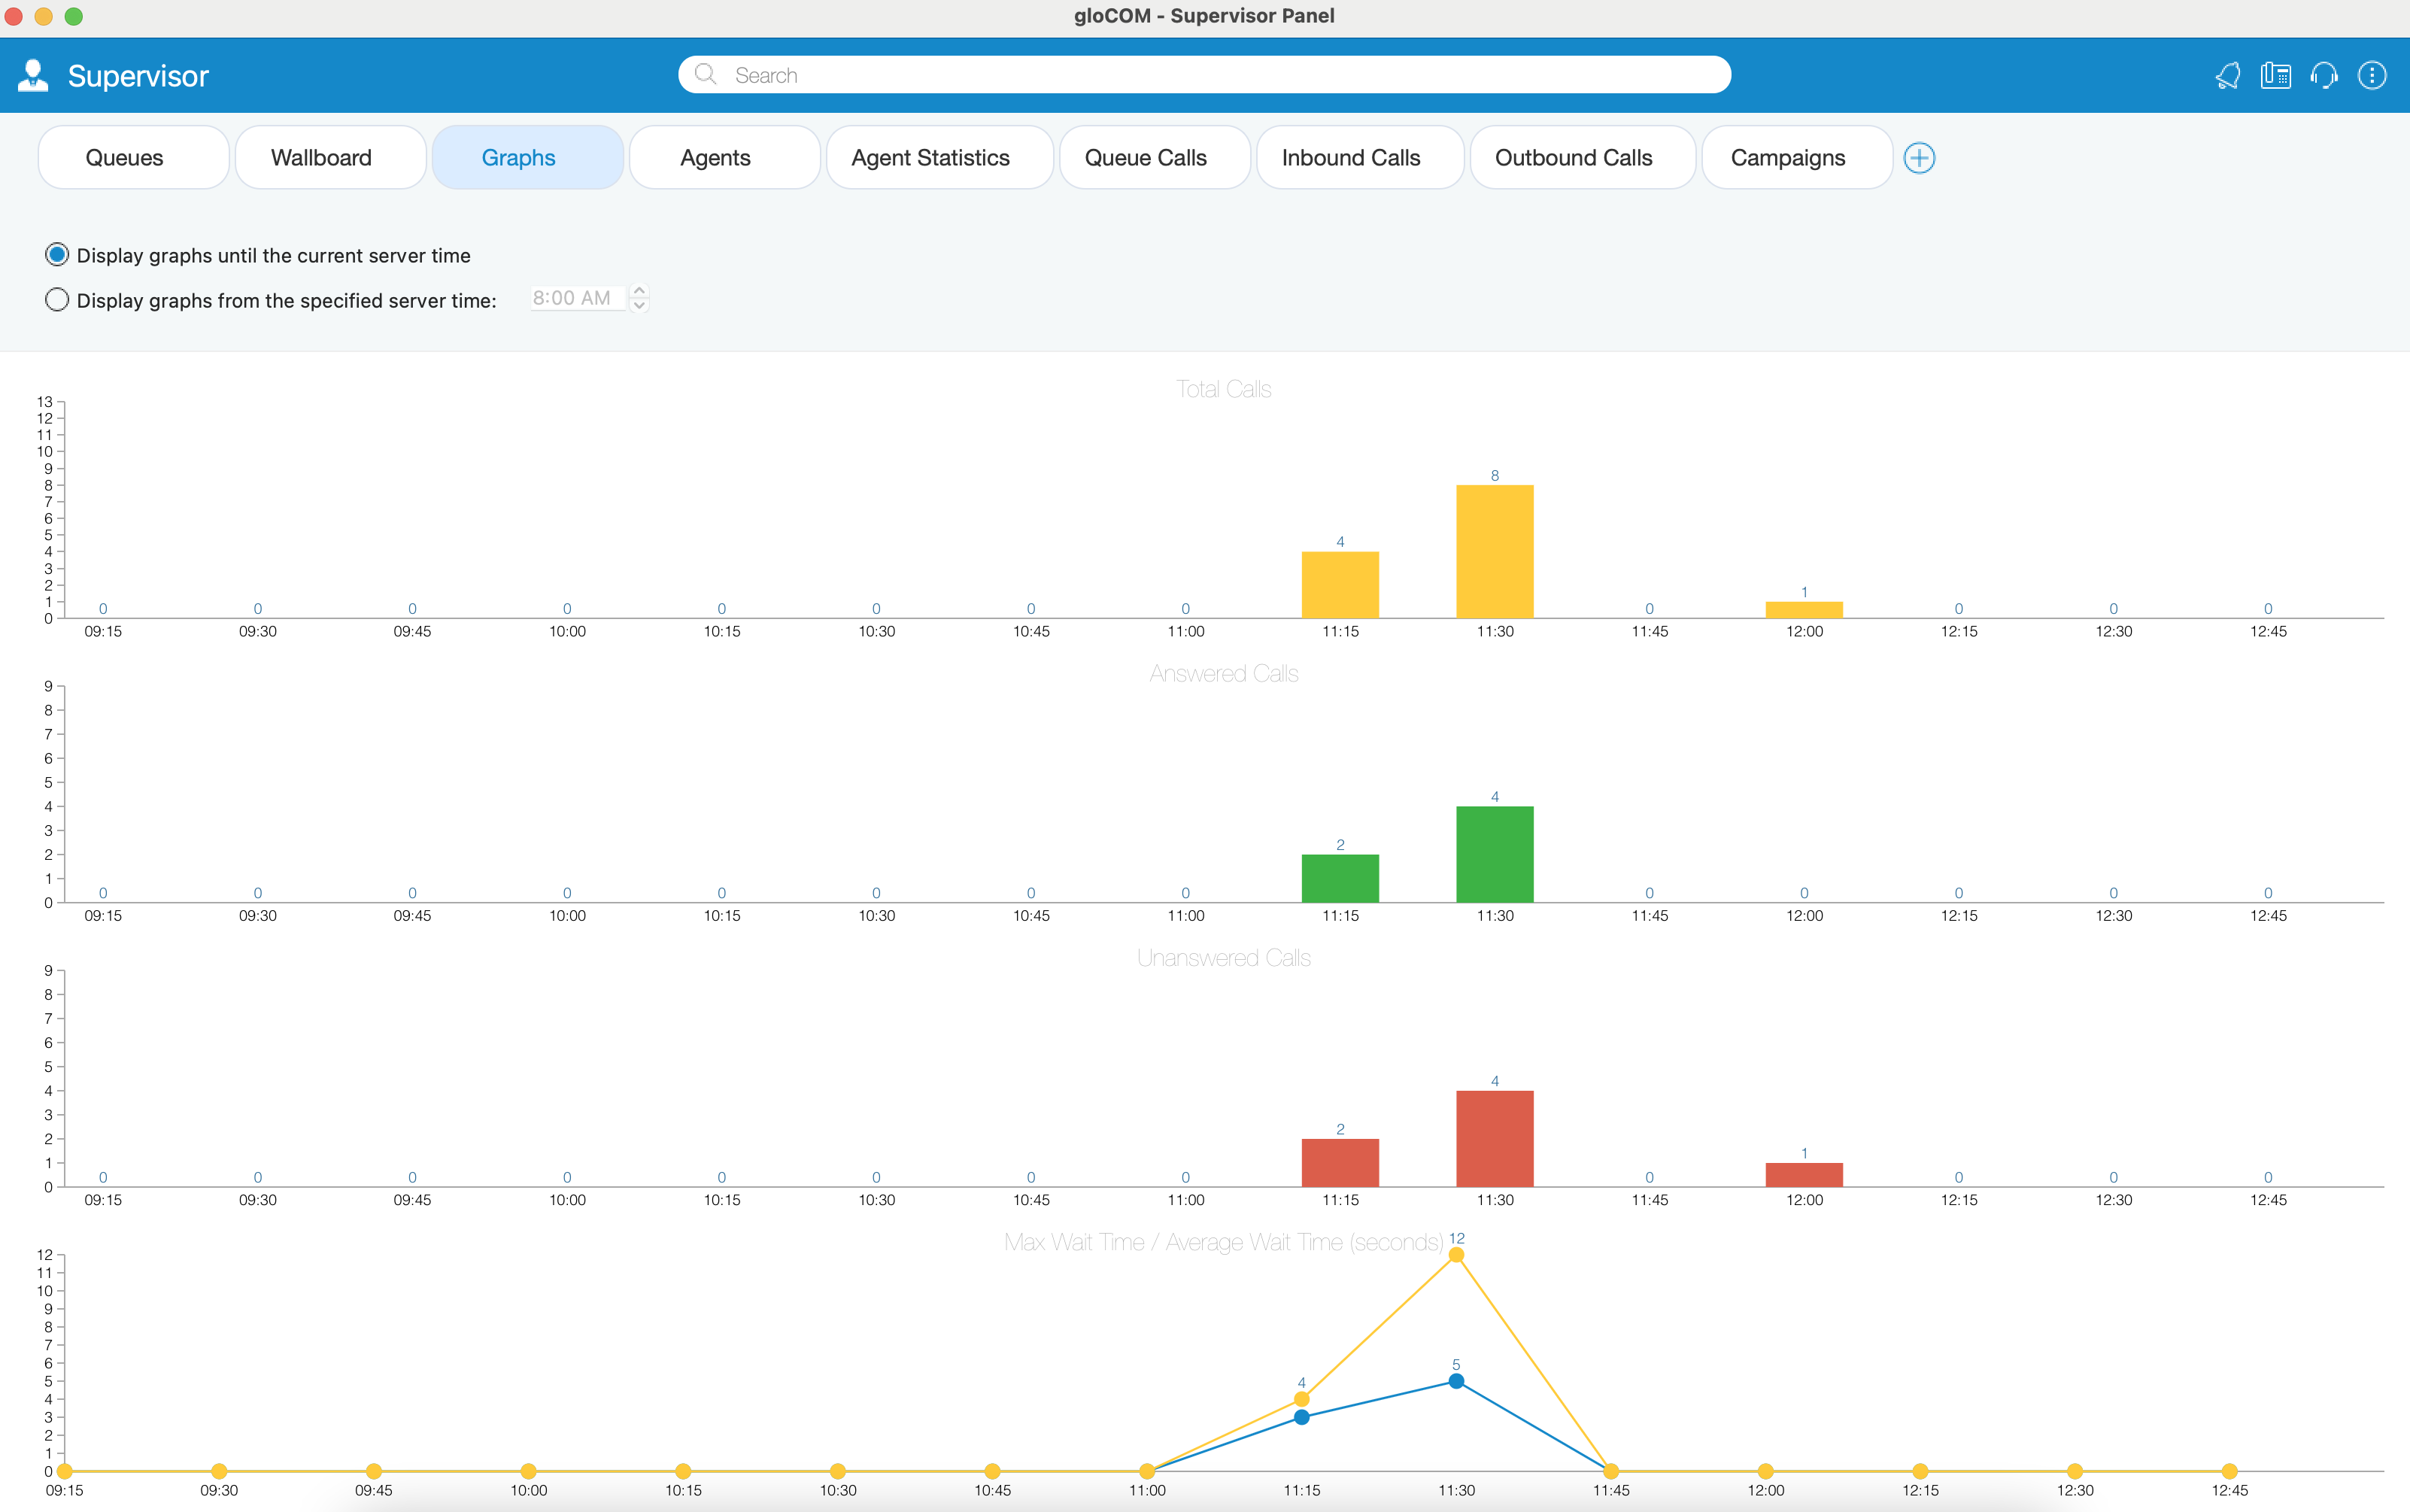
Also, the user can choose whether he/she wants to display Graphs until the current server time, or to display Graphs from the specified server time.
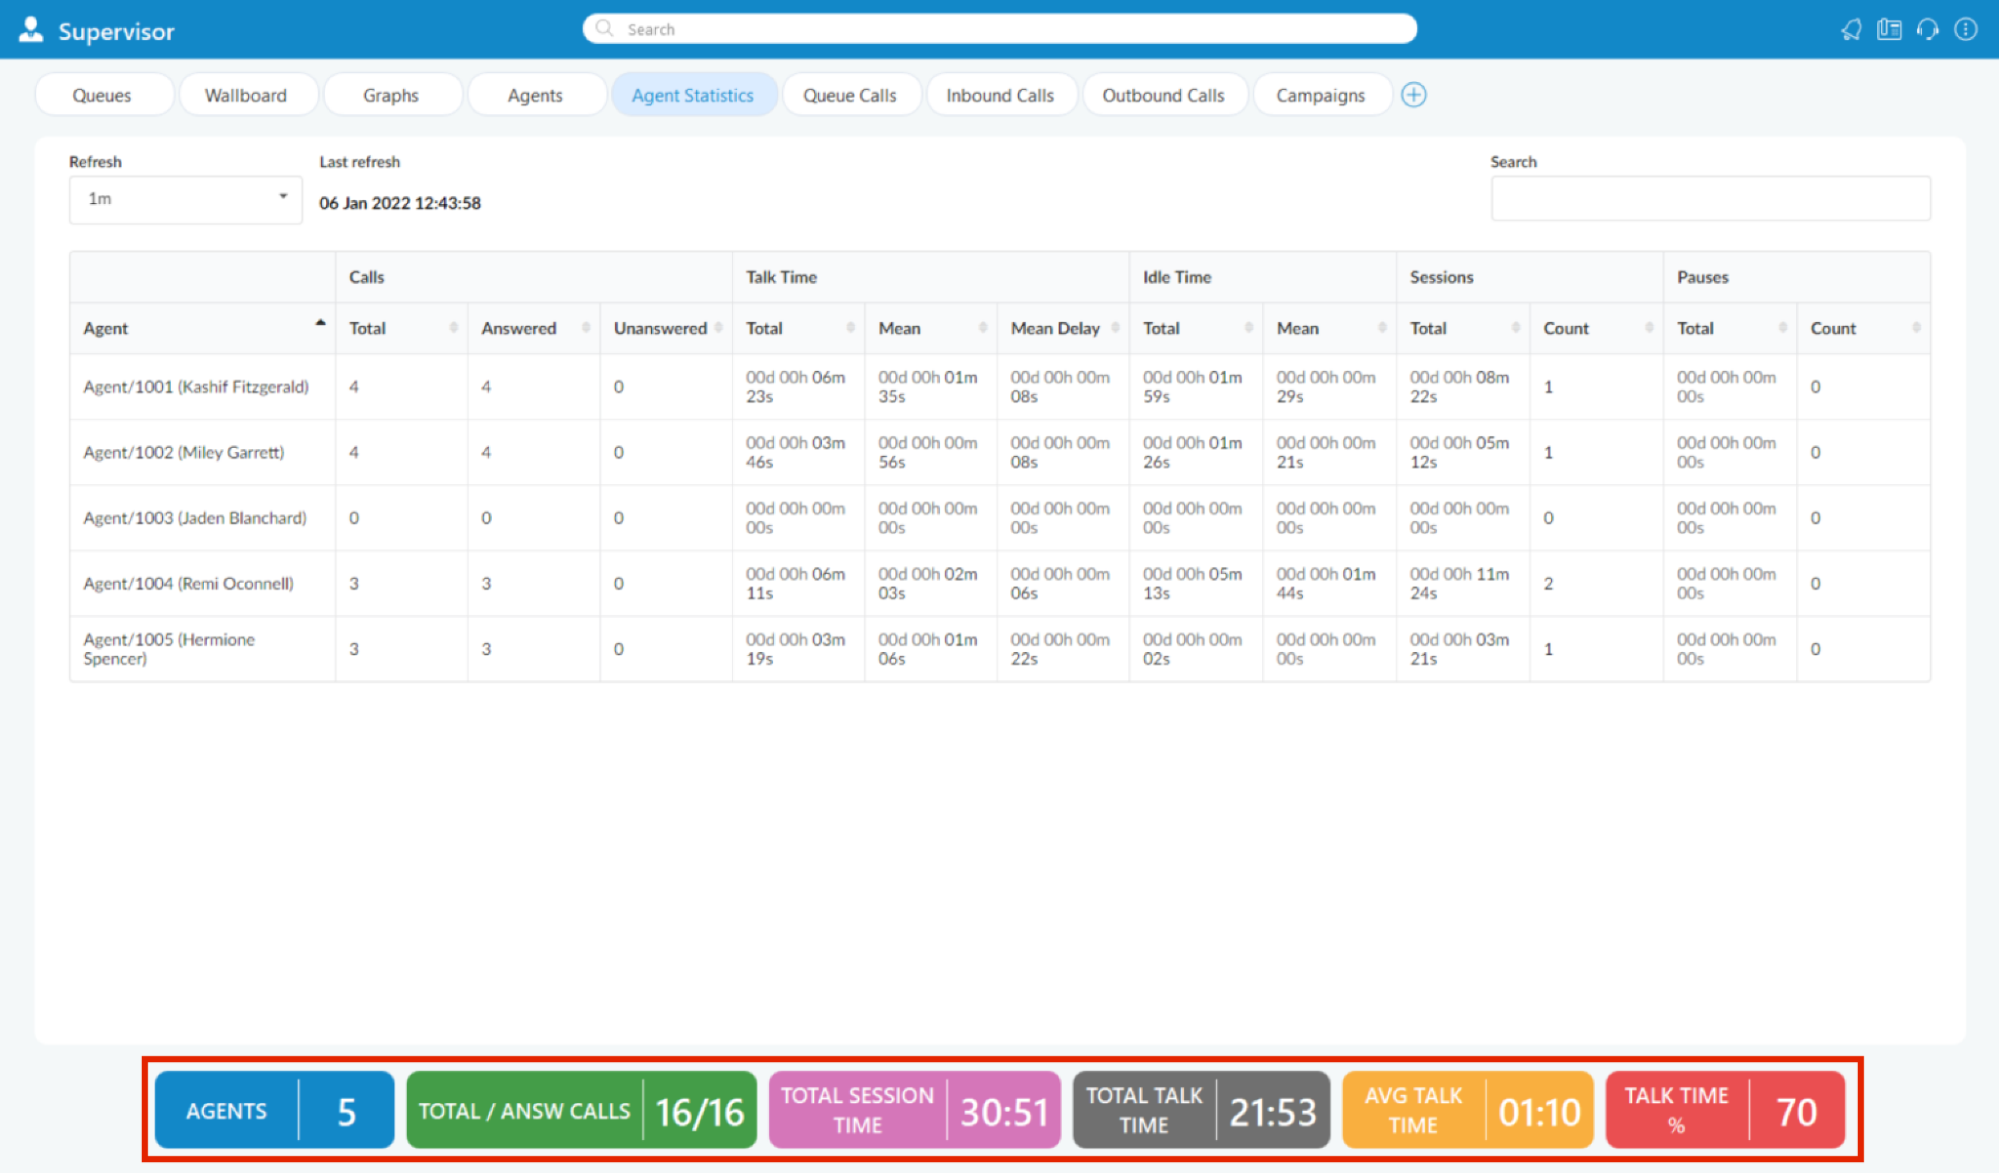
¶ Agent Statistics Module
Prior to version 6.0, only Agent Inbound (real-time) statistics were available. Now, Agent Statistics module displays Agent's Inbound and Outbound statistics that include all Agent's calls (inbound, outbound, direct (in/out) ) into calculations. Calculations are reset every day starting from midnight.
For each Agent the following information is shown:
- Agent Name and Number: This section shows Agent's name and Agent's number.
- Calls: All calls answered by Agent.
- Total: Represents the total number of calls.
- Answered: Represents the total number of answered calls.
- Unanswered: Represents the total number of unanswered calls.
- Talk Time: Agent talk time.
- Total: Represents the total talking time.
- Mean: Mean/Average Agent talk time.
- Mean Delay: Mean/Average caller wait time before answered by the Agent.
- Idle Time: Agent idle time (callback Agents only).
- Total: Total Agent idle time(when Agent is not busy).
- Mean: Mean/Average Agent idle time.
- Sessions: Time Agent was logged in the queue.
- Total: Total time Agent was logged in.
- Count: Number of Agent sessions.
- Pauses: Represents Agent's time on Pauses
- Total: Total time Agent was on pause.
- Count: Number of pauses.

It is possible to set refresh time to the desired value to keep statistics updated. Also, labels on the bottom of the page are showing the total number of Agents, Total/Answered calls, Total Session Time, Total Talk Time, Average Talk Time, and Talk Time (%). More information about these labels is on the Agent Statistics tab.
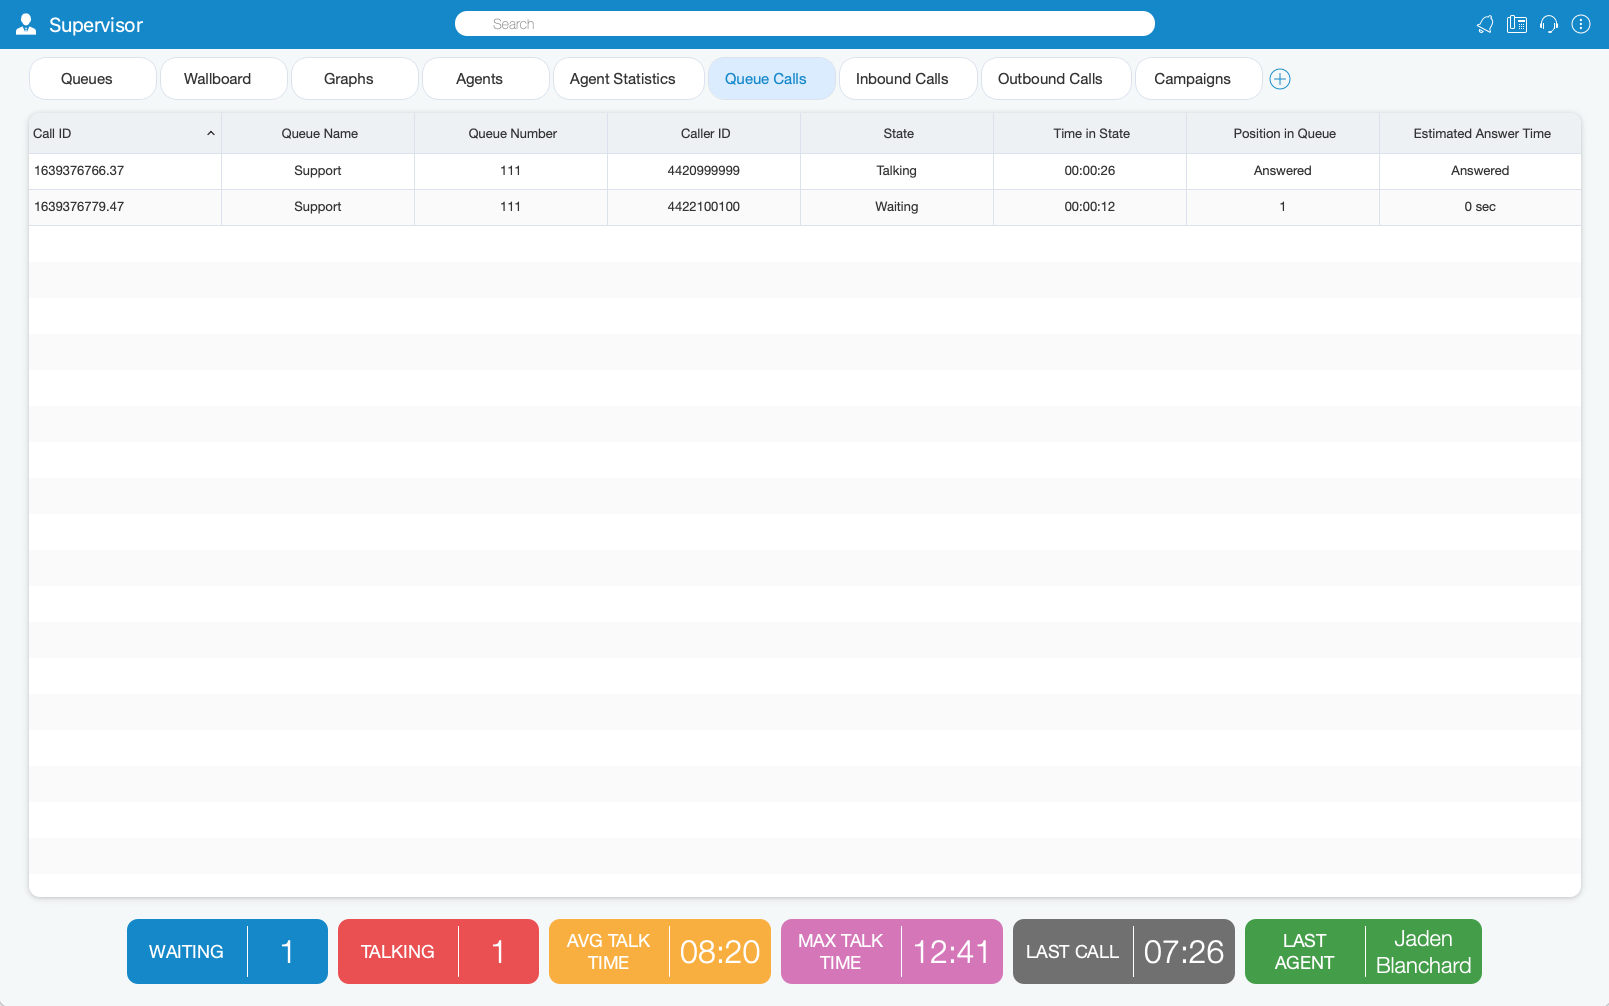
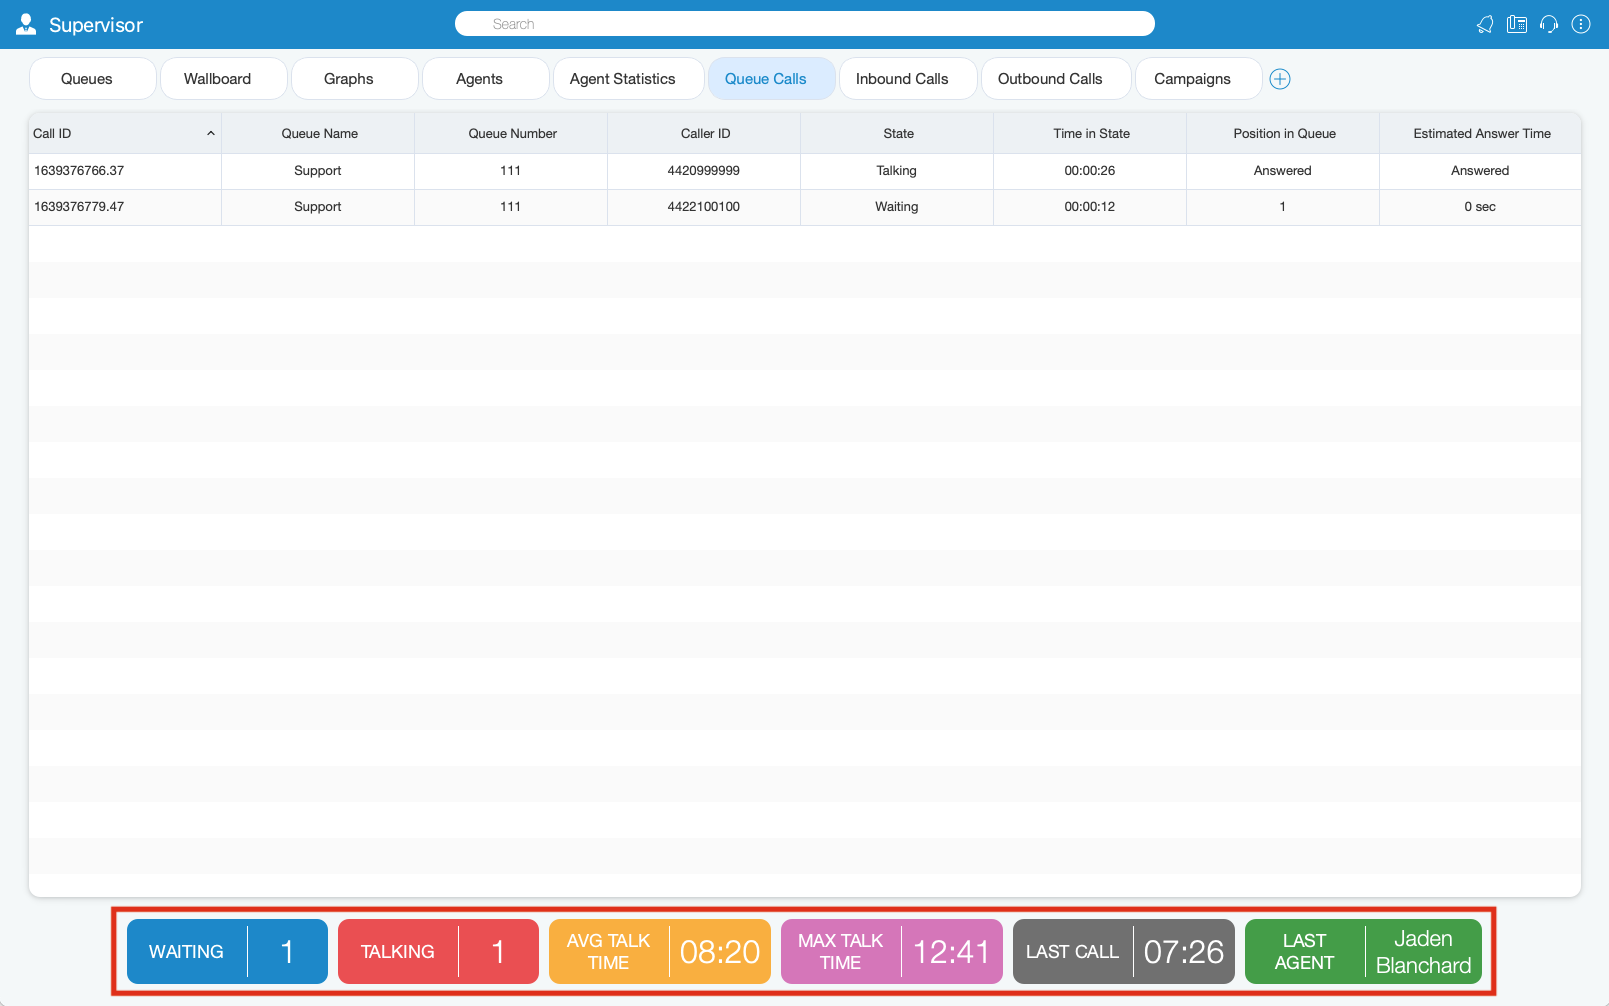
¶ Queue Calls Module
Inside the Queue Calls module, the Supervisor can monitor information for calls from all the Queues he/she selects to be visible through the Preferences dialog.
For each call the following information is shown:
- Call ID: Represents ID number of call.
- Queue Name: Displays Queue name.
- Queue Number: Shows Queue number.
- Caller ID: Represents DID number of the Caller.
- State: Represents current state of the Call.
- Time in State: Total time in current state.
- Position in Queue: Represents position number in Queue.
- Estimated Answer Time: Shows estimated answered time.
The Supervisor can perform the following operations for each call if he/she has the permissions:
- Transfer Call: The Supervisor can transfer selected call.
- Take Call: The Supervisor can take selected call.
- Monitor Call: The Supervisor can monitor selected call.
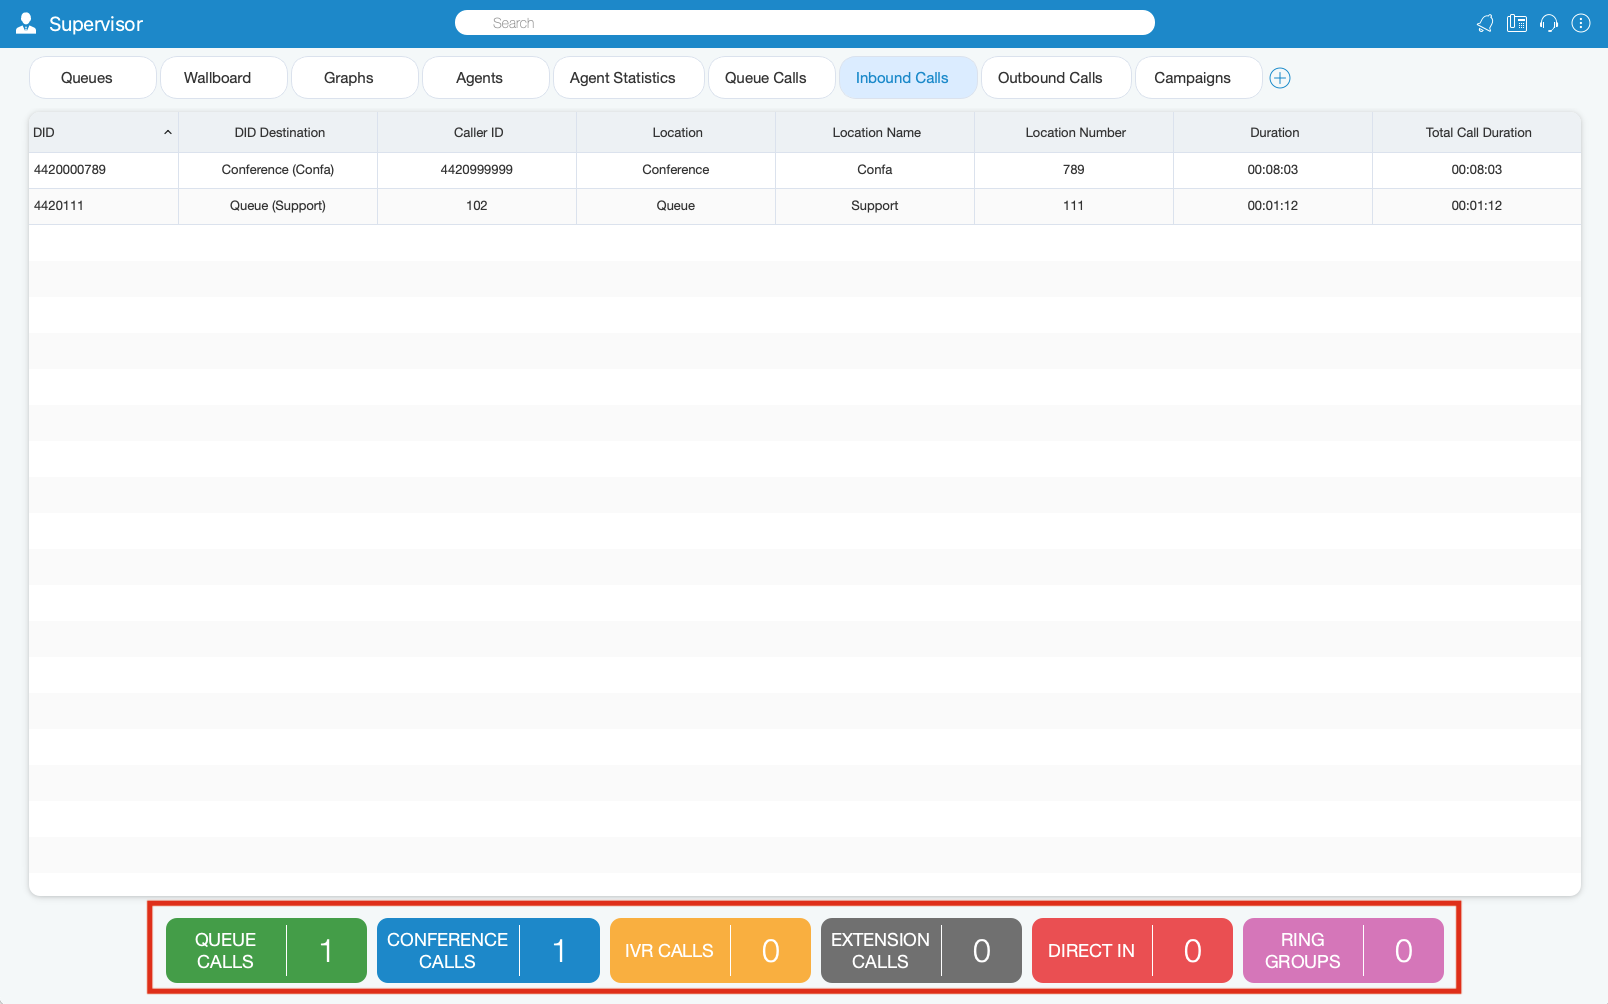
¶ Inbound Calls Module
Inside the Inbound Calls module, the Supervisor can monitor information for all calls coming into the system.
For each call the following information is shown:
- DID: Displays DID Call number.
- DID Destination: Represents destionation of the Call.
- Caller ID: Shows DID number of Caller.
- Location: Represents type of location (IVR, Queue, Conference etc...)
- Location Name: Displays name of location.
- Location Number: Shows location number.
- Duration in Location: Shows current duration in location.
- Total Call Duration: Show total Call Duration.
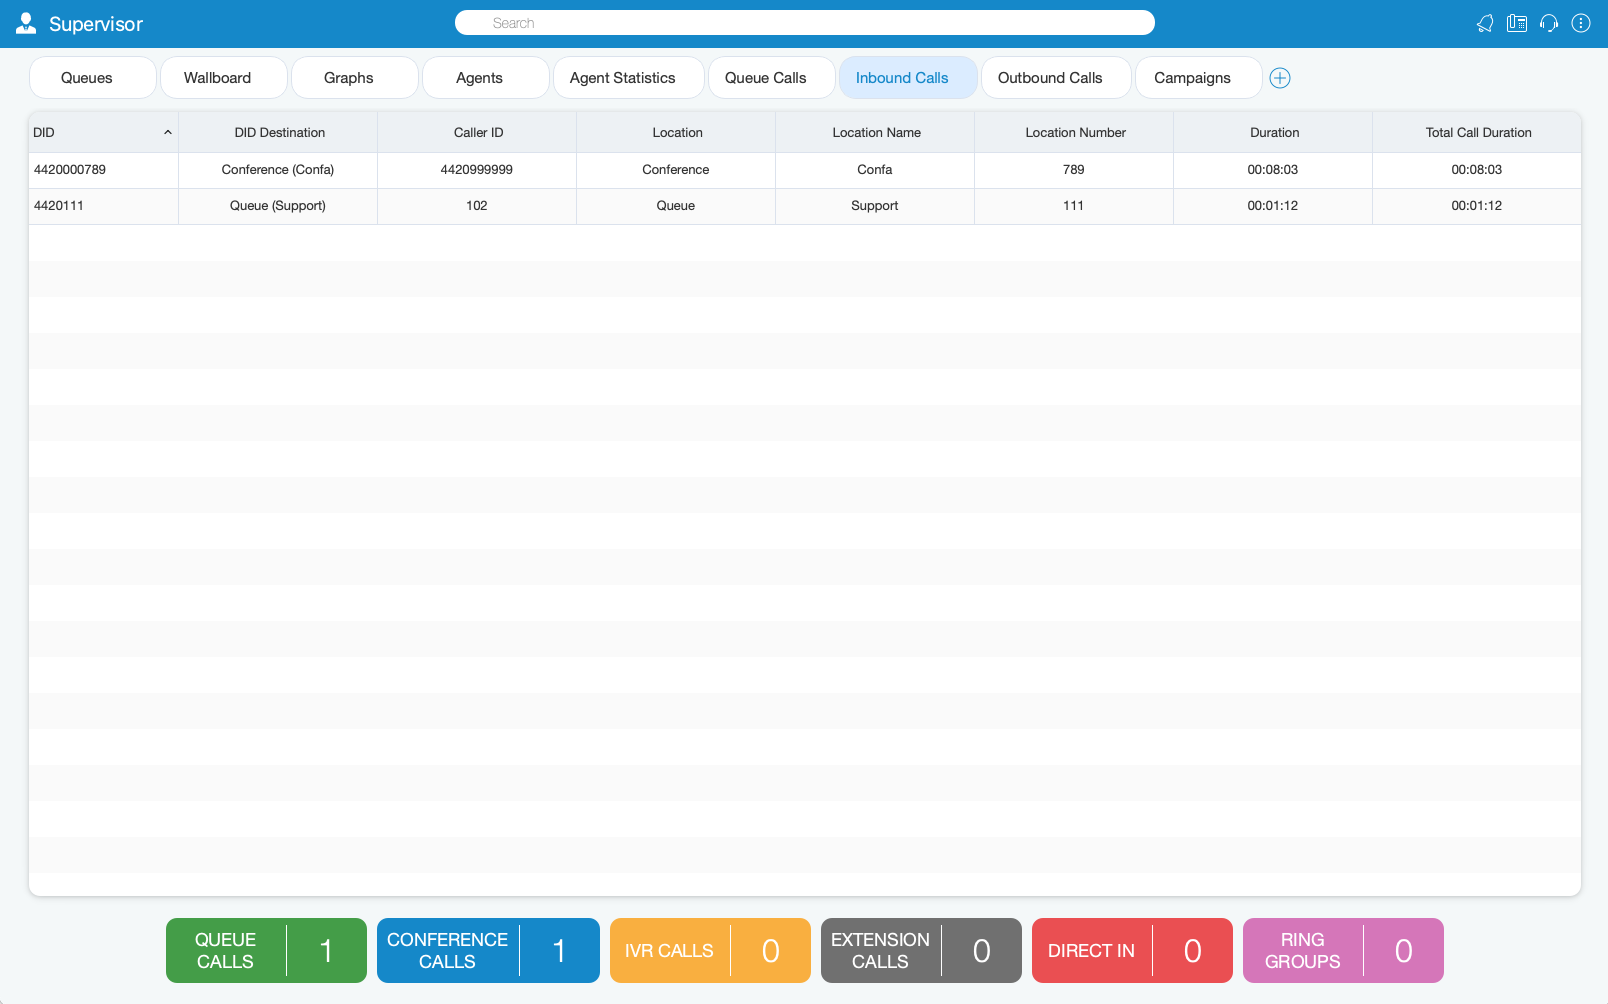
The Supervisor can perform the Transfer Call operation for each call if he/she has the permissions.
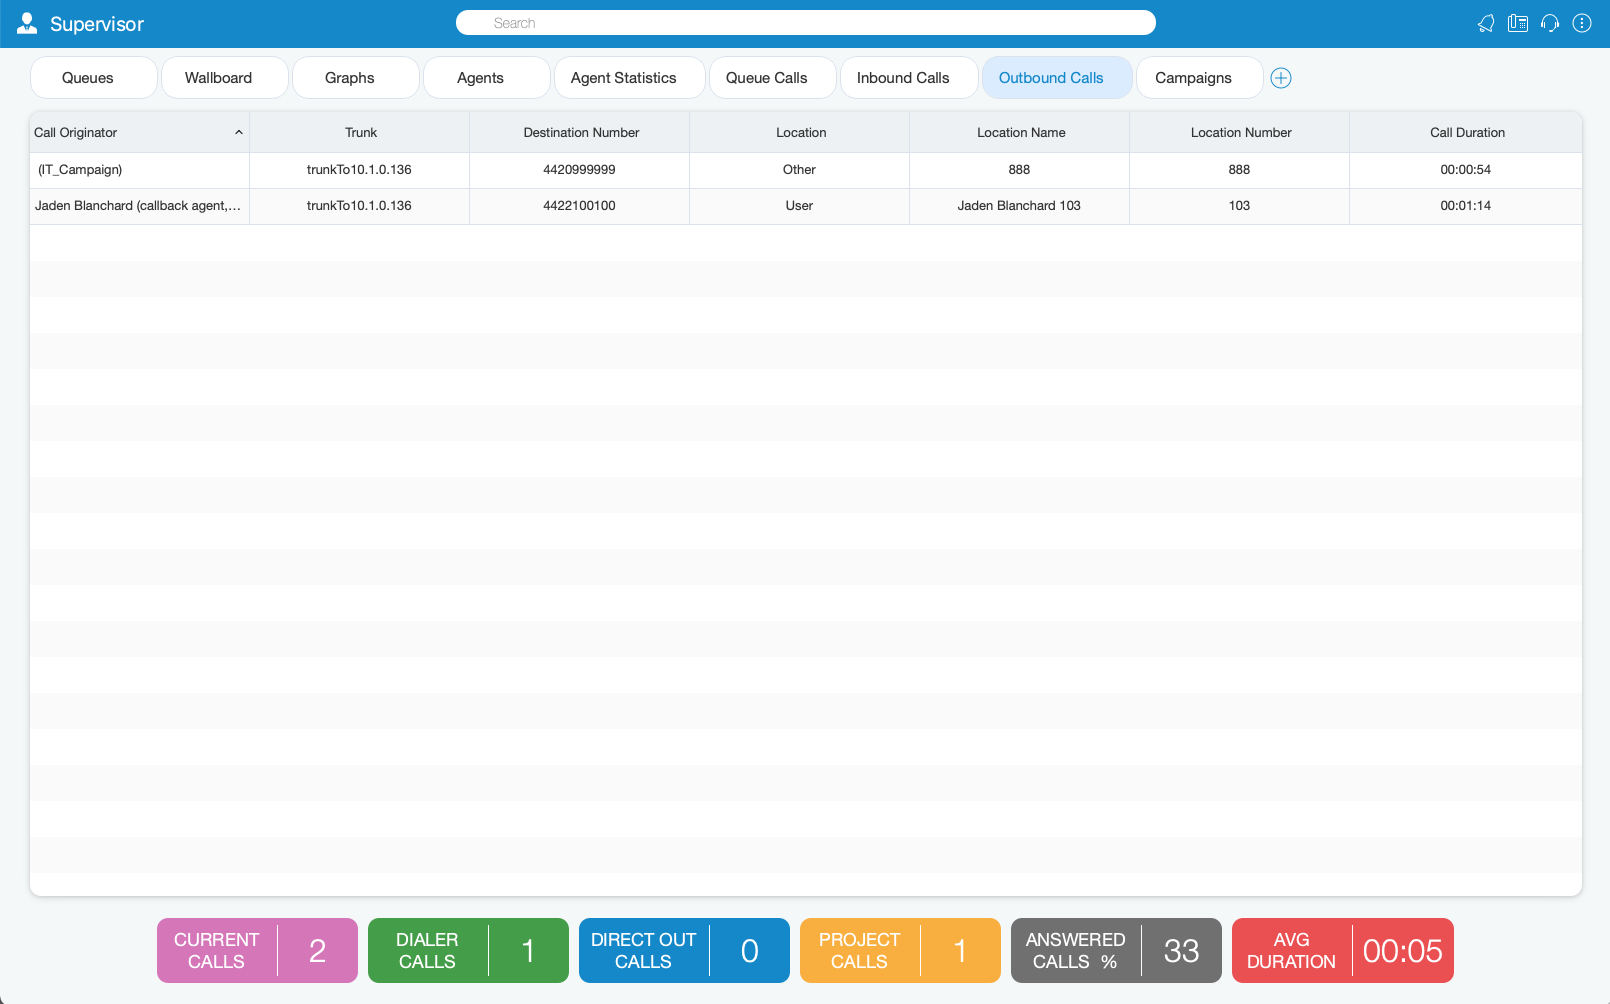
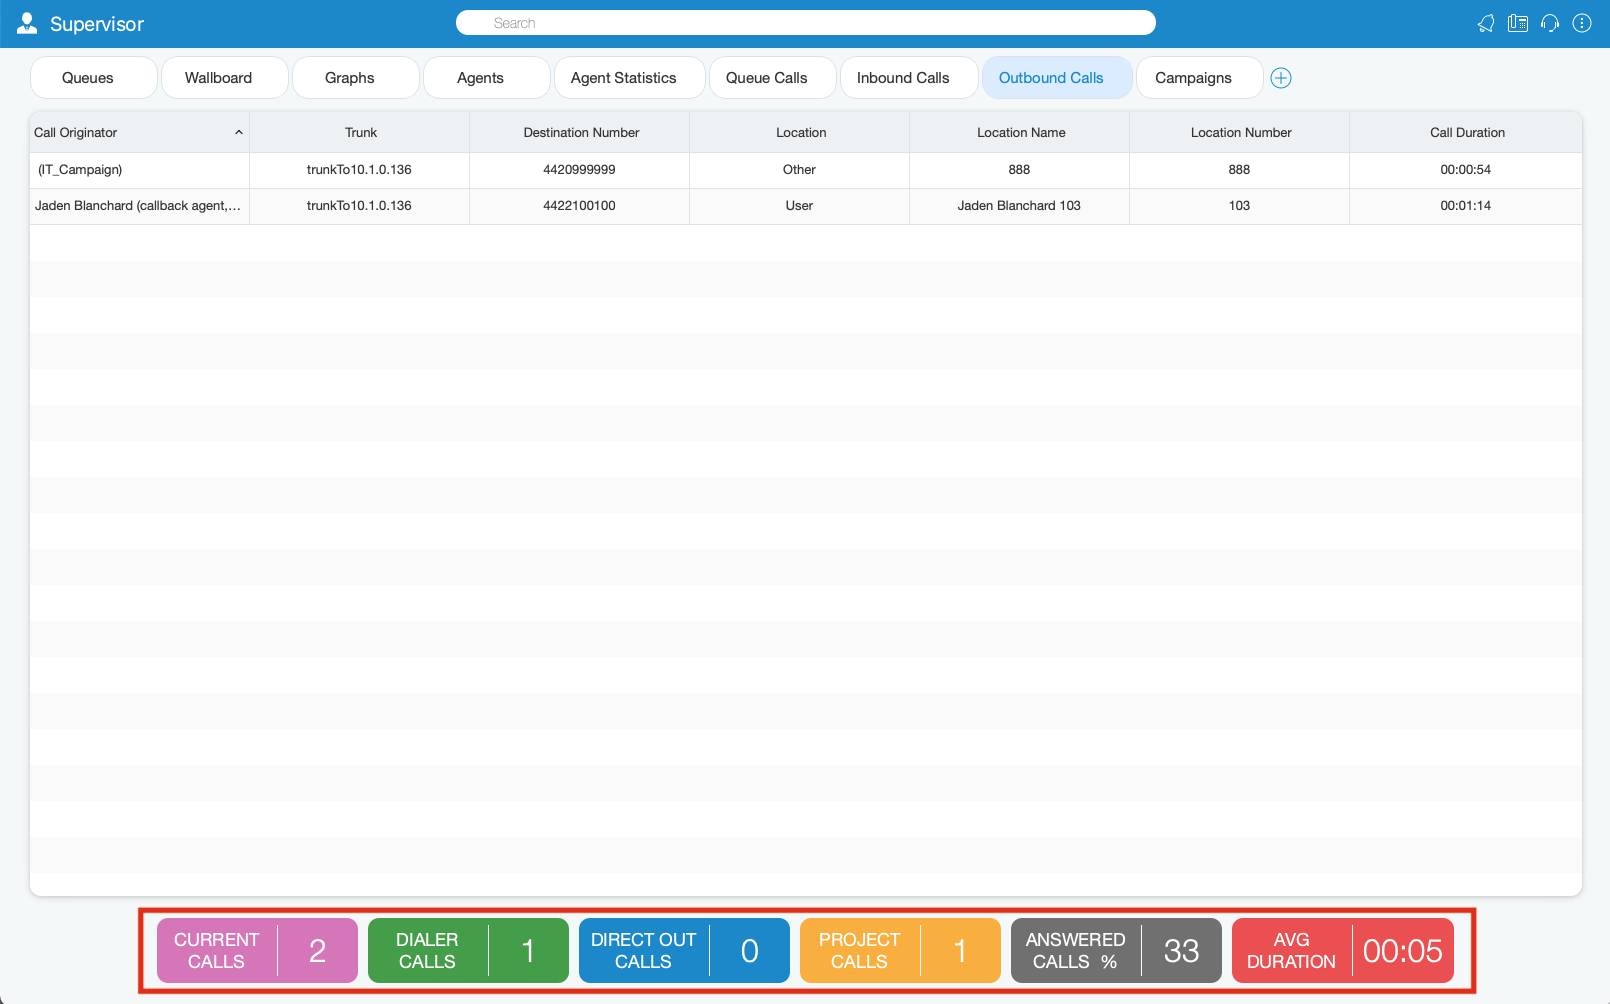
¶ Outbound Calls Module
Inside the Outbound Calls module, the Supervisor can monitor information for all calls going out from the system.
For each call the following information is shown:
- Call Originator: Displays originator of the call (Agent, Dialer, Project).
- Trunk: Displays used trunks for calls.
- Destination Number: Displays DID number of the outbound call.
- Location: Displays type of location.
- Location Name: Represents location name.
- Location Number: Represents location number.
- Call Duration: Represents total call duration.
The Supervisor can perform the following operations for each call if he/she has the permissions:
- Transfer Call: The Supervisor can transfer selected call.
- Take Call: The Supervisor can take selected call.
- Monitor Call: The Supervisor can monitor selected call.
- Hangup Call: The Supervisor can hangup selected call.
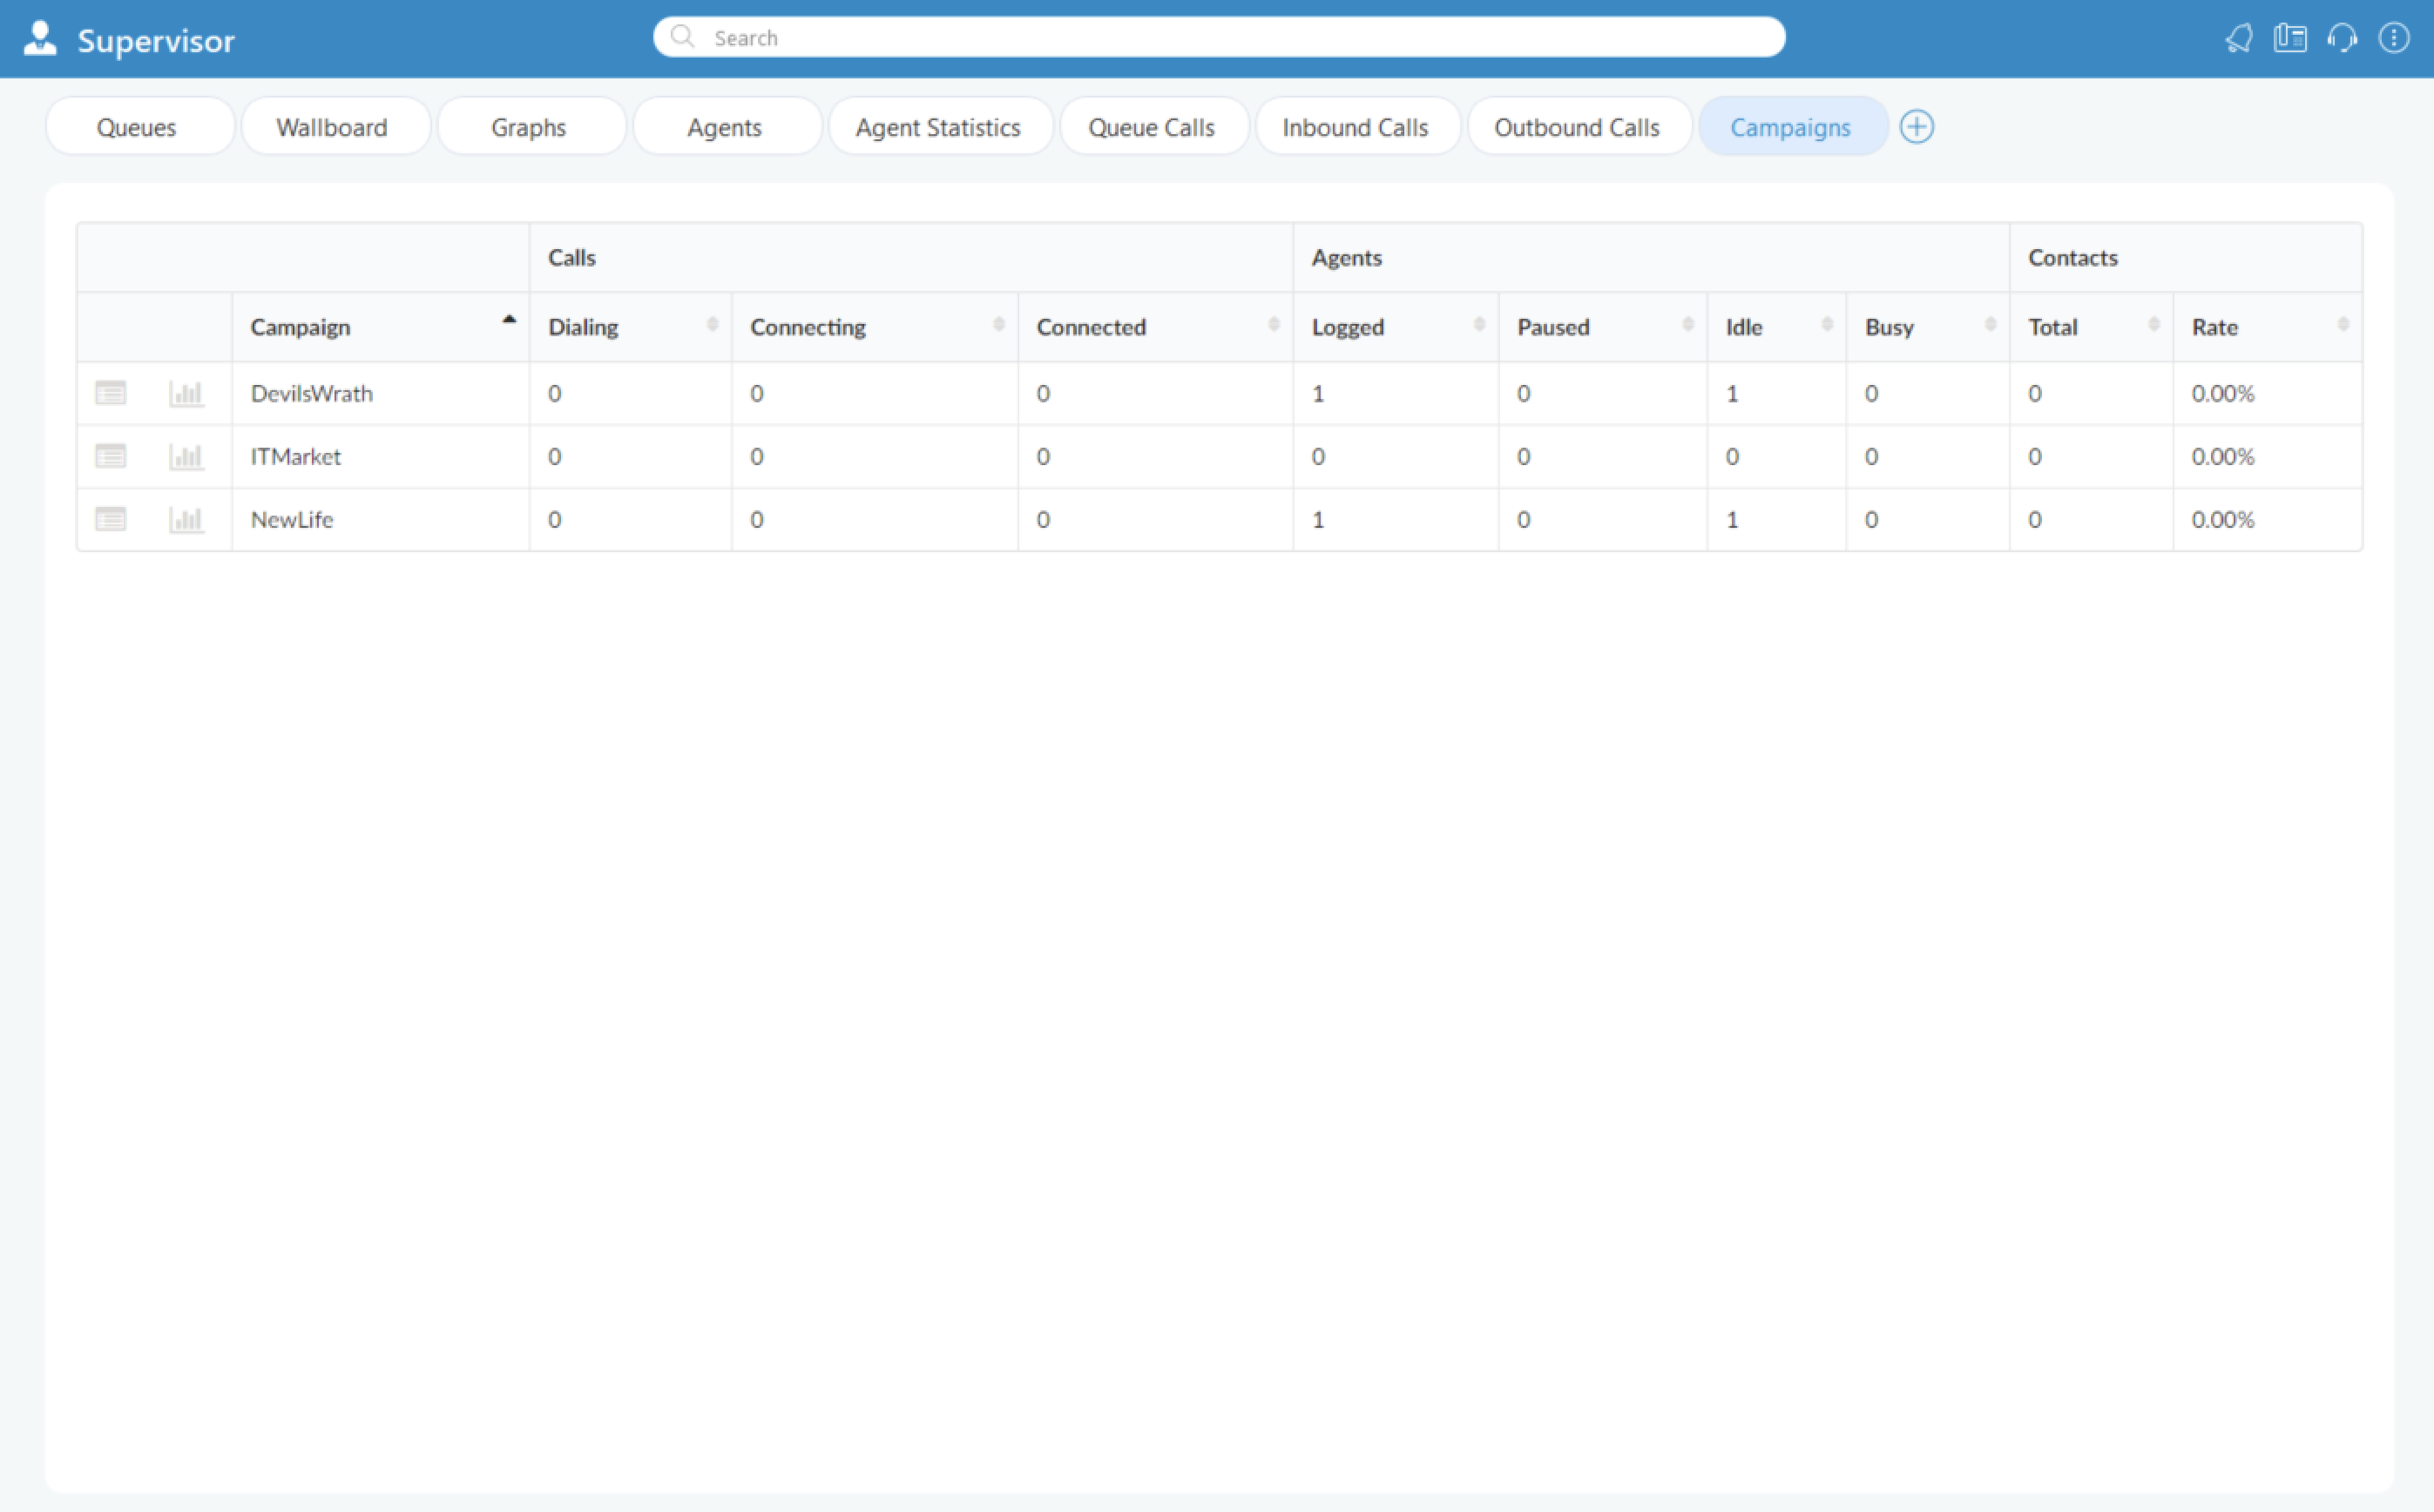
¶ Campaigns Module
The Campaigns module displays Campaign statistics for the current day.
For each Campaign the following information is shown:
- Campaign Name: Displays Campaign name.
- Calls: Represents number of dialing, connecting and connected calls.
- Dialing: Shows number of Dialed calls.
- Connecting: Shows number of currently Connecting Calls.
- Connected: Displays number of Connected Calls.
- Agents: Displays number of Agents in current Campaigns.
- Logged: Shows number of Logged Agents.
- Paused: Shows Agents on pause.
- Idle: Displays currently Idle Agents.
- Busy: Displays number of Busy Agents.
- Contacts: Indicates successful contacts in Campaigns.
- Total: Indicates total number of successful contacts in Campaigns.
- Rate: Refers to the percentage of workload that has been done in Campaigns.
¶ Supervisor Real Time Statistics
With the current fresh design of the Supervisor, advanced Global Statistics were introduced. These statistics include all Systems statistics, Queues, and Agents statistics in real-time, and can be displayed within different tabs.
For selected tabs in Supervisor Panel, there are specific areas (on the bottom of the panel) that are showing Real-time Statistics for each tab separately.
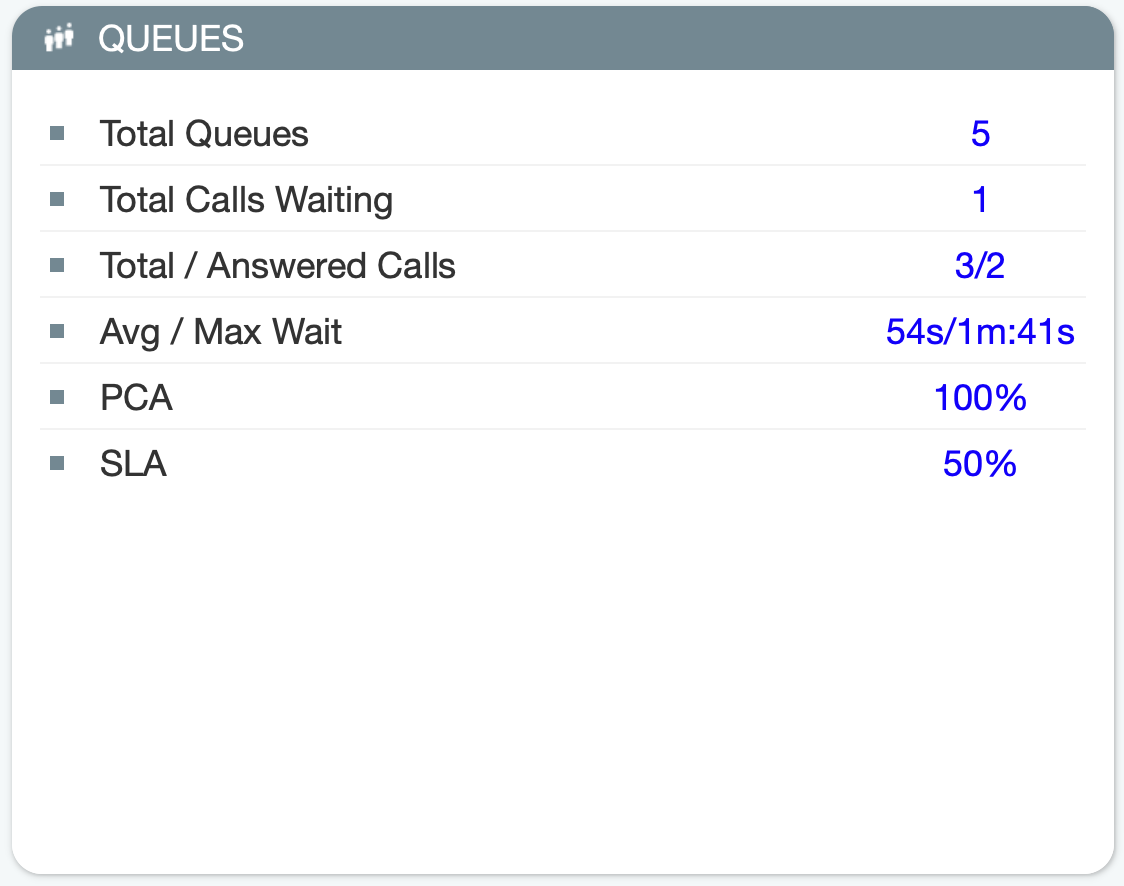
¶ Queues Tab
Inside the Queues tab, the Supervisor can monitor real-time information for all Queues selected through the Preferences dialog.
For the Queues tab the following statistics are shown:
- Total queues: Represents the total number of queues on the system.
- Total calls waiting: Represents the total number of calls waiting in the Queue.
- Total/Answered calls: Represents the total number of calls that entered the system and the total number of answered calls by all Queues.
- Average Wait Time (AWT) (in seconds): Represents the average amount of time callers must wait to reach an Agent.
- Maximum Wait Time (MWT) (in seconds): Represents the maximum amount of time callers must wait to reach an Agent.
- PCA: Represents the percentage of calls answered in all Queues.
- SLA (%): Represents the percentage of calls that have been answered within a specified period of time. Service Level can be configured in the Preferences window.
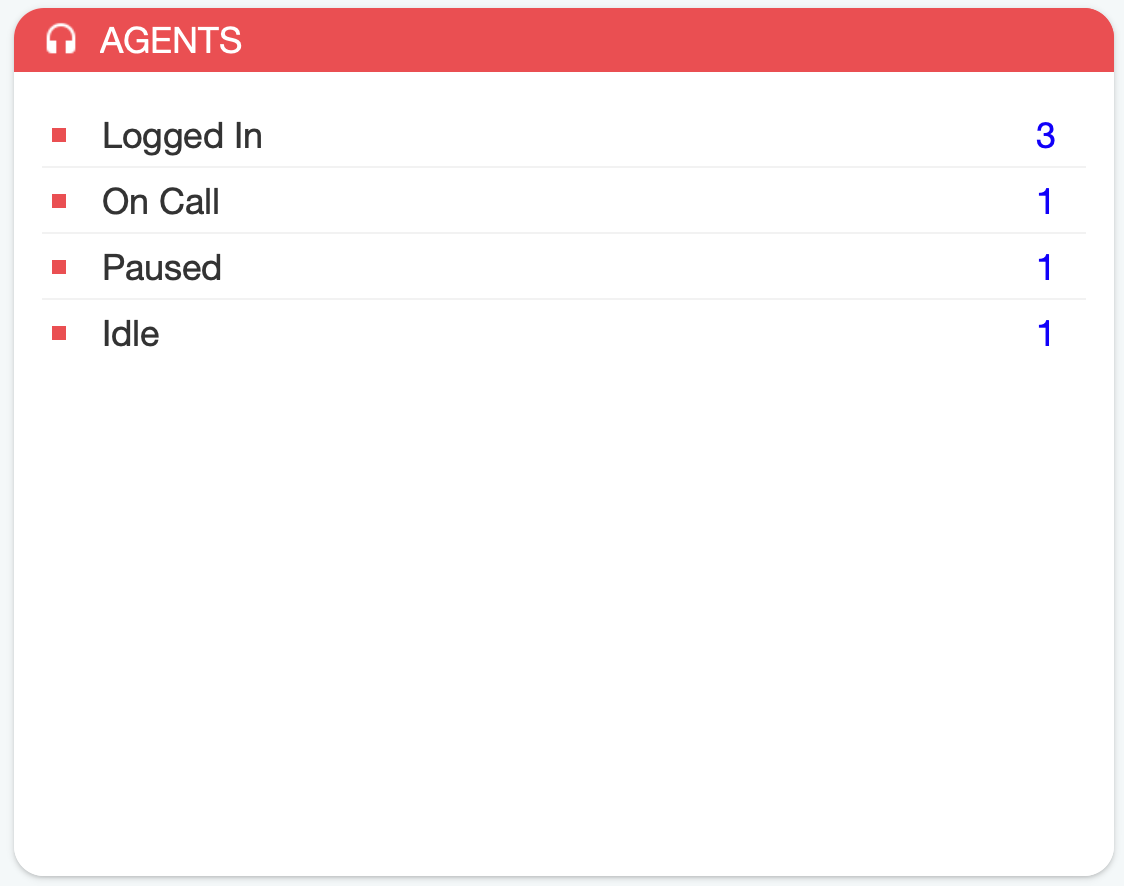
¶ Agents Tab
Inside the Agents tab, the Supervisor can monitor information for all logged-in Agents selected through the Preferences dialog.
For the Agents module tab the following statistics are shown:
- Logged In: Represents the total number of logged-in Agents.
- On Call: Represents a number of Agents on call.
- Paused: Represents the total number of paused Agents.
- Idle: Represents the total number of idle Agents.
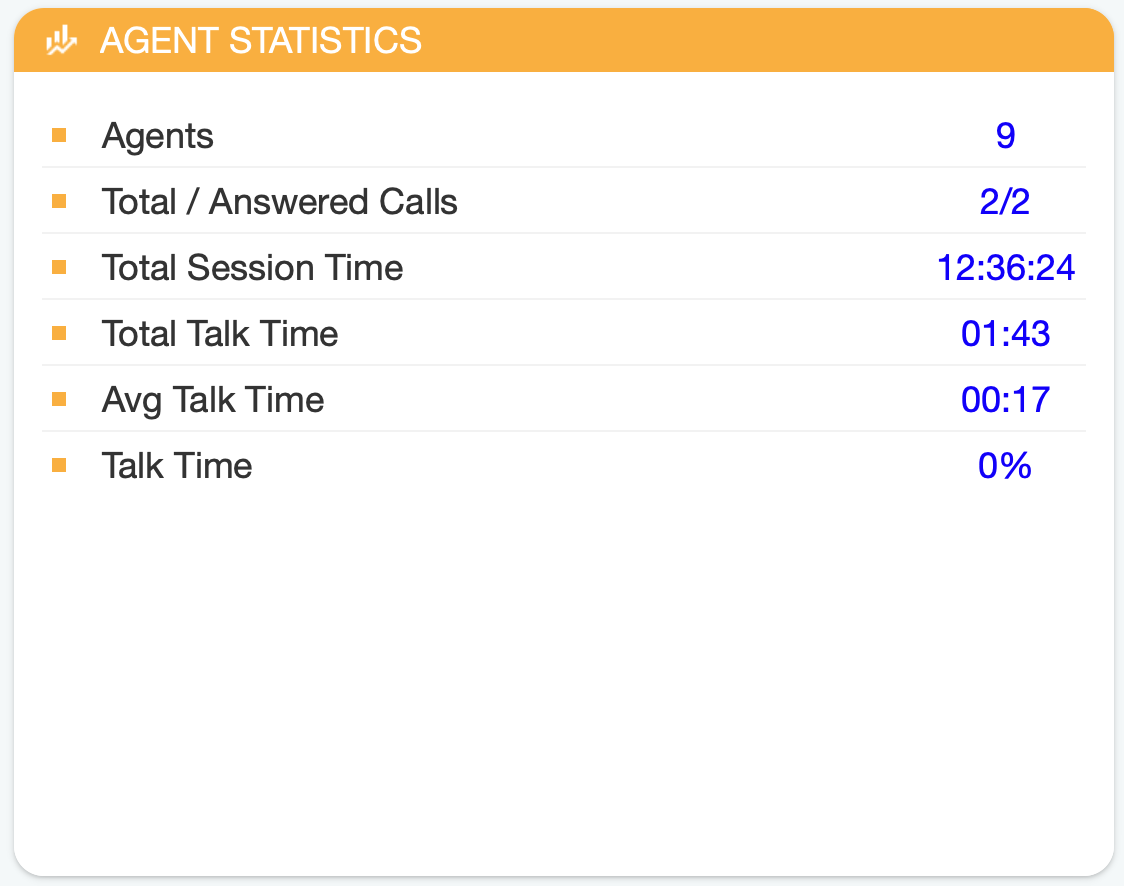
¶ Agent Statistics Tab
Agent Statistics tab displays Agent Inbound and Outbound statistics that include all Agent calls (inbound, outbound, direct (in/out) ) into calculations.
For the Agents Statistics tab the following statistics are shown:
- Agents: Represents the total number of Agents on the system.
- Total/Answered calls: Represents the total number of calls per Agent and the total number of answered calls by all Agents.
- Total Session Time: Represents the total amount of time Agents were logged on the system. (Total Session Time is updated every minute, and also whenever an Agent logs off, in real-time).
- Total Talk Time: Represents the total talking time for all Agents. (Total Talk Time is updated every minute, and also whenever an Agent finishes a call, in real-time).
- Average Talk Time: Represents the average amount of talking time per Agent. (Average Talk Time is updated whenever an Agent completes a call).
- Talk Time (%): Represents the percentage of all session time, Agents were on calls.
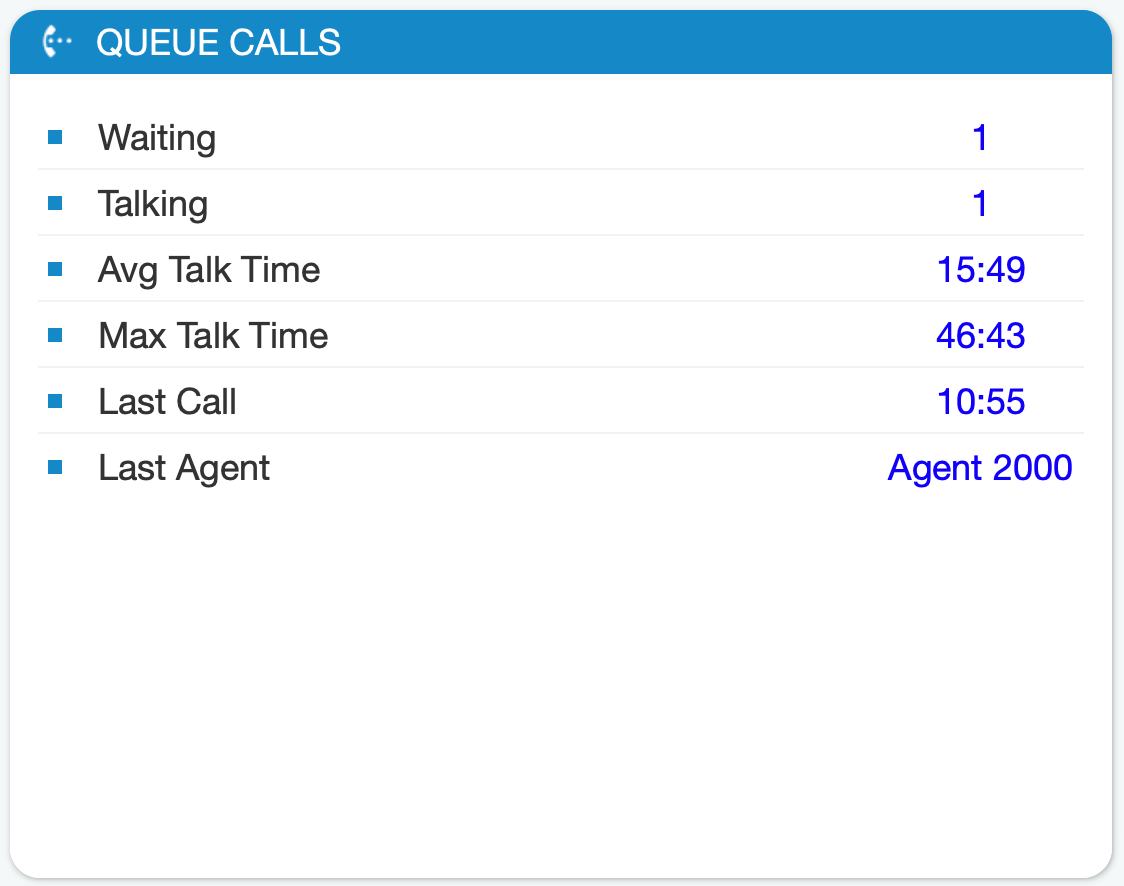
¶ Queue Calls Tab
Inside the Queue Calls tab, the Supervisor can monitor information for calls from all the Queues he/she selects to be visible through the Preferences dialog.
For the Queue Calls tab the following statistics are shown:
- Waiting: Represents the number of callers in the Queues.
- Talking: Represents the number of Agents currently talking.
- Average Talk Time: Represents the average talk time for all Agents.
- Max Talk Time: Represents the longest Queue call.
- Last Call: Displays the time when the last call happened.
- Last Agent: Shows the name of the Agent who has the last call.
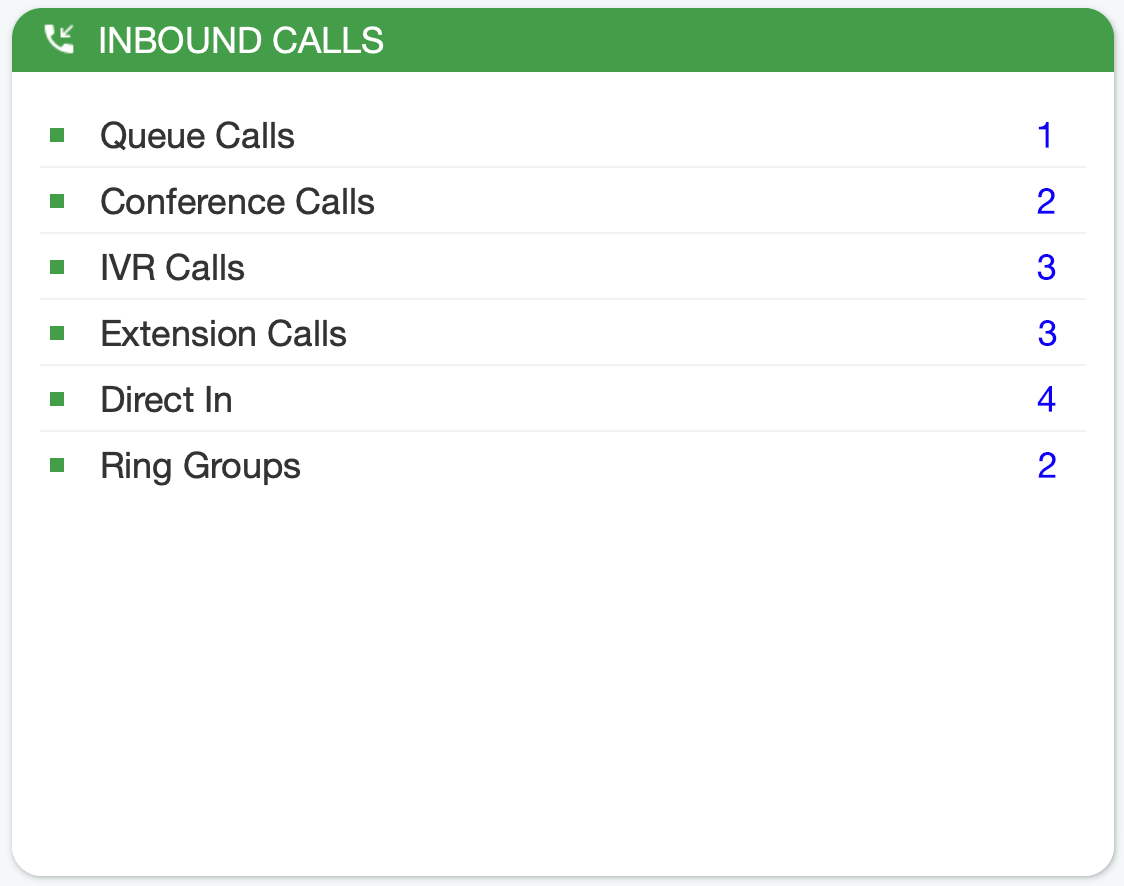
¶ Inbound Calls Tab
Inside the Inbound Calls module, the Supervisor can monitor information for all calls coming into the system.
For the Inbound Calls tab the following statistics are shown:
- Queue Calls: Shows the number of all Queue calls.
- Conference Calls: Shows the number of all Conference Calls.
- IVR Calls: Shows the number of all IVR Calls.
- Extension Calls: Show the number of all Extension Calls.
- Direct In: Shows the number of all Direct In Calls.
- Ring Groups: Shows the number of all Ring Group Calls.
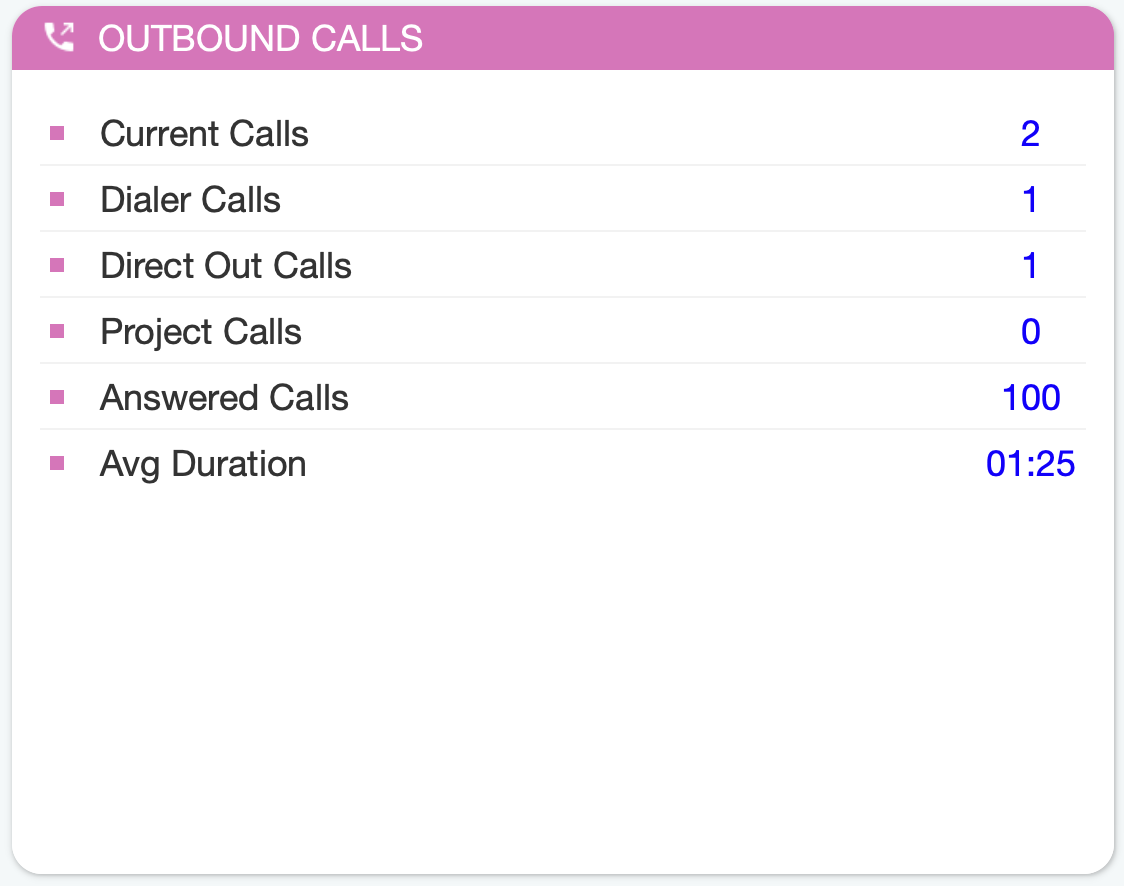
¶ Outbound Calls Tab
Inside the Outbound Calls module, the Supervisor can monitor information for all calls going out from the system.
For the Outbound Calls tab the following statistics are shown:
- Current Calls: Displays the number of current calls.
- Dialer Calls: Displays the number of Dialer calls.
- Direct Out Calls: Displays the number of Direct Out Calls.
- Project Calls: Displays the number of Project Calls.
- Answered Calls(%): Represents the percentage of Answered Calls during one day (starting from midnight).
- Average Duration: Represents the Average Duration of the call.
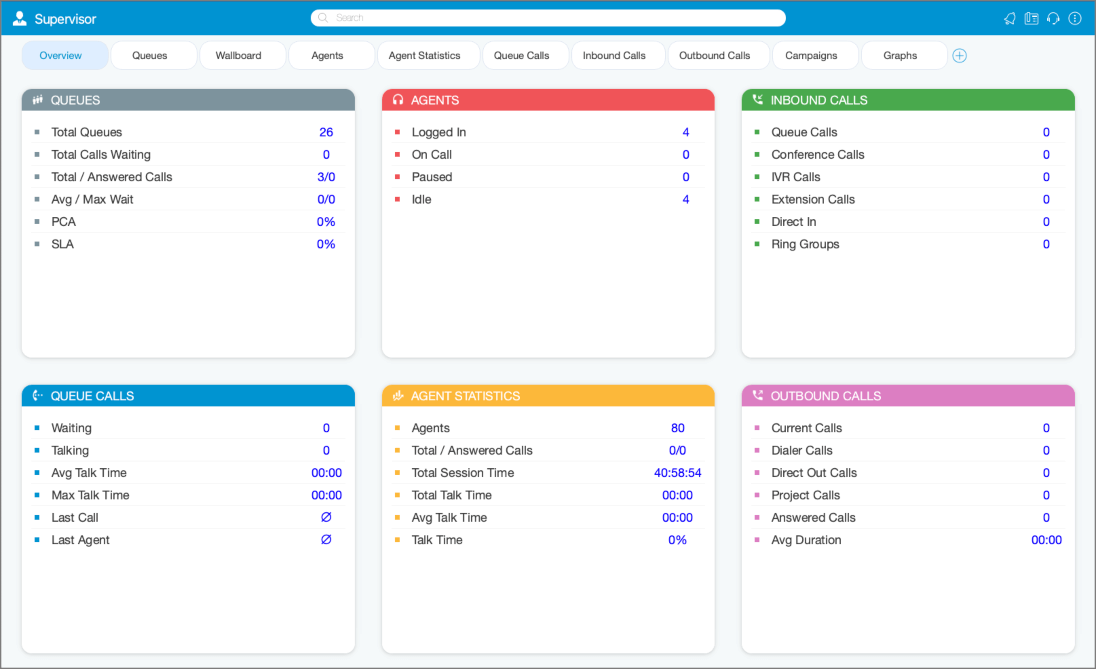
¶ Supervisor Overview
User can have an Overview of all Supervisor Agent tabs inside of Overview tab all at one place organised as dashboard where all information are easily accessible at one place.
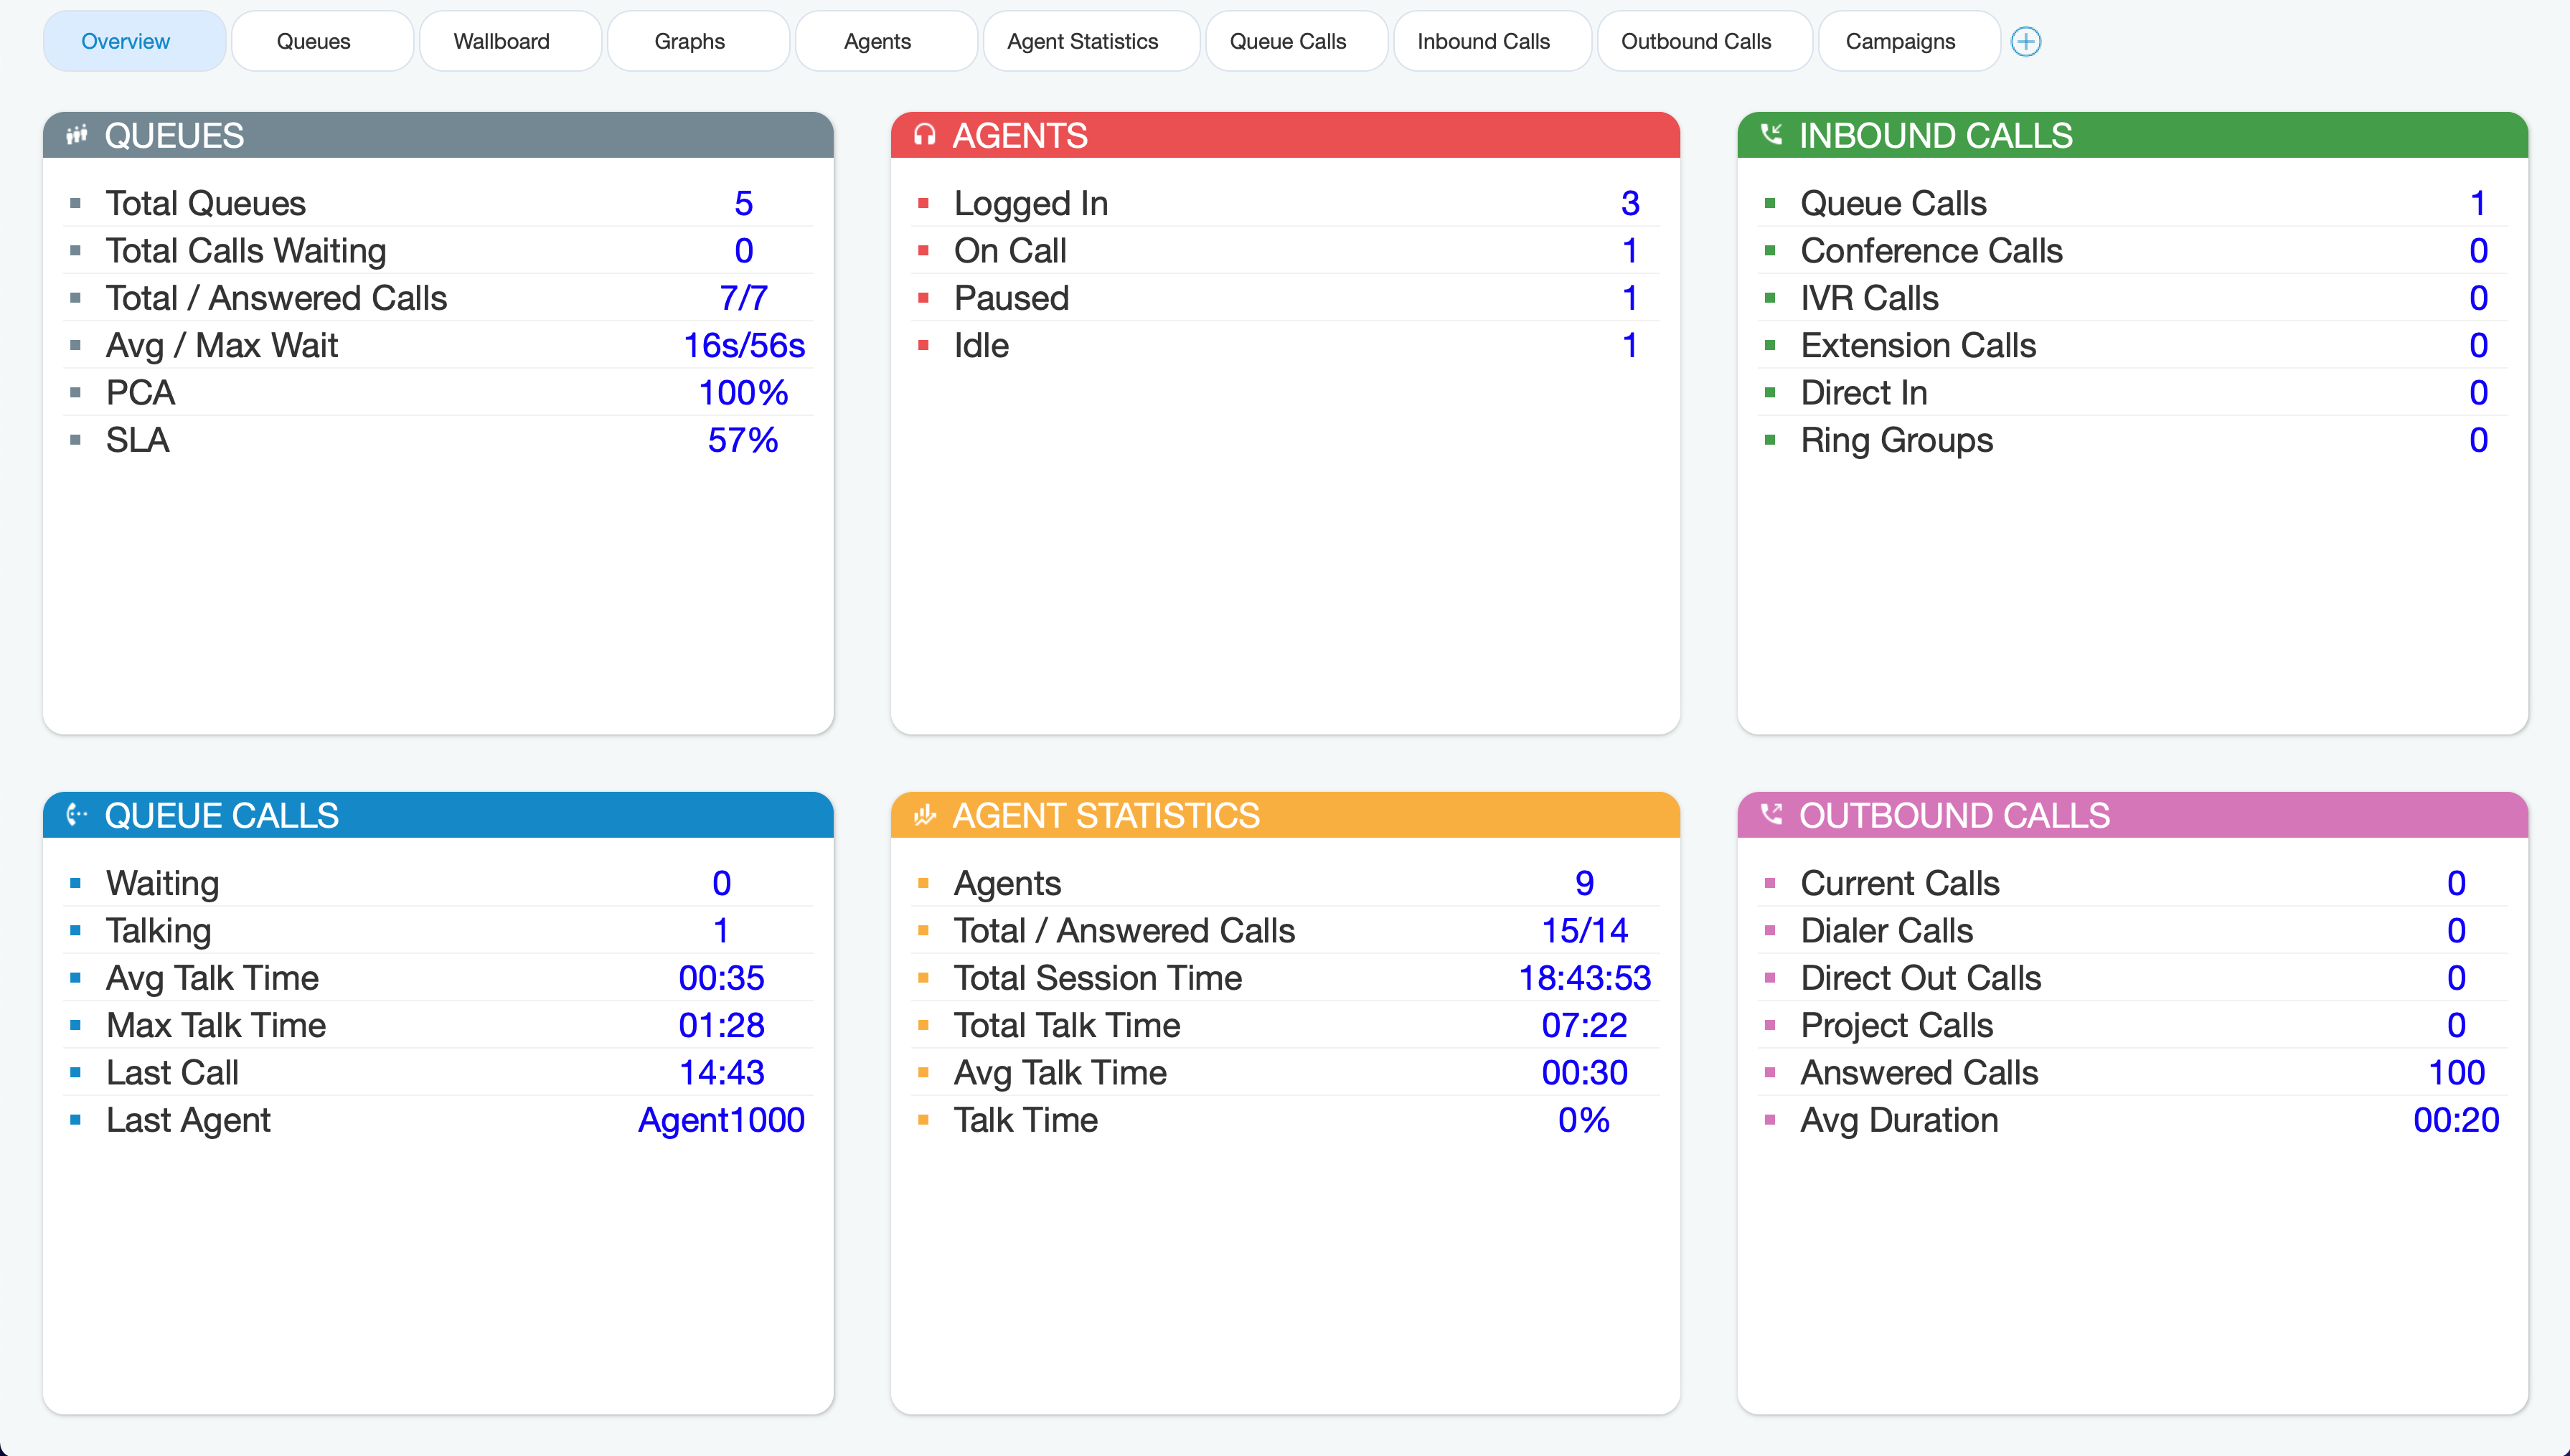
¶ Queues Overview
- Total Queues: Represents the total number of queues on the system.
- Total Calls Waiting: Represents the total number of calls waiting in the Queue.
- Total/Answered Calls: Represents the total number of calls that entered the system and the total number of answered calls by all Queues.
- Avg/Max Wait: Represents the average amount of time callers must wait to reach an Agent.
- PCA: Represents the percentage of calls answered in all Queues.
- SLA: Represents the percentage of calls that have been answered within a specified period of time. Service Level can be configured in the Preferences window.
¶ Agents Overview
- Logged In: Represents the total number of logged-in Agents.
- On Call: Represents a number of Agents on call.
- Paused: Represents the total number of paused Agents.
- Idle: Represents the total number of idle Agents.
¶ Inbound Calls Overview
- Queue Calls: Represents the total concurrent inbound calls per Queue.
- Conference Calls: Represents the total concurrent inbound Conference Calls.
- IVR Calls: Represents the total concurrent inbound calls per IVR.
- Extension Calls: Represents the total concurrent inbound calls per Extension.
- Direct In: Represents the total concurrent inbound per Agent calls.
- Ring Groups: Represents the total concurrent inbound calls per Ring Groups.
¶ Queue Calls Overview
- Waiting: Represents the total number of concurrent calls waiting in the Queue to be answered.
- Talking: Represents the number of Agents currently talking.
- Avg Talk Time: Represents the average talk time for all Queues.
- Max Talk Time: Represents the longest Queue call.
- Last Call: Displays the time when the last call happened.
- Last Agent: Shows the name of the Agent who has the last call.
¶ Agent Statistics Overview
- Agents: Represents the total number of Agents on the system.
- Total/Answered Calls: Represents the total number of all answered Agent calls.
- Total Session Time: Represents the total logged in time for all agents.
- Total Talk Time: Represents the total talk time for all agents.
- Avg Talk Time: Represents the average Agent talk time.
- Talk Time: Represents the percentage of talk time for all agents.
¶ Outbound Calls Overview
- Current Calls: Displays the number of current calls.
- Dialer Calls: Displays the number of Dialer calls.
- Direct Out Calls: Represents the total number of direct out calls.
- Project Calls: Represents the total number of concurrent per Project Code calls.
- Answered Calls: Represents the percentage of Answered Calls during one day (starting from midnight).
- Avg Duration: Represents the Average Duration of the call.
¶ OmniChannel Supervisor (available in gloCOM Supervisor edition)
¶ Supervisor Login
An additional requirement for the supervisor edition has been added to log in as an agent with proper credentials (agent number, agent PIN).
If you have the omnichannel license enabled, the next step is to log in to the app. Please note that the login process for Omnichannel has been updated.
In the new Agent panel, supervisors will need to log in as agents by providing additional credentials:
- Agent number assigned to the Supervisor (required)
- Agent PIN (optional)

These changes are designed to address privacy concerns related to permissions. Supervisors can now monitor only the queues and agents they are responsible for. To enable this, supervisors must be added as members of the specific queues they need to monitor.
It's important to mention that these changes do not affect the Supervisor panel. The Supervisor panel will continue to provide comprehensive information about voice queues and other call-related statistics.
When logging in as a Supervisor for the first time, you will be automatically directed to the 'Dashboard' page. This is the default setting and only occurs during your initial login as a supervisor.
Also, with the latest update, when you log in as a supervisor, you'll find yourself in a 'Logged Off' state by default. In this state, you won't receive voice calls (as you'll appear offline in the app), but you'll still be able to receive and manage conversations via LiveChat and Emails. Even in this 'Logged Off' state, you'll have full access to all supervisor functions, including monitoring conversations, a dashboard, banning/unbanning customers, and active and closed conversations.
To begin receiving Voice calls, click the 'Agent Login' button in the agent profile section. Once clicked, you'll be prompted with an additional window to confirm your login.
¶ Supervisor Login Without Agent Number
If you attempt to log in without entering an agent number, you'll successfully access the app's main page, but you won't be able to use or activate the Agent panel. However, the Supervisor panel will remain accessible for your use.
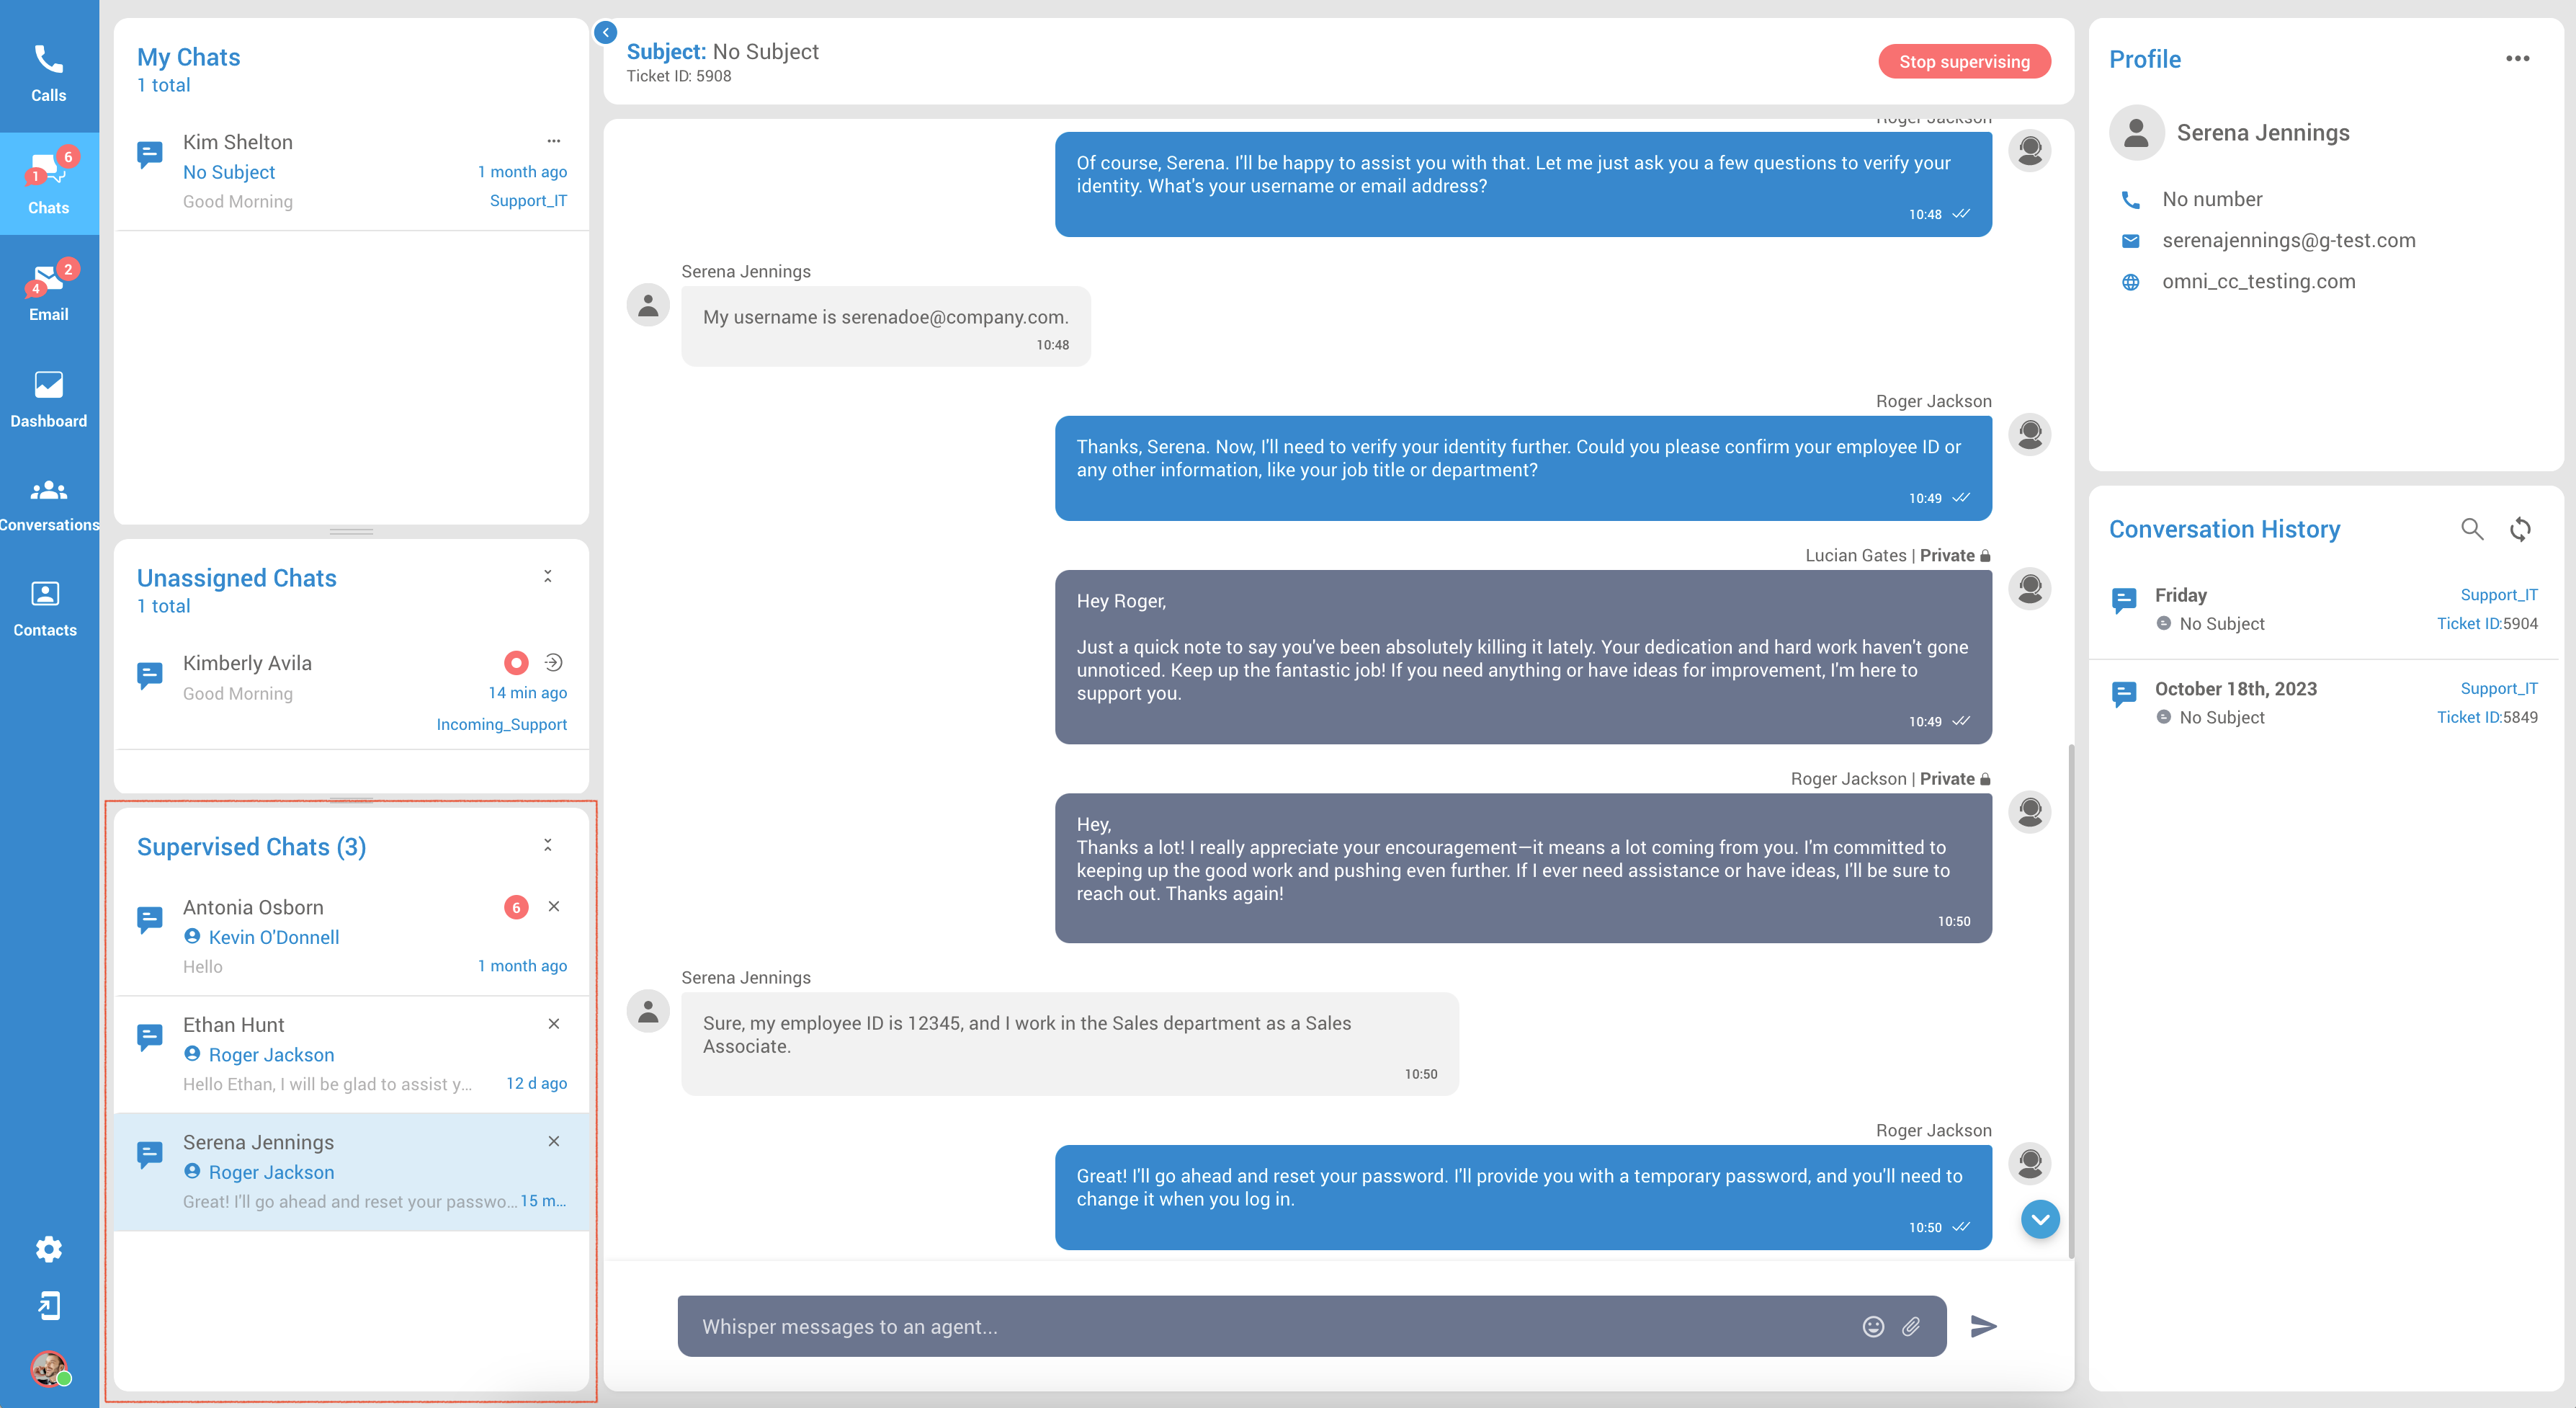
¶ Agent Panel - Supervised Chat
Supervisors have the capability to monitor live chat sessions between customer service representatives /agents and customers. During this session, the supervisor can intervene in chat when the agent encounters complex issues or requires assistance. They can take over the conversation to provide immediate support, answer questions, or resolve customer concerns more effectively.

Messages in the gray box are private and visible only to the supervisor and the agent. The 'Whisper' option is enabled in the supervisor edition, allowing communication solely between supervisors and agents.
In this section, Supervisors have the ability to easily identify and choose the particular conversation they want to supervise. This is made simple through a drop-down menu located under the Actions column. This menu presents Supervisors with multiple actions and they can select the option that best suits their supervision requirements.
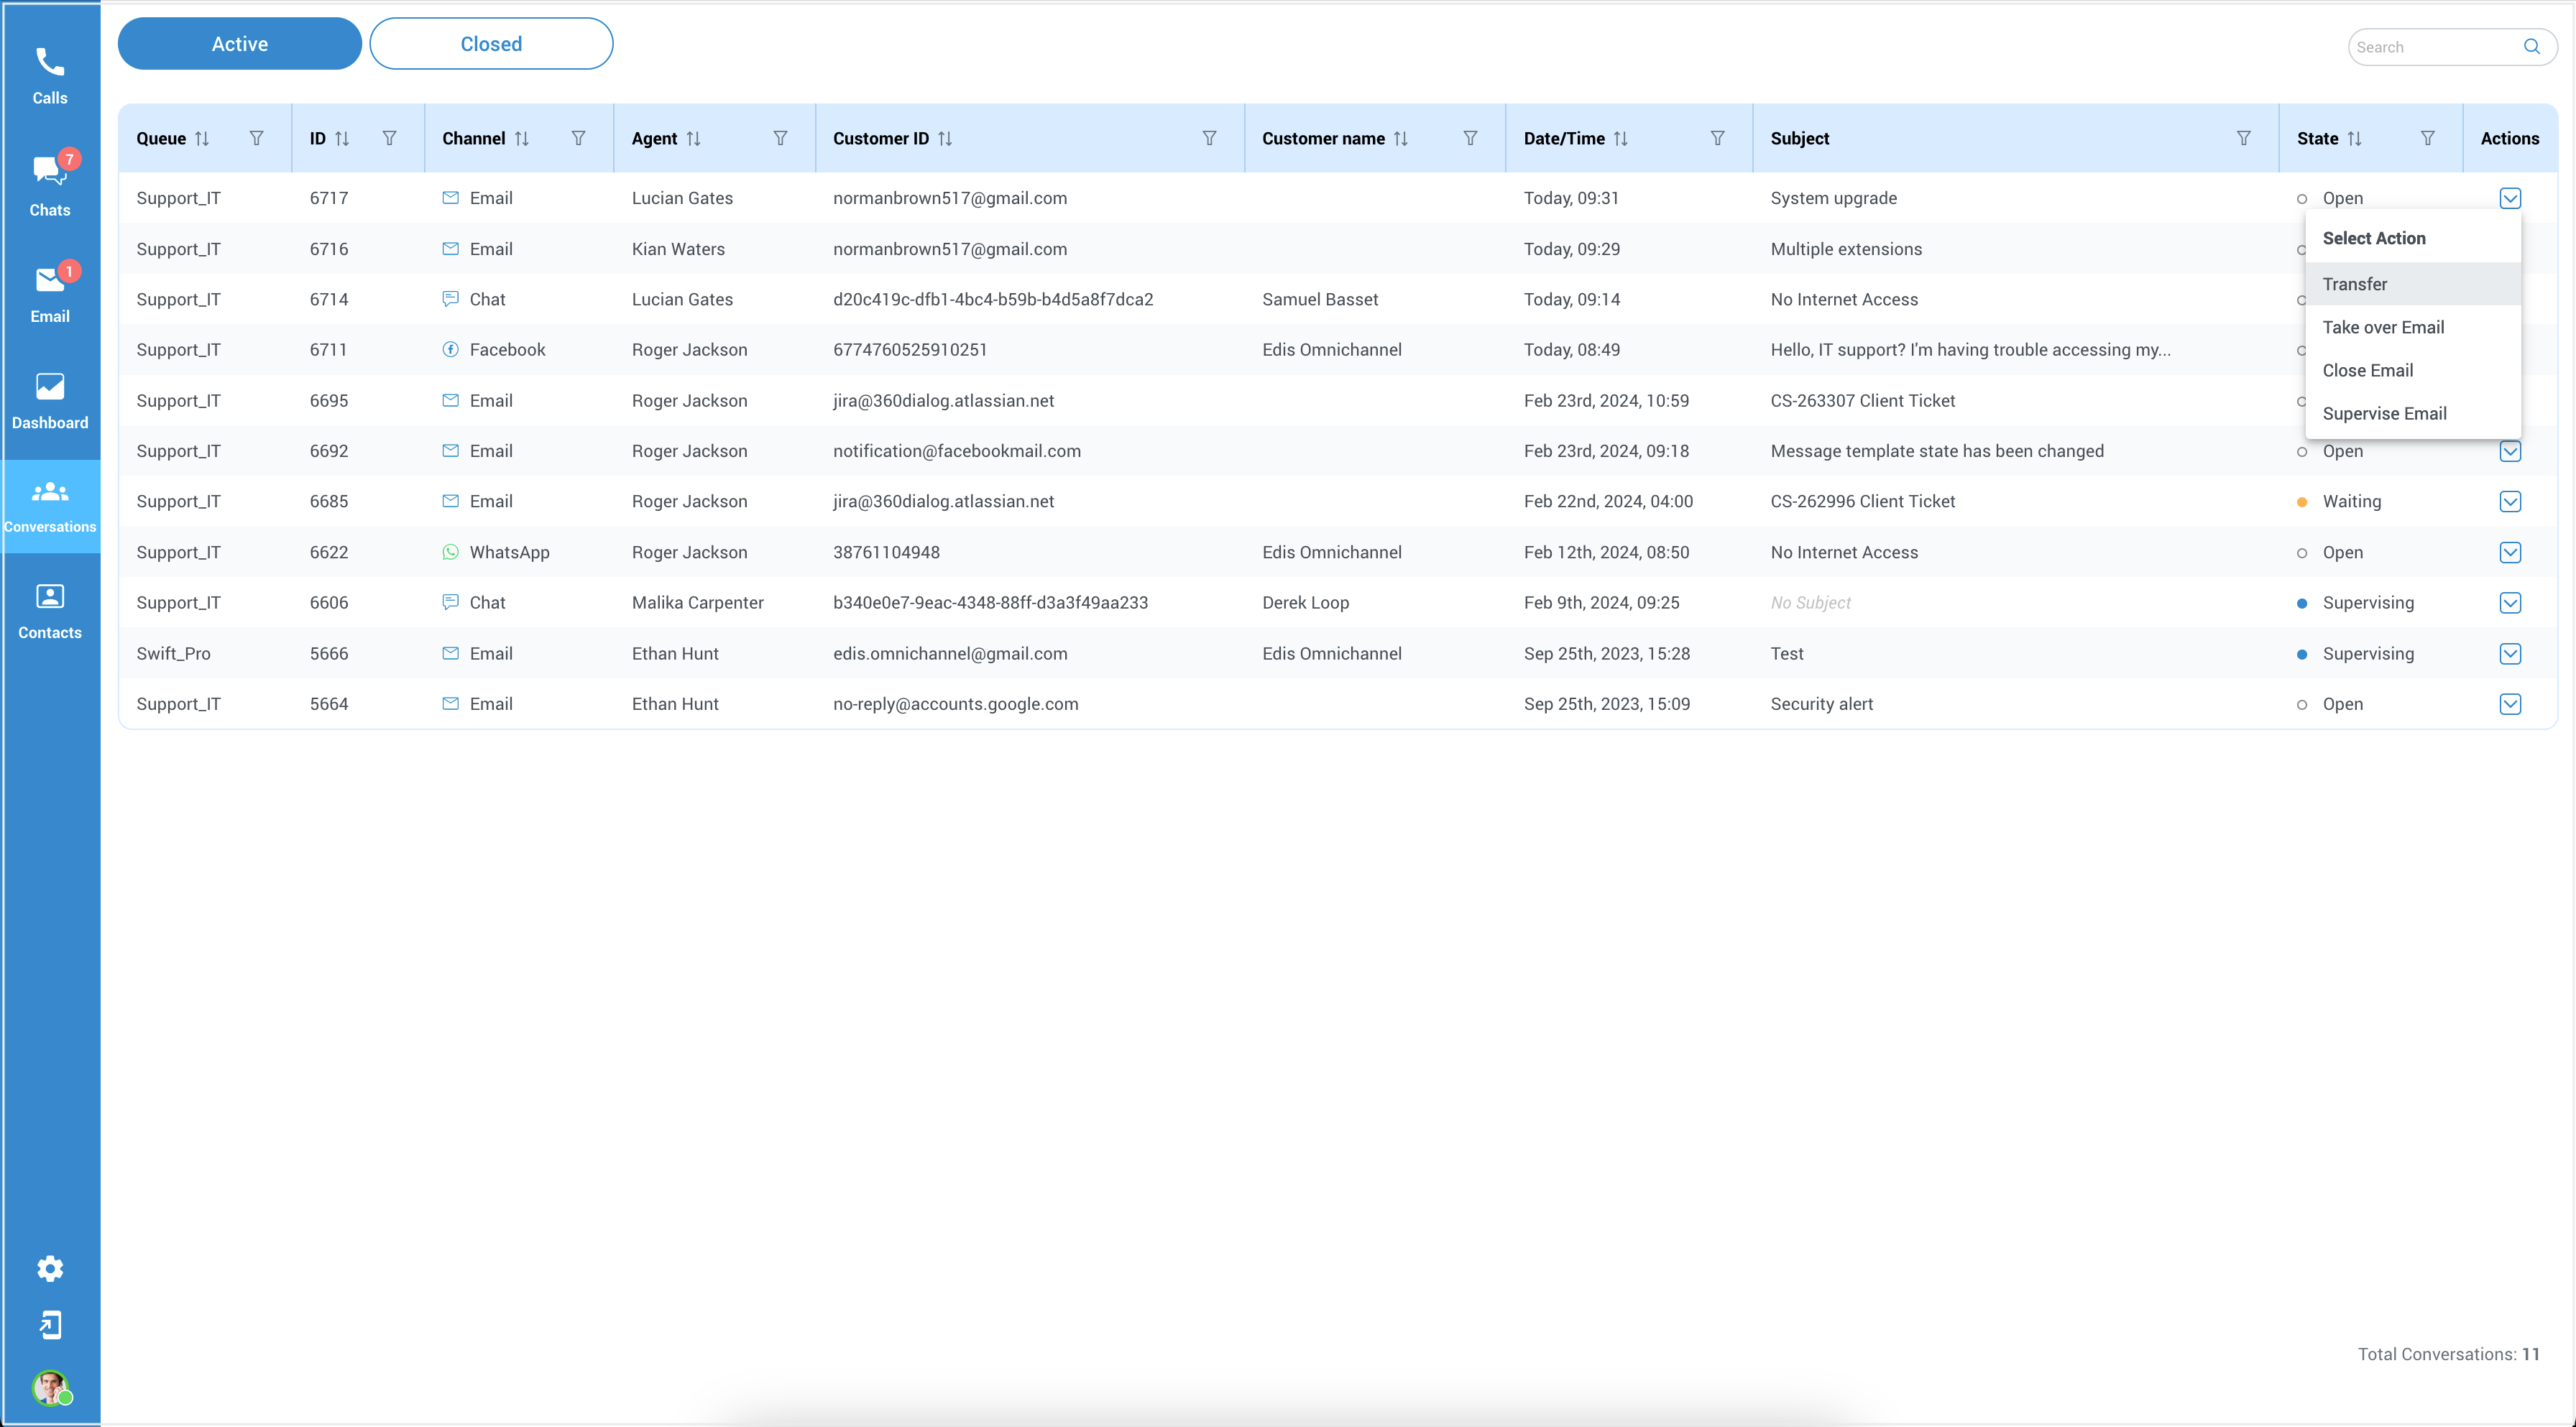
A corresponding notification will appear within the window when the supervisor starts or stops supervising the conversation.
It's crucial to highlight that when a conversation is being supervised, there's a notable change in its status. This modification is visible in the State column within the Conversations tab, where the status shifts to "Supervising". This updated status serves as a clear indicator that the conversation is currently under supervision.

A pop-up message will appear after choosing the relevant option, displaying the guidance: "You can find your supervised tickets inside the Chats/Email tab." This message serves as a prompt, directing Supervisors to where they can locate their supervised tickets. To acknowledge this message and proceed, the Supervisor should click the OK button.
Following this step, the supervised chats become visible in a newly introduced segment. It will appear below the "Unassigned Chats" section.
The supervising can serve various purposes:
Quality Assurance: Supervisors can assess the quality of customer interactions to ensure that agents stick to company policies and provide high-quality customer service.
Training and Coaching: Supervised chat allows supervisors to provide real-time guidance and feedback to agents. They can offer suggestions, answer questions, and help agents handle complex or challenging customer inquiries more effectively.
Compliance and Regulatory Requirements: In some industries, strict regulations or compliance requirements regarding customer interactions may exist. Supervised chat can help agents follow these rules and guidelines to avoid legal and regulatory issues.
Conflict Resolution: If a chat conversation escalates into a dispute or conflict, a supervisor can intervene to mediate and attempt to reach a resolution that satisfies the customer. This can be especially important in preventing customer dissatisfaction.
Emergency Situations: In cases of emergencies or urgent customer requests, supervisors can quickly assess the situation and provide guidance to agents on how to respond appropriately
¶ Supervisor Dashboard
The supervisor dashboard closely resembles the agent's dashboard with the main distinction being the inclusion of an additional column named 'Daily Stats'. This column displays daily statistics for each agent or queue, providing enhanced monitoring and performance insights.
Please note that for the Daily Stats column to function correctly and display as intended, activation of the ClickHouse database is required.
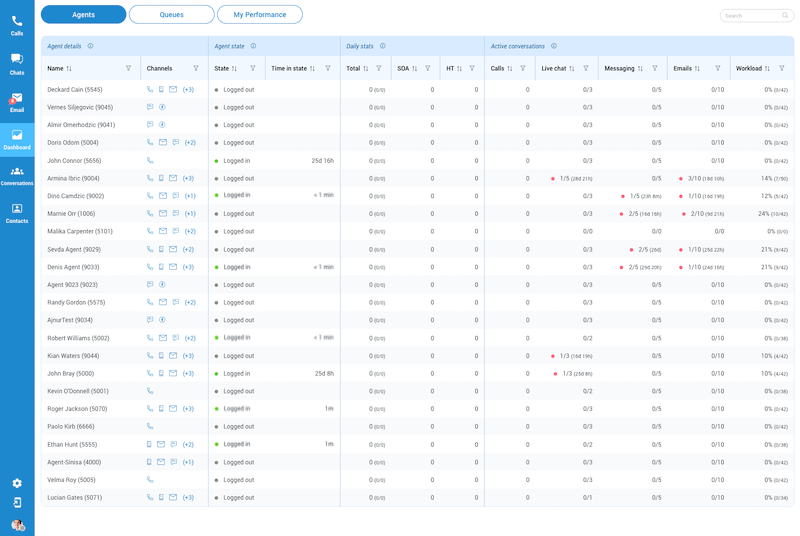
¶ Agents
The Agents dashboard offers crucial insights into activities across diverse channels and conversations. When supervisors access this section, they gain information about their colleagues within the system, providing valuable insights for collaboration or supervision. Additionally, supervisors have access to a dedicated column displaying daily statistics for each agent.
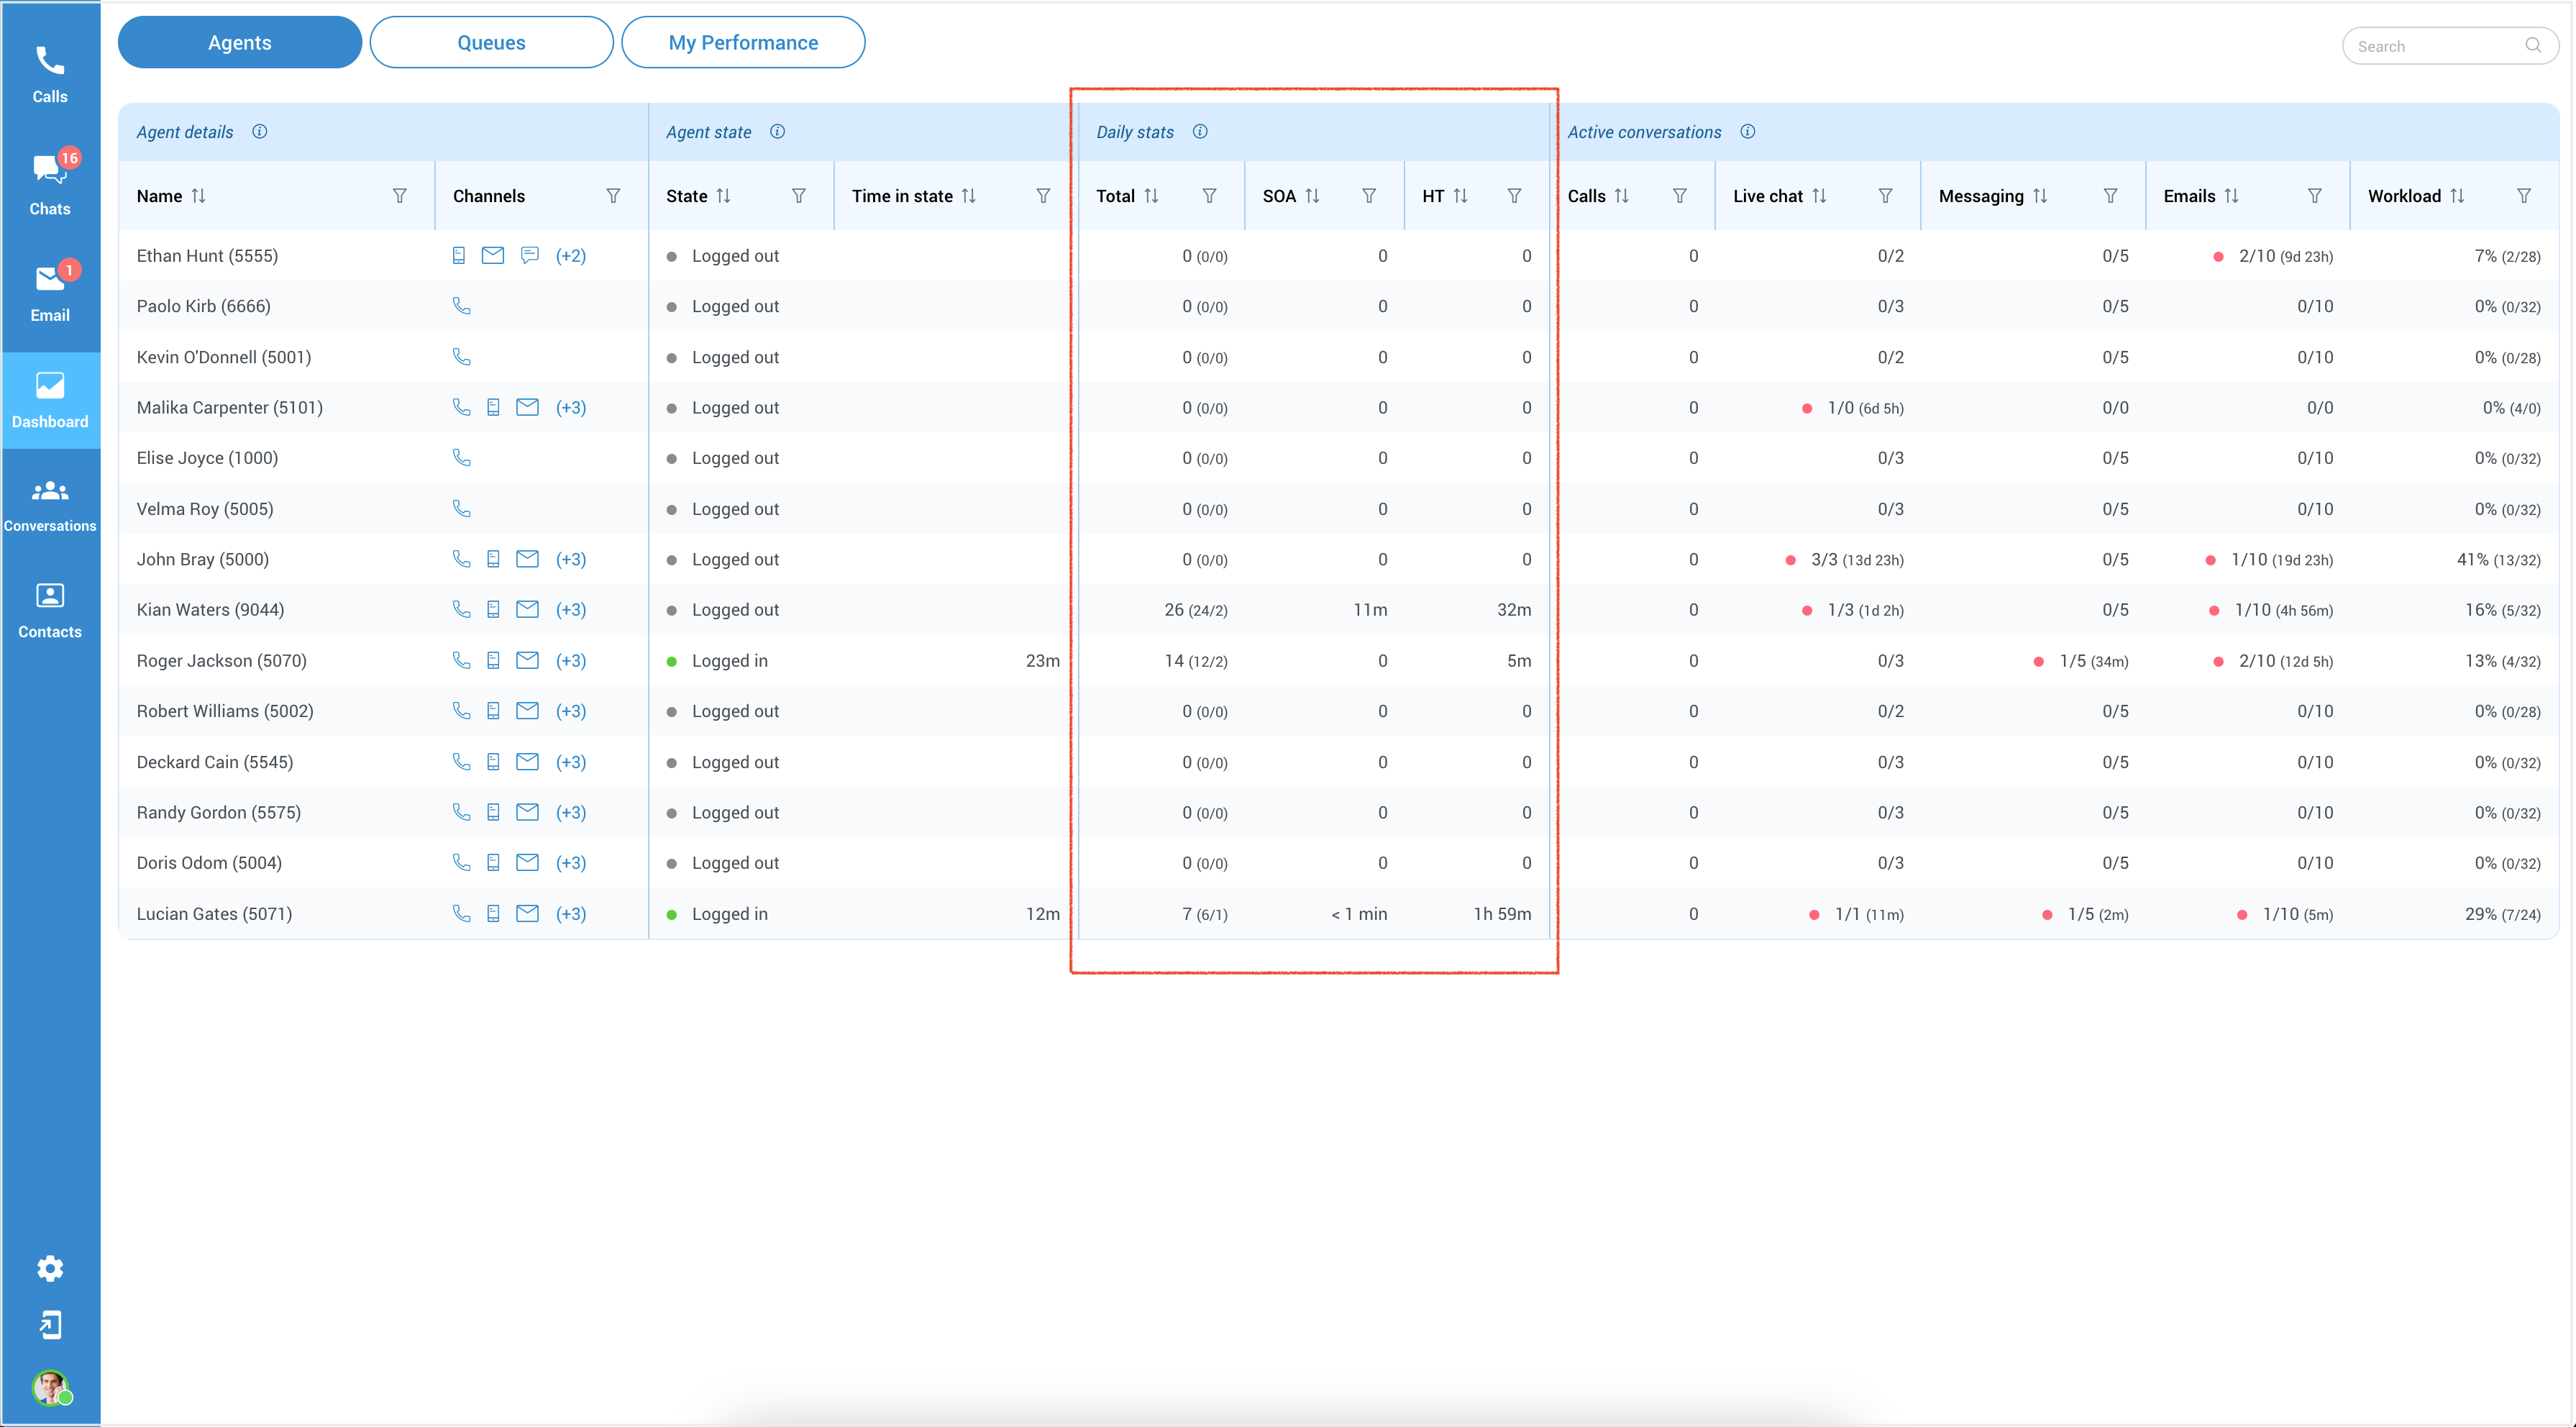
Daily Stats
Refer to the data and information collected on a daily basis to measure agent's individual performance. This page consists of three sections:
Total (In/Out) - This metric indicates the current number of conversations assigned to a specific agent, distinguishing between inbound and outbound interactions. It provides an overview of the workload and responsibilities the agent is currently handling.
[This metric works like a counter telling the supervisor how many conversations each agent is dealing with. It helps supervisors see the workload and what tasks or responsibilities each agent is currently managing.
So, an agent has a high number of conversations assigned to them. In that case, it means they're pretty busy handling customer inquiries or reaching out to customers, depending on whether the conversations are inbound or outbound. On the other hand, if an agent has a low number of conversations, they might have some spare capacity to take on more work or help out their colleague.]
Average Speed of Answer (SOA) - The average speed of answer measures the average time it takes for an agent to respond to a call or conversation, encompassing the time spent waiting in a queue. It reflects the efficiency and responsiveness of the agent in addressing customer inquiries or issues promptly.
[The "average speed of answer" is a way for companies to measure how quickly they respond to customers. It's like looking at the time it takes for an agent to pick up a customer's call or respond to a customer's messages, including the time a customer spends waiting in line or a queue.
If the average speed of answer is low, it means that, on average, customers don't have to wait very long to get assistance. That's a good thing because it shows that the company is efficient and responsive in promptly addressing customer questions or problems.
On the other hand, if the average speed of answer is high, it means customers often have to wait longer before someone helps them. This might indicate that the company needs to improve responsiveness to make customers happier.]
Average Handling Time (HT) - The average handling time signifies the average duration an agent spends on each call or conversation. It encompasses the time spent actively engaging with the customer, addressing their needs, and providing necessary assistance.
[The "average handling time" is like a stopwatch measuring how long the agent is actively engaged with the customer.
It includes all the time when the agent is actively helping the customer, like answering their questions, solving their issues, and ensuring they're satisfied.
So, if the average handling time is short, it means that, on average, the agent doesn't keep the customer on the phone or chat for too long. They efficiently handle the customer's needs, which is generally a good thing because it saves the customer's time.
But if the average handling time is long, it suggests that, on average, the customer might spend more time with the agent, which could sometimes mean longer conversations or problem-solving. While this can be necessary for some complex issues, companies often aim to keep this time as short as possible to provide quicker service.]
¶ Queues
The Queues section provides a quick and convenient way to understand the activity and performance of the assigned queue, improving the ability to respond to customer inquiries efficiently. It offers insights into the queue requests actively handled by agents. Similar to the previous section, supervisors can access a dedicated column displaying daily statistics for each queue.
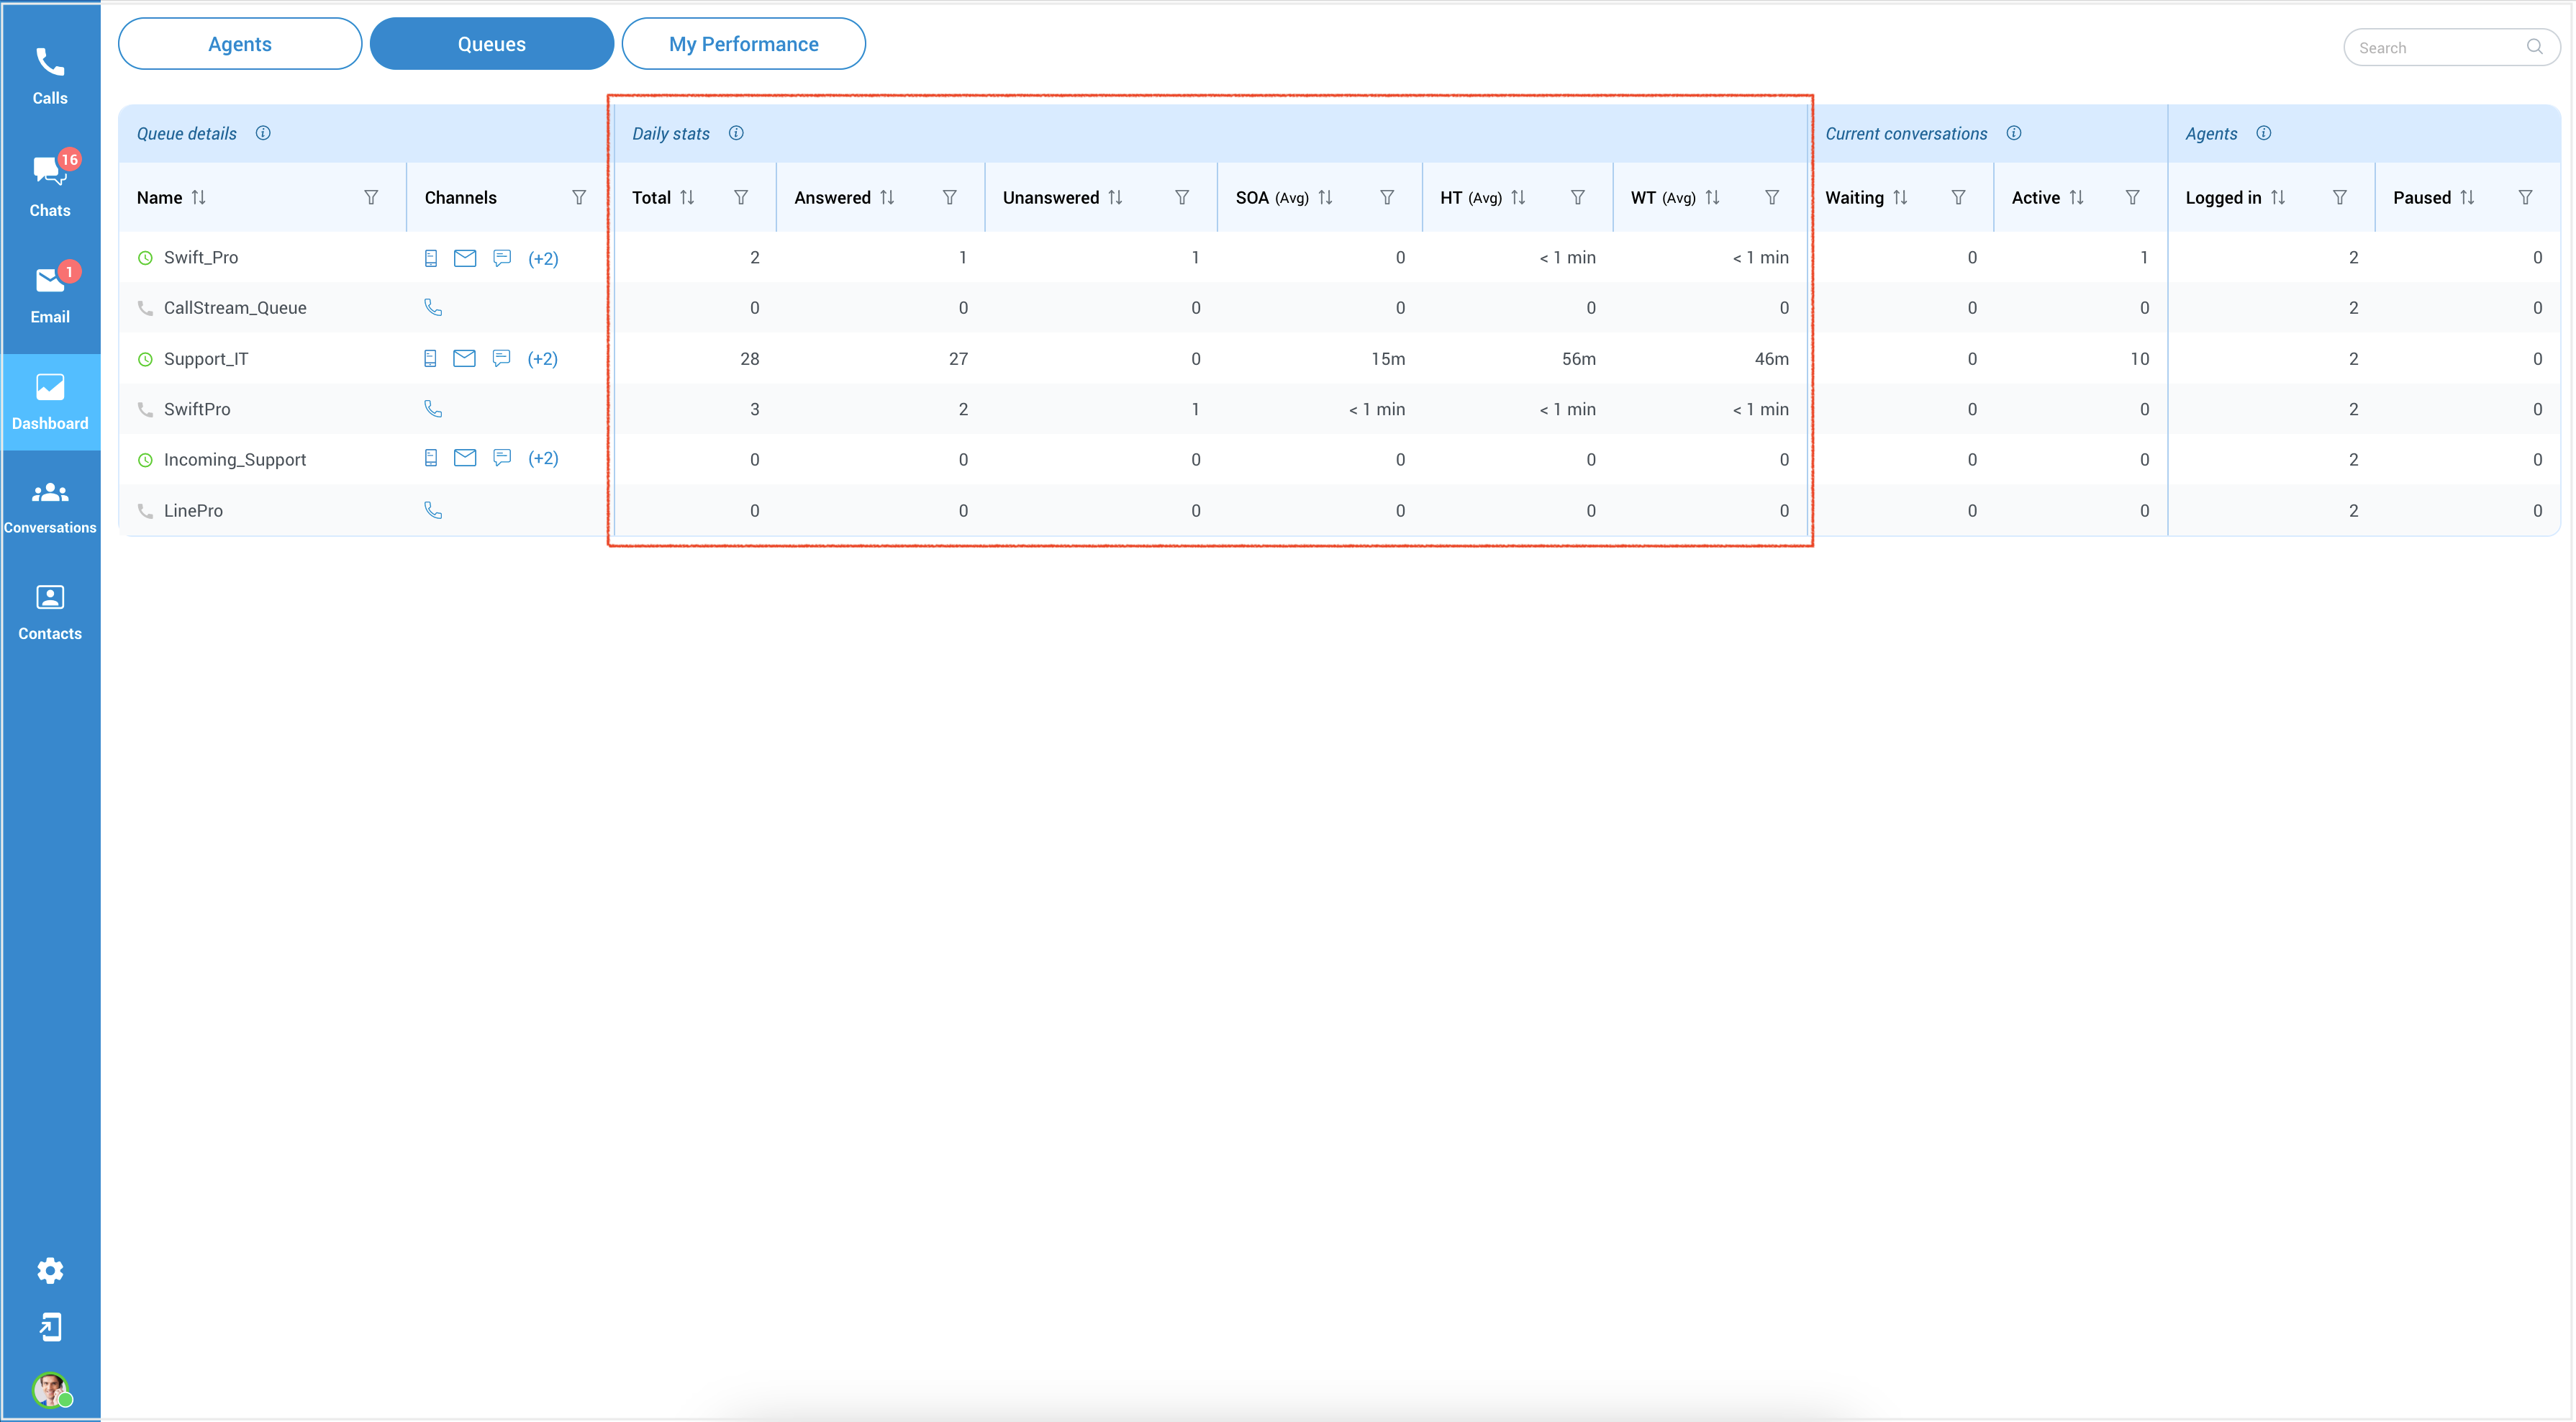
Daily Stats
These metrics are essential in analyzing call center performance, evaluating agent productivity, and optimizing customer service. Below there is a breakdown of the info displayed on this page:
Total: Represents the overall count of conversations, indicating the total number of interactions.
[The conversation count adds up all interactions, giving a supervisor a clear picture of the total number of customer conversations that have taken place. It's a precise way to keep track of the workload and activity of your support team or communication channels.]
Answered: Represents the number of conversations that have been successfully addressed or responded to by agents.
[Counts the number of interactions where the customer's needs were met, or the agents successfully addressed their issues. It's a way to measure how effective the support team is in providing solutions and resolving customer concerns.]
Unanswered: Represents the number of conversations that have not yet been addressed or remain unresolved.
[Counts the number of interactions where the agents have not fully addressed or resolved the customer's needs or issues. It's a way to measure the workload of unresolved matters that still require attention or resolution by the support team.]
Average Speed of Answer (SOA): Represents the average time it takes for all agents in the queue to answer calls or conversations, including the time spent waiting in a queue. It helps measure the overall responsiveness of the support team.
[The "average queue answer time" is like looking at a watch while waiting. It tells, on average, how long all support team members take to start talking to customers after customers have joined the waiting line. This includes the time customers spend waiting.
So, if the average queue answer time is low, it means that, on average, customers won't have to wait very long in line before someone from the support team starts helping them. That's good because it shows the support team quickly responds to customers' needs.
But if the average queue answer time is high, customers often have to wait a while before getting assistance. This might suggest that the support team needs to be more responsive and reduce waiting times.]
Average Handling Time (HT): Represents the average duration that all agents spend on calls or conversations, measuring the average time taken to handle customer inquiries or resolve issues.
[It's a way to measure how long it takes agents to answer customer questions or solve their problems. This measurement includes the time spent actively talking to and helping the customer.
So, if the average handling time for agents is short, it means that, on average, these agents efficiently handle customer inquiries and resolve issues quickly. This is generally good because it shows that the agents are responsive and efficient.
However, if the average handling time for agents is long, it suggests that, on average, agents take more time on each call or conversation. While this could be necessary for complex issues, companies often aim to keep this time as short as possible to provide quicker service.]
Average Waiting Time (WT): Represents the average time that customers spend waiting in a queue before being connected with an agent or representative. It indicates the average waiting period for customers seeking assistance.
[The "average queue wait time" tells, on average, how long customers have to wait in this virtual line before they can start talking to an agent who can help them.
So, if the average queue wait time is short, it means that, on average, customers don't have to wait for a long time before they get to speak with someone who can assist them. That's good because it means quick access to help.
On the other hand, if the average queue wait time is long, it suggests that, on average, customers have to wait for a while before they can connect with an agent. This might indicate that the company needs to improve its response time to reduce waiting times.]
¶ Conversations Active
The Active Conversations section enables supervisors to efficiently monitor ongoing and queued conversations within the system. Here, supervisors can perform various actions such as transferring, supervising, or managing conversations as needed.
Available Actions
These features can enhance the functionality and effectiveness of the call center environment, enabling supervisors to streamline operations, ensure quality service delivery, and optimize customer experiences. Following options are:
Transfer: This feature allows supervisor to transfer a conversation from their queue to another agent or a different queue within the call center. It enables efficient collaboration and ensures that conversations are appropriately directed to the most suitable resources.
[Example: A customer calls in with a complex technical issue regarding internet service. The customer has already been talking to Agent A for a few minutes, but the issue is beyond Agent A's expertise. The supervisor realizes that the customer's problem requires specialized technical knowledge that Agent B, who is an expert in internet service troubleshooting, possesses. So, the supervisor decided to use the transfer feature to resolve the customer's issue promptly.]
Take over: As a supervisor, this feature enables you to take over conversations that are being handled by agents. By doing so, you can provide assistance, guidance, or intervene in critical situations to ensure smooth customer interactions and maintain service quality.
[Example: As the supervisor monitors the conversation between an agent and a customer, the supervisor may notice that the customer's frustration is escalating and the customer is becoming increasingly dissatisfied with the service. It's clear that the agent is having difficulty resolving the issue, and the customer's dissatisfaction may lead to a negative customer experience. To ensure a smoother customer interaction, the supervisor takes over the conversation with the customer.]
Close: When a conversation is deemed complete or resolved, supervisors can use the "Close" feature to mark the conversation as finished. It helps maintain an organized workflow and allows agents to focus on ongoing and new customer interactions.
Supervise: This functionality allows supervisors to monitor conversations between agents and customers. By supervising ongoing conversations, supervisors can assess agent performance, provide real-time coaching, and ensure adherence to quality standards.
GoTo: This functionality allows supervisors to switch directly to a particular conversations.
¶ Conversations Completed
This section conveniently presents all closed conversations containing chats, emails, and voice interactions for review and reference.
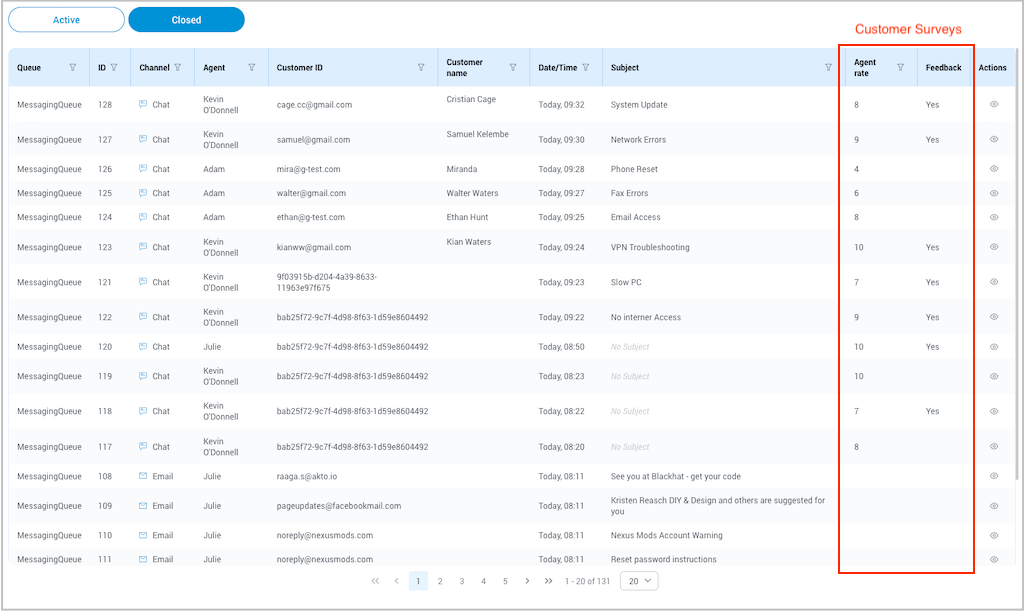
Customer Surveys
Within this section, supervisors are presented with the results from customer surveys in two columns:
-
The Agent Rate column shows the rating (from 1 to 10) that customers give to the agent.
-
The Feedback column indicates whether the customer left additional comments or feedback for the conversation (Yes/No).
Actions available
![]() Show conversation - access and review the historical record of the closed conversation.
Show conversation - access and review the historical record of the closed conversation.
![]() Play record - playback and listen to the recorded content of past voice interactions.
Play record - playback and listen to the recorded content of past voice interactions.
You can access all closed conversations and played records in the supervisor edition. If logged in as an agent, you can only view the conversations and records you were directly engaged with.
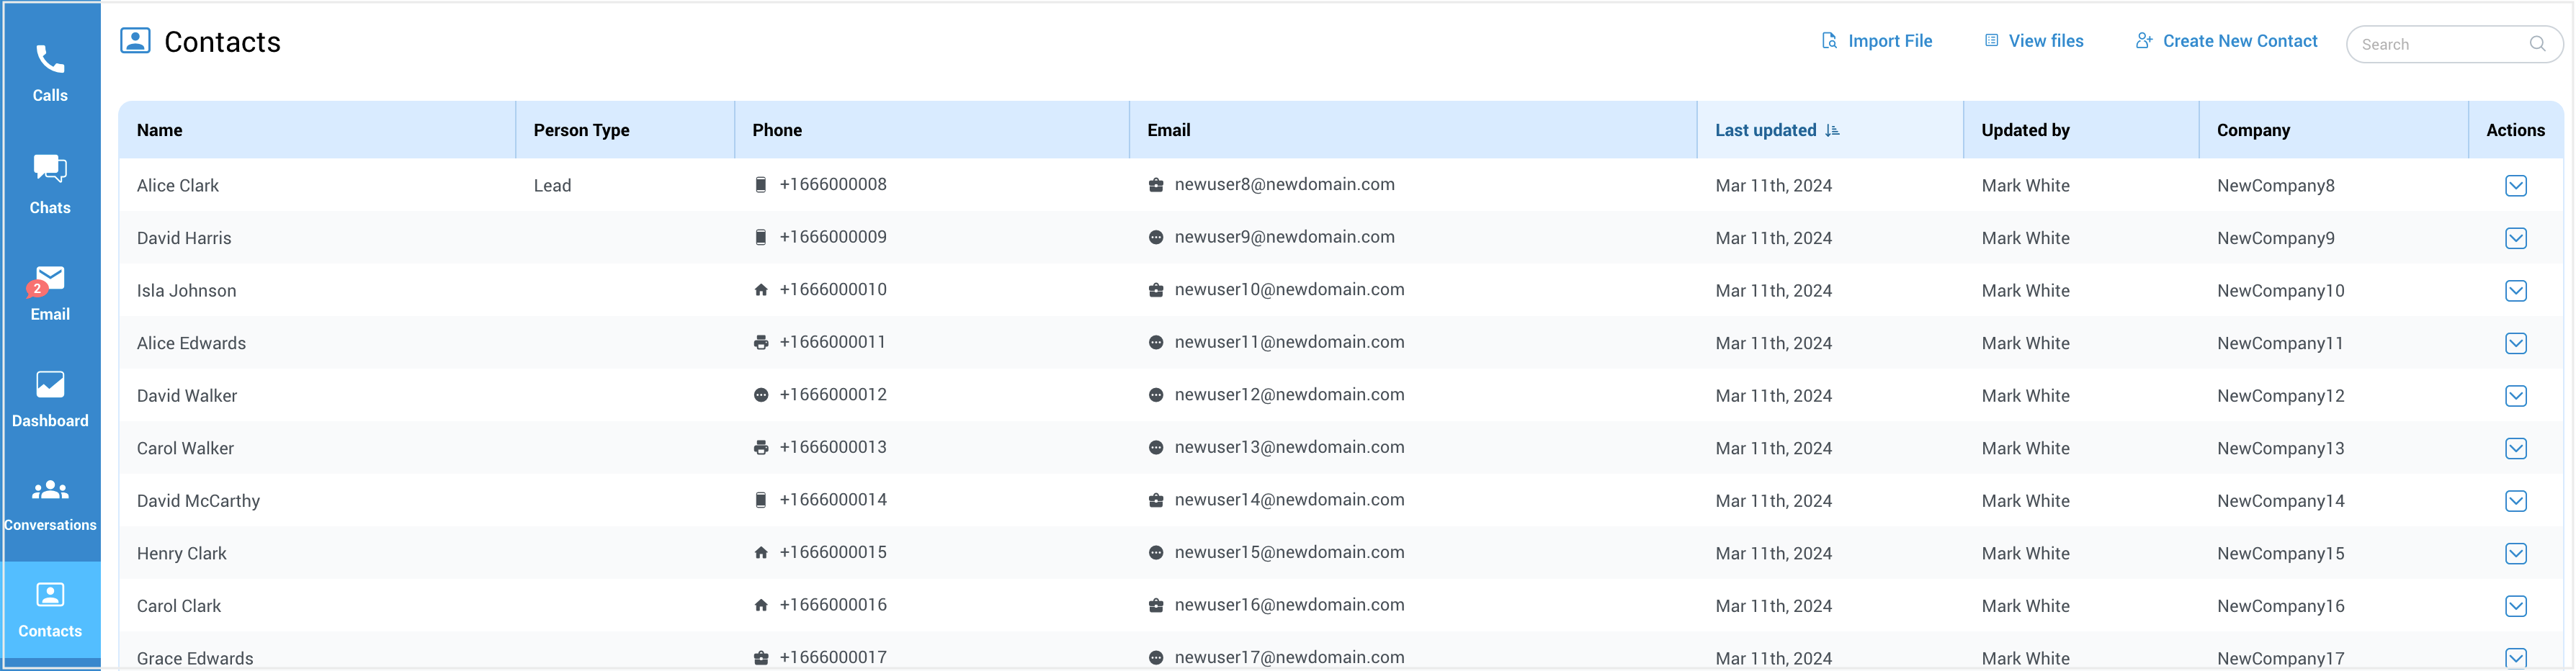
¶ Contacts Directory
¶ Uploading Contacts via CSV
To start uploading contacts using a CSV file, go to the Contacts tab within the Agent panel. This is where you'll initiate the process of adding contacts from your CSV file into the system.
In the upper right corner, you will find three buttons: Import File, View Files, and Create New Contact.
¶ Importing CSV File
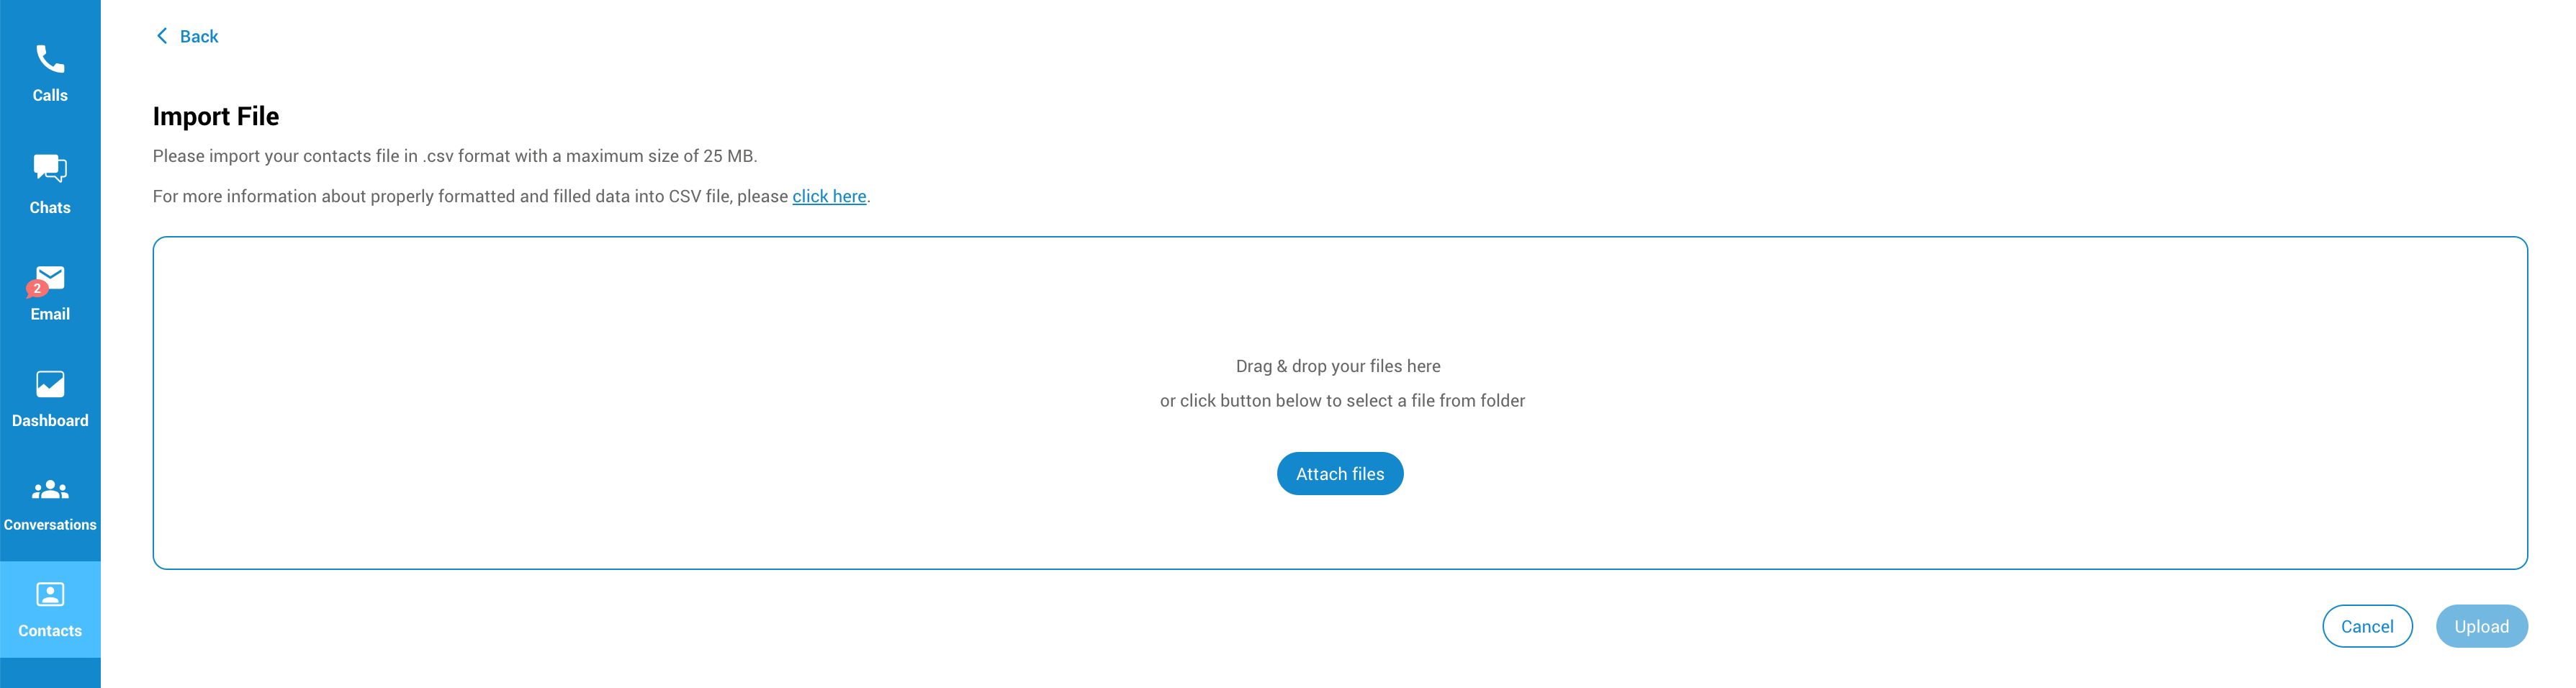
To upload contacts via a .CSV file, follow these steps:
- Click on the Import File option. This will open a new window.
- Next, click on Attach File and select the .CSV file you want to upload.
- Once you've chosen the file, click the Upload button to commence the process of importing contacts.
Below are the instructions on how to format your CSV file for contacts upload.
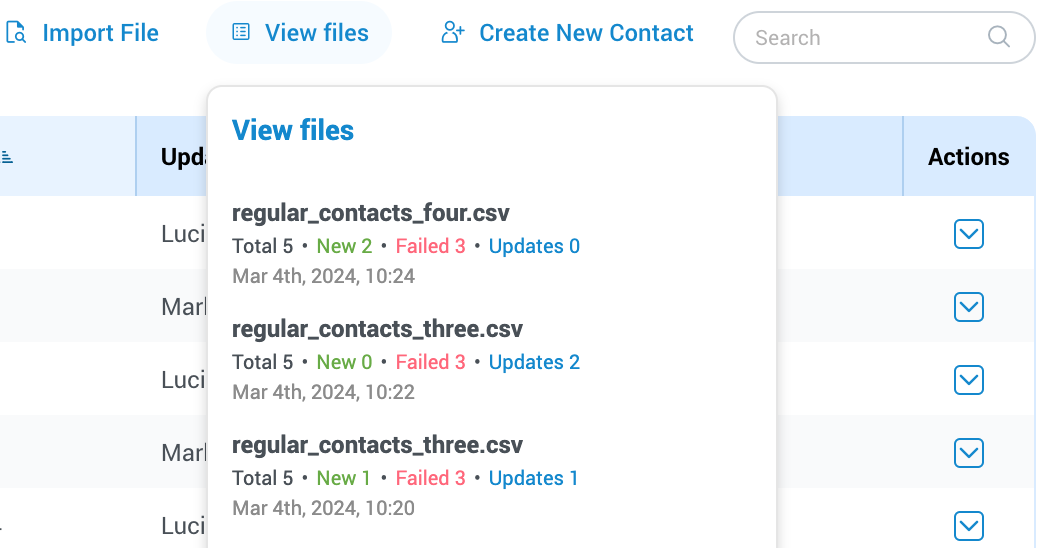
After uploading the file, you can quickly review the changes made by your CSV file. Click on View Files to access the upload status, which includes details such as Total rows, New entries, Failed uploads, and Updates.
Additionally, you can view the timestamp indicating when the file was uploaded.
If needed, you have the option to cancel the synchronization process. Upon cancellation, you'll receive confirmation that the sync has been terminated.
¶ Create a CSV File
When preparing your CSV file for contact upload, it's essential to include specific headers to ensure the CSV upload works correctly. Here are the required headers:
name,last_name,company,contact_type,phone,phone_label,email,email_label,fbUserId,notes
If any header is missing or misspelled in the CSV file, it will not be considered valid, and the process of uploading contacts will not work properly.
Most headers are self-explanatory, but some may have attributes that require correct formatting:
name: Enter the contact's first name.(Required)
last_name: Enter the contact's last name. (Required)
contact_type: Choose between contact and lead.(Required)
company: Enter company's name. (This filed is optional)
phone: Enter the contact's phone number. (This field is optional but recommended)
phone_label: Define the type of phone number. (Possible options to enter: mobile, work, home, fax and other)
email: Enter the contact's email address. (This field is optional but recommended)
email_label: Define the type of email. (Available options to enter: private, business and other)
fbUserId: If applicable, enter the contact's Facebook user ID.
notes: Additional information or notes about the contact.
You can also access this information by clicking on the link provided within the attachment page.

Please note that the maximum file size for uploading a CSV file is 25 MB.
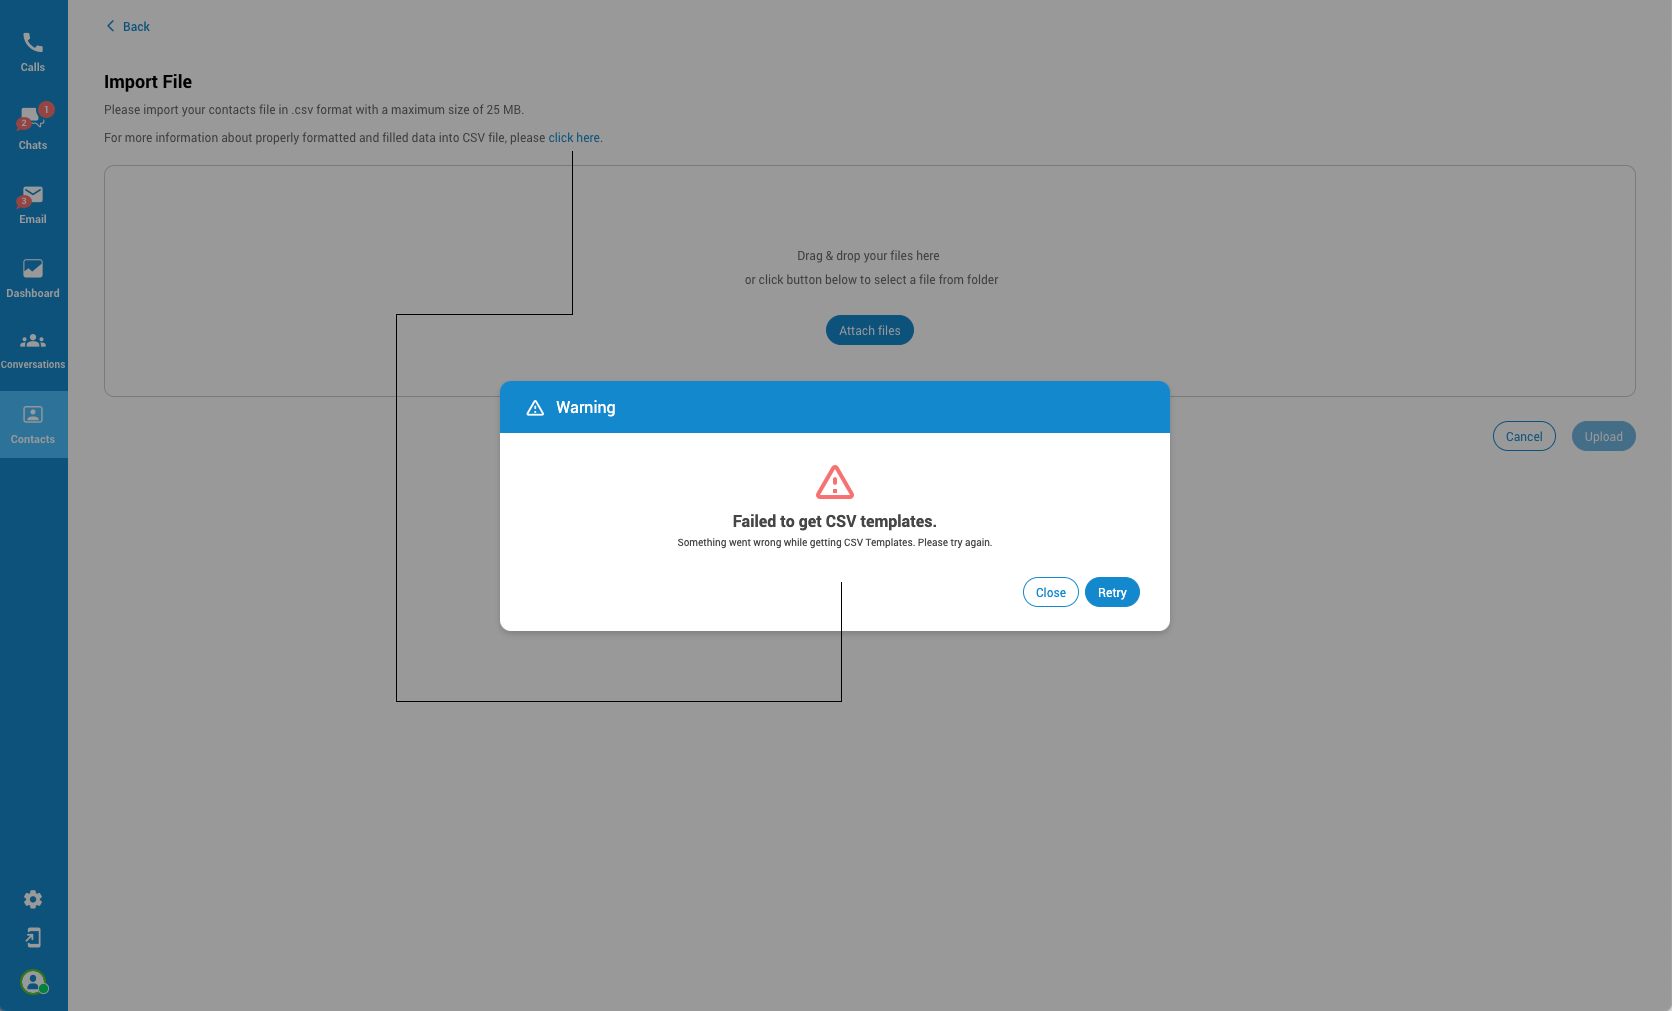
If the user clicks on 'click here' to open the dialog for how to format a CSV file, and the dialog fails to display the instructions, they will see the following message: "Failed to get CSV templates. Something went wrong while getting the CSV template. Please try again.".
Below is an example of a correctly formatted CSV file:
name,last_name,company,contact_type,phone,phone_label,email,email_label,fbUserId,notes
Derek,Docker,TechCorporation,lead,+123456789,mobile,derek.dockere@acmecorp.com,business,fb12345,Interested in whole product line
Kimy,Anderson,InnovaSolutions,lead,+987654321,work,kim.anders@innovatech.com,other,fb33333,Lean towards producs C and D
¶ Merge Contacts
Contact merging is a feature that enables the consolidation of multiple contact records into a unified entity. This process streamlines and organizes contact information by merging redundant or duplicate entries, resulting in a single comprehensive record.

By merging contacts, users can avoid clutter and confusion in their contact lists, ensuring efficiency and accuracy in managing and accessing important contact details.
Here are the steps to efficiently merge your contacts:
- Navigate to your Contacts list.
- Find the contact you want to serve as the primary for the merge.
- In the Actions column next to your selected contact, click the dropdown menu, and choose the Merge option.
- Once you initiate the merge, you'll be directed to the Merge Contacts screen. Here, the page title will read: "Merge Contacts - Please select the information you wish to retain; details from the other contact will be replaced."
- To merge contacts, begin by searching for them using their names and surnames. Next, utilize the dropdown menu to choose another contact for merging with the initial one.
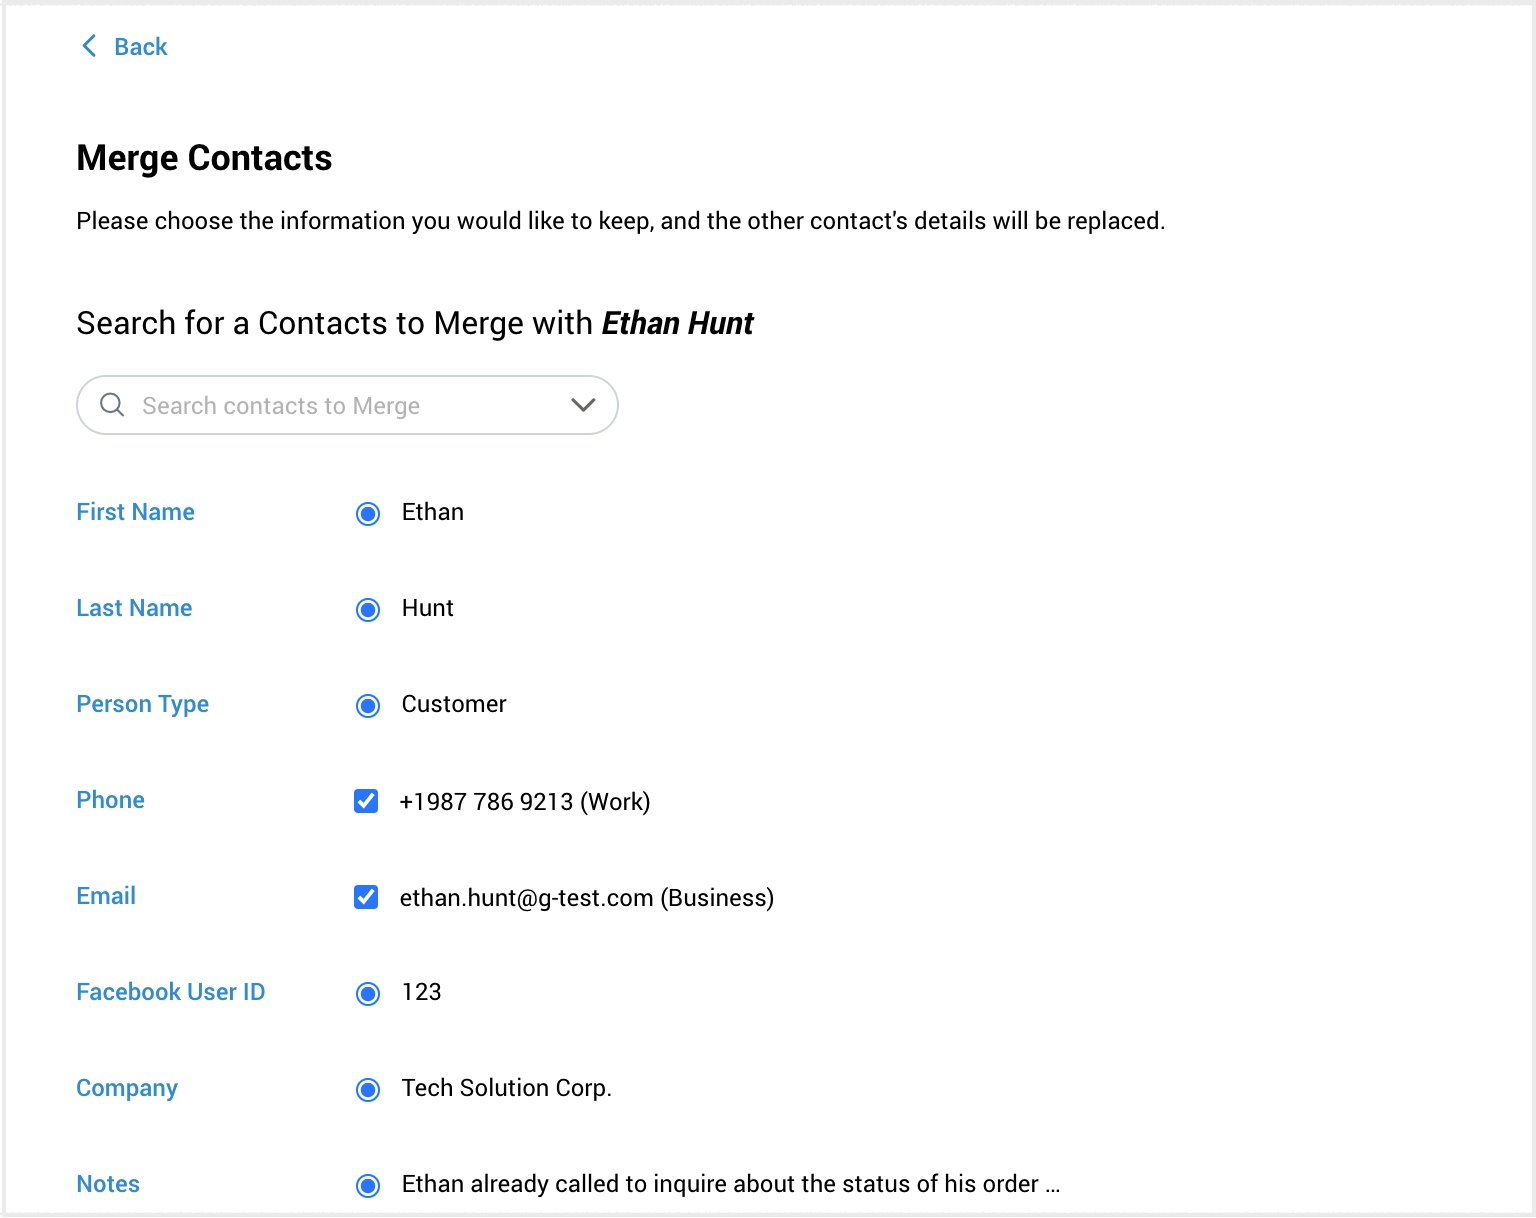
When merging contacts, you can select multiple phone numbers or emails (checkboxes), but only one option each for fields like name, last name, person type, ect. (radio buttons). Use radio buttons to indicate which information you want to retain. After merging, the selected information will be displayed in the Contacts directory.
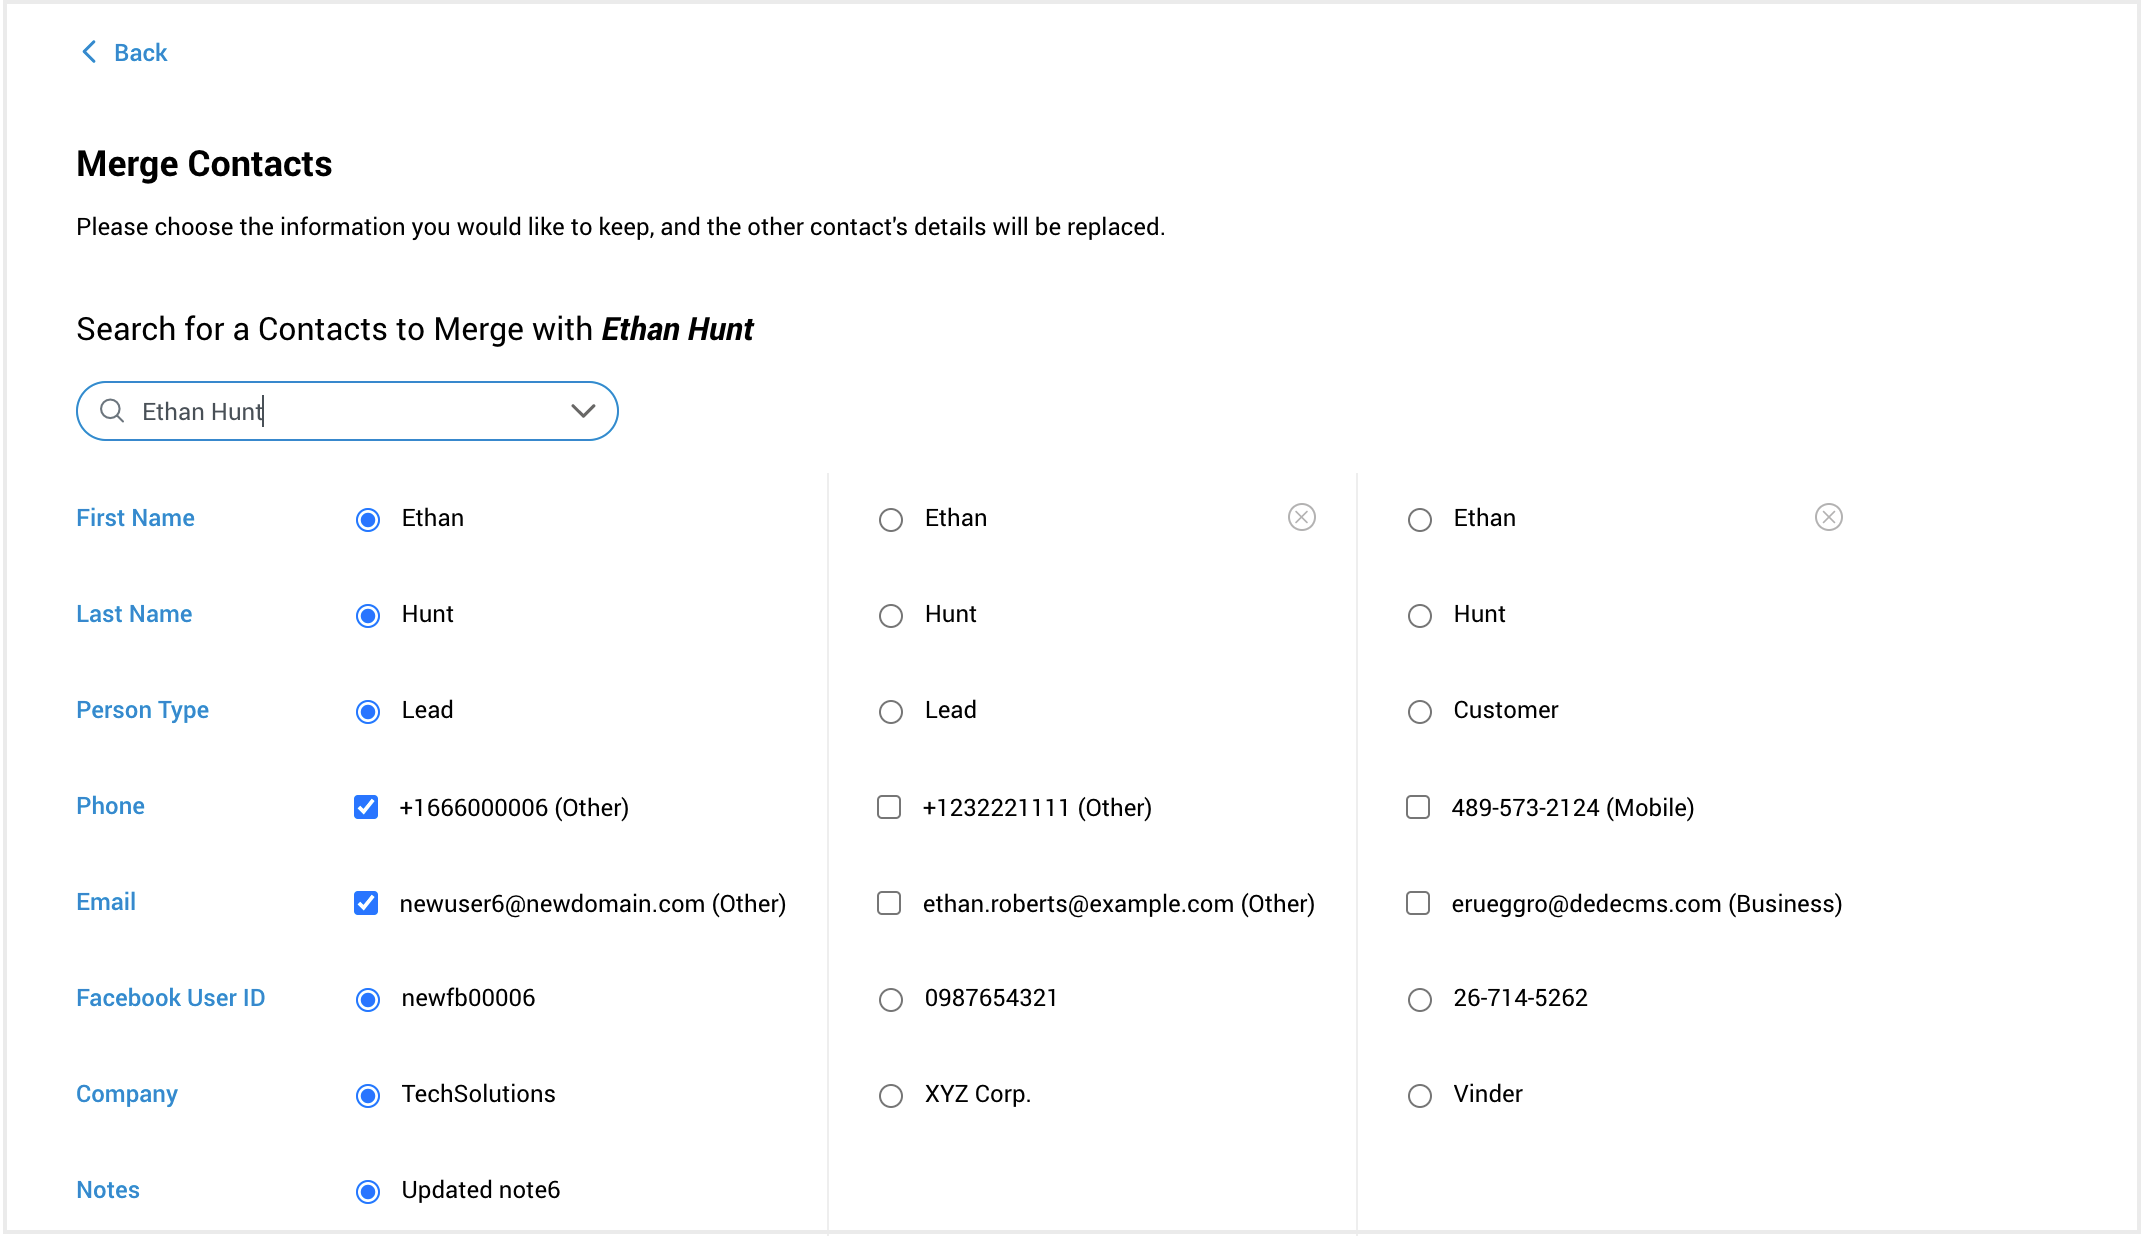
Once you've made your selections, click Merge. A confirmation alert will appear: "Are you sure you want to merge these contacts? Merging is a one-time action and cannot be undone. Ensure you have selected the correct details to keep, as the original contacts will be permanently updated.
¶ Delete Contacts
Supervisors have an additional option compared to Agents: the ability to delete contacts. Within the Contacts directory, supervisors can select a desired contact and access the 'Action' options. From the dropdown menu, they can choose the 'Delete' option to remove the contact from the directory. It's important to note that there is no option to undo this action once it's completed.

¶ Supervisor Typing Notification and Sneak Peek Preview
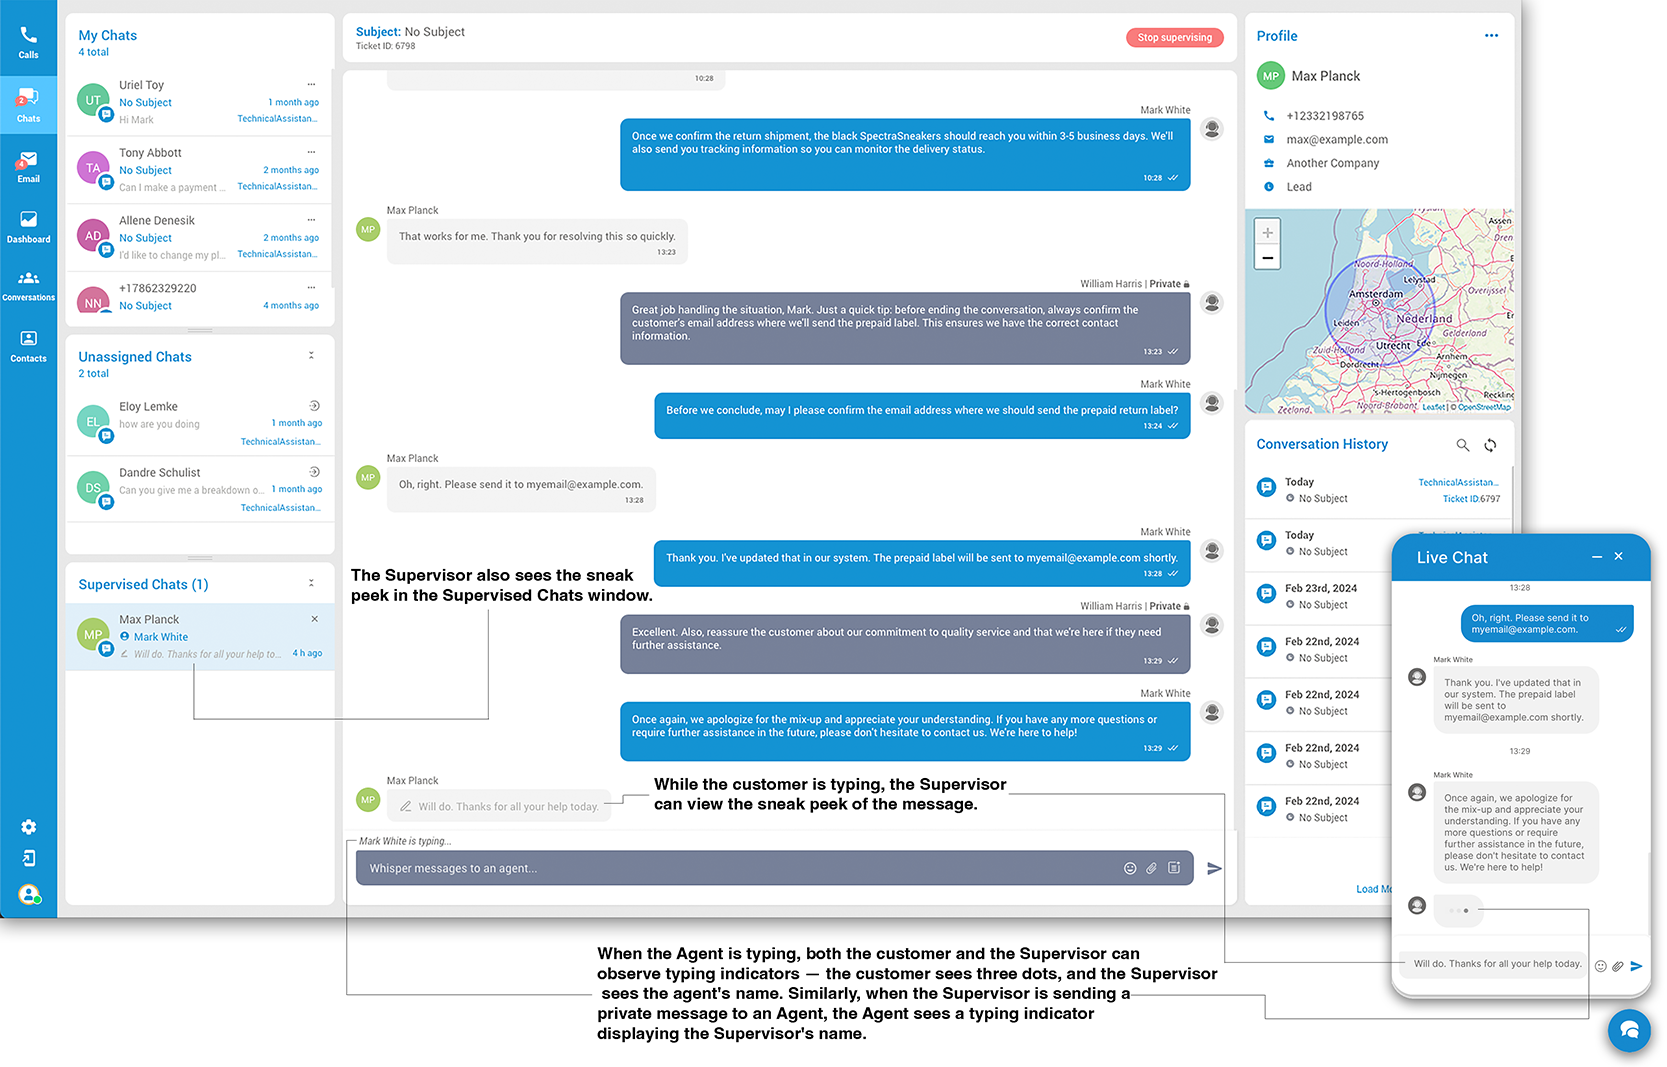
¶ Overview
This section highlights key features available to supervisors within our live chat application, specifically focusing on typing notifications and sneak peek previews. These tools are integral for enhancing both the oversight of live customer-agent interactions and the direct communication between supervisors and agents. By leveraging typing notifications and sneak peek previews, supervisors can ensure more proactive and informed support, ultimately contributing to a smoother and more effective customer service experience.
¶ Features
¶ Private Chat between Supervisors and Agents
-
Initiating Private Chat:
- Supervisors can start a private chat with any agent, even if the agent is currently engaged in a conversation with a customer.
-
Typing Notifications:
- When a supervisor initiates typing a message in a private chat with an agent, the agent receives a typing notification displaying the supervisor's name.
- Conversely, when an agent is responding within the same private chat, the supervisor will receive a typing notification with the agent's name. This bi-directional notification system ensures both parties are aware when the other is composing a message.
¶ Sneak Peek Preview in Multi-Party Conversations
-
Customer Message Previews:
- If a customer is composing a message in a chat where both an agent and a supervisor are present, both the agent and the supervisor will receive a sneak peek preview of the message being typed by the customer. This feature allows for preemptive action and response planning.
-
Supervised Chats Window:
- In the Supervised Chats window, supervisors have the ability to view sneak peeks of messages that customers are typing in real-time across all chats they are supervising. This overview enables supervisors to monitor multiple conversations simultaneously and provide timely assistance or intervention as needed.
¶ Privacy and Notifications
-
Privacy in Supervisor-Agent Interaction:
- It is important to note that while supervisors and agents can exchange private messages and receive typing notifications, these interactions are invisible to the customer. This ensures that internal communications do not interfere with customer service.
-
Customer Typing Notifications:
- Customers do not receive typing notifications when a supervisor is typing in a private chat with an agent. This maintains the privacy of supervisor-agent communications and ensures the customer experience remains focused on the agent-customer interaction.
¶ Conclusion
The supervisor functionalities within our live chat application, including private chats, typing notifications, and sneak peek previews, are designed to enhance the supervision and support provided to agents. By facilitating efficient communication between supervisors and agents, and offering real-time insights into customer messages, our system ensures a high-quality service experience for customers while streamlining the support process for our team.
¶ Supervisor - Settings
This section provides agents with comprehensive access to critical functionalities, enabling seamless management of security protocols, voice configurations, application settings, voice alerts, as well as pre-defined responses, WhatsApp templates and Email signatures.
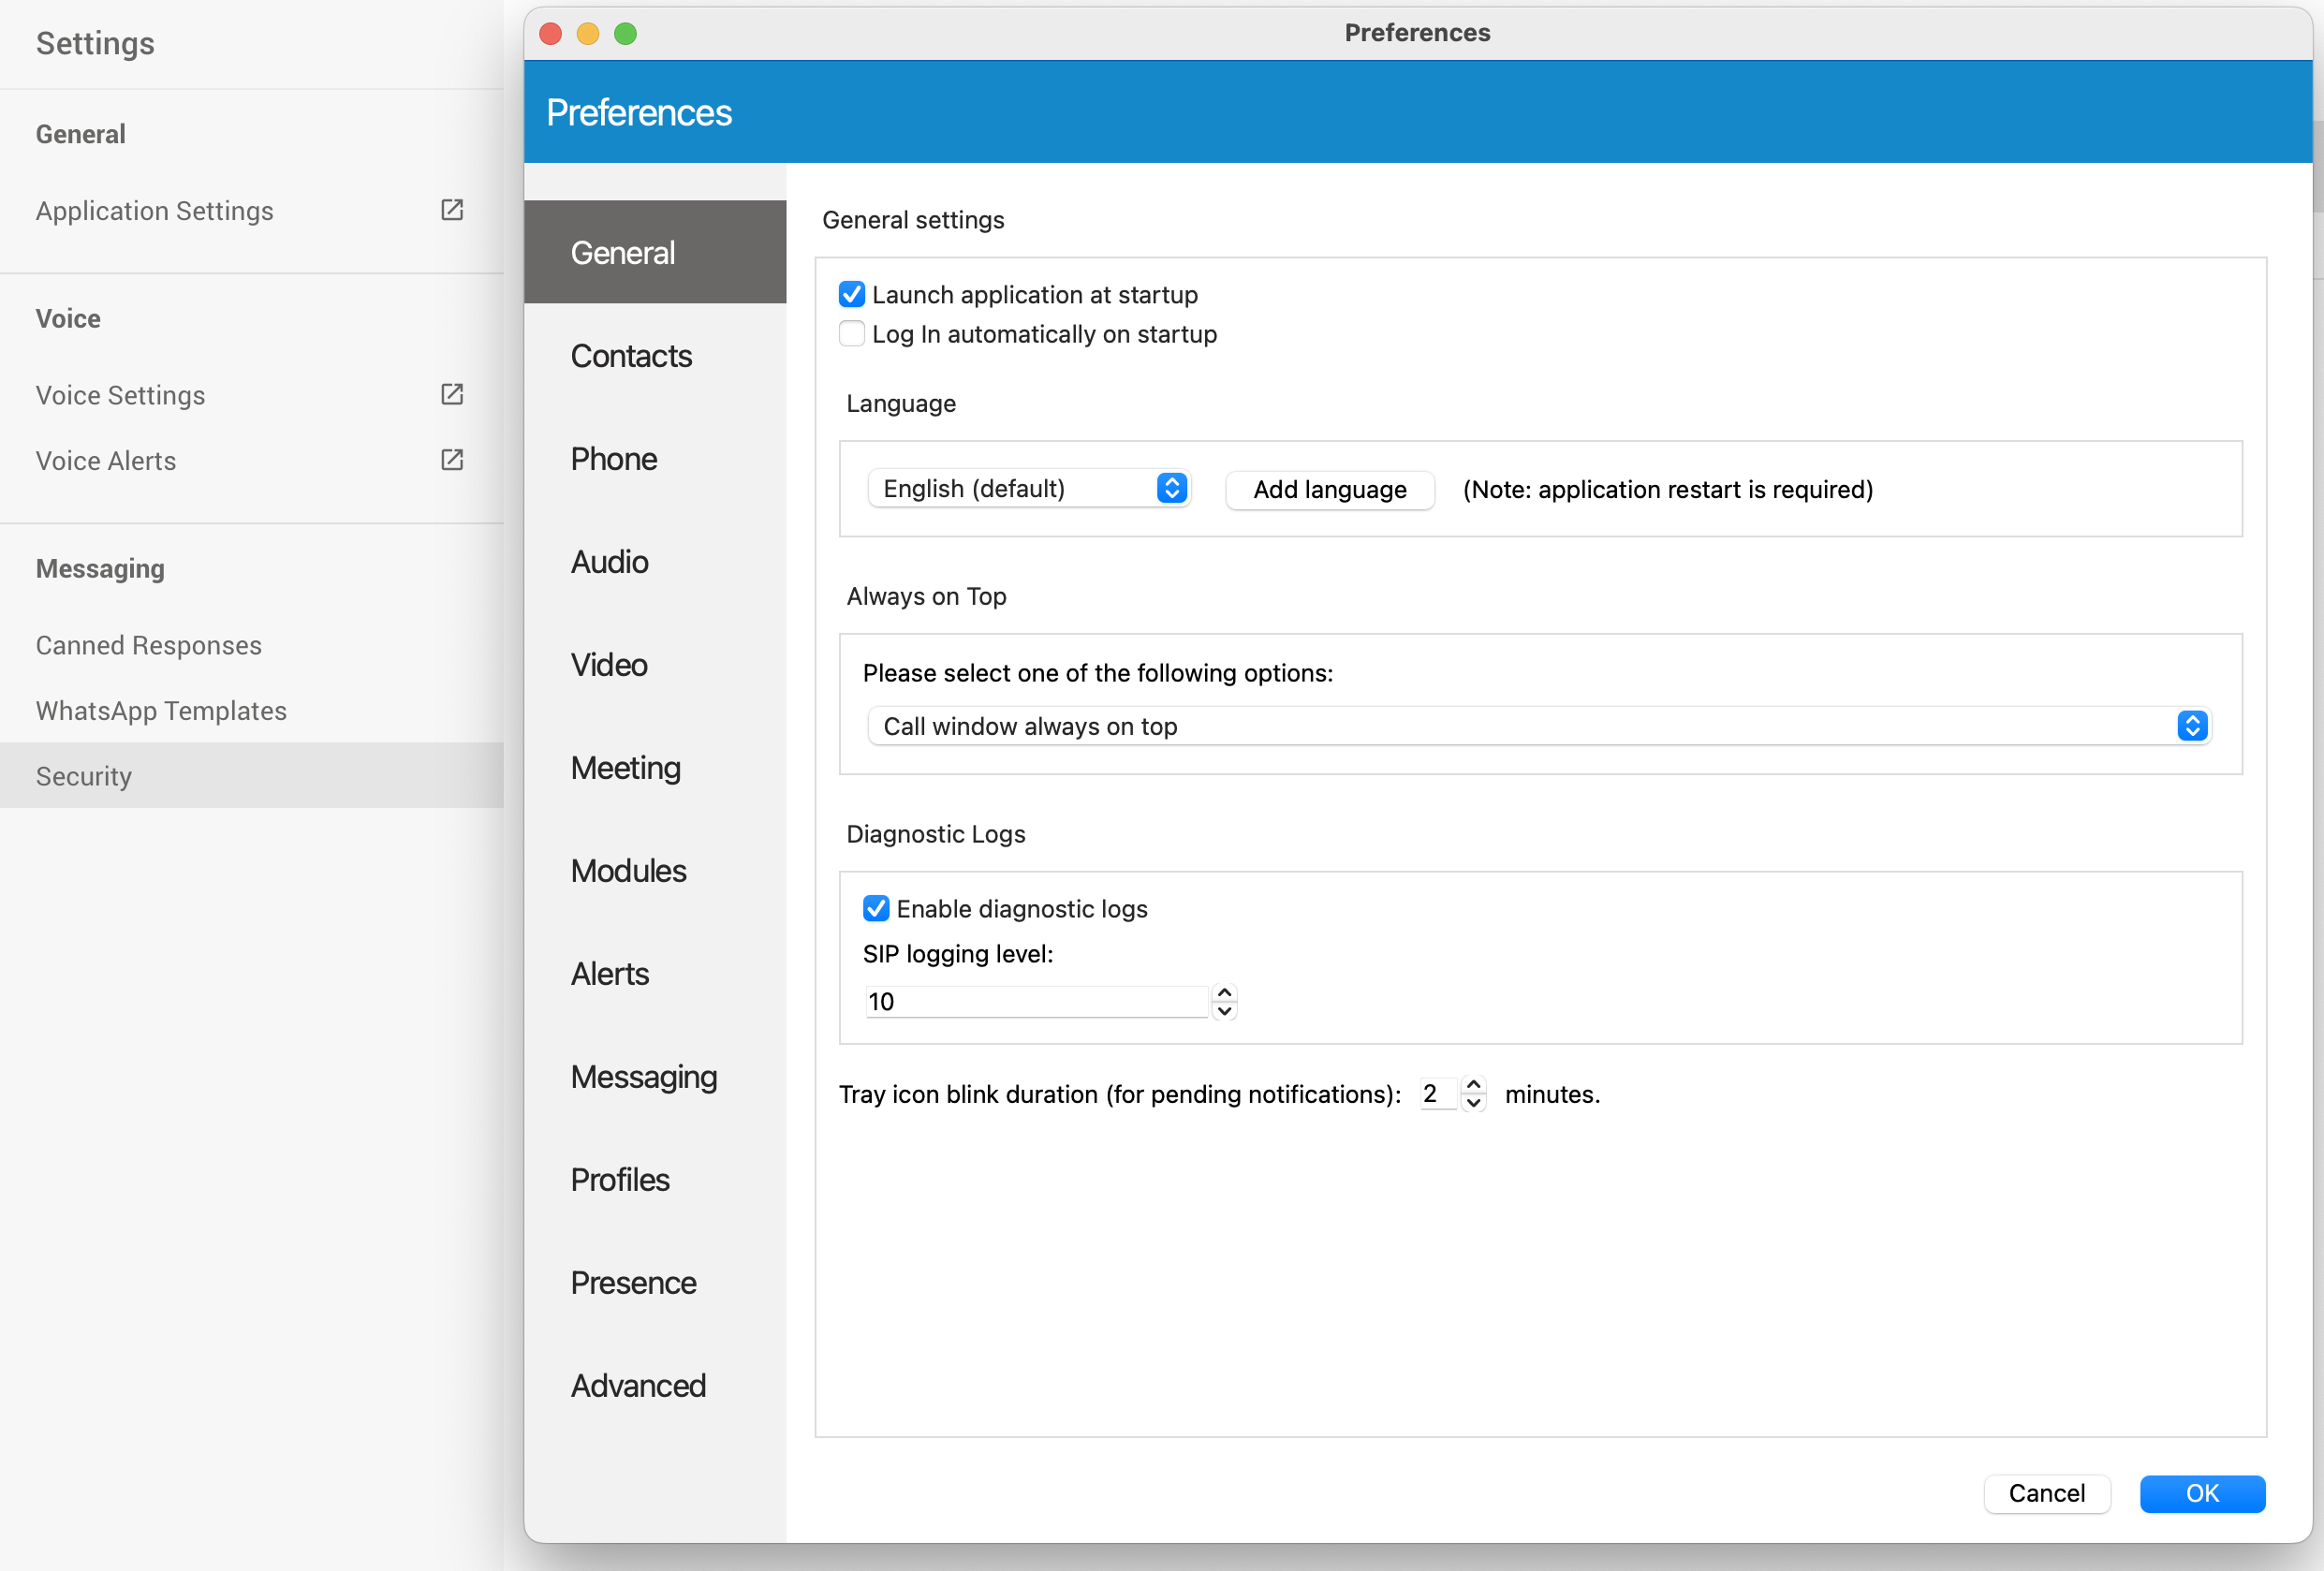
¶ Application Settings
Within the Application Settings section, users have the flexibility to configure a range of parameters to suit their preferences and streamline their experience. This includes options such as automatic launch and login, preferred language, configuration options related to phone functionality, audio and video settings, alerts, module settings, etc.
¶ Voice Settings
This panel contains settings for Agents, Queues and Alerts, so accordingly, there are 3 tabs with same names.
Agents
The drop-down list is used to select which agents will be visible in the Agent Panel window, inside Agents tab.
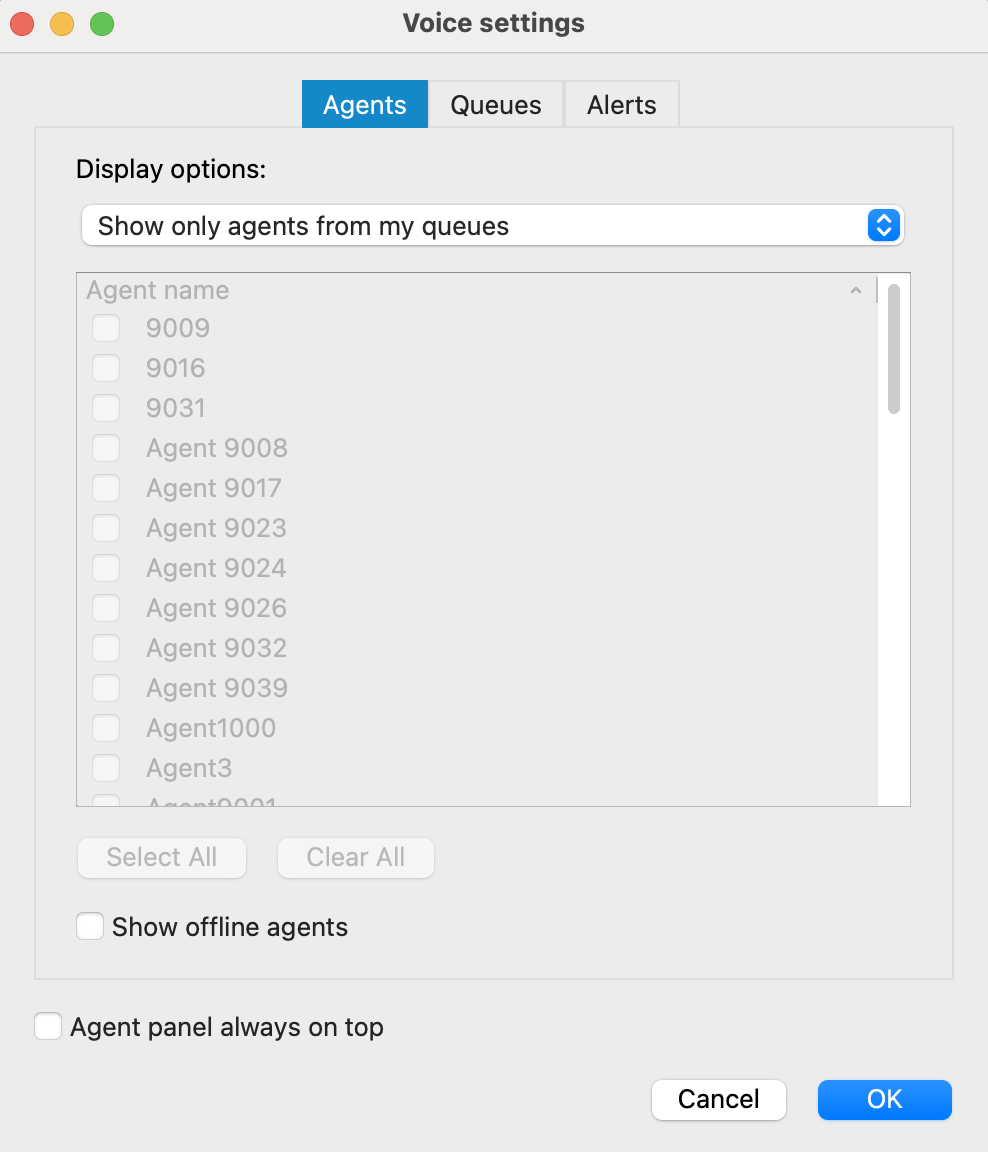
You can select the following options:
• Show only agents from my queues • Show all agents
• Show custom selected agents
Also, there is checkbox 'Show offline agents' that is used for showing offline agents inside the Agents tab.
Below, the checkbox 'Agent panel always on top' is used in case you want to set the Agent Panel always on top.
Queues
The drop-down list is used to select which queues will be visible in the Agent Panel window, inside Queues tab.
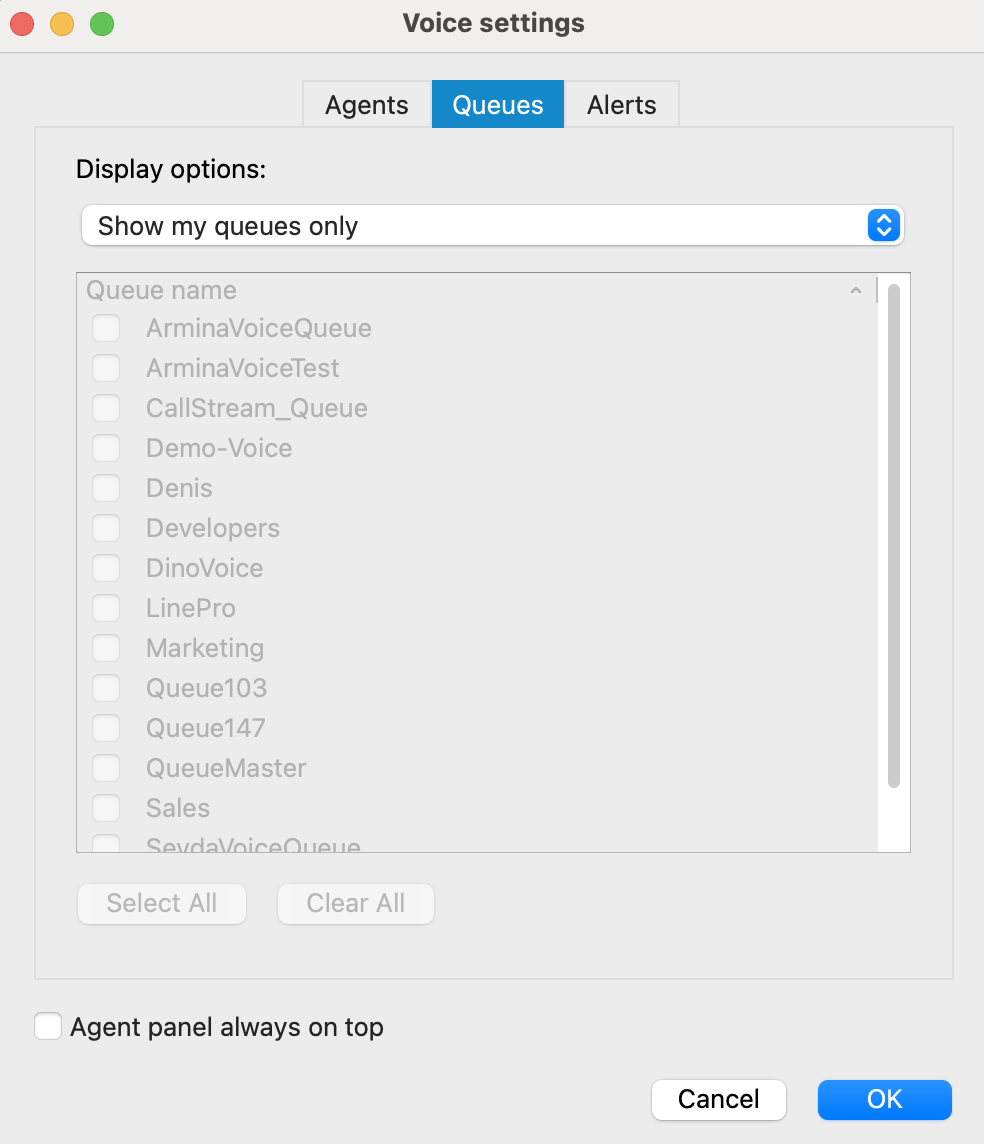
The following display options are offered:
• Show my queues only
• Show all queues
• Show custom selected queues
Below, there is a checkbox 'Agent panel always on top' that is used in case you want to set the Agent Panel always on top.
Alerts
Max wait time (MWT): MWT displays longest waiting caller in the Queue.
- Threshold (minutes): If you want to be alerted when a caller is waiting for more than X minutes in the Queue, set Threshold on that value. When the waiting time reaches the Threshold, it will be displayed in red color, and application will optionally display an alert to the user.
- Refresh time (seconds): Select or enter the number which will represent refresh interval in seconds.
Alert Options
- Alert interval (minutes): Alert interval is the amount of time in which application will alert agent for one specific type of event (alert). You can select or enter the number which will represent this interval in minutes.
- Show popup for alerts: If this option is checked, the application will show popup whenever an alert occurs.
- Alert me for my queues only: If this option is checked, you will receive alerts only for your queues.
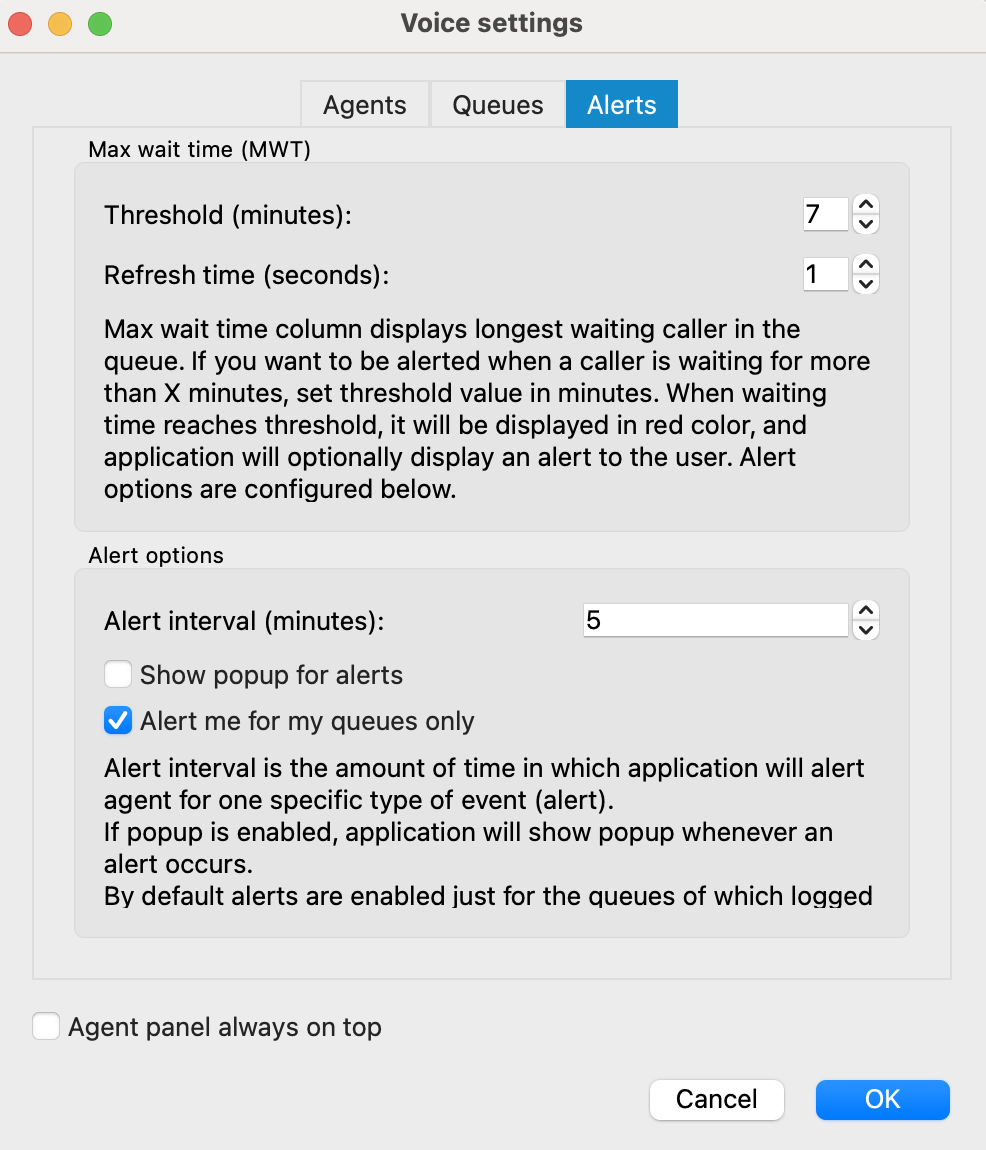
Below, there is a checkbox 'Agent panel always on top' that is used in case you want to set the Agent Panel always on top.
¶ Voice Alerts
The "Alerts" dialog presents a comprehensive list of alerts. Each alert in the list includes the following details: the timestamp and specific alert information.
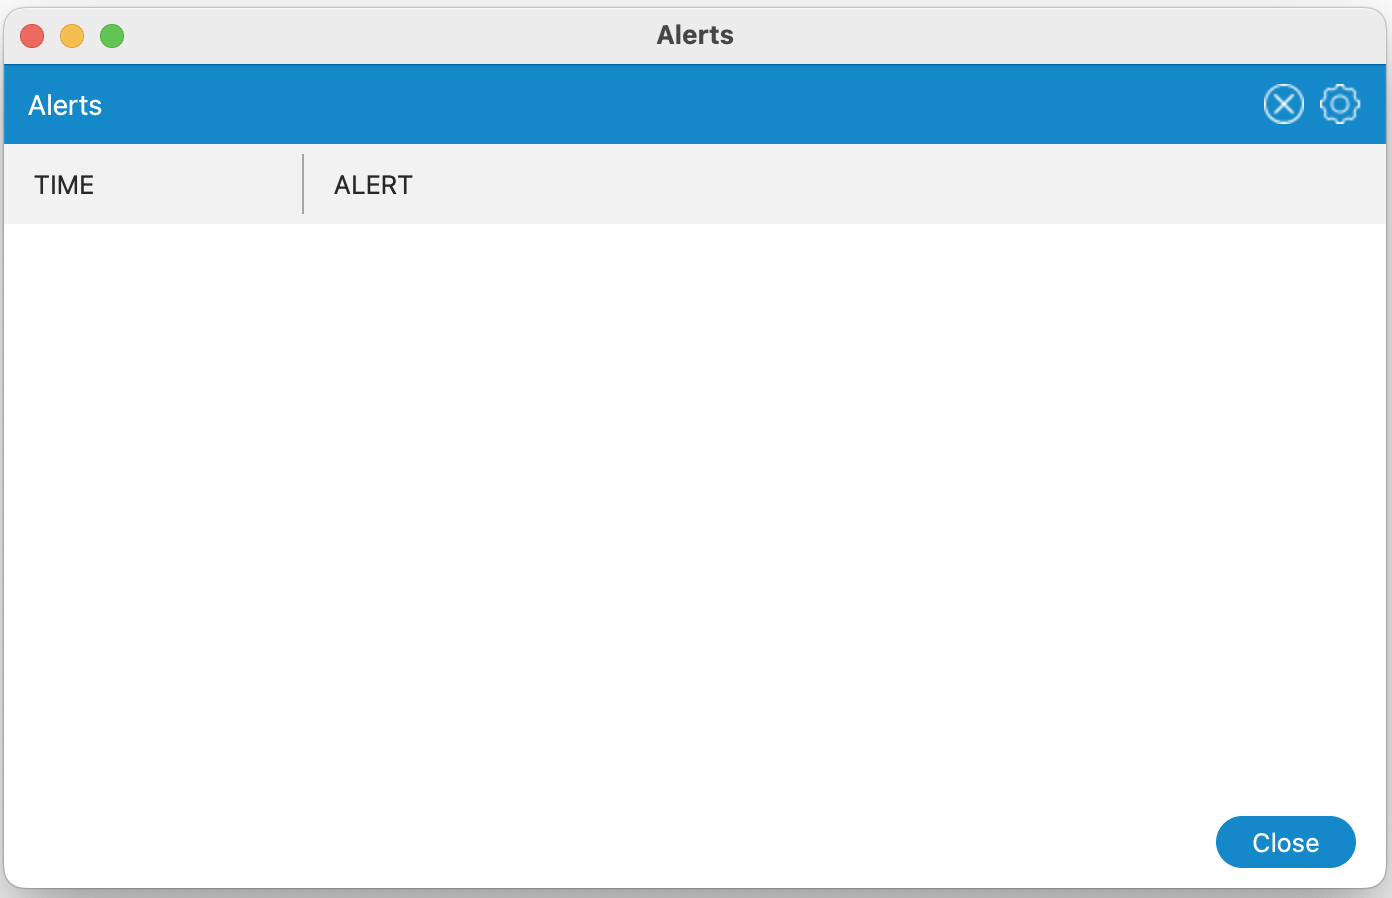
Located on the top right corner of the Alerts dialog, there is an option to delete all alerts from the list. Additionally, adjacent to the "Delete" button, you'll find a "Settings" button. Clicking on this button will open the "Agent Panel Settings" dialog, allowing you to modify previously configured alert options to suit your preferences.
¶ Canned Responses
Canned responses are predefined message templates utilized to promptly address customer inquiries. They ensure consistent and efficient communication across multiple channels, such as SMS, email, chat, Facebook, and WhatsApp.
¶ Location of Canned Responses
Canned responses are conveniently located within the Agent Panel Settings page, under the Messaging section. Upon navigating to this page, supervisors are greeted with a comprehensive list of preexisting canned responses. Users can easily browse through this list using the search bar provided, enabling them to search by either the name or content of the canned responses.
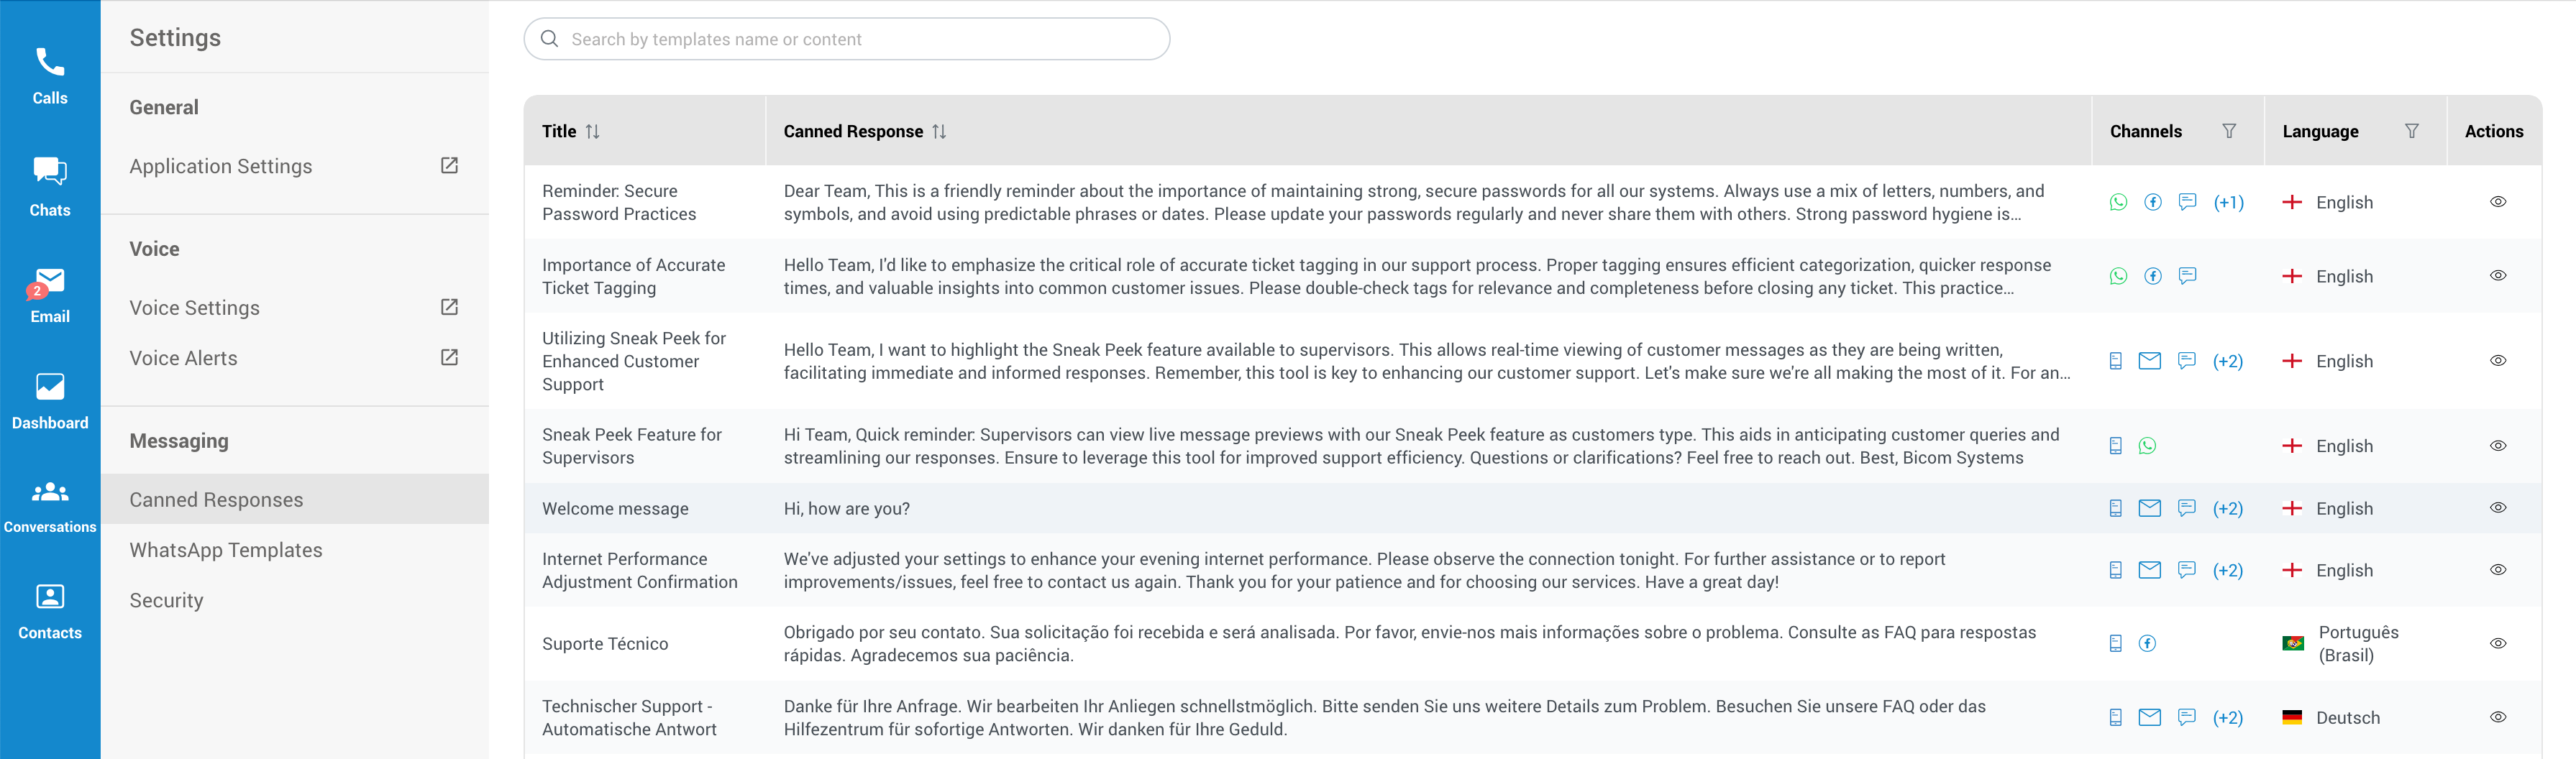
The list is structured into five columns:
- Title: Allows sorting by name.
- Canned Response: Facilitates sorting by content.
- Channels: Enables filtering by assigned channel(s).
- Language: Allows sorting by language. Available options include English, Deutsch, Español, Français, Italiano, and Português (Brasil).
- Actions: Provides options to View, Edit, and Delete a canned response.
Clicking the New Canned Response button opens a dialog for creating a new canned response.
¶ Creating a New Canned Response - Supervisor edition only
Within the Supervisor edition, you'll find a New Canned Response button located in the upper right corner. Clicking on this button will open a dialog where you can create a new canned response.
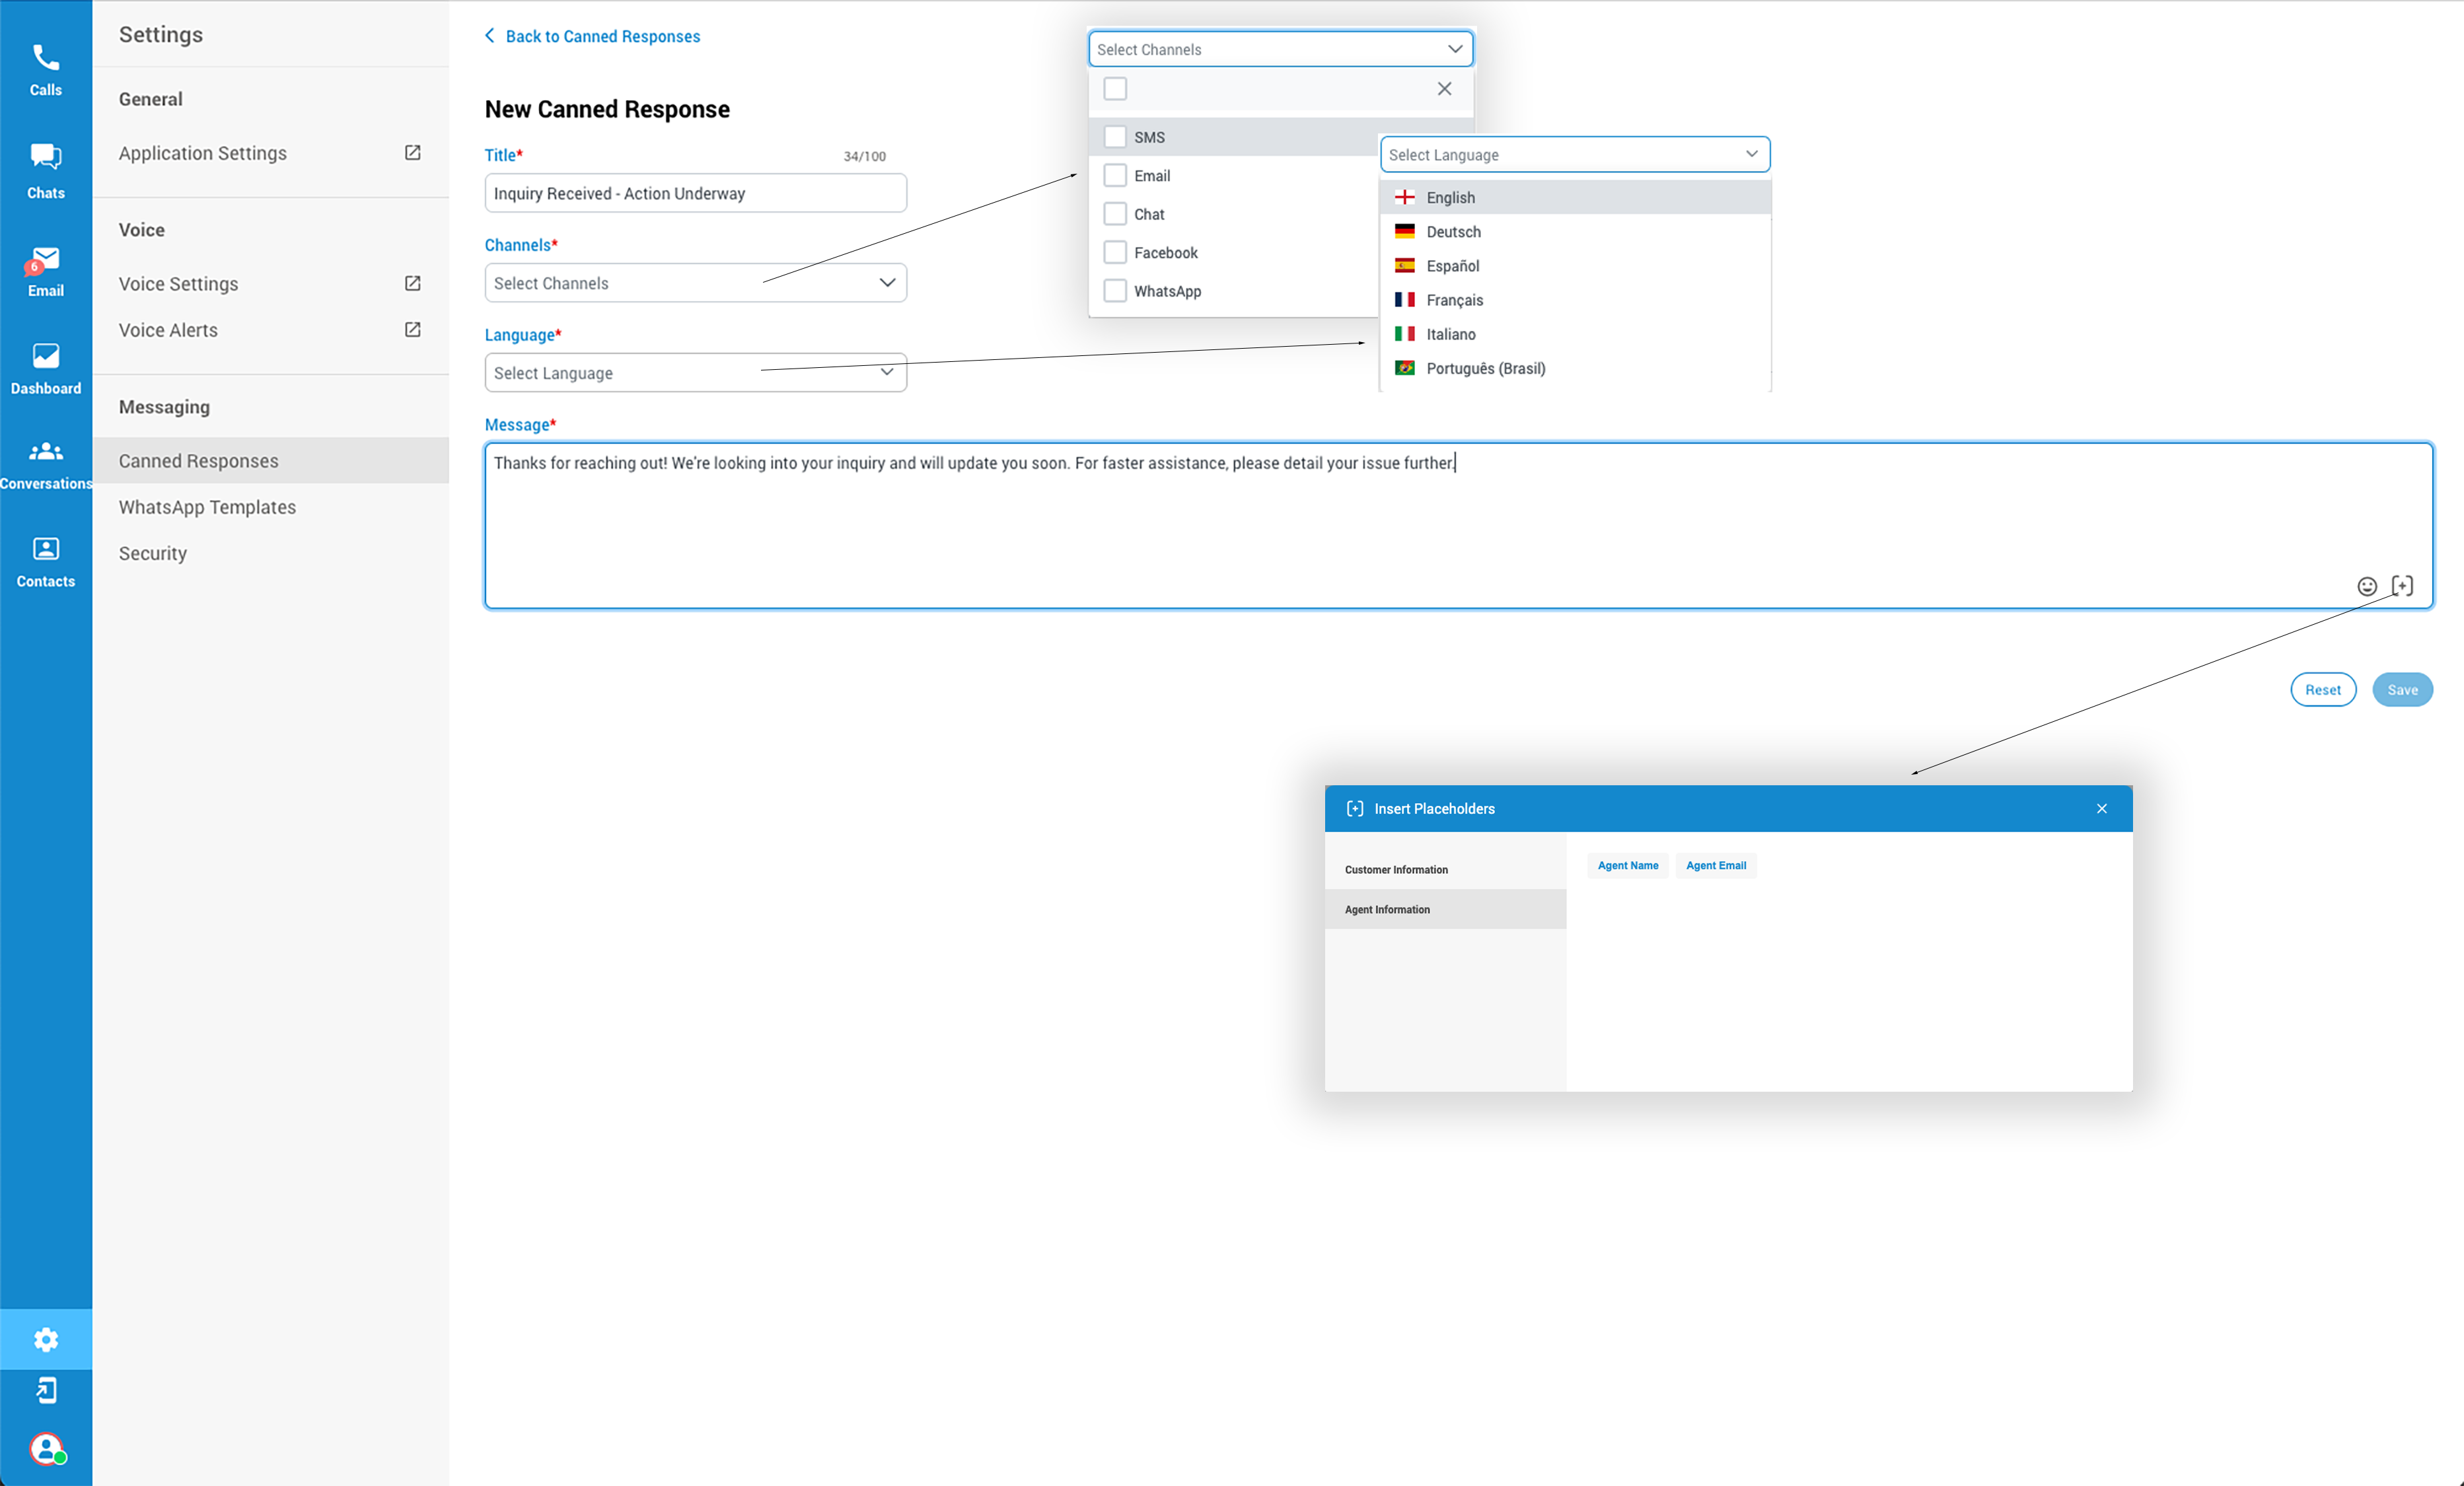
The process of creating a new canned response is straightforward:
- Enter the Title of the canned response.
- From the dropdown menu below, choose the channel(s) to which this canned response will be assigned.
- Select the language.
- Add the content of the canned response. Emojis and Placeholders (variables such as
{{CustomerEmail}},{{AgentName}}, and{{AgentEmail}}) can be included to personalize the messages. - Save the canned response to add it to the list.
The {{AgentName}} placeholder is like a blank space that gets filled with the actual name of the agent who is sending a message. For example, if the agent's name is "John," wherever you put {{AgentName}} in your message, it will automatically show "John" when John sends the message. It's a way to make messages feel more personal and tailored to the recipient.
Using canned responses to respond to customers is identical to using canned responses in the agent edition.
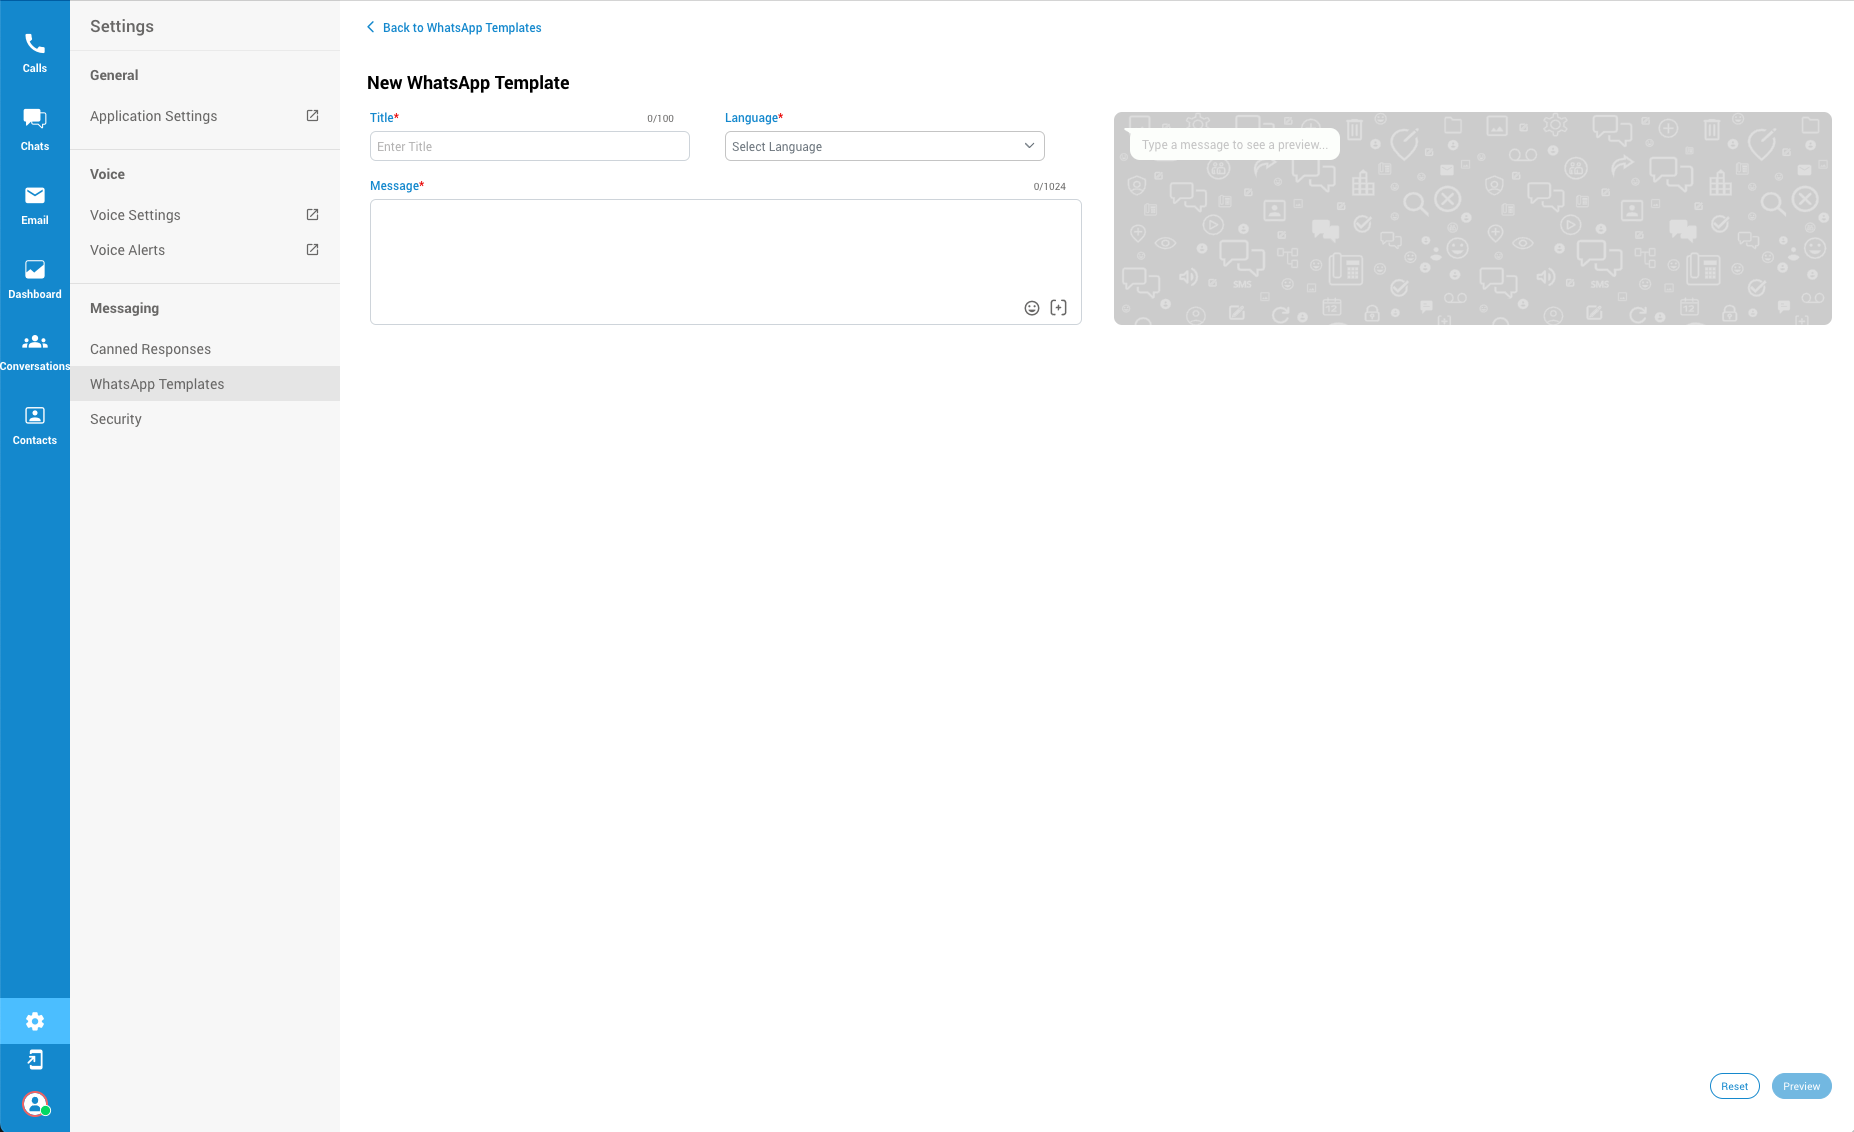
¶ WhatsApp Templates
Creating a new WhatsApp template in the gloCOM Agent Panel is a straightforward process designed to facilitate efficient and compliant communication. Follow the steps below to create a template.
¶ Accessing the New Template Screen
- Click the New Template button located in the upper right corner of the WhatsApp Templates panel. This action will bring you to a new screen dedicated to creating a template.
¶ Filling Out the Template Details
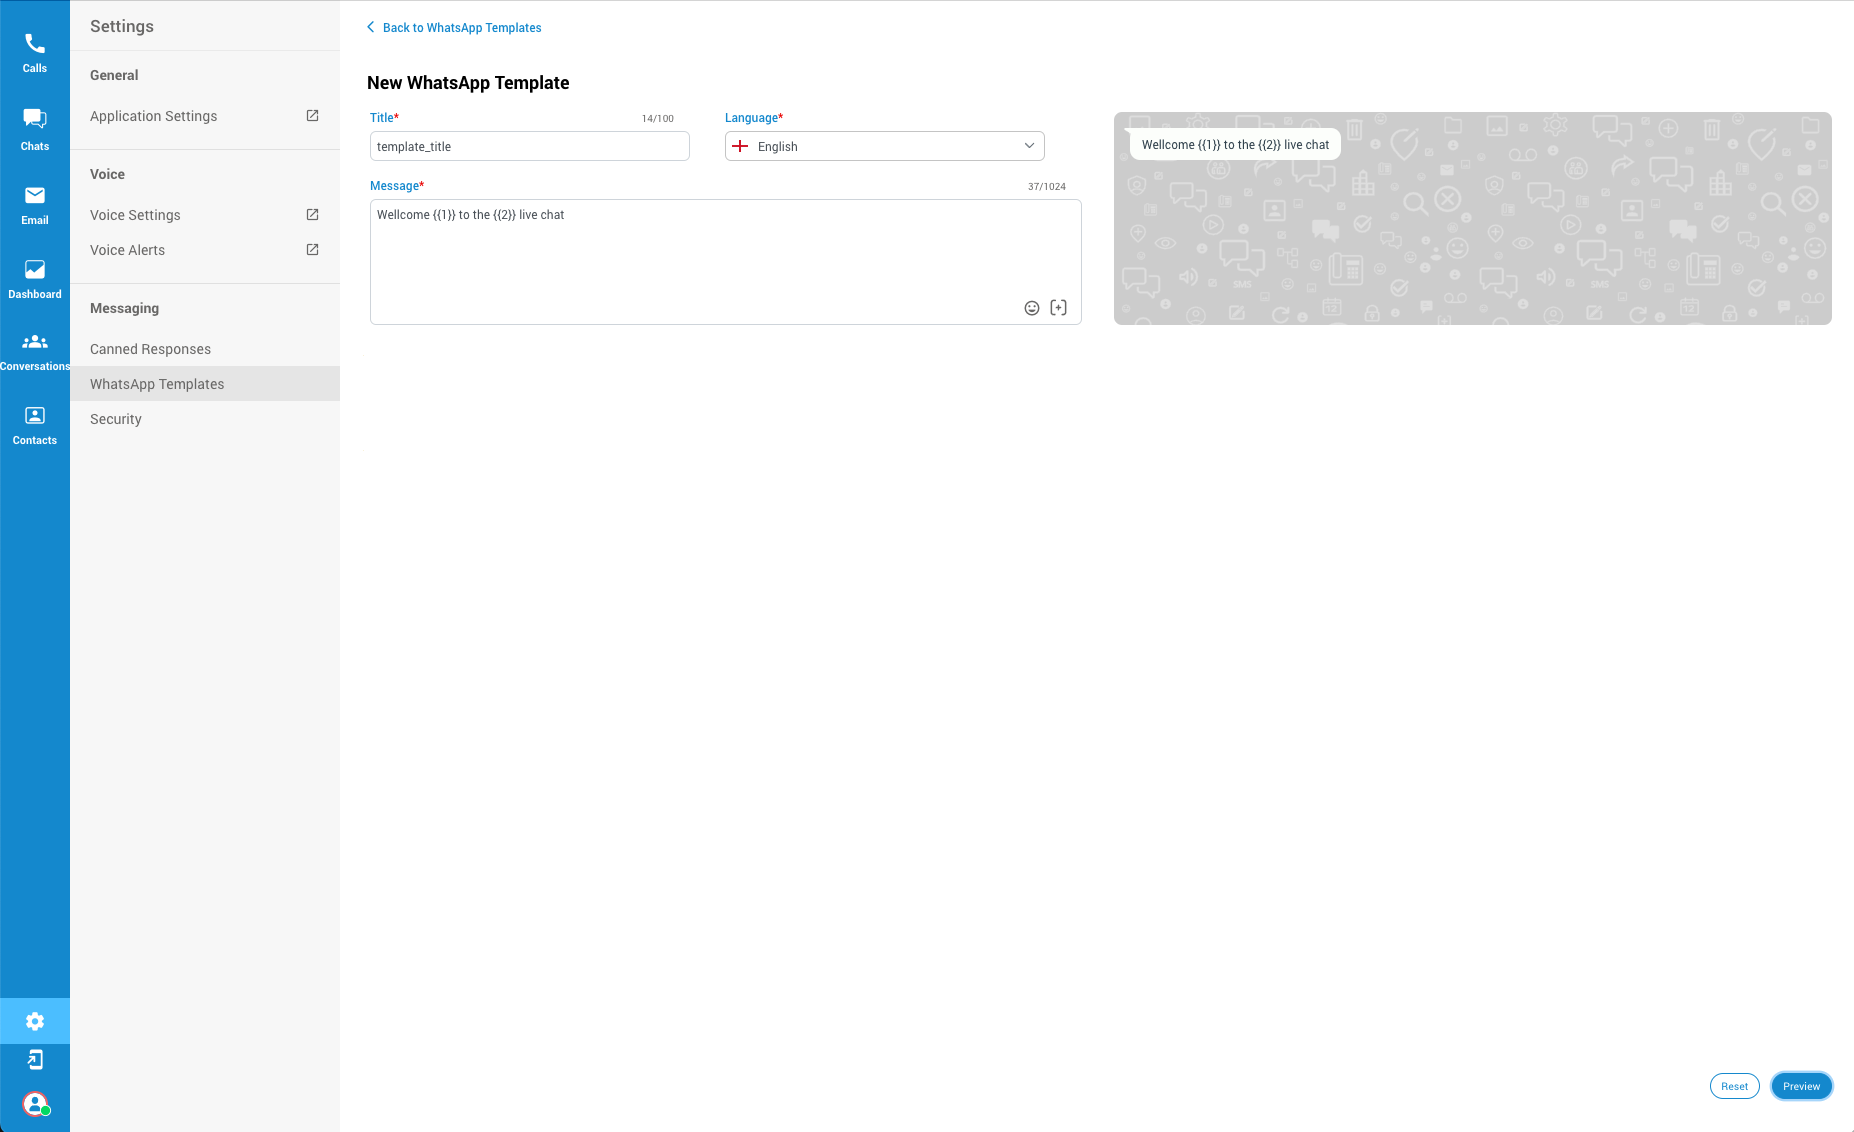
¶ Title
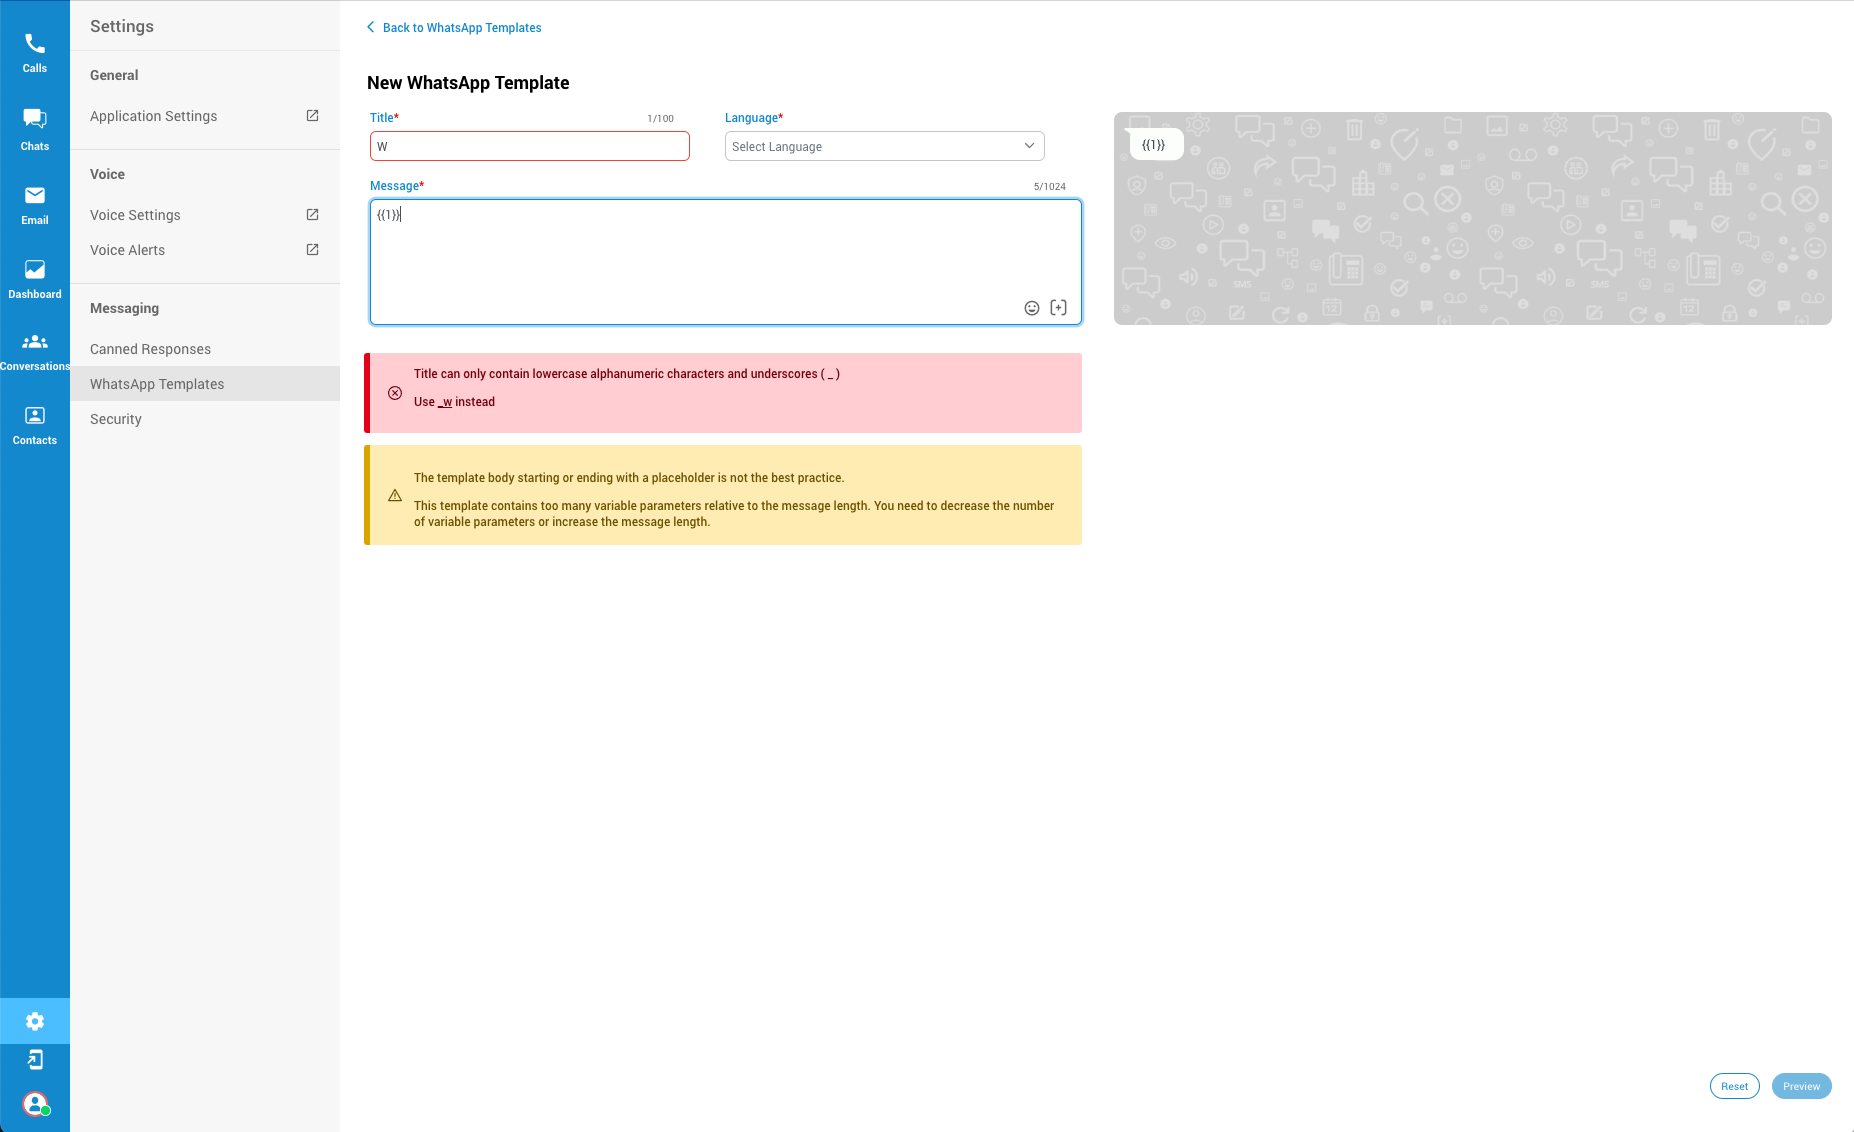
- Input Requirements: The title of the template must adhere to a specific format, utilizing only lowercase letters and underscores (e.g.,
example_template_one). If the title is input in any other format, a warning message will appear:
"Title can only contain lowercase alphanumeric characters and underscores."
¶ Language
- Selection: Choose the template's language from the dropdown menu. Currently available languages include English, German, Spanish, French, Italian, and Portuguese.
¶ Message
- Content Creation: In the Message area, write the template text. The text can include variables for dynamic content. However, starting or ending the template with a variable is discouraged. If the template does not adhere to best practices, such as beginning with a variable or containing too many variables relative to its length, an attention placeholder will appear with guidance:
The template body starting or ending with a placeholder is not the best practice. This template contains too many variable parameters relative to the message length. You need to decrease the number of variable parameters or increase the message length."- Example Message:
Hello {{1}} and welcome to the {{2}} live chat.
- Example Message:
¶ Live Preview
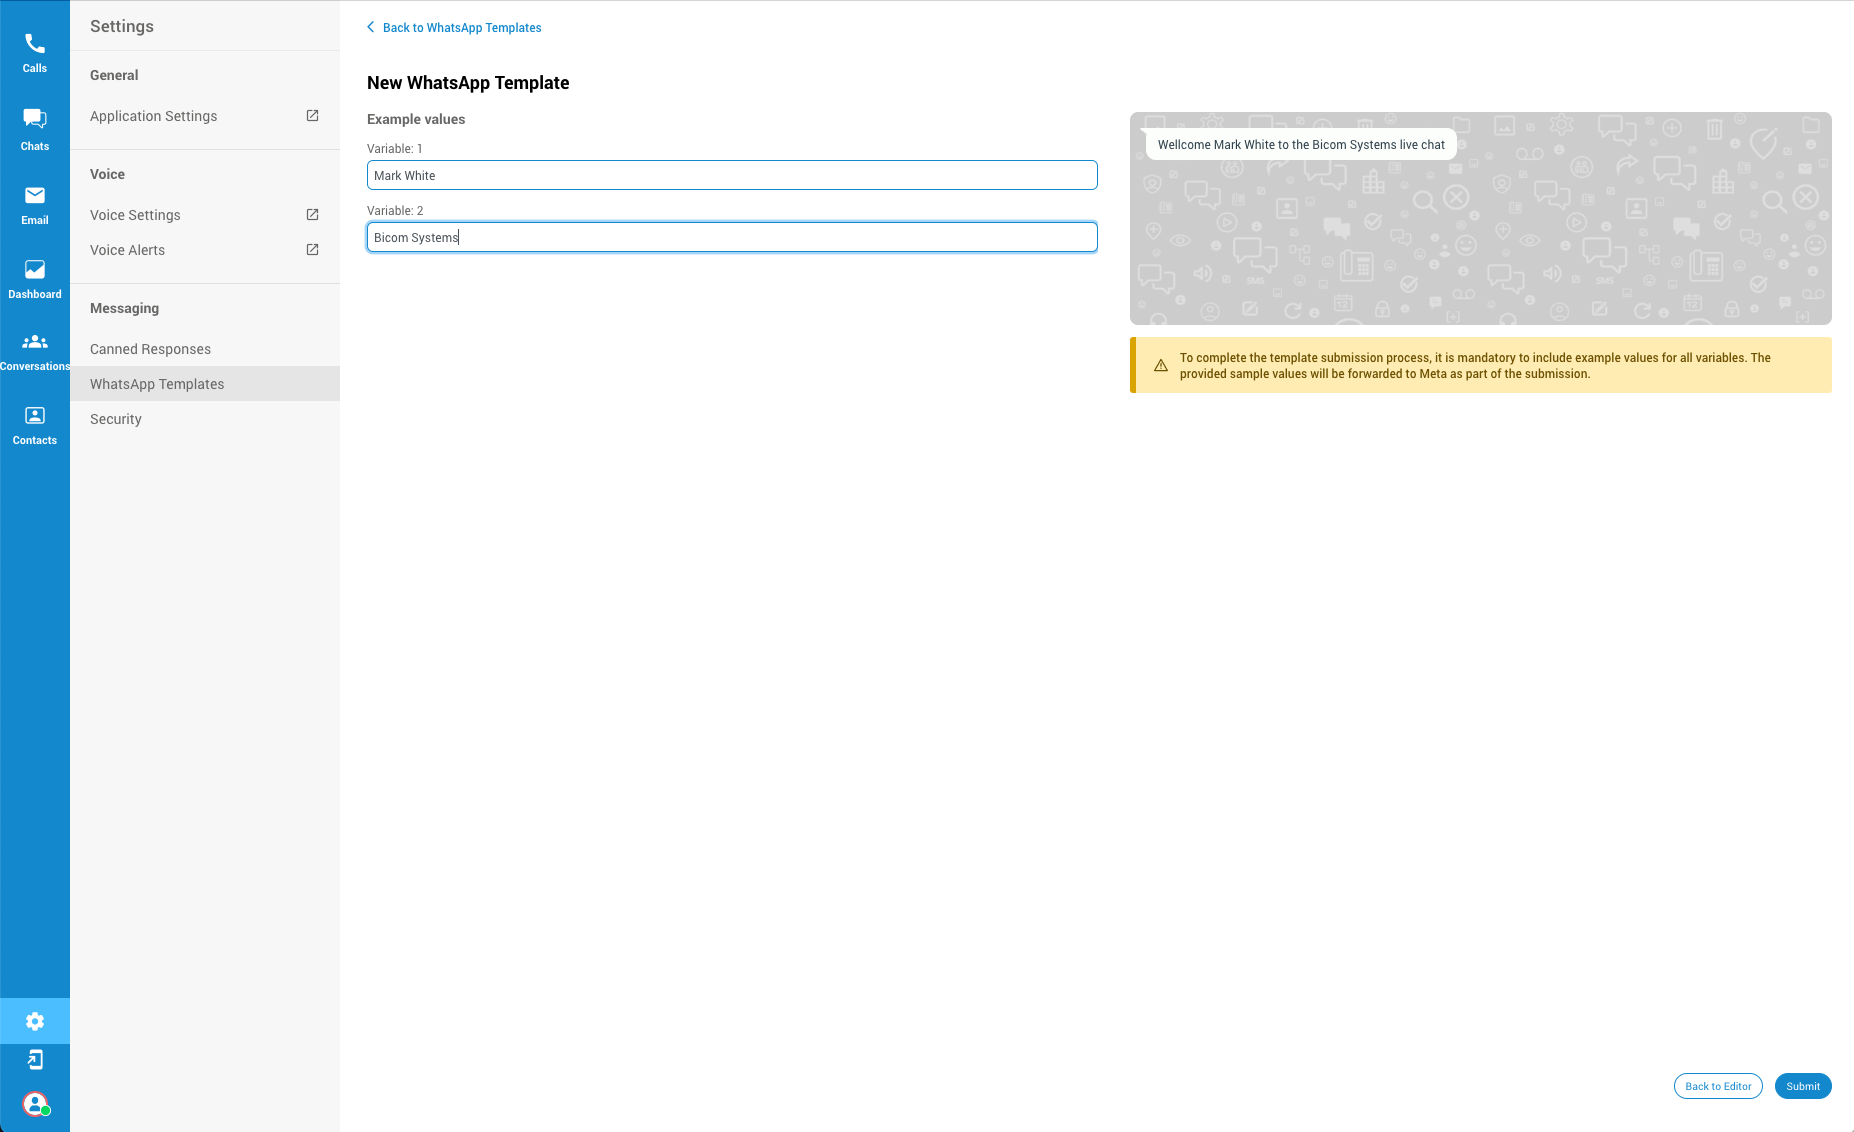
- As you input the Title, Message, and select the Language, a live preview of the template will be visible on the right side of the screen. This feature helps ensure the template appears as intended before submission. Please input the values in placeholders as these values will be sent to Meta for overall approval.
¶ Previewing and Submitting the Template
- Preview: After filling out the template details, press the Preview button to input variables into the text fields and see how the message will appear with the variables integrated.
- Submit: Once satisfied with the template, click the Submit button. If everything is in order, the template will enter the "Submitted" state and then, upon approval, the "Approved" state. If the template is not approved for any reason, a "Rejected" indicator will appear along with a message specifying the reason for rejection.
WhatsApp templates used within our Agent app require prior approval from WhatsApp before they can be used for outbound messaging. This process ensures compliance with WhatsApp's policies and enhances the reliability of our messaging service.
Steps for Approval:
Template Creation: Develop/create the WhatsApp message templates.
Submission for Approval: Submit the templates to WhatsApp for review and approval via the designated platform.
Approval Notification: Await confirmation of approval from WhatsApp before using the templates within the Agent app.
¶ Key Considerations for Template Creation
- Ensure the template title and content follow the specified guidelines to avoid rejections.
- Utilize the live preview feature to adjust the template before submission.
- Pay attention to feedback and warnings to refine the template as needed.
This process is designed to streamline the creation of WhatsApp templates, ensuring they meet both the company's and Meta's standards for approval.
¶ Important Note on the 24-Hour Rule
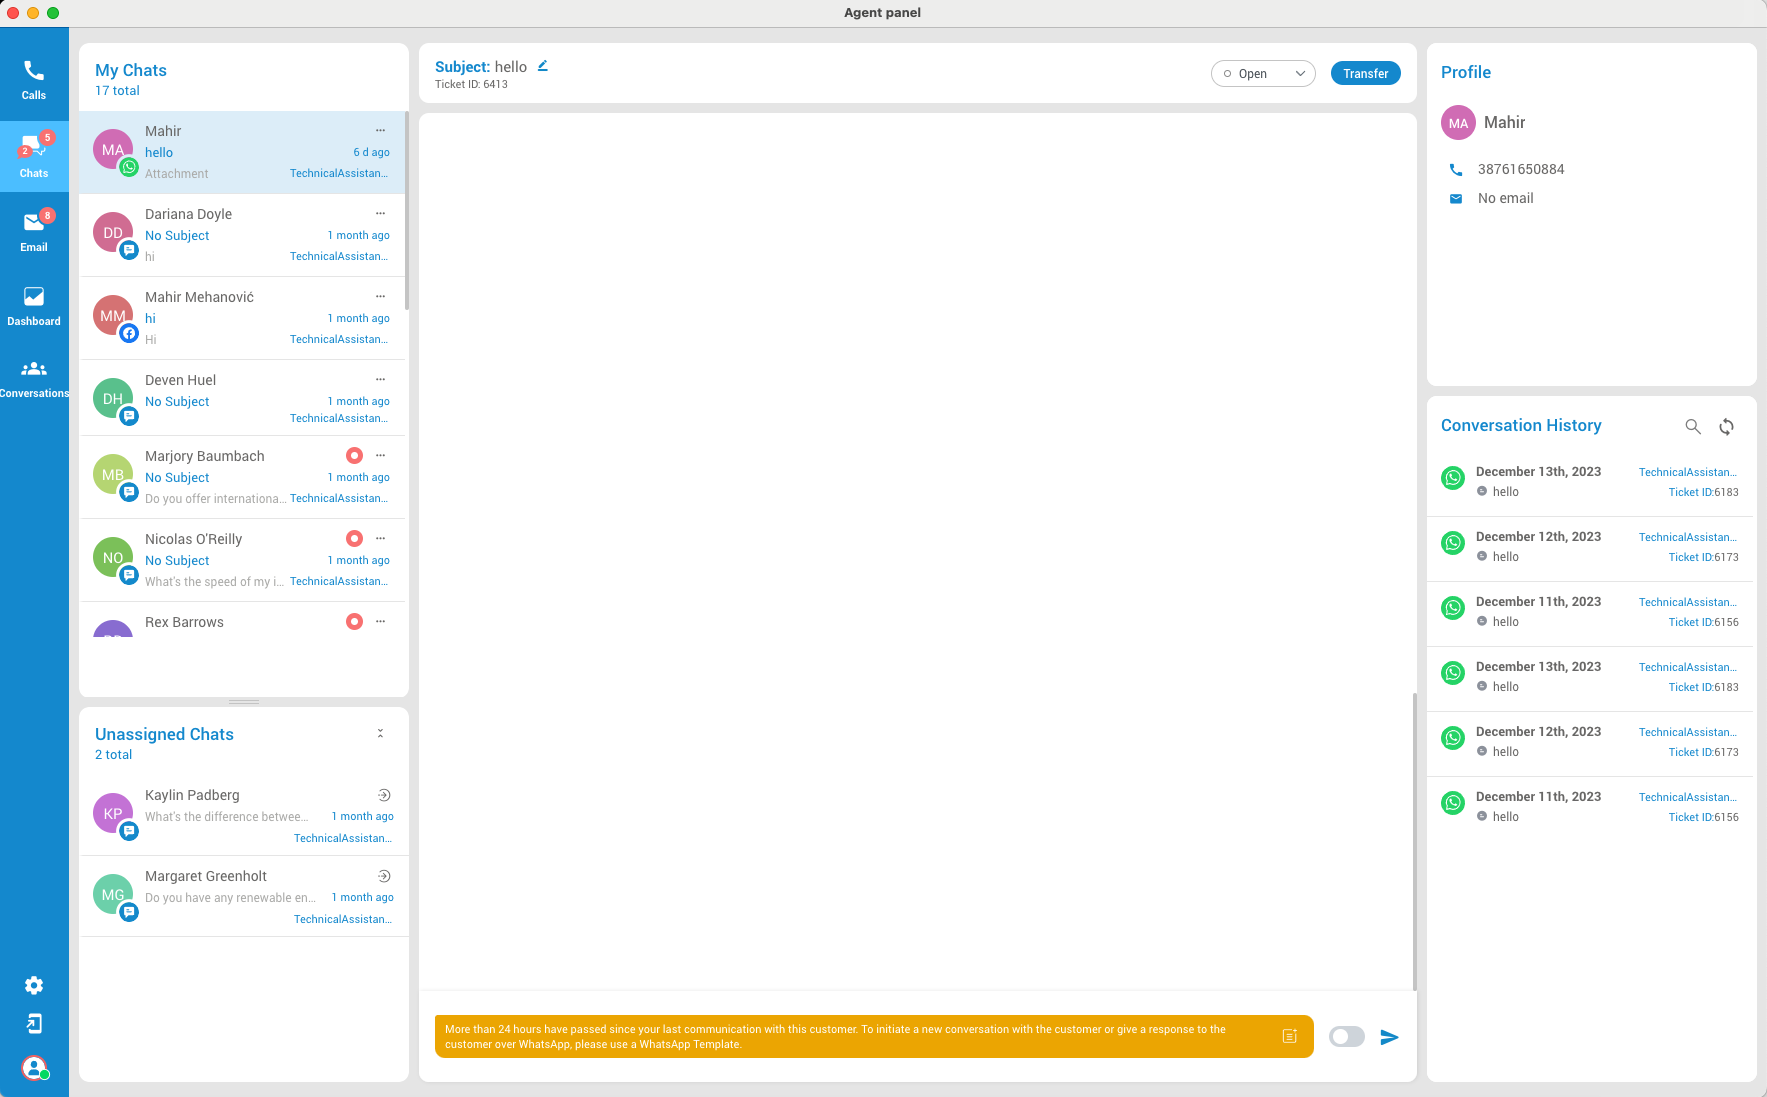
- 24-Hour Communication Window: If 24 hours have passed since the last conversation with a customer via WhatsApp chat, an info bar will cover the text input placeholder. This bar will notify that the 24-hour window has closed and the Agent is restricted to sending only WhatsApp templates until the customer responds again. This rule is part of WhatsApp's policy to ensure timely and relevant communication with customers.
NOTE: This restriction emphasizes the importance of timely follow-up and the strategic use of WhatsApp templates for re-engaging customers after the 24-hour window has closed.
¶ Supervisor Security
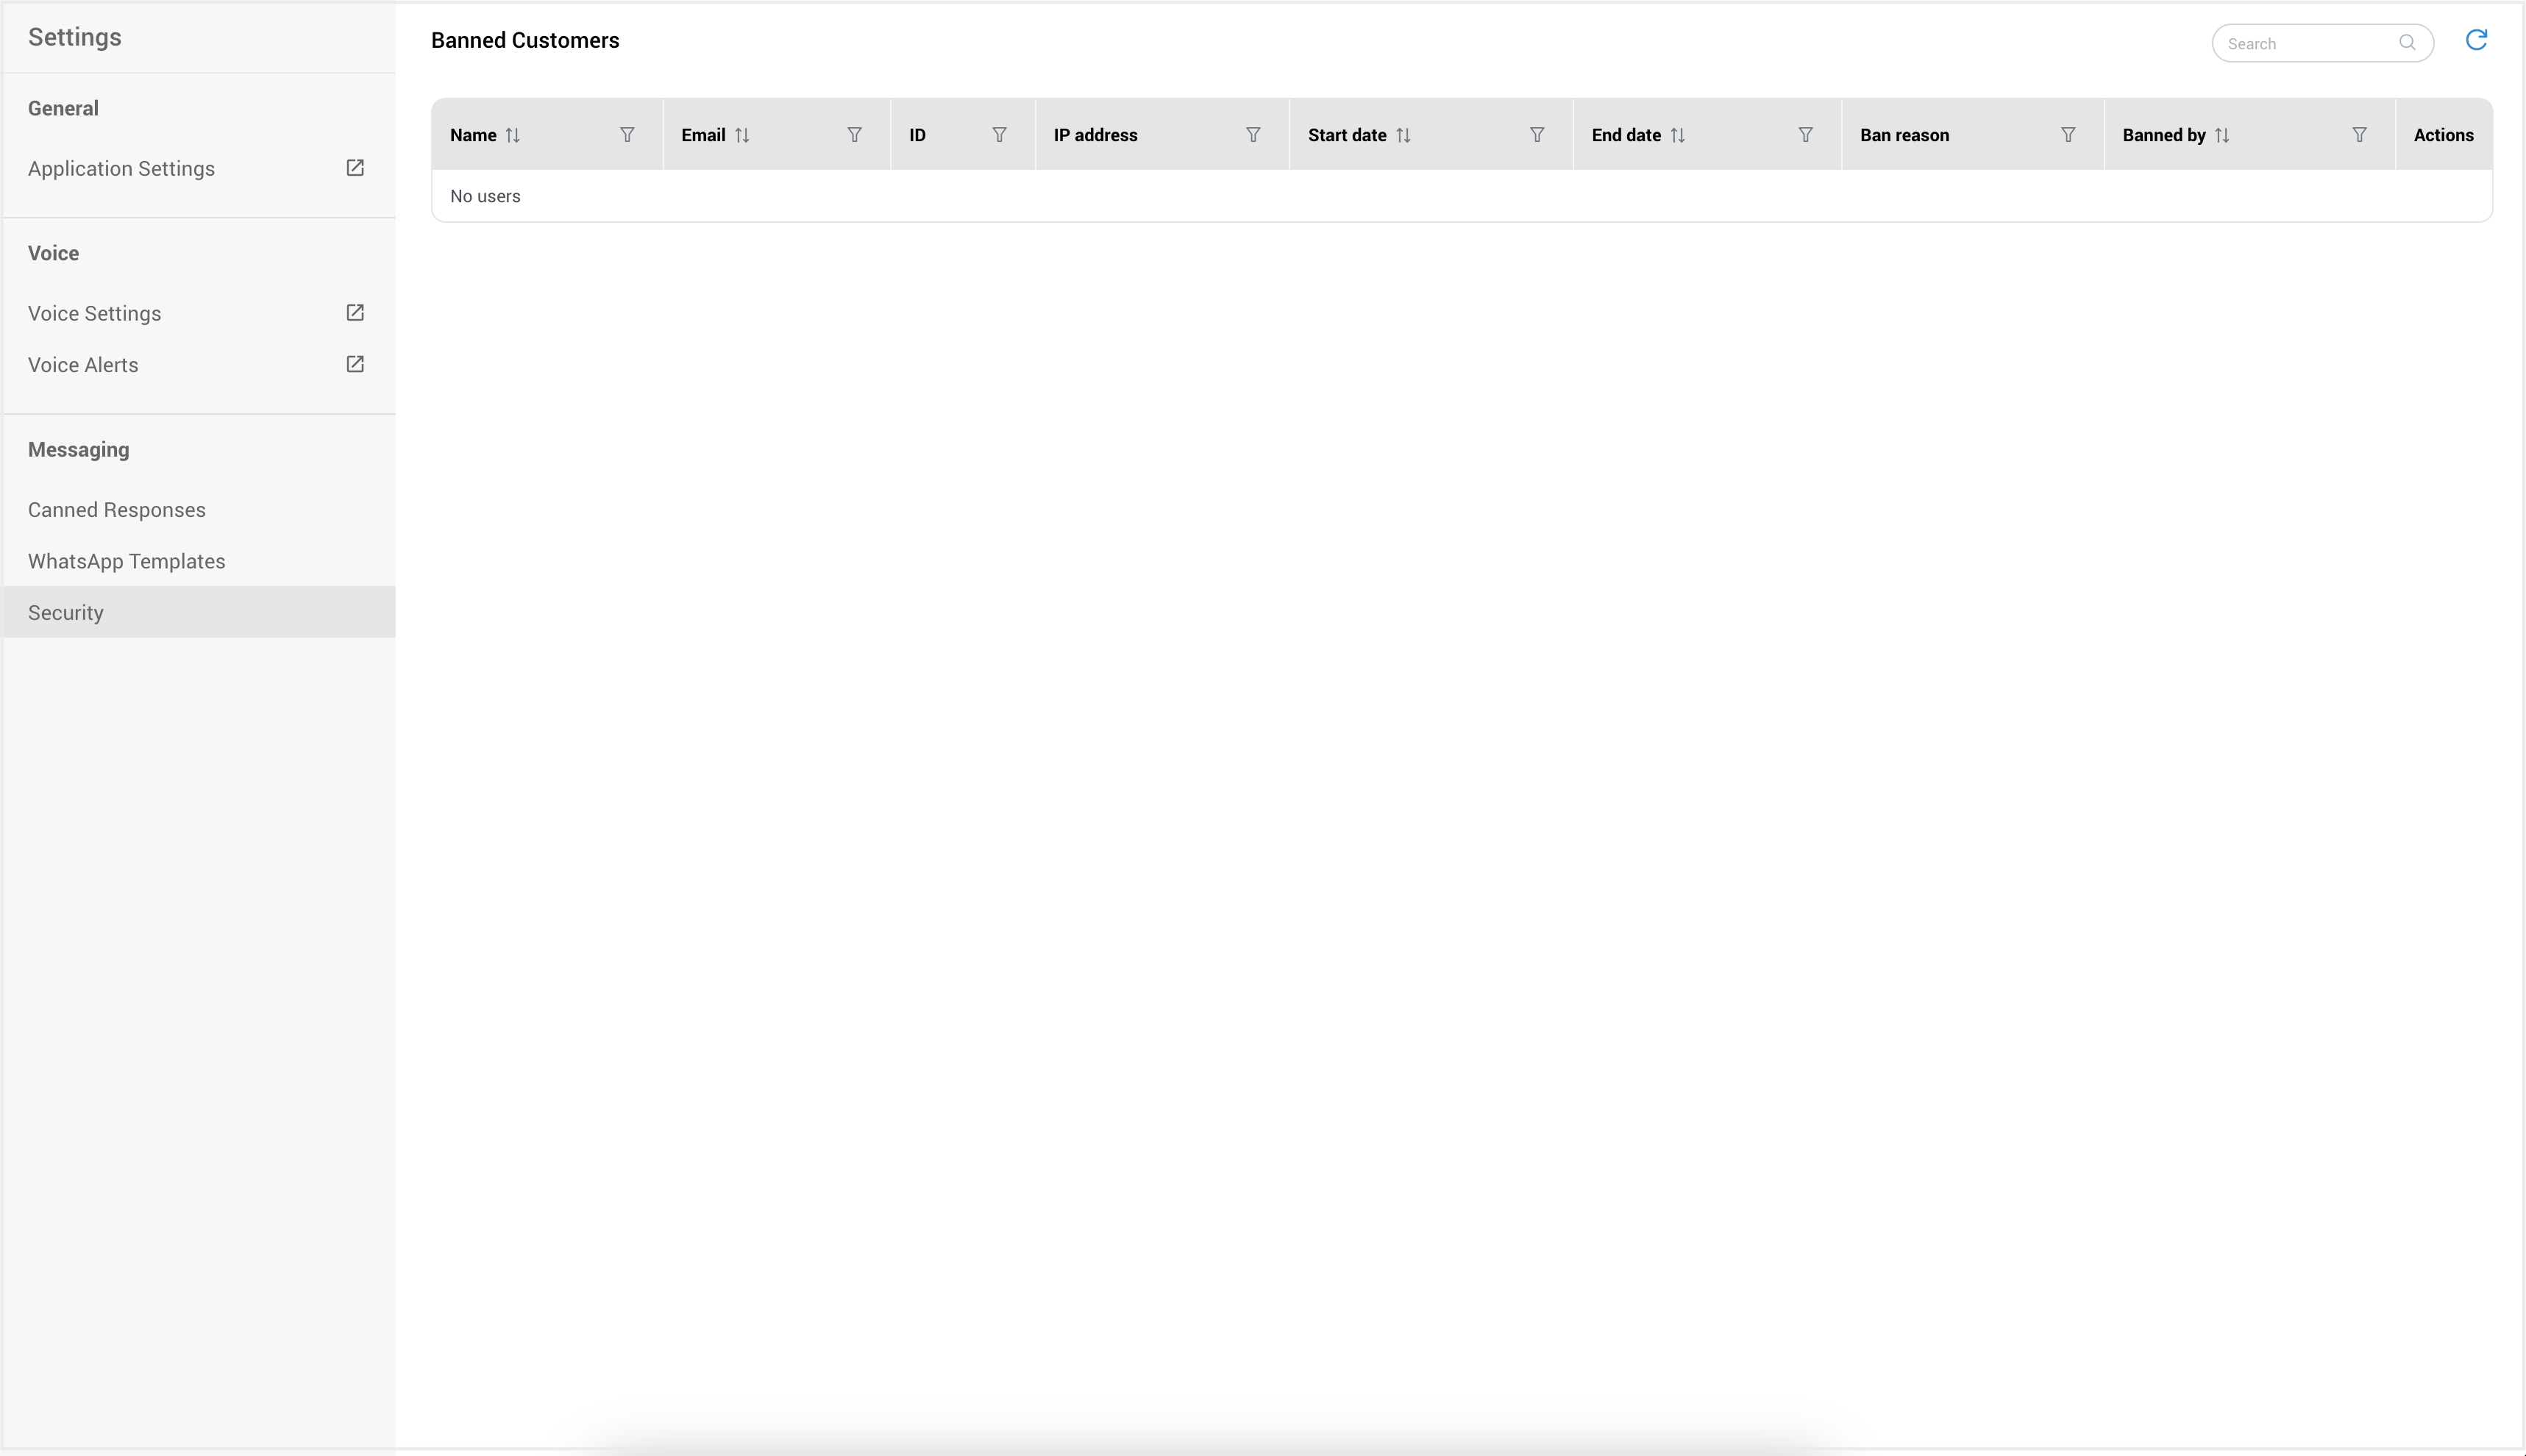
¶ Ban and Unban Customers
Supervisors in call centers possess the authority to both ban and unban customers. Still, this authority is generally limited to particular circumstances and is contingent upon adherence to the company's established policies and procedures. Unlike agents, supervisors have the capability to unban any customer previously banned, whereas agents can only unban customers they personally banned.
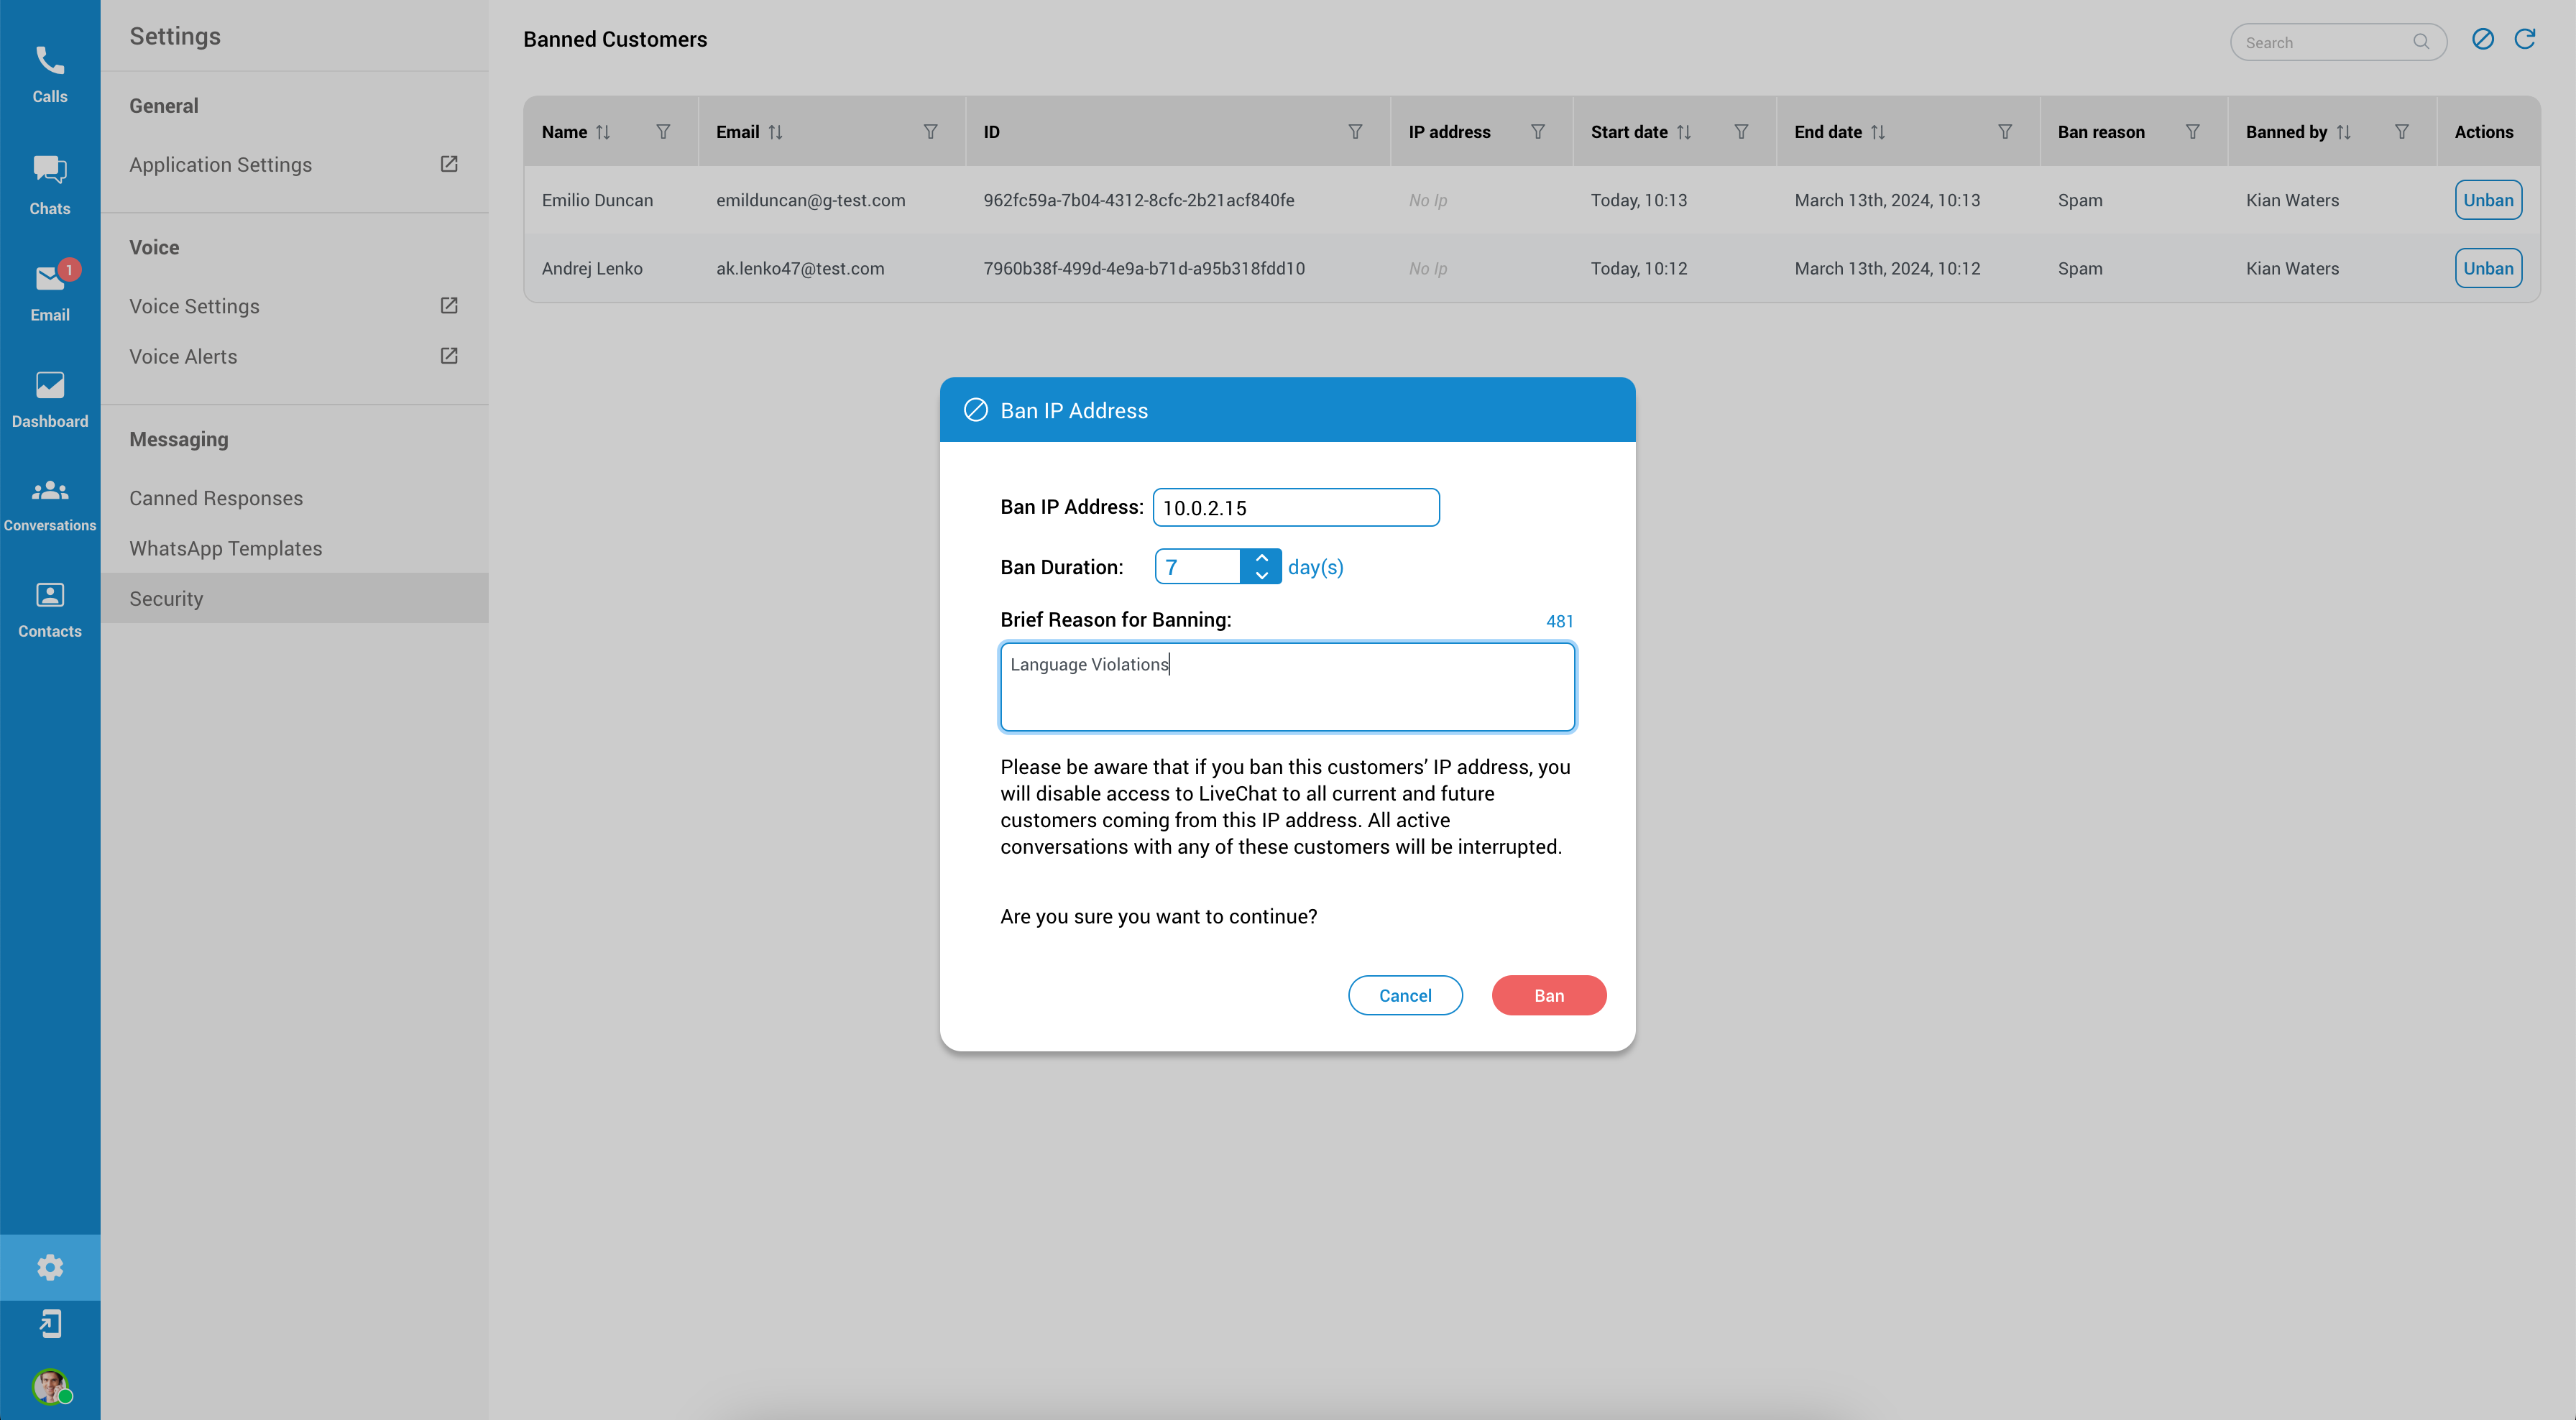
 Ban: Allows supervisors to impose a new ban on a customer.
 Unban: Permits the removal of a ban. Agents can unban customers they personally banned, while supervisors have the authority to unban any customer.
 Refresh - We highly recommend that users consistently utilize this button both before and after initiating the ban process. This practice ensures that the data in the table is displayed accurately and reliably.
Banning should be a measure of last resort, and companies should strive to provide opportunities for customers to address and fix issues that led to the ban whenever possible.
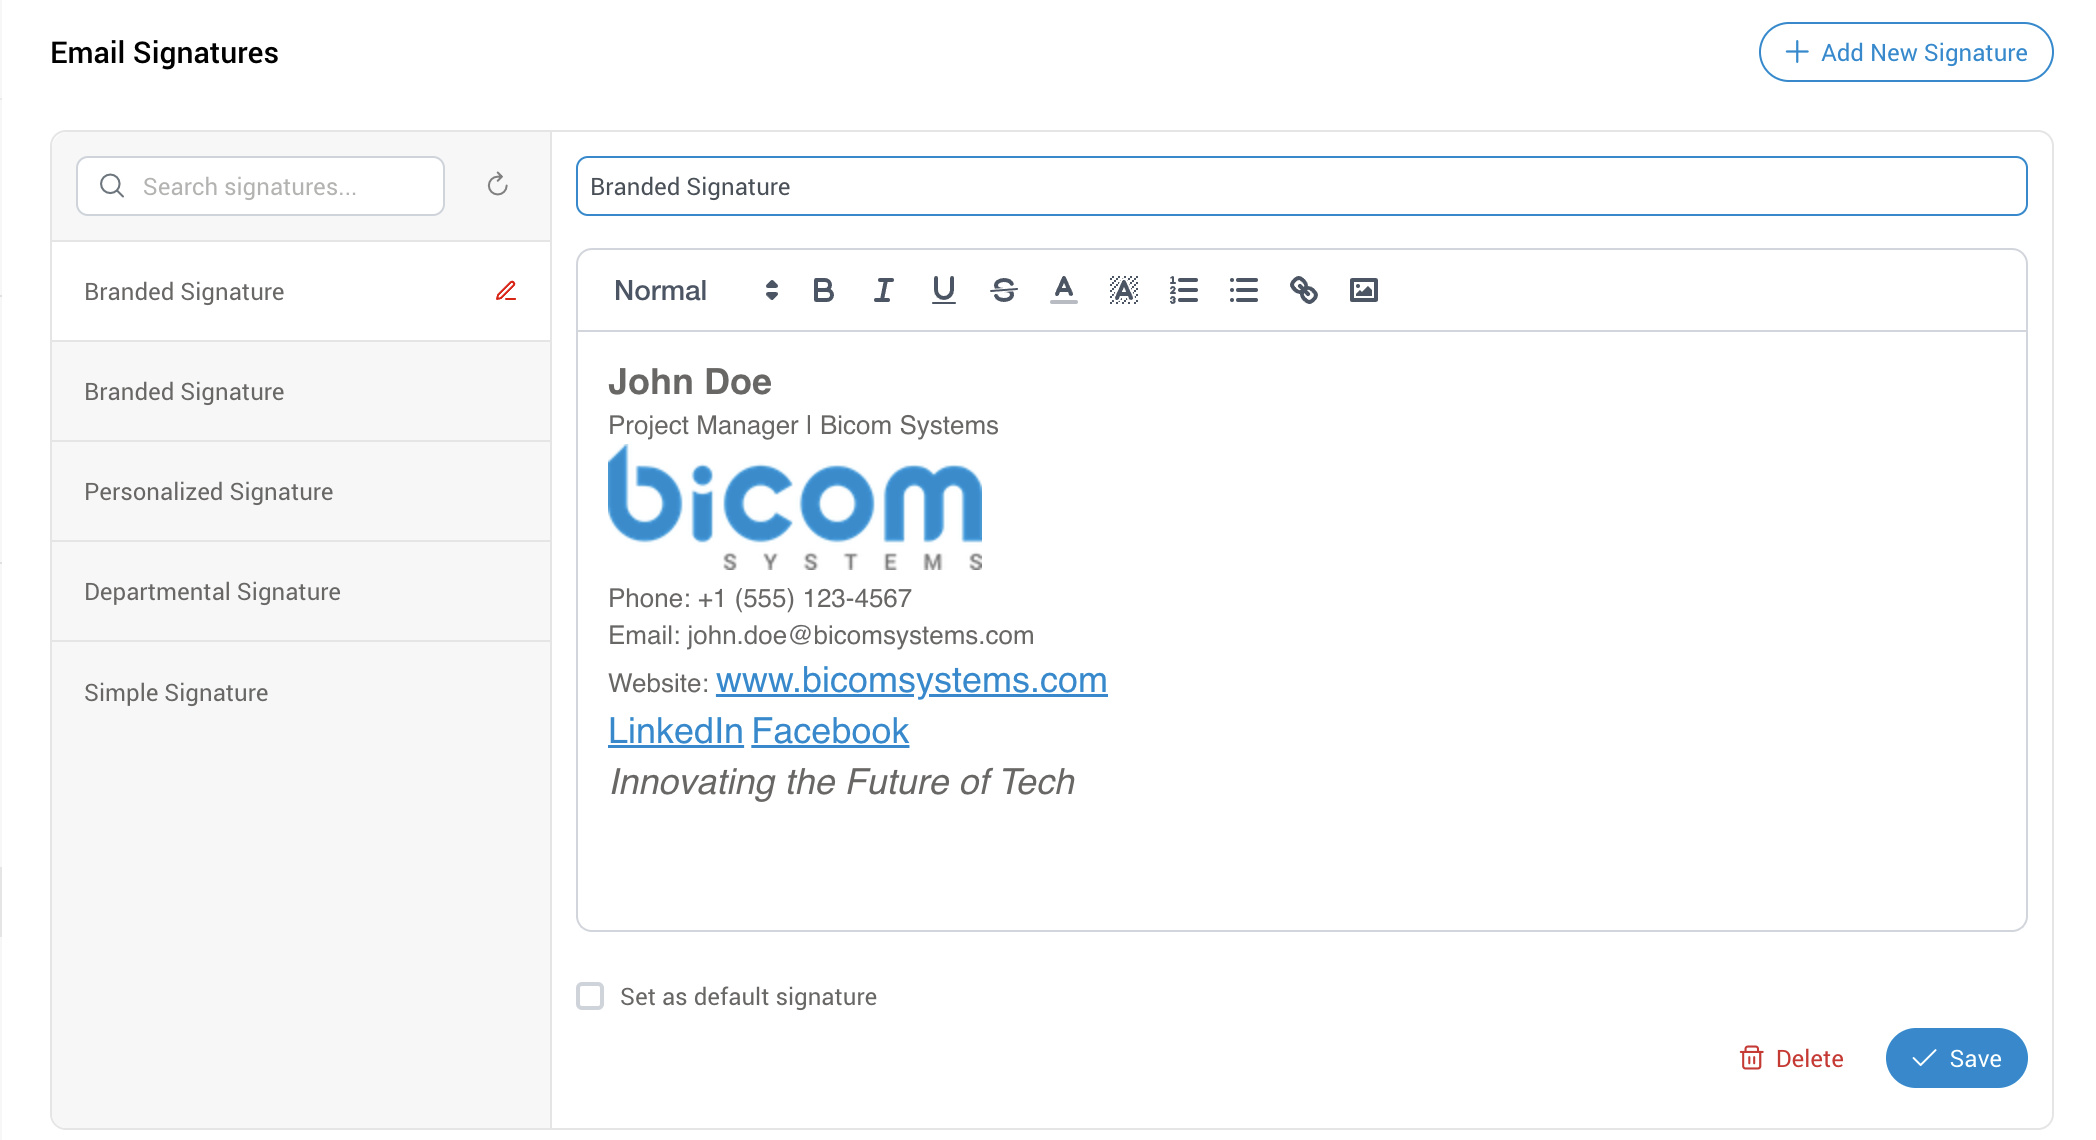
¶ Email Signatures
The Email Signatures feature in our app allows you to create and manage personalized signatures that are automatically appended to your outgoing emails. This feature is designed to help you maintain a professional appearance and ensure consistent branding in all your communications.
With Email Signatures, you can:
-
Create Professional Signatures: Design signatures that include your name, title, contact information, and any other details you choose.
-
Maintain Brand Consistency: Ensure that all emails from your organization reflect your brand’s identity, including logos, fonts, and colors.
-
Save Time: Your signature will be automatically included in every email, saving you the effort of manually adding it each time.
This feature is perfect for individuals who want to add a personal touch to their emails, as well as businesses aiming for a uniform corporate look in their communications.
¶ Accessing the Email Signatures Feature
You can access the Email Signatures feature within the main Agent app settings by navigating to the Messaging section.
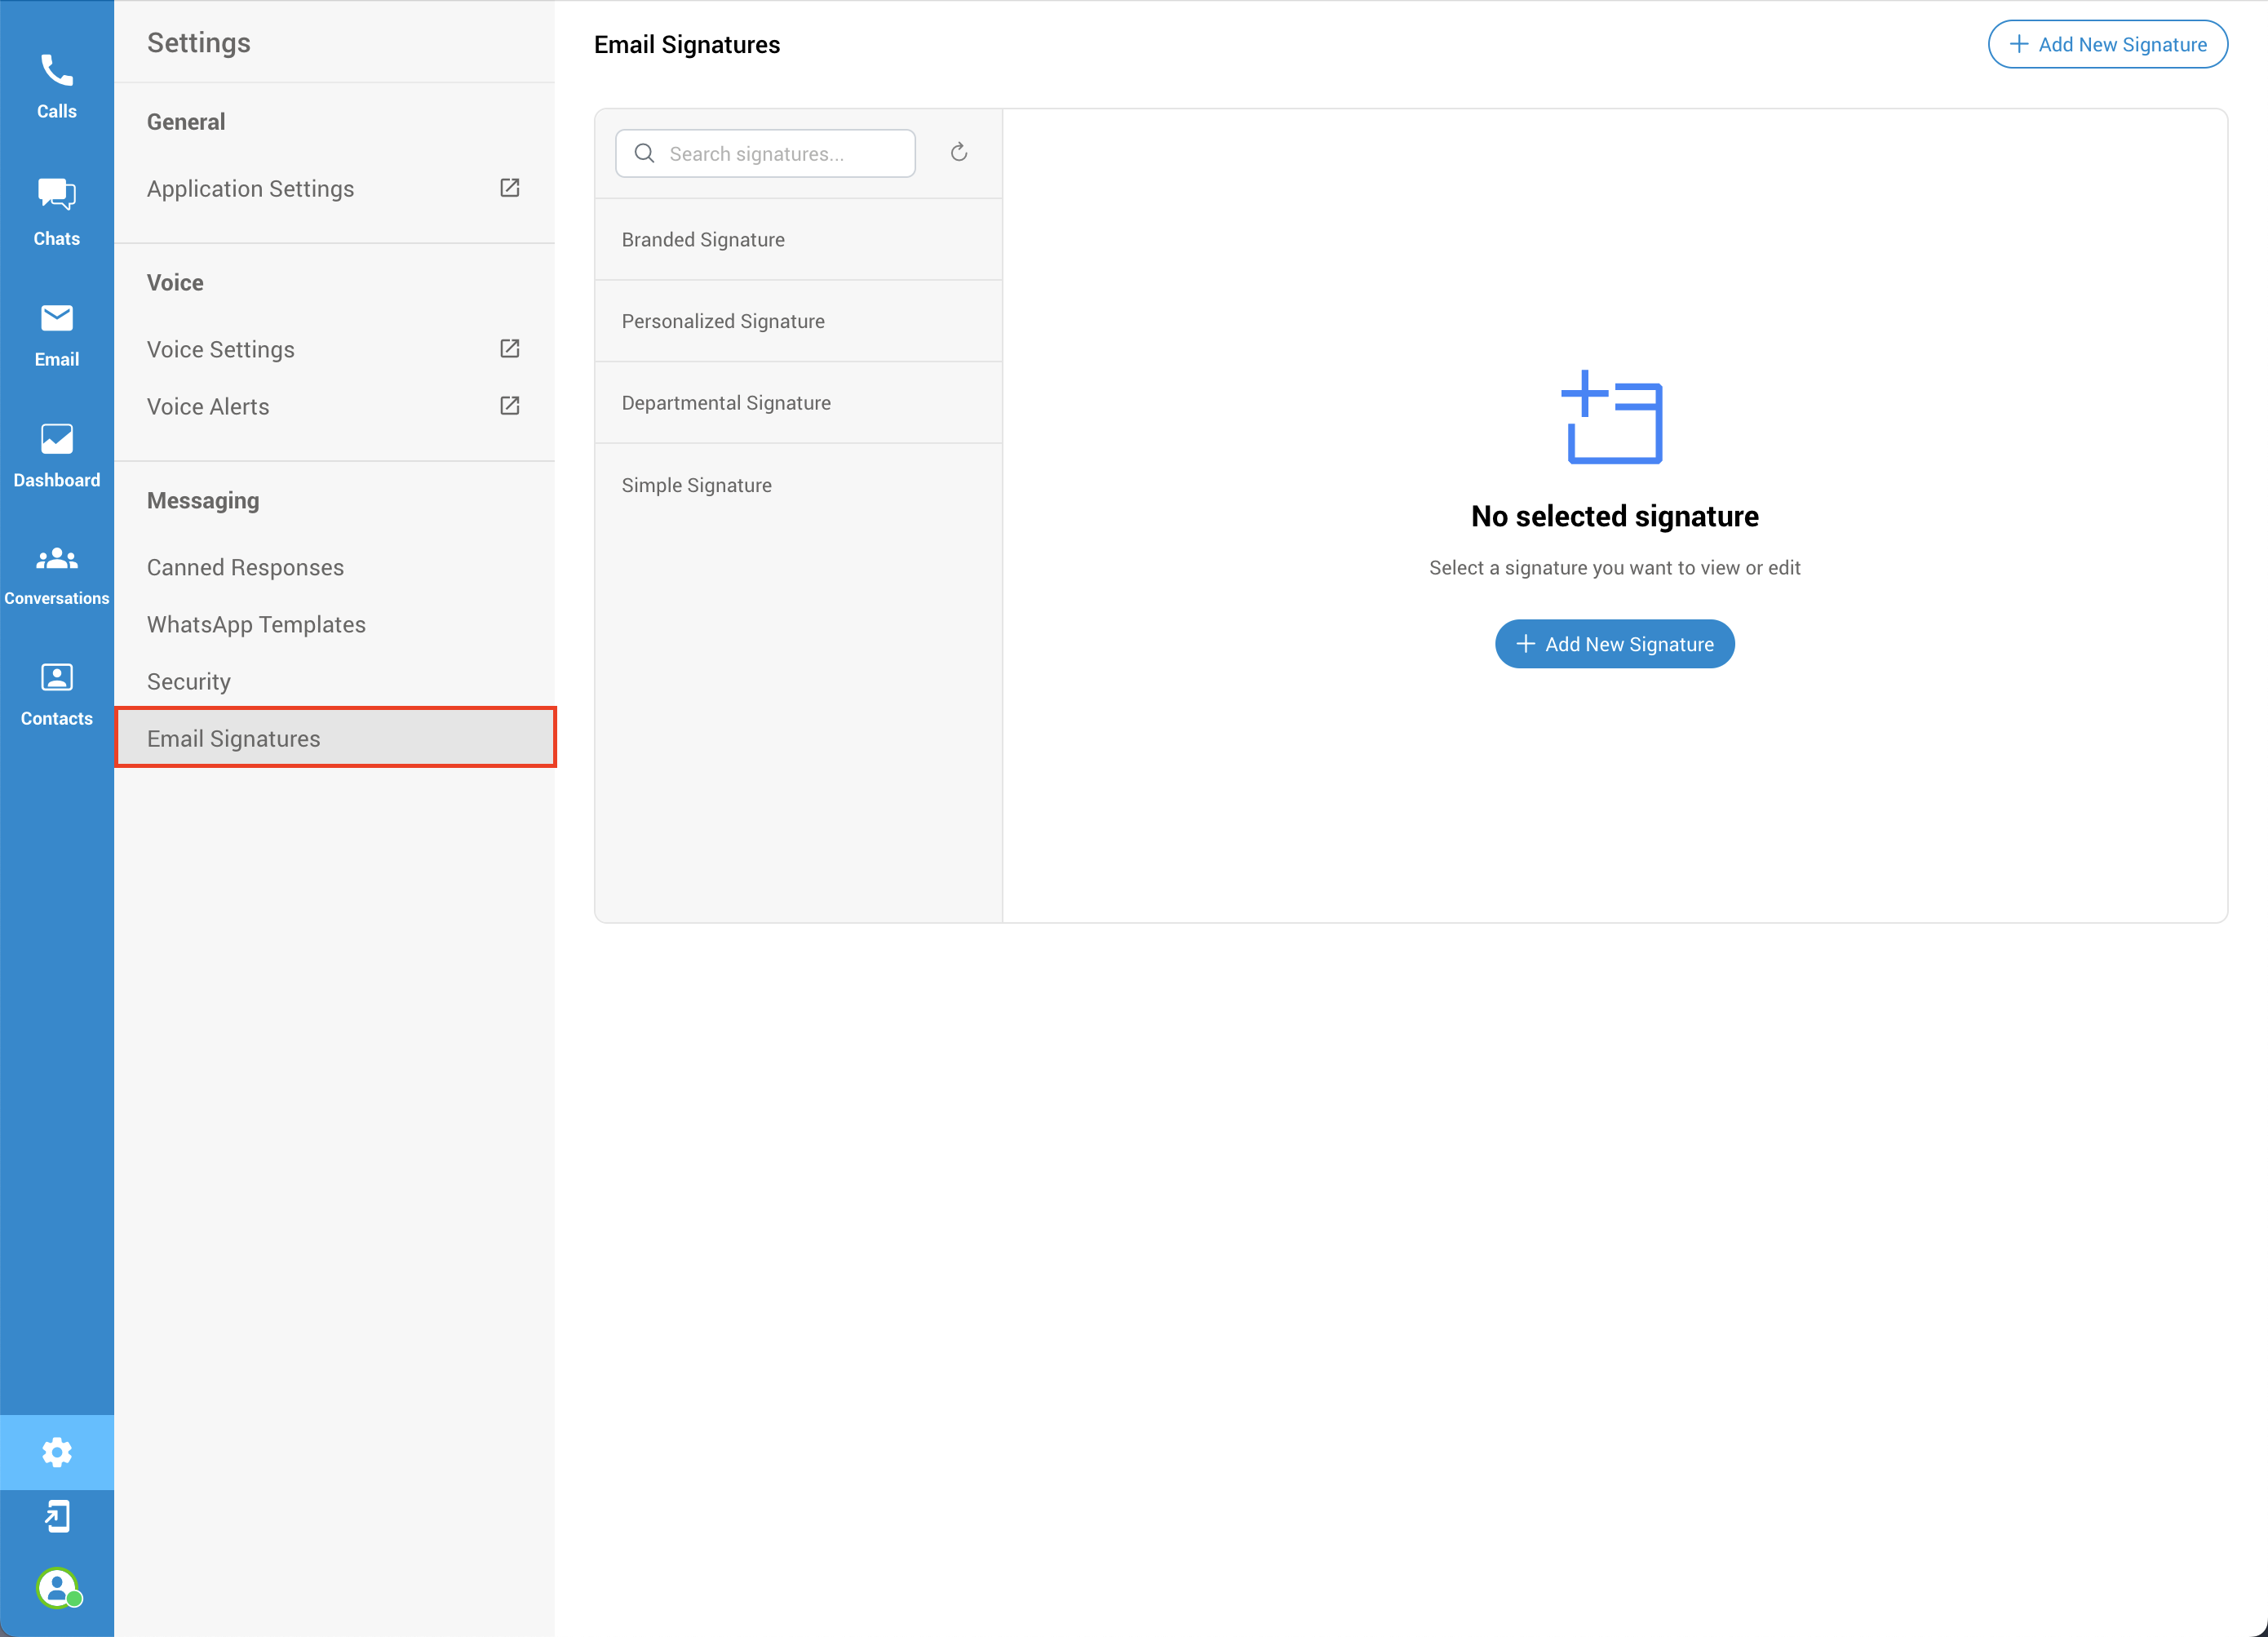
Once you navigate to the email signatures section, you can search through your email signatures, preview existing ones, edit them, and create new email signatures.
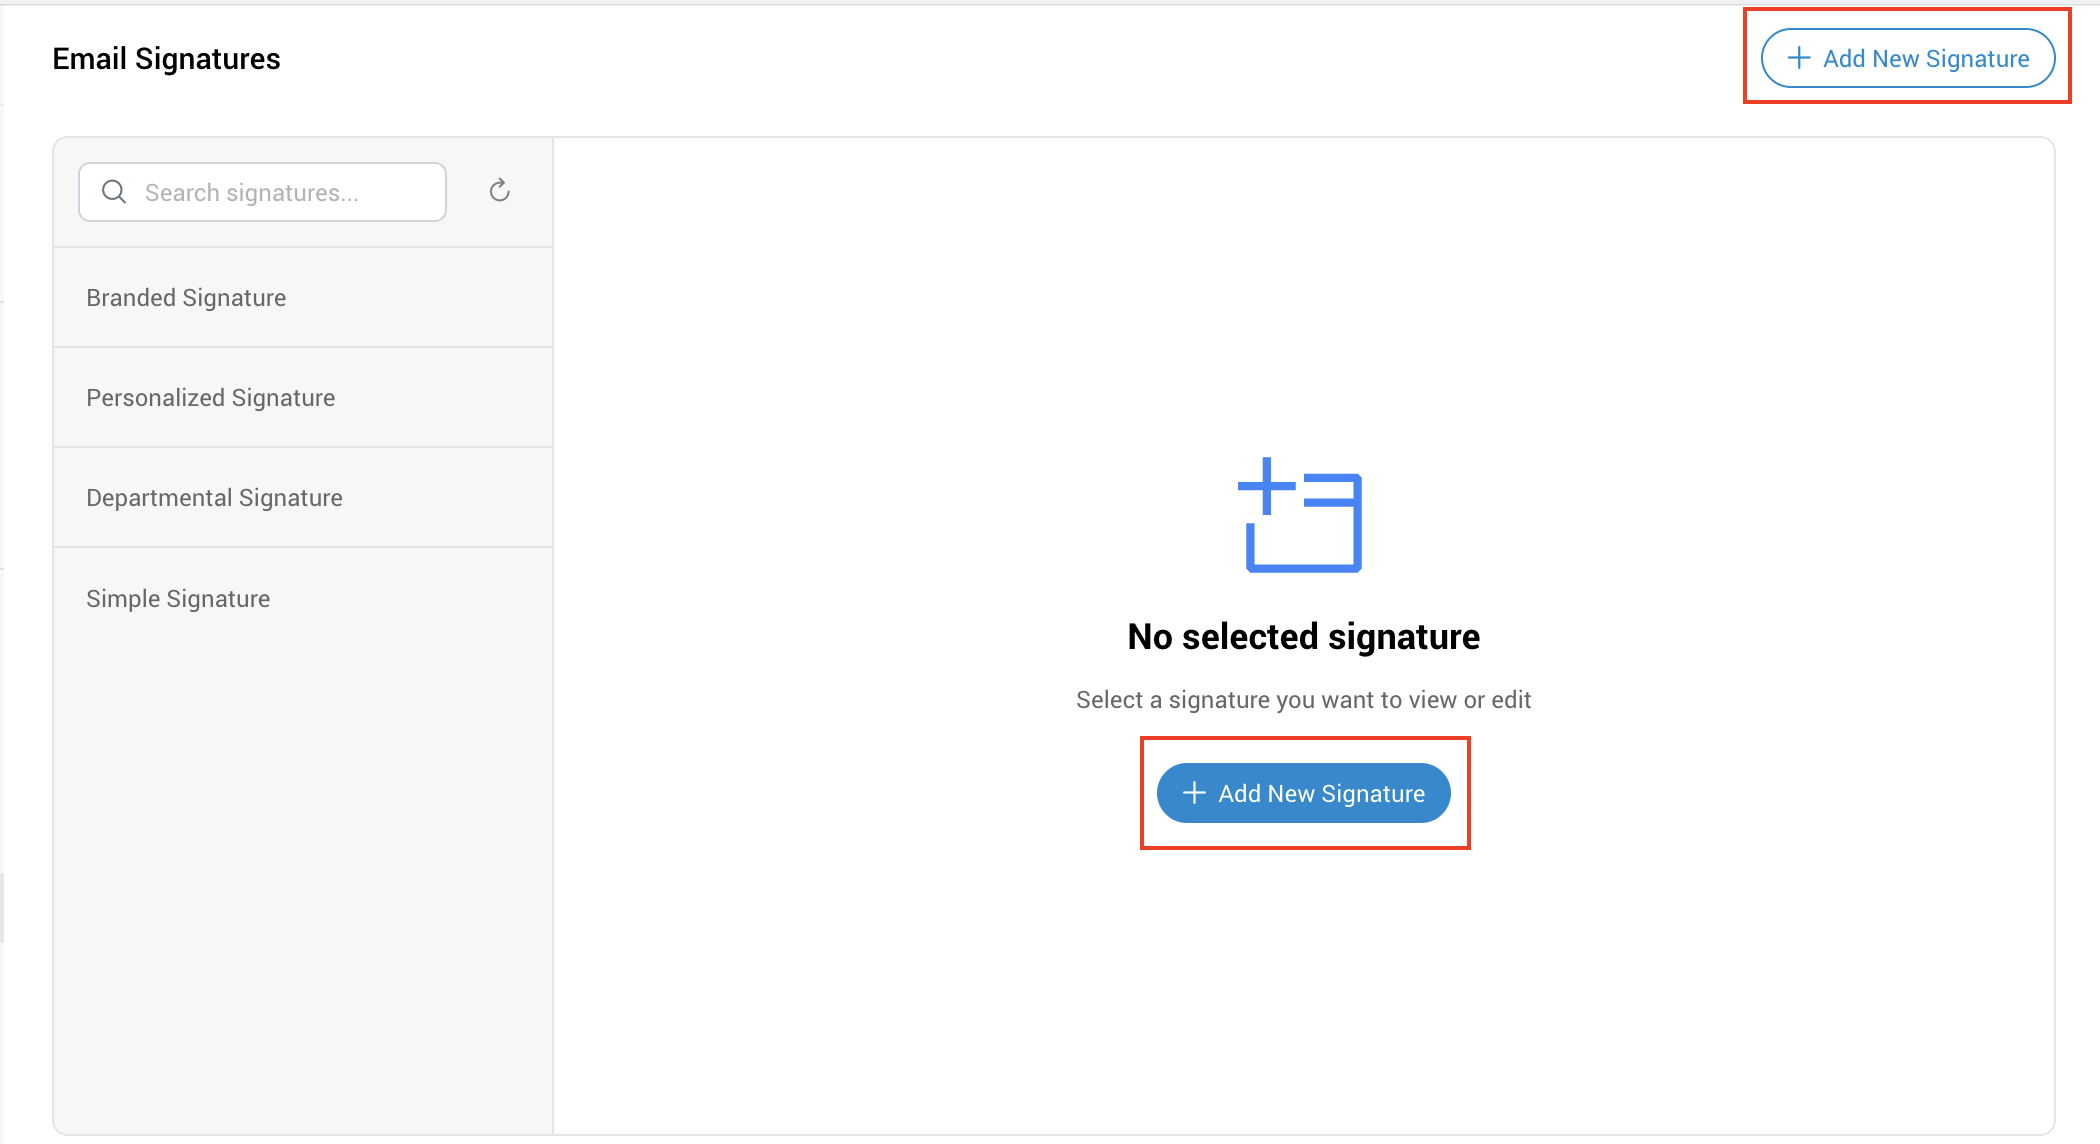
¶ Add New Signature
To create a new email signature, you can use either of the "Add New Signature" buttons. One button is blue and centrally located within the email signature section, while the other is white and positioned in the top-right corner of the section. Both buttons serve the same function and will initiate the process of creating a new email signature.
After clicking the "Add New Signature" button, a new pop-up window with a drop-down menu will appear. From there, we can select one of the templates created through the GUI and modify it, or we can click the "Create Signature" button without selecting a template and creating a new one from scratch.
If we select one of the templates, we will get a preview of that signature in the same window. Clicking on the "Create Signature" button will open a new form where we can modify this template.
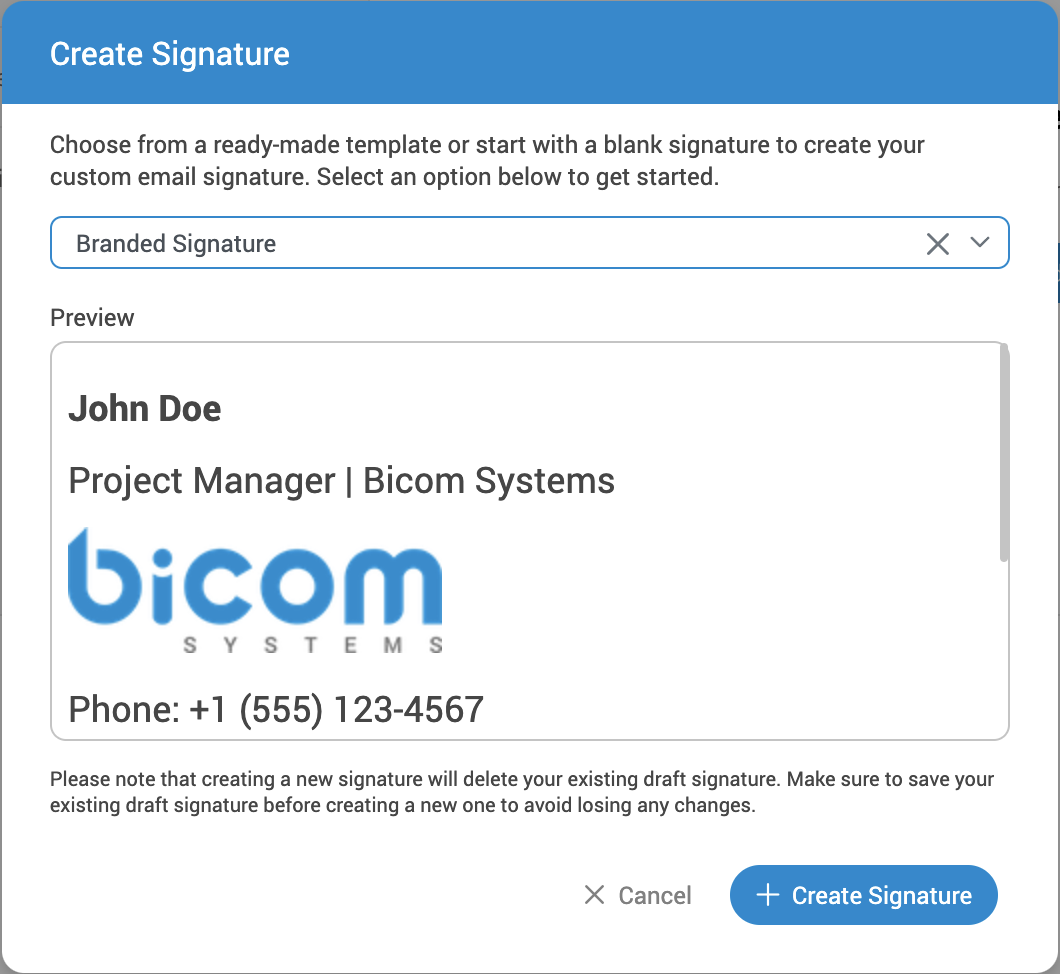
If we want to create a signature from scratch without selecting the template, click the "Create Signature" button, and a new form will open.
At the top of the form, enter the signature name. Below that, enter the body of your email signature. At the bottom of the form, you have the following options:
-
Set as Default Signature: Set this email signature as the default for all your emails.
-
Delete: Remove the email signature.
-
Save: Save the new email signature.
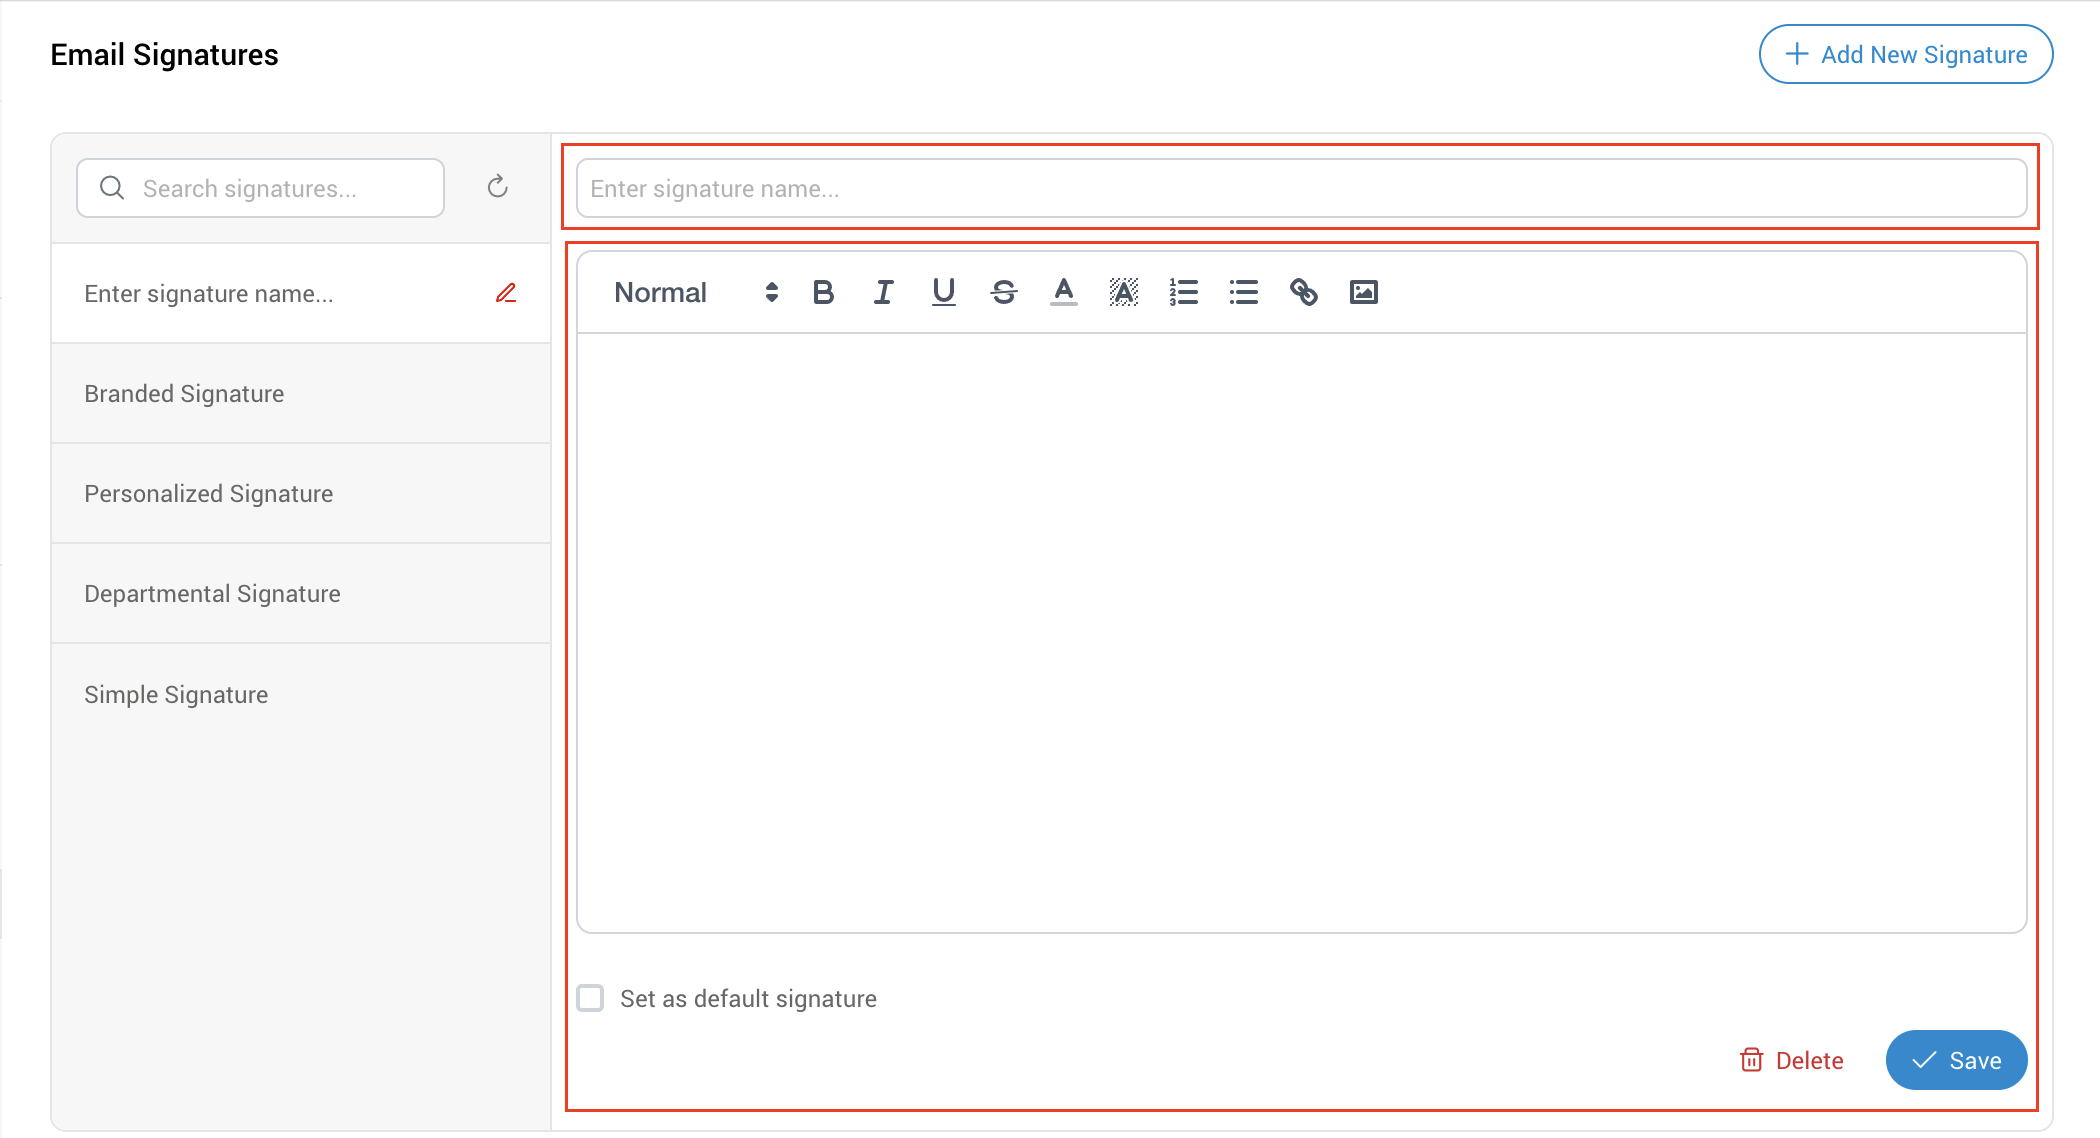
Once you are satisfied with your email signature, click the "Save" button to save it.
¶ Edit/Preview Signature
To preview an existing email signature, simply find it in the list and click on it. From this window, you can also edit the email signature. Please remember, when you finish editing, click "Save" to save your changes.
¶ Delete Signature
To delete an existing email signature, select the desired signature from the list and click the "Delete" button located next to the "Save" button.