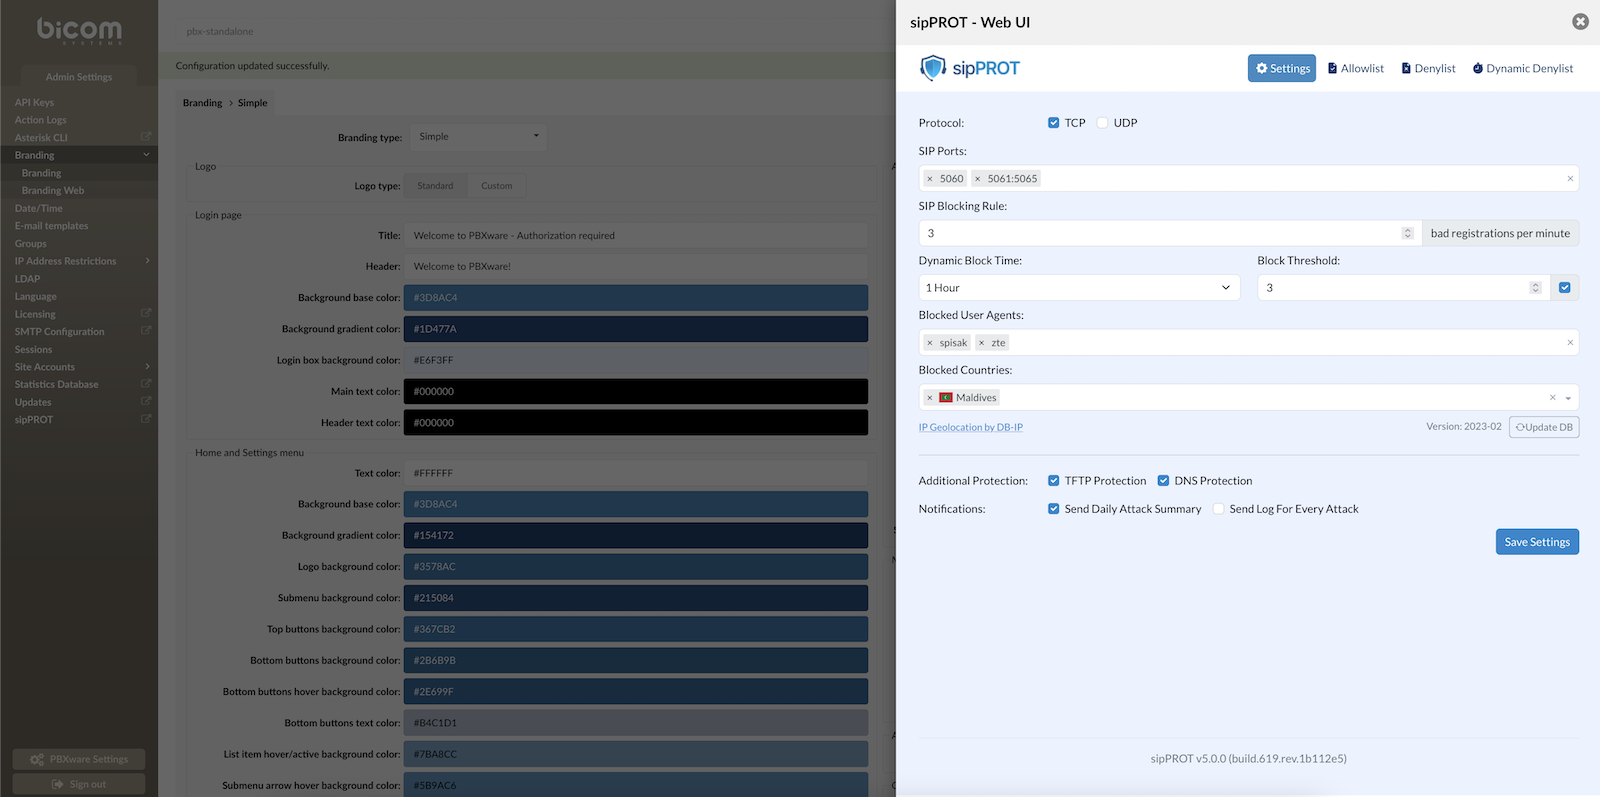
¶ sipPROT
¶ Introduction to sipPROT
¶ What is sipPROT?
sipPROT is a security tool developed by Bicom Systems to protect VoIP systems from SIP-based brute-force attacks. It's designed to monitor and react to suspicious SIP activity in real time, blocking unwanted or potentially harmful traffic before it becomes a problem.
sipPROT can be installed in two environments:
-
On standalone PBXware systems, where it runs directly on the hardware.
-
On SERVERware hosts, where PBXware is deployed as a VPS—sipPROT should be installed on each host to ensure full protection.
¶ How It Works?
When sipPROT detects unusual or repeated failed SIP registration attempts, it automatically blocks the offending IP address using firewall rules. These blocks are temporary by default, but if the same IP triggers multiple alerts, it can be permanently banned.
sipPROT doesn't rely on logs—it works by analyzing live SIP traffic, which makes it more accurate and faster at detecting threats compared to other solutions. It also includes Geo-IP filtering, letting administrators block or allow traffic based on country. This can be useful for minimizing exposure to regions known for frequent attack attempts.
¶ What It Helps Prevent?
-
Repeated unauthorized SIP login attempts
-
Service downtime caused by denial-of-service-type brute-force activity
-
Possible credential theft through SIP registration abuse
¶ Key Capabilities
-
Live Traffic Analysis: Monitors SIP packets in real time to spot and stop attacks immediately.
-
Smart IP Blocking: Automatically blocks attackers with temporary or permanent bans.
-
Geo-IP Filtering: Optional location-based blocking adds another layer of protection.
-
Firewall Integration: Updates firewall rules directly without needing manual intervention.
sipPROT adds a critical line of defense to VoIP systems, helping ensure availability and reducing the risk of financial or service disruption due to SIP attacks.
¶ Accessing sipPROT in PBXware/SERVERware GUI
sipPROT configuration options can be accessed through the following locations in the GUI:
¶ sipPROT on PBXware Standalone
Navigate to:
Admin Settings → sipPROT → Settings
This section contains the available configuration options for sipPROT.
¶ sipPROT on SERVERware
Navigate to:
Networks → sipPROT
This section provides access to the sipPROT configuration and network settings.
¶ sipPROT Dashboard
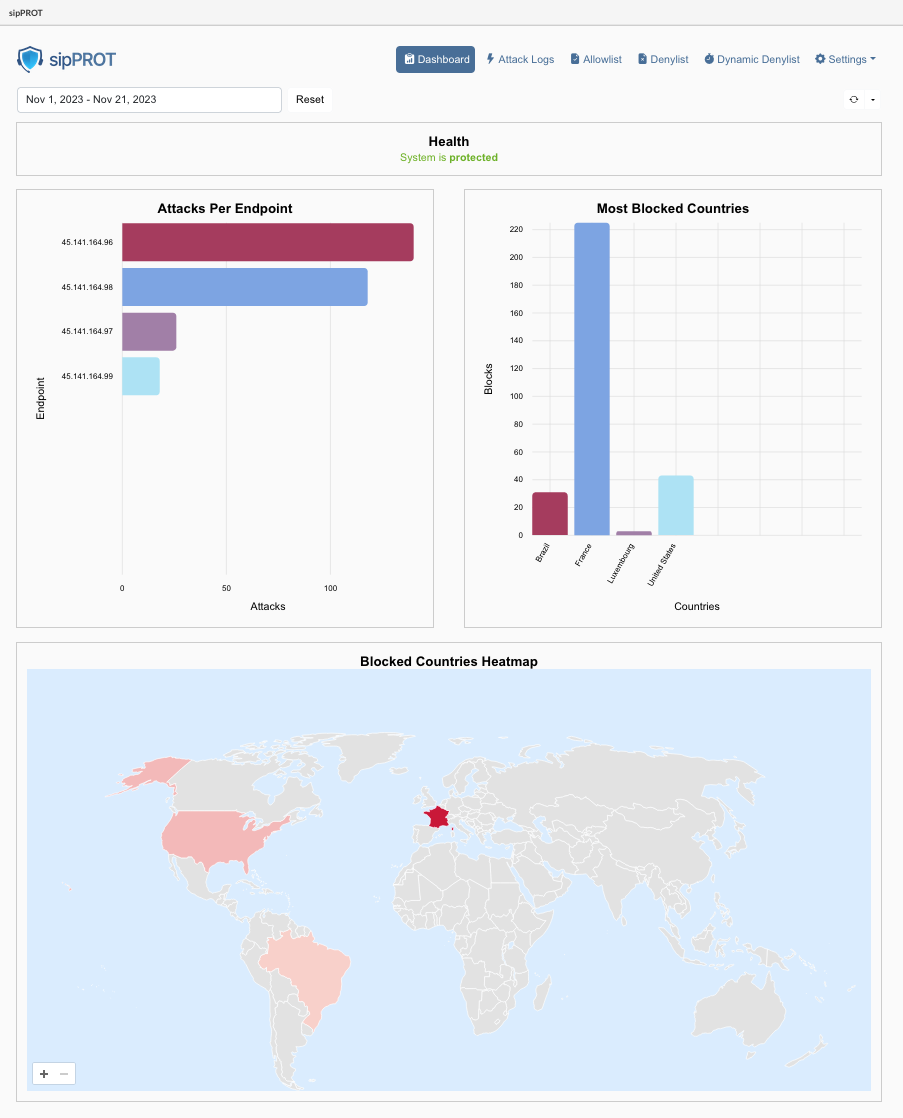
The sipPROT dashboard is designed to provide critical information regarding the health and status of the protection system. Here's a brief overview of what each widget on the dashboard likely represents:
| Widget | Description |
|---|---|
| Health: | This widget displays the health status of the sipPROT service. It indicates whether the service is running smoothly or if there are any issues. If there are problems detected, users are prompted to check the hosts page for more details. A direct link to the hosts page is also provided for quick access. |
| Prompted Message: | System is protected: System did not detect any health issues. |
| Prompted Message: | Issues detected: Please check the hosts page via direct link or from the menue to see details. |
| Attacks Per Endpoint: | This widget shows a list of attacks for a specified time period, helping to identify which IP addresses or Virtual Private Servers (VPS) are most targeted on user's server. For PBXware users, this will typically show attacks on a consistent IP address. |
| Most Blocked Countries: | This widget displays information about the origin countries of blocked IP addresses. It groups blocked IPs based on their country of origin, providing insights into geographic patterns in the attack data. |
| Blocked Countries Heatmap: | A geolocation heatmap that visually represents the density or intensity of attacks based on geographic location. It uses color coding to indicate areas with higher and lower concentrations of attacks. Warmer colors indicate higher concentrations of attacks, while cooler colors indicate lower concentrations. |
| All these widgets are affected by the date picker filter and the refresh time selector on the dashboard. This means users can customize the displayed data based on specific time frames and set how frequently the information is updated. | |
| Each widget provides valuable insights into different aspects of the security and health of the system managed by sipPROT, making it easier for users to monitor and respond to potential threats or issues. |
¶ sipPROT Settings
General sipPROT configuration can be found under menu Settings > Firewall.
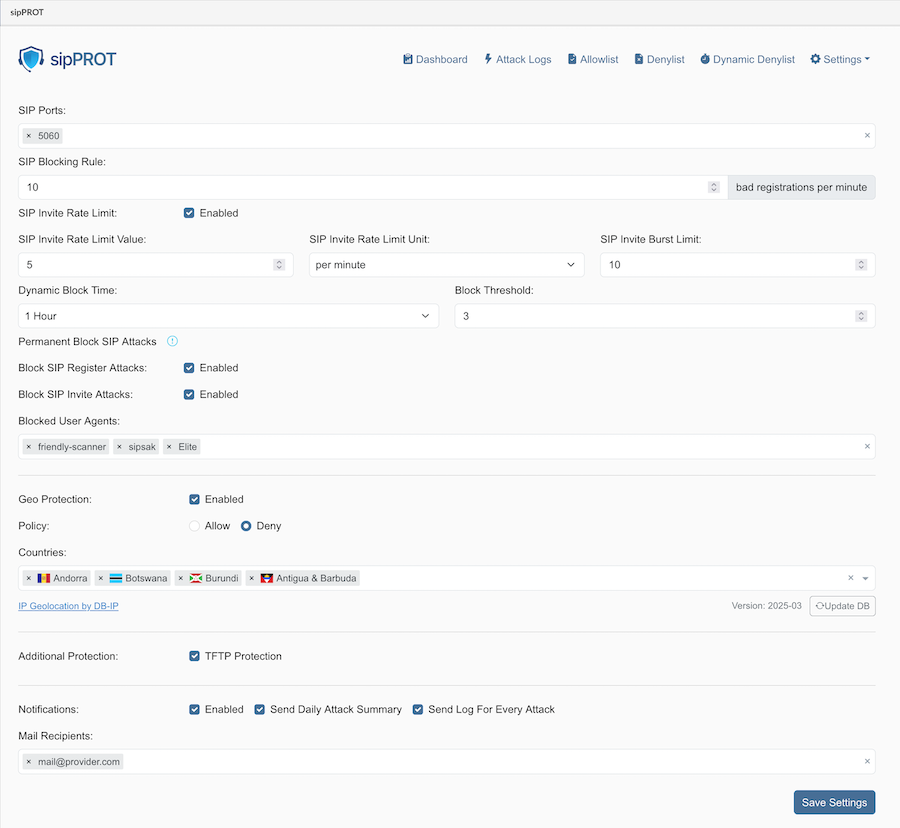
¶ The description for the options available:
| Field | Description |
|---|---|
| SIP Ports: | Specify one or more ports or ranges to monitor, such as "5060" or "5060:5062". |
| SIP Blocking Rule: | Set the maximum number of unauthorized registration attempts per minute before blocking an attacker's IP address for a specified amount of time. |
| Dynamic Block Time: | Choose how long blocked IP addresses will remain blocked after preventing an attack. |
| Block Threshold: | Define how many times an IP address will be dynamically blocked before it is permanently blocked by being added to the denylist. The acceptable range is (1-20). |
| Blocked User Agents: | Specify the SIP user agents to block incoming traffic from. Keep the list as short as possible to avoid affecting system performance. |
| Geo Protection: | Enable or disable GEO blocking, and select either the 'Allow' or 'Deny' option. |
| Option: | Allow: If 'Allow' is selected, only traffic from selected countries will be permitted, and all other traffic will be denied. Ensure that resources the server needs to access outside the selected countries, such as email or external archiving servers, are explicitly allowed. |
| Option: | Deny: If 'Deny' is selected, all traffic from the blocked countries will be denied. |
| Blocked Countries: | Select the countries from which to block incoming traffic. sipPROT will block the entire range of IP addresses belonging to the selected countries, or allow them if a different method is selected above. |
| SIP Invite Rate Limit: | Enable or disable the SIP Invite rate limiting feature. This feature helps protect against spam INVITEs. This is disabled by default but enabled in the example. |
| SIP Invite Rate Limit Value: Specify the maximum number of INVITEs (considered as "SIP calls" by the UI) allowed from a single IP address (IPv4 or IPv6) within the defined unit before it is dynamically blocked. In the example, this is set to 5. | |
| SIP Invite Rate Limit Unit: Define the time unit for the SIP Invite Rate Limit Value. In the example, this is set to per minute. | |
| SIP Invite Burst Limit: Allows for an initial burst of INVITEs (considered as "SIP calls" by the UI) from a single IP address. In the example, this is set to 10. This value is configurable. | |
| Permanent Block SIP Attacks: | This section contains options to enable permanent blocking for specific types of SIP attacks. Permanent blocking occurs when an IP address is dynamically blocked a number of times that exceeds the Block Threshold. |
| Block SIP Register Attacks: Enable this to permanently block IPs that repeatedly violate the SIP Blocking Rule and exceed the Block Threshold. (Enabled in the example) This feature is independent of the SIP Invite Rate Limit settings. | |
| Block SIP Invite Attacks: Enable this to permanently block IPs that repeatedly violate the SIP Invite Rate Limit (if enabled) and exceed the Block Threshold. Important: This option can only be enabled if "SIP Invite Rate Limit" is also enabled. If "SIP Invite Rate Limit" is disabled, this option will be disabled/greyed out. | |
| Additional Protections: | |
| TFTP: Protect user's server against TFTP brute force attacks using a rate limit. The default rate limit is 10 requests per minute, with a maximum of 100 burst requests. | |
| DNS: Protect older systems from the glibc stack-based buffer overflow in getaddrinfo() security flaw. If DNS zones are actively in use within SERVERware, it is essential to disable sipPROT DNS protection. Failure to do so may result in conflicts or operational issues. This feature is enabled by default and should not be modified unless users know what it is for. | |
| If users are unsure what the feature is for, users should not modify this option under no circumstances. | |
| Notifications: | |
| Enable: Enable or disable notifications from sipPROT. | |
| Send Daily Attack Summary: Receive an email with a daily report of attacks if this option is ticked. | |
| Send Log For Every Attack Receive a notification for every attack. The default value is once per hour. | |
| Mail recipients: | |
| Enter the email addresses of all intended recipients for sipprot notifications. | |
| The SMTP settings must be correctly configured for email notifications to be sent successfully. | |
¶ Attack Logs
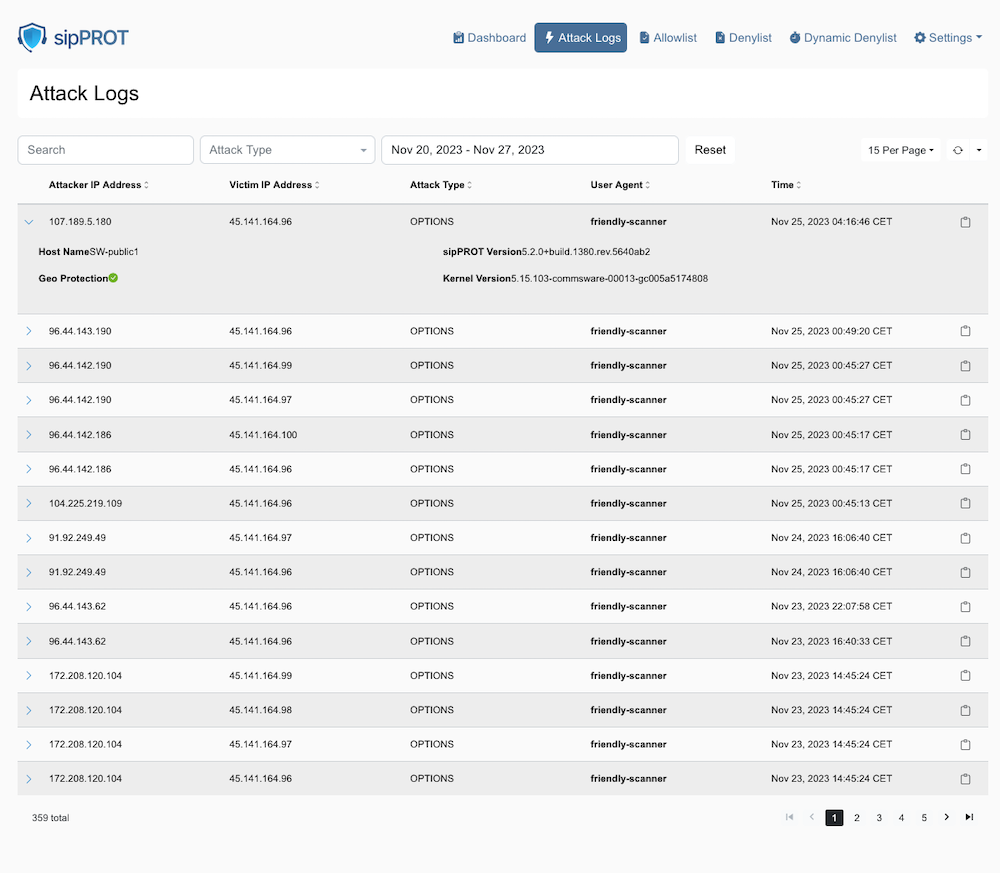
Regular monitoring of attack logs helps keep track of the types and frequency of attacks targeting the system.
How to Use the sipPROT Attack logs page:
| Action | Description |
|---|---|
| Understanding the Interface: | Attack logs page displays a table of SIP (Session Initiation Protocol) attacks detected by sipPROT. The columns include Attacker IP Address, Victim IP Address, Attack Type, User Agent, and Time of attack. |
| Reviewing Attack Logs: | Scan through the list to review the recent attacks detected by sipPROT. Look at the 'Time' column to see when each attack occurred. The 'User Agent' column may give users insights into the type of tools used for the attack. If the user agent in the list is bold it will indicate that user agent is blocked explicitly in the sipPROT settings. |
| Filtering Logs: | Use the 'Search' bar to filter logs by specific criteria, like IP address or attack type. Users can select different types of attacks from the 'Attack Type' dropdown to narrow down the logs displayed.There are two type of attacks available to filter OPTIONS and REGISTER. |
| Inspecting Specific Attacks: | Click on the IP address of either the attacker or victim to possibly see more details about that particular entity (this functionality depends on sipPROT's features). |
| Managing Logs: | The date filter at the top allows adjustment of the log viewing range. Any applied filters can be cleared by clicking the Reset button. |
| Using Geo Protection: | If available, the 'Geo Protection' indicator can show if geo-blocking features are active or whether an attack was mitigated based on geographical rules. |
| Navigating Pages: | Use the navigation arrows or page numbers at the bottom to scroll through multiple pages of logs. |
| Adjusting View Settings: | Users can change how many logs they can see per page by adjusting the setting in the top right corner where it says '15 Per Page'. |
| Taking Action: | Based on the information in the logs, users might decide to update their firewall rules, add certain IP addresses to a blocklist, or take other security measures. |
¶ Allow/Deny Lists
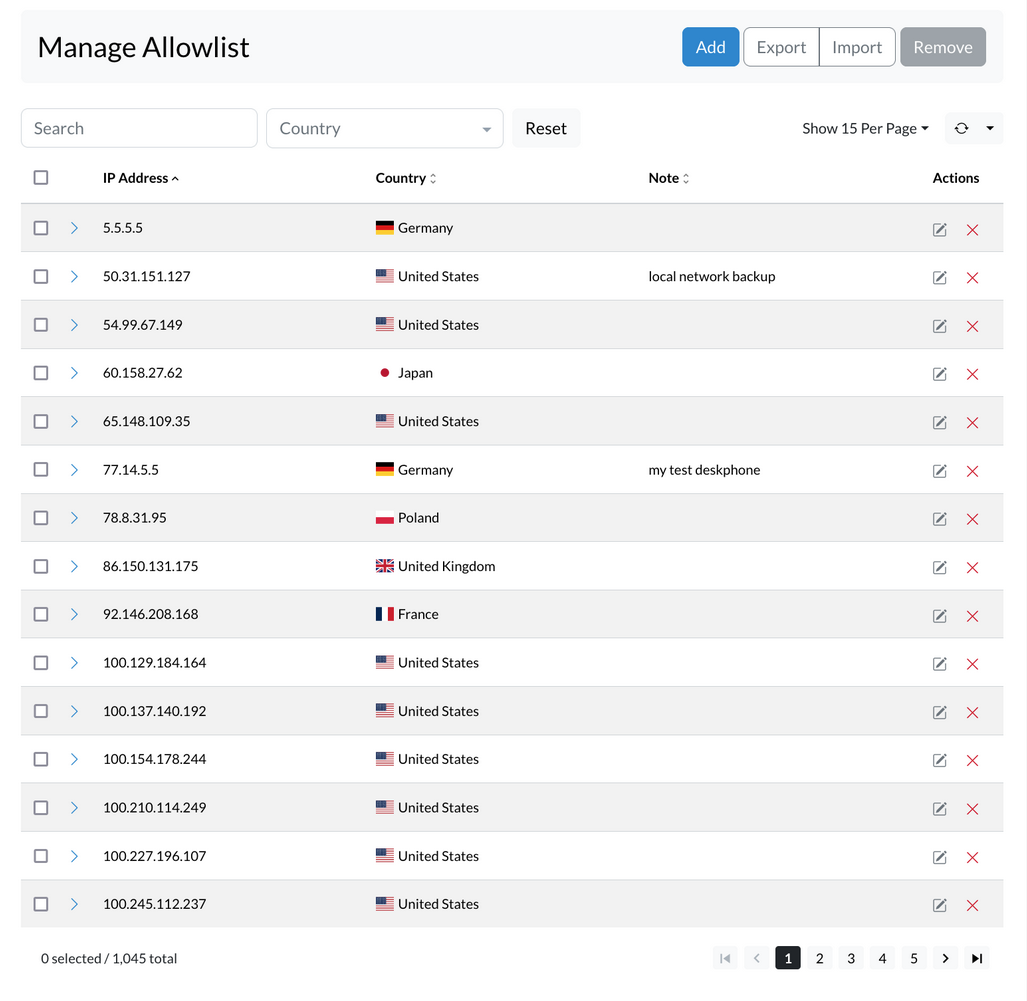
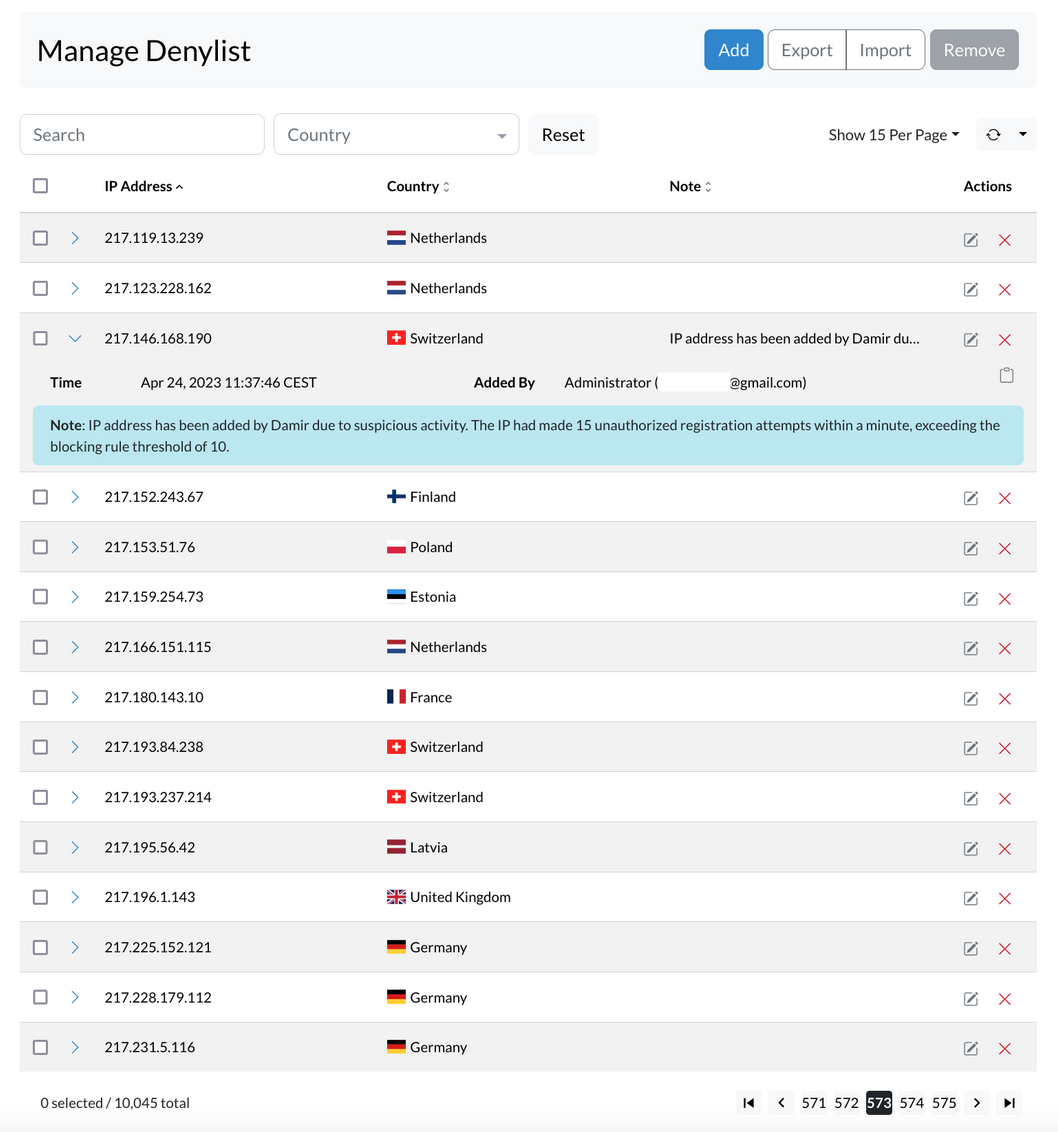
The Allow/Deny lists offer a variety of management options, such as searching, exporting, importing, and deleting entries. Additionally, users can easily access more detailed information for each entry with a single click, offering valuable insights for more effective list management.
¶ Buttons

- Add (Manualy add single IP record to the list)
- Export (export the whole list to a CSV file)
- Import (import the list from a CSV file)
- Delete (delete selected IP record)
¶ Search
- Search (Search the list by IP record or note)
- Country (Search IP records by country)
- Reset (Clear the country and reset the search)
¶ Display and Refresh Options
- Show per page (dropdown to select number of records displayed per parge)
- Refresh (The "Refresh" option in the allow list is a dropdown that allows users to set the refresh interval for the list. When a refresh interval is set, the list will automatically refresh at the specified interval. However, it's important to keep in mind that this action may clear any current selections in the list. )
At the bottom of the list, users can find:
- Number of selected/total records.
- Page numbers with selector.
¶ Note
Also for the convinience additional information regarding the specific IP can be found with a single click on the arrow on the beggining of the record to expand the additional information for the record, containing:

- Note: The note for the record if available.
- Added By: The user who added the record.
- Copy button: Copy the record data in the clipboard in json format.
   {
   "ip": "217.146.168.190",
   "note": "IP address has been added by Damir due to suspicious activity. The IP had made 15 unauthorized registration attempts within a minute, exceeding the blocking rule threshold of 10.",
   "time": 1682329066,
   "added_by": "Administrator (user@gmail.com)",
   "geo_data": {
      "country_code": "CH",
      "country_name": "Switzerland"
   }
   }
- Edit: Edit the record button.
- Delete: Delete the record button.
¶ Allowlist
The allowlist is a list of IP addresses that are allowed uninterrupted access to the system. This list can be manually populated via a form or uploaded using a CSV file. It is important to keep the allowlist up-to-date to ensure that legitimate users are not blocked from accessing the system. The allowlist provides an additional layer of security to the system and helps prevent unauthorized access.
¶ ADD IP Records to Allowlist
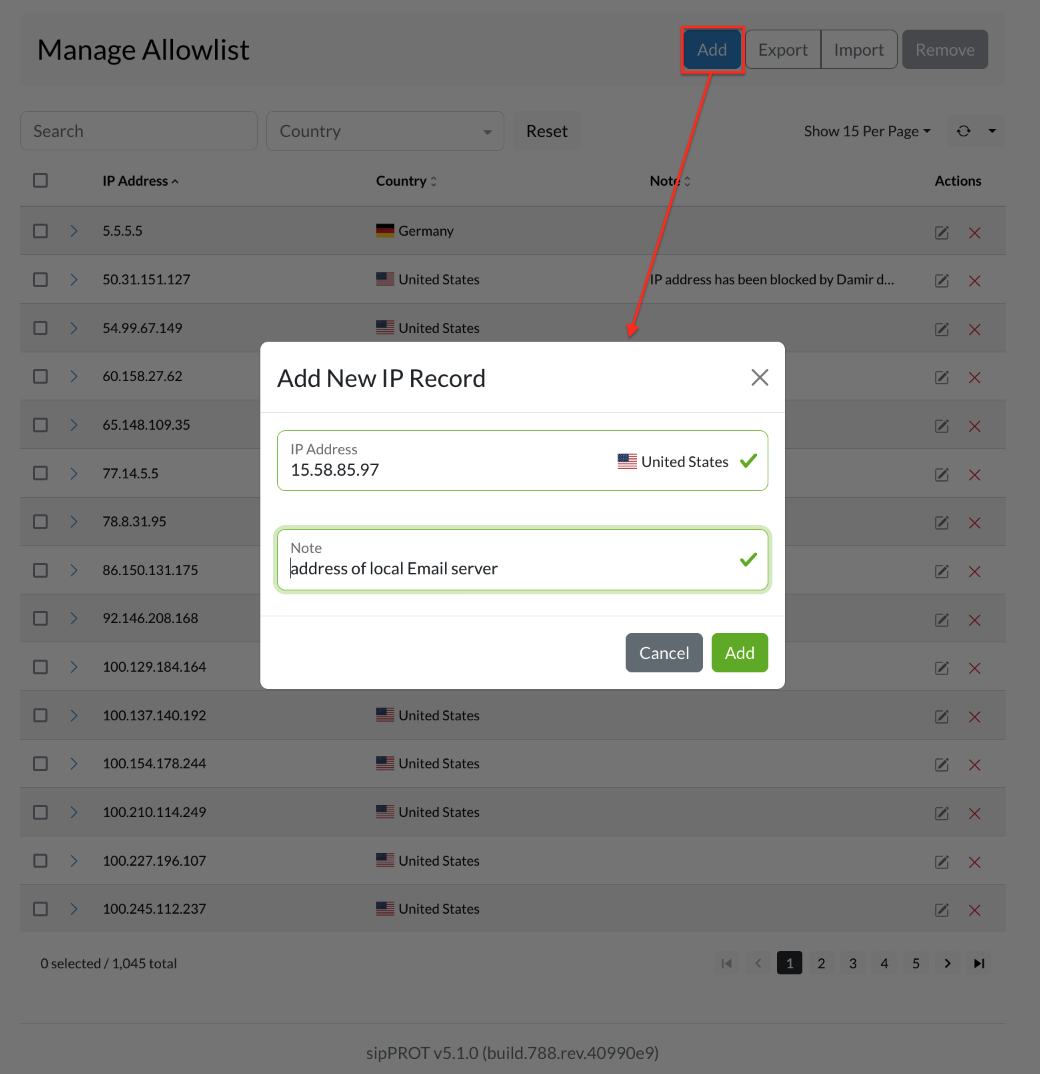
To add an IP address to the Allowlist, follow these steps:
- Navigate to the Allowlist tab in sipPROT.
- Click the Add button.
- Enter the network or IP address in the designated input field.
- Optionally, add notes to provide context or reasons for adding the address.
- Click Add again to confirm and include the IP address in the Allowlist.
It's important to ensure that the entered IP address is accurate and valid. Once an IP address is added to the Allowlist, it will be allowed uninterrupted access to the system.
¶ IMPORT / EXPORT Multiple IP Records to Allowlist
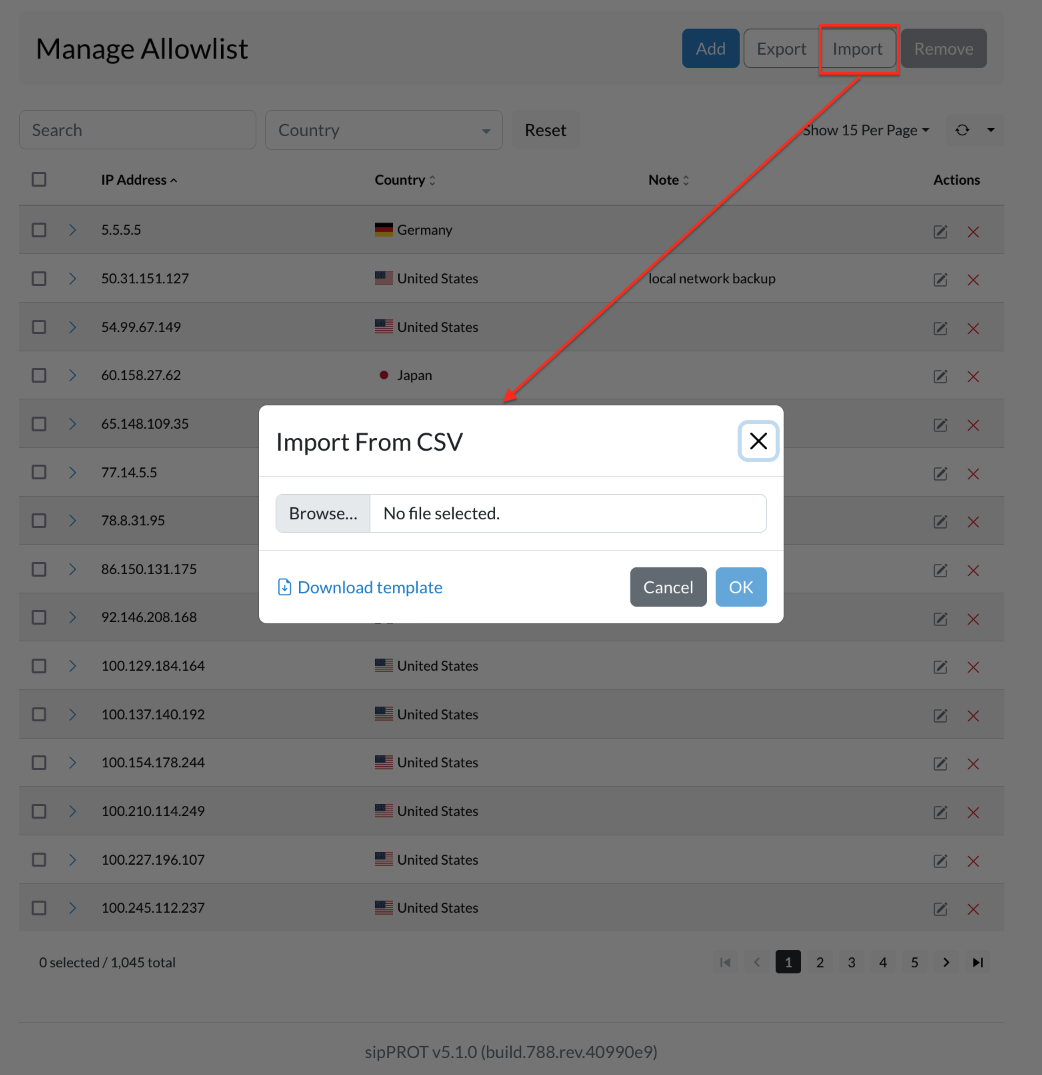
To import multiple IP addresses into the Allowlist, use the Import CSV option in the upper right corner of the Allowlist IP Addresses tab. A CSV file containing the IP addresses to be added to the Allowlist is required.
The CSV file can be created by downloading the provided template file, which includes headers and examples to help get started. Open the file in a spreadsheet program like Microsoft Excel or Google Sheets, then add the IP addresses to allow access under the "IP_ADDRESS" column. An optional note can be added for each IP address in the "NOTE" column.
Example CSV file :
IP_ADDRESS,NOTE
192.168.x.x,"example note1"
77.14.x.x,"example note2"
Save the file as a CSV, ensuring it is in the correct format. Then, return to the Allowlist sipPROT tab in the system and click the "Upload" button. Select the CSV file created and click "Upload" again. The system will import the IP addresses from the file and add them to the Allowlist.
To export the list of IP addresses from the Allowlist, use the "Export CSV" option to download a file containing all IP addresses currently on the Allowlist.
¶ Remove IP Address rom the List
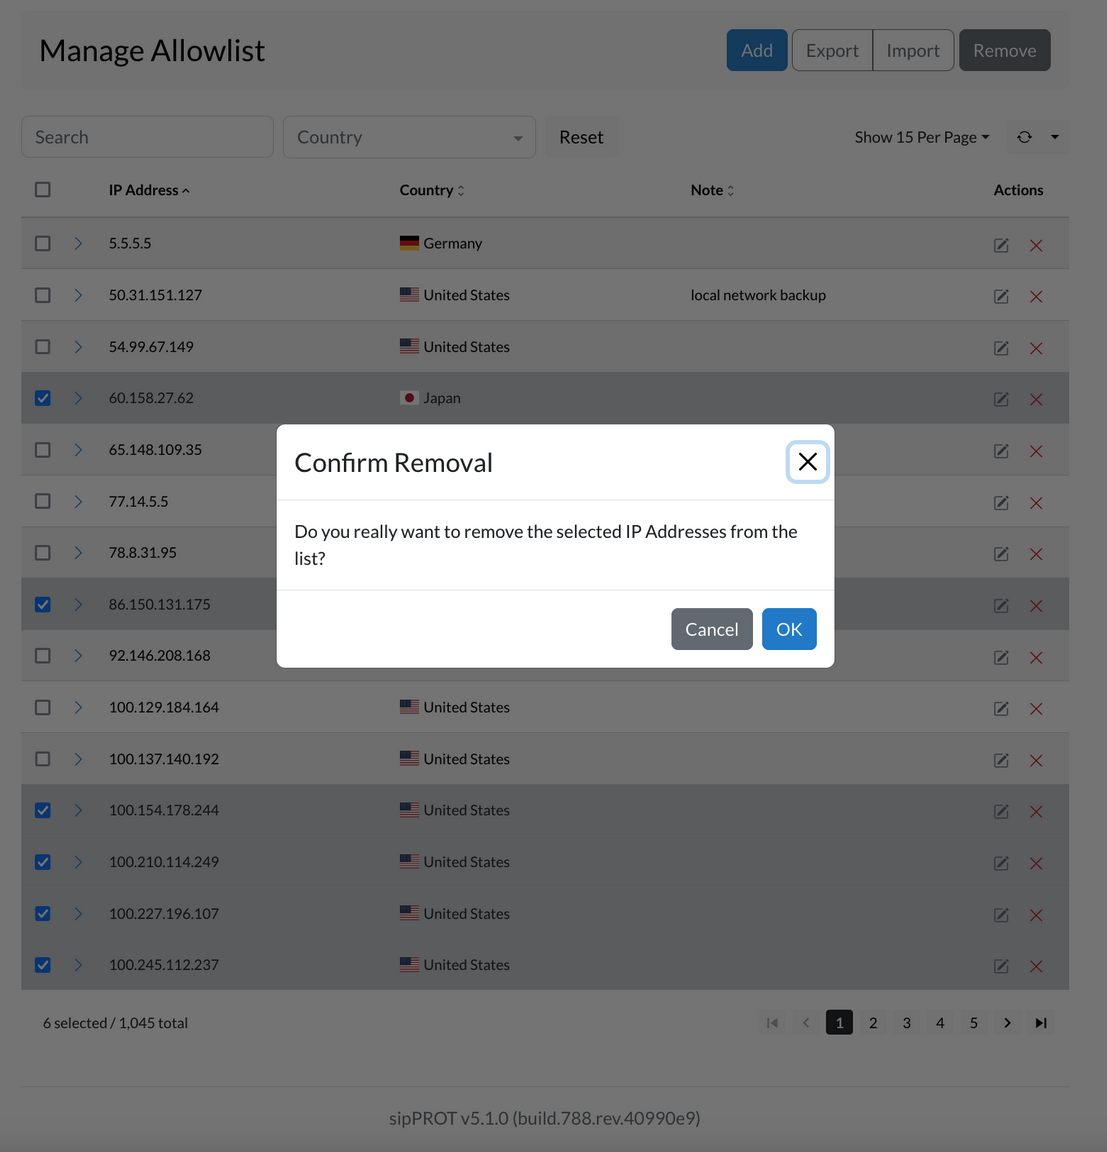
IP addresses can be removed in two ways. To delete selected entries, mark the checkboxes next to the desired IPs and click Remove. A confirmation window will appear; select Yes to confirm the action.
To remove all entries, use the Select all option, then click Remove and confirm with Yes.
All changes are applied immediately. For bulk removal, a CSV file can be used. A template is available, including headers and sample data, to assist with formatting.
Please be noted that the Allowlist overrides all other lists. If an IP address appears in both the Allowlist and another list (like the Denylist), access will still be granted, and the conflicting entry in the other list will be ignored. This is especially useful when blocking an entire range—for example, a subnet like 192.168.50.0/24—but needing to permit a specific IP within that range, such as 192.168.50.15. By adding that IP to the Allowlist, it bypasses the broader block and retains access.
¶ Denylist
The Denylist is a collection of IP addresses that have restricted access to the system. This list can be populated manually by entering an IP address and an optional "note" through a GUI or by importing a list of IP addresses via a CSV file. Additionally, the Denylist can be dynamically populated with IP addresses from the Dynamic Denylist if they are identified as being associated with persistent attacks on the system.
IMPORTANT - The Allowlist has precedence over the Denylist. If an IP address is present in both the Allowlist and the Denylist, the IP address will be granted access to the system.
¶ ADD IP records to Denylist
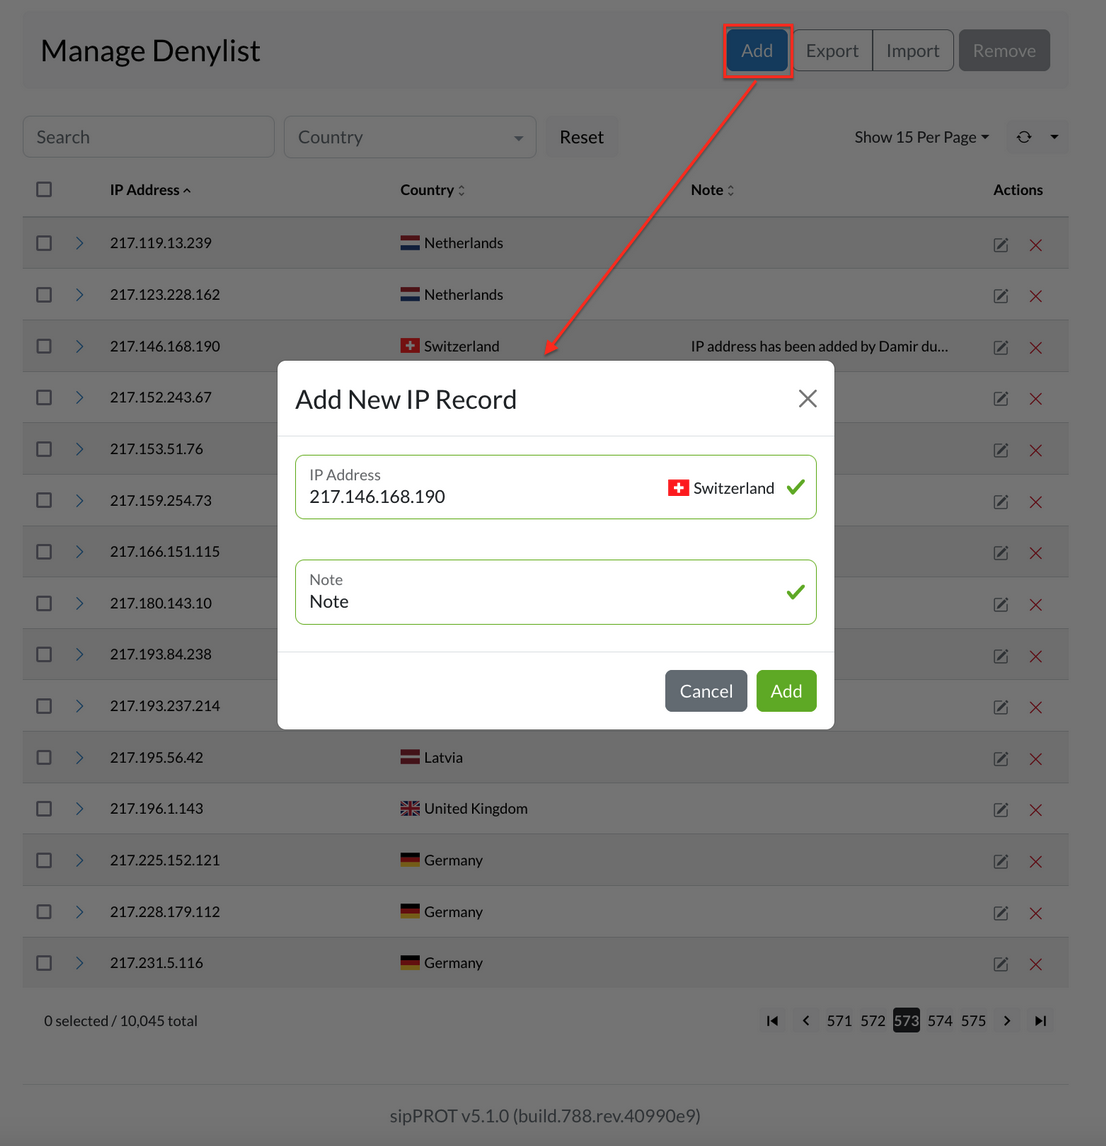
To add an IP address to the Denylist, follow these steps:
- Open the Denylist tab in sipPROT.
- Click the Add button.
- Enter the network or IP address in the designated field.
- Optionally, provide notes to indicate the reason for adding the address.
- Click Add to confirm and include the IP address in the Denylist.
¶ IMPORT / EXPORT Multiple IP records to Denylist
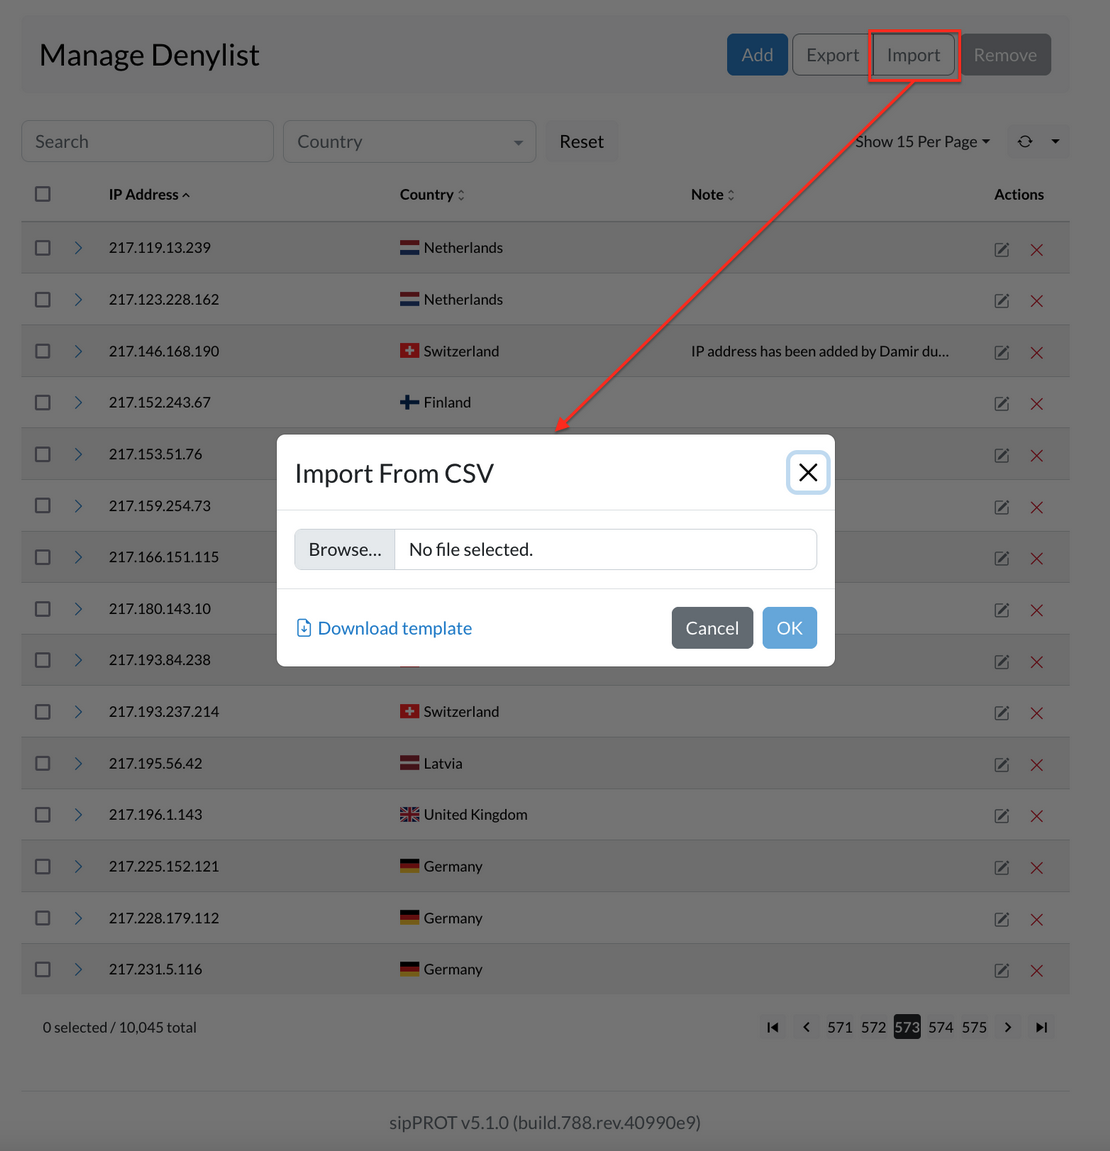
Multiple IP addresses can be added to the Denylist using the Import CSV option found in the upper-right corner of the Denylist tab. This feature requires a CSV file containing the IPs to be added.
A downloadable template is available to help with formatting. It includes headers and example entries. After downloading, the file can be opened in a spreadsheet tool like Microsoft Excel or Google Sheets. IP addresses should be added under the IP_ADDRESS column, with an optional comment or description in the NOTE column.
Example CSV file :
IP_ADDRESS,NOTE
192.168.x.x,"example note1"
77.14.x.x,"example note2"
After editing, save the file in CSV format. Then return to the Denylist tab in sipPROT and click the Upload button. Select the prepared CSV file and confirm the action. The system will process the file and add all listed IP addresses to the Denylist.
To download the current list of denied IP addresses, use the Export CSV option. This will generate a file containing all entries currently in the Denylist.
¶ Remove IP Address from the List
A network or IP address can be removed in two ways. Select one or more entries using the checkboxes next to them, then click the Remove button. A confirmation prompt will appear—choose Yes to confirm the removal. To delete all entries at once, use the Select all checkbox, then click Remove and confirm the action when prompted.
Changes take effect immediately. For removing many entries at once, a CSV file can be used for bulk updates. A template file with the correct format, headers, and sample entries is available to help with this process.
¶ Dynamic Denylist
The Dynamic Denylist shows IP addresses that have been automatically blocked after being flagged as sources of suspicious or malicious traffic. These entries are added without manual action, keeping the system protected in real time against ongoing threats. Each blocked IP is listed with details such as the scanner or user agent involved in the attempt, and the country of origin. This helps in analyzing the type and source of the attack for inspection or troubleshooting purposes.
Blocked IPs can be manually removed if needed, or left to expire on their own once the timeout period is reached.
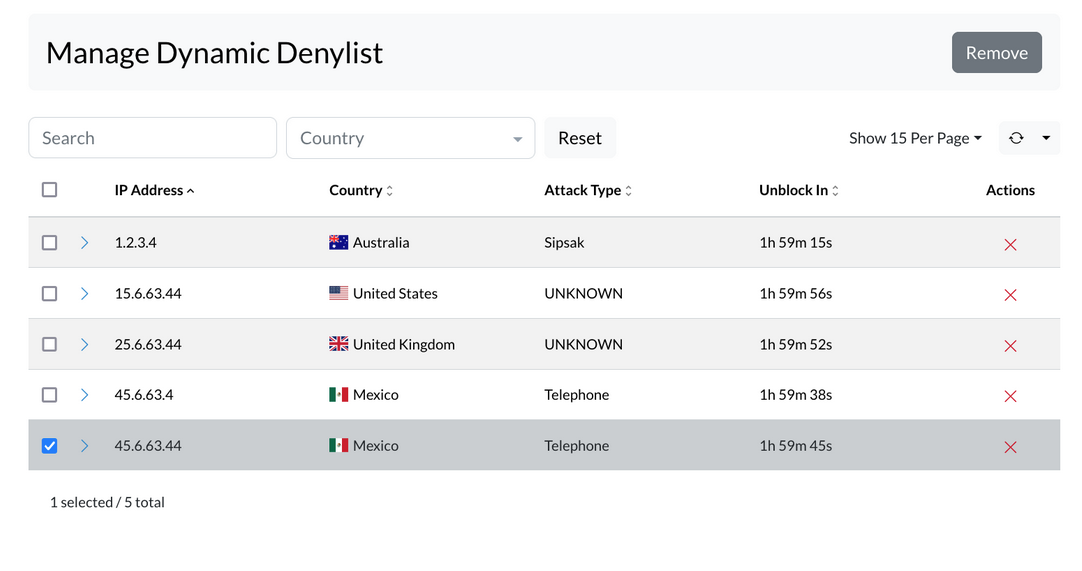
Dynamic deny is a security feature in sipPROT designed to automatically block IP addresses that exhibit malicious behavior against user's system. This feature operates based on a set of predefined rules established by the administrator. Here's a more detailed explanation:
| Field | Description |
|---|---|
| Dynamic Blocking: | When an IP address attempts an action that violates the rules set in sipPROT (like repeated failed login attempts, which could indicate a brute force attack), the dynamic deny feature is triggered. This results in the offending IP address being temporarily blocked. |
| Dynamic Block Time: | This is a crucial setting within the dynamic deny feature. It specifies the duration for which an IP address will be blocked once it violates the rules. For example, if the Dynamic Block Time is set to one hour, any IP address that breaks the rules will be blocked for an hour. |
| Behavior During the Block Period: | If the blocked IP address attempts another attack while it is still in the blocked state, the Dynamic Block Time is reset. This means the block duration starts over, and the IP remains blocked for another full hour from the time of the new attack. |
| Unblocking: | If the blocked IP address does not attempt any new attacks during the block period, it will be automatically unblocked once the Dynamic Block Time elapses. |
| Permanent blocking: | An IP address is added to the denylist if it persistently attacks and is repeatedly blocked by the dynamic deny feature. This is governed by the "Block Threshold" setting. For example, if an IP address commits more than 3 attacks within a specified time frame (as defined in settings), it will be permanently blocked, meaning it is moved to the denylist. This ensures that consistently malicious sources are dealt with more stringently. |
The dynamic deny feature in sipPROT acts as a proactive defense layer, automatically blocking IP addresses that show suspicious or harmful behavior. These temporary blocks are triggered by rules set by the administrator and help reduce the risk of repeated or ongoing attacks. Once the threat subsides, blocked IPs are automatically removed after a set timeout.
¶ sipPROT Hosts
To access the hosts page use the top navigation menu Settings > Hosts, or click directly on the dasboard, Health widget.
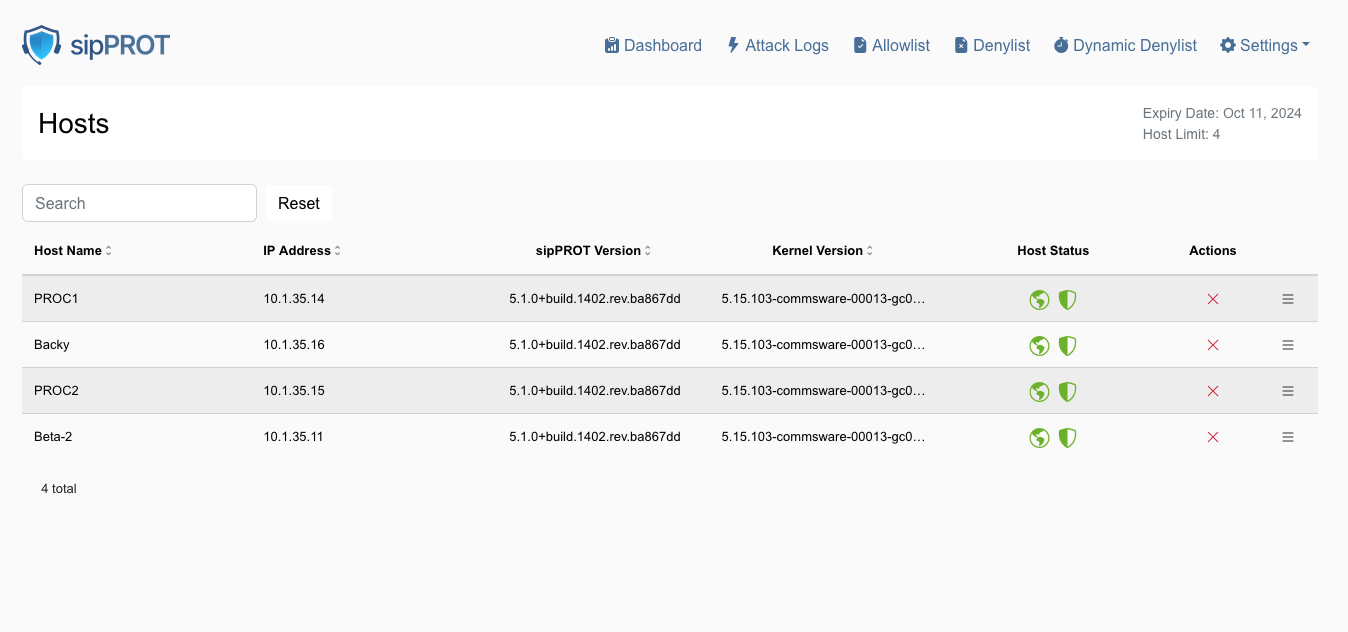
The sipPROT hosts page offers a comprehensive overview of various hosts. On this page, users can access detailed information about the status of the sipPROT service for each host. This includes:
| Feature | Description |
|---|---|
| Service Status Per Host | Displays the current operational status of the sipPROT service on individual hosts. A red shield icon indicates the service is not running and needs inspection. |
| License Information | Shows details about the sipPROT license, including its validity and the number of hosts it covers. |
| GEO Protection Status | Indicates whether geo-protection features are active and functioning correctly on each host. A red earth icon indicates the GEO service is unavailable and requires inspection. |
| sipPROT version | Displays the installed sipPROT version per host. |
| Host kernel version | Displays the kernel version installed on each host. |
| Host IP | Shows the IP address of each host. |
Additionally, this page provides functionality to remove hosts. Removing a host will temporarily disable the sipPROT service on that host until it is restarted. This feature is particularly useful in cases where the number of hosts exceeds the license limits. For example, backup hosts that typically do not run SIP services can be selectively unprotected to stay within the license limits.
¶ sipPROT Notifications
To access the notifications page in sipPROT use the top navigation menu Settings > Notifications.
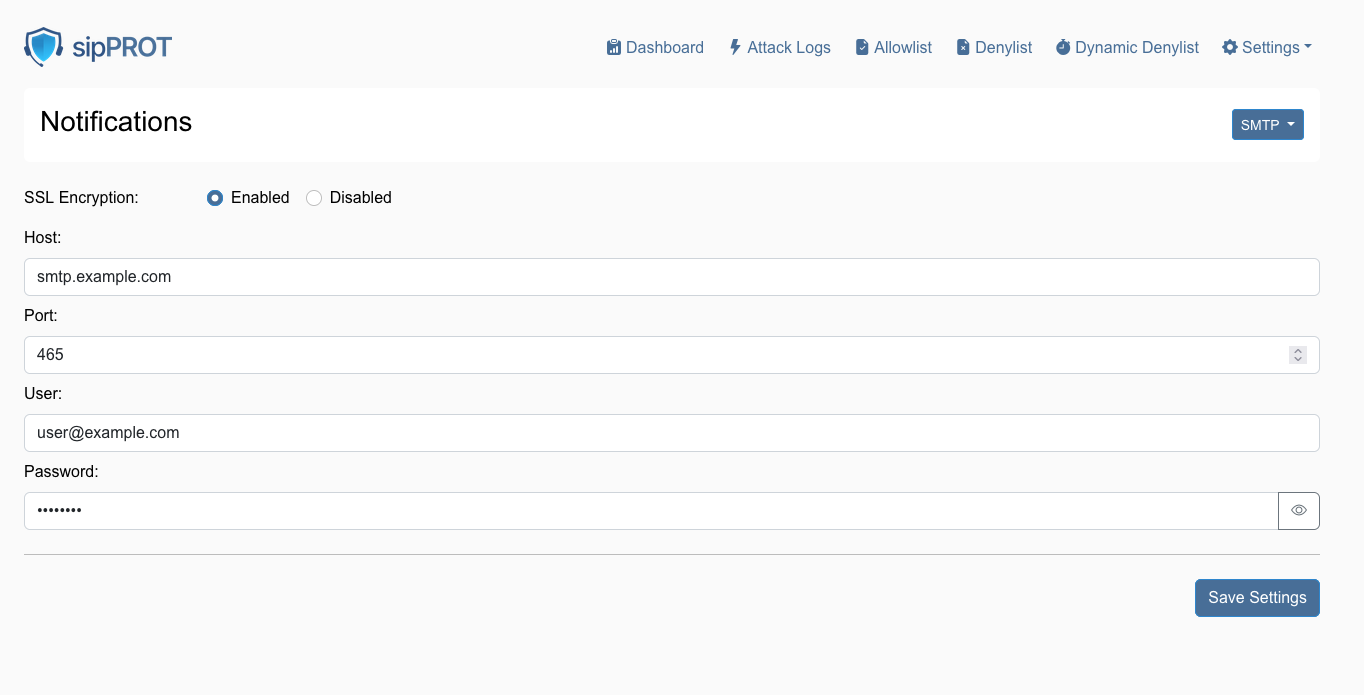
| Action | Description |
|---|---|
| Configure SSL Encryption: | Select the 'SSL Encryption' option and choose 'Enabled' to ensure that notification emails are sent using a secure connection. |
| Enter SMTP Details: | |
| Host: | Enter the SMTP server address for email provider, such as smtp.example.com. |
| Port: | Input the port number used by SMTP server. Commonly, this is 465 for SSL or 587 for TLS. |
| Enter User Credentials: | |
| User: | Input the full email address that will be used to send notifications, such as user@example.com. |
| Password: | Enter the password associated with the email account. Make sure to input this accurately. |
| Save Settings: | After ensuring all the information is correct, click the 'Save Settings' button to apply the changes. |
¶ sipPROT API Documentation
A new "API Documentation" button has been introduced in the GUI, providing users with direct access to a Swagger-enabled API documentation page. This page allows users to explore and test API endpoints in real time.
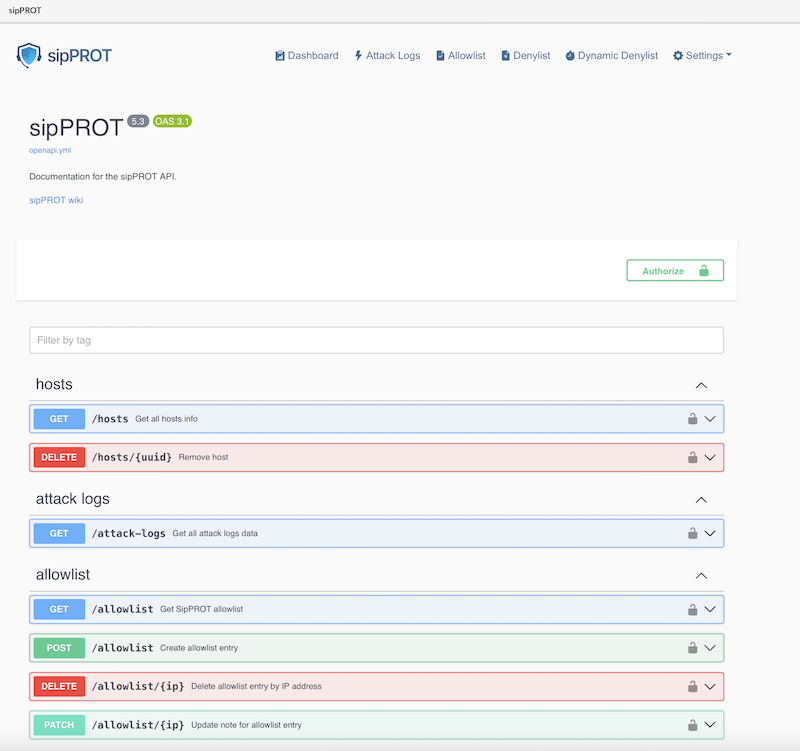
How to Use the API Documentation:
-
Accessing the Documentation:
- Click on the "API Documentation" button in the GUI. This will open a new browser tab with the Swagger interface displaying the available API endpoints.
-
Authentication Required:
- To execute API calls directly from the documentation, users need to generate an API Key for their user account.
-
Generating an API Key:
- Navigate to the user settings section in the GUI.
Create a new API key and copy it.
- Navigate to the user settings section in the GUI.
-
Using the API Key in Swagger:
- Go back to the Swagger interface.
- Locate the "Authorize" button or the input field for authentication.
- Paste the generated API key into the login prompt to authenticate requests.
-
Executing API Calls:
- Once authenticated, users can select an API endpoint, provide the required parameters, and execute the request directly from the Swagger interface.
¶ Working with sipPROT CLI
The new updated version of sipPROT comes with updated CLI commands and outputs. CLI autocomplete is added for sipPROT commands.
 # sipprot --help
NAME:
   sipPROT - CLI

USAGE:
   sipPROT [global options] command [command options] [arguments...]

VERSION:
   5.4.3+build.1445

COMMANDS:
   status, s        Prints number of IPs per list
   check-update, u  Check for updates
   version,         Print only the version
   list, l          Manages IP lists
   settings         To inspect settings
   help, h          Shows a list of commands or help for one command

GLOBAL OPTIONS:
   --config FILE  load configuration from FILE (default: "/opt/sipprot/conf/sipprot.conf")
   --log value    log URI e.g. stdout://, syslog:// or file:///var/log/sipprotd.log (default: "stdout://")
   --debug        include debug logs (default: false)
   --help, -h     show help
   --version, -v  print the version
¶ sipPROT Status
To get information about sipPROT status use the following command:
- sipprot status
This command will give the following information:
# sipprot status
+---------------------+------------+
|        LIST         | NUM OF IPS |
+---------------------+------------+
| Allow               |        493 |
+---------------------+------------+
| Deny                |        482 |
+---------------------+------------+
| Dynamic (temporary) |        100 |
+---------------------+------------+
To list detailed information use flags --all, --allow, --deny, --dynamic
Example:
# sipprot status -allow

Allowlist:
+-----------------+----------------+
|   IP ADDRESS    |    COUNTRY     |
+-----------------+----------------+
| 191.85.106.233  |   Argentina    |
+-----------------+----------------+
| 165.191.222.98  |   Australia    |
+-----------------+----------------+
|  175.35.61.159  |   Australia    |
+-----------------+----------------+
|  83.164.34.163  |    Austria     |
+-----------------+----------------+
|  178.127.91.72  |    Belarus     |
+-----------------+----------------+
| 178.116.223.166 |    Belgium     |
+-----------------+----------------+
| 109.140.180.239 |    Belgium     |
+-----------------+----------------+
Print sipPROT version information:
# sipprot version
sipPROT:  5.1.0+build.777.rev.5ad785a
Additional quick check, if the provided IP is in any of the following: allowlist, denylist, dynamic denylist.
Example:
# sipprot list check 83.221.171.193
IP address '83.221.171.193' found in Allowlist
IP address '83.221.171.193' found in Denylist
If an IP address is in the "List of IPs in the allow list," that IP will not be blocked by sipPROT.
If an IP address is in the "List of IPs blocked by the deny list," IP will be blocked regardless of whether an attack is coming from that IP.
"The information shown in the screenshots on this wiki such as IP addresses, hostnames, email addresses, and service versions are placeholders used for demonstration purposes within the sipPROT interface. They are not indicative of actual threats or real-world configuration and should not be treated as such."
¶ TLS/WebSocket Secure Protection in sipPROT
¶ Overview
What does this feature do?
sipPROT already watches the phone system for attacks — password guessing, random extension dialing, break-in attempts — by watching network traffic. This feature closes a blind spot in that protection.
A lot of calls today don't come from a deskphone. They come from softphones, browser clients, and other UC apps talking to Asterisk over TLS and WebSocket — the same encrypted connections a browser uses for HTTPS. From the outside, an attack over one of these connections looks like ordinary traffic. But Asterisk itself knows instantly when someone typed the wrong password or tried an extension that doesn't exist.
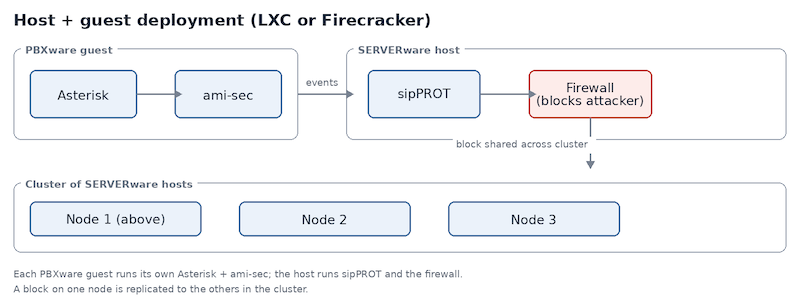
This feature closes that gap two ways: sipPROT now watches TLS and WSS traffic directly, the same way it already watches SIP, and a companion service called ami-sec listens straight to Asterisk's own internal security alerts and feeds them into sipPROT — catching attacks that leave no trace on the network at all.
¶ Supported attacks
- Extension password brute force — repeated login attempts against a real extension, trying to guess the password. The traffic itself looks completely normal; only Asterisk knows every attempt failed.
- Non-existent extension scanning — attempts against extensions that don't exist, usually automated, hoping to find one left unsecured. Again, nothing about the request looks wrong on its own — only Asterisk's own account lookup catches it.
¶ How protection works
- Real-time monitoring of TLS and WSS, with the same rate limiting and blocking sipPROT already applies to SIP.
- A new companion service, ami-sec, that reads Asterisk's own internal security alerts directly, catching extension password brute-force attempts and non-existent-extension scanning that don't show up as suspicious traffic on the network at all.
- Attack Logs display attacks reported by ami-sec.
- Live notifications and daily reports now include TLS and WebSocket Secure attacks alongside everything else already covered.
- Works out of the box - no configuration, no separate credentials, no install step. Ships with sipPROT on both standalone and clustered (SERVERware) deployments.
¶ Configuration
No configuration required. Both the TLS/WSS monitoring and ami-sec ship as part of sipPROT and work automatically — nothing separate to install, no password to set up. ami-sec reuses the AMI credentials the phone system already has.
¶ Deployment
Standalone — on a single PBXware box (Gentoo or Ubuntu), everything runs together: the phone system, ami-sec watching it, sipPROT, and the firewall that acts on it.
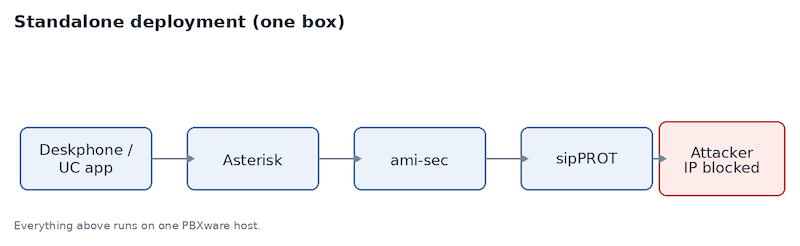
Clustered / SERVERware — on a SERVERware setup with multiple PBXware guests (containers or full VMs), each guest runs its own copy of ami-sec watching its own Asterisk instance. Blocking is handled centrally on the host, and a block on one node is automatically shared with the rest of the cluster.
¶ Privacy
By default, this only inspects connection metadata, not call content, meaning packet inspection and TLS decryption stay off.
¶ Update sipPROT on PBXware
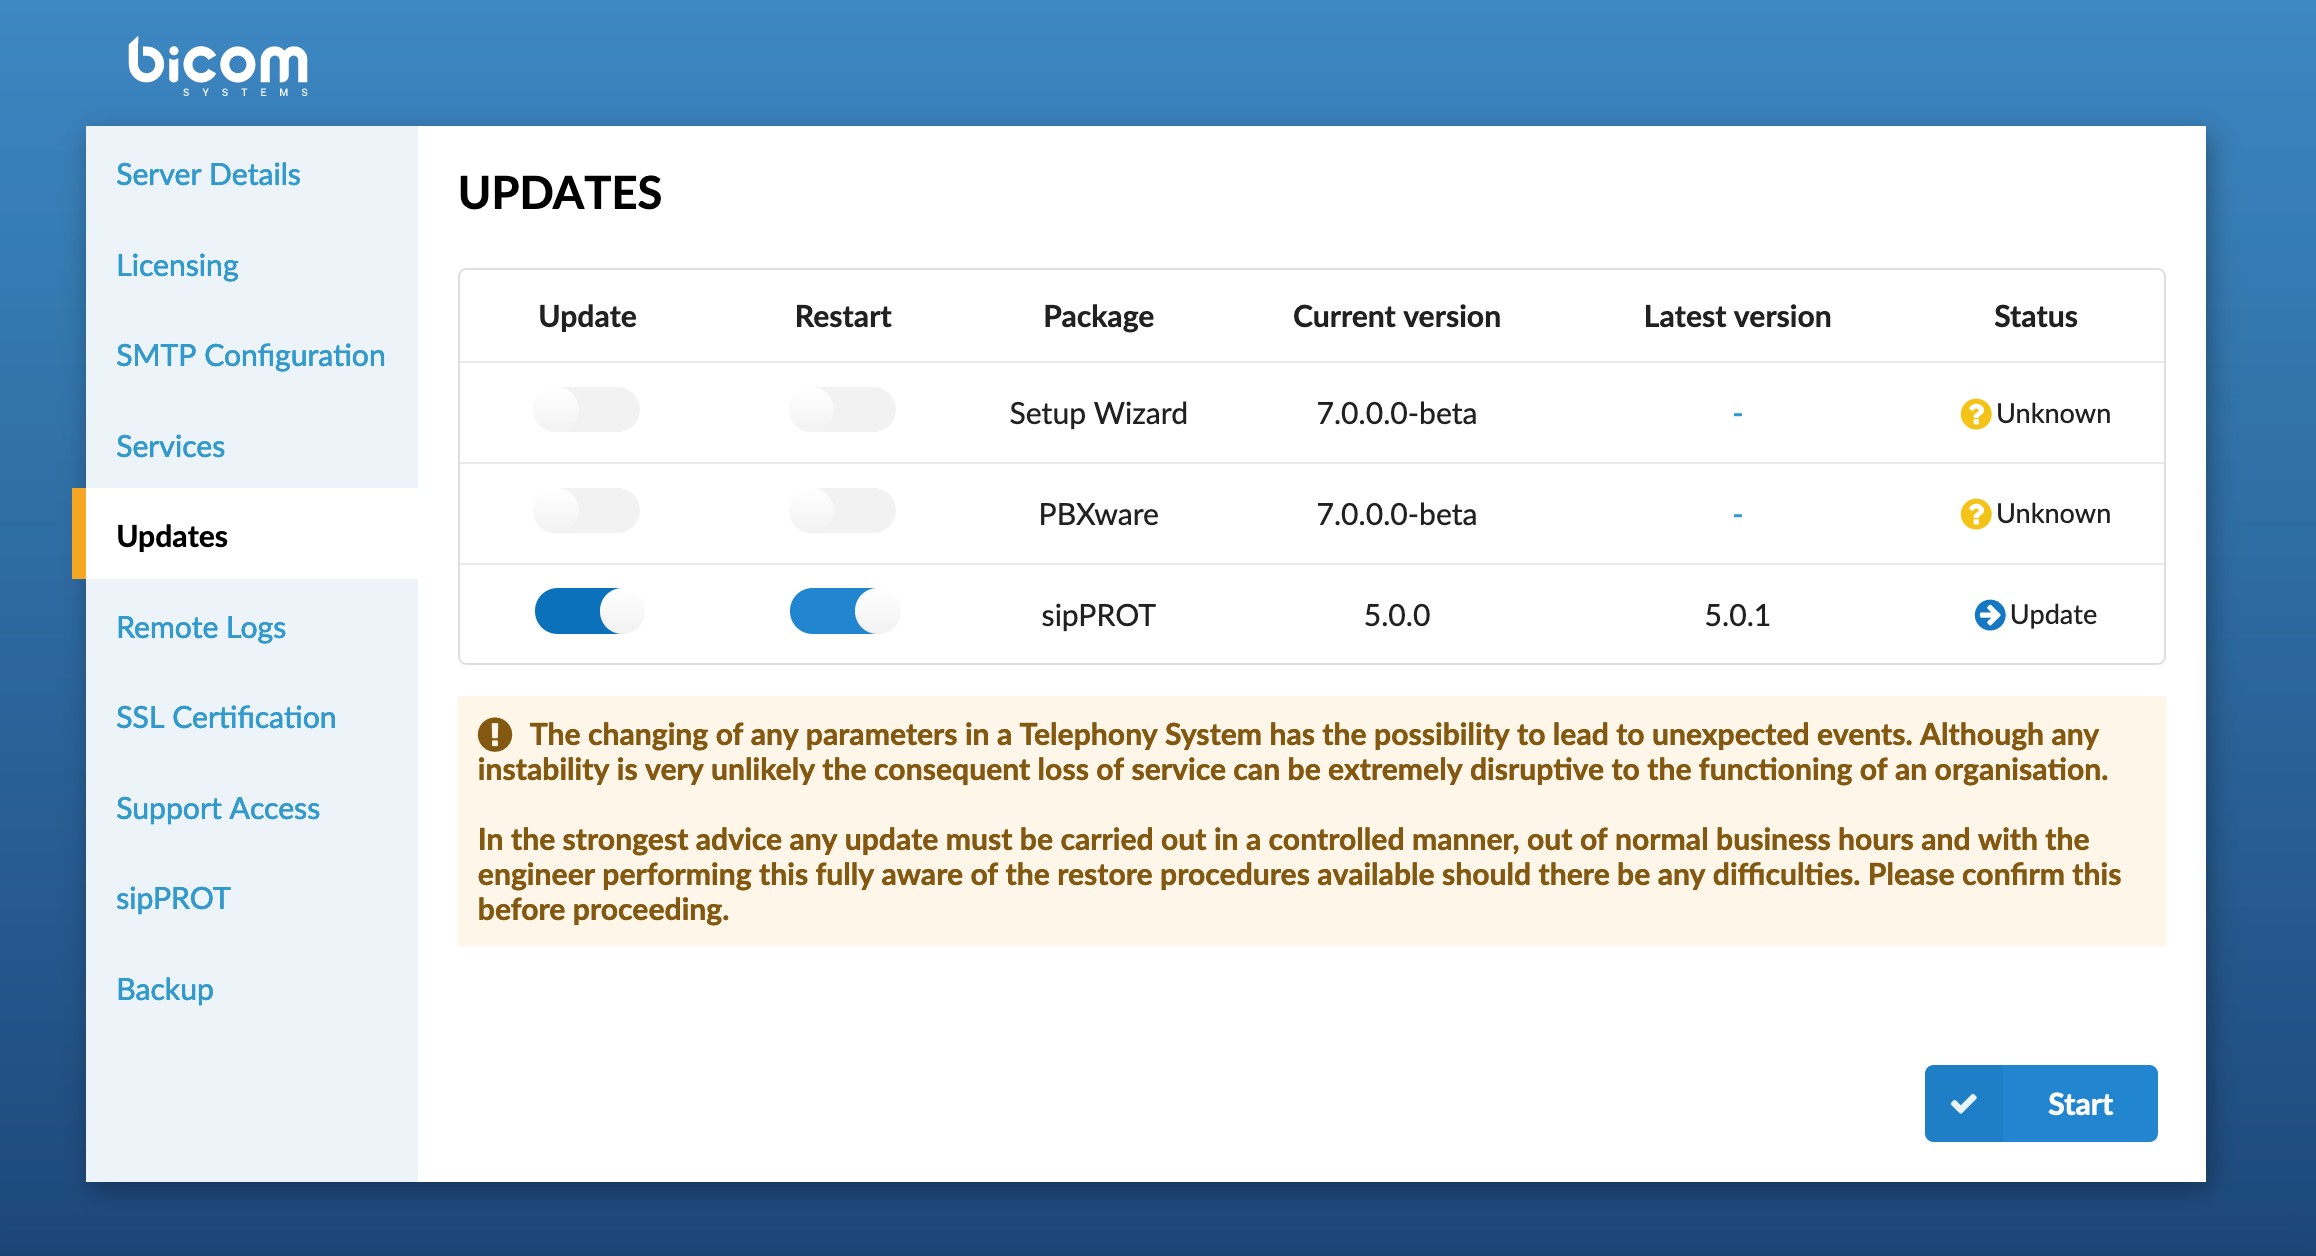
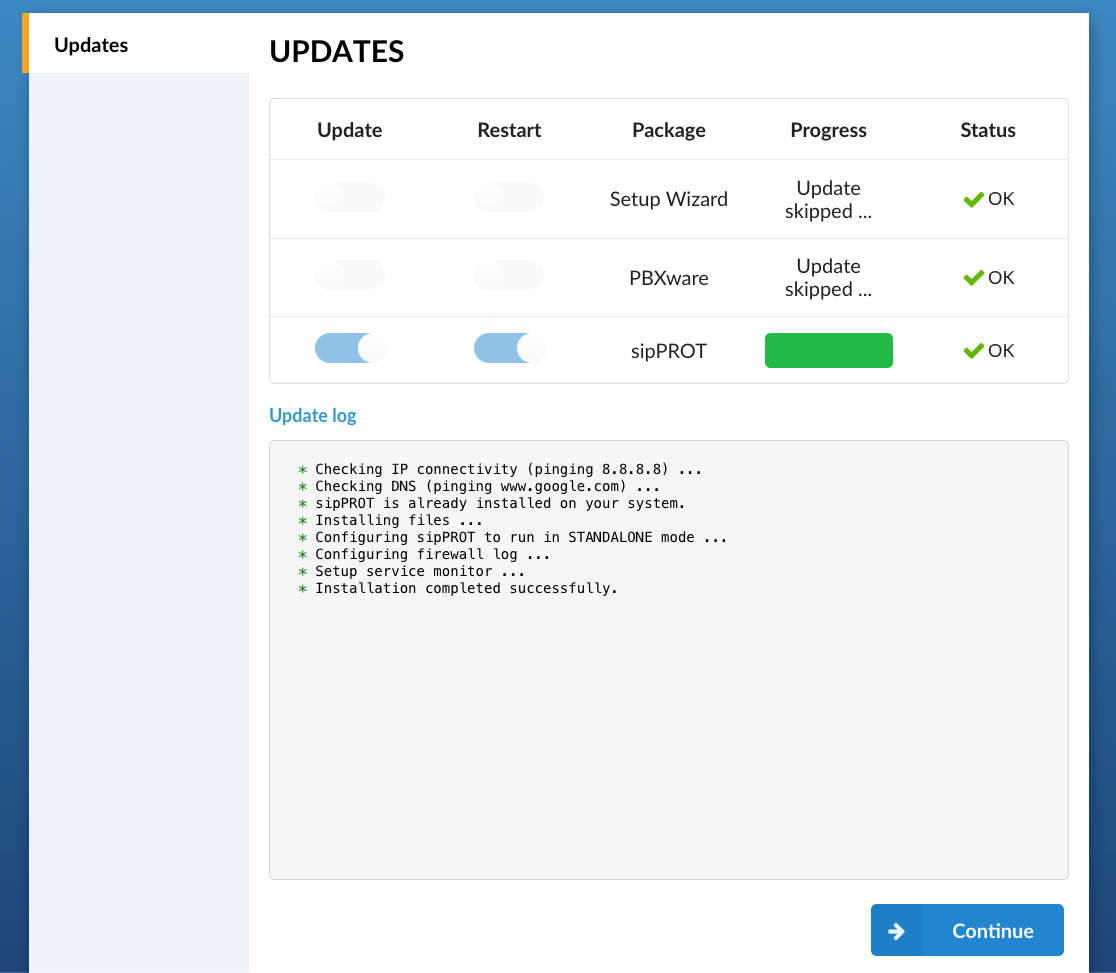
The sipPROT update can be performed through the PBXware Setup Wizard, in the same way as other PBXware packages.
IMPORTANT: PBXware Version Requirement
To receive the latest sipPROT versions, including new features and improvements, PBXware must be running version 8.1 or later.
If your PBXware version is older than 8.1, the latest sipPROT updates cannot be installed. Keeping PBXware up to date is recommended to ensure access to the latest sipPROT features, improvements, and security updates.
¶ sipPROT Branding
When sipPROT is installed in PBXware, it uses the same branding and language settings configured for PBXware.